
Operation Brevity
One of the things on Mark and I’s to-do list for a while now is to try out the Battalion Combat Series from MMP/The Gamers. The scale is an interesting choice, and more importantly for me, the fact that North Africa is well-represented in the current titles. I find the desert war interesting, and a bit under-served these days. Mark got a couple titles in the series in 2019, and in January we finally tried out the “Operation Brevity” scenario from Brazen Chariots. It’s a nicely limited two-day scenario, that was about the right size for our initial trial of the system.
I had the Axis forces, the bulk of which are an Italian Frontier… “Command” defending Halfaya Pass, and areas south, and the rest in two small German Kampfgruppes near Bardia. The British have an armored and a motorized battalion to the south, and at the start of the game a support group comes on as reinforcements along the coast (…I don’t quite get the point of coming on as reinforcements at the start of the game). There’s a number of odd/ad-hoc unit designations here, including HQs of ‘groups’, and the Support Group consisting of three ‘columns’, (which seem to be the Jock Columns; I wish these had been mentioned in a supplemental unit symbol key, instead only talked of in the Order of Battle notes without explicitly stating that’s how the counters are organized). The British win by taking Halfaya Pass and one of Sollum, the barracks on the outskirts of the town, or Ft Capuzzo.
Brazen Chariots demands use of the optional Orders segment (which I don’t think I’d mind using all the time), which mostly controls the movement of the HQs, but also limits switching in/out of prepared defense (which the Italians start the game in, and it is wise to keep them that way) and fatigue recovery, making things go a bit slower, as you have to be prepared to change options instead of a more ‘on-the-fly’ sequence.
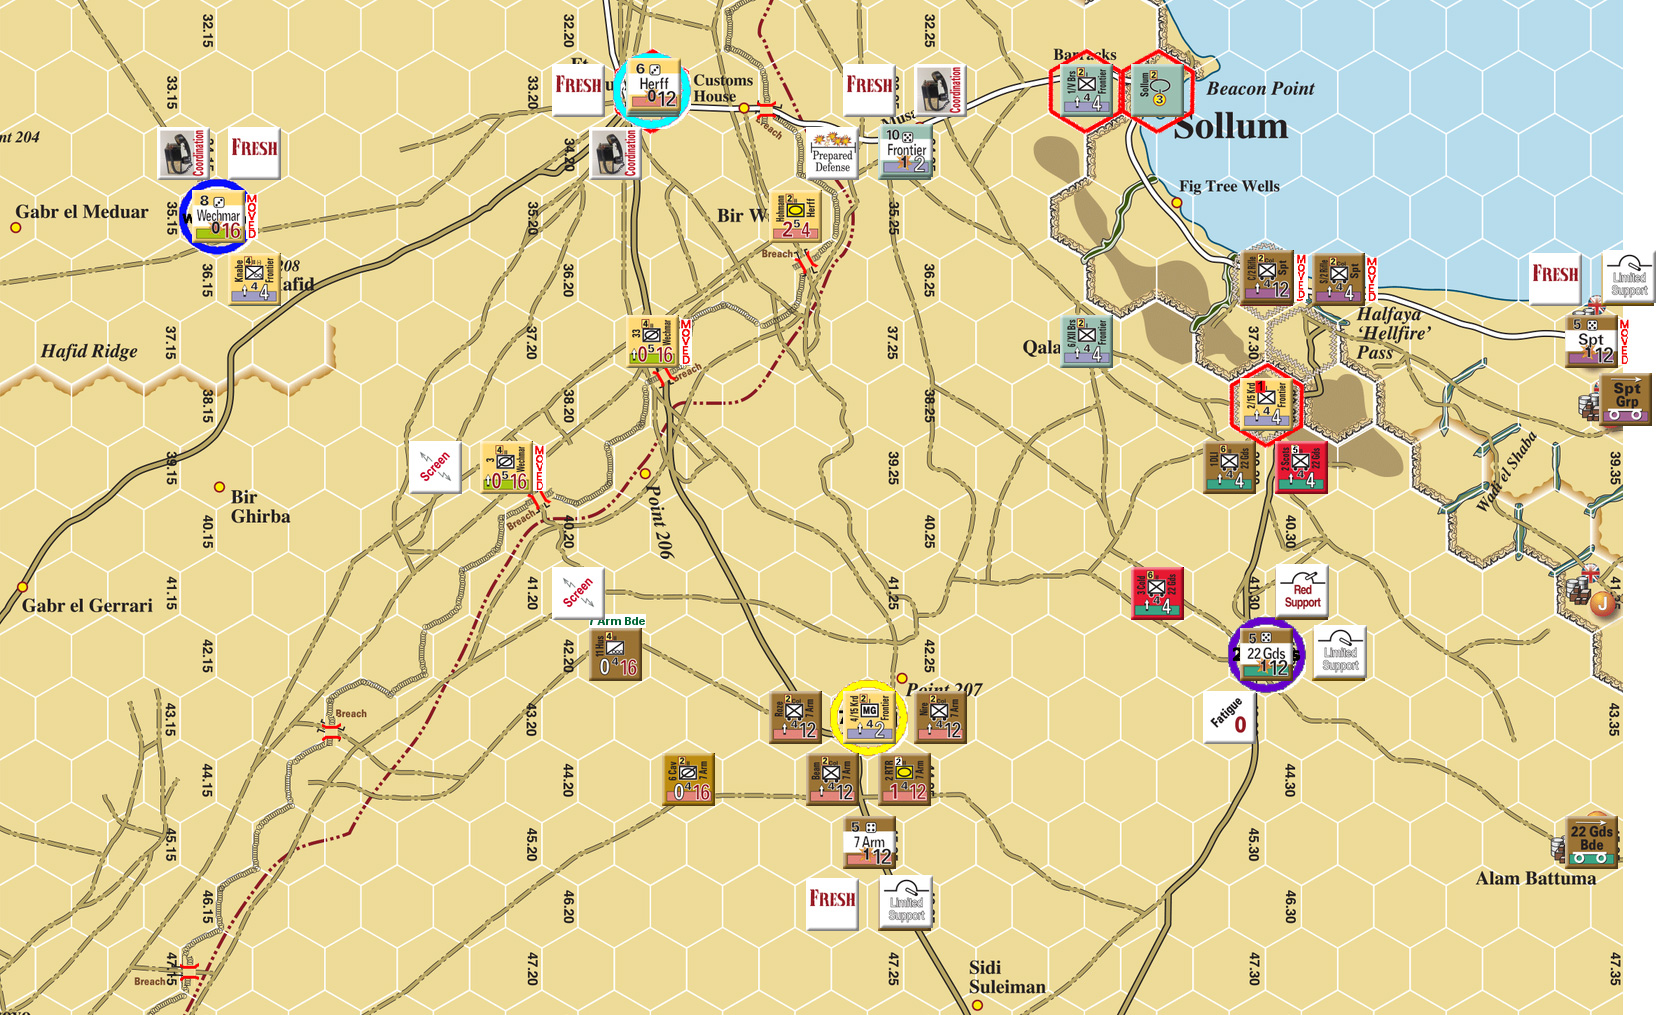
The British automatically go first, and Mark started with 22nd Guards Brigade, the force that starts just south of Halfaya Pass, and moved two motorized battalions up to the southern entrance of the pass and attacked with an assist and suppression barrage for an overall +2 combat, which cost us both a step. Combats are interesting, since it’s just a single result table with a bunch of modifiers. It seems to work well, and in this case, I took a loss instead of retreating because of the prepared defense. The trouble was the defending unit was only a German company, and therefore had two steps, compared to the six from each British battalion. The good news was Mark rolled low for fatigue, and the formation was no longer “fresh” (which is a level below “0”).
He also failed a second activation attempt, and play passed to me with Kampfgruppe Herff. (This was probably a mistake in timing.) My general plan was for Herff to take over defense of Ft Capuzzo, allowing the Frontier command to concentrate to the east. So the HQ and a battalion ended up there, while Holmann’s battalion continued down to the wire at Bir Wair, applying coordination penalties to both formations.
The 7th Armored Brigade moved north, and pretty much surrounded a MG company at Point 207, but did not attack. I attempted to move up the Frontier command, but the modifiers from being Italian, and being mixed with Herff meant it failed the SNAFU roll completely, and failed an attempt for a “second” activation. Every formation actually has to pass a SNAFU roll to actually do anything, but with everyone being ‘fresh’, that was generally impossible to fail until that roll. There’s such a thing as a ‘partial’ success while limits movement and to a smaller extent combat, but we hadn’t seen one yet.
The Support group went next, and it moved up into position between the two units guarding the pass, and then got a partial SNAFU for its second activation, and attacked the company blocking the coastal route (interestingly, it’s nearly impossible to get at the southern location from that direction, thanks to the combination of ZOC and indirect road path). A destruction barrage knocked out a step, and then a good roll on a -1 attack took out the second, while the British also took a loss, and advanced into the hex. KG Wechmar finished off the turn by racing forward to take up positions along the wire.
For the second (and final) day of the scenario, an armored battalion and company of 88s arrives for the Germans, and there’s a one third chance of the 4th Light Panzer Division shows up, which they did not. The 88s were attached to the Frontier command, and went into support mode, instantly giving them limited support. Mark took his Matildas out of support mode, letting them show up on map a bit ahead of the rest of the 22nd Guards.
I got the initial activation, but the Frontier group failed SNAFU again (final roll = -1), and I lost the garrison in the pass to isolation, and then failed the second activation. The 22nd Guards took the pass, and headed north along the ridgeline to attack the barracks, losing two steps of a battalion and the Matildas in the process, though a destruction barrage reduced the defenders.
KG Herff went next, and in a double activation moved south of the wire, taking up positions to keep the forward MG company at Point 207 from being completely surrounded. The Support group went next, reducing the defenders of Sollum with a destruction barrage, but then losing one of their columns entirely in a botched attack. The remaining columns played it safer, with one stopping adjacent to provide support to the third when it attacked. That knocked out the defenders with a situational retreat, and the British took Sollum for a win.
We continued anyway, with KG Wechmar moving south on a Partial SNAFU, and forcing the 11 Hussars (in screen mode) to retreat, and then causing losses to both sides with an engagement with the 6 Cavalry Battalion. The second activation was another Partial, with engagements that finished off 6th Cav, and forced the Hussars to retreat twice (once with a loss). Sadly, all of that still came up short of the goal, which was to jump the 7th Armored HQ, but the engagements chewed up too much time.
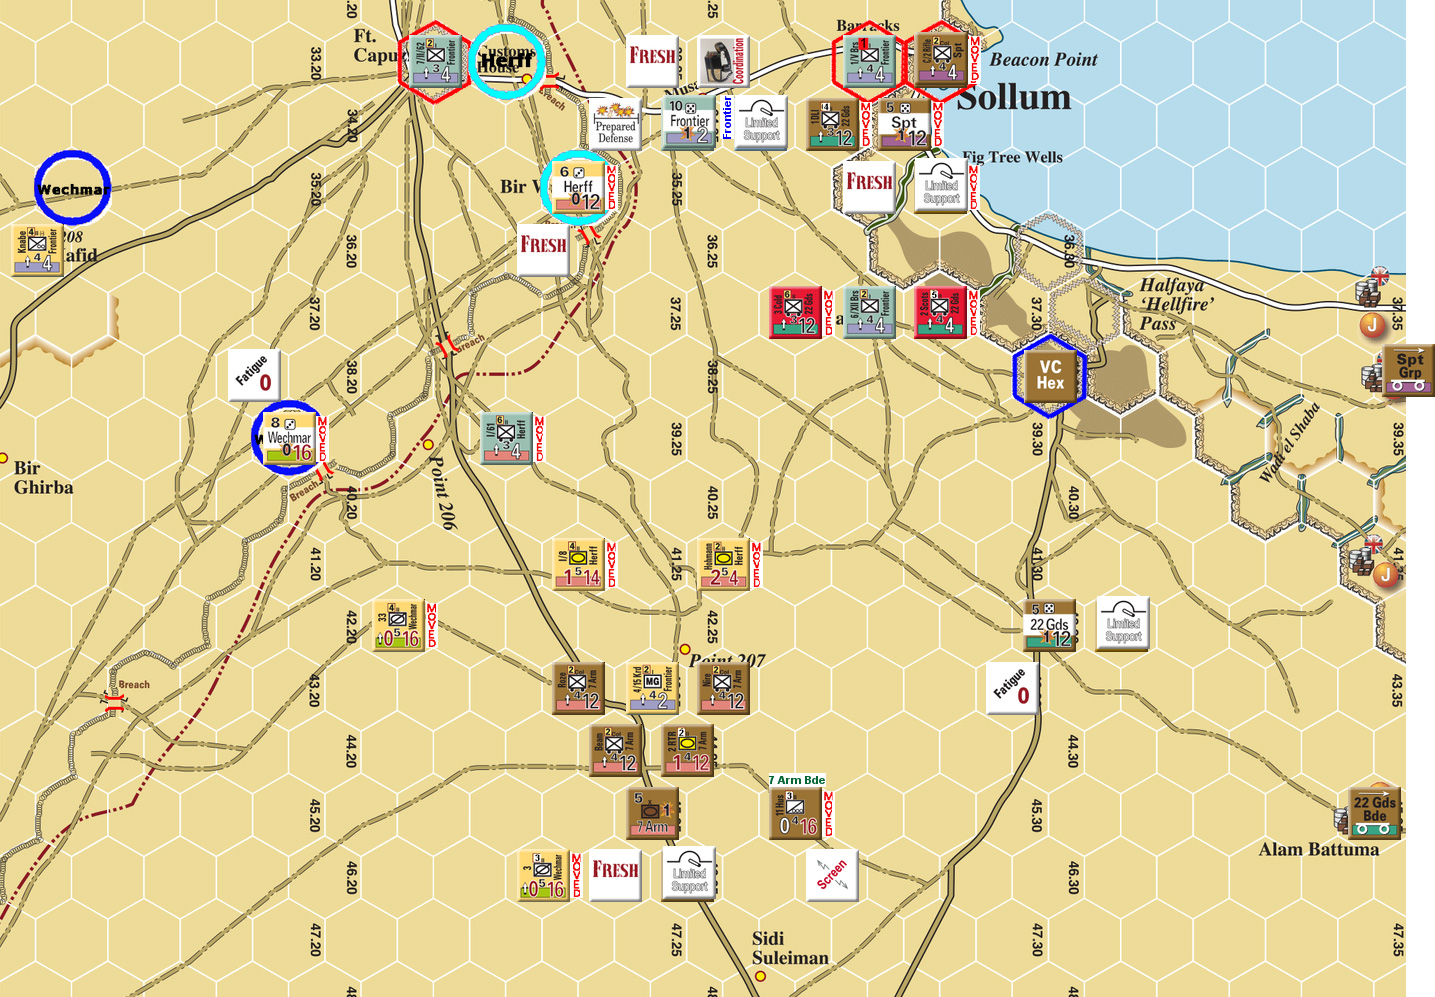
The 7th went next, and the 11th Hussars dropped out of screen mode to engage my forward unit (3rd), for losses to both sides. 2nd RTR moved over to engage, but took a loss on a poor roll, but then knocked out my unit with a destruction barrage followed by a successful engagement. An assisted attack on the MG company caused losses to both sides, while while a final attack rolled poorly for an A2 to lose a column. And the 2nd activation failed, ending things there.
Afterword
There’s a lot to like in the system. The combat system is kept very simple, and seems to work very well considering. The formation activations do a good job forcing you to think about the separate higher-level units and the twin challenge of keeping them separate and coordinating an overall thrust. In a way, its reaching for something like the orders system of Rifle and Spade (at least with the optional orders system, and realizing that a WWI system needs to be a lot more inflexible). The idea of “support” (and units that can either be together on the map, or split up to provide support) is great, and really brings the purpose of many brigade and divisional assets to light in this system.
SNAFU makes sense, but does leave me a little cold. Some of that is just getting burned twice by the Italians refusing to budge at all, but it does seem like some form of letting a new unit move into a position before the previous one marches out without screwing everything up would be nice. Doing it as I did causes the double penalty of coordination and mixed units for wanting to trade out in one hex. Moving one out, and then the other invites the enemy to come in for free. Admittedly, if the enemy is that close…. Combined with the forced back-and-forth and sequential double-move… I just miss GCACW’s initiative, though that’s built around units going 1-4 times during a turn, instead of 1-2.
The rules, however, need work. There needs to be a lot more crossreferencing in there than there is. A lot of time was wasted trying to find things in the rules, often far from where the rule actually was. And I have some questions/comments:
3.2d Mixed formations: Imagine a line of six hexes (A-F); one formation has units in A and F, the other has units in C and D (square in the middle of the first formation’s blob). By the wording of the rule, the second formation, being the the middle of the other’s blob, is judged mixed since they’re in the middle of an inactive blob. The first one isn’t, since they have no units inside an inactive blob. Isn’t this reversed? (They would both get coordination markers. Coordination should come after mixed formations in the rules, since the latter is how you get the former.)
One of the defense combat modifiers is a bonus for being certain types in a “terrain hex”. Well… any hex has terrain. “Desert” is a terrain. I eventually figured out that it was trying to reference the “Combat/Barrage Terrain” column in the terrain chart, but since the terminology wasn’t the same, this took some looking and an assumption. Terminology needs to be more consistent. Also, talking about some of the modifiers in the rules would be helpful.
Is there any particular order to exiting and entering support in the assignment phase? If a formation gains support, and an enemy unit goes from support to real such that it could cut support to a unit in the formation that just gained support, which happens first? Also, the rules should mention that a unit exiting support must be on move-side instead just having it on the Assignment Procedure Chart.
The Vassal module helpfully has the Brazen Chariots version of the SNAFU table, with the modifiers applicable to the game. However, looking them up to verify in the playbook was derailed by skipping past the relevant section buried in the supply section several times. I’m willing to bet that the negative modifiers to SNAFU for the Axis are for supply reasons, but, in the game context, this is a SNAFU issue, not a supply issue, which is a separate section of rules.
Discussion ¬