
100 Regalbuto Ridge
After finishing up “In Sight of the Volga“, Martin and I arranged a second game. This time we went to the For King and Country set, and picked scenario 100, “Regalbuto Ridge”, which originally appeared in ASL Annual ’89 as a Squad Leader scenario, and was turned into an ASL scenario in Annual ’90. The original seems to have been very pro-German, and the reprint shortens the scenario by a full turn. The limited stats on it suggest the balance is much better now.
It’s July 1943 and the Brits have taken a dominating ridge in southern Italy. Naturally, the Germans are counterattacking to retake it. The Brits have fourteen elite squads with good leadership, a MMG, six LMGs, a 51mm and a 76mm MTR to hold the board 2 hills. The Germans have fourteen elite squads, plus six 838 Assault Engineers, a MMG, five LMGs, an 81mm MTR and an off-board 75mm INF (one leader starts HIP with a Radio and uses Spotted Fire for the INF, which can’t malfunction by SSR). The Germans start anywhere on board 3 (which adjoins on a short end), but the real reason for all of board 3 to be there is that the INF is off the far end of that board, and counts it’s length as part of the range.
The real twist on this ‘assault the hill’ scenario is SSR 2: All woods are brush. There’s almost no cover out there. There’s a few buildings scattered around at level 0, but the Germans have to advance in full view of the hill, and the British have nothing to work with either, unless they can dig in. The Germans need to have more squad-equivalents on board 2 hill hexes than the British at the end of the game to win, with units at level 3 counting double. I saw a partial AAR on Grumble Jones’ blog (only talking about the middle of the game), which comments that elite troops were dying left and right. Having taken the attacking Germans, this did nothing for my confidence….
Martin had what looked to be a fairly solid set up, with the large MTR and MMG on the back peak of the hill, and all of level 3 occupied. There was a cluster on the mid ‘arm’ of the hill, and the lighter MTR and most of the LMGs on the forward slope. I mostly lined up in one area, where I could crawl through some brush towards a cluster of houses that I could use as a jump-off/rally area. A secondary group (five squads, including one Assault Engineer and a 8-0) would work the other side of the ridge with level 2 hex 2F7 as the initial goal. The MTR was in 3DD2, which as a level 2 hex had decent LOS to much of the hill, while the MMG was in CC5 with the 9-2 leader. As soon as things were supressed at all, it would move forward, and the -2 with light cover would make even long-distance fire scary. The radio was in DD8, where it could see much of the hill, especially level 3, and stray shots shouldn’t be a problem.
I tried putting smoke down on 2I5 to provide cover for the advance, but it seems no one thought to pack smoke rounds for the MTR. It did manage to hit H3 with normal HE for no effect. The INF turned out to be firing at range 41, and so needed a 5 +2 shot (after getting radio contact) with ROF 1; it never actually got a hit the entire game, though I maintained contact the entire time with the exception of one player turn. The MMG did better, with a 1MC, but his LMG squad passed it without trouble.
As a sign of what to expect, my initial probing HS along the south flank was fired on three times, with each shot getting a result. And they passed both MCs and the PTC. It wasn’t until my fourth move, and his fifth shot that he pinned an 838. It wasn’t until my ninth unit moved that he finally broke a squad. In fact, it wasn’t until fairly late when disaster struck at all, when an NMC broke my 8-0 on the south side (my only leader down there), and pinned one of two squads moving with him. This did set off his sniper, who then broke an already-moved HS. Overall, the total carnage from a large number of shots, and moving through lots of residual with -1 and -2 DRMs was a broken 8-0, a broken 468 and broken HS, and three pinned squads.
Martin’s dice weren’t that bad, but mine were better. He averaged ~7.85, which isn’t horrible, and he never rolled over a 10. The problem is there was one roll under a 6 (5). That still should have been enough to cause more problems than it did, but I averaged under 7, though I never rolled a 2, and rolled 4 (his SAN) once. There was also a good number of doubles in there, which would have hurt anyone other than the Brits a lot. My one problem was trying for Infantry Smoke three times, and only getting it once; the first squad pinned before getting in position, the second one rolled a 6, and the third finally gave part of my line some cover. There were only two Final Fire shots, which were about the same. Advancing Fire was a little limited, but I had two blob attacks that pinned units.
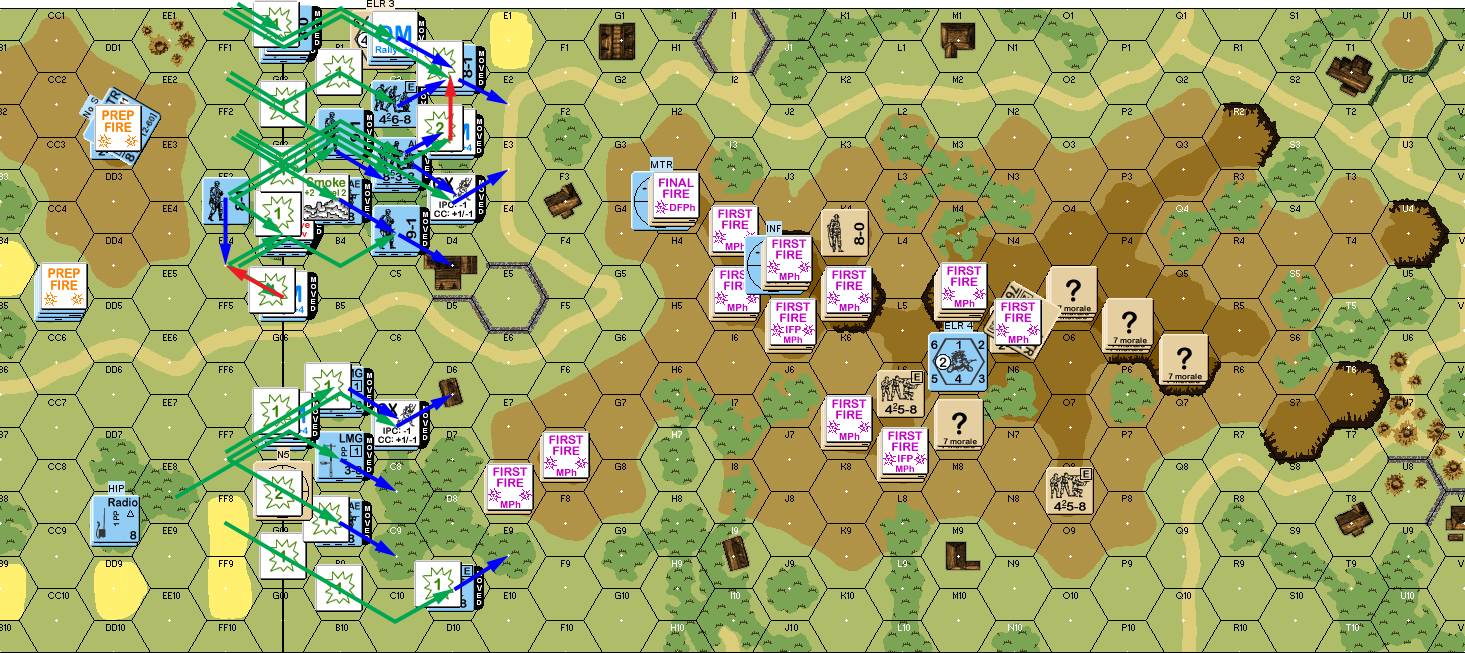
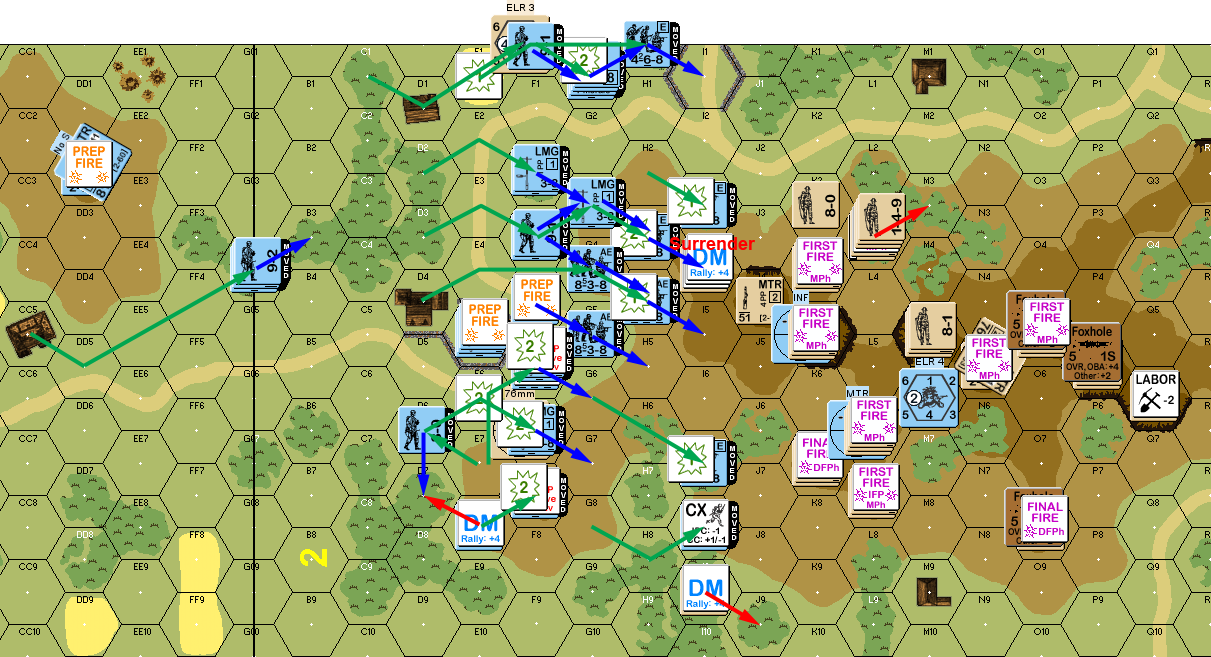
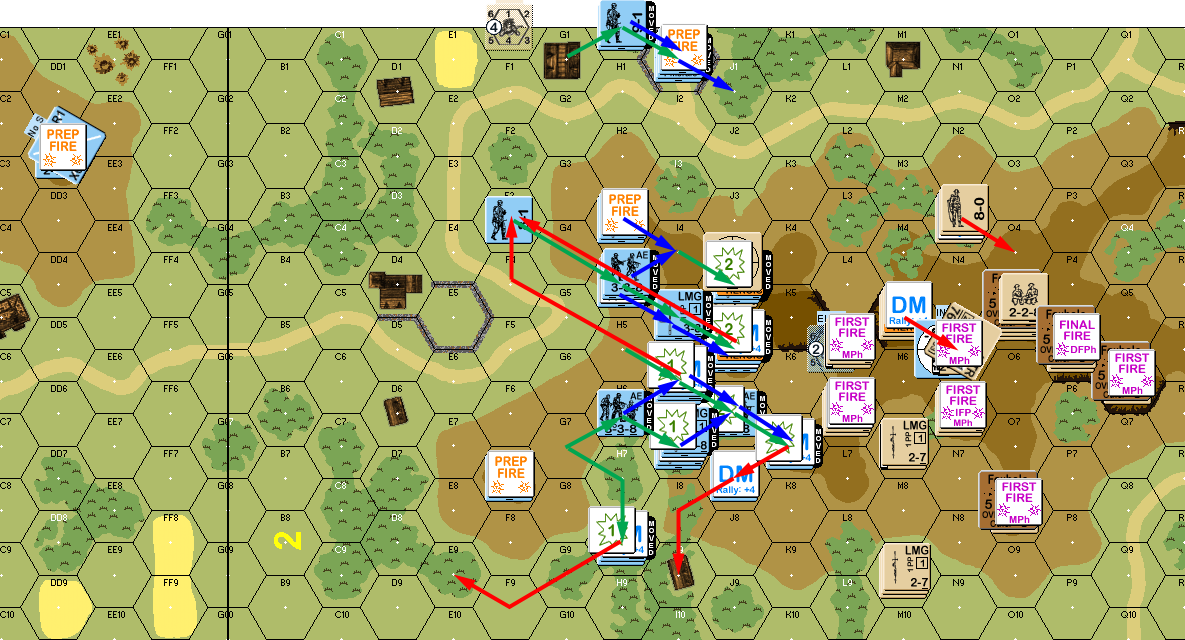
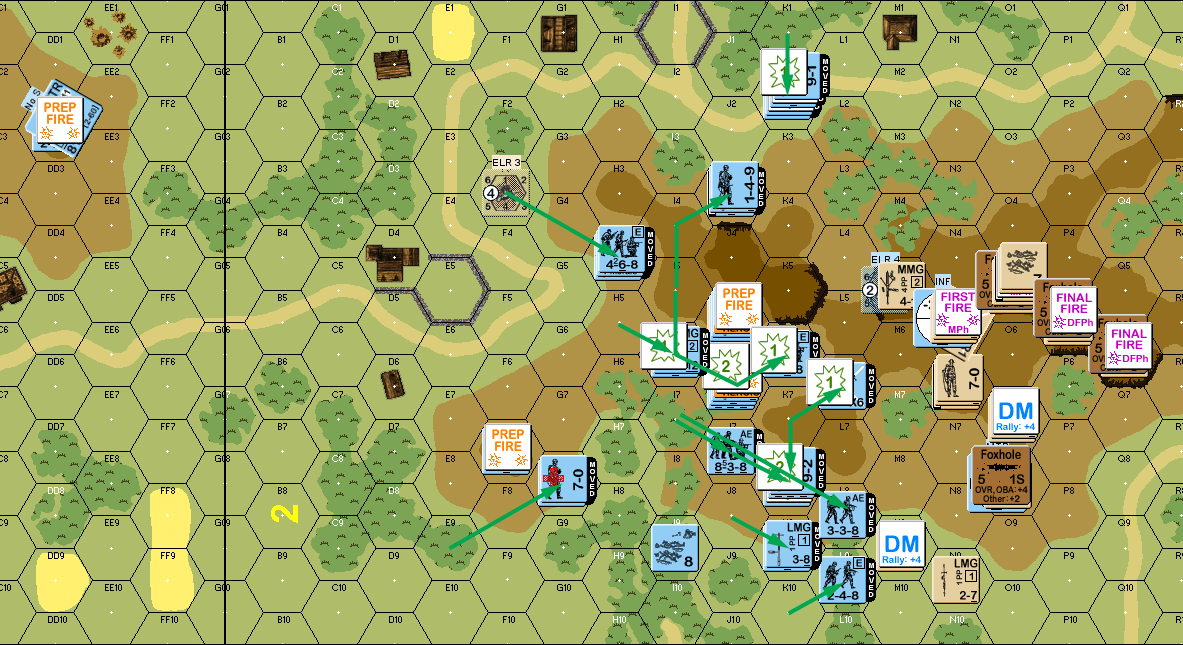
Situation, German Turn 1. Note that all of boards 2 and 3 are in play, but the rest isn’t generally important here.
I rallied one squad for Martin’s turn. He tried digging in in four hexes for his Prep, and succeeded with one of them. Actual fire averaged high, thanks to malfunctioning the large MTR, though he did get a 1MC with a ‘5’ roll, which I passed with another 5. But mostly, with my guys still in +0 terrain, he rearranged his troops and skulked. Now, some of this needed doing. I was definitely putting the main thrust into the north, and he needed concentrate more in the area, but I think he also needed to risk more men to breaking (who would then rout back to leaders out of my LOS…) to start slowing me down.
I took three shots at a HS who lost HA by going up a slope I could fire through, but he passed the 2MC I generated. However, the MMG got a K/1 during DFPh to knock out his light MTR HS, and then it broke the HS over on F7. So maybe hanging out in my LOS isn’t a good idea.
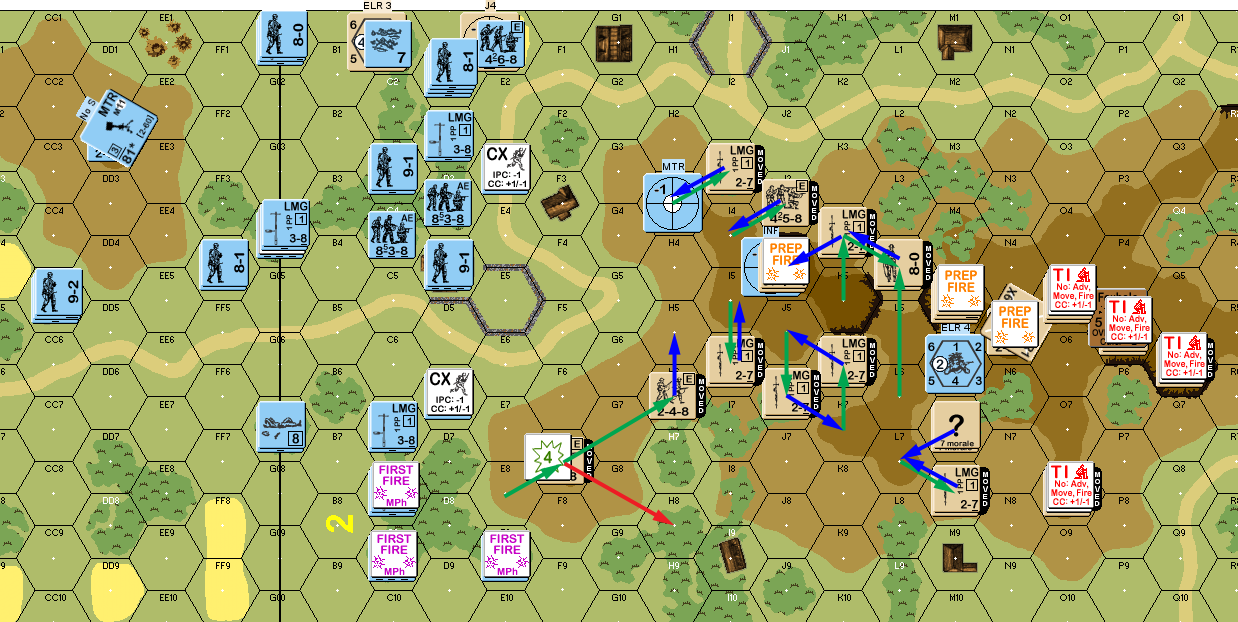
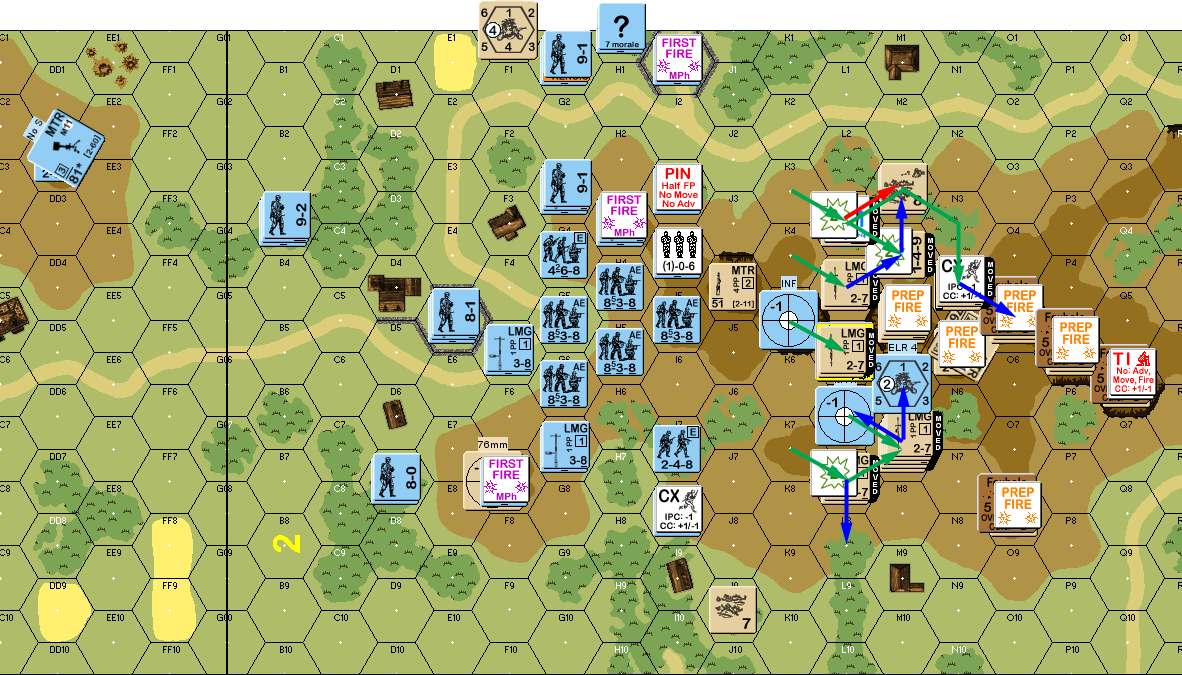
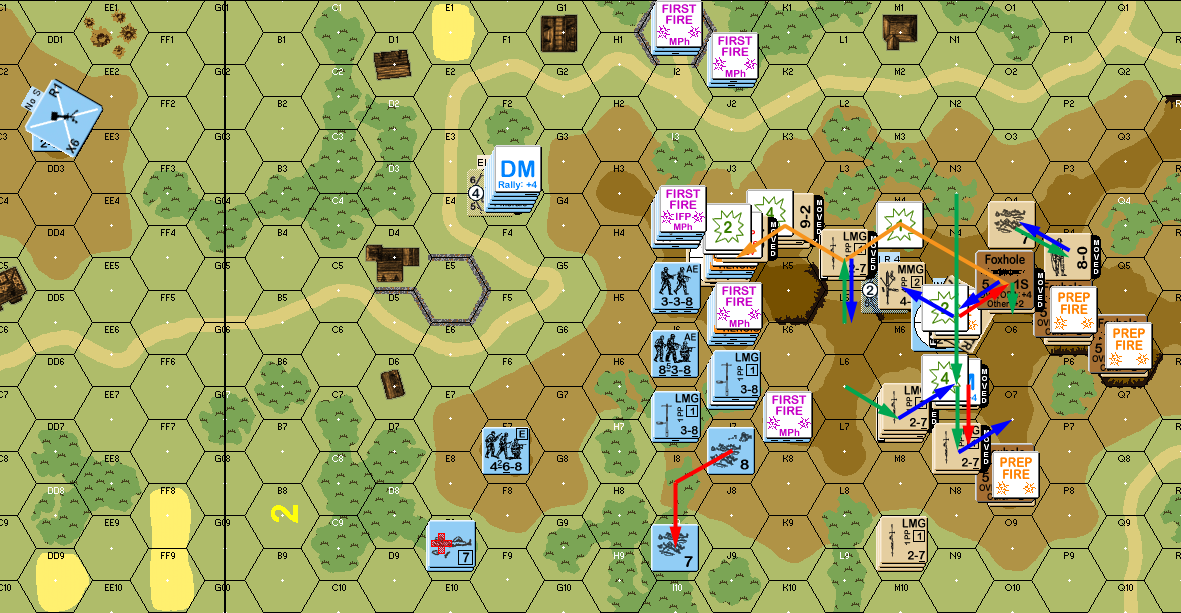
Situation, British Turn 1.
Both squads and my leader rallied for my Turn 2, putting me back to full strength, and much closer to the goal. The MTR got a hit on 2H1 to break the squad there, long range fire from 2E1 broke the squad on the little ‘shoulder’ in K4, and the MMG got a K/2 on I5 to break the remaining HS there. This left a nice cluster on the initial ridgeline I was aiming for, but I had taken about half of it out.
My second HS move went into LOS of a squad+9-2, which resulted in losing him to a 1KIA. However, I did get a couple of early smoke attempts off to cover the middle of my advance. Overall, I had better options, though ranges were going down, and Martin had a couple of blocked shots. His dice were a bit better, though most of the time, I did well also. The big loss was a 8-1 and two squads tried getting up on the hill, only to be fired on twice from J4, and the second one was a 1MC to break the leader and a squad, while pinning the second one. He also broke an 8-0 who was working around the north to help rally them. Overall, casualties/chaos was light again, as that’s all he could do to me, though I was much less vulnerable than during the first turn. I managed some PTCs in AFPh, of which there was only one failure, and his sniper did go off again to pin a squad in F0.
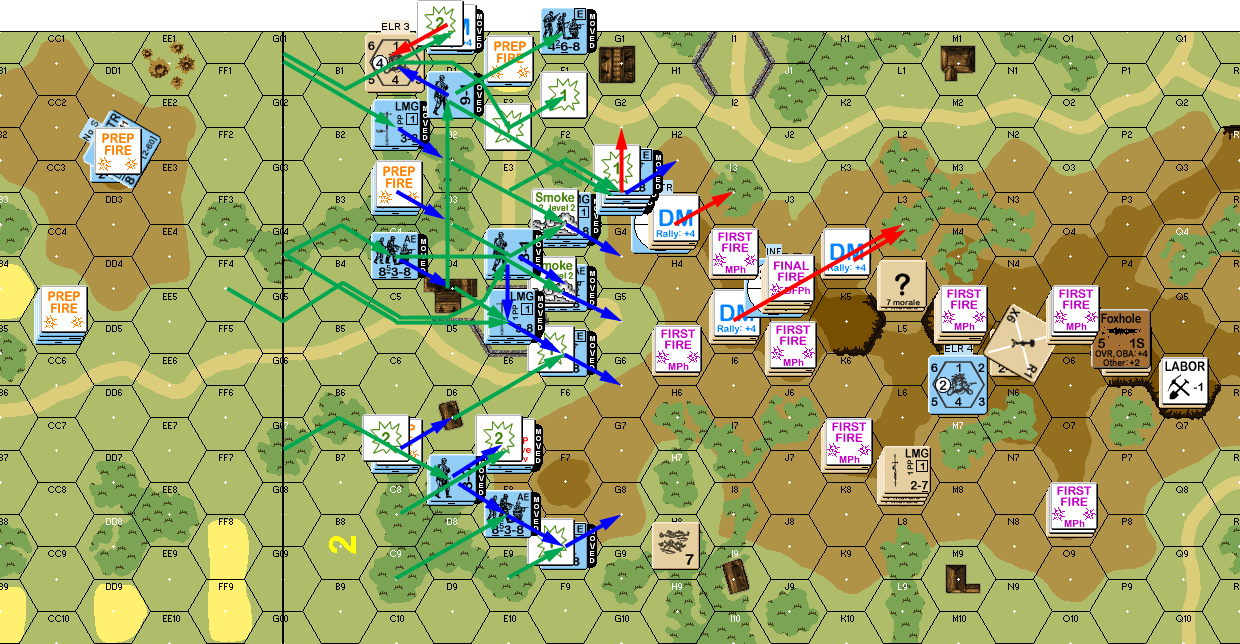
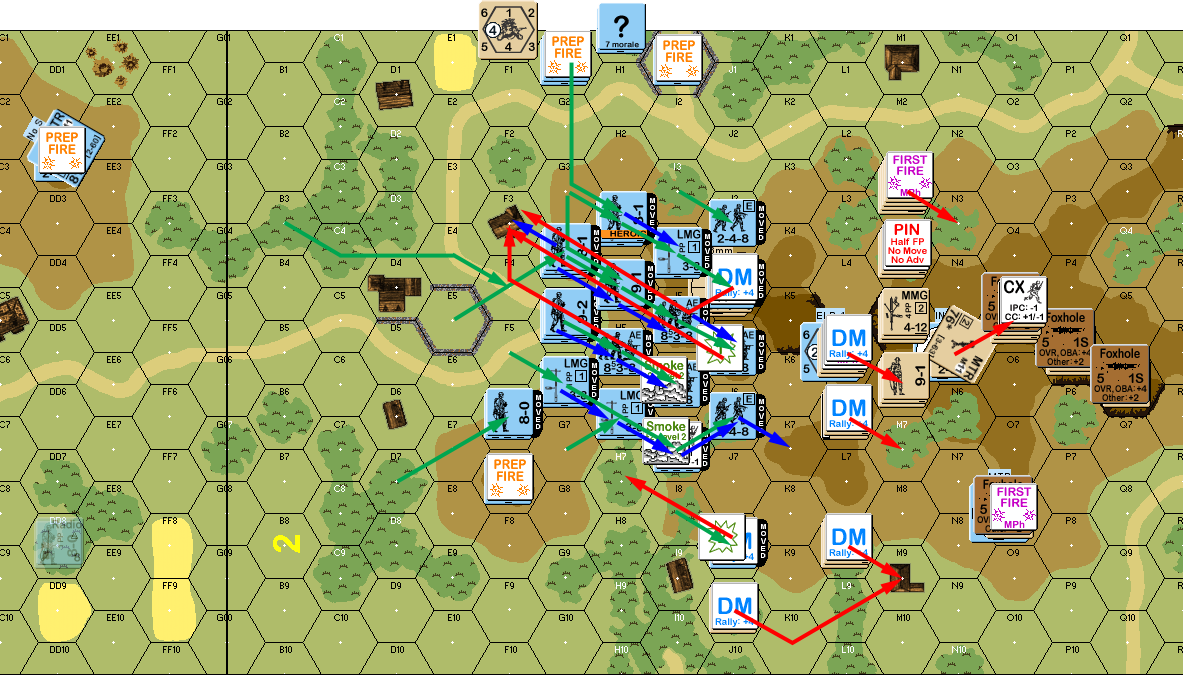
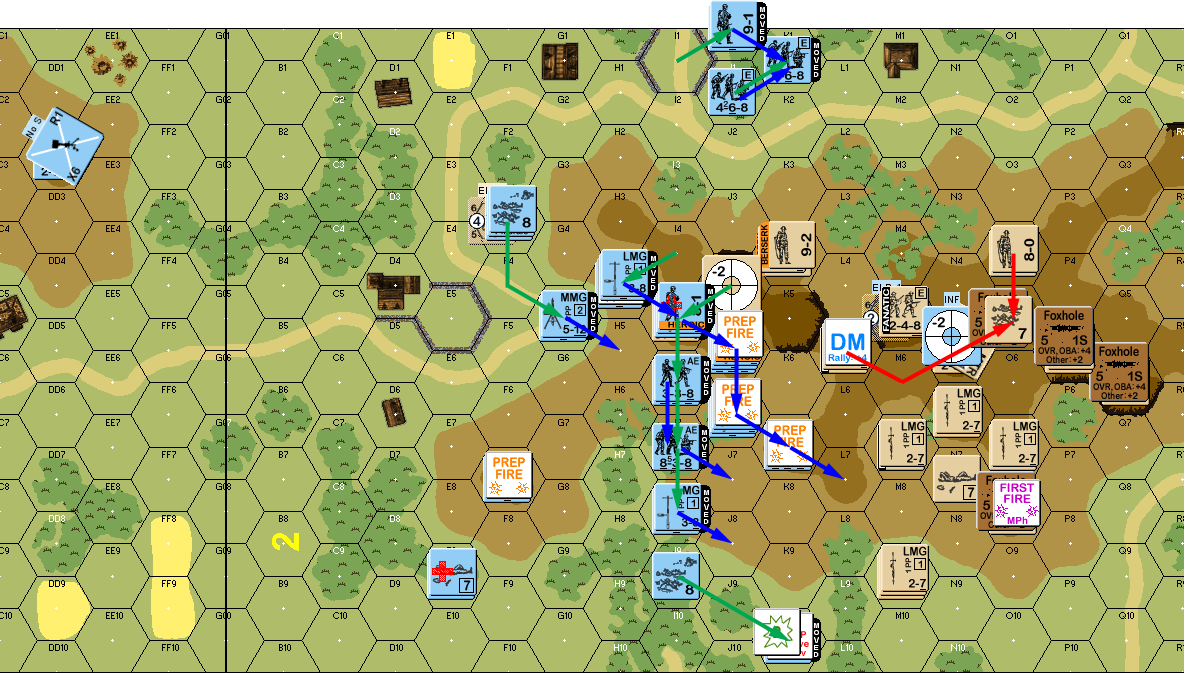
Situation, German Turn 2.
Martin’s Turn 2 RPh went very well for him, with his MTR being repaired, and his MMC self-rally in I3 generating a new 8-0 leader, while my broken 8-0 died from a previously unnoticed wound. He generated two more foxholes in Prep (with one last squad going to Labor -2), and with three shots from the rear ridgeline, got one result, which broke an 838. During movement, there wasn’t a lot I could do, but I did pin an 8-0 who was on his way back to L3, and broke a HS that was trying to get away from my main advance. In DFPh group of 838s Final Fired at the broken HS, and eliminated him with a failed 4MC. Advancing Fire did nothing, with me passing the one MC he generated.
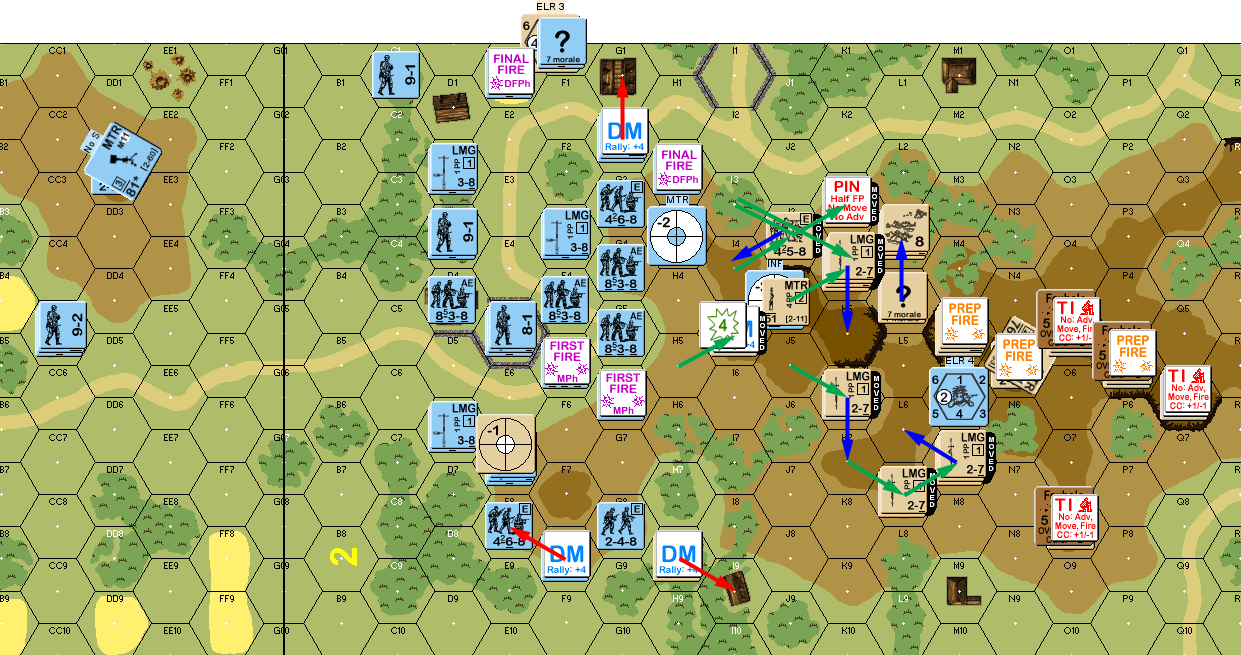
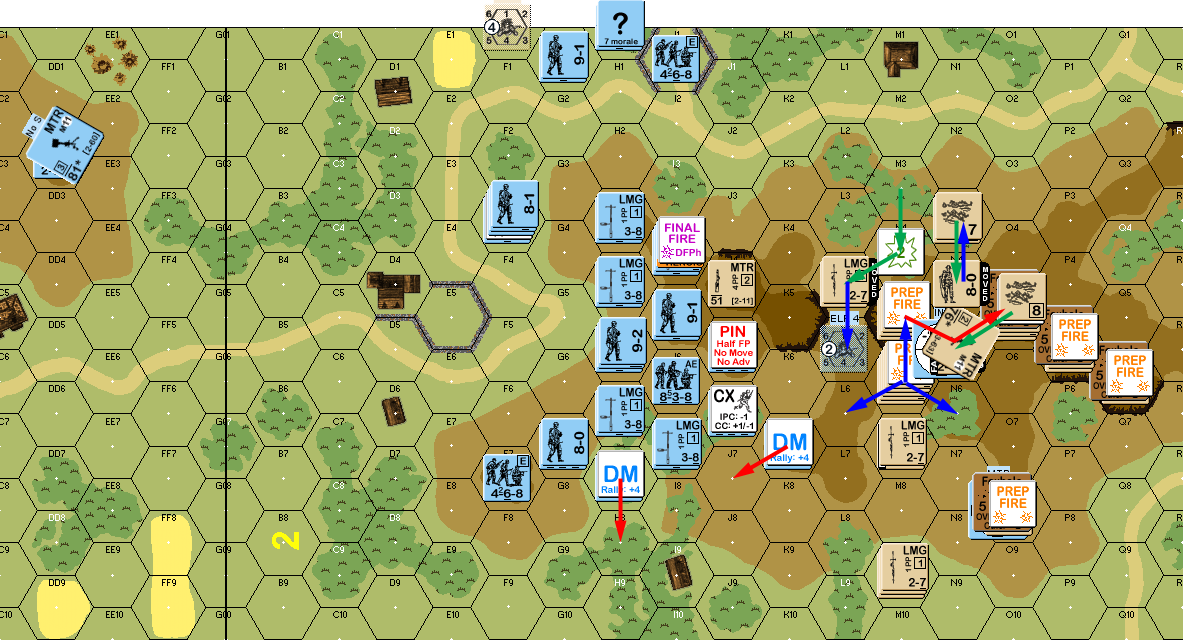
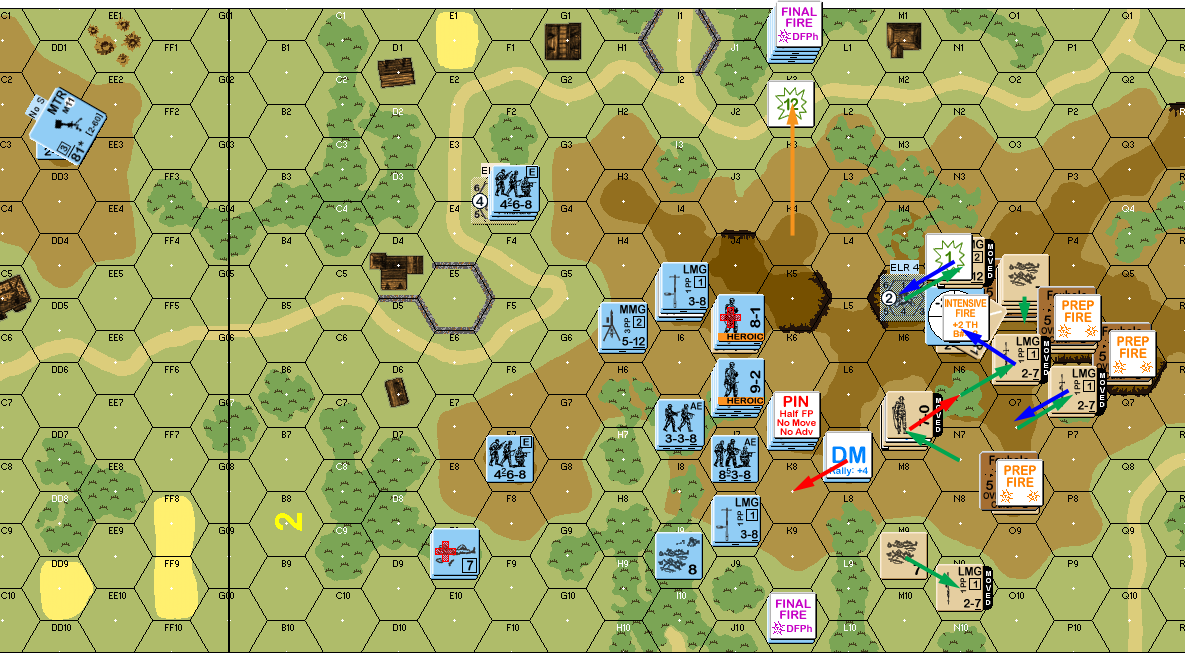
Situation, British Turn 2.
I didn’t get anything back for my Turn 3, but Martin rallied a squad and HS in L3, with the latter going fanatic and generating a Hero. The big guns did nothing for Prep, but I managed to pin I4 with fire from a pair of 838s (the firepower I could throw around with them being in range could get very nasty…). The southern force got a squad onto the little peak in F7, which drew a lot of fire, but Martin couldn’t do more than pin the squad (I’d occupy that hex for the rest of the game; range was a bit long, but it didn’t suffer HA for anything short of the level 3 ridge). Short moves also got me all around I4, who broke on Final Protective Fire. So overall the casualties for my third turn of movement was two squads pinned and one enemy squad broken. Advancing fire broke a squad in L3, and could have done more with some really low rolls except for Cowering.
The end of this turn saw the end of the first phase of the assault. I advanced several squads onto the hill, had a couple squads at level 2, and the main force was a big spread out blue blob that could start concentrating fire on anything that looked especially dangerous.
Situation, German Turn 3.
Martin didn’t get anything back for his turn, while I rallied a squad and the 8-1 in G1, with the leader going Heroic (I would have much preferred a promotion to 9-1…). Martin finished digging in in Q6, while the rest of the ridgeline prepped with poor rolls to do no more than pin a HS in I3. Naturally, with all the German firepower out there, most everyone else skulked, and I broke an 8-0 as he tried to move out. Trapped at the end of the first ridgeline, the squad in K5 took an unanticipated way out: they climbed down the cliff, nicely out of LOS of everyone. (As I said at the time, I think of it on board 25, where there’s practically no other choice, but I don’t think of it in connection with board 2.) Neither of us had any further effective fire, despite some good rolls in DFPh; Martin’s dice were just as good as mine there.
Situation, British Turn 3.
I rallied my only broken squad for my Turn 4, while Martin didn’t get anything, but did transfer a LMG from a fanatic HS to a full squad in a foxhole with the 9-2. For Prep… my MTR went on the longest rate-tear I’ve personally seen. It got fifteen shots at ROF 3. The entire second half was uselessly pounding O8 where the foxhole helped keep anything bad from happening to the squad there, but in the first half, the L6 squad went fanatic, and then got hit with a K/2 to become a broken HS, and then L8 broke on a couple of hits. And that initial HOB set off my sniper to pin L5. I had other fire, but the only result of that was to pin M4 (with a 12; if only I’d rolled one lower…).
My second move was to put down some smoke cover. The squad survived enemy fire fine, and then rolled a ‘6’. Still, my second attempt worked, which provided some needed cover, and later I got a second attempt to set up a decent screen. My first attempt to get onto the crest met MTR fire and broke, along with an attempt to get to M9. However, my sniper went off again, and returned to L5 to break the squad this time.
Final Fire was mostly poor, but Martin killed a HS in K4 with a K/2, broke a squad in J5, and the MTR got a hit on I6 to CR an assault engineer with a 12 on a NMC. Advancing fire broke an 8-0 in M3 and reduced a broken squad there, as well as breaking the MTR’s crew.
This turn looked a bit more like what I’d been expecting all along, with a two and a half squads routing back to F3, and some losses at the front. But it had been a punishing turn for Martin, with his defense decidedly eroding.
Situation, German Turn 4.
Martin rallied an 8-0 N3, and a squad in M6 for his Turn 4, but got nothing else, while I got a squad and a half in F3. Once again, there was a fair amount of prep, including the (now) big stack in M6 who put together a 12 -1 attack against J5 for a 3MC… which pinned me. He reclaimed the MTR with a fanatic HS, but his Hero took a fatal wound as it climbed the hill. Final Fire broke the leader in M5, while the HS manning the MMG was fine. The MTR managed another hit on O8, which pinned the squad on a 2MC.
Situation, British Turn 4.
The wind turned gusty for my Turn 5, so there’d be no smoke cover this time. I rallied the final squad in F3, while Martin rallied his crew and the second 8-0 in N3. My MTR made up for last turn by malfunctioning this time. L5 became fanatic, and the 9-1 in M5 went Heroic. On the other hand, I did break the MMG HS there, and pinned L6. My crawl forward did not do so well this time, with four squads breaking, and an 8-0 wounding, then ELRing to 7-0 and wounding again, and my 9-2 was wounded. The good news is that none of the wounds were fatal, and my 9-1 Battle Hardened to a heroic 9-2 (which made him wounding all to likely…). Final fire got a K/2 on J2, which reduced a squad, and wounded the heroic 8-1 on a failed MC.
My advancing fire did nothing, and an all-too-large stream of troops started crawling back. Even after all the carnage, the number of squad-equivalents on the hill was 11-8, my favor, though adding in the level 3 bonus shifted it to 11.5-12. Things were obviously still going in my favor, though three wounded heroes had me worried for losing most/all of my leadership.
Situation, German Turn 5.
Martin’s Turn 5 RPh was… bad. He lost a HS on self-rally, and his 8-1 in O5 went berserk! This was really bad for him as his 9-2 and squad in the hex with him followed suit. I got no results. Prep had no results, and the ‘zerkies charged J4 in two waves (since only the 8-1 was outside the foxhole), with the 8-1 taking a wound as he went into J4, but the second wave didn’t have enough MF to enter the hex, and so stalled in K3 with several shots at them doing no more than setting off my sniper, who fatally wounded the heroic 9-1 w/MMG in M5.
He sent an 8-0 over the hill to rally troops on the south side, but the only effective fire of the turn past the berserk 8-1 ELRed him to 7-0. CC went as expected with the wounded, berserk 8-1 dying to my guys for no loss. And all of this had shifted the score to 11-7 (11.5-10) my favor. I vaguely thought about skulking back out of sight, bring up my brokies as they recovered, and making him come to me for the last couple turns, but decided pressing the attack would be more effective (and not doing so against the spirit of the scenario).
Situation, British Turn 5.
I managed to self-rally a HS in I9, and rallied the MMG squad F3, but missed a couple other rallies. Martin had shuffled a HS forward to the abandoned MMG, and the crew back to the MTR, but only managed to recover the latter. Prep managed to break L5, but couldn’t do anything to the further British positions. I contemplated a couple ways to deal with the berserkers. The main thing was that I wasn’t going to engage in a close-range firefight with ML10 guys. So I ended up evacuating the ridgeline, while the force that had slowly been making its way towards M1 consolidated into one hex and waited for them to charge down the hill and across the road.
Situation, German Turn 6.
Martin self-rallied his 7-0 and a HS in M9, but couldn’t get anything else past recovering the MMG, while I rallied the final squad in F3, and repaired the MTR. With me pressing close, his MTR missed its first shot at K7, and then malfunctioned when he intensive fired it. Other fire did pin the contents of that hex, and he broke L7. The men K1 waited for the berserk charge to get adjacent, and then ended it very convincingly with a 3KIA. There wasn’t much I could do about most of the rest of his movement, but the recently-rallied HS in M9 tried running around the shoulder of the hill, and died to a 12 on a 1MC.
The MTR got a solid hit on its old target, O8, and finally broke the squad there. This left it with no more real targets, and it was too late in the game to shift it at all. Even better, I got a 1KIA to kill his MTR crew in N5.
Situation, British Turn 6.
My wounded 7-0 self-rallied for my last turn, bringing along the HS with him. Martin got a squad and a half in O5. Prep went well, with O7 rolling a 12 on a NMC to reduce to a broken 1st line HS, and a K/3 killed the latest holder of the MMG. During movement, the remaining prisoners came in handy when they got selected on a K/2, and the guarding squad was unhurt. Martin managed a couple good shots during the MPh: a 1MC against my north-edge platoon to pined one squad and broke the other two before they could dash onto the hill, and a 1KIA knocked out another squad in L6. Final Fire pinned a squad, but my advancing fire pinned the 8-1 in P5 and broke the squad there.
With very little left, the main thing left was for Martin to rally (nothing did), and prep everything to push my score down, but couldn’t get any real results. The game effectively ended with me having 12 squad-equivalents on the hill (nothing at level 3) and the British with four squad-equivalents, all at level 3.
Situation, German Turn 7.
Afterword
First off, my thanks to Martin for seeing this all the way through, even though it could not have been pleasant for much of the game. I definitely had more than my share of luck, especially with a lot of passed MCs. I also got some very significant low rolls on fire attacks to just pick off parts of the British defense, which just slowly trimmed back the defense to almost nothing. My sniper went off fairly often for a SAN of 2. On the other hand, that was because a fair number of his units became fanatic over the course of the game. And then there’s that insane rate-tear from the MTR….
On the other hand, as I mentioned, the INF did absolutely nothing all game. It never got ROF (1, after the spotting penalty), and never actually hit, much less got an effect. Now, at best, it was a 5-or-less roll, but after all those rolls, you’d still expect one hit…. I contemplated just moving the 8-0 out for rallying, but kept sticking with spotting fire. Smoke grenades did fairly well for me, though it sure felt like I was rolling 6 on almost every try.
It’s hard to say what Martin might have done better. One thought would be a ‘reverse slope’ defense, basically be one hex back from the crest, and wait for me to come up, and hit me at point-blank range. Sadly, that doesn’t work well on board 2; there’s too few places where that can even be tried. The main thing I can say is having extra units on M5 to dig in while the MMG fires would have been good. Once the foxholes are in place, the MG can be moved into them. Normally, I’d say a more flexible and mobile defense was needed, but with the lack of cover… Martin was already doing well on that end.
Discussion (2) ¬