
HF2 Bertoldo the Brave
After finishing some French Toast and Bacon, Patch and I returned to Hatten, with the second scenario, in March. I continued with the Germans, who are attacking in about the same area this time.
Pre-game rubble took out Eglise Saint-Michel, eliminating a potential early lookout position. The Americans set up behind a road in the area the first scenario covers with eleven squads, MGs, a couple BAZ, one each 60mm and 81mm MTRs, three tank destroyers, a 57mm ATG, and some foxholes to spread around. There was a decent looking line up front, with the TDs further back along with the MTRs, and second line already in place with them, and a bit in front of the victory area.
The Germans get sixteen squads, good leadership, a PSK, a couple DCs, five halftracks (three standard 251s, and two 251/21s with 20mm guns mounted), and two Panthers. They set up on the other side of the road, but can also enter along the east edge (which I did with two loaded 251/1s). They have six and a half turns to go about twelve to eighteen hexes and take nine out of eleven victory hexes. (An extra wrinkle is that shifts one hex against a side that no longer has mobile tanks/TDs with functioning MA left.) I concentrated on the north edge with less cover, and a lot less green in front of me. A middle group was tasked with clearing out the central area with a cautious advance, while another three and a half squads held down the south, waiting to advance when he had to pull out from events elsewhere.
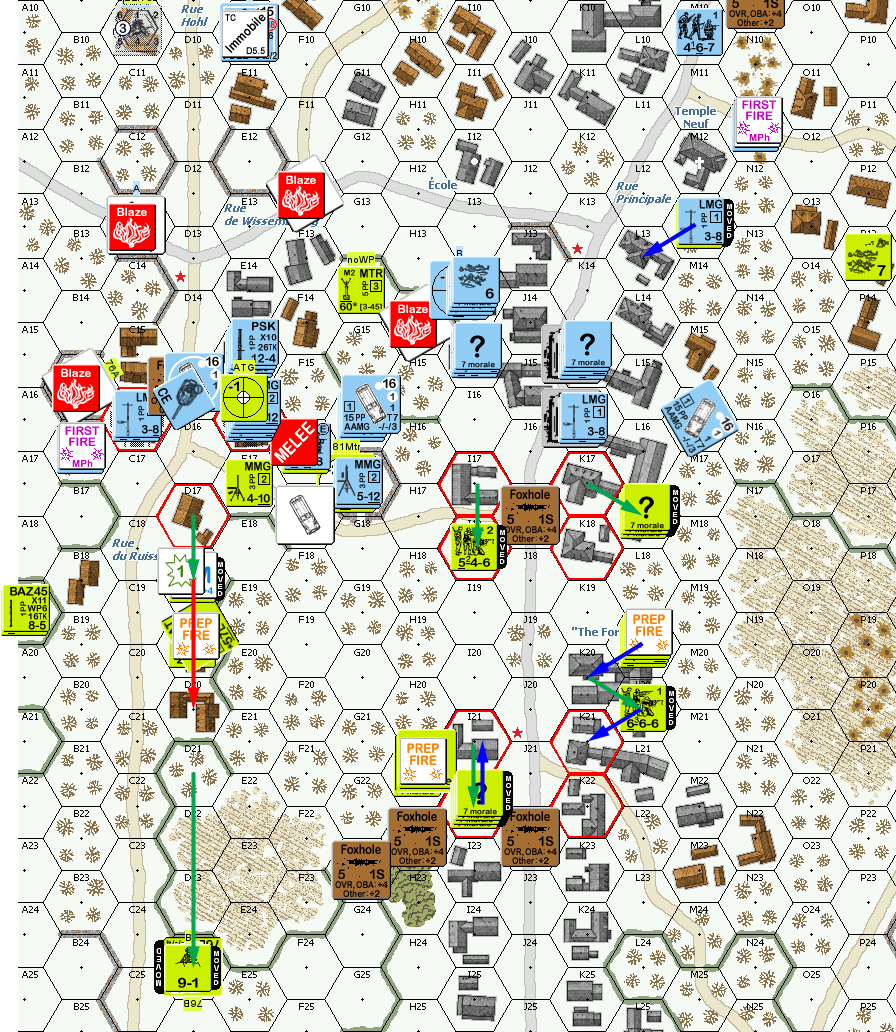
Much of the center OpFired, and I took a MMG shot at E7, sadly getting no result. The first two probing HS drew no fire, but the third one took a 1KIA from N8 (not where I expected…). A squad moved up, survived fire from D17 (barely in long range, but clear thanks to the road), and entered E7 to eliminate a dummy. As I moved into the central area, I took fire from I10 and H7 and C9 finally revealed themselves. Only the latter managed to break anyone, which was a help. At the end of the phase, I tried dashing across in the south again, and he revealed J7 (instead of adjacent J6…), and got a K/2 to break and ELR what was left.
Final fire then broke the initial HS in B8, and malfed an AAMG. My only advancing fire result was malfing the CMG on a Panther, despite two good rolls on C9. Patch did self-break the HS in H7 to get away from a 548.
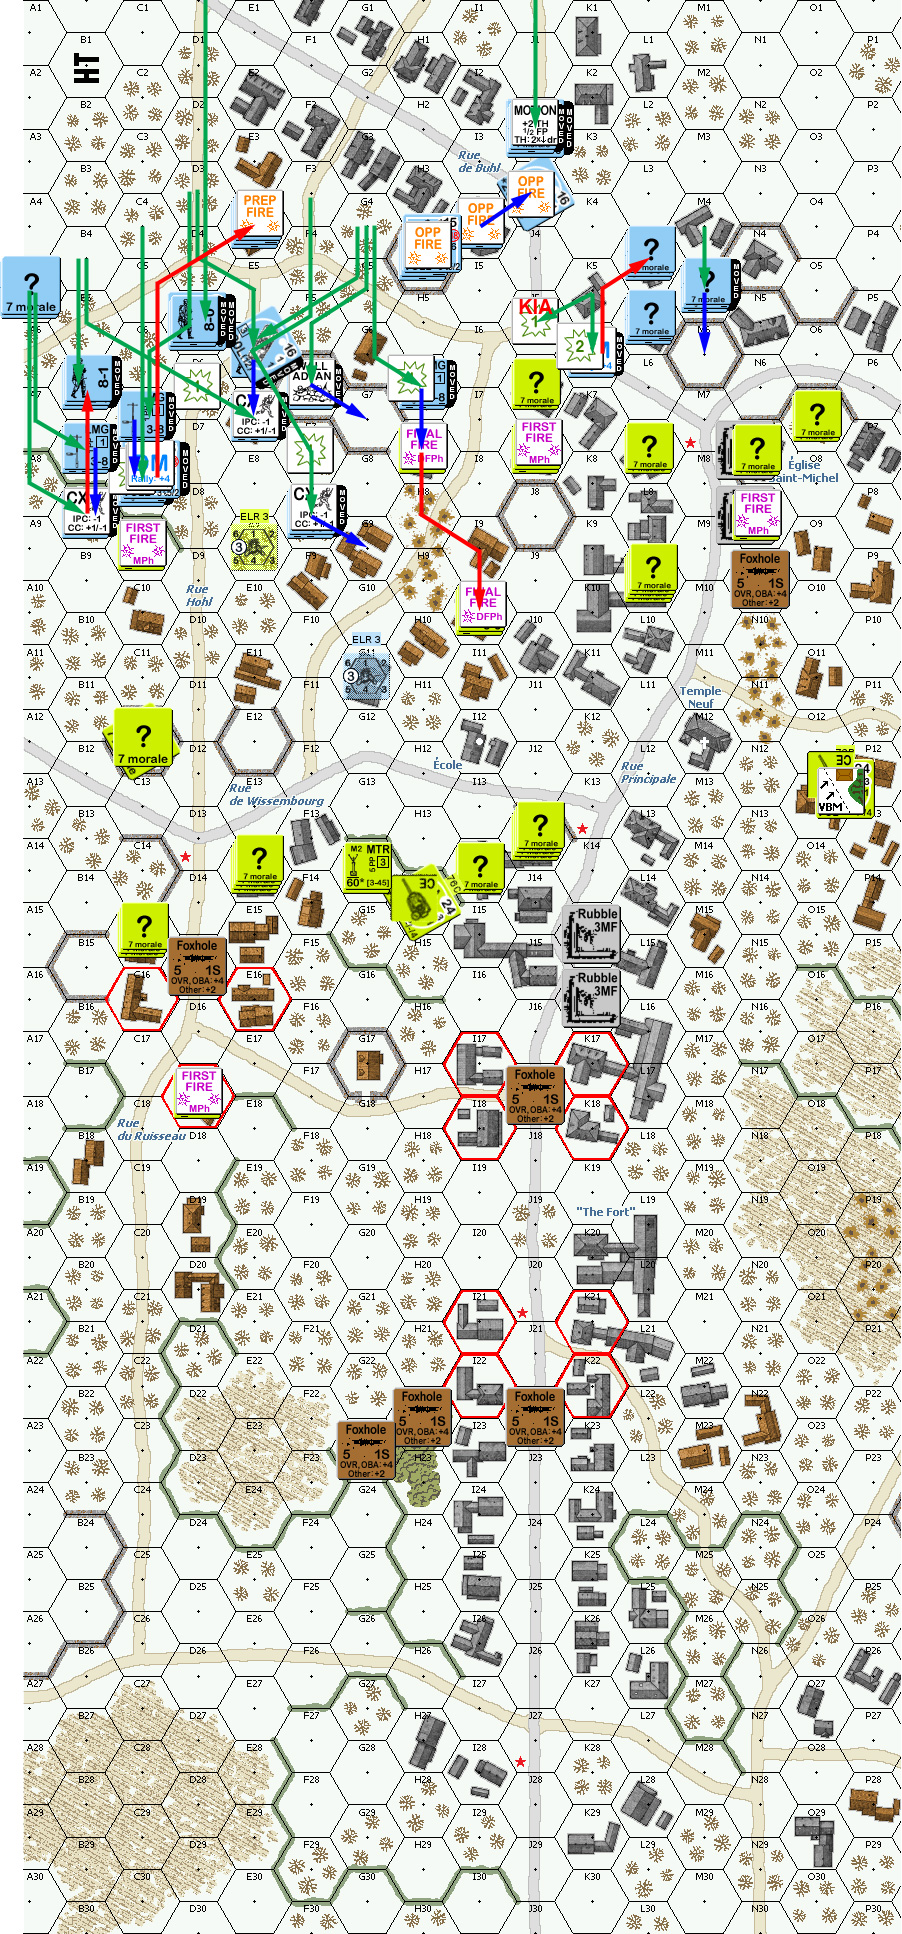
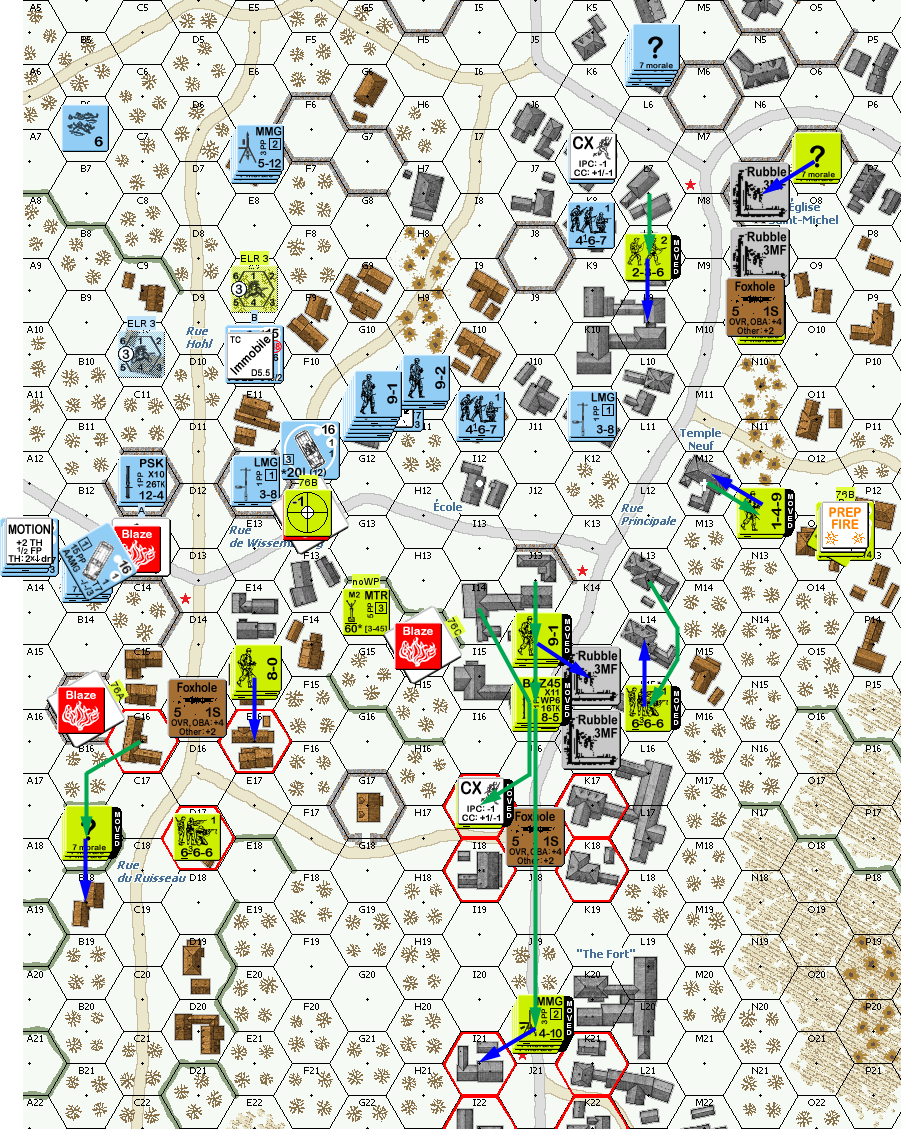
Situation, German turn 1, showing the full board. This is the entire north edge (towards the left). Victory hexes are marked in red.
Patch lost his AAMG permanently for his turn 1 RPh, while I rallied a squad and got the CMG back. Patch skulked, and the north TD pulled back a bit. As a result, both of us were short on worthwhile shots.
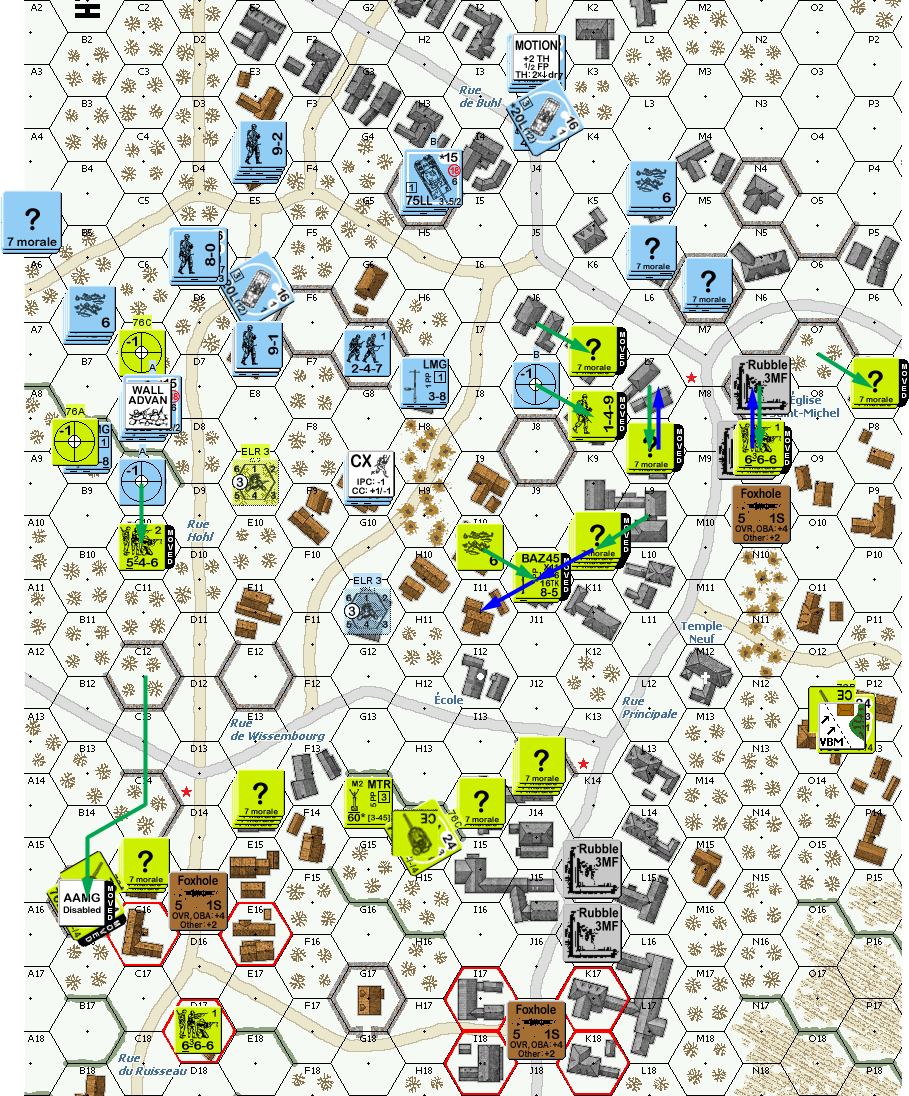
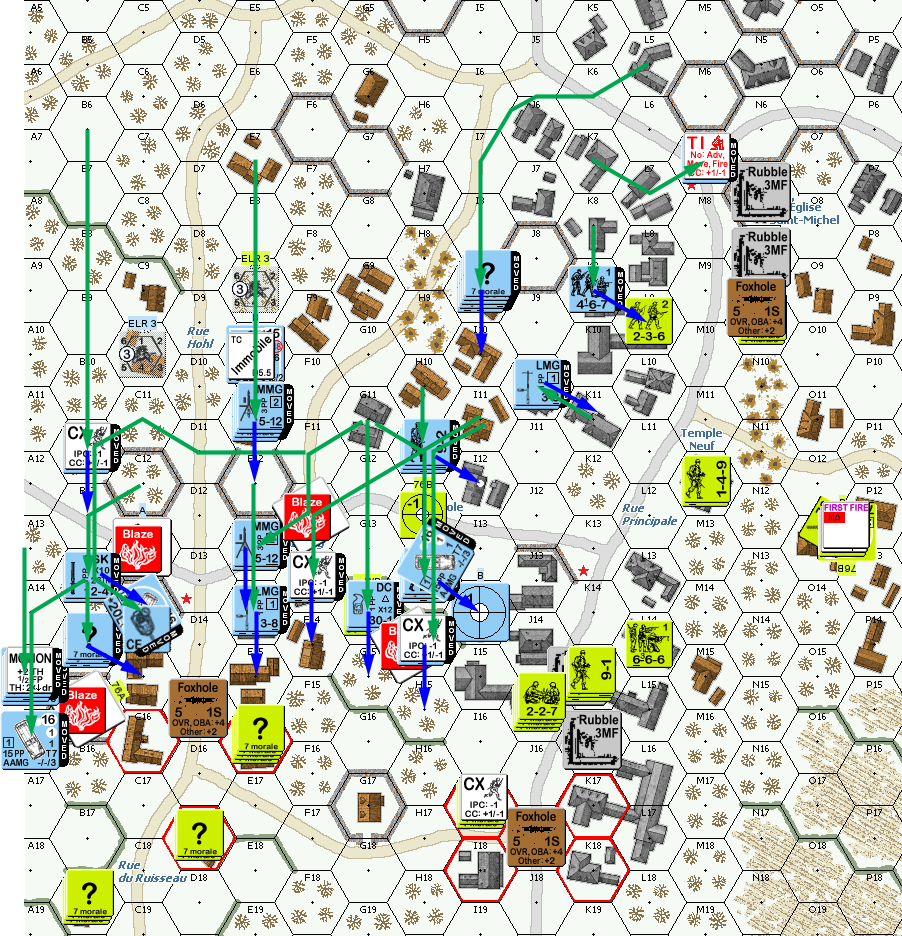
Situation, American turn 1.
Nothing happened for my turn 2 RPh, and my one prep fire shot broke C10. Unfortunately one of my first moves walked into a K/2 on a great roll, and another killed a dashing DC squad. Much worse was late in I moved the 9-2 and stack into an area that was much more clear than it seemed from the lack of other fire there. I had known to avoid it, but lost track with everything going on, and two good shots broke the 9-2 and reduced two squads to HS.
The good news was that I was still forcing my way into the middle of the map, and his final fire shots were ineffective. My Panthers put Acq down on two of the TDs (one of which had been too busy to do the reverse, and he was looking at the front armor). The northern American squad died of FtR (both sides have No Quarter in Hatten).
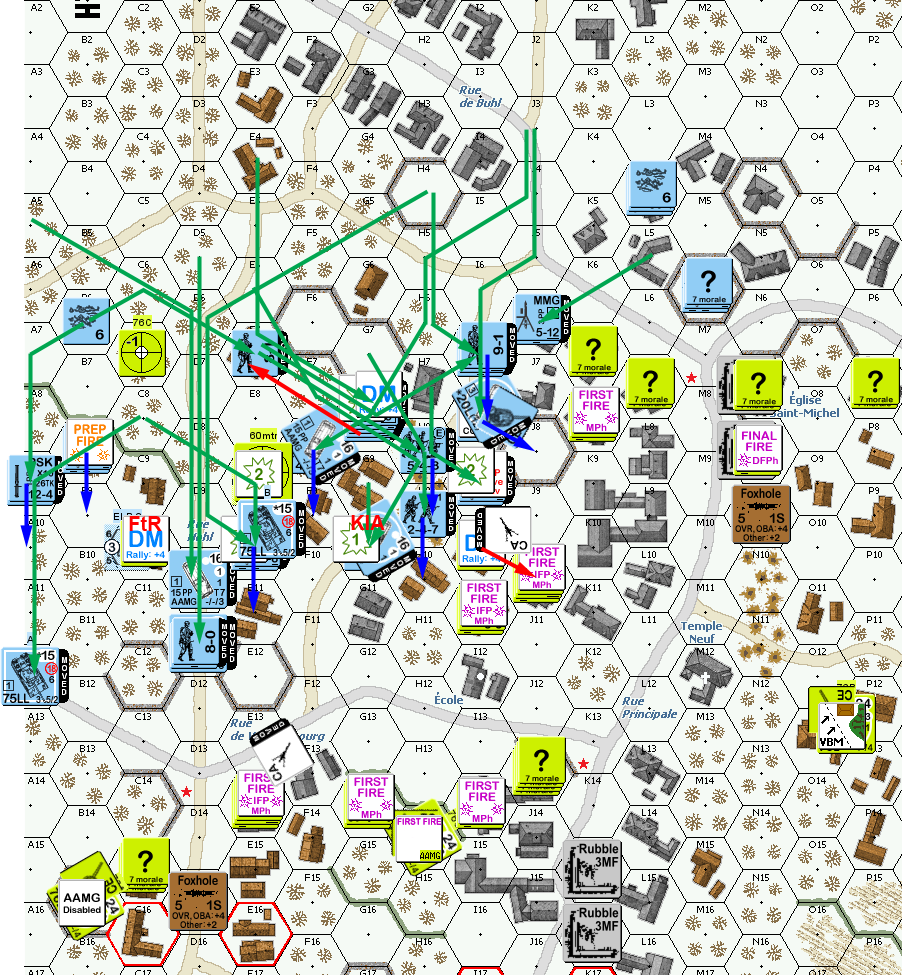
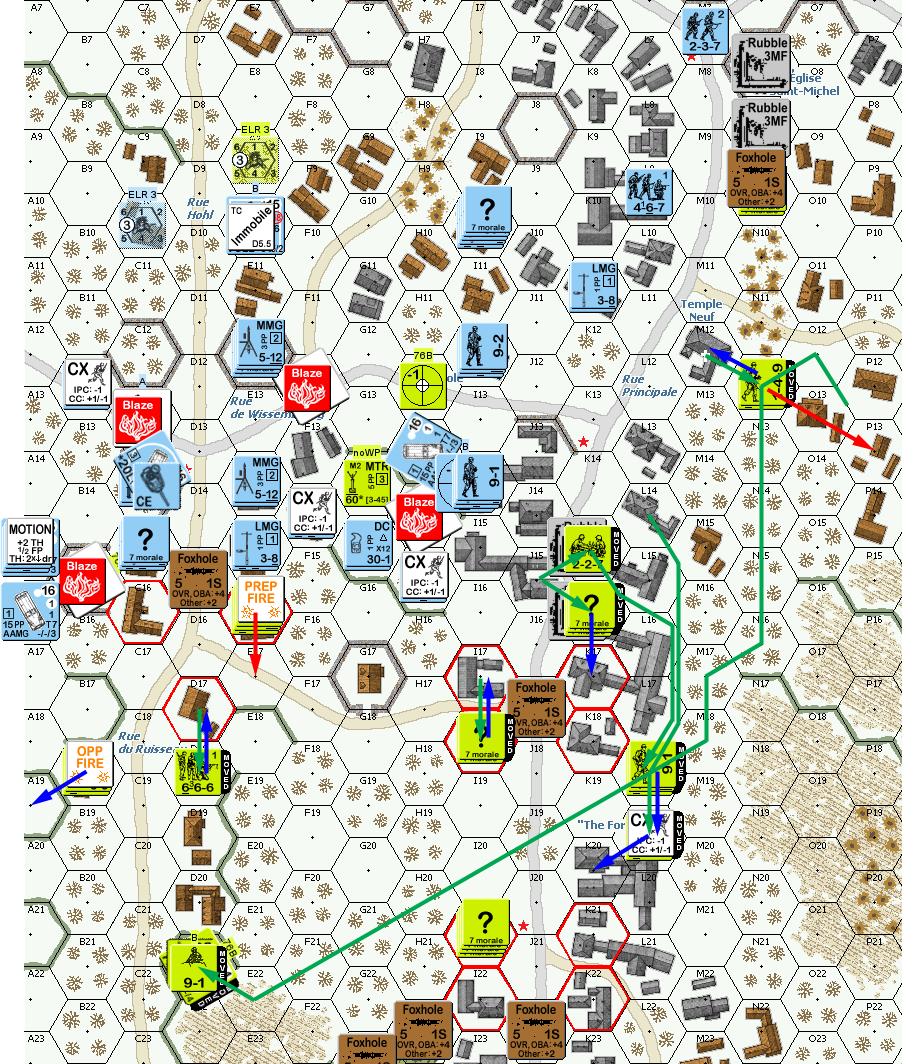
Situation, German turn 2.
Patch got nothing for his RPh, but I rallied a HS and the 9-2. In prep, Patch found his small MTR had no WP and his middle TD had no APCR. But, he got a deliberate immobilization hit on a Panther (he’s tried several times over the years, and this is the first time it’s worked), bounced two shells off the turret, and one off the hull. In addition to normal skulking (which the main line in the xx14 area was needing to do now), he pulled out of the center, but I broke a squad in bypass when he tried to get some extra distance. The northern TD dropped some smoke grenades to cover its departure, but a CH added even more smoke there.
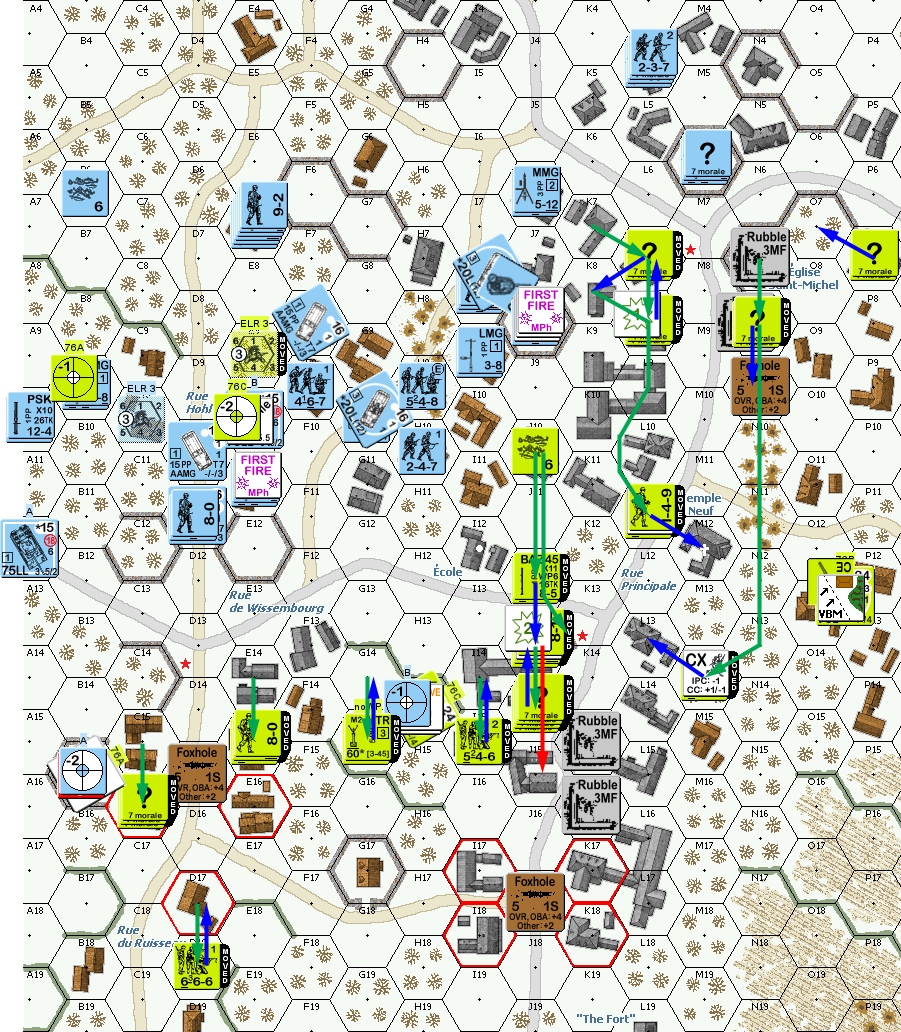
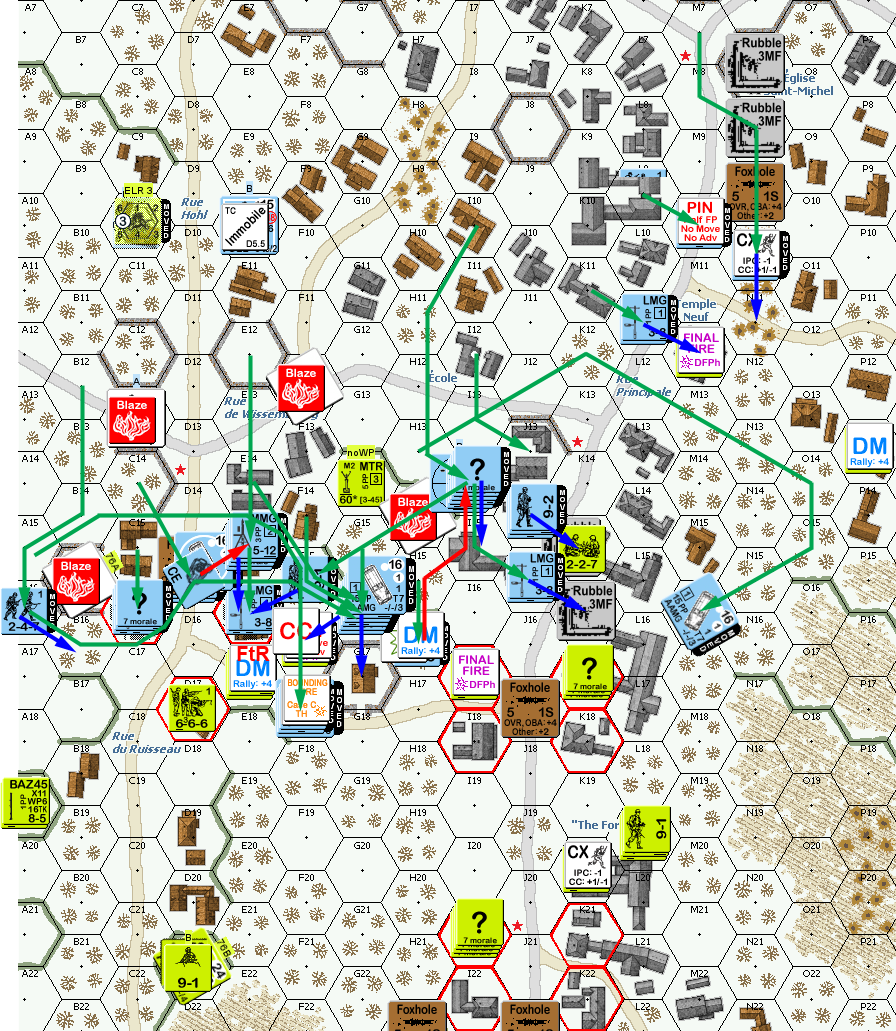
Situation, American turn 2.
The only thing for my turn 3 RPh was getting my LMG HS back in E7 (and not getting the MMG HS, both survivors of my turn 2 goof). The immobilized Panther took out the TD that had immobilized it in prep, and its MGs broke the MTR crew in G14. Early moves revealed a Dummy in K8 and a HS in L7, giving me a much better idea of what I was dealing with. The two 251/21s proceeded down the central road, coming into view of the American line, with a firelane starting from the HMG. Thankfully, neither halftrack was affected, but it did keep me from wanting to risk any infantry in there.
And my second major mistake was not seeing that the last American TD had a clear shot from the south side of the board to the north. My mobile Panther was showing the side armor to him. Worse, that was the one with his armor leader, who turned his first shot into a hit to burn it.
Situation, German turn 3.
Patch rallied a squad for his turn 3 RPh, while I rallied a HS and rearranged the G11 stack to give my DC to an elite HS, while they gave their MMG to a first line HS. The TD prepped to blow up one of the 251/21s, and he started pulling out of his current line to garrison the victory areas more directly.
I had been hoping to transport a couple of squads back to the rear victory area by driving the halftracks along the north edge, only taking a couple of +2 shots on the way there, but Patch obviously realized what was up, and set up to prevent that before I could do more than get in position.

Situation, American turn 3.
I finally self-rallied the HS in B6 for my turn 4 RPh, and Patch rallied his crew. Despite the losses, the good news is that I thought I’d need another turn to dig him out of the old positions. The bad news was that once again, I needed a good plan to get at the new positions. The first good news was managing to search N7 to find out that was a Dummy. The south side was clear all the way to xx9. Better yet, I got a lot of troops past the north-south road that he’d largely abandoned, and largely cut off E16. I got into CC with the HS in L9 and took it out for no losses.
Situation, German turn 4.
Nothing happened for Patch’s RPh as there was no one and nothing broken. The BAZ in B18 went for OpFire while the MMG in E16 failed to break my adjacent squad (passed NMC). And he continued pulling out faster than I expected. The entire area from I12 to L17 is a mass of stone buildings that I was not looking forward to clearing him out of, as there’s no good way to get at the victory hexes in that area without going through it, unless you can clear everything else to have a free hand with much more open approaches. Which was a potential concern, though he had enough to make it a problem. At any rate, he did not risk getting broken and caught in that mess and pulled out two squads, the HMG and his 9-1. The TD abandoned its starting position, and moved across the board to a northern position behind a line of buildings that had a lot of good LOS to important places, or rather the ground in front of them that I’d have to cross.
The remaining 251/21 got three shots at E16, pinning the 8-0 and reducing the MMG squad to an ELRed HS. And a good shot broke the squad in N12, leaving his hero on his own. Nothing else had any effect, including the OpFired BAZ missing my halftrack.
Situation, American turn 4.
There was no activity for my turn 5 RPh again, and no prep fire. My back HS moved through N9, showing it to be a dummy, and the hero to be the last American unit in my rear. I had been thinking it was real, though if I’d remembered its initial position in P7, I might not have. Sadly, that hero was effective, pinning my first attempt to get at him, and killing the HS I sent into CC.
The center HT circled around to DM P13, and then parked near a victory area. An attempt to get at I17 cost me a broken, ELRed HS (I had been thinking that might be a dummy). I infantry OVRed the 8-0, pushing him into F16. The two north halftracks relocated into the center (away from the waiting BAZ), with the loaded one doing a drive-by-shooting to pin the 8-0. This also set off his sniper, who reduced my SAN to 2.
Final fire broke a squad in D15, and pinned the crews of two halftracks, and then revealed the ATG in D19 to take a shot at the loaded HT. It missed, but my odds of keeping him from killing everyone in it was low. Then his large MTR showed up in H21 to take a ranging shot at G17, where I was planning to jump off for the final push from. I had some good advancing fire rolls, but I couldn’t do more than pin the 8-0 and ATG crew. I killed the crew in K15 in CC, but the pinned 8-0 in F16 survived, putting my squad into Melee.
Situation, German turn 5.
Patch’s hero picked up the LMG my HS had delivered to him, the ATG fired on the F17 halftrack, killing everyone aboard. He of course skulked some more, but the TD pulled back another three hexes, limiting its shots a bit more, but wisely getting it out of range. I broke the D17 squad as it tried to pull back, and final fire pinned a squad in I18, and broke the ATG crew. Patch’s 8-0 converted to HtH Melee, but couldn’t get a result while going down.
Situation, American turn 5.
I rallied a PSK HS for my turn 6 RPh, and I positioned units on either side of the hero, with him firing the LMG at my squad, who passed the resulting 1MC. The southern HT went into bypass-freeze L17, who then failed a PAATC for RFCC. On the north side, I took the D16 intersection, and got into the area where his broken squads were trying to recover. In the center, the HMG broke my 9-1 and pinned a squad and a half. Final Fire broke and reduced the squad that got into I17. His HMG also broke the pinned units G18, F17, and E17… though looking at it now, that was all illegal as his HMG was already Final Fired, but I didn’t catch that at the time.
This time, I brought a squad against the hero, but he got Ambush and slipped out the side door. In L17, even rolls produced no ambush, so Patch went first, narrowly avoiding a result while I CRed his squad.

Situation, German turn 6.
Patch got nothing for his turn 6 RPh (and spotted a better self-rally just after time), but the squad and two HS that routed to E16 all rallied (but not the 9-1). The TD missed (again!) the HT parked in G19, but its AAMG broke the squad in D20. The MTR got a solid hit on the remaining 251/21 to burn it, but the HMG malfunctioned. All that left him only a “?” stack, a squad, and the hero to move. The first two skulked, and the hero went into J14 to DM the two HS that had failed to rally there. My fire did nothing but allow Patch to relocate his sniper. For advance, he abandoned the MTR, and brought the HMG back, putting something in all four hexes of the final group of victory hexes. The Melee in L17 switched to HtH, and Patch just missed a result again, while I rolled a 2 to eliminate him and generate a new 8-0.
Going into the final turn, I had five hexes out of a needed ten, and it was just theoretically possible to make it work. I got my 9-1 for RPh, while Patch repaired his HMG. Prep fire broke I18, which meant that that area was not going to come down to a final CC roll. With limited units that could even get there, the first couple moves were more aimed at limiting SFF, but the south-side HT tried for more freeze sleeze, but was stunned adjacent to its goal (it would have worked if he hadn’t gotten the HMG back).
The infantry part of L17 went next, taking a 20FP shot in L21 for a K/4 that wounded the 8-0, sent the 9-2 heroic… and broke the squad. The next part was sending a squad in from the north towards I22, which revealed a 8-0, squad and MMG for a K/3 that my (now) HS survived. Then I sent the PSK HS sprinting towards the TD in the hope they might get a very lucky shot and reduce my needed hexes to nine again. But the AAMG broke them, and we called the game at that point.

Situation, German turn 7.
Afterword
This scenario took as quite a while to go through as it was very tense and required a lot of thinking the entire time. It looks to be really well balanced, and is a very interesting situation, and well worth a play or three.
The problem with making noticeable goofs, is I can count on Patch not to reciprocate. Also, die luck was against me for the first couple turns (I believe our DR averages for the first turn were ~8 and ~6), and the rolls that lowered Patch’s average tended to be really important ones. However, I had a lot of offensive punch, and was able to lever him out of some good positions fairly quickly. I wonder if he left some of them a little too quickly, but given that I forced two or three Failure to Routs, I have to say Patch had it right.
Patch considers his defense of the D16 area a mistake, and certainly he lost more there than he could easily afford. I don’t think the Americans can just give it up, so that area is a tough call. He also considered putting the ATG in D17, but felt it was too obvious and a Panther would just kill it. Instead, I parked a bunch of halftracks on that road, and he just had a squad to fire at them with.
The SdKfz 251/21s were really nice, and certainly were a big help in the fight. Better, I managed pretty good use out of the regular halftracks, which is not something I have a lot of practice with. I think the north-side advance was a really good idea, since the light cover was just good enough to make it survivable, and didn’t give Patch many places to conduct a shootout from. Once that side had advanced, everything else flowed from there. I was really happy with the turn _ advance, since that indeed left E16 no real choices, and he didn’t survive it.
Discussion ¬