
91 Ad Hoc at Beaurains
When I first saw the scenario “Ad Hoc at Beaurains”, I was fascinated by it. Four full boards, sixteen turns. It should be massive, but the number of actual units is actually small, and no units begin on the board at all. I talked Patch into trying it out long after I first saw it in January 2009…:
As a complete switch from the city fighting of VotG, Patch and I decided on this unusual scenario from Annual ’92 that was updated in FKaC. The idea of a four-board scenario that starts with nothing on board (except the German Sniper) has always fascinated me. Sixteen turns is a little frightening, but I figure with the absurdly low counter-density, much of the game should pass pretty quickly, even purely by email.
Given a choice, I went with the British, and their all-armor force. I figure, win or lose, I’ll learn something.
I was right, I’m learning a lot. Like, don’t start an armor scenario during a week where you’re too busy to really look at the tanks you’re using. 😛
Anyway, with one email, and one-extra long Monday-night session, we’ve gotten to the beginning of turn 4.
A quick note to those unfamiliar with the scenario: It’s May 1940, and the British are counter-attacking Rommel’s 7th Panzer Division. Only the tanks manage to get through, and Rommel is throwing anything he can find in their way. Mostly, this is 37mm ATGs and some light tanks. Since the British have 6 Matilda IIs and 6 Matilda Is, these are entirely inadequate to insure a kill. The Germans do get a pair of 88s sometime between turn 6 and 11. The Brits have to exit 30 VPs to win, with every 2 CVP caused effectively counting as one EVP.
So, exit about four tanks of 12, not much to stop them, 16 turns, sounds simple, no? We’ll see—in a straight line, there’s 40 hexes to go, and the Matilda IIs have 9 MPs. The Matilda Is have 6, and can’t even use the road bonus.
A final note to remember when looking at the screen shots, is that there are no gullies or bridges on board 5. We can’t find a way to turn gullies off in Vassal though.
Turn 1 was calm enough as both forces started entering. I decided to enter in two groups towards the north end of board 5.
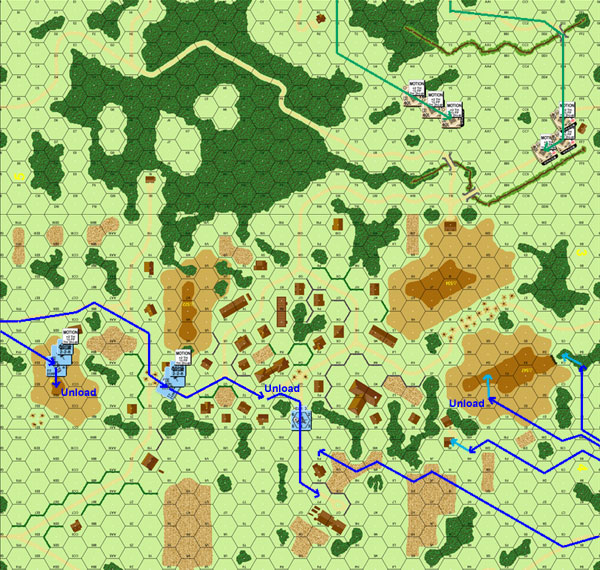
Situation, end of Turn 1; also shows German movement on Turn 2. Remember, gullies do not exist.
Then I got to choose whether I wanted the Matilda Is to come in behind the first group, or if I wanted to have them on their own, and see if they could either sneak through, or distract the Germans from the main force. In the end I decided to see if I could get the IIs to clear the way for them.
One thing I hadn’t realized until Patch pointed it out, is that Matilda Is are radioless, so they’re going to have fun with Platoon Movement. It was also around here that I started figuring out the costs for some things and realized that hills are a real challenge at +4 MP when you only have 9 to begin with, never mind 6.
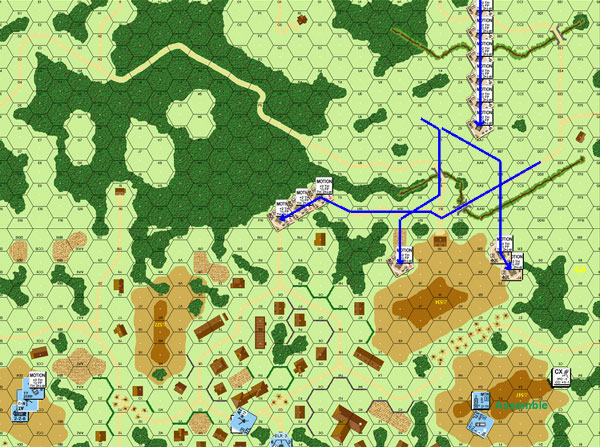
Situation, end of Turn 2.
As it is late here, I will update with the much more exciting Turn 3 later. (Hopefully tomorrow night.)
“Rindis and I are taking a switch from the far end of the Eastern Front to a small area on the early war Western Front. Our next scenario is Ad Hoc at Beaurains, redone for ASL in the ’92 Journal. This scenario features a a small number of counters over four boards, which is a far cry from our usual scenarios. With the lower piece density I’m hoping this will be a fast one.”
“I took a look at the boards on this one, and despite ROAR giving this battle even odds, it certainly does seem pro-British. Only 5 Matildas need to exit for a win, with that number decreasing depending upon CVP inflicted on the Germans. There’s 16 turns for the lumbering behemoths to cross those four boards, but a replay someone posted show it can be won in as little as 5. The rag-tag German forces are armed with a bunch of 37L and 20L popguns, so I’m looking at a lot of deliberate immobilization shots this game. I do get two 88L guns coming on board, but the earliest they can appear is turn 6 and as shown before, it may not matter.”
“The problems with this game is it’s truly up to the dice, which is going to be more than a little frustrating. Against a moving Matilda, I need a ‘4’ or better for a DI shot (+5 DI, +2 moving, -1 size = +6, with no acquisition bonuses possible). Against the damn tankettes, however, I need a ‘2’ (+5 DI, +2 moving, +1 size = +8), or you can try and punch through a 6 AF with a TK# of 9, which needs a ‘2’ once again for a clean kill (though a 3 hull hit will immobilize). Let’s not even go into what my 20Ls can accomplish… At any rate, off we go.”
“No units start on board, so it’s a question of where to start shuffling units. For the moment I’m keeping units close to the southern end of Board 3. My goal is to stuff one gun up on the hill, with the other one joining for support or else get an early start on the shuffle to stop a northern thrust.”
“Turns 1-3 scream along as there’s just no one with LOS. Unused to shuffling Guns about I make an error in not loading the Gun in 3DD2 as a preemptive move on turn 2, and I discover when I load it Turn 3 that you’re TI when you do so. I had counted on shuffling it somewhere else. I throw infantry at choke points, trying to force Rindis up onto the hills, and move my 37L HT up there but fail to get HD status. Things are set for the Brits, as something has to happen this turn.”
“Ya know those little 50mm Mtr? The one you look at in the OB and think, “What the hell am I supposed to do with this?” I heartily recommend rolling a Critical Hit with them, like I did, immobilizing a Matilda and drawing first blood. Wow. 0.0 I don’t think Rindis was happy at all with that result. A second Matilda moves close to my ATG in town, and two more face off against my units in 3M5. A Matilda to the north bypasses one of my units and I miss a Reaction Fire CC attack, and the second takes position on the hill to duel my ht. I ping shots off the two Matildas in Final Fire, and Rindis reveals his armor leader to smoke my ht. Now he needs just 28 CVP to win, meaning he only has to exit 4 Matildas of the 5 remaining. So not good. I can’t believe they lowered the VP requirements for this one.”
“Turn 4 starts next, and I get a bunch more units. Not sure what to do against all the Matildas or where my other ATG is going to go, but I’ve a little time to think about it as I’m now home from work sick this week. Stupid colds.”
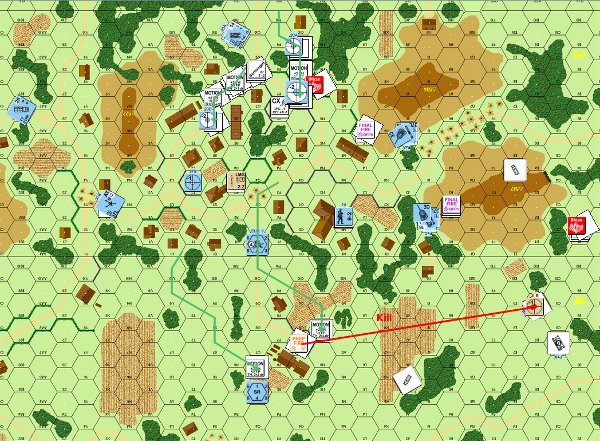
Turn 3: Things be a-happenin’

Thanks Patch!
The worst thing about that MTR CH is that he Immobilized the Matilda II right in the middle of the intersection on the west side of town. Getting the Matilda I’s around it is going to be annoying.
I’m possibly taking this a little too cautiously, and should have just zoomed everybody through on the board 3 roads. But then, He’s much more mobile than I am. The infantry can keep up if it really wants to. (They are Infantry Tanks after all.) And those HTs are speed demons. I was very happy to get the one with the pop gun. I don’t need it trying to squeeze off rear shots as I move along, and part of the reason to engage his forces right now is precisely to rack up some CVP to make my job easier.
“Too many arrows out there, so I’m doing this one early.”
“Turn 4 is when my main forces arrive (hooray!) but first some things to sort out in town.”
“I’ve a 2 range frontal shot on a Matilda, which is about the best I can hope for on a DI shot. 1st shot miss, no ROF, IF shot elims the gun on a 12. So not good. Lots of mortar fire, but no luck on repeating last turn’s feat.”
“In movement I throw a leader and squad across hill 547 at a Matilda II, get a ht out of the way, and move a 37L closer, but not close enough to be useful. I send all the 38(t) tanks along the north edge as I’m weakest there, and the two 20L tanks take the southern flank. The 7-0 takes the radio to a second story, and the 9-2 is making a mad run towards the village.”
“Defensive Fire fails to do anything other than braking the crew in 3S3 who are wondering where their gun shield went. I rout him further into the town, and try two close assaults. The 247 fails to attack the moving Matilda II when it rolls a “10” on the PAATC, but my 8-1 and squad jump on board without hesitation and flame the tank on a Final ‘2’ result. Rindis has just 4 Matilda IIs left (and by all rights there should be another immobilized one in 3U3, damnit >.<), and if I get one more he’ll have to exit the lumbering Matilda I’s to win, barring no more casualties on my end. Ha! Of course there will be further German casualties. But two tanks down is nice going into Turn 4.”
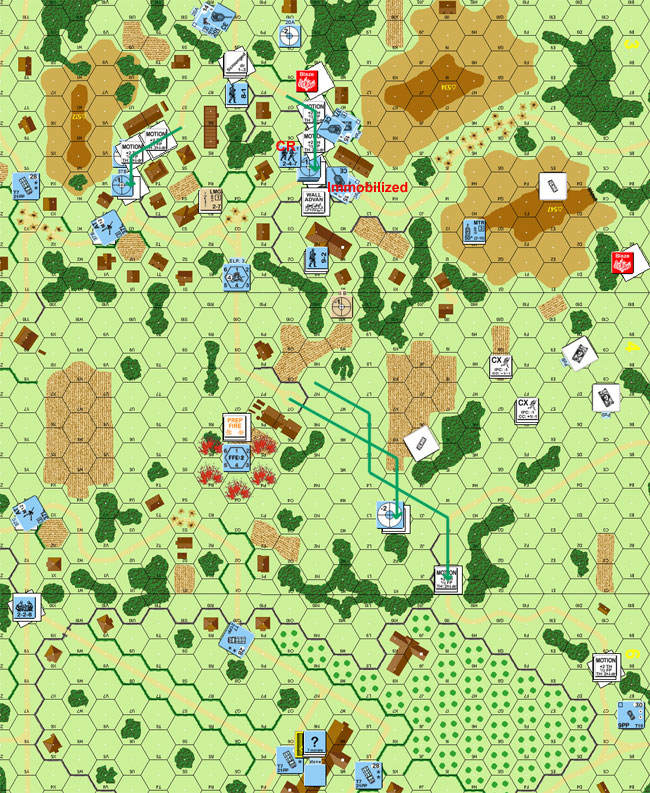
Start British Turn 4. The Matilda I’s are posed to enter around 3Q10

“Running on some computer issues at this end, so our game has unfortunately slowed.”
“Turn 4 ended with little happening other than British movement. The little Matilda 1’s continued their slow crawl towards the board 3 village, but their bigger brothers got aggressive. Rindis abandons his immobilized Matilda II and now there’s British infantry on the board. A Matilda II sneaks its way through some buildings using VBM and got a LOS on a towed 37L that’s shifting into position. (As much as Rindis moans about losing to me, it’s the stuff like this that makes beating him difficult. I never foresaw that move.) In Advancing Fire he narrowly missed the truck.”
End Turn 4

“My tanks are getting close to engaging the Matilda IIs, which is going to make or break this game. He has the ability to blow them apart as I struggle to slow him down, and every tank he destroys makes it easier for him to win. I just hope my 88s enter soon.”
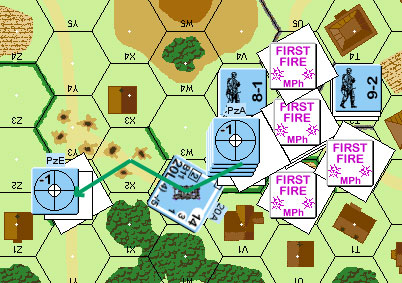
“I immediately unload the 37L in his tank’s sights, as well as the one behind it. I can’t get it where I wanted it anymore, but two 37L ATGs at this location isn’t a bad thing, and I can push it about for a better position. I shove the 20L tanks along a flank as they prepare to engage the Matilda Is in upcoming turns, and my main tank force prepares to engage his lone Matilda II crawling along the northern flank. Infantry floods towards his AFVs, and I’m set to engage 3 different tanks in CC with 5 units. My observer heads to level 2 in the chateau and gets ready to bring down some pain. In an error, I completely forget to move my motion halftrack.”
“Rindis misses my unloading ATG and transport vehicle, and fails to hurt the infantry charging his Matilda Is. Since turnabout is only fair, I respond by failing 4 of my 5 PAATCs, and do no damage in CC. >.< To end things on on a high note, in the UK Turn 5 Rally my broken crew rolls a ’12’ and is eliminated.”
End German Turn 5

Well, one computer build later, I’m back, but I don’t have Dreamweaver installed yet, so no pictures from me at the moment.
I’m glad I can surprise Patch every once in a while, it’s the main thing I’ve got going for me.
I had one Prep shot on my 5, the Matilda bypassing 3U1 decided to try to make sure of the 37L in front of it, and get a couple CVP. A ‘4’ -1 just barely scored a CH, auto-killing the Gun and crew—much better than I was expecting.
Better with him gone, I have no problem sending the center Matilda into board 4 and parking behind the wall next to the building in the center of the board (4O7), giving me shots at two of the 38(t)s that are waiting to ambush the Matilda coming along the north side. That one took a chance, advancing to LOS of those same two tanks and stopping to have it out, despite the German infantry nearby. At the very least, I should have spent an extra MP to park sideways and give a chance of negating any Immobilization. The Matilda with the AL moved to the east center of town, preparing to make a break for it next turn.
The Matilda Is trundled on, finally reaching the edge of board 3 near the center road. If I had it to do over again, I’d have put them on the south end, the way is much straighter there.
On turn 6, the 88s failed to show, but Patch successfully Immobilized the north Matilda, and the ATG south of town broke the crew that I had tried to face it down with. The two Pz IIs are rushing the Matilda Is, who are powerless to do anything about it.
While three of the 38(t)s moved to engage the Matilda Is, he moved infantry up to the north-end Matilda, which coolly held its fire until the tank in LOS that didn’t prep to Immob him tried to start and was destroyed.
Then the SdKfz 251 out in the middle of board 4 tried to make a dash across the other Matilda’s field of fire. The Matilda fired on it, missed, fired the CMG on the next hex, got an ’11’ (!), IFed on the next hex, and barely got a hit.
The north Matilda, having gotten its target, swung the turret around for a DF CMG at the adjacent squad… and rolled a ’12’, malfing the only MG. The adjacent squad and a half both made their PAATCs, and burned it in CC.
It’s my turn 6, I’ve got three functioning Matilda IIs, 20 CVP, and the 88s should show up soon. It’s certainly possible to win this, but it’s starting to slip away with all the Matilda II losses.
“Rindis summarized our latest meeting, so I’ll be brief.”
“Rindis popped my 37L ATG before he even got a shot off, illustrating the difficulty in deploying guns under fire, and making my cautious about those 88’s when they come on board. I need those guns to win. The Matilda IIs move against my tank force, with one getting sneaky and taking a HD position where I can’t nail it. As usual, the tiny Matilda Is crawl forward. The wreck in 3Q8 is posing a tiny roadblock, as the platoon movement restrictions make their 6MP crawl even slower, and this is a game about time. Hmm…”
End UK Turn 5

“For my turn, the gauntlet has been thrown and the tanks must duel it out. I successfully immobilize the Matilda II in 3B1 with my first shot, and with that done, it’s time to get the hell out of there. My ATG breaks the British crew that’s moved forward, solving the problem of British infantry for now.”
“One of my tanks easily escapes, but a second in 4C7 is too exposed. Failing to drop smoke, he is quickly dispatched. My other tanks roll across hill 547 and 534, where they threaten the smaller Matildas and dare Rindis to move his heavy armor away from the victory exit. I move infantry up against the immobilized Matilda to clear that 40L off the board for my 88s to enter, and also to remove the threat of a second roaming crew with a LMG.”
“In one of my bigger blunders of the game, I think Rindis will be distracted by my sitting duck tanks and won’t trade shots with a halftrack moving across his front. Boy, was I wrong. He nails it with an IF shot, and I’m down 5 more CVP. Once it dies I figure out a better plan for it, fat lot of good it does me.”
End German Turn 6

Okay, now that I can post images again, time to try to catch up with this.
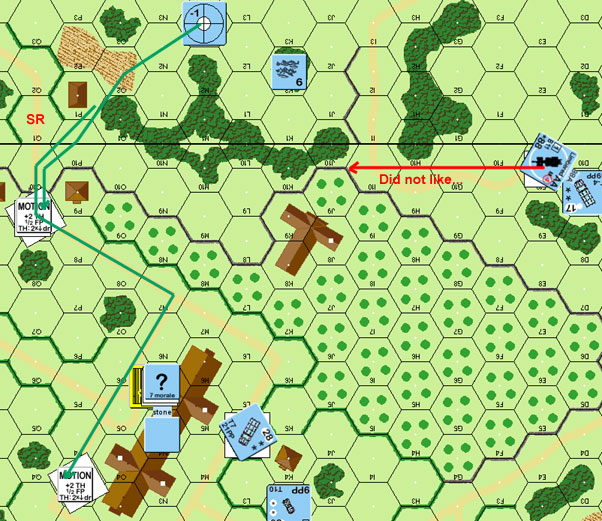
My turn went pretty fast. The Matilda parked on board 4 took a shot at the remaining 38(t) and killed it, and the other two moved to join it. The two platoons of Matilda Is split up as they tried to find unblocked ways into the village. Patch called down an SR near the board 4 villa, and while it scattered, it was still adjacent to the only tank he could see.
Situation, end of DFPh, British turn 6.
And then on turn 7, the 88s arrived. The OBA promptly Immobilized the Matilda, which left me with fewer mobile Matildas than I needed to exit… but not by much. The two remaining include the AL, and with 27 CVP, I was very close to what I need for the remaining two to be sufficient.
Patch opted to enter the 88s in on the two flanks of the east edge, while the 37s moved up and he prepared a gauntlet bristling with guns for the Matila Is. In fact, the problems of the congested terrain became even worse as it became obvious that he could put tanks in the roads to force continual 2 MP movement for the platoons.
He moved the squad and a half that had killed the north-side Matilda out… in full view of my tanks. For some reason I blanked on the fact that I could fire with a -2 DRM, and am thankful I did, as the 9-2 and squad in 3M2 attempted to run up to the tanks on board 4, and the parked Matilda whipped the turret around and broke the squad.

Situation, end of MPh, German turn 7.
Again, that isn’t all, and I’ll try to get to the rest tomorrow night.
Sorry for the delays here, its been a busy week. The game is moving faster than the reporting….
For my turn 7, the two remaining Matilda IIs headed towards the north end of boards 4/6, as I didn’t care to let the OBA have another crack at my tanks. The Is continued to inch their way through town, absorbing an amazing amount of punishment, and one Street Fighting squad even being reduced on a ’12’.
I’m not proud, I’ll take my CVP any way I can get them.
Sadly, on my last move, he finally got a result, Immobilizing the lead tank of the second platoon.
Situation, beginning of AFPh, British turn 7.
Looking things over, we realized I was very close to winning. That CR on the Street Fighting put me at 28 CVP (=14 EVP), the Matilda IIs are worth 7 VP each (thanks to that 11 AF), and one of the two remaining ones has the 9-1 AL, who is worth another 2.
Patch continued to try to stop the Matilda Is in the village, with little success, the 37L ATG got 8 TK rolls on the lead tank of the first platoon, and it shrugged them all off.
He shuffled a couple tanks around in the village, and pushed a 37 forward. The only exciting parts were that a couple of MMC tried to catch up to the Matilda IIs, and one of them caught a K/1 and broke for his trouble, and he unloaded one of the 88s across my proposed exit path.
And for further insult, K3 Final Fired on 4F5 with the MA, got a MC, and Patch rolled a ’12’ to eliminate the broken HS.
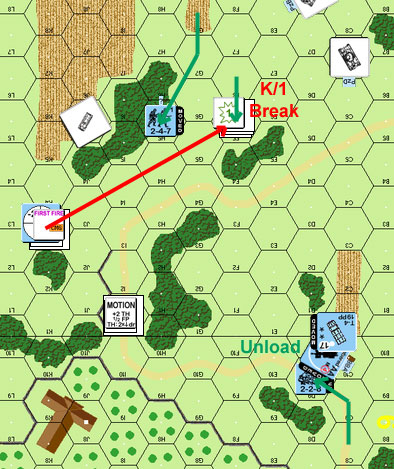
Situation, German MPh 8, north end of board 4/6.
“As Rindis mentioned, we’re advancing far faster than we can get logs up. We’re currently on turn 10, in fact. I’m missing the logs for Turn 8, so I’m not showing movement maps this time.”
“With an immobilized Matilda sitting in 4Q6, I have a problem of an impregnable ATG sitting in the middle of board 4, which prevents me from moving on his other tanks without taking losses. I decided to concentrate on his little tanks instead, and swarm them in the middle of town. This tight little plan backfires horribly as I lose a squad to the north, and Rindis suddenly has the points he needs to win with just two tanks. Well. Isn’t that just peachy. I unload the 88 in 6D9, which is the best I can do to try and nail a tank. At a 10+4 it’s not a great shot, but I’ve won ASL 23, Under the Noel Trees, with a worst game ending shot.”
“In Rindis’ turn, he decides he doesn’t like the potential game loss in 6I10 and decides to shift flanks to the center, pursued by my mighty 50mm mortar who fails to get any effect, but goes on quite the rate tear. In town, things go horribly for Rindis. The close proximity of several 37L tanks, infantry, and an ATG is a grim reminder why you don’t go into built up areas without supporting infantry. I burn a tank in 3N5, kill another in 3U3 and 3P3 with infantry, and then burn the immobilized Matilda in 3N4 with Final Fire. One turn,and 4 Matilda I’s gone. I think I can take out the remaining two tanks without difficulty, but the matter may be moot if the Matilda II’s exit. In the only move I have left, I throw the SR I had planned to close off the 3Q1 area across board 4 and drop it on target on a Matilda II. It’s my only hope.”
Disaster at Beaurains, End British Turn 8

“Disaster! In my Prep Fire I lose radio contact, and the SR goes away. I malfunction my ATG in 3V2, and I swarm the two Matilda Is, hoping to clear them off the board and use my OBA to get the last remaining tank before he can exit (still my best TK #s, as the 88’s are effectively out of the game). I courageously throw a 247 against one of the Matilda IIs, but he breaks next to his target. A longshot, but I’m grasping at anything now. My 9-2 leads a squad to kill a 5th tank, but I lose a PAATC against the tank in 3V2, so one survives.”
“Excitement during the turn occurs when the immobilized tank in 4Q6 scores a possible CH vs my spotter. The agony! But on the possible hit subsequent dr, he misses. That would have been a shot to remember.”
“Should I be throwing my tanks at the Matilda IIs? Probably. But it’s 1:1 odds (the immobile Matilda II in 4Q6 is still very much a threat), and I expect to lose 1, maybe 2, before I can even begin to try and engage his mobile tanks. I still think my best odds are with the OBA. If I can just immobilize 1, he’ll not have the CVP to exit one tank and win without going back on the offensive against me. Hard call, and maybe a wrong one, but it’s my plan.”
Carnage continues on Board 3 as another tank dies in 3U3. The remaining Matilda I is in 3V2

OBA vs Armor. Would be more exciting if my SR in 4O1 hadn’t died.

jrv pointed out:
“In my Prep Fire I lose radio contact, and the SR goes away.”
“The SR doesn’t typically go away when you lose radio contact. Only if the loss of contact is voluntary. This can be important when you re-establish radio contact.”
“JR”
“Curse you, complicated rules that I thought I knew! Fortunately, my next SR was dead on target.”
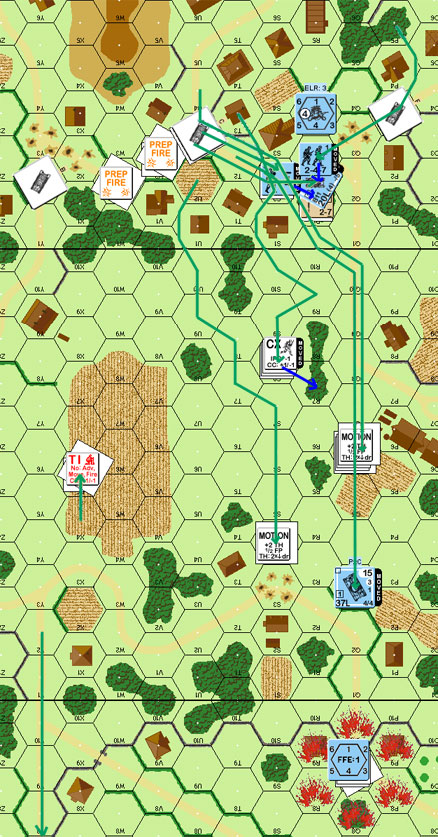
Patch’s last report and screenshots pretty much shows the game at the end of German turn 9. But there’s one critical thing missing: After the near-hit during British 8, the Immobilized Matilda II malfunctioned the main gun during German turn 9.
It didn’t have great odds to hit his FO to begin with, but with him sitting on top of the new exit path, this was not good.
Thankfully, I know that there’s no guns in the chateau, so I can use some CE again to zip through the front yard. Meanwhile, the lone remaining Matilda I finally manages to leave the board 3 village behind, though not board 3 itself.
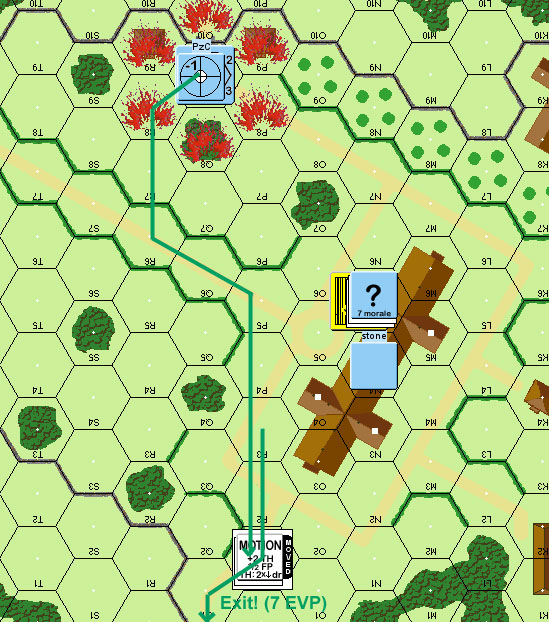
Situation, end of British Turn 9.
Flight of the Matilda I.
Patch puts down a new AR, and the SR lands only two hexes off. The FFE comes down on target for turn 10 PFPh, and rolls ‘3’ against both wooden buildings, but doesn’t manage to affect the tank. (No rubble or flame creation though.) The 37mm ATG on the south end of the board 3 village repairs, swings around to fire at the fleeing Matilda I, and gets a CH.
With that distraction out of the way, Patch sends the bulk of his remaining tank force running east to make a final mad attempt to stop the remaining Matilda IIs.
Since my crew had finally recovered on the south end of town, he froze it in place with a PzII, and parked a squad and a half next to it, while another squad and 9-2 took off after the tanks. He sent his first tank right through the hex of the Immobilized Matilda II (“The cheek of those Jerries!”), and parked a mere 4 hexes directly behind the one that was getting pounded by the OBA. He sent two others after it, but they couldn’t manage the same distance, and one parked on top of the disabled Matilda, keeping it from even trying to engage anyone with the CMG.
Flight to the east, German turn 10.
The CC was predictable, he ambushed the poor crew, and killed them (needed a 12 or less…).
My turn 10 gave me what I wanted as the disabled Matilda finally repaired the MA on the third try. And then they nearly broke it again on an ’11’ prep shot at the 38(t) that was cruising by.
This was now the final on-line session, and we started making goofs in our hurry to finish the game. Mine was that I forgot to BU the crew of the remaining Matilda II.
British turn 10 movement.
Patch attempted to take out the Immobile Matilda II, and once again was unable to affect it in DF or in his Prep with the ATG that was finally in LOS.
Then came Patch’s muff. The first thing he did was stop the 38(t) sitting on top of the Immobile Matilda. After that he remembered that he wanted to try for a smoke dispenser first. Personally, I consider even that a mistake. He should have moved that tank last, so that the Matilda would be unable to interfere with any other movement.
At any rate, I got a side hull hit as he stopped, and killed the tank. No crew survival. Then 4Q3 attempted sD, failed, and an IF shot from the Matilda killed it (crew survived though – first time in the game).
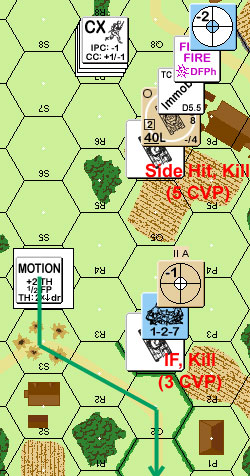
Good shot, sir!
The remaining 38(t) proceeded to stop one hex behind the final mobile Matilda II. It fired two shots, at him, but couldn’t get a hit while moving. (Should not have done that IF shot, disabling the MA and going under recall would have been a disaster.) The FO came down from his roost and survived a FFMO/FFNAM shot to end adjacent.
Patch’s 38(t) missed with the main gun, but managed a stun with the MG (I really wish I’d remembered to go BU), which couldn’t do anything permanent, but it forced me to stop, and put me under the ‘no manned MG provision’ for CC when the leader went in. Thankfully, he couldn’t manage a 2 -1 shot. Thankfully I passed the Mechanical Reliability roll (10), and he couldn’t hit with two DI shots and a final CC reaction fire, allowing the tank and leader to go off the board.
With a final EVP of 16, and 38 CVP, I scored 35 VP, not only enough to win, but enough to win under the original VP limit.
A very good, and very tense game. This one really came down to the wire.
There was some discussion recently about the German chances in this scenario. I could see several possibilities for them, and Patch used them all.
I’ll say I did not help my situation at all with the Matilda I entry. I hadn’t realized they were radioless when I set them up. 😛 For those, the only choice is the south side of board 5, they have to avoid the congested terrain caused by the village in the center of board 3, and should avoid having to platoon move over the two hills on the north end of board 3. That only leaves the south.
I’m still surprised that they lasted as long as they did without loss. I was starting to think they might actually get to board 4 when Patch finally got 5 of them in one turn. The Achilles heel of the Is is that there’s only a CMG MA, so the German tanks are invulnerable to them.
The key for the Germans is definitely to channel the Matilda IIs, force them to maneuver (which slows them down further), and take every low-odds chance there is to stop them. Patch killed two in CC, Immobilized one with a MTR shot, one with a 37L hit, and one with the OBA. Also, invite them to stop. There’s a 1/36 chance that they’ll never start again (didn’t happen this time, but I did roll a 10 and an 11 on Mechanical Reliability).
On the other hand, getting into a shootout with the Matilda IIs is a good way to lose tanks. Patch did it twice and lost two tanks each time. And that was with my Matildas more spread out than they really should have been. There was a continual see-saw of Patch disabling or killing a Matilda II I needed for an exit win, and then giving me the CVP I needed to be able to win with the remaining tanks.
“Lots to respond to, but Rindis covered things fairly well.”
“I’m not used to same-hex opposing units tactics, and that resulted in several mistakes that didn’t cost me the game, but certainly reduced my chances in the final turns.”
“With the last Matilda I gone, it was time to make a run for the two remaining tanks. I charged a 9-2 and squad down the board, ready to take out the immobilized tank in CC, before I remembered that he still had that coax gun, and running next to it in OG didn’t seem the best idea, given how close Rindis was in CVP to win. Rindis only needed to exit two tanks to win. I couldn’t get it down to just one exit to win as I had no chance of stopping the lead tank. Thus, I backed off.”
“When I threw my remaining 38(t) tanks across board 4, one ended up in the immobilized tank’s hex, holding his fire to the same hex. If I had moved the tanks first, I could have gotten my infantry adjacent unharmed. Error on my part, as this tank then repaired its gun and killed two tanks.”
“When Rindis repaired his gun, he’s right in that I should have moved that tank last. Again, just never occurred to me. I’ve so rarely dealt with these tactics that they cost me.”
“The game play rather fell apart as it became apparent as the game was down to the one tank having to exit. Everything that was on boards 3 and 4 sat there and didn’t move. I don’t think this narrowed attention hurt the game, but when I stunned the tank and opened up more attack opportunities, it does go to show that the show’s not over ’til the fat lady sings.”
“What do I think of this scenario? Now that it’s over, I think that it’s horribly out of balance. The Matilda Is are not at all necessary to win, and as I’ve seen in one AAR, they Matilda IIs can blow across the south end of the board and exit to win by turn 5. The Matildas are very hard to immobilize (Rindis shrugged off two immobilization hits due to UK Vehicle Note 26), and if you do DI a tank, it’s still there with its gun facing your armor. Rindis only exited two tanks for his win, and got the rest in CVP. It’s not that hard to do.”
“Despite my feelings about this scenario, I had a blast. You really had to think on this one, and I loved the tactical puzzle of the heavy armor vs small guns. I loved the mobility of the pieces and the wide map area, and after slogging it through Stalingrad, a mobile battle was a lot of fun. Can’t say I would have liked it as much if Rindis had made a mad end run, but how it played out was enjoyable.”
footsteps commented:
“Thank you, gentlemen, for another fantastic AAR. You should have your very own section for all of your threads.”
“Alan”
“Can’t say I would have liked it as much if Rindis had made a mad end run, but how it played out was enjoyable.”
I wouldn’t have liked it either. It seems to me that just doing the mad run for the east edge defeats the entire point of the scenario, which works quite well if you avoid just ‘gaming’ it that way.
“Thank you, gentlemen, for another fantastic AAR. You should have your very own section for all of your threads.”
Well, I do link to all of them (and a couple other things besides) on the ASL page of my site.
“Awesome. Now I’ll never get any work done.  “
“
“Alan”
Postscript:
This is still a scenario I remember clearly three years later. I thought the setup had a lot of potential, and I was right, it is a blast to play. Like “Escape to Wiltz” it is a pure meeting engagement scenario, and the sprawling physical scope of the scenario is something I’d really like to see more of, especially if it can be paired up with the fast play that this scenario revels in.
Discussion ¬