
J102 The Yelnya Bridge
I can’t remember how Patch and I decided upon our next scenario, probably we looked through the latest Journal (Journal 7) for something interesting. We actually ended up posting separate threads around the same time, so the beginning is a bit more redundant that normal, getting going in March 2009…:
Once again, Patch and I are doing something quite different than last time. From an early AH West Front scenario of epic turn count, we’re doing 4.5-turn recent MMP East Front action.
Sadly, I’ve decided this principle should extend to my own play. I’m making goofs all over, starting with my setup.
The Germans can either capture 3 buildings or exit 16 VP off the north edge in the 4.5 turns. There’s really only two areas suitable for exiting, and one takes them near the victory buildings. So, I ended up overly-focused there; especially as the secondary route would force the vehicles to cross a stream without a bridge.
I should have remembered that both of us lost our fear of Bog Checks during Pegasus Bridge. At least I had some idea of what I’d do if he did go that way. Because Patch looked at all the brown uniforms in the village and decided he wanted nothing whatsoever to do with it.
On the other hand, I really wanted to defend the village. I don’t like the chances of this mostly-conscript force going up against SS troops.
I like the spot I found for the ART. Good field of view, some cover. It’s been attracting some fire, but nothing’s rattled the crew yet. Sadly, I took a chance on an IF shot (had a decent chance to hit), and malfed the Gun on an ’11’.
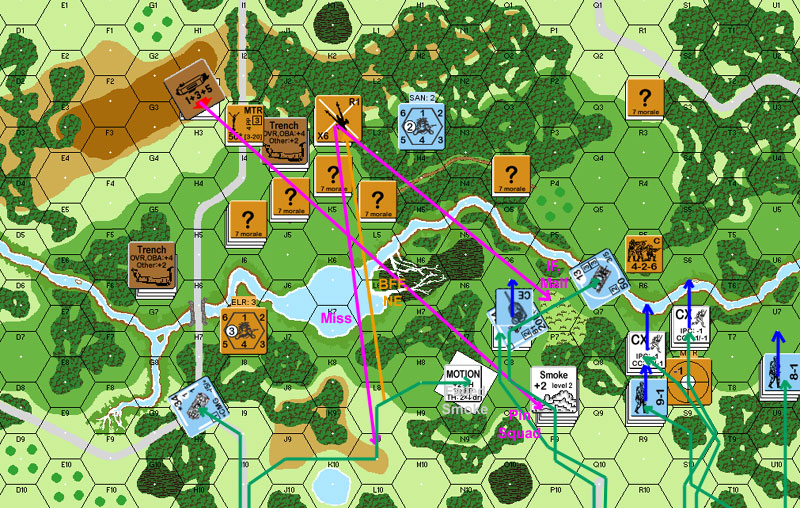
Situation, RtPh, German Turn 1.
My turn 1 was, of course, occupied by my redeploy to the east. Once Patch saw the Trench in G6, he felt sure that it had the ATG. Not a bad guess, I’d nearly put it there. So, I wanted to bug out, and I didn’t want him to see what was really there. Sadly, I completely missed a LOS, and Patch got to see the squad and Commissar anyway. Not only that, but I got so focused on that action, I completely forgot to move out the revealed conscript squad in R5.
Thankfully, all Patch managed to do to them is send them Berserk (it would have been a surrender, but these are SS). They also got a second ‘2’ on the next MC, but ‘zerkies don’t check HoB.
The other good news was the MA on his PzII malfunctioning. The bad news was him breaking my MTR team. I’m not sure I’m ever getting that MTR back. Oh and he revealed a dummy in P3.
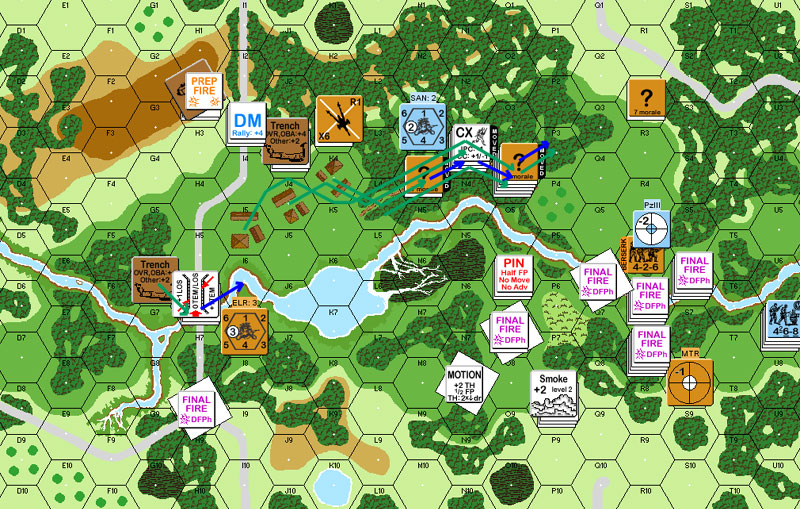
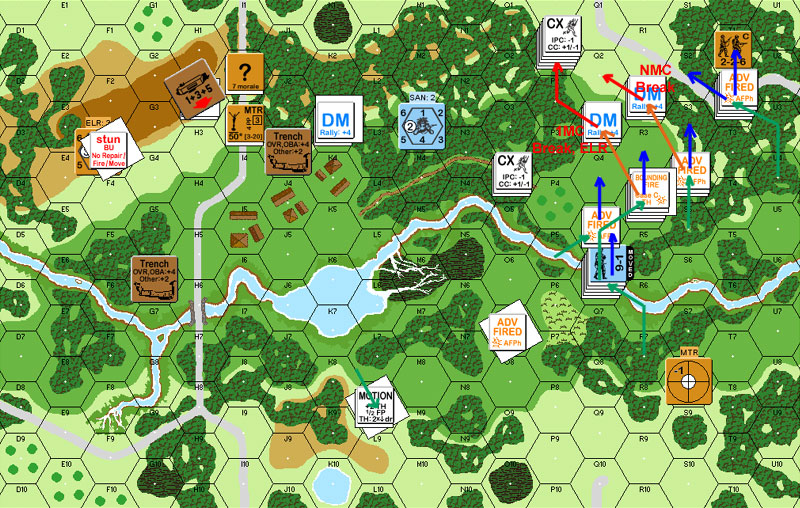
Situation, end of DFPh, Russian Turn 1.
Advice for anyone else playing this as the Russians: Don’t use my setup.
“Ok Rindis and I are at it again, this time fighting it out on the Eastern Front in the early war years. The scenario is The Yelnya Bridge, and Rindis has chosen the Russians on the defense. It’s an interesting scenario, with an odd mix of units and a heck of a board.”
“Victory conditions require me to take a cluster of three buildings, or exit 16 VP off the north edge. One look at Rindis’ setup, and I”m all for exiting off the north edge. There’s precious little to the east, so that’s my target. There’s only 5 turns, and the stream will make that difficult.”
“I entered the ACs first, and Rindis immediately revealed his 76 Art piece. He missed rate, so I abandoned my plan of sitting on L10 to interdict forces moving out of the village. The second AC moved to H8 so it could grab a LOS down the road and engage the Art on a different facing.”
“Next I moved the PzIII with a squad using Armored Assault. The goal here was to lay down some Smoke to screen my other units. Rindis pinned my squad from his bunker before I could get smoke out, though, so he was cut short. Looking at the rules, I see I made an illegal move and continued moving the tank after the infantry was pinned. Dang. Rindis IF’d against the tank and malfunctioned the Art, so my vehicles are clear for now. Other units made their way across the board, and I’ve a platoon hugging the eastern flank as it makes a run for the board edge. Downside here is movement is so dang slow.”
End German Turn 1

“Entering the Russian turn, Rindis begins the mad rush to reinforce the eastern flank. Lacking anyone to interdict, the Russians get into the woods and down the path without trouble. In the rush he completely forgets to move a 426 in R5. Seeing a chance to take a squad out of the war, I nail him with a 24FP +2 and send him into Berserk mode. Definitely not in the plan. On the plus side, I reveal a dummy stack and break his mortar HS, noting that Rindis appears to have deployed, which he can’t do with Russians. Naughty! On the bad side, I break the MA of my PzII (but get it back in German 2 Rally!)”
Russian Turn 1

“Several errors by both of us in this one. Not a good start. Rindis will go into his plan, but he told me that he thought the stream would be more of an obstacle, which is why he set up light over there. That may cost him, though he’s redeploying nicely.”
“On the plus side, I reveal a dummy stack and break his mortar HS, noting that Rindis appears to have deployed, which he can’t do with Russians. Naughty!”
Whoops! Flashed back to VotG, where there’s an SSR to deploy purely for MTR crews.
“So far I don’t think either of us can claim it’s our best game.”
“Maybe our rule errors will even out? :)”
Patch’s turn 2 was not what I expected. The Berserk squad took a fair amount of firepower before finally reducing to a HS. Everyone moved away from him. Both tanks Prep fired, while one AC crossed the bridge and wound it’s way up the hill, away from the road. The other one went into reverse and repositioned itself to look across the stream at the village.
The real problem for me is that his Prep broke my Gun crew. Now I have to get them rallied before I even get to attempt to fix the ART….
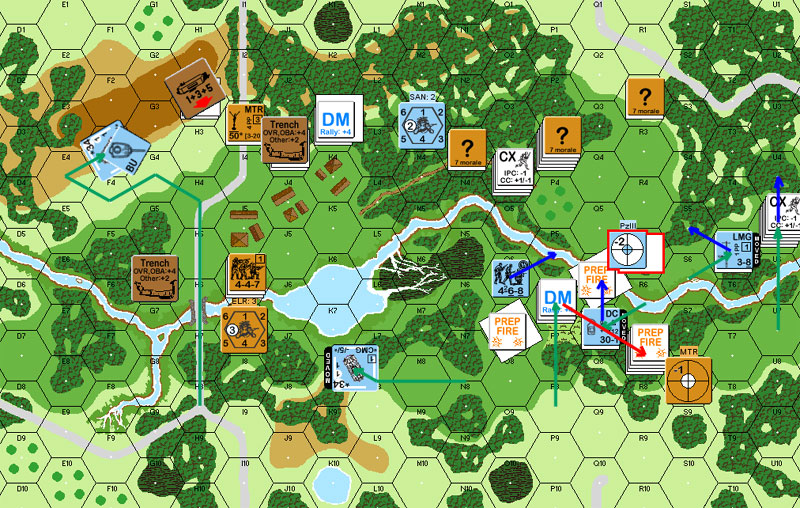
Situation, AFPh, German Turn 2.
As the ‘zerkies charged, Patch managed to roll decently high on a 24 +0, cowering and only generating a 2MC. I, of course, rolled higher to eliminate the HS.
Movement, again, consisted of my efforts to redeploy to cover the east-side exit. The Commissar and squad stuck in the stream from last turn made good time, with shots from the ACs not bothering them, and one causing a malf of the CMG/MA.
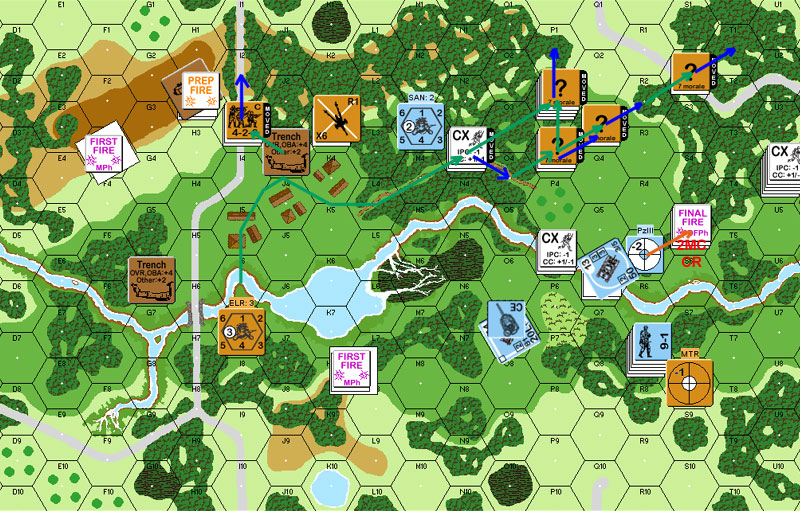
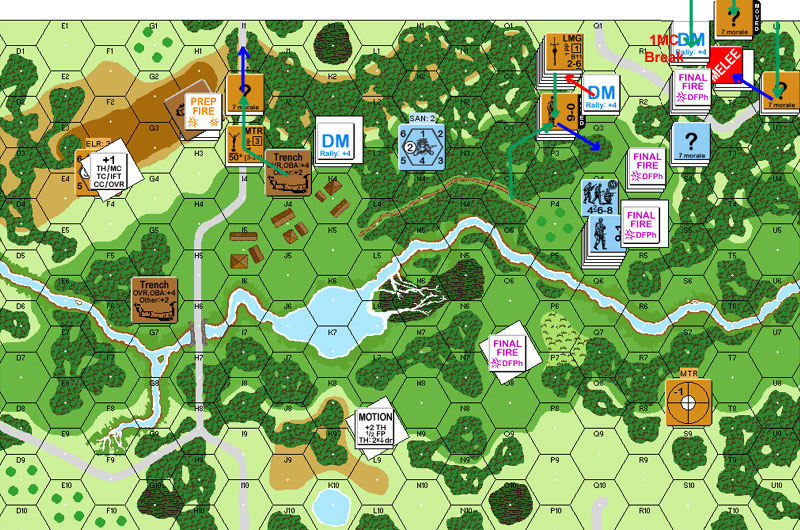
Situation, AFPh, Russian Turn 2.
And once again, we’ve gotten further, but dinner calls.
German 2
“Turn 2 makes hting evident that I didn’t do enough to get units into a position where I could fire at units in the glade across the stream in the east. There’s precious little I can see. The PzII takes on the Art crew and breaks him, knocking that pest out of the way for a while. The Berserk unit is in a horrible position for me, and is completely blocking my advance across the stream. My advance is effectively delayed a turn as I pour a ton of fire at the unit, succeeding in only reducing him to a HS.”
“In movement I throw an AC across the now open path to the F2 hill (I do miss the old hill ID numbers), threatening an exit. The second AC moves into position by the pond to interdict the 9-0 and squad, or fire on the Art piece, or the bunker. Nice spot. Defensive Fire nails a squad moving in the brush, but that’s all the damage I take. Though I liked the advance up the U column, I note that it’s seriously reduced my available firepower on the line.”
Russian Turn 2
“Rindis charges with the Berserk HS, but despite my continuing horrible DRs he dies. The rest of Rindis’ units slowly shift to try and stop my advance into the T1 woods mass. A 426 moves to close the I2 woods road and threaten an assault on the AC over there. My Defensive Fire does damn little other than keep the Art crew under DM and break the second AC MA on a 4 (-2) shot. >.<“
“Rindis has done a nice job of moving everyone east after I committed to that flank. I seriously erred in not having someone who could get fire into L4 and force them to eat residual fire or else bypass the woods through the more expensive woods hexes. This is going to go down to turn 5 for certain, and the easy eastern advance is developing into a battle.”
Patch’s turn 3 Prep just consisted of one of the ACs firing to keep my AT crew under DM.
Everything else moved forward. One group moved next to a concealed unit to find a HS that promptly caused a a PTC that they all passed, and couldn’t do anything on SFF. He then advanced a squad under armored assault with the PzIII towards the choke point in the trees, stopped a couple hexes away, and broke my concealed LMG squad with bounding fire.
Patch realized that the AC with the good view across the river in L7 had poor movement choices, and ended up starting in reverse, backing out one hex, going into forward motion, and turning it’s VCA twice to burn 33 MPs…. This caused him to end about where the PzII was going to go… so that ended up not moving.
Advancing fire broke the other guardian of the choke point, but did activate my sniper, which hit his leading AC. Pity it was a ‘2’ instead of a ‘1’….
In advance, the entire line rolled forward, but he only put a single squad into CC with my HS, putting the other squad and 8-1 on the tree-line looking across the way at my last meaningful bit of resistance.
Patch rolled a ‘6’ for Ambush, but I matched that with a 5 +1. He decided to try to capture the conscripts but failed, and I missed getting an effect by one….
Situation, after AFPh, German Turn 3.
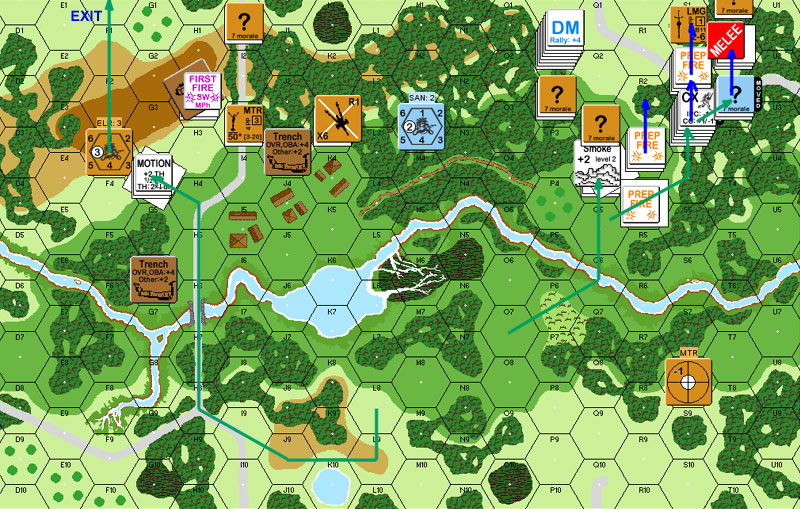
My Turn 3, and just what I needed, reinforcements. Patch was threatening to just stream everybody off through the east-side woods, so there wasn’t a lot of thinking on what I wanted to do.
Patch, sadly, managed to break one of the entering squads against the edge of the board with nowhere to go. He killed the surrendering unit, invoking No Quarter. He also managed to Reduce the squad that was still crawling across the open ground in Q2.
I pushed my new leader and a squad into the Melee in the hopes turning that in my favor while still keeping the third new squad in reserve in T0 to slow any attempts to exit. Sadly, this time he killed the HS, while my combined force couldn’t touch him.
Situation, after DFPh, Russian Turn 3.
For turn 4, Patch did a fair amount of prep fire, attempting to reduce the blocking forces, and thankfully wasn’t able to do anything. The first AC immediately exited for 5 VP. My DF had no effect, and everything advanced closer to the board edge, with a second squad going in to help the melee. He wiped out my troops on a 3:2, and I still wasn’t able to do any damage.
Situation, DFPh, German Turn 4.
This left my back against the wall, and very few options. Of the turn three reinforcements, a single squad was all that was left a turn later, and the only damage Patch had at this point was a malfunctioned CMG (which he wisely refused to repair). My crew finally rallied at this point (I think that was the only rally I got all game). And I preped the squad and leader in P1 in the hopes of getting lucky and stopping his force in S1 from exiting through the simple expedient of breaking them.
All I got was a PTC that everyone passed and a missed sniper check. The remaining west-side forces charged the remaining AC (with the malfunctioned CMG/MA), and I prepared a couple of advances to try to get into possible interdiction locations.
Then Patch’s DF broke the leader in P1, reduced the broken squad, eliminated the HS, and broke the other squad (in other words, 4 breaks for 4 on a 1MC). He then got a 4MC against the concealed squad in T0 and broke him on an otherwise decent roll.
This gave him 18VP that he could exit without me even being able to fire at him. I conceded. We did check the upcoming CC with the AC to see if I could get any satisfaction out of the scenario. Of the three units, only the 447 squad made the PAATC, and it couldn’t roll low enough to touch the AC. Laughter was heard as it went driving past the stymied defenders.
It’s an interesting scenario. The terrain is very different than I’m used to. I seem to have problems figuring out how to balance my defense when I have to defend against two approaches, but this is probably the worst one yet. I really let myself get too convinced that the east route was untenable for the vehicles. However, the path from one section to the other was obviously the key to how to set up for this, and I kept use of it solidly in mind throughout the entire setup process. This allowed it to be something less than a complete walk over (and in fact keep the pressure on Patch), as I was very successful shuffling almost everyone over to the new defenses.
After the last couple quick-playing scenarios (which we’ve really enjoyed), we’ve decided upon a much longer one. But Patch hasn’t played “Hill 621” for a decade, and I haven’t played it since SL, so it’s time to revisit it.
Postscript:
This was an extremely trying scenario for me, with nothing going right, starting with setup. I have to say with two off-board exit areas plus the village to defend, I just don’t know what the Russians are supposed to do here. I did generally have a plan to shift over to the secondary area if Patch went for it, which worked, but the infantry and no heavy defenses were no match for Patch’s SS troops. Back on the other half, the heavy equipment was no match for the German vehicles, allowing me to be defeated in detail in both places.
Discussion ¬