
PBr CG I “Who Are These Devils?” — July 15 AM
[Previous Date: 14 N]
After all the ‘fun’ the Axis gets trying to get rid of the British paratroopers and glider-borne troops on the 14th, the forces landing on the coast of Sicily link up and take over the area, preparing for the drive into the interior of the island. By now, I was somewhat punch-drunk, and knew I was in trouble no matter how you looked at it, and tried something bold. I set up my forces for an attack, hoping to force my way into town while he was relatively weak with whatever he’d paid the extra expense of on-map setup for. I also wanted to make another try at the pillbox at the bridge. If I should happen to get lucky enough to take it while he still had to get forces over the bridge…. We started out in January 2008:
“Boy o boy, are we overdue for this. Holidays and internet outages have played havoc with our schedule.”
“15AM is our next scheduled game date. I have chosen to attack (natch), and I purchased two Sherman platoons, two infantry companies, and an OBA battery. My goal, depending upon German setup, is…well… damned if I know. Take as much territory as possible before his forces get too large.”
Pregame Set-up

“Well well well. Rindis’ setup caught me completely off-guard. He appears to be counterattacking. Rather than seizing large amounts of territory, my immediate goal is to repel this attack. Instead of sending infantry to the west across the fords, I’m moving more stuff across the bridge and concentrating to the east. I can tell from the vehicles that Rindis has a pair of ATG on board, so I can expect to lose a few Shermans before this is over.”
“Prep Fire goes horribly, horribly wrong. I fail to strip concealment, even on the troops in the entrenchments by the town. I draw a red card for the OBA. Movement had better be better.”
“And…. it’s not. Rindis pops a tank on the bridge with an Intensive Fire CH, burning it. The O20 bunker is now shrouded in smoke. The small flanking force I sent west find the second ATG with the loss of another tank. The Shermans are living up to their reputation for catching on fire. I also find his two Mortars, one of which goes on a horrifying ROF tear (about 8!) against the N15 pillbox. If not for the bunker I’d have lost everyone in that hex. How the hell am I supposed to advance across this terrain and take those damn things out? The only good news is Rindis bought Stukas this day, but they failed to come on this turn. I throw two tanks into town, and two more to the east to deliver flanking fire against the units assaulting the town.”
“For German turn 1, Rindis makes his move. Objective, the O20 pillbox. His goals to grab that strategic location and seal off the bridge. His Prep Fire also goes poorly, and we enter his movement with no broken units on board. The Italians enter from the NE at great speed to assist in the town assault and draw me from reinforcing the pillbox. He assault moves through the vineyards to retain concealment, and I’m expecting some Adv Fire flamethrower shots. My Defensive Fire had better go well. And it does!”
“The units in the Q13 Entrenchment are eliminated when my MMGs go on a tear and deliver multiple breaks. To the east I strip concealment off several stacks and break a number of units. With my units across the river, several have no ability to rout are are stuck. There are far, far fewer SW in evidence than I had expected, and it suddenly strikes me that this is a depleted company. Hooray! A spotting round lands amongst the troops to add to Rindis’ troubles. To the west, an 8FP +5 attack strips a dummy stack. There appears to be no one to the west except for crews and what I calculate to be an Italian leader, 336 (346?) and HMG. I may have an opportunity there.”
Start of UK Turn 2

“Although the turn went well once it began, it was a comedy of errors as we began. My Turn 1 purchases were illegally set-up, and so correcting that threw my plans out of whack. Rindis thought he had to roll a die for entry of his units, and so they never came on-board until the Advance phase. Several entrenchments had to be relocated as they were in irrigation canals. What a mess. But the good thing about friendly games is we made the corrections with nary an argument.”
“Turn 2 I plan to further the destruction of the eastern Germans and shove the rest of my units across the bridge. I also plan a push to the west against the Guns. High-risk, but something must be done.”
“I don’t appear to have logs for Turn 2, so we’re skipping things a little as we move onto Turn 3.”
“Turn 2 opened well and I broke some units to the east, allowing me in Movement to interdict the broken units from Turn 1 and set them up for capture. In the west, I throw three squads into the river on a longshot assault on the Gun positions. I know this will be hampered by was is sure to be an Italian squad and HMG combo, but I do it now before his reinforcements arrive or not at all, and I want those Guns. I shove what I can from the southern bank covering force across the river, but not everyone makes it. I survive the turn unbroken, and capture several units.”
“For Rindis’ turn 2, he makes the game interesting by successfully rolling for the entry of his Fighter Bombers. The crossing of the rest of my units across the bridge just got… difficult. In his Prep Fire, Rindis breaks one of the units that forded the river and makes a serious attempt in the west to cause some damage. I fire most of my units before realizing the two squads with DCs haven’t moved yet. I’m saved when Rindis doesn’t feel he can support an attack and doesn’t assault. Masses of Italians advance from the NE, and his German reinforcements hightail it down the trail.”
“In turn 3, I resolve some of the DC squad threat by eliminating one of the squads, and intensive the Italian threat by breaking the MA of the tank I sent to meet it. I shove another platoon towards the southern Guns, supporting the fording units. Rindis demonstrates the power of masses of Italians with a 20FP attack, but the mods are +6 and the attack fails. He also rolls poorly for both of his FB and neither attack, which spells doom for the west flank. In CC I capture an ATG and a Mtr and kill a crew, delete another dummy stack, and finished off the leader to the east. There’s now a lot of Brits next to that lone Italian HMG, and I’m hoping my luck continues on that end of things.”
“We’re stopped for now on German turn 3. More to follow!”
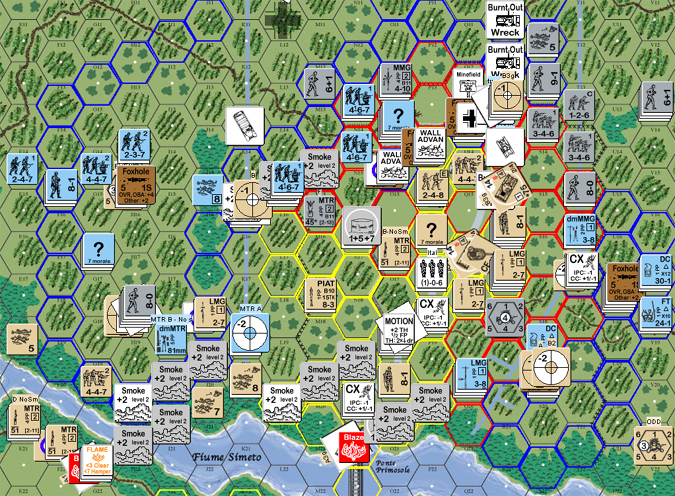
End of UK Turn 3. Movement over the last turn shown in nationality colors.

Thanks, Patch for continuing the reporting while I’ve been neglecting my duty.
Just got through the bottom (German) of turn 3. Patch had a poor DFPh, which is no end of relief for me. The reinforcements are starting to move into position, and the returning 10-2 has actually managed to generate a PTC already.
In the north, things are stable, which means he’s not about to make any big thrusts, but I’m not really pressing him to send extra troops up there. I’ve snuck an Italian squad into the foxhole line, but I don’t have much hope for his chances of living.
The west side has just weathered a reasonably big crisis. It could still fall apart, but I’ve got some good troops about a turn away now. Patch grabbed one of my ATGs and destroyed it, but I broke the guys who grabbed the dismantled 81mm MTR before he could do anything with it. (And at 5 PP it’s staying put for a while.) On the other hand, the other ATG refuses to move, and I really need to shift it away from his infantry. And as Patch knows, there’s an unseen 88 and pair of 75mm INF somewhere….
The east side is in trouble. The early attempt to grab the O21 pillbox failed, and bled the German troops in the area pretty white. It was a big gamble, but I really wanted to close the bridge if at all possible. Even so, there’s enough firepower out there that he has to be cautious when leaving the village, so he may just let me hang on. Of course, he does have one of my flamethrowers now.
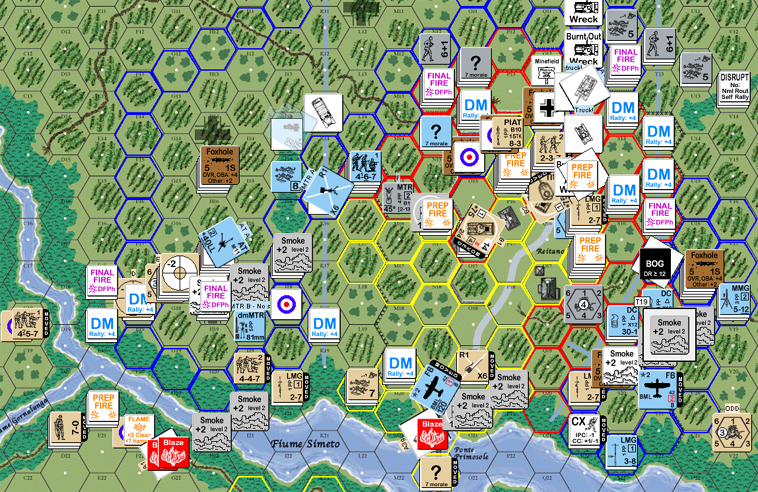
Situation, End of German Turn 3.
We’re now through most of British turn 5, and it’s still being quite an adventure.
In the east, Patch is doing all too well. In fact, the Pioneers that started there must be one of the unluckiest elite German formations ever. They came in depleted (something Patch figured out long ago-from the lack of DCs, if nothing else), and have steadily taken losses during the entire date. They’re down to a squad and a half (the HS is broken) and two leaders.
Patch was put out when I self-broke the HS and it retreated out out of its foxhole with it’s MMG in the face of two adjacent British squads.
This turn isn’t looking any better. He’s got a Sherman (Bogged) next to the remaining German foxhole, and a squad that will presumably move adjacent in APh.
To the North, things aren’t going much better. The Italians just can’t take the firepower he’s putting out, and can’t really touch the British. So far, he’s been mostly unwilling to leave the protection of the village, but he’s about to sweep out the middle canal line.
In the West, things have been… better. Patch has been trying to get at H18 the entire time. It’s strategic point, and there’s a dismantled German 81mm MTR next to it, if he can just hang on to it long enough. He’s possessed it at least twice, but his men keep breaking, and it’s too heavy to rout off.
One of my fighter-bombers managed to kill his leader in the area, and my MTR managed to CR/break the nearest squad, but now the MTR has malfunctioned, and the Italian HMG that’s been holding the area has been removed by the conscript crew getting too eager with it. And a squad Patch sent around the flank turned out to be headed to a new objective hex in C18–which is going to put him on the north bank in there no matter what else I hold.
And my first two OBA draws were red cards…
This is Turn 5, so I can always hope that this will be as short as the last date….
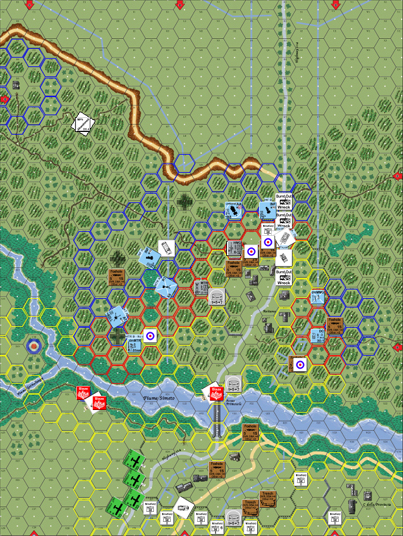
Situation at end of British Turn 5 DFPh.
End of UK Turn 5
“I’ve shredded two platoons in an attempt to knock out Rindis’ guns to the west. I nailed one ATG, but the 81mm Mtr has been the bane of my existence. I’ve picked tehe bloody thing up three times, but cannot survive to destroy it. Now that the HMG is dead I’ve dived in again with a 447 where 458s fear to tread. I’ve also shuffled a captured flamethrower to the north wall, daring Rindis to try for those abandoned Italian MGs. As he has noted, I’ve finally worked a squad west to a new Strategic Area at C18, opening up the west flank.”
“In the east, the covering units have finally died so I’m making a push out of the buildings against the critical U17 foxhole. I know there’s a leader and an HMG in there, but have no idea if it’s assembled or not. I’ve driven a tank next to it, and bogged, but the foxhole is now open to Point Blank fire, and vulnerable. In turn 6 I will have 4 squads adjacent to it with a captured DC, and HMG or no, someone is bound to get in. My two HMGs are positioned to provide some, though limited, support against his fighters. Now on to the first End of Game dr!”
“Awww, man! Someone get that fat lady to shut up! I need Act III!”
“15AM has ended on UK turn 5, darn it, leaving me in a bit of a spot. I’ve a bogged AFV in No Man’s Land, I’ve not the opportunity to pick up that dang Mtr and kill it, though I did retain the J18 Strategic Location, as well as the one with the current location of the 81Mtr, so I guess its mine? Yay!”
“Things to note: The Italians are terrible in this campaign! They posed a threat early on, but once they started breaking, I knocked them down faster than Rindis could rally them. As an example of how vulnerable they are, back around turn 3 or so, Rindis tried rallying a stack of two broken 336s. The first one rolled a “2”, but on the HoB table surrendered. The second 336 also rolled a “2”, and also surrendered! What can you do with forces like that? (Personally, I pointed and laughed. :)) )”
“On to the refit phase and 15PM. Three of Rindis’ guns (two 75mm INF and the 88L AA) never fired, so I can’t predict the exact set-up area, but there’s some definite pluses in my favor.”
End of 15AM Date

That does it. From now on, I’m just going to have to assume that the scenario will be over the first time Patch rolls.
Edit: and here’s the post 15AM Setup Areas:
[Next Date: July 15 PM]
Discussion ¬