
HF4 Liehr Launches First
After Unhorsing Patch, we went to the next Hatten in Flames scenario. Both sides are preparing for a new attack on the morning of Jan 10. The Germans get going first, and attack into the teeth of American resistance.
A little too in the teeth, in this case.
I had the Germans, who have thirteen squads, two late-model Pz IVs and two Panthers. The Americans are defending with ten squads, two each MMG, MTR, BAZ, and a pair of immobile HIP M10 tank destroyers, with another pair entering on turn 2. The Germans are trying to get six buildings near the J27 crossroads in 5.5 turns, and get credit for taking I28 early, and having more functioning vehicles at game end. (You know, I hadn’t really contemplated til now that they do have to be Mobile, so the at start TDs don’t even count.)
I eventually decided to follow the prodding of the victory conditions, and move on the north side of town, hoping to have a shot at I28. Two of the tanks and some infantry would attempt to hold defenders in place while I raced towards getting access to the H26 area.
Patch had one good shot, which of course was at a 9-1 and two squads. Thankfully, the 1MC only battle hardened squad and generated a hero. But, it made me a bit more cautious on the rest of my moves, which was something I probably couldn’t afford on this plan. The Panther parked in its assigned space overlooking the town, but the PzIV went slow for armored assault on the next stack through the vulnerable area, instead of parking in B23.
In Final Fire, Patch got several hits on D20 with a MTR, but couldn’t get an effect. Return fire from D20 broke the MTR HS, and revealed a concealed squad, but my lead Panther also malfunctioned its CMG in AFPh. In CCPh, Patch revealed a TD to prevent “?”… in B23! (My original movement plan would have gotten very exciting.)

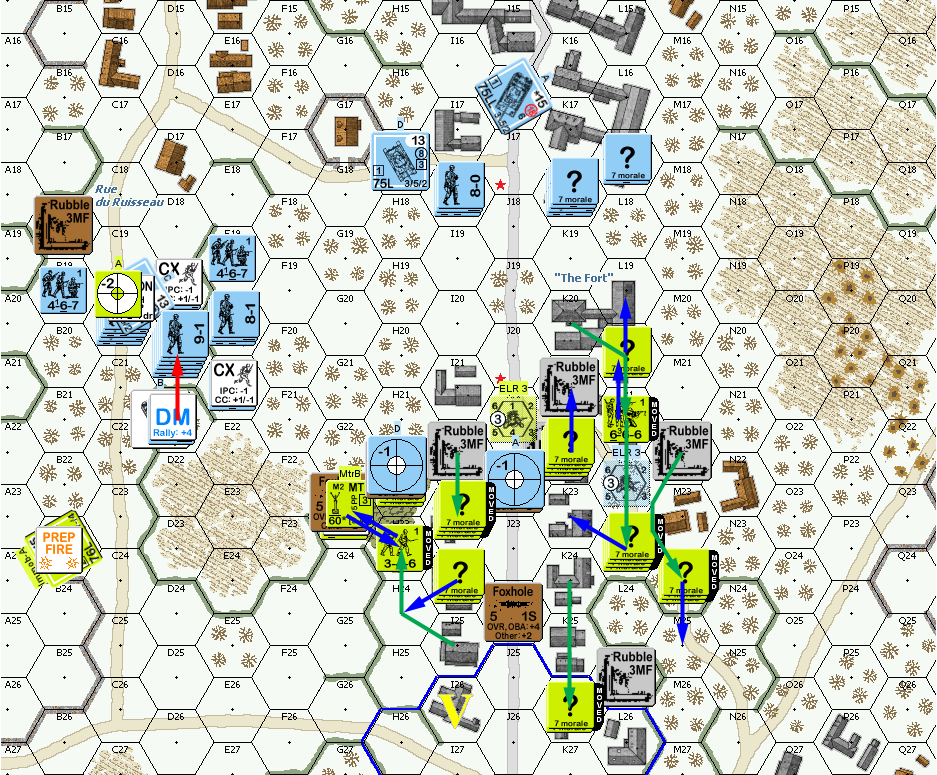
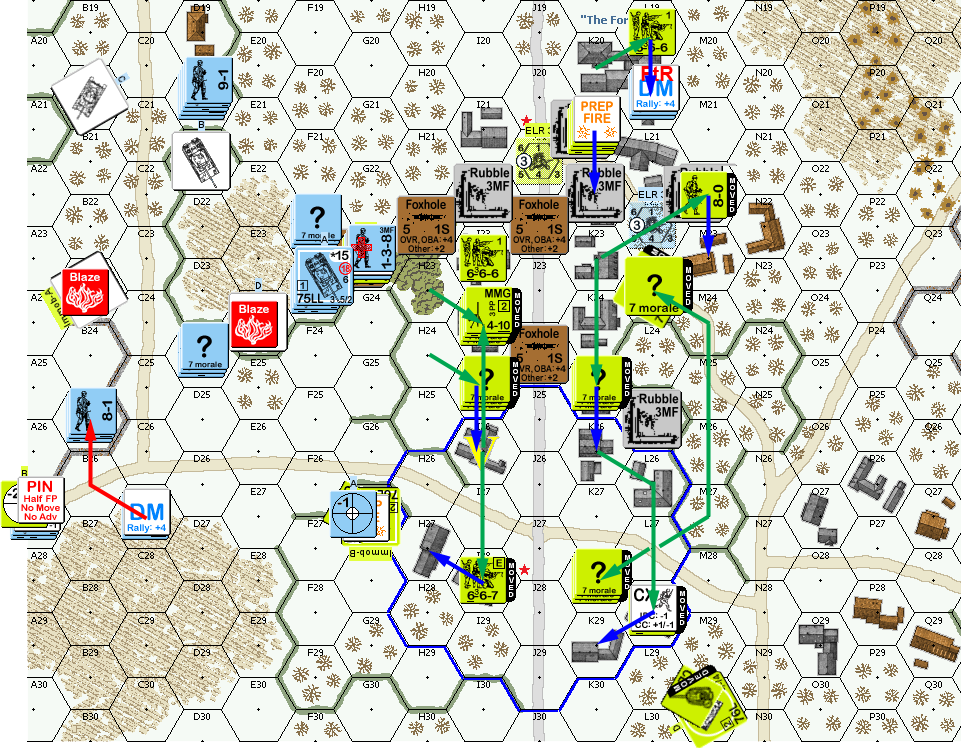
Situation, German Turn 1, showing the full map area. North is to the left.
Patch’s HS self-rallied for his first turn. Prep naturally killed the Panther with a side shot, though the crew bailed out but broke from a AAMG shot, and then he got two Acq on the Pz IV with ROF and an IF shot. Past that, he pulled out of sight, and I only had one big (24FP) shot at his TD, pinning the crew.
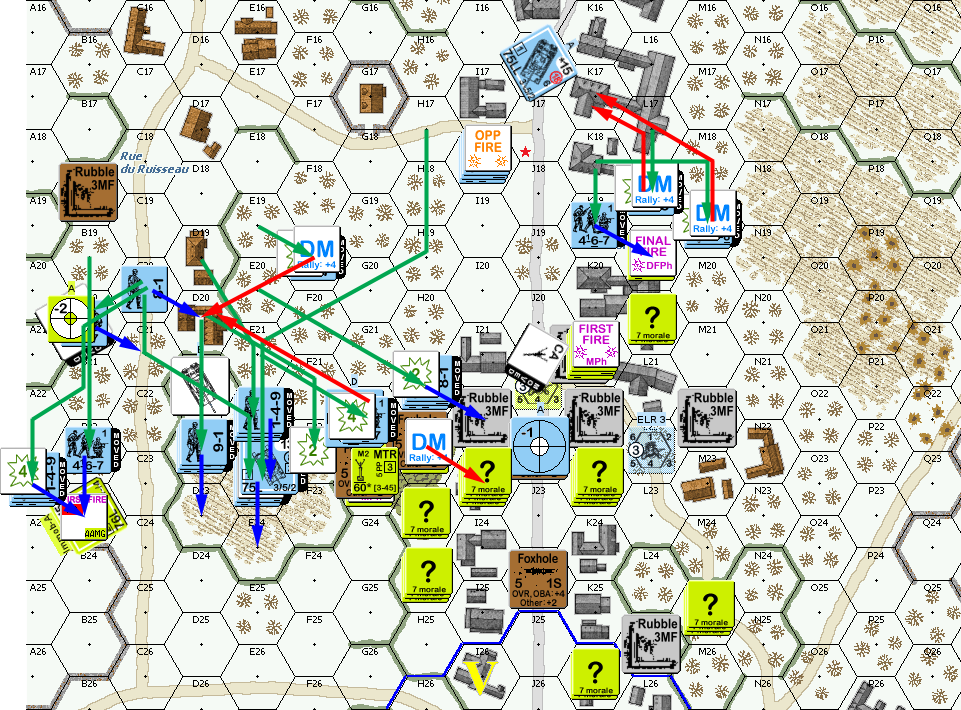
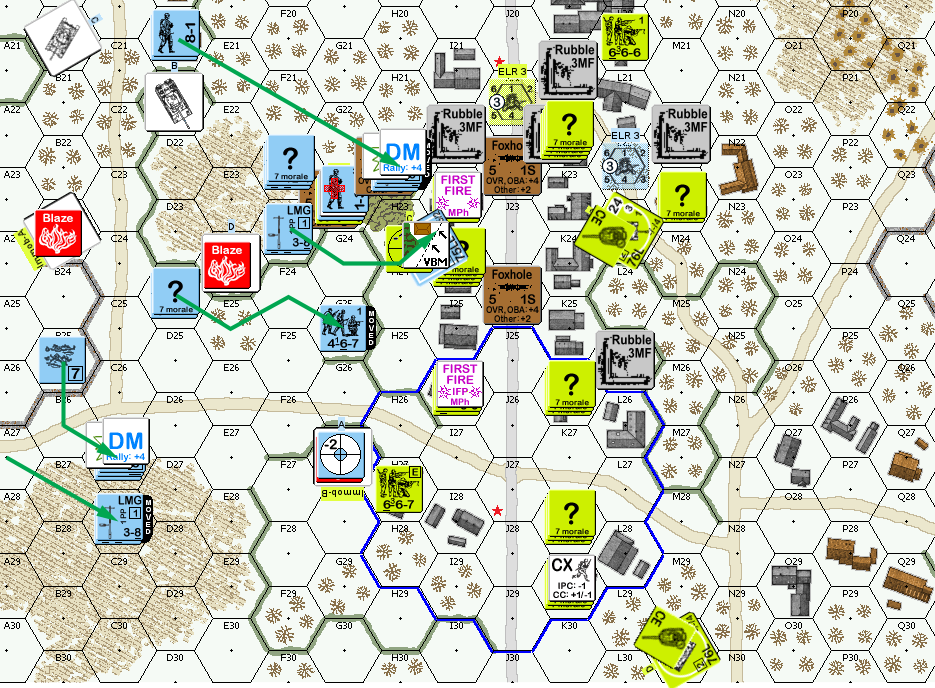
Situation, American Turn 1.
The Panther crew died for my turn 2 RPh. I had three operations for the turn. First was getting the TD, and I moved a couple squads adjacent to it, and he fired the AAMG at the second one… generating a hero on a 1MC. But he still nailed the in-Motion PzIV when it attempted to find a spot to return fire from, though that crew also survived. On the other flank, I put pressure on the L19 building, but lost a HS to a K/2 with a broken squad and a half. In the center, I advanced on the foxholes in the tree line, and lost a squad+LMG to a 1KIA. But, his squad broke to FPF, leaving just a HS facing me who broke one of mine in DFPh.
My advancing fire pinned the TD crew again, and the squad in L19. I decided to take on the squad in L19 (4:6…) to tie him up for the next turn, which is what happened. On the other flank, both squads passed PAATCs, and burned the tank destroyer.
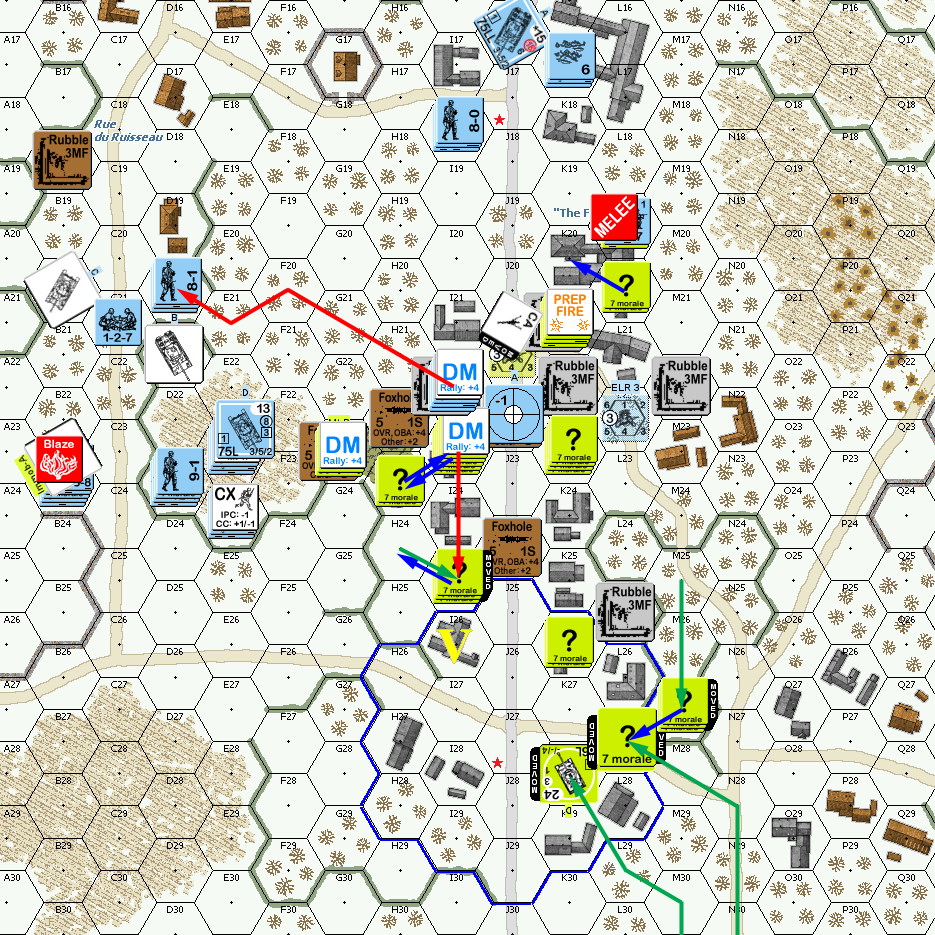
Situation, German Turn 2.
The reinforcing tank destroyers set up on the M and N columns, and I rallied a squad and a half in D20. K21 prep fired at the rubble I had just occupied, pinning my 8-1 and breaking the squad. I ELRed his HS in G23 as he tried to pull out, and then eliminated him during final fire. I fired into the L19 melee, and pinned both sides (slightly better, and I would have broken both sides…). My MMG in in I18 managed six shots, but everything after the first was no result. Thankfully, Patch didn’t want to risk a second squad in the hex, and the melee continued.
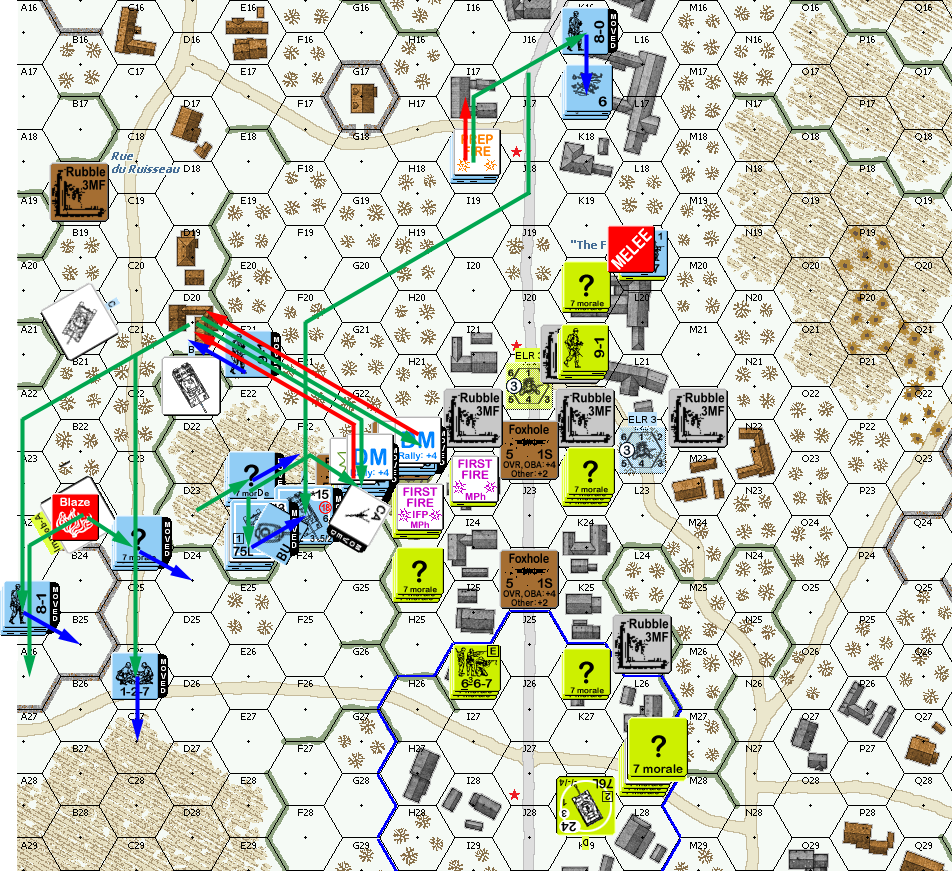
Situation, American Turn 2.
My self-rally in K17 failed for my turn 3 RPh, but I rallied the squad and leader that had just retreated to D20, and Patch rallied his squad in I26. I prep fired into the melee, but failed to do anything this time. My attempt to get into the G23-H22 treeline ran into too much firepower, and two stacks broke including reducing a squad and wounding a hero. This was also to cover an attempt to get around the flank further out so I could approach the victory area directly from the north. As part of this, The tanks redeployed to the hedged area in my front line (I also figured that it was likely that the other HIP TD was set to support the south side).
Good news was that Patch malfunctioned a MMG during DFPh. But he also broke my MMG squad in I18… and revealed the last tank destroyer in G27, who promptly burned the surviving PzIV. He then turned his attention to a lead squad in the north and pinned it. In desperately needed good news, the L19 melee ended with me rolling a ‘2’ to eliminate the American squad and withdraw into L20.
Situation, German Turn 3.
Patch repaired his MMG, and I rallied one squad in each of my rally points for his RPh. The K21 MMG fired on my melee veterans and ELRed the squad, though the new 8-1 was unphased. The TD picked on my northern flank, pinning one squad again, and breaking the ex-PzIV crew. Patch mostly skulked out of sight, but I was surprised to see one of the mobile tank destroyers move to back up the very western edge of the town (admittedly, the Panther was unlikely to get there), while the other moved to the south side of the main road, east of the crossroads.
Naturally, the second immobile one was burned by the Panther, but that was my only attack. My broken squad in L20 died to FtR, while the broken crew got behind a wall. Patch attempted a 6:1 CC against my 8-1 in L20, but I got Ambush, and withdrew out.
Situation, American Turn 3.
I rallied the HS in K17 and a 8-1 in D20 for my turn 4 RPh, but nothing else. While there was still three turns left, pushing Americans in stone buildings roughly six hexes was a tall order. So, I continued the advance, getting another couple of squads, and their leaders broken, and once some of the American line had fired, moved up the Panther, planning to lock I24 down while also facing the TD across the street. It was risky, but I needed to get things moving.
What I didn’t consider is just how narrow the front aspect is while in bypass. I consider it too friendly normally, but then it’s very narrow while in bypass, and the TD had a side shot as I came around the corner of the building. Even with a +3 for limited LOS, Patch got a hit and killed the Panther
Situation, German Turn 4.
Afterword
At that point I conceded. I had about four intact squads at this point, and was counting on armor support to make progress at all. There were probably better ways to go about this plan from the get go, but I had been frustrated.
My instincts had been screaming at me to go right/south. I eventually talked myself out of it because of the victory building, and the fact that the orchard gets mighty thin on that side of the village. But, there was a lot I liked about that approach. The outer buildings and hedges offered a lot of short-range protections until I got to the main victory area. The main stumbling block would be “The Fort”. But with two tanks and a fair amount of firepower concentrated on it, I could probably force Patch out without wrecking a flank to do it. Then, it would come down to if I could take the far side of the hedges before Patch got in there.
The scenario itself is very interesting, as all the Hatten ones have been so far. Patch, as ever, is not someone I can count on to make any mistakes. And not moving the PzIV to its assigned position turned out to be a mistake. It would have revealed the first TD early, and I probably would have lost one, but not both tanks to it.
Discussion (2) ¬