
SH169 Incident at Morkedia
After our latest fight in Hatten, Patch and I turned to SFB for our next main fight. Patch settled on an unusual fight with the Jindarians as our next scenario.
In “Incident at Morkedia”, a Jindarian caravan does a rare unprovoked attack on a small settlement, apparently after supplies. They have three of their asteroid ships (a CA and two CLs), while Federation forces show up for the defense at the start of turn 5 with a CA and CL. However, the settlement is well defended with a FF and pair of POLs on hand, along with a mobile base in orbit and a pair of ph-4 batteries, with a mining base and military garrison at the settlement.
The real goal is for the Jindarians to win control of the surface, bring a bunch of supplies up to their ships, and then get out again, with victory determined by how much they grabbed. I never even got close to that, and didn’t even get to the point of really worrying about it, because I had enough problems dealing with everything else around. But, we did get some practice with a lot of rules we’re not used to, starting with the Jindarians themselves. But ground bases, atmosphere effects, and the like are not things either of us is practiced in.
The Jindarians are pretty different on their own. They’ve been living in asteroids for millennia, and their ships are their homes. They only have minimal shields, but have lots of armor representing the bulk of the asteroid for each shield facing, and can even repair a certain amount of the armor during the scenario (and the shields at the same time, so they can potentially get a fair amount of protection back in one turn). The interiors of the ships are protected by special rules designating that none of them have a standard layout, and ‘anti-transporter fields’ that require power to operate, each cover one shield facing, and are hit on flag bridge hits. They have a few option slots, which are limited here to mostly cargo and hull, with one set of barracks. There’s extra fluff in fabrication and works boxes (destroyed on lab and cargo hits respectively). Shuttles are plentiful, and weapons are powerful, but few in number; movement costs are lower than expected of their class (and therefore much lower than you’d expect of a flying rock), but power is inadequate even for the low MC, making them overall power deficient.
Total armament across a CA and two CLs is nine WRGs (warp-augmented rail guns) and ten phasers. With those classes, I’d expect eight to ten heavy weapons (and the WRG is a good one), but a minimum of fourteen phasers, they have the Fed problem writ large, with a few internals compromising phaser coverage. Worse, they’re evenly distributed in various arcs, so there’s no good concentration of firepower to be had.
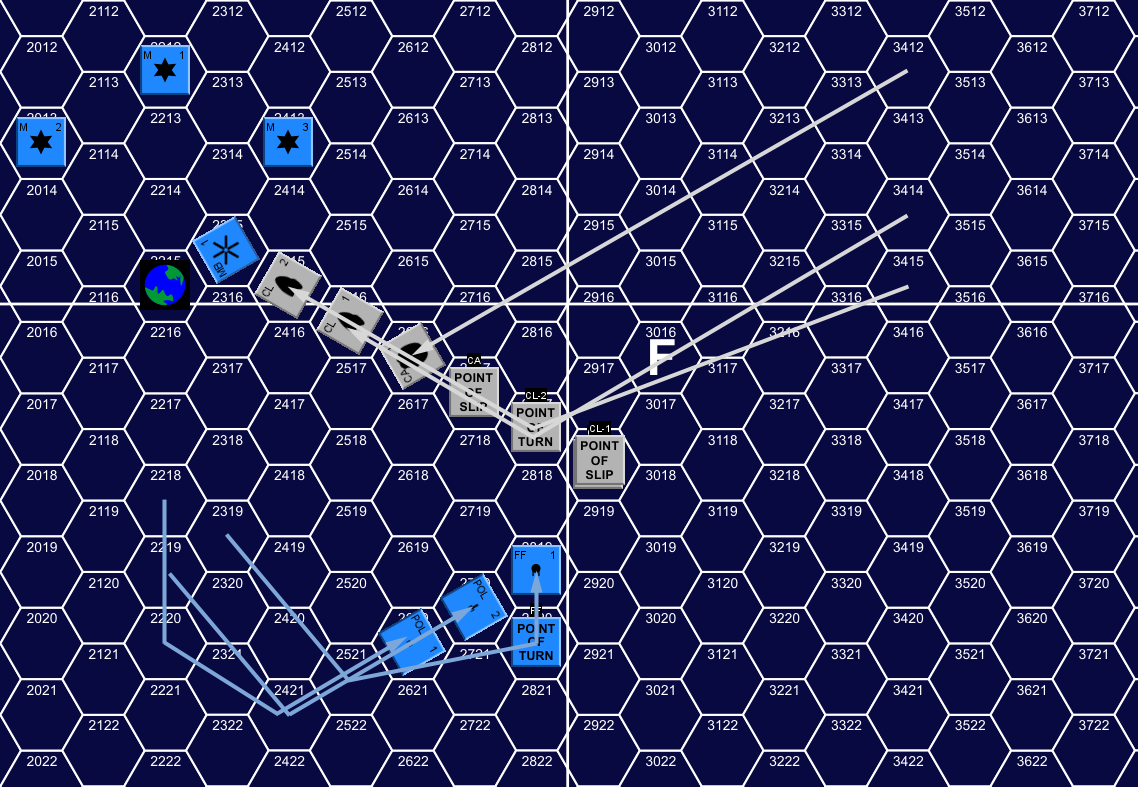
Once we sorted through a few difficulties in the rules (generally dealing with small base operations), we got going with my speeds meant to get me near the planet in one turn (20 for the CLs, CA 18), while the Federation ships cruised at somewhat lower speeds. Patch started with an instant minefield to interfere with those plans by putting three transporter bombs three hexes each from the planet, and then transported a fourth on impulse 3. The Federation ships then left, and later started swinging around onto my flank. The CLs stayed together and were on final approach to the planet by the end of the turn (taking a transporter bomb on the way in) while the CA cruised straight ahead all turn.
The two ph-4s fired on the CA as it dropped below the horizon on impulse 25. At range 7 they did 23 damage to punch through the #1 shield and do 13 to the armor (about a quarter of it). On 28 the two CLs each fired a WRG at the FF, with one hit through a +1 shift to do 17 damage (at range 4; the WRG has a scarily flat damage and to hit curve, with the to-hit dropping every ten hexes and the damage dropping every five, so that range 1-5 is all 5 or less to hit with 17 damage), and nearly collapse the #6. The next impulse another WRG fired and hit to do 14 internals to the FF, while two phasers from it nearly got the #5 shield of one of the CLs. On 30 a POL fired a photon at the CL but thankfully missed. On 31 the lead CL crashed into the minefield knocking out its #1, and the MB followed up with 2xph-1 for another 8 damage to the armor. On 32 the MB’s orbit brought it to range 1 of the lead CL, and it fired bearing ph-3s to do another seven damage to the armor, while the CL hit it with a WRG and 2xph-1s for 25 damage, leaving shield #5 at one box.
Turn 1, Impulse 32, showing movement from 16 on.
The Federation ships all went speed 12 for turn 2; one CL went speed 1 to get itself parked over the planet while the other went speed 10 to deal the ships. My CA plotted to pass behind the blind side of the planet so it could park over it from the other direction at the end of the turn. On impulse 2 (after sorting ourselves out in a new session), the adjacent CL and MB fired at each other, with the MB doing 17 damage to chew up most of the #1 armor, while the CL’s WRG, which hit for thirteen internals, taking out a pair of phaser-3s. The next impulse, the other CL fired a WRG for 17 internals on the MB, taking out the special sensors.
On impulse 7, ph-1s on the MB recycled, doing ten damage to the CL, causing internals, hitting one warp and one phaser. On impulse 8, the Fed squadron swung around, and one of the POLs got a a photon hit on the CA to knock down shield #5. My mobile CL was too slow and clumsy for what was needed and took itself out of the fight trying to do a 180 while the Federation squadron came back around through the minefield, and started launching shuttles near the end of the turn. One of the POLs did four more damage into the slow CL with a phaser on impulse 30. The CA came into view on 32, and the the ph-4s immediately fired at it, doing 30 damage to take out about 2/3rds of armor belt #3. The other ground-based phasers (-3s and -2s) hit the CL for 31 damage, finishing off the #6 armor and doing 17 internals, reducing it to 6 power. The CA fired bearing phasers and WRG at one of the ph-4 bases, crashing the shield, taking out hull, damage control, and excess damage (small base damage allocation is purely at the owner’s discretion). The forward WRG fired at the FF, which had presented its down shield to the CA, and took 17 damage as internals, crippling it.
My mobile CL went speed 8 for turn 3, while the other two stayed still and paid for a little warp tactical. I had started kicking shuttles out at the end of the previous turn, and this continued here. However, Patch had his shuttles out first, and as a decent ‘fighter squadron’ started picking off my shuttles before they could get to the 8-impulse delay to fire themselves.
Worse, on impulse 4 one of the POLs tractored the immobile CL. Since the actual move cost of the CL is 1/2 (instead of the normal 2/3 for a CL, much less something higher for being a flying rock), this worked out to a working MC of 5/6, and his speed 9 POL was down to 3. But, more importantly, the CL was not able to launch any more shuttles. The CL fired a WGL and phaser at the POL, but missed with the WGL, and so merely did half the #4 shield to the POL (a hit would have been 10-12 internals, which might have managed to disable the tractor beam). The good news was that you can’t drag something into an atmosphere with a tractor beam, so Patch had to tow me away instead of slamming the rock into the planet at 3c (which would have been pretty rude to the colony). The FF got a shot on the CL with the remaining photon for a hit through the down #6 for another power hit.
My CA fired a phaser at each ph-4 base (that was a mistake, I really needed to concentrate on the first one and finish it off), doing 5 points to the first base, knocking the rest of the fluff, but didn’t penetrate the shield of the second. The ph-4s fired at the CA, doing 35 damage, 27 of which got to the armor. The various ph-3s on the planet and shuttles teamed up to auto-kill the bulk of the shuttles I’d already launched. I then tried a Hit & Run raid on the phaser, but failed the attempt. Things like that are something we need to be paying more attention to in SFB, and I was more than desperate enough that I didn’t have any guilt over ‘springing’ it on Patch. And without special boarding parties, it’s a 1/3 chance to begin with. I didn’t bother with a follow-up attempt, since he’d obviously do reactive guards after that. At least the boarding party made it back.
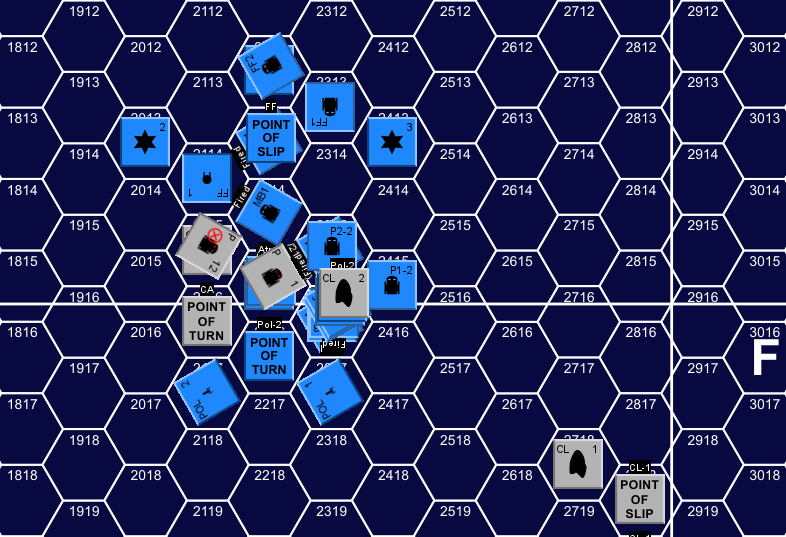
Turn 3, Impulse 11. The planet is under the shuttles in 2215. This is after Patch got rid of most of the shuttles I launched.
On impulse 11, the FF crossed into arc of the CA’s remaining unfired WRG, which hit, along with the front-left phaser for three internals through the #1 shield, all power hits. The tow put a down shield/armor of my wrecked CL on the MB, which fired 4xph-1s on impulse 22 for another 20 internals, taking out all control spaces and one of the WRGs. And a lot of hull. On impulse 30, the other POL swung around the planet and tractored my CA (it has the unexpected move cost of 2/3, making for a simple 1 MC together). On 32 the POL slipped out, shifting the CA into range of a transporter bomb, and even at our low practical speed, it went off, damaging the #6 armor (and taking out the shield). My good CL came adjacent to the planet, and fired on the second ph-4 base, knocking down its shield, doing two hull.
The CA won a two-point tractor auction going into turn 4, while CL-2 remained tractored. I only had minimal movement (1 for the CA to potentially get back in position, tac warp for CL-1, and, after tractoring effect, speed 1 for CL-2). CL-1 hit the first ph-4 base with a phaser, bringing it down to half power. The ph-4s and all other ground-based phasers fired at the CL for 82 damage, which after everything, turned into 35 internals, mostly bulk, but it did destroy the facing weapons and five power.
The next impulse, a shuttle fired for for more internals, taking out a second WRG. The CL taced to bring another phaser to bear, and took out a pair of ph-3s on the first ph-4 base. And I finally remembered something I’d needed a couple turns ago. Jindarian ships are generally deficient with seeking weapon and fighter defense. But the WRG has a rapid fire mode to cover that gap. In this mode, the WRG rolls against every small object within four hexes in its arc of fire for eight impulses. Drones have a 1/3 chance of destruction, plasmas take damage, and shuttles have a 1/2 chance of taking 2d6 damage each impulse. There were twelve shuttles in arc and range, with three of them destroyed the first impulse (#2), plus one crippled.
On impulse 3, the shuttles fired while they were still alive, doing minor damage to the CA, and four more internals to the CL. Three more shuttles died to the WRG. On impulse 4 another shuttle died and another was crippled. On impulse 5, POL-1 dropped its tractor, since Patch now needed its firepower, and one of the crippled shuttles was destroyed. On impulse 6 the last intact shuttle moved out of arc, which left one crippled shuttle in the line of fire, which was finally hit and destroyed on impulse 8. On impulse 25 POL-1 got to range 2 of the CA, but missed with the photon and the phasers didn’t penetrate armor. POL-2 circled around during the turn and got a range-2 shot at a down shield of CL-1 on impulse 29, and did 23 internals to get the third WRG, most of the works, and all but five power (largely center warp).
Afterword
I called it at that point. I hadn’t gotten anywhere with the actual goal, both CLs were effectively hors de combat, the CA had nearly lost the #3 armor, and now the big Federation ships were going to show up. So, complete, abject, failure on my part.
Possibly, the best idea would have been to just charge straight into the planet, and unload everything I had at the ground bases. I certainly needed to get rid of those ph-4s, but with the armor I could actually take the first shot. Most likely, I’d still have a damaged CL, but I’d have the other two right there. Since the front WRGs are LF+L/RF+R, there are two on the centerline, so a determined rush should take one out, possibly both.
One part that really concerns me is you need to take control of the surface (technically, using the ‘advanced’ rules in Module M, but we didn’t get anywhere near far enough to worry about it). The Jindarians have a total of 24 boarding parties (plus… 20 from taking a pair of barracks? I hadn’t realized it was that many), while the ground bases have 20. Plus potential reinforcements from the MB and ships. (The MB has a barracks module for a total of 38 boarding parties, and five transporters to put some down in the first couple turns.) That seems way too many for the Jindarians to deal with at the rate they can get them down (3 transporters per ship). I eventually realized that what you do is send them down at non-combat rates to the remote area, and then make up for the numbers by using the shuttles for fire support (I’d have to look up what they’re worth, but there’s a lot of shuttles, and two bays per ship to pump them out with).
So, move one CL to one hex range on the first turn (crashing through any instant minefields, like Patch used), with the other two getting within five by the end of the turn so they can all hit the ground bases. The second turn is spent trying to mop up from that, and putting out shuttles that’ll get into the atmosphere at the end of turn 2. This means getting adjacent to the planet before impulse 32, so plot a slightly high speed and either use mid-turn speed changes (which we don’t use), or emergency deceleration to keep from going away again. Transport down boarding parties during this—that’s the part the Jindarians are good at. They are still protected by armor when the shields are down, and can spend time transporting with relative impunity.
That leaves the ships and the MB, which together have a decent amount of firepower, and there’s just not enough weapons to go around. I suppose just try to pick on them with the rear WRGs, and of course, low speeds should allow re-arming them for turn 3.
The shuttle part of my plan went up thanks to Patch’s good use of his available shuttles as a local fighter squadron. The answer to that was one WRG on rapid-fire mode, but it was way too late by the time I remembered that.
Frankly, I just do poorly against bases. I’ve only really had one good fight against them, and a number of poor ones. The MB here however needs help. With four cargo pods, it would take a lot of killing, but it only has 10 power, and 5 is needed for housekeeping. A Power Augmentation Module would do a lot for even this basic version of it.
So, failure, our sessions went long, and went slow thanks to a lot of complicated stuff going on that we’re not used to. Still a lot of fun to be had just seeing a number of things that we don’t generally deal with. Expect our next scenario to be simpler though.
Discussion ¬