Rindis.com

All my hobbies, all the time
  • Home
  • My Blog
  • Games
  • History

Categories

  • Books (504)
  • Comics (10)
  • Gaming (918)
    • Boardgaming (674)
      • ASL (155)
      • CC:Ancients (83)
      • F&E (78)
        • BvR – The Wind (26)
        • Four Vassal War (9)
        • Konya wa Hurricane (17)
        • Second Wind (5)
      • SFB (78)
    • Computer games (162)
      • MMO (77)
    • Design and Effect (6)
    • RPGs (66)
      • D&D (25)
        • O2 Blade of Vengeance (3)
      • GURPS (32)
  • History (10)
  • Life (82)
    • Conventions (9)
  • News (29)
  • Technology (6)
  • Video (50)
    • Anime (48)
  • Writing (1)

Patreon

Support Rindis.com on Patreon!
Become a patron at Patreon!

Other blogs:

RSS Inside GMT

RSS Playing at the World

  • Playing at the World 2E V2 Arrives May 5, 2025

RSS Dyson’s Dodecahedron

  • Red Knife Hole July 13, 2026

RSS Quest for Fun!

  • The Expense Post May 24, 2026

RSS Bruce Heard and New Stories

  • Pain, Exhaustion, and Morale in D&D BECMI June 7, 2026

RSS Chicago Wargamer

  • The 2 Half-Squads - Episode 310: Cruising Through Crucible of Steel January 27, 2023

RSS CRRPG Addict

  • Al-Qadim: Over, Sideways, and Under July 13, 2026
SF&F blogs:

RSS Fantasy Cafe

  • The Leaning Pile of Books July 5, 2026

RSS Lynn’s Book Blog

  • Top Ten Tuesday: Books I Want to Read by New to Me Authors  July 14, 2026
ASL blogs:

RSS Sitrep

  • Cardinal ASL Sins March 18, 2026

RSS Hong Kong Wargamer

  • FT114 Yellow Extract After Action Report (AAR) Advanced Squad Leader scenario April 16, 2025

RSS Hex and Violence

  • This still exists? March 25, 2025

RSS Grumble Jones

  • Grumble Jones July Scenario GJ162 You Will Engage the Enemy July 1, 2026

RSS Desperation Morale

  • How to Learn ASL March 16, 2025

RSS Banzai!!

  • October North Texas Gameday October 21, 2019

RSS A Room Without a LOS

  • [Crossing the Moro CG] T=0902 -- Rough start July 18, 2015
GURPS blogs:

RSS Dungeon Fantastic

  • Felltower - Monsters Fleeing between Sessions vs. PCs replenishing June 28, 2026

RSS Gaming Ballistic

  • B-Scale at the Table July 13, 2026

RSS Ravens N’ Pennies

RSS Let’s GURPS

  • Review: GURPS Realm Management March 29, 2021

RSS No School Grognard

  • It came from the GURPS forums: Low-Tech armor and fire damage January 29, 2018

RSS The Collaborative Gamer

  • Thoughts on a Town Adventures System January 18, 2022

RSS Don’t Forget Your Boots

  • GURPS Supers Newport Academy #7: “Invitation to the future.. of the 1970’s” July 5, 2026

RSS Orbs and Balrogs

  • Bretwalda - Daggers of Oxenaforda pt.4 - Fallen King May 27, 2017

I Need to Brush Up On My Guderian…

by Rindis on June 14, 2010 at 11:12 am
Posted In: Boardgaming

Mark came over yesterday for more gaming. After the drought of April/May, June is pretty busy. The game du jour was the new CDG Stalin’s War, which I got on preorder recently.

Mark volunteered to take the Soviets (who are supposed to have a really tough learning curve), and I gave him the beginner’s balance of 3 Replacement Points. This was a surprise, I was already expecting to take the Soviets. The other surprise wasn’t as good; Mark hadn’t had time to go over the rules, something we try to avoid.

The game got off to a poor start for the Germans, my initial 6 cards were a 4, a 3, three 2s and a 1 CC. The bright spot was that the 4 was Winter Uniforms. That left me with a 3 OPS June attack, and that’s where things actually went poor as I got ‘1’s on two of my attack rolls (my choice of attacks was probably not the best either).

I drew another 2 to fill out my hand, and had a hard time getting any momentum going as one or two OPS at a time with a need for constant breaks wasn’t cutting it. I managed an initial breakthrough near Minsk and was on my way to the vastness of central Russia. With my units in his rear, I started to encircle the entire southern half of the front on turn 3, greatly aided by some breakthroughs directly in the south.

And that is where things started going wrong.

Keeping those forces locked down for the bulk of the turn was a great strain. While slowed down, they are not immobile, and I didn’t want them causing havoc on my supply lines by sitting on top of the rail roads, so units sat trying to keep things together while Mark tried to reestablish supply to some of them. Worse, in the north Riga turned into big problem as he kept sniping away the overextended panzer corps that were trying to keep it cut off. I sank too many reduced units and too few OPS into Riga, and I lost valuable units to it for no gain. In the mean time I did take Smolensk and send a unit temporarily across the Paulus line.

The fourth turn did not see anything go better for me, with the added complications of Odessa and Sevastopol. Both are ports, so it is impossible to simply starve units out them (without cutting supply to all the other Black Sea ports… and even then they’re fortresses, which always allows limited supply). I spent too little effort on them, and so had more units in my backfield that I couldn’t get rid of. Combined with Mark’s very successful efforts against my panzer corps, much of my offensive punch was worn down, even with most of the winter effects negated.

I battled my way into Kharkov regardless, and immediately found myself overextended. Mark did a great job locking up the flanks of the advance and keeping me desperate to recover the situation. In the end, things were somewhat stable, but my armies were starting to take alarming losses, in no small part thanks to his shock armies fresh from Siberia.

The day ended at the end of turn 5, with me having made good on the opportunity to play two replacement cards, and actually start to get the German Army into fighting trim again. But, the offensives were over for the rest of the game, and it was now going to be the long struggle to last the game, which would not be easy. VPs were already down to 6 (from the starting 7). One point of that was Kiev, which Mark had snuck into at the end of the turn, though it would not last. Another was for it being Spring 42 without play of Hitler Takes Command, which I hadn’t even seen yet (that and Luftwaffe Support were the two cards left in my draw deck). So I freely consider this a Soviet victory.

The biggest problem is letting the panzers get too weak and get picked off. After that is figuring out how to deal with Soviet out-of-supply units until actually die at the end of the turn.

Between an hour from Mark running a bit late and I having to go over the rules with him, and Mark unexpectedly having to leave an hour early, it was a fairly short day. But we still got through 5 turns on our first go. Looks like this one will play pretty fast once we get to it. (Best PuG time is 6 turns on a long game, this would have probably hit 7 on a normal day, and should easily speed up to 8-10 later for a single afternoon.)

└ Tags: gaming, Stalins War
 Comment 

Syrian Push

by Rindis on June 9, 2010 at 8:38 pm
Posted In: Boardgaming

Well, Jason came over this last Sunday, eager for another game of Pursuit of Glory. Forewarned, I had it all set up by the time he got here. After my long, long, game with Mark, most of my experience is with the Allied Powers, and I took the Central Powers this time.

Play was fairly smooth for me, since I’m somewhat familiar with all the Mobilization and Limited War cards by now. Jason is still learning and had to do a fair amount of head-scratching at various points as to how he was going to proceed. In spite of that, we got through 6 turns in one afternoon, which is the best I’ve seen so far.

Jason started with the standard Russo-British Assault, and I led off with Pan-Turkism, hoping to get a Jihad victory rolling later. Jason mostly ignored Egypt at first, but when I moved up through the Sinai with several units, he very quickly SRed in several units and played Anzac Reinforcements into Egypt before I was ready. I played Liberate Suez anyway, and took heavy losses in the best attack I could swing.

Meanwhile, things were typically busy on the Russian front, trading a couple spaces back and forth on the West side, and I moved into Ermia during turn two. Jason refused to play Secret Treaty for the event. I only played six cards in the first turn (can’t remember if I had a CC card or not), and the one card I didn’t draw on turn 2 was… Persian Push.

Both of us went to Limited War on schedule at the end of turn 2, and I gave him a nasty problem. I played Goeben on turn 2 right after he had played for RPs (and that reduced the RU RPs back to 0), and my first play of turn 3 was Gorlice-Tarnow, keeping him from getting any RU RPs that turn either. I then put down German Subs in the Med keeping him away from Invasions also on that turn, and limiting his Balkan options.

Overall, I undid most of the benefit by being too aggressive. He mounted a large attack which I saved with Reserves to the Front, counterattacked later during turn 4 (darn MOs) and left the elite III Corps out front. Jason knows how to put together strong attacks, and I lost the best TU corps way too easily.

Turn 4 was lead off with Lawrence and Djemal Crushes Secret Societies. I can’t really remember turns 4 and 5 separately at all. However, I was getting nervous, there was no sign of Parvus by turn 5, and both turns hands were pretty junky all around (some decent CC cards, but the average OPS/card was below 3). Kitchner’s Invasion landed at Adana followed by Maude and Galipolli Invasion (the next turn) and Salonika Invasion (as reinforcements straight to Cyprus). I attempted to block the beaches, but Maude forced his way inland, destroying the I Corps in the process. While I tried to patch together the next line, the reinforcements streamed in, forcing me out of Eregli and Mamure Station. He sped across Anatolia, taking Antyla the long way around, by way of Afyon.

He was finally starting to spread out a little too much, and had to pause some in turn 6. (A turn 5 I Order You to Die! in Kayseri helped.) However, the east wing kept going, turning me out of Aleppo, and would soon push me into the mountains Riyaq, while I formed a TU-A corps in Damascus. Parvus finally showed up for turn 6, along with Bulgaria.

Also, Persian Push showed up. I still had units in position to take advantage of it, and went over the plan in my head a few times in my turn. Towards the end of the turn, I noted that Jason had left his flank open as he advanced past Aleppo and Alexandretta. Of course my flank was wide open in there and there was no one to take advantage of the hole. As the sixth round came around, and I played Persian Push I suddenly realized I had the answer. The new TU-A division came in at Rakka (on the west edge of Mesopotamia) and activated, moving through Aleppo and Mamure Station, ending in Alexandretta. This cut his flank off and eliminated two divisions and a BR corps.

We had to call it a day there. I meant to save the position for future reference/use, but I’m afraid I didn’t have the time, and had to pack the game away (the problems of only having a dining room table to game upon). VPs were at 12, Jihad was stuck at 5. I’d say that it was looking towards an Allied win, but that last play could have been the beginning of some serious problems for him. My RPs were still healthy, though I needed to get some replacements soon. The Russian army was reasonably beaten up.

Oh, and I hit Total War at the end of turn 6, while the Allies had 3 points to go.

So far, invasions are the bane of my life as the CP. I have yet to successfully defend against an invasion, with all my efforts being too little too late. Some of that was an unwillingness to pull troops off the Russian front, which I should have done sooner than I did. I didn’t think I really had much to spare there, but when things started going from bad to worse in Anatolia, I found some spares.

Things would have been much simpler with an early Parvus to Berlin. It would have helped convince me to pull troops out, as the Russians were stuck at -1 VP, and it would have taken a lot of effort to get the 5 VPs they needed. Effort that I would have much rather seen than the invasion at this point. The Persian Gulf and Suez fronts were stable, though if I had ever stabilized Anatolia, I’m sure the push he’d built up for in Mesopotamia would have started.

I think I also need to play German Military Mission when it first comes up. I have generally ignored it for a late-game play, if needed (which I did on turn 6 this time). But now that I’ve actually defended in Anatolia, I have some idea of where to put the trenches (which I’ve always been unsure of).

└ Tags: gaming, Pursuit of Glory
 Comment 

There Has Been a Victory!

by Rindis on May 30, 2010 at 7:58 pm
Posted In: Boardgaming

Mark came over today for our regular FtF session. It was his turn to pick, and he went for There Must Be a Victory from Against the Odds. It’s about the naval portion of the Seven Weeks War between Austria and Italy.

Mark took Italy (who ended up doing well from the war, getting Venice from France, who got it from Austria, but the actual fighting was a disaster). We only got through a small part of the game, but there was plenty of excitement to go around.

The main part of the game is on a small area map of the Adriatic, with battles going down to a tactical system with ships maneuvering around firing gunnery and ramming. Both sides have to roll to activate forces to move them around. Austria starts with a decent mobilization rating (desperate to fight to a conclusion quickly), but this goes down as the game progresses (as the war goes well against Italy on land, there is less reason to risk the expensive fleet). The Italian navy is hampered by lack of political will (not willing to risk the expensive fleet), going up as things go poorly on land, and hampered by their own admiral (amazingly over-cautious, apparently went to the McClellan School of Commmand).

In the event, the first turn consisted of Itally re-basing the main fleet from Taranto to Bari, while the Austrians besieged and bombarded Ancona. The second turn culminated in the Battle of Ancona, as the Battle fleets of both sides clashed. The rest of my forces had retired to resupply, and Mark’s had failed to move. The weather foul, which had a serious effect on the combat. Everything is at an extra -3 to do (on a d10), and maximum visibility was 3 hexes (generally goes down in battle as smoke from all the canons obscures vision).

We both started in line ahead formation, and the opening salvos were completely ineffective (-3 weather, -~7 defense, -2 range, plus gunnery of 3, not happening). Mark made the decision to ram my flagship with his. That was well and good, but the next ship in my line was also an ironclad ram, and it rammed his flagship. This ended up with both flagships going down and the entire combat immediately degenerating into a free-for-all mess. I did better, ramming another good ship of his almost immediately, and getting my first ram out of the way before he could fall victim (covering him with another ship for counter-ramming also helped).

Mark ended up losing three good ships (only one ironclad) and scuttling a fourth when she had to be abandoned, while I only lost my flagship (poor Vice-Admiral Nameless, he shall be missed). This got me 30 VPs compared to his 12 (and 4 for the earlier blockade). The bad news of course, is that three of my ships were pretty battered, especially the steam ship-of-the-line Kaiser who had been in the thick of the fighting and performed 2-3 rams despite not really being meant for that kind of service. I had gone in with one less ship, and the quality was slightly on his side, but I got a crew quality bonus (+1) that really made the difference.

Turn 3 saw Mark get a random event which forced him into further inactivity, while I repaired the Kaiser and blockaded Ancona and Bari. I also bombarded Ancona again, which did far better than the first try, with fewer ships. We had to call it during turn 4, which was shaping up for the Second Battle of Ancona, this time with much more of both side’s fleets present. I would have had more ships overall, but the bulk of them were fragile gunboats. With clear weather the gunnery battle would be much more important, but I’m not sure I would be able to make it work.

Final VPs where we left off was 38 to 12 in my favor. If the new naval battle didn’t break me, I was still in a position to dominate the war for the next few turns, but my ability to dictate activity would slowly erode. I think I was in position to win, but it is hard to say for sure. Of the AtO games we’ve played it is by far my favorite, and I hope we can try it again. In the meantime, I’m planning on Stalin’s War for our next adventure.

└ Tags: gaming, TMBaV
 Comment 

Kroal’s Illegitimate War

by Rindis on May 24, 2010 at 12:00 pm
Posted In: SFB

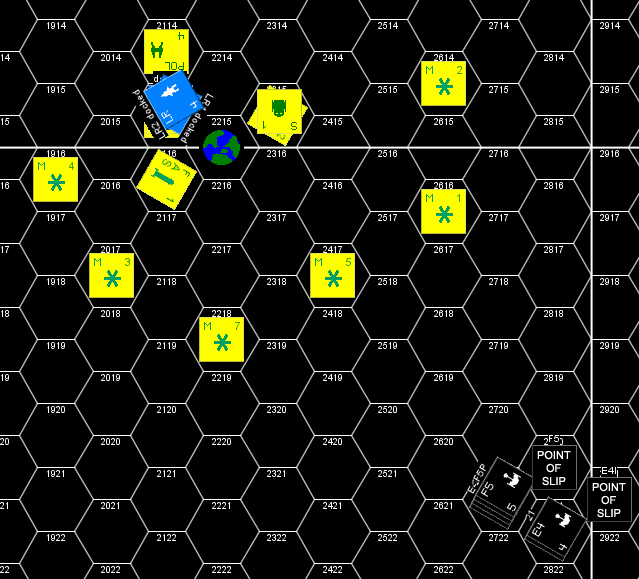
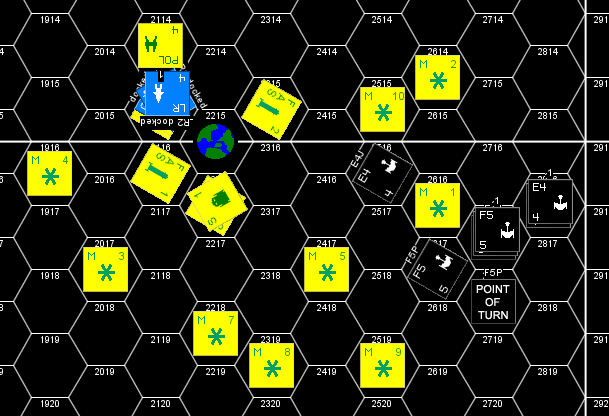
This SFB scenario from Module S2 is probably the most complicated one we’ve done yet. It’s not quite the size of “Battle of the Long Claws”, but it’s close, and has a poor crew (an E4J), a legendary captain, inactive ships (systems are off and have to be rebooted), drone bombardment, and the need for a lot of personnel transfers.

The LDR (Lyran Democratic Republic, formerly the DDSC) has hired Orion pirate ships to help with their defense. The pirates who didn’t get the contract arrange to make it seem to the Klingon Internal Security Forces that those ships are the ones responsible for several pirate raids inside the Empire. The ISF takes off in hot pursuit of one such raid, only to end up at an LDR base where the Orion ships are docked for maintenance and R&R.

After some discussion, we got going a bit late yesterday with me in charge of the Klingons (an F5 and an E4 squadron—specifically a F5P (defanged F5C), 2xF5Is (F5s with shorter range disruptors), 2xE4I (E4s with shorter range disruptors), and a E4J (penal ship, poor crew)), Patch taking charge of the base (a civilian Base Station, still decently large, but toothless compared to most bases) and the Orion ships; and Mark in charge of the mobile defenses (a L-POL, a F-AL, and 2xF-AS).

This is another scenario that doesn’t seem to be thought through properly. I went moderate speed the first turn, and kept tightly bunched (F5s in one hex, and E4s in the next hex over). Mark came out and engaged with the Pol at moderate range, the F-AL at close range and the F-ASs went after the first turn’s drones. Rolls on both sides were poor, with half the disruptors missing at 3-6 or 2-6 range. For me, that wasn’t too bad, as my massed fire was more than enough to gut the F-AL. However, he should have punched a shield on a F5I and done some internals with two overloaded disruptors, but with only one hit, it just weakened the #2.

On turn 2 I went in for the base. I was already fairly close, and Mark’s forces were scattered around the rest of the board. With only Ph-2s, Patch made me pay, but it wasn’t nearly as bad as it could have been, with the dinged F5I taking a volley through the weak shield and being crippled.

I did quite a number on the base. It was struggling to find power to do everything, and the Orions were just barely generating power for their own shields. Most of the systems on the base were destroyed in my overrun and all three tractors were, forcing the Orions to undock, though they were still drifting in orbit with the base.

I circled around the planet and potshotted a FA-S at range before coming in again to drop some drones and suicide shuttles on the floating mess and heading off to engage the LDR frigate (no gatlings yet) that came in as a reinforcement on turn 3. He refused to engage directly (a good idea), and I was pondering what to do next as we ended for the day.

There was another FF and Pol due on turn 4, and I was headed towards where they’d enter. I figure if they went fast, I’d try to engage (rather than turn my back on them), otherwise it was back to finish off the station to get the explosion and start working on the Orions. Once they were crippled, it would be time to leave (can’t disengage until they’re crippled, I’m crippled or my legendary captain dies). The Orions were not going to be more than an accounting exercise, but the combined LDR forces are potentially dangerous if all together (especially after another Pol and trio of armed freighters on turn 5). So it was time to get an exit strategy while they were separate. Or just try to pick them off one by one.

By the points as they stood when we quit, it was a Decisive Victory. After accounting for some damage, and my disengagement after crippling the Orions, it would go down to Major.

In all, there’s two things here for the LDR. They need to stay closer to the planet and each other. Among other problems, the drone defense was not there because all the ships and shuttles got strung out. I misplayed the drone bombardment (didn’t plot it all ahead of time like I was supposed to, but I missed the backup plans on if they don’t immediately see a valid target either). Second, would be transporter bombs. We’re not used to using those, and taking all the TBs possible to put an ‘instant minefield’ around the base could pay great dividends. It could keep the Klingons at a greater distance, or at least make them pay a much higher price for going in after the base (and force them apart a bit so as not to all get hit by one mine).

Still, good to get a chance at SFB again. It’s nearly been a year since the last game we had finished up.

└ Tags: gaming, SFB
 Comment 

Windows 7 Update

by Rindis on May 21, 2010 at 11:25 am
Posted In: Life

Well, one bit of optimistic news I originally reported on my transition to Win7 went bad.

CorelDraw 8 installed fine, and ran fine, at first. I noticed a little later that it was a bit crash-happy. In fact, it started fine, and then slowly got worse. It didn’t take long until it was crashing on application launch.

This could just have been something going wrong once, and then cascading into a worse problem, and a uninstall/reinstall would fix it, more-or-less permanently. But I didn’t like the fact that it happened after a fairly low number of launches. So, I looked around for alternatives.

The current version of CorelDraw is X5 (15). There were a bunch of copies of X4 on eBay through one guy, that was just the disk and (supposedly) a valid reg number for $45. The star rating was low, but I saw it go up over a couple of days, so I figured people were getting product and being happy with it, a good sign. And then all his listings disappeared the day before I would have gone for it. The account seems active, but pointers to his listings go to empty pages. Not good. And then similar listings appeared on other, 0-star accounts (different images). I think I’m very happy I missed out on that.

I ended up bidding on a copy that claimed to be an unopened box with all the manuals. Just squeeked out a win at $50 (someone tried to snipe it at $50 and failed). It arrived yesterday. Indeed, unopened box in what looks to be the original shrink wrap. I note the disk says ‘Asia Pacific Edition’ and the box has an Australia website address (.com.au), but the language choices are the normal English, French, Spanish, Portuguese (Brazil) for the Western Hemisphere….

It installed fine, and so far, operates beautifully. I’ve probably already put it through more than I did the copy of 8. Going to take a bit to get used to the interface, it has naturally changed some in six versions.

└ Tags: horo, Win7
 Comment 
  • Page 269 of 315
  • « First
  • «
  • 267
  • 268
  • 269
  • 270
  • 271
  • »
  • Last »

©2005-2026 Rindis.com | Powered by WordPress with ComicPress | Hosted on Rindis Hobby Den | Subscribe: RSS | Back to Top ↑