Rindis.com

All my hobbies, all the time
  • Home
  • My Blog
  • Games
  • History

Categories

  • Books (485)
  • Comics (10)
  • Gaming (906)
    • Boardgaming (665)
      • ASL (153)
      • CC:Ancients (82)
      • F&E (78)
        • BvR – The Wind (26)
        • Four Vassal War (9)
        • Konya wa Hurricane (17)
        • Second Wind (5)
      • SFB (78)
    • Computer games (160)
      • MMO (76)
    • Design and Effect (6)
    • RPGs (66)
      • D&D (25)
        • O2 Blade of Vengeance (3)
      • GURPS (32)
  • History (10)
  • Life (82)
    • Conventions (9)
  • News (29)
  • Technology (6)
  • Video (48)
    • Anime (46)
  • Writing (1)

Patreon

Support Rindis.com on Patreon!
Become a patron at Patreon!

Other blogs:

RSS Inside GMT

  • Meet the Xiongnu: A Civilization of GMT’s Ancient Civilizations of East Asia February 6, 2026

RSS Playing at the World

  • Playing at the World 2E V2 Arrives May 5, 2025

RSS Dyson’s Dodecahedron

  • The Flying Swine – A Fine Drinking Establishment February 6, 2026

RSS Quest for Fun!

  • The Myth of Rational Animals November 23, 2025

RSS Bruce Heard and New Stories

  • WWII Aviation Industry Part 4 August 11, 2025

RSS Chicago Wargamer

  • The 2 Half-Squads - Episode 310: Cruising Through Crucible of Steel January 27, 2023

RSS CRRPG Addict

  • Star Trail: Because It's There February 5, 2026
SF&F blogs:

RSS Fantasy Cafe

  • Strange Horizons Roundtable on Influence January 26, 2026

RSS Lynn’s Book Blog

  • Booking Ahead/Weekly Wrap Up February 8, 2026
ASL blogs:

RSS Sitrep

  • Blockhaus Rock April 1, 2025

RSS Hong Kong Wargamer

  • FT114 Yellow Extract After Action Report (AAR) Advanced Squad Leader scenario April 16, 2025

RSS Hex and Violence

  • This still exists? March 25, 2025

RSS Grumble Jones

  • Grumble Jones February Scenario GJ157 February 2, 2026

RSS Desperation Morale

  • How to Learn ASL March 16, 2025

RSS Banzai!!

  • October North Texas Gameday October 21, 2019

RSS A Room Without a LOS

  • [Crossing the Moro CG] T=0902 -- Rough start July 18, 2015
GURPS blogs:

RSS Dungeon Fantastic

  • Black Company Playtest: Summer of Riots January 27, 2026

RSS Gaming Ballistic

  • Mission X: Obviously Not 2025. Life happened, read on. December 13, 2025

RSS Ravens N’ Pennies

RSS Let’s GURPS

  • Review: GURPS Realm Management March 29, 2021

RSS No School Grognard

  • It came from the GURPS forums: Low-Tech armor and fire damage January 29, 2018

RSS The Collaborative Gamer

  • Thoughts on a Town Adventures System January 18, 2022

RSS Don’t Forget Your Boots

  • GURPS Supers Newport Academy #2: “Jailbreak” January 4, 2026

RSS Orbs and Balrogs

  • Bretwalda - Daggers of Oxenaforda pt.4 - Fallen King May 27, 2017

J67 The Lawless Roads

by Rindis on November 15, 2012 at 12:00 pm
Posted In: ASL

Journal 4 had an article on the British Universal Carrier, and some scenarios featuring them. I managed to talk Patch into one of them, but I’d still like to try the other scenarios. We got going in January 2010…:

After finishing the Market-Garden set, Patch and I are playing one of the early-war scenarios in Journal 4 featuring Carriers. The British are trying to clear a road through a village (no GO Germans on or adjacent to it), but the Germans are already strongly defending the town. In addition to needing to chase the Germans away from the road, the British will lose if more than four of their AFVs are killed (or if four tanks/tankettes are killed).

Given a choice, and remembering Patch’s problems with a similar set of victory conditions in Khopra’s Crossing, I take the defending Germans. They don’t get any vehicles of their own, and the anti-tank capability isn’t great, but the Brits don’t have anything heavier than an A10. Patch will have to be cautious, especially with two 37mm ‘doorknockers’ hidden somewhere.

Board 12 is an unusual mix of terrain for an early board, and there’s a few of the hedgerow overlays in play (though bocage is not in play—a hedge is a hedge here) and I have to spend some time deciding how to defend. The real target is the road itself, but if I concentrate on that, he could easily bypass part of the defense and strike towards the middle or back end, hoping to leave me without fallback positions. So I opt to defend the entire front with an eye towards hustling towards the road if he attacks down it as expected. The four OB-given ‘?’ are used to conceal where the good leaders, MMGs and ATRs are. The MTR doesn’t have any place with a good LOS and end up on the hill in T1 when I forget that Orchards block non-same level LOS.

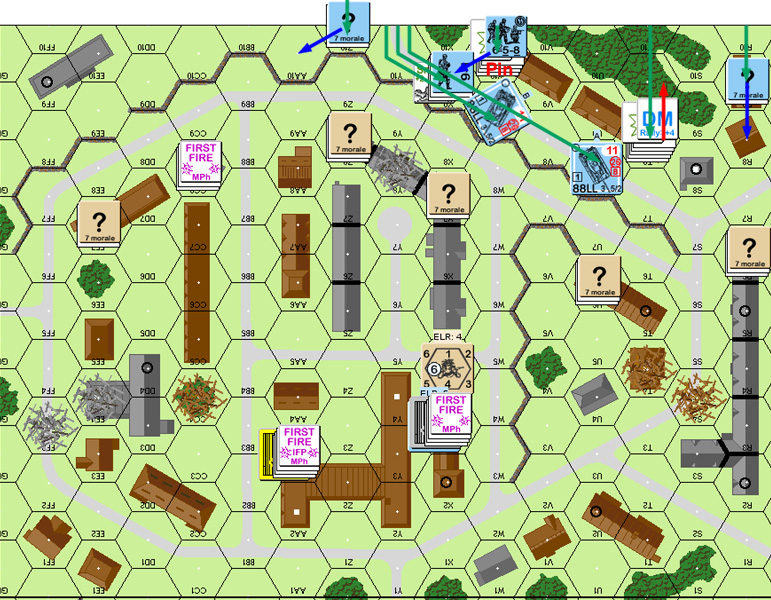
Patch setup near the road and got to work clearing it immediately. With some concentrated firepower, and a ROF-tear on his MTR, he broke a leader and LMG squad, and pinned another LMG squad. I was able to do far less to his initial advance than I would have liked. The worst part was that he put three squads past the hedgerow between V and W, and got into the first of the stone buildings. I had figured I’d keep him out of there a while longer.
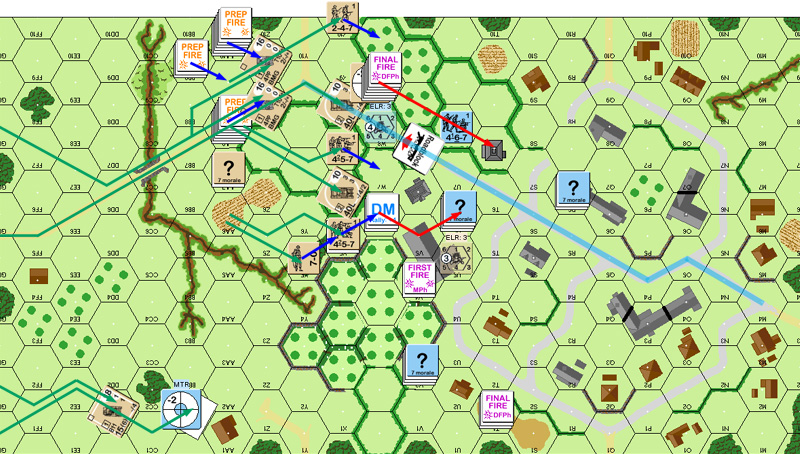

Situation, British Turn 1 DFPh. The blue ribbon is the victory road, note that an SSR turns a graveyard into an orchard and you can still see pieces of it poking through the overlays.

Even with my broken squad having made it back to my 9-1 leader, I got nothing back on my rally. I wasn’t sure how to reorganize my defense. In general, the plan was to shift for more defense in depth along the road, but he had the two Mk VIs crawling along the south edge of the board, and I didn’t want them getting into my rear unopposed. My opening MTR shot on the lead one hit and got a ‘2’ result on the IFT to kill it with no survivors, that simplified things greatly. A shot from U8 broke W7, taking some more pressure off me, and I decided to gamble with a stone building and a -1 leader and stand up to the rest of his breakthrough in W6. A shot from U6 broke one of the two squads there. Things were looking up.

I pulled out of V2, taking a roundabout route to make sure he couldn’t strip concealment. As I moved other forces around, I came up with a sneaky little plan. First, V4 smoked W5. If that hadn’t worked, I’m not sure I would have gone through with it, but with the smoke (only on a ‘1’!), I put the squad in V4 into X4, where he could cause problems for the broken squad in W6, and was adjacent to the British 7-0 in X5. Sadly, I couldn’t get him in Advancing Fire, and he self-broke to rout away before I could go for CC with him.
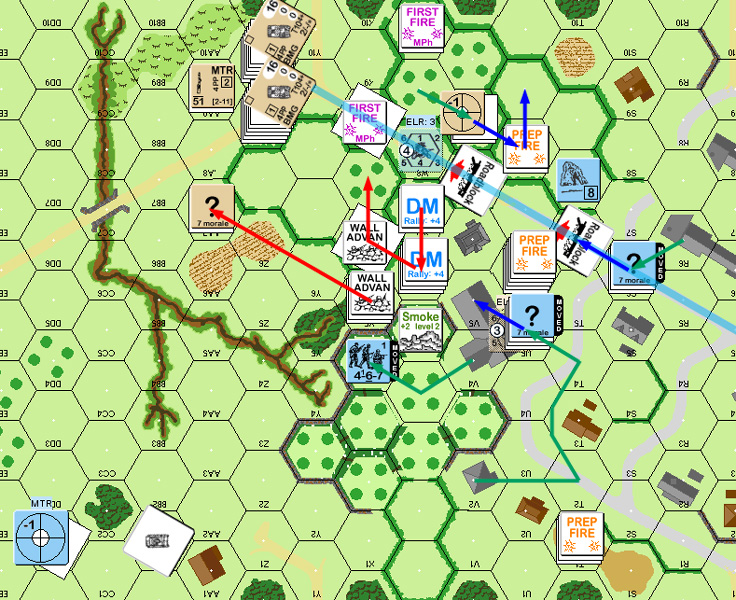

Situation, German Turn 1, end of MPh.


Gunner Scott commented:

“Hi-“

“Thats one hell of a scenario. Been a long time since I played it, but I do remember those little carriers giving the Germans grief as they would race to cut rout paths.”

“Scott”
↓ Read the rest of this entry…

└ Tags: AAR In Progress, ASL, gaming, Journal 4
1 Comment

Bosworth 1485

by Rindis on November 12, 2012 at 10:40 pm
Posted In: Books, History

As usual, Osprey’s Campaign series does an excellent job of presenting the background and people involved in the battle in question. In this case, the later stages of the Wars of the Roses, and Richard III’s reign are covered very well. There is a lot that cannot be known through the distorting lens of Tudor propaganda, but some good points are made.

The general course of Henry Tudor’s landing and march into central England are handled well (I like the Campaign series in general because it is as much about the maneuvering to battle as much as the battle itself), with the usual excellent maps. There are also several very nice two-page spread original color paintings by Graham Turner scattered throughout, instead of art borrowed from previous books. There are two problems here: One, they usually have a paragraph or so of the main text over part of the art, and the contrast is often low enough to make reading the text difficult. Two, the people, even when they are supposed to be in motion, look posed. Other than that, they’re fine pieces, but my eyes are trained by an artist also educated as an animator; these people don’t look like they’re moving.

A final problem is that the book was published in 1999, and a couple surveys conducted since then indicate the battle may have been fought about two miles from where it was previously believed to be. It is still worth picking up, especially if found cheap, but I hope that once the resulting arguments start working their way through academia, Osprey will release a new edition of the volume.

└ Tags: books, Campaign, history, Osprey, reading, review
1 Comment

A38 North Bank

by Rindis on November 8, 2012 at 12:00 pm
Posted In: ASL

Patch and I finally finished up our tour of the A’91 Market Garden scenarios in December 2009…:

Last week me and Patch started the last of the Market-Garden scenarios from Annual ’91. Thankfully, we have the errata from FKaC, since it’s not very balanced in the original.

I’m playing the Germans, who are trying to drive the British away from their remaining foothold near the Arnhem bridge, and the river. I have 7 SS squads, good leadership, two Tiger IIs, and seven turns. The Brits have 4 squads, better leadership, a Hero, a 57mm ATG, and Ammunition shortage. Oh, and thanks to the errata, 8 OB-given ‘?’ (and I enter on turn one, so everyone else gets freebies), and I don’t know who has his 3 PIATs until he uses them. Four AT weapons, none of which can penetrate the front armor, but since I don’t know where they are, a back, or at least flank, shot is probably going to come up sooner or later. At least I know the PIATs can’t be where he isn’t.

Patch set up a loose perimeter at the north edge, with a couple of high observation posts. Not liking the open west terrain for entry, I went for the east half with the hopes of driving a wedge into the 21U6 building area. The Brit 10-3 turned out to be in one of the high posts (of course) and managed to break my 9-2 and a squad shortly after entry, also pinning a second squad. Naturally, the Brit 9-2 was in the other high location (which my eyes seem to have skipped over), who then pinned the 7-0 and a squad.

Thankfully, that was all the mischief he was able to accomplish, while I got a lucky PTC on 21Z8, and revealed it to be dummies.


Situation, German Turn 1 DFPh.
↓ Read the rest of this entry…

└ Tags: AAR In Progress, Annual 91, ASL, gaming
2 Comments

The Wars of the Roses

by Rindis on November 5, 2012 at 9:58 pm
Posted In: Books

Osprey’s title on the Wars of the Roses is typical of their Man-at-Arms line. Half the book is a good simple history of the period, and a fairly solid introduction to it. There’s no details, no sense of the people, but given the proverbial confusion that the Wars can engender, this cut-down summary seems to be a good place to start.

It is also nice in that it manages to point out a fair amount of ‘received fiction’ in the normal accounts, beginning with a paragraph-long description of the Wars, and then stating “A familiar story perhaps: but not containing a word of truth.”

It’s an early Osprey book, so the color plates are good without being great. However, the discussion of the plates is extra long, and informative.

└ Tags: books, history, reading, review
1 Comment

A37 Dreil Team

by Rindis on November 1, 2012 at 12:00 pm
Posted In: ASL

Continuing our tour of the Market-Garden scenarios, Patch and I started this one in October 2009…:

Just started the sixth scenario of the Market Garden series with Patch tonight, with me as the Brits.

It’s fairly interesting. The Brits have to exit 8 VP off the GG end of board 22 in 9 turns. The distance isn’t that great, and the British have a good amount of firepower, and are well equiped with multiple MMGs, LMGs, PIATs, and a mortar. But the stream on the board is flooded, except for the two edge hexes (which are merely deep), which limits the crossing options to four hexes, two of which are adjacent to each other.

The Germans only have six squads, two leaders and two LMGs. However, three of those squads are elite, and both leaders are 9-1s.

Oh, yeah, and they have a Panther.

Patch set up with the Pather guarding the NE (right) bridge and ford by himself, one leader, two squads and LMG on Level 2 of the one Multi-Story building in his setup area, and the rest near the other (closer) bridge.

I took a while to do my setup. I just wasn’t at all sure as to how I wanted to handle this.

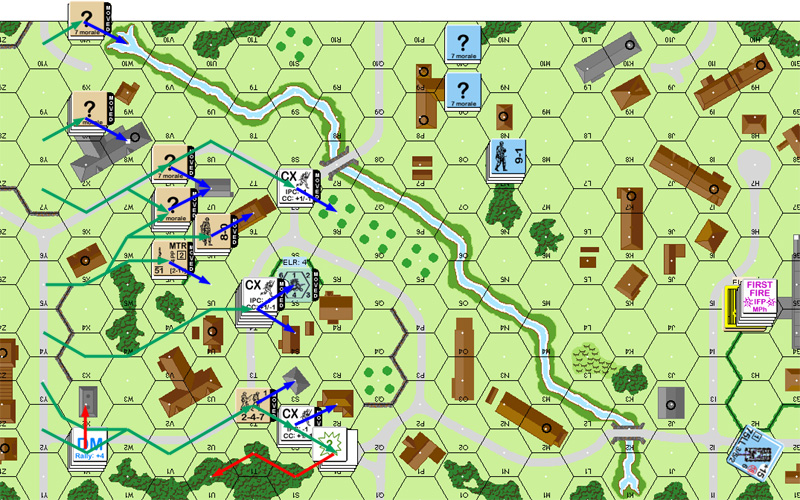
The eventual plan was fairly conservative. Even with only two areas to cover, he doesn’t have enough for a great defense in depth. I figured to move out into the center area and engage the troops guarding the nearer bridge. I’d also send a unit across the W10 ford. It’s slow, but it makes sure I will get someone across. I planned on pushing a PIAT as far as I could towards the other bridge to keep him honest. That didn’t work out so well. DFF broke a LMG squad with the 8-1, and and Final Fire broke the PIAT squad in R1 (he retained rate).

Sadly, I only thought of it after I was moving, but it would have been interesting to run a squad from Y6 to the R7 bridge, and advance to Q8. Thanks to all the buildings and the range, it’s easier to do than it looks. They’d be in some trouble, but it would force some hard decisions from Patch.


Situation, British Turn 1, end of MPh.

I rallied the LMG squad with the leader during rally. Since Patch couldn’t get at the other squad, that left me in a very good position for the next turn.

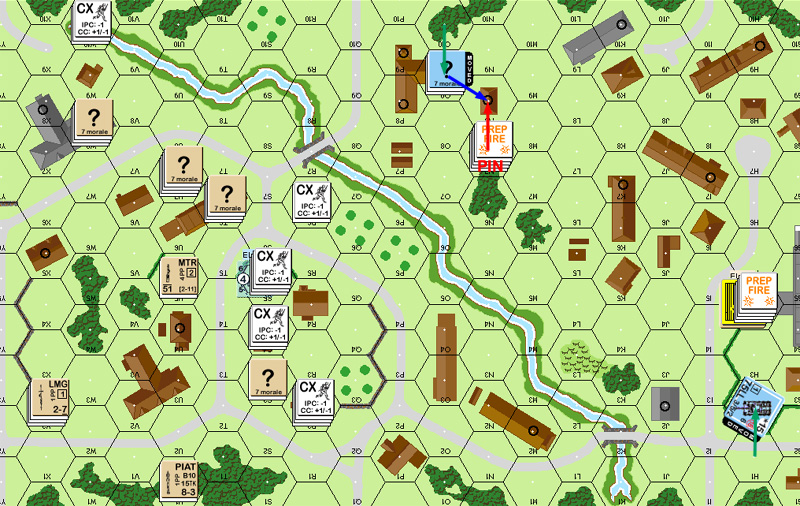
Patch preped the squads in N7 at my squad in the Orchard near the bridge and rolled poorly. The LMG fired twice at S5, but couldn’t get an effect. H4h2 fired at S5, with a -1 (no cover…) and got a 2MC. Thankfully, both squads passed.

For movement, he pulled in the O10 flank, and shifted the Panther one hex so it could cover the R7 bridge.

My MTR managed three shots (ROF 2…) but couldn’t get anything at 2FP, even with the -1 Air Burst TEM. However, R6 got a 1MC on them, breaking the leader and pinning both squads.

This left Patch with quite a problem, and had to think about it quite a while. He ended up routing the leader next door and leaving the squads in place. He’d been tempted to self-break them to get them away from the MTR, but the furthest available rout target was M6. If he was going to rout, he wanted to go further.

This leaves me with a decision. I had been planning on using the MTR to put Smoke on the bridge, since I assumed the ACQ would be useless anyway. Now I need to decide if I want to try to kill the two squads, not great odds, but the best that MTR is ever likely to see….


Situation, German Turn 1, end of MPh.
↓ Read the rest of this entry…

└ Tags: AAR In Progress, Annual 91, ASL, gaming
2 Comments
  • Page 233 of 308
  • « First
  • «
  • 231
  • 232
  • 233
  • 234
  • 235
  • »
  • Last »

©2005-2026 Rindis.com | Powered by WordPress with ComicPress | Hosted on Rindis Hobby Den | Subscribe: RSS | Back to Top ↑