Rindis.com

All my hobbies, all the time
  • Home
  • My Blog
  • Games
  • History

Categories

  • Books (449)
  • Comics (10)
  • Gaming (877)
    • Boardgaming (647)
      • ASL (151)
      • CC:Ancients (78)
      • F&E (78)
        • BvR – The Wind (26)
        • Four Vassal War (9)
        • Konya wa Hurricane (17)
        • Second Wind (5)
      • SFB (75)
    • Computer games (151)
      • MMO (74)
    • Design and Effect (6)
    • RPGs (64)
      • D&D (25)
        • O2 Blade of Vengeance (3)
      • GURPS (31)
  • History (10)
  • Life (81)
    • Conventions (9)
  • News (29)
  • Technology (6)
  • Video (45)
    • Anime (43)
  • Writing (1)

Patreon

Support Rindis.com on Patreon!
Become a patron at Patreon!

Other blogs:

RSS Inside GMT

  • Foreign Intervention in Baltic Empires: Part Two May 8, 2025

RSS Playing at the World

  • Playing at the World 2E V2 Arrives May 5, 2025

RSS Dyson’s Dodecahedron

  • Mermay #2 May 8, 2025

RSS Quest for Fun!

  • Pro Active Price Increases April 5, 2025

RSS Bruce Heard and New Stories

  • D&D Class: The Cryptreaver February 24, 2025

RSS Chicago Wargamer

  • The 2 Half-Squads - Episode 310: Cruising Through Crucible of Steel January 27, 2023

RSS CRRPG Addict

  • Realms of Darkness: #$@* the Lemons and Bail May 7, 2025
SF&F blogs:

RSS Fantasy Cafe

  • Virtual Sci-Fi/Fantasy Book Recommendations Event May 5, 2025

RSS Lynn’s Book Blog

  • Review: Senseless by Ronald Malfi May 8, 2025
ASL blogs:

RSS Sitrep

  • Blockhaus Rock April 1, 2025

RSS Hong Kong Wargamer

  • FT114 Yellow Extract After Action Report (AAR) Advanced Squad Leader scenario April 16, 2025

RSS Hex and Violence

  • This still exists? March 25, 2025

RSS Grumble Jones

  • Grumble Jones May Scenario GJ147 Sturmgewehrs at Schevenhuette May 1, 2025

RSS Desperation Morale

  • How to Learn ASL March 16, 2025

RSS Banzai!!

  • October North Texas Gameday October 21, 2019

RSS A Room Without a LOS

  • [Crossing the Moro CG] T=0902 -- Rough start July 18, 2015
GURPS blogs:

RSS Dungeon Fantastic

  • Rules, Rulings, and Notes for DF Session 208 May 9, 2025

RSS Gaming Ballistic

  • Preview PDF Downloads Suspended due to Bot Spam January 5, 2025

RSS Ravens N’ Pennies

  • Carpe Blogiem: Author, Patreon, and Blog Highlights – February and March 2025 March 30, 2025

RSS Let’s GURPS

  • Review: GURPS Realm Management March 29, 2021

RSS No School Grognard

  • It came from the GURPS forums: Low-Tech armor and fire damage January 29, 2018

RSS The Collaborative Gamer

  • Thoughts on a Town Adventures System January 18, 2022

RSS Don’t Forget Your Boots

  • GURPS Kung Fu Furries #2: “The Chicken Unleashed!” April 6, 2025

RSS Orbs and Balrogs

  • Bretwalda - Daggers of Oxenaforda pt.4 - Fallen King May 27, 2017

F&E Vassal Module 2.1

by Rindis on October 8, 2023 at 12:00 pm
Posted In: Boardgaming

At long last, the new version of the F&E Vassal module is out! You can download it from ADB here:
http://www.starfleetgames.com/documents/F&E-2.1.zip

Please save the zip package to where you keep your modules, and then extract everything. The extensions will then be seen by Vassal (as inactive) once you open the main “F&E 2.1.vmod” file through the module manager. There is also a new version of the User Manual PDF, which I recommend you look through.

Right after releasing 2.0 I started work on a 2.0.1 to fix some problems (most notably LDR ships initially reported as ‘Tholian’ in the inventory windows), and then went to 2.1 when I added some new features while playing “Konya wa Hurricane” with Byron. I got some feature requests that, along with the need to upgrade all the save game files, made the finishing touches drag out until the project backburnered itself. And then Tactical Operations came out.

I have, in fits and starts, spent much of this year adding all the new units from that to 2.1, finished off the upgrades, and a couple new extensions. The full list of changes is in version history file (look in the Help menu), but here’s the main highlights:

    • Each empire’s Home Fleet now has a bigger box, so they can take bigger collections of ships without all the fleet boxes chewing up screen real estate.
    • Reserve fleet boxes are smaller, but now have a grid to lay out your force in.
    • The large map now has sector and cordon borders that can be turned on/off, like the small map.
    • There is a new ‘Control Panel’ window where you can manipulate the scenario borders, Orion Enclave, and turn off unneeded ship capture dialogs.
    • Units from Tactical Operations have been added, including moving BBs from an extension to the main module.
    • There are new extensions for the Carnivons and Paravians.

Warning: Some changes require careful handling to use a 2.0 game in v2.1. Notably, I fixed the spelling on the two Kosnet fleet boxes, so units in there will disappear when going to 2.1. Just move everything out of them in 2.0, save, open in 2.1 and move them back. Also, sector borders will disappear from games using the large map, and fixing that is a little tricky. The entire upgrade procedure for a saved game is in an appendix of the User Manual, or just send me a message and the current saved game file, and I can do all the upgrading for you.

Another hidden change to the module is I ended up with an insane number of prototypes to handle all the variations in tracked stats. I’ve gone to a system that is messier on the piece side, but only needs a couple of prototypes. The old pieces still use the original prototypes, so cleaning that up is a long-term goal for the module. Past that, further set up files would be good to do, and I want to do an extension for the Romulan Civil War scenario in Captain’s Log #50.

I’ve also contemplated adding background graphics to the fleet boxes (like has been done for the reserve fleets), but a unique one per fleet would make the module size balloon even more (this is about twice the size of 2.0), though a common one per empire is possible.

I’d like to hear thoughts on that and any other features that could be handy. One that I need to look into is giving each fleet marker a command to open the appropriate fleet window.

└ Tags: bgg blog, F&E, gaming, Vassal
1 Comment

Konya wa Hurricane Alliance Turn 18

by Rindis on June 22, 2019 at 12:00 pm
Posted In: F&E

My ongoing F&E game with Byron continues to go slow; both of us have delays, though I’ll admit to being the bigger source of them.

The overall Alliance economy grew 32EPs this turn (after exhaustion effects. The Kzinti capital came out from devastation to pump another 13 points into their economy (before exhaustion), the Federation is still liberating their territory and picked up 23 points, and the Gorns picked up a province. The Hydrans lost a point, but the situation there is becoming more and more untenable for the Coalition there, and there is now a Hydran BATS over the capital.

Builds:
Federation: DVL, BC, TG, NCA, 10xNCL, NVH, NSC, 3xDW, 2xDWA, 5xFF, 4xFFE, NCL->NSC
Kzinti: CV, NCA, 2xCM, MEC, 3xDW, 4xFKE, CV->CVH
Gorn: DNH, BC, CMV, HD, TG, LTT, BDE, 4xDD, CL->CLE
Hydran: LGE, RN, MKE, DWE, 3xCU, PGC, PDU

Despite having a couple B10s available, the heavy ship situation is sliding away from me with Byron building two excellent heavy raiders, and the Gorns already having their DNH. He’s also getting into heavy fighters, though I have a few of those already thanks to the Lyran CSV.

The Hydrans moved the LGE and new PGC into the Raid Pool and concentrated on picking off garrisons in their space, killing a LTS, crippled F5, and F5S as well as disrupting a Lyran province. The Kzinti disrupted one Lyran province, one Klingon province as well as hitting a Lyran-held Kzinti province and killed a Lyran DW garrisoning Kzinti space. The Federation put the DVL into the Pool and hit three garrisons in their space and disrupted three Klingon provinces. The Gorns hit two ships in their space (one of which evaded, and the other was lost), and two more in Federation space. A DNL took a lucky hit from the Klingons to be crippled, while a WE reacted out of a Federation Raid to a Gorn one (targeting a SNB), the WE then evaded, but the SNB failed its cloak roll and was killed.

There is always some gratification in seeing a fair number of crippled enemy ships heading out of your space for repairs; sadly he has the money and facilities to make sure they return while I continue to struggle with my backlog. And another note to show how things are going is that Byron moved the Kzinti FRD in the Barony into the capital.

The Hydran fleet moved out to Klingon space, overwhelming my remaining pinning forces again, and hit the next BATS in line. The Kzinti mostly occupied themselves fighting in their own space on the supply line to 1407, but also sent a fleet back to the Klingon capital. Meanwhile, Federation moves concentrated in southern Klingon space, largely going after my depot in 2014 (original Klingon border BATS + Lyran BATS + auxiliaries), as well as the minor planet in 2216.

On the Romulan border, Federation forces shifted back northward (not everything shifted, but there were no offensives in the SW ‘wing’ of Romulan space), putting a large number of ships on the two Federation planets just within their border. The Gorns tried to draw the Romulans out with moves that stopped just short of the border. One happened late, and landed on the NZ planet with intent to take it, so I reacted out to defend it. Over in the east, he pinned a force on the last BATS in line while moving a fleet unopposed to the 4812 SB.


Hydran theater.


Kzinti theater.


Klingon theater.


Romulan theater.

While the Romulan priority has been to try and hold on to the planets at the corner of Federation space, the SB trumps that and two reserves went there, leaving only one to go to 3711. Similarly, two Klingon reserves went to their capital to try and keep the Kzinti out while the mess there is cleaned up. A Klingon and Lyran reserve went to save 1506, and one Lyran reserve was out of range of all combat (the third one was already at the Klingon capital).

Battles:
1505: SSC: Klingon: dest F5L
2515: SSC: Klingon retreat
3514: SSC: Romulan withdrawl + cloaked evasion
4009: Romulan: dest SN
1013: Klingon: dest F5; Hydran: dest CU
1214: Klingon: dest BATS, 2xcripF5
0916: Lyran: crip CW, DWG, FF; Hydran: dest CU
0816: Klingon: dest E4; Hydran: dest DG
1404: Lyran: dest DWS
1506: Lyran: dest FF; Kzinti: dest EFF
1411: Klingon: crip F5E; Kzinti: dest FFK
2216: Klingon: dest 2xPDU; planet captured
2213: Klingon: dest cripF5
2014: Klingon: dest BATS, LAV, 2xFTL, crip AD5, E4A, capture NCL; Lyran: dest BATS; Federation: dest NCL
2114: Klingon: dest D6; Gorn: crip CMC, capture D6
1914: Klingon: dest D7; Federation: dest FFE, crip FF
3515: Romulan: crip SKE; Federation: dest FF
3612: Romulan: dest KE; planet captured
3711: Romulan: dest NH, KRC, KE, 2xSP, SKE, 3xSN, crip SPB, SPM, SK; Federation: dest CF, crip 2xCA, 5xNCL, DW, DWA, FFB, FFE, planet recaptured; Gorn: dest DD, crip CLE, COM, 2xBD
4309: Romulan: dest SKG; Federation: dest 2xNCL
4710: Retreat after refused approach
4809: Romulan: dest CE
4812: Retreat after refused approach

The Gorns tried to pick off a pair of D5s in 2515 with a HD, BD, BDS squadron (giving me a -4 disadvantage in SSC), but the Gorns were way too overconfident (‘2’ on 2d6…) so the Klingons pulled out with no damage to find a better day to die.

Mostly the Hydran front was a bunch of walk overs where they sacrificed frigates (often with half their line consisting of such, including one ad hoced into the outer escort slot of a carrier) for better damage, but in 0816 a good Klingon force, good die rolls and a heavy EW advantage allowed me to kill a cruiser.

The Alliance’s return visit to the Klingon capital took some thought. My reserves plus BG Harbinger was a good force, but the Kzinti fleet was also large (though bulked out with FFs) with good fighter reserves. I eventually decided to accept approach and try to do some damage before he came in to finish off the crippled secondary SB. I managed a denser line (B10V Insatiable was a big help), and a 1-5 split on the die rolls allowed me to do twice as much damage, and the Kzinti left. With my denser line, I had an advantage on approach, I had a D5M to kill ships, and if it went the full three rounds of approach, the Kzinti force wouldn’t be very effective when he finally got to the defenses.

Klingon infrastructure continues to collapse with the Federation taking a planet in the southern Empire, and the loss of the dual BATS (Klingon/Lyran) in 2014. I still had a number of auxiliaries staged there and lost them all for little more than fighters. I did have enough to direct on an NCL the first round, and a lucky ‘2’ captured it, and it survived pursuit. In the next battle, the Gorns returned the favor to capture a D6. Byron isn’t too big on using captured ships (…and he is building enough already), so he may scrap it. Certainly the expense of turning it into something good like a D6S seems a bit excessive.

The Romulans aren’t entirely out of Federation space yet, but Byron did a good job getting them off of the two planets there. I had a single small line at 3612, and retreated out rather than see half of it crippled, giving up a KE in the process (I had hoped to evade out, but the VUL failed on the first roll). The combined Fed/Gorn fleet over 3711 was a lot bigger than mine, though my fighter reserve was a little bigger. I stuck it out a few rounds, forcing him to take decent casualties with overall good rolls, while losing ships to the DNT. Byron crippled an entire SPB group on the first round, which gave me a real problem as it was going to be vulnerable in a retreat. Stuffing a BHF into the group and going for -3 leftover points helped, but I did also run him out of a lot of ships including parts of his carrier groups and all the fighters.

Meanwhile, in 4309 we had a round of combat that neither of us wanted over the neutral planet in the Gorn-Rom NZ. Byron was going to retreat out after offering approach, but I didn’t want him stripping the defense PDUs to make seizing it easier later, so I accepted. I certainly came out ahead, but the Romulan navy is still feeling a bit fragile.


Coalition: 381.3 EP (x2) + 520 (bases) + 795 ships (/5) = 1600.6
Alliance: 446.4 EP (x2) + 445 (bases) + 860 ships (/5) = 1681.8

So not only has the tide turned, but the Alliance is now officially winning on VPs, much earlier than I had expected. This is a combination of the Coalition economy contracting at a furious pace, and the Alliance picking up about 100 VPs. Most of that is also the economy, and the fact that most of that is the unreduced Federation economy just makes it worse. Overall, my ship count is almost exactly the same as last turn, but the Romulans lost 8 ships overall, which was made up for by the Lyrans having a quiet turn. The Alliance has picked up 45 ships overall; more or less spread around, though the Federation alone is up by 23.

The good news is that I had no real disasters this time. Losing the double-BATS at 2014 for relatively cheap hurts some, but it was certainly an important target, and I do have bigger worries. I’m more surprised that the Kzinti did not spend any real effort trying to take half their space back from the Lyrans, or that if they were going to to go for the Klingon capital again, that there was no Federation help.

└ Tags: bgg blog, F&E, gaming, KwH
2 Comments

Konya wa Hurricane Coalition Turn 18

by Rindis on December 22, 2018 at 12:00 pm
Posted In: Konya wa Hurricane

After the disaster and near-ending of the game last turn, this has slipped far down the priority list, but the game does continue. Bryon (and I, to be honest) is hoping we can get this to the introduction of PFs, which is getting close.

Income took a fairly deep cut this time, with the Klingons losing about 25 EP, and the Romulans down another 6. The Lyrans were up 1.3 EP due to a lack of raids into their space, for a total contraction of 30.7 EP (all before exhaustion), for a total income of 285.975 EP after exhaustion. Unlike last turn, I actually mostly prioritized new ships, planning to return to an emphasis on repairs next time.

Builds:
Klingon: B10, C7, D7, D5W, 5xD5, 2xAD5, F6, 2xFWE, 3xF5, F5J, B10->B10V
Romulan: NH, FHF, 4xSP, SPM, 3xSK, SEH, WE, [BC]->G-BC, WE->KE, SP->SPM, SK->SKE
Lyran: DN, TGP, NCA, CW, CSV, CWE, DW, 3xDWE, 3xFF, FRD, FTM

The Klingons cancelled their C8 for an extra roll on B10-3 (which got 5 & 1…) and it is now a couple turns from completion (34 points), while B10-2 Insatiable finished, and was converted to a B10V. Meanwhile, a D7 was substituted out for the first C7, starting the overall trend to bigger cruisers with CR 10. The Lyrans built a second scout-carrier, but the Romulans still need to find hulls and budget for their free fighters (another CNV would be nice, if expensive).

Both the Klingons and Romulans put a war cruiser into the the Raid Pool. Overall, raids did not go well. No raiders were damaged, much less destroyed, but called up POLs still managed to cause most of them to retreat. The Lyrans hit Kzinti space with both of their raids, and succeeded with one. All four Klingon raiders and three Romulans went for Federation space, and destroyed one FF, while disrupting three provinces. The SHR went after the Fed LTT in Gorn space again, along with another raider in Gorn space, but neither got anywhere.

The Klingons have a major cripple backlog to take care of, and the Romulans have a few more cripples than I’d like, so it was decided to keep their operations fairly minimal. The Lyrans meanwhile have worked through just about all their cripples, and went on the offensive, working to take a decent chunk of Kzinti space to force them off of an offensive deeper into Klingon space. Elsewhere, the Lyrans were limited to moving back towards supply, now that their grid in Klingon space had collapsed. The Romulans did a limited offensive, pinning a Federation reserve, while trying to retake some of their captured planets.


Lyran offensives.


Romulan counteroffensives.

The Federation only could move two reserves, and only used a couple ships from them, keeping me from taking 2106, and interfering with a Romulan sweep of ships out their space (I’d lost track of the fact that there was a reserve in range), while the Kzinti reserves went to the small fight in 1505.

Battles:
3318: SSC: Federation: crip FF
1410: SSC: Federation dest cripFF
2106: SSC: Klingon: dest 2xF5
1202: Kzinti: dest POL
1101: Kzinti: dest POL
0801: SSC: Kzinti: dest POL
1003: SSC: Kzinti: dest POL
1504: Retreat after denied approach
1505: Kzinti: dest CM, 2xDW; Klingon: dest E4A
3415: Federation: dest DWA, DE; Romulan: dest 2xSK, crip KE
3612: Romulan: crip WE, capture planet
3509: Federation: crip NCL, FF; Gorn: dest BDE; Romulan: dest VUL, K7R, crip 2xSK

Byron had left a single crippled Federation FF next to the Klingon capital, and I sent out a couple of cripples to finish it off, and retrograde back home. About a day later I remembered that the Federation 2nd Reserve was in range of the fight if he wanted to give me a big problem (…and himself a logistical problem), but the 2nd sent a CA and FFS to save 2106 instead, and my F5Ls took care of the intruder with no problem. The latter fight rolled 4 vs 11 in SSC, and I figure the Fed squadron just did a textbook Kaufman Retrograde to the poor F5s.

Part of the plan was to get the Kzinti Earl’s and Duke’s fleets on 1407 out of supply, and limit his options next turn. The reserves into 1505 threatened that, but I managed to retreat off of there (taking the planet, even temporarily would have been a good bonus, but not why I was there) onto the reserves, which weren’t very big, and took losses trying to stand up to a full line.

Sadly, after all of this, the main plan failed, as I hadn’t realized the Kzinti had one more POL to call up, which can restore supply to 1407 after a lot of effort to cut it off. If I’d actually taken 1504, it would have still worked, and I might have been able to do that, at a cost of notably more casualties, and probably fewer Kzinti casualties.

└ Tags: bgg blog, F&E, gaming, KwH
 Comment 

SH3 The Coming of the Meteor

by Rindis on December 2, 2018 at 12:00 pm
Posted In: SFB

Patch and I recently finished off a try at this old scenario (I think it’s from the original pocket edition) in the Basic Set. It has some of the ‘feel’ of the Original Series adventures, and is a neat premise:

In Y160 a massive meteor was spotted headed for the industrial colony on Pollux IX. The Federation heavy cruiser Kongo, under the command of Captain Phillip Kosnett, was dispatched to avert the disaster. When Kongo arrived on the scene, however, Kosnett discovered that a Klingon frigate was shepherding the meteor.

The meteor starts 10 hexes away from the planet (and moves on the first impulse of every turn, so it’s about nine turns away), with the F5 Khedive next to it, and Kongo 22 hexes from them. The asteroid can be towed by a ship facing away from it and tractoring it for 16 impulses (…speed does not matter). Victory is purely by how close to the planet the asteroid gets to the planet, with even two hexes being a danger as small fragments will still hit the colony, killing a tenth of the inhabitants, and causing a draw. The asteroid can be ‘destroyed’ (broken up into pieces by 400 points of damage), which does not affect the ability to tow it, and does make it less dangerous to the planet.

We had to have a bit of discussion about the MacGuffin, as while the scenario quite clearly calls it a ‘large asteroid’, it doesn’t call out that section of the rules (which I hadn’t known of, I remembered the general asteroid field rules, and the small moon rules…), and defines that it will destroy any unit in a hex the asteroid enters. Large asteroids don’t prevent ships from entering its hex (and they can even land on it), or block fire, or anything you might expect of something large enough to crush whatever is in a hex 10,000 kilometers across. We did go with the large asteroid rules, and drop the normal asteroid ‘dodge’ rules as it is supposed to be a singular object instead of a debris field. It’s one place where clearer instructions would help.

Patch volunteered to take the F5, and a few impulses in realized just what he was in for. (I had expected he’d stick me with figuring it out.) He went a reasonable speed of 16, while I went 18 to get near the asteroid on the first turn. The CA is at WS-2, or the second turn of arming of photons, and I fully overloaded one, while keeping the others standard, while the F5 is at WS-1 and had to charge up phasers, and it also put up 2 points of ECM to discourage longer-range shots.

On the first impulse, the asteroid moved, and Patch lowered shield #1 to put a transporter bomb in front of the meteor. This did change my initial approach plan, but we both commented later that while a great opener, a second mine behind the asteroid would have been much better, and forced more maneuvering from me (as it was, I just sideslipped enough to bring me around behind the meteor). As I headed in, the F5 got underway, and did a clockwise loop that ended with the disruptors out of arc until he turned directly in on Impulse 26, with the range 15 and closing. Patch fired at that point, hitting with one disruptor on shield #1, and we finished the turn at range 11.

Only being three hexes from the meteor, I slowed to speed 10, charged up a tractor beam, partially overloaded a second torpedo, set one for proximity fuse, and held a HET in reserve in case Patch got too close. Patch stayed at 16, and dropped all EW while I put up 6 ECM. Patch turned away on Impulse 2, and on Impulse 4, with him about to go out of arc, I hit him with the prox photon on the #3 shield. Patch then increased his ECM to 1, presumably to discourage any more of that….

On Impulse 13, I slipped in ahead of the asteroid, and attached the tractor beam. On 16 Patch started coming back in for a run at my rear, and I launched a shuttle to provide some cover and/or drone defense. On 20, Patch fired his overloaded disruptors at range 8 as he was about to go out of arc again; thanks to my ECM shift, only one hit on shield #3, partially countered by the one point of reinforcement I’d afforded there. On 26, he turned directly in, launched a drone the following impulse, and my towing took effect on 29 to get it out of line of a direct impact with the planet.


Turn 2, Impulse 4, showing movement throughout the turn.

For the third turn, I kept up the tractor while still paying for speed 10 and an HET, and 5 ECM with 1 ECCM which left very little power for everything else. I finished overloading the second photon, and started reloading tube D, and had to pay a half point out of batteries to balance it all. Meanwhile, Patch’s F5 dropped to speed 14 and didn’t bother with EW.

I launched a second covering shuttle on Impulse 4 as Patch continued to come in. The first shuttle fired at the drone, but only did three points on a bad shot. Patch came in with a second drone following, and the second shuttle fired at him on 14, doing 2 points to #4 on another bad roll at range 2. On 16, the F5 passed directly behind the CA on the oblique, and unloaded it’s best shot at range 1: with the +2 shift, one disruptor missed, and the five phasers did 18 damage, I blew the remaining batteries to take five internals, which knocked out two phasers and one power. I had fired back with two of the side phasers to do 11 to his #2, and the other two were used to shoot down the second drone and finish off the first one; which thankfully weren’t Type-Vs. (Patch pointed out that it’s really rough to take two-space drones when you only have one four-space rack.)

I seriously contemplated cutting the tractor as he came out of his pass, and burning the HET to pump three photons (two overloads) and two phaser 1s into a rear shield at point blank range (it was, after all, the general plan of all those expenditures), but I’d already had the second towing move, and the third one would come up before the end of the turn, and the F5 was empty. So, I stuck it out, got the third hex, which pulls the asteroid completely out of range on Impulse 29, and Patch basically conceded at the end of the turn.

Afterword

With the asteroid out of the way, I could basically go slow near it, and keep myself pointed at the F5. It would get pounded if it tried to tow the asteroid back into range. I could have pounded him during turn 3, but sticking with the asteroid meant I didn’t need to go back to it later.

There were a few more options that Patch had: He could have put another TB into where I’d go when I towed, he could have powered up a suicide shuttle (though he was probably a bit thin on power) and launched it during his pass. I wasn’t going anywhere, and it’d absorb even more of my fire. A scatterpack could have been interesting… but Patch still needs to get Advanced Missions.

I knew it was going to be an odd match, and wasn’t sure how it would play out. One thing I finally realized is that it was written back when plotted movement was the norm, and that could give the F5 the edge it needs here. Even with plotting, the F5 knows where the CA is going eventually; the CA has fewer guarantees about the F5.

Suggestions:

There seems to be a habit of not going back and really reexamining older scenarios when republished in later editions. Along with plotting, it looks like this was written before ‘speed is life’ became a real mantra, and it’s expected that things will proceed more slowly. Also, the asteroid really needs more clarifications in the rules. I’ve got a few ideas on how this scenario could be refitted, though I don’t have any idea how balanced any of it might be.

First, I think the variation in SH3.62 might work a lot better. Adding a CL and D6 to the mix could be very interesting. It evens the firepower out a lot, and more importantly, the D6 and F5 can threaten to try and dodge around one Federation ship to get at whichever one’s towing.

Second, it’s too easy for the CA to park next to the asteroid and just put everything into reinforcement for a turn or two. I deliberately didn’t do this, and kept to speed 10, but there was no reason go even that fast on Turn 3. It gets even worse if you use mid-turn speed changes to slow down right as you get to the asteroid, and speed up when it’s time to break the tractor. My thought is instead of spending sixteen impulses towing, you must spend so many movement points (calculated off of Practical Speed) to move the asteroid one hex. This could allow faster towing, though getting a CA to go really fast takes some doing, and possibly means cutting power elsewhere. Eight movement seems like a likely base figure to try, since that means speed 16 for the same rate as the original, though if you’re using mid-turn speed changes, it should definitely be something like 10 movement. (This could also be translated into energy expended if you want to make it harder for the F5 to tow back, or to make the CA and D6 the obvious towing candidates in the four-ship version.)

Lastly, this seems like a perfect situation to give the Federation some firing restrictions. Chasing down the F5, blowing it up, and then towing the asteroid out shouldn’t be too hard (it is a fixed map), but it’s not very Star Fleet. There’s already a rule that the Klingon captain can claim “it was all a horrible mistake”, and all combat halts. A simple solution would just be to use the Non-Violent Combat system (D6.4), which would allow the F5 to feel safer about losing a shield or two. (We’ve had a scenario where it was used once, and small ships can generally not worry about the big CA too much.) A more custom rule could be interesting though: Don’t fire unless the Klingon has. Don’t fire anything that could cause internals (on best rolls) unless the Klingon has done internals.

└ Tags: bgg blog, gaming, SFB, Y160
1 Comment

Konya wa Hurricane Alliance Turn 17

by Rindis on October 7, 2018 at 12:00 pm
Posted In: Konya wa Hurricane

The Alliance economy climbed by forty points this turn, showing just how out of control the situation is. Even the Hydrans went up 14 EP before exhaustion (for an actual increase of 10.5 EP), with the Gorns showing the smallest improvement. After exhaustion, total income was 378.1, and repairs hit a new record, with the Gorns providing most of the increase. This was also helped by getting Orion back, which I just had had no chance to deal with last turn.

Builds:
Federation: DNG, CA, CF, NCA, 10xNCL, NCD, NSC, 3xDW, 2xDWA, FFB, 9xFF, BP+, 2xFF->FFB
Kzinti: NCA, 3xCM, 3xDW, 2xFFK, 2xFKE, FF, CVL->CVD
Gorn: CCH, BC, CM, 2xHD, LTT, BD, 2xBDE, BDS, DD, BD->BDS
Hydran: MKE, HR, DWE, 4xCU, MB->BATS

The good news is that Kzinti shipbuilding is curtailed, skipping both their CV and BC. The Hydrans are mostly treading water, but are installing a BATS on their capital, which I probably won’t be able to dislodge. And of course, the Federation and Gorns are building ships much faster than I can.

Raids concentrated on the Klingons, with all four Kzinti raids hitting Klingon provinces near the capital, and three Federation raids just south of it. Five of these resulted in disruptions, and I lost a JGP and D5 and had a D5 crippled in the reaction fights. The Hydrans hit two Klingon garrisons in Hydran space, and part of the captured neutral zone. I didn’t bother responding to the last, but the increased garrison groups paid off by destroying the single existing THR. Another Federation raid hit a D5 near the Kzinti border, but good rolls and a reacting F5L killed the DNL for no loss to the Klingons. The last two were in Federation space, one which killed a D5 while a WE cloaked away from the last one. The Gorns sent one raid into west Federation space to kill a garrisoning F5, and Romulans escaped from two attempts to kill garrisons just inside Gorn space, and a last raid disrupted a Romulan province.

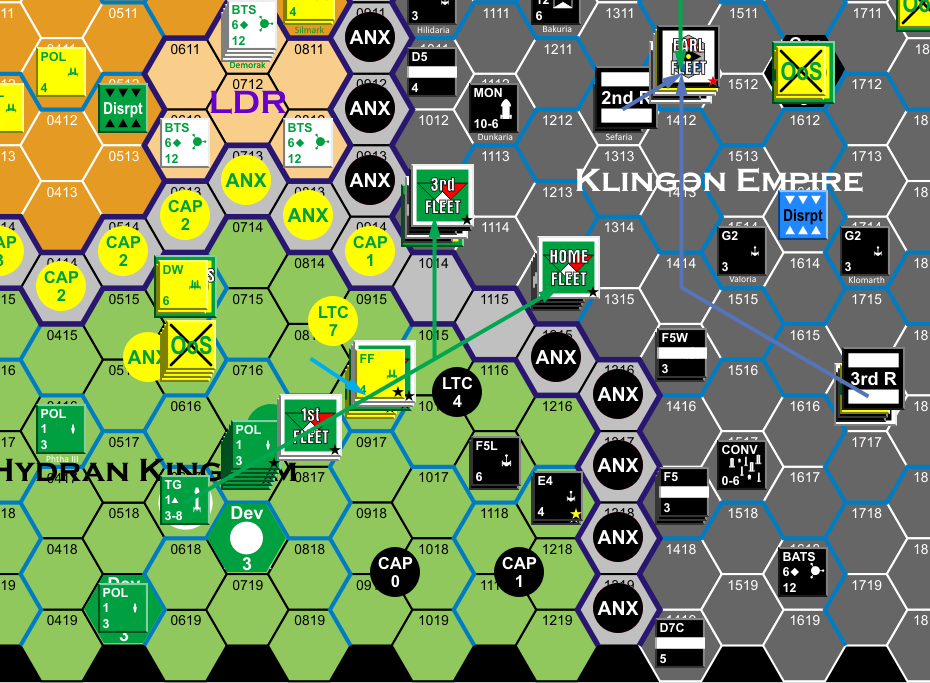
The Hydrans naturally attacked toward the Lyran-Klingon corner again, and I intercepted a good amount of it, but he was still able to put a good fleet of about 20 ships on 1013.

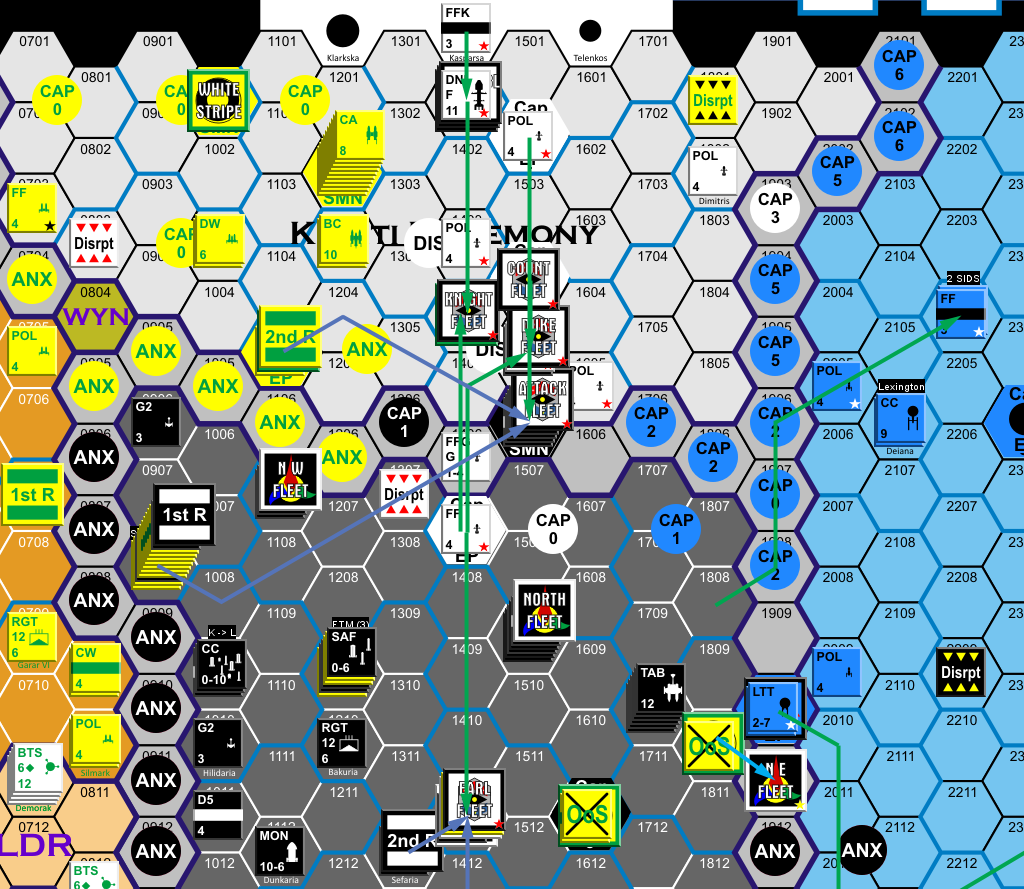
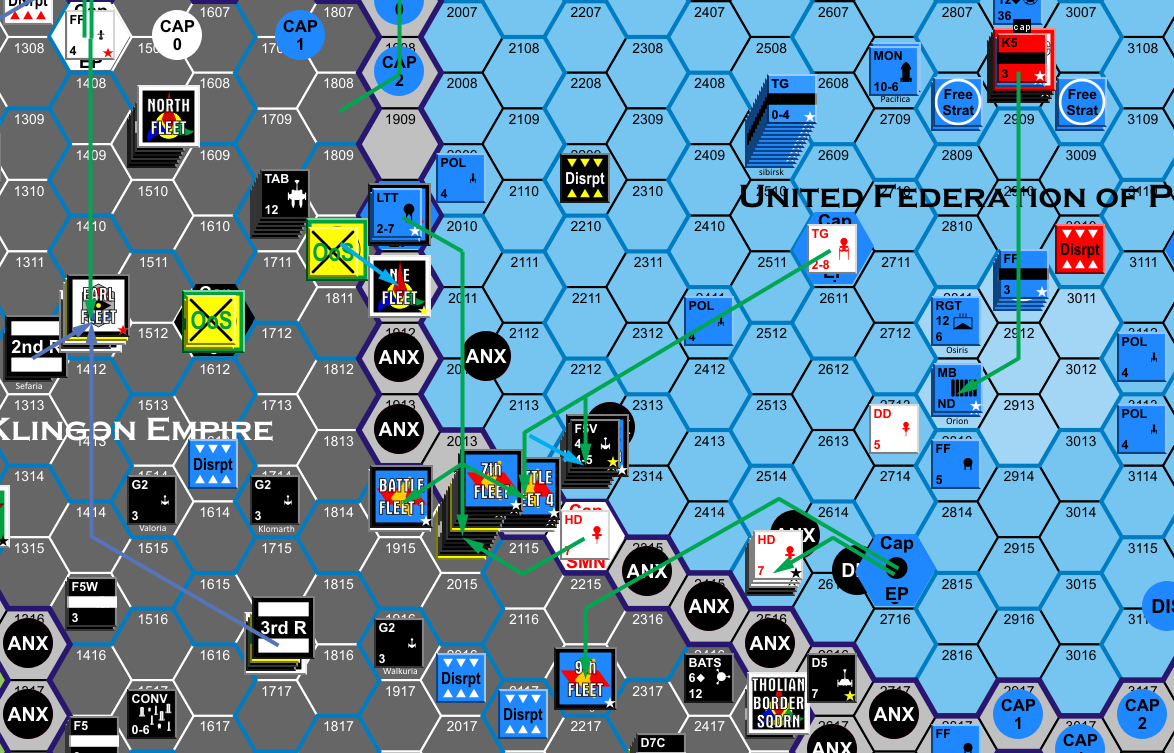
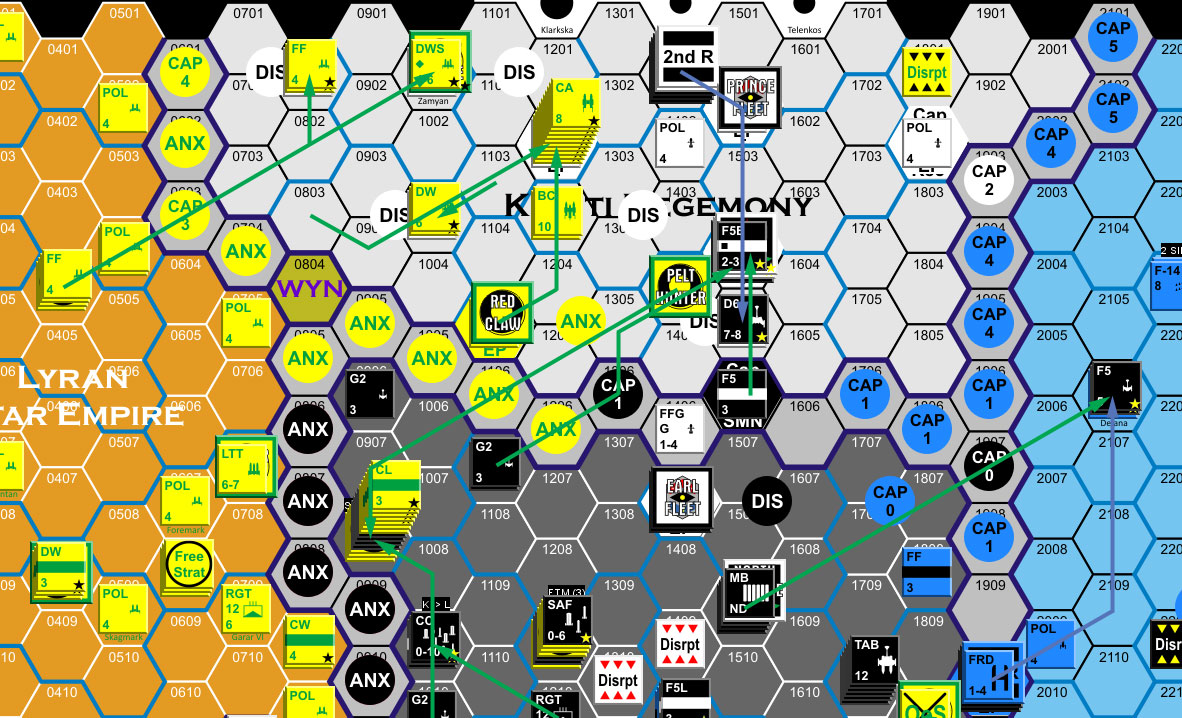
The Kzinti started driving south immediately, scattering fleet elements on anything in their way, including sending a bunch of Auxes after the garrison on 1504. The North Fleet started a fight at the NZ planet in 1506 by reaction, but further reinforcements freed up the Kzinti garrison already there. Federation forces moved into to pick off various small forces, and partially pinned the Lyran and Klingon fleets at 1810 before the Kzinti sent another wave at the Northern Reserve SB and BG Harbinger at 1611.

Then the 3rd Fleet moved to the Klingon capital. Or tried to, as NE Fleet moved to intercept… which caused consternation. Byron had entirely missed that it was there underneath the Lyran Fire Squadron marker. Since it was a heck of a thing to miss, I let him go back and rework his moves some, but no matter what, he wasn’t going to have nearly as much in the capital as he’d originally thought. Part of the original planned move was to pin the Klingon 1st Reserve on 1312 (assuming it didn’t react), which he gave up on, but I reacted it into the capital at one point anyway, as he still had good opportunities to do so with the Kzinti, and it was to his advantage to keep the capital as lightly defended as possible (I’m not sure why he didn’t spend some more effort on it, as well as the 3rd Reserve on 1209).

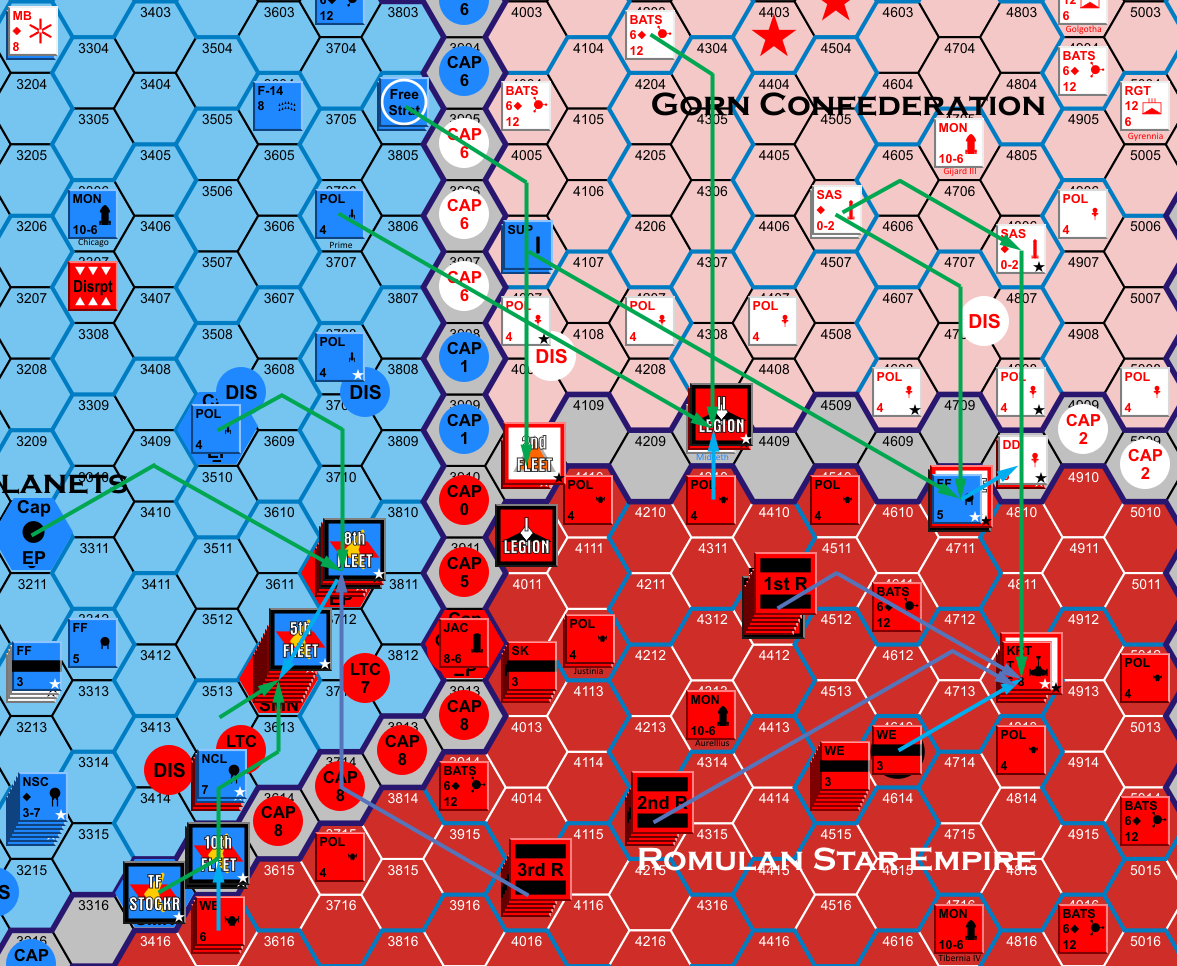
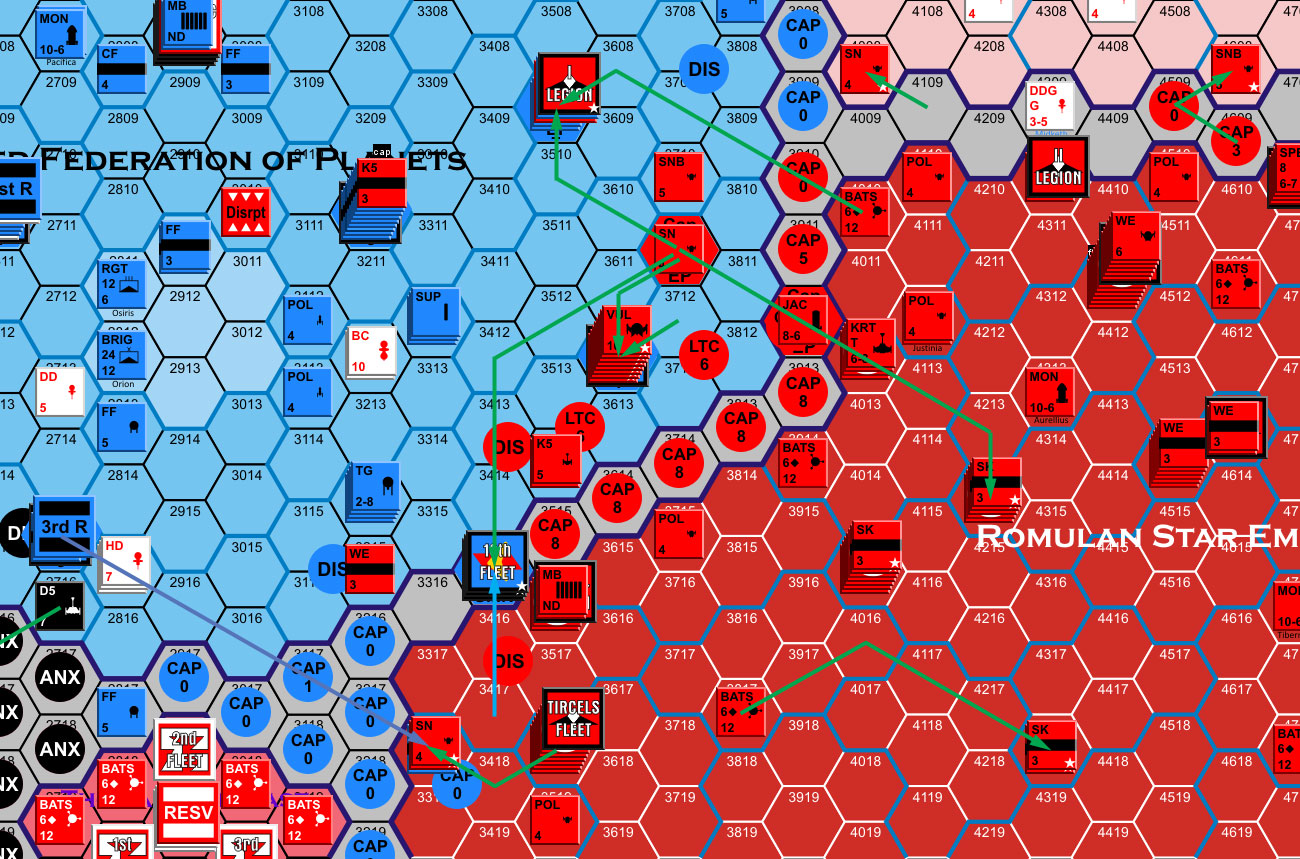
Over on the Romulan side of things, two major thrusts developed: one near Tholian space aimed at picking off the BATS in 3319 and retaking 3415 as well as threatening the SB, while Gorn and Federation forces also concentrated on the corner area near all three. One major thrust also went to 3612, which I stopped part of, but not enough to save the planet, since that would just make 3711 vulnerable.


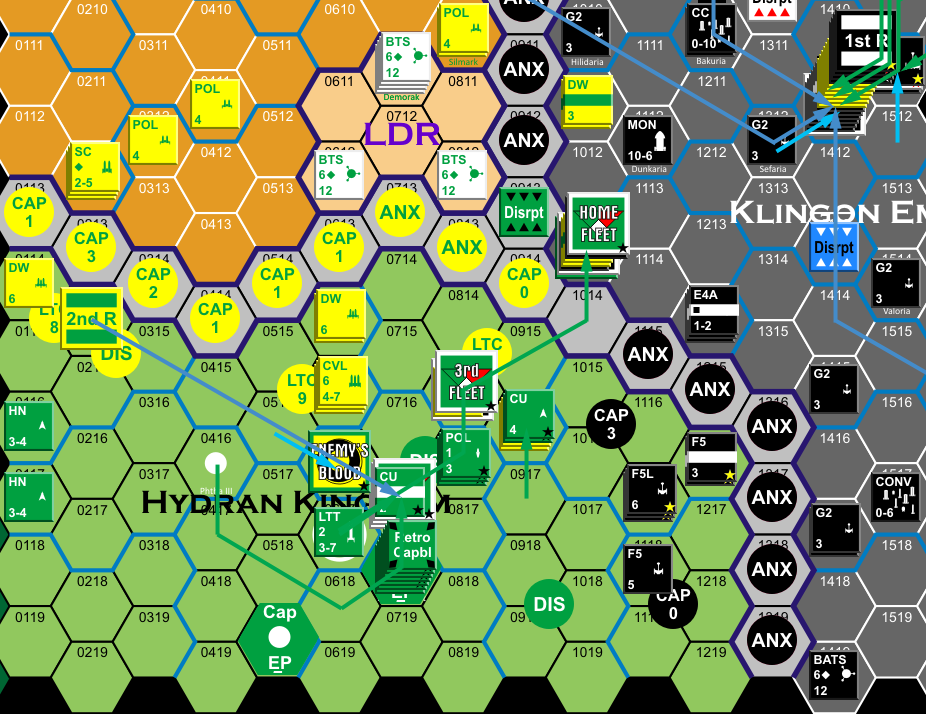
Second strike at 1013.
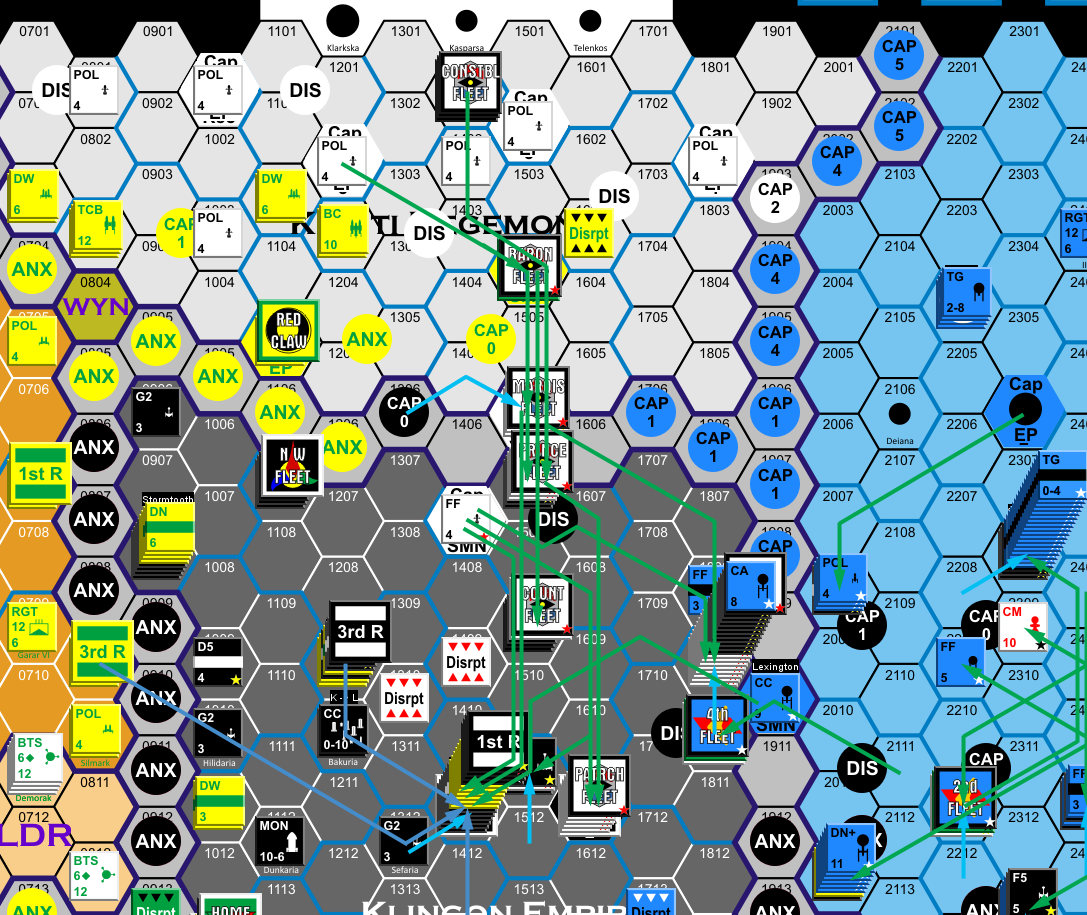

The Kzinti flood.


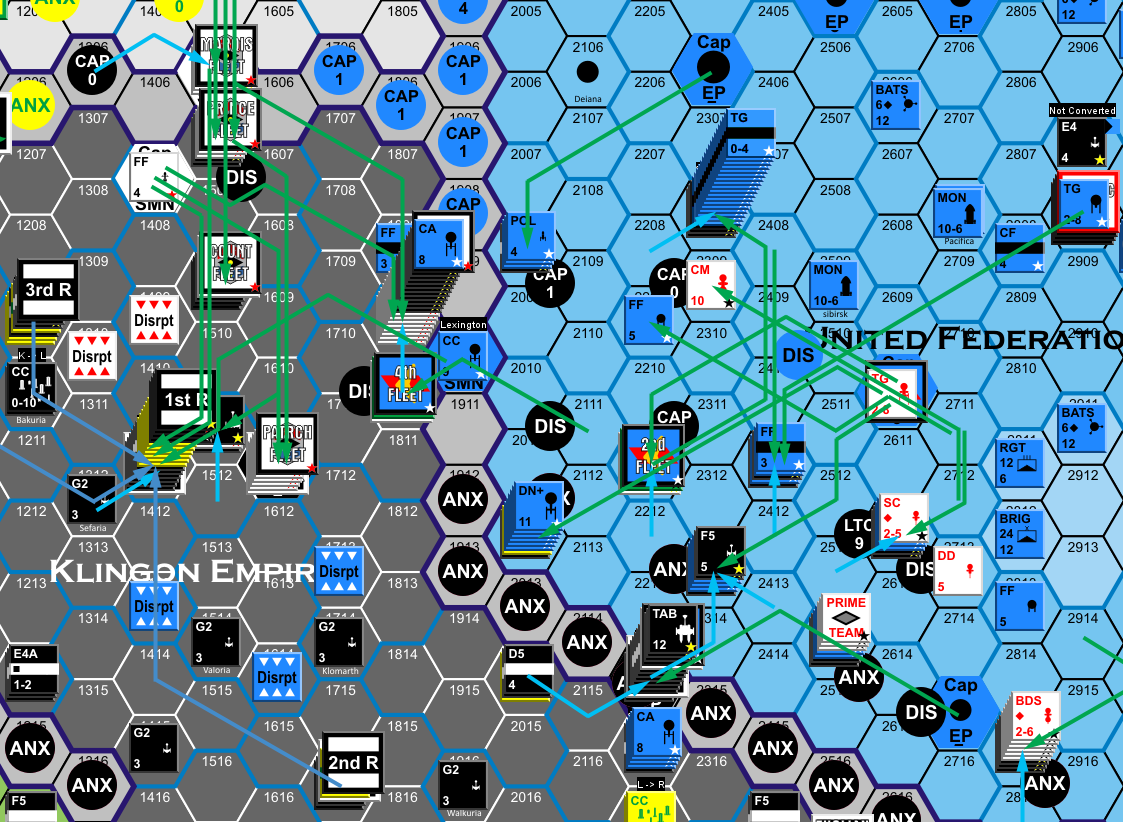
Federation tidal wave.


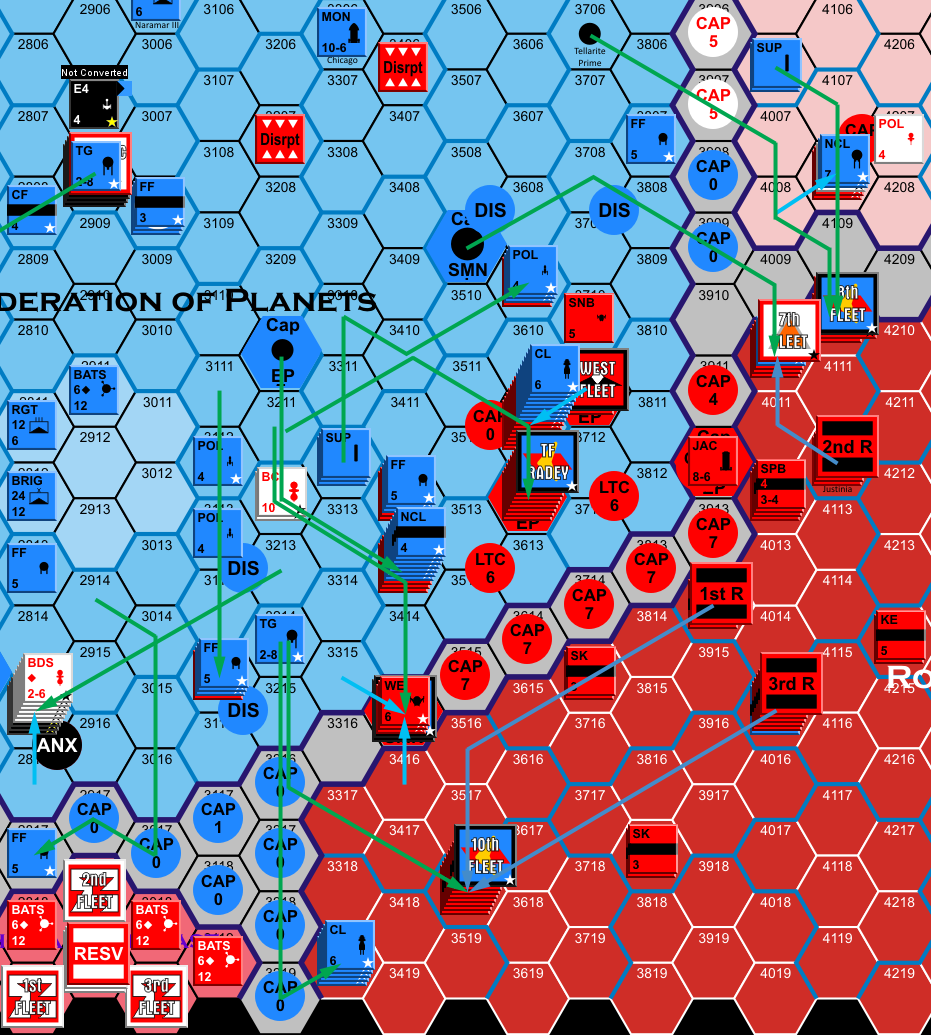
Losing the rest of the are near the Tholians.


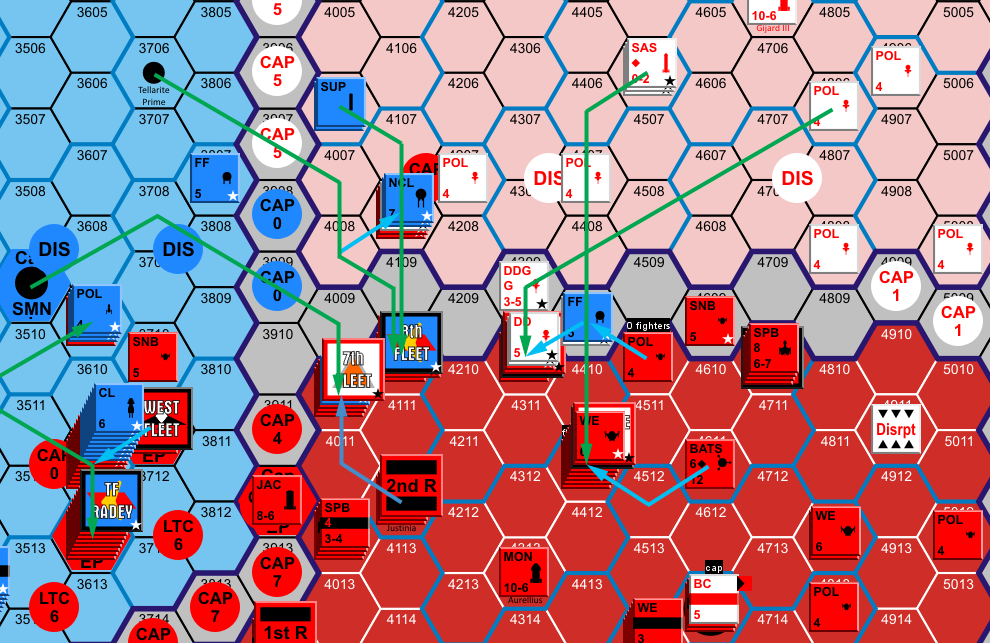
Gorn border offensives.

Naturally, all available reserves (three: Klingon 2nd and 3rd, Lyran 3rd) went to the Klingon capital. The Lyran reserve in Hydran space went to help near the Hydran capital, and one in 0707 had nowhere to go. I had to think long and hard about how serious 3518 was, but sent both Romulan reserves in range to make sure of the SB. Meanwhile, the 2nd Reserve went to save BATS 4010.

Battles:
0916: SSC: Hydran: dest 2xCU
2008: SSC: Klingon: dest cripD5
2313: SSC: Klingon: crip F5; Federation: crip FF
2411: SSC: Klingon: dest 2xF5
2612: SSC: Klingon: crip F5
2514: SSC: mutual retreat
2613: SSC: Klingon: dest cripF5, F5S
3115: SSC: Romulan: crip WE
3412: SSC: mutual retreat
3609: SSC: cloaked evasion
4108: SSC: cloaked evasion
3319: Romulan: dest BATS; Federation; crip 2xFF
2308: Klingon: dest E4A
2309: Klingon retreat
2815: Klingon: crip D7C, F5; Gorn: crip HD
2012: Klingon: dest F5; Federation: crip FF
2215: Klingon: dest BATS, cripD5
2214: Klingon: dest FRD, SAV, cripD6, cripD5, crip F5E, E4A; Federation: dest DE, capture planet; Gorn: crip 2xCM
1507: Klingon: dest F5L
1809: Klingon: crip D6, F5; Federation: crip CA; Kzinti: crip CM
1810: Klingon: crip F5; Lyran: crip CW; Federation: dest CA
1611: Kzinti: dest FKE
1411: Klinshai: dest MB; Kangor: dest SB, 4xPDU, devastated; Kangorax: dest 2xPDU, devastated; Kangor-Ultra: dest 2xPDU, devastated; Kadrak: dest 4xPDU, crip SB, devastated; Drakis: dest 2xPDU, devastated; Shadrak: dest 2xPDU, devastated; Klardon: dest 4xPDU, devastated; Vordon: dest 2xPDU, devastated; Aradon: dest 2xPDU, devastated; Klingon: dest D5W, 2xD5, F5E, crip 3xD7C, 2xD6M, 6xD5, D5V, AD5, 3xF5, F5S, capture MEC; Lyran: dest CWE, DW, FF, crip STT, CW, CWE, DW, FCR; Federation: dest BT, NCA, CA, NCL, 3xCL, 7xFF, crip CA, 14xNCL, 5xDE, 2xDW, 8xFF; Kzinti: dest 2xMSC, CLD, 2xDW, FKE, SDF, crip CC, 5xCM, 5xMEC, CLE, DW, 3xFKE, 2xEFF, 3xSDF
1511: Kzinti: dest FF
1509: Retreat after declined approach
1504: Lyran: crip 2xCL; Kzinti: crip FF, capture planet
1506: Klingon: crip F5, F5E; Kzinti: dest 2xFFK, crip FFK
1013: Klingon: dest BATS, F5W, F5, F5J, crip D7, 2xD5; Lyran: dest MB, 2xDW, crip CW; Hydran: dest 3xRN, LN, crip RN
1815: Klingon: crip D5, 2xF5
0717: Klingon: dest F5L, E4, crip D7C, F5; Hydran: dest CU, crip HR
0816: Hydran: dest POL
2211: Lyran: dest DW; Gorn: dest BD
3518: Romulan: dest SKE; Federation: dest FFE
3612: Romulan: dest WE, SN, K5S; Federation: crip 2xNCL, capture planet
3415: Romulan: dest SP, SK, K5, crip KE; Federation: dest FFE, crip 3xNCL, capture K5, capture planet
3611: Romulan: crip SK, SKE; dest CL, crip FF
3413: Romulan: dest SNB; Federation: crip FFB
4110: Romulan: dest BATS; Federation: crip FF
4109: Romulan: dest SNB
4310: Retreat after refused approach
4411: Retreat after refused approach
4010: Retreat after refused approach

Some of the smaller combats went fairly well, including great rolls in 0916 to wipe out two CUs (who had little business taking on a DW and LTS to begin with…), but Byron managed to arrange for one retreating group to overrun the survivors of an earlier battle in 2613, and that wiped them out.

Byron put the entire pile of cripples from the destruction of the 3rd Fleet SB onto a patrolling F5V group in 2308, which sacrificed the escort to get away. This trick of finding battles for cripples so they can retrograde further has been getting common lately. The F5V was forced to retreat onto a waiting Gorn CM, but poor rolls allowed it to get away from that.

Overshadowed by other events, there was no real backup for my repair center on 2214. The Federation/Gorn force was bigger and better than what I had available, leaving me to pull some cripples out and a LAV.

I had the clever idea of using a fighting retreat to pour BG Harbinger into the capital from 1611, but of course Byron sensibly didn’t resolve that fight until later. At the capital itself, I started fighting at one system per round, determined to extract the highest bill I could over my own defenses. The outer systems quickly got stripped, and then it turned into the real brawl as he started taking on the two non-capital SBs, with me putting a line in front of both. Byron directed the PDUs over a couple of rounds, (when he didn’t drop damage on ‘6’s to force auto-kills…) while leftover damage reduced my mobile fleet to less than two lines worth. (Later on, I realized that cripples could go to the static forces of any system; handy if I wanted to sacrifice a few ships for more rounds against him… but it took a while to wake up to that.)

Midway through, I used the capital SB’s fighters to refill empty bays elsewhere on the same round that Byron captured a Lyran FF, and he took a round at Klinshai itself to blast the Lyran MB set up there, the FF aiding in a deception operation. I had command difficulties elsewhere, but but at the capital, I could bring out Insatiable, the almost-complete B10 that’s worth 19 on the line (no crippled side, so it still needed protecting in form). Another ‘6’ allowed him to kill the MB with 26 left over…. The Klingons mauled a MSC and dropped 61 with a mere ‘3’ roll. A ground attack to kill a PDU while he was there failed, and I ended up capturing the MSC. (With that damage, other ships died, but the random roll came up with the best of all of them.)

To my surprise, Byron left after only crippling the second SB. He’s correct that it’ll be a problem to repair, and isn’t worth a lot crippled, but I figured he’d want finish it off now rather than later. I picked off a couple things in pursuit, but both sides are pretty shattered. Of course, he has a lot more scattered around than I do, and the Klingon economy isn’t worth a lot at the moment…. Even after going through the logs in detail, I don’t know how many rounds this actually was, but it was probably in the mid-teens.

The fight in 1504 was interesting in that the Kzintis had 2xLAV, 3xSAV and no escorts. They ad-hoced a bunch of FFs so they couldn’t just be directed on, but it meant there was very little capable of pursuing me when I retreated (especially since I directed on one of the few FFs not busy escorting a slow unit), and Byron only realized the problem at that point.

I had the advantage at planet 1506 (where the North Fleet had reacted to) but I wasn’t entirely sure I wanted to tangle with a pair of CVDs with 24 fighters to punch through. But I went in, and picked off a couple FFKs in pursuit, though crippling the F5E is going to give me trouble, since the only spare light escorts there are E4As.

The Klingons rolled three better than the Hydran on approach to 1013, doing two less damage to a decidedly superior line. (If the Lyran STL hadn’t shocked last turn in the same place, I probably would have won the approach; that round at any rate.) I forced him to go through the co-located Klingon BATS to kill the Lyran MB, and kept rolling well enough to kill ships, which is something I’ve been needing to do to the Hydrans. But now the Lyrans have almost no supply into Hydran space.

Planet 3612 was something of a disaster. The Federation force was slightly small, so I decided to damage it and retreat, but but I was a good group, and I ended up sacrificing half my group to keep the carrier group intact rather than slowly cycle it through the repair process. I should have just sacrificed one ship and left, which I had almost done.


Coalition: 413 EP (x2) + 530 (bases) + 793 ships (/5) = 1673.2
Alliance: 409.4 EP (x2) + 435 (bases) + 815 ships (/5) = 1579.8

Losing the Klingon capital was a near thing. I had set up last turn to try and hold as many Alliance ships out of that vulnerable location as I could, which is why it didn’t happen. If I hadn’t had the NE Fleet in the way (which hadn’t moved on my turn because of its position in the way of the 3rd Fleet on 1910), the capital would have fallen, and I would have surrendered the game. There’s no real recovery from losing the Klingon shipyard at the best of times, and there’s certainly no SB that the Klingons can guarantee will be out of reach of a powerful Alliance force for six turns right now.

The last several turns has been me going from one disaster to the next, but this was the first one I was… partially ready for. I had hoped to hold the outer systems better than I did, and the economy is going to be a mess. The current plan is to go on a bit longer, but this game is on a short countdown to an end. There’s not a lot I can do to push back on the large number of places that are falling apart, and those are staging points for ever-larger numbers of Federation ships to pound what’s left. Worse, important Lyran bases have been taken out, so they will be largely useless next turn (and after unless I can re-establish some).

└ Tags: bgg blog, F&E, gaming, KwH
 Comment 
  • Page 1 of 17
  • 1
  • 2
  • 3
  • 4
  • 5
  • »
  • Last »

©2005-2025 Rindis.com | Powered by WordPress with ComicPress | Hosted on Rindis Hobby Den | Subscribe: RSS | Back to Top ↑