
HF7 Gotta Get Out
After seeing the SturmTiger in action, Patch and I returned to Hatten, with a morning American assault to retake the town. They get 4.5 turns to take a building and make sure there’s no GO Germans in four others. After a couple of defenses that just came apart at the end of the scenario, I went with the Americans.
The Germans get ten squads, “?”, MGs, one PSK, and a choice of ATG or 81mm MTR plus second PSK, and Patch took the former. On turn 2, they get a pair of Pz IVs. Patch rubbled U12 and X15, with the random rolls rubbling R10 and W14; the center two would change the action quite a bit. With a field of “?” facing me it was hard to tell just what the defense was geared around, since there were counters in all the obvious places, but three of the foxholes he got were around V12, and it is the obvious focus of a defense.
The Americans come on with eleven squads, two each MMG, MTR, BAZ, four Shermans, a M3A1 HT (w/BAZ on board) and a MMG HT (12FP of MGs, which only overlap to the rear, and a free—by SSR—667 squad). I set up with a decent group headed for the main victory building, while the majority of the troops were to get into a nearby hedged-off area. From there, they should head north towards further goals, and the second group likely converging on the V12 area, since there’s a lot of buildings and orchards to make progress difficult. The Americans get (effectively) dispersed OBA Smoke centered on two hexes picked before setup, and I went for fairly cautious close targets (looking at it in play, I think I should have gone a little further back). There is also a dawn low-light LV for the first two turns (which we remembered for once).
My first move was running a HS into AA18, which had a Dummy (very exposed, and therefore likely, but…). My second big move was an armored assault to the hedgeline, which finally drew fire, getting a 1MC to pin a 8-0 and break both squads. Thanks to the Smoke, I got next to Y18 and broke him with my first AFPh shot, giving me control of the hedged-off area.
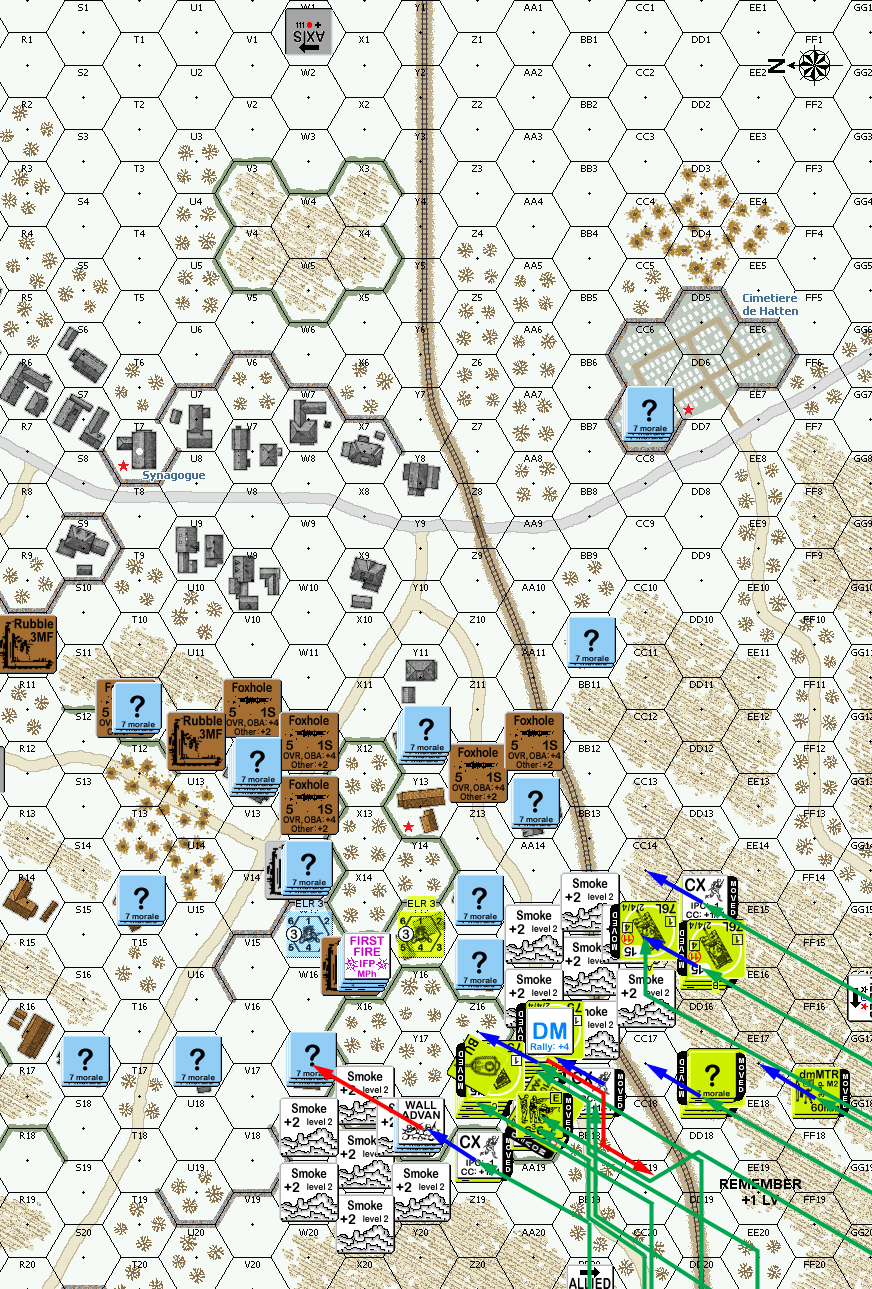
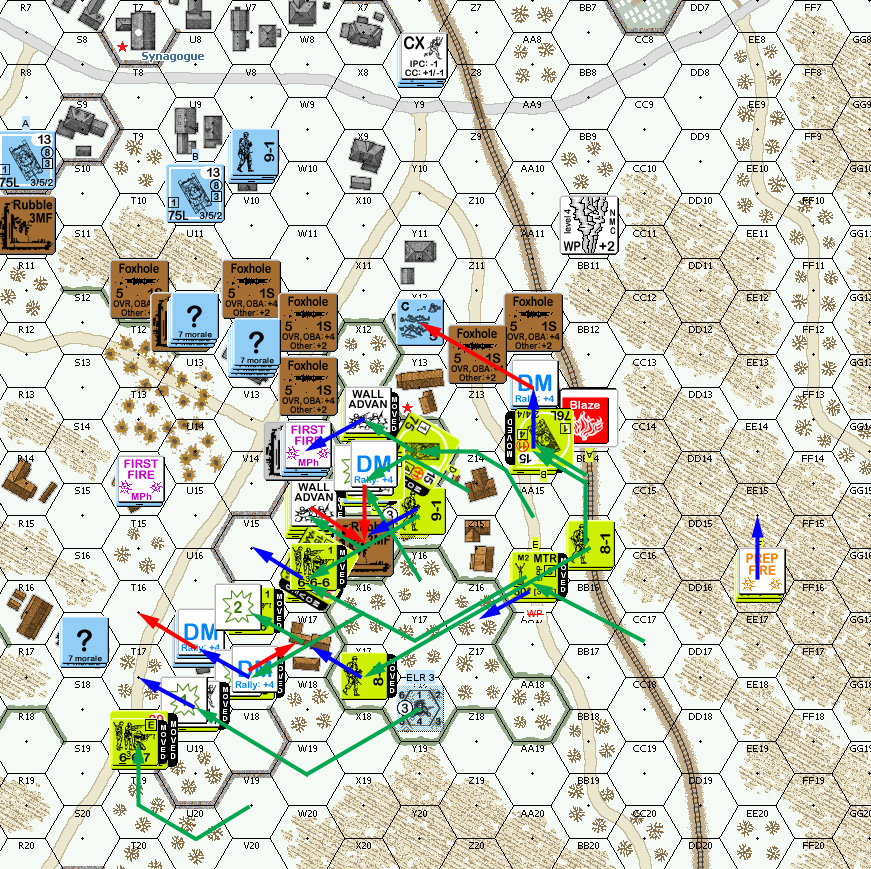
Situation, American turn 1, showing the full active board. North is to the left.
Patch skulked to the east, and started pulling out of the Z14 cluster of buildings for his first turn. With the smoke and all, my only activity was to assemble the MTRs.
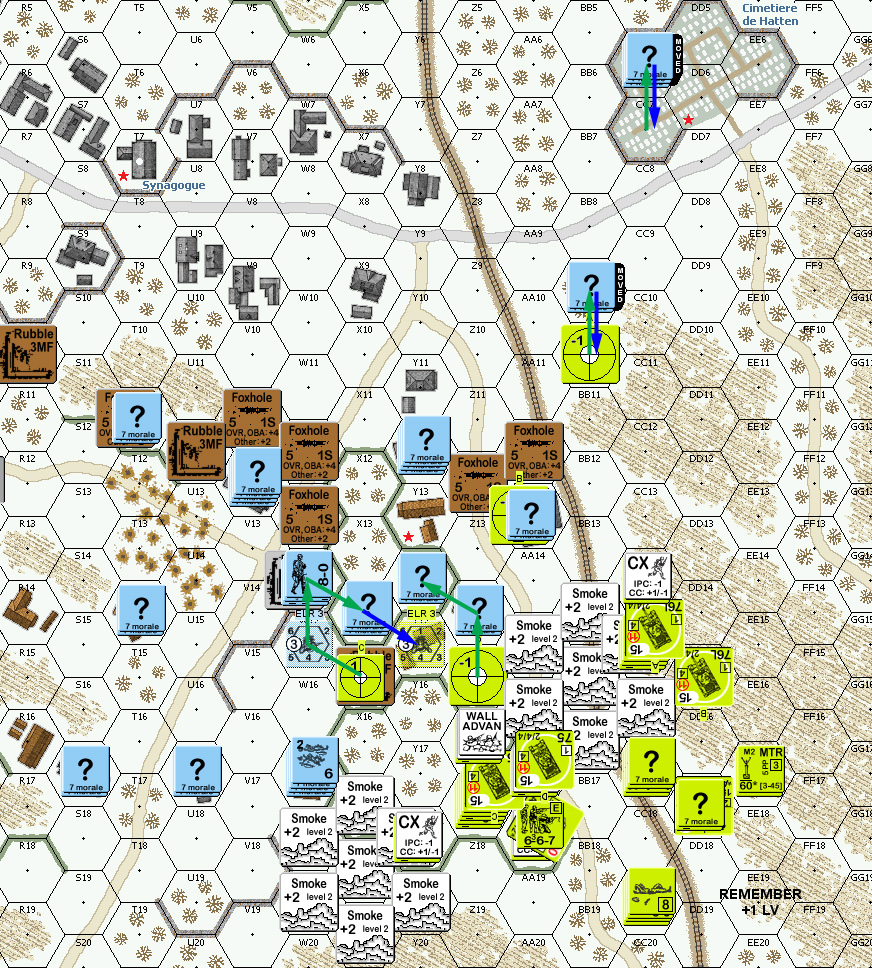
Situation, German turn 1.
For my turn 2 RPh I self-rallied my leader, and got both squads back. The pre-game smoke went away, but the LV was still in effect. The MTRs prepped, but didn’t do anything past setting of Patch’s sniper, who pinned the Y18 HS. I searched W17, which turned out to be a Dummy plus the broken squad. A big move put a squad into Y15, which also turned out to be a Dummy. Z14 opened up as I moved adjacent, breaking a squad. Out in the plowed fields, Patch killed an advancing HS, though he cowered to cancel a planned firelane. I tried to get at AA13, but Patch broke the armor assaulting troops as they came adjacent. Worse, the squad got a PF in final fire and killed the Sherman, but the squad ELRed from the backblast. Advancing fire broke Z14, and I advanced into Y14. I was CX, but thankfully, he didn’t manage ambush, and we both missed, tying up his squad in melee
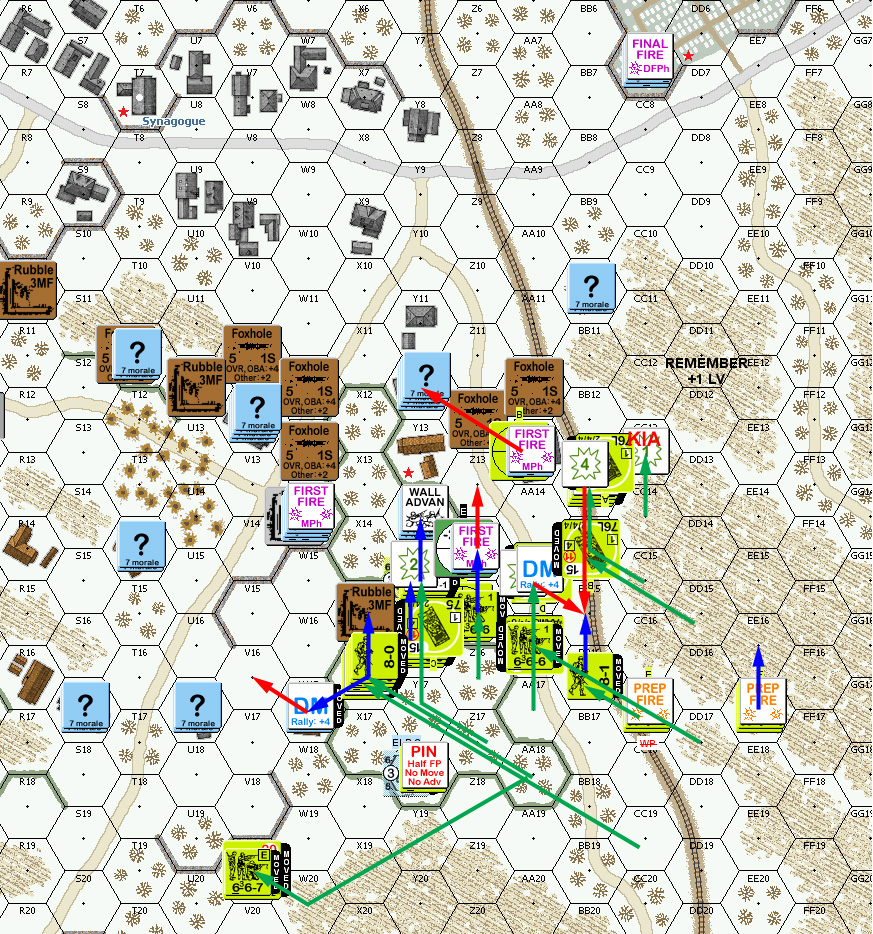
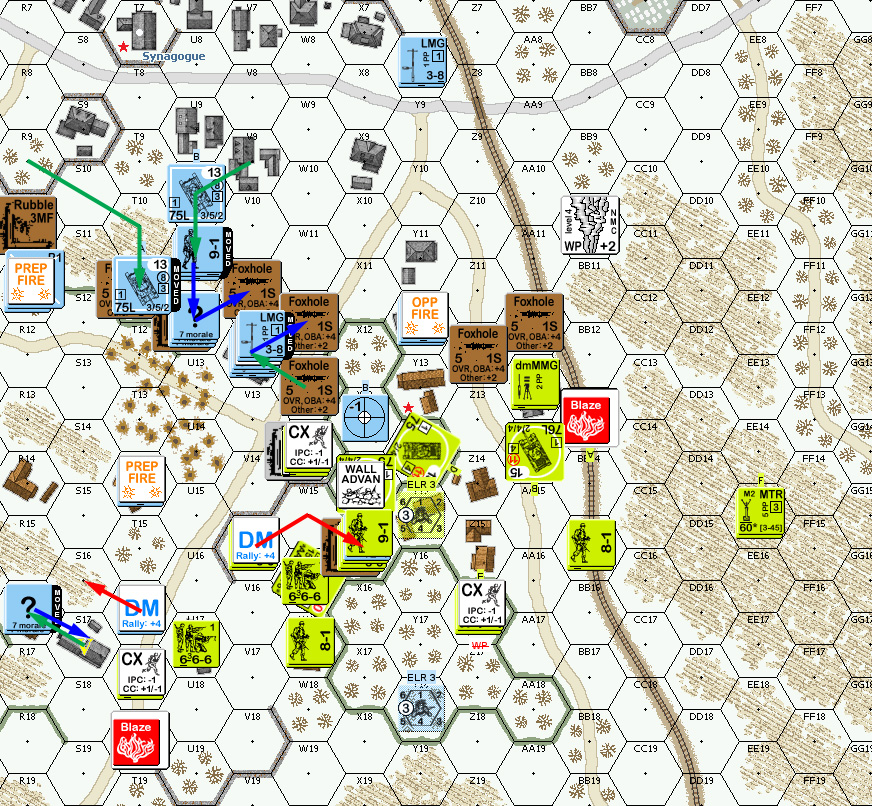
Situation, American turn 2.
I rallied one squad for Patch’s RPh, while the Pz IVs got set to enter on/near the paved road. To my surprise, Patch positioned them extremely cautiously and far back (he did admit to being a bit spooked by the BAZ 45 TH table, especially the 8 TH at range 3). He pulled out of Y12 and the graveyard, and I ended up firing into the melee. With 24FP, anything could happen, but I rolled high and cowered for a NMC that broke Patch’s squad while leaving me intact (the other way around seemed so much more likely…), and his squad was killed attempting to withdraw.
Situation, German turn 2.
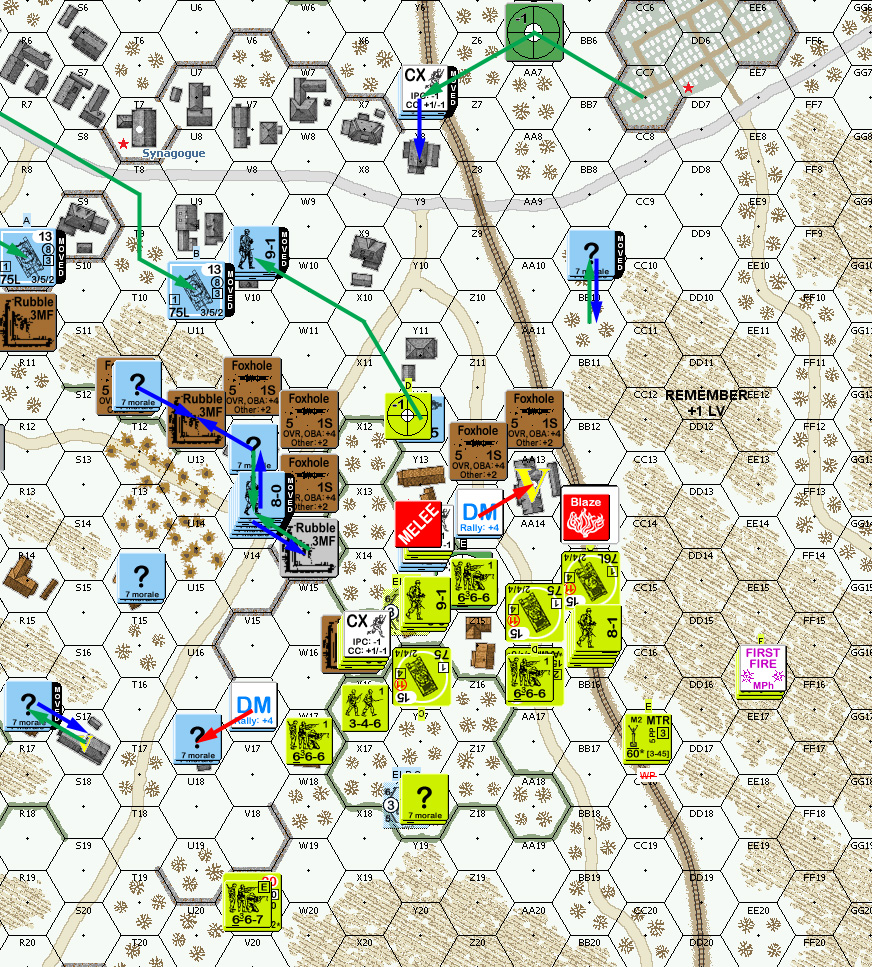
My 8-1 rallied for my turn three RPh, but my squad did not. Prep fire put WP on B12, eliminating the Dummy there. My initial move ended with an ELRed HS, but Patch revealed the HS in U17 to do it. The main goals were U17 and W14, with defensive fire breaking a squad that got close, but final fire merely sent a 667 fanatic. Then he revealed the ATG in R11, who got a hit for K/3 on W15, killing an 8-0 and breaking a BAZ squad. Worse, it then acquired the MMG HT, and there wasn’t going to be a thing I could do about it (though that should have been a reveal of the Gun, and we missed it).
I advanced into AA13 to take control of the primary goal, and went in for CC in U17 and W14. I knocked him out in former for no losses, but Patch got ambush in the latter, and withdrew, rather than go for a 1:2 attack, even with me being CX.
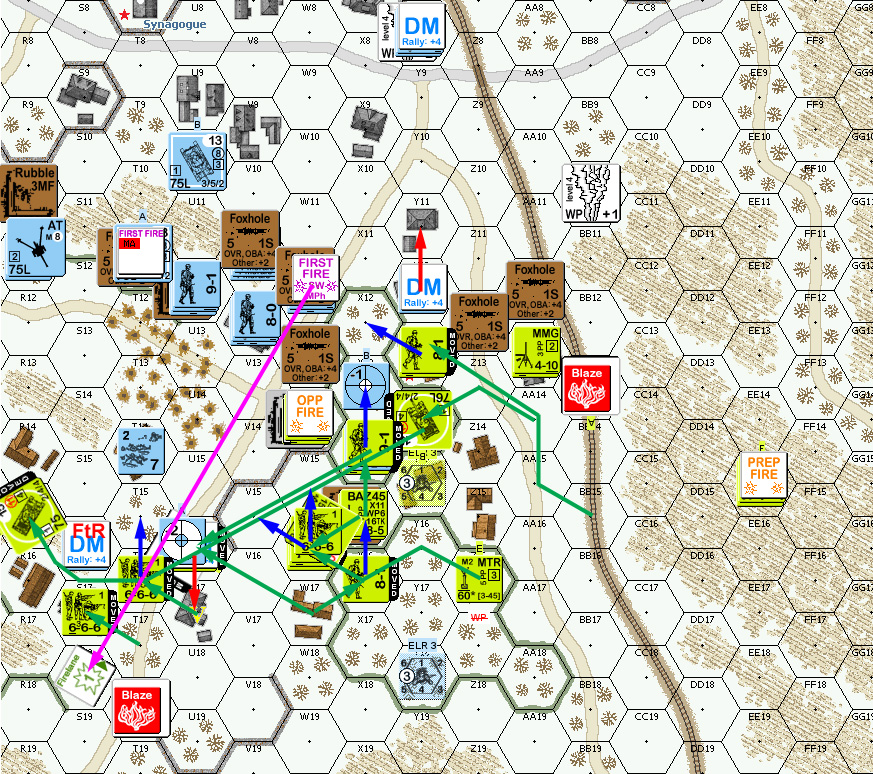
Situation, American turn 3.
Patch self-rallied in Y12 for his RPh (I had forgotten to DM him…), and I rallied the non-DM squad in BB18. The ATG burned the MMG HT, but then malfunctioned on a ROF shot at W14. A 8FP shot from V12 also broke my BAZ squad in V15 (I’d had hopes of getting the reverse on him). A Pz IV moved up to behind the hedge in T11 (about where I expected him to go last turn…). Y12 tried op-firing, but a 2 from a Sherman broke him and eliminated the broken squad on a 12. Further fire broke T14, clearing another building.
Situation, German turn 3.
For my turn 4 RPh, I rallied a HS, and two of the three squads in X15. The problem was that Patch repaired the ATG, making an approach on V12 much more dangerous. A MTR got a WP CH on Y8, ELRing the squad there and leaving only a Pz IV and squads in foxholes as the guard on his east flank. Sadly, that was still more than enough, but it meant getting at them was easier. This was where I had a lot of trouble, as there was a lot of firepower out there, and only limited methods to get at V12, which had three adjacent stacks to back it up. I needed to find a way to get at it, but just wasn’t finding one.
I did move into S17, which had a Dummy (I kind of expected that, and shouldn’t have used AM). Part of my maneuvering was to get a Sherman into R15 where it could see part of the defenses, but the ATG and tanks couldn’t see it, but a Pz IV got the first attempt with a IF shot before it could get behind a building to break LOS. The second one made it, partially because I used bypass to force targeting to S16/S15/R16, which was out of the ATG’s LOS, but I was still down a tank and I wanted all of them for the last turn. Thankfully, Patch only had one more good roll in him that turn, and his 1MC vs W14 was met by another HOB from my fanatic squad… which sadly did nothing (battle harden; a berserk at that point could have gotten very interesting, and hero would have been appreciated).
Situation, American turn 4.
It was looking likely that the only good way to not have GO Germans in V12 at the end of my next turn was to tie the hex up in Melee. To do that, I figured I needed to have everyone in good jumping-off points to get at the building in the hope that a couple could make it. The worry was with the relatively light terrain I had that Patch would just break everything in LOS, and that’s pretty much exactly what happened in his turn.
He started with putting smoke into T13 and W14, more or less negating a couple important fire bases, and then broke everyone in X12 and X13. The best I could do was a PTC on V12, which he passed. X12 routed down to X15, while X13 stayed in the hope that the 9-1 might self-rally and give me something on that side again (I should have routed to Y13 for the rally terrain bonus). Patch shuffled two squads and two leaders into V12 and put another squad+leader into the W13 foxhole.
So, for the last turn, I had a very low odds rush for the final victory building, with hopes of putting a couple vehicles in there. It’d hurt ambush, but the hope was to have so many different targets he couldn’t kill everything, and that would leave a non-GO melee.
Things started poorly with the 9-1 failing to rally, and the squad with him rolling 12 for 1st MMC self-rally (so being in the building wouldn’t have helped), and I got the squad, but not the leader in X15. V15 did manage a WP hit on V14, but with the -3 MC for the stone building everyone passed (Patch tried to apply the WP smoke grenade CH rule to his 9-1’s roll, which would have ended with two broken leaders, but no…). His sniper went off to stun the remaining HT. I was still in PFPh, and already down to two vehicles.
And everything went wrong during movement. Patch broke anyone who moved, one Sherman tried going for a bottom bypass of V15, but while going through W13 (who had already fired), he got a two SFF PFs to kill it, after the leader missed on the first one. The other one got through two shots from the Pz IV into the smoke, but the ATG got it from the rear right afterwards.
Afterword
On the die luck whining side, I would like to point out that I rolled Patch’s SAN twice and he got a ‘2’ each time. He rolled mine about 4-5 times, and I never got anything. I also actually tried for a fair amount of smoke, but my only luck was with one MTR and that BAZ WP shot. I never got a smoke grenade on… probably about four tries, and missed on three sM tries. Patch certainly had some bad luck to go along with the good, with three malfunctions, but immediately getting the ATG back was exactly what he needed.
The ATG was a nasty surprise to me. I hadn’t really considered where it’d be, but R11 is a very good position. When it popped up, I was caught flat footed, and just couldn’t get firepower into there. The general plan I had worked, but I needed a little more cover, and a little more time. I also regret having both MTRs over on the south. That’s the obvious place for them, but there’s a lot one might have done from V15, but I had no way to get it there. I also couldn’t find a good use for my HTs. Part of that is scenarios feature them far less than they should, so I just haven’t had to deal with them often.
Patch is right that there’s no good way to defend anything west of the R12-V13 road, so he kept the defenses light. I did fairly well turning him out of the approaches to W13, and was very happy when he abandoned the X15 rubble, but I needed to push a little harder in turns 2-3 to have more time in that area. Still, I did mostly turn him out of one position after another until I got within reach of the Pz IVs, and I could never get anything on them. The X15 rubble was also important, as it’s a good central rally position, but the extra move cost makes it a very annoying one.
Discussion (2) ¬