
Two Rounds of Bibracte
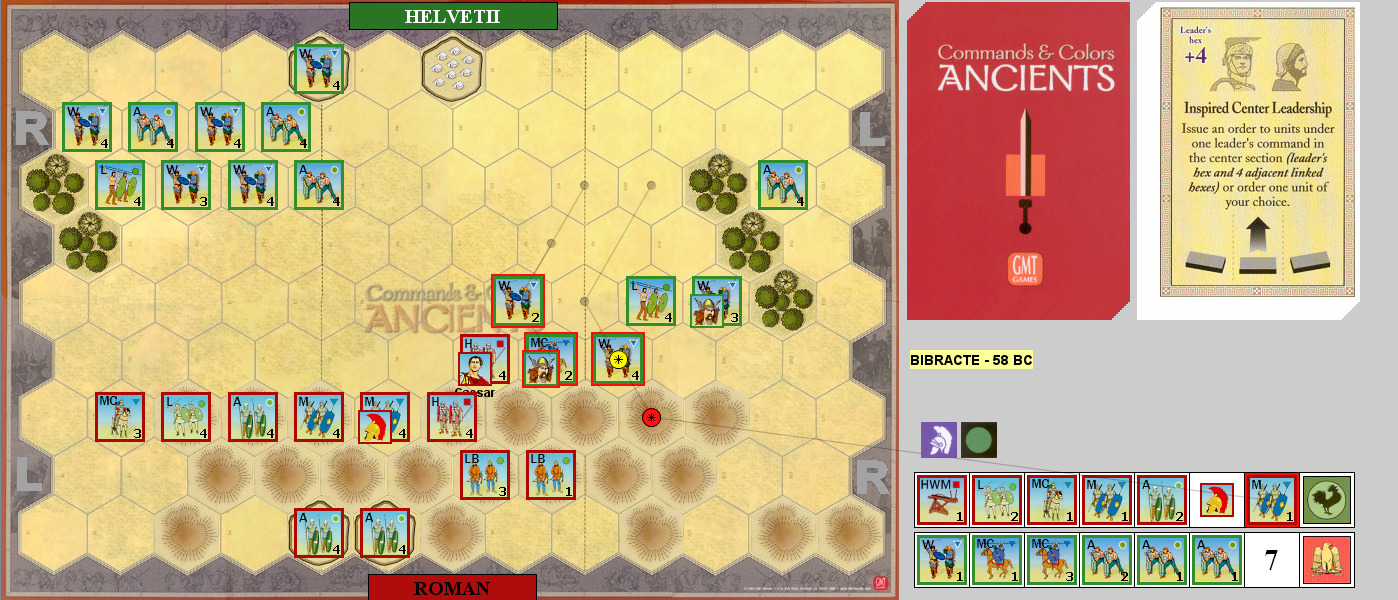
After Getting Out of Hatten, Patch and I did our usual between games round of Commands & Colors: Ancients. Up this time was the Battle of Bibracte, the earliest scenario in Julius Caesar’s career. The Helvetii have a force of Auxilia and Warriors, while the Romans have a mix of Auxilia and Mediums, with two Heavies, and one HWM. The Romans are largely on hills, and both sides have two camp hexes that can be looted for a banner, though the Roman ones have Auxilia permanently stationed in them.
I had the Helvetii first, and led with Order Three Left to move up the detached flank a bit, with the woods interfering, and ran off a MC with one loss. Patch Ordered Four Right forcing my Warriors to retreat, and doing a block to another with the HWM. I Ordered Two Center to chase off a LB, and Patch advanced the Heavies with his own Order Two Center. I Double Timed to get two Warriors in contact on my left-center and destroyed the HWM, and advanced a Warrior onto the hills, trading blocks with a Medium, and then retreating.
Patch Ordered Two Right to close up his line, and I Ordered Lights, doing no damage, but getting my left and center into better shape. Patch Ordered Two Right again, forcing my weak Warrior unit to retreat. I Ordered Mediums to bring reserves up in the same area, trading blocks with a Light. Patch Ordered Two Left, but didn’t do more than rework his flank, while my Order Four Left let me kill a Light and get back on the hill, also doing a block to a MC in return for one hit. Patch used Leadership Any Section to attack with his right, destroying my Warriors, and doing two blocks to an Auxilia, taking one block in return.
I got around his leader-Medium with Leadership Any Section, finishing off a MC and Medium and doing two blocks to an Auxilia, while taking two hits on a MC, and one on a Warrior. Patch used Leadership Any Section for his isolated Auxilia, and finished off my MC. Order Three Center did two ranged hits to a LB, and Patch tightened up his line with Move-Fire-Move, getting one hit each on a Warrior and Auxilia. Mounted Charge got my remaining MC up, and I lost one while taking a hit on the other, but did two blocks to a Heavy, and one to an Auxilia. Patch Rallied to bring his Heavy and a Medium up to full, and recover a block on the Auxilia, and then knocked out my Auxilia. I reformed with Order Two Center, and Patch used Line Command to come into contact, and shuffle the rest of the line towards where all of the action was. I lost two Auxilia, but finished off one of his, and killed a leader. I rushed in with Inspired Center Leadership, did three hits and a banner to a Medium, used momentum to attack again (uphill), and got the final hit. 7-6
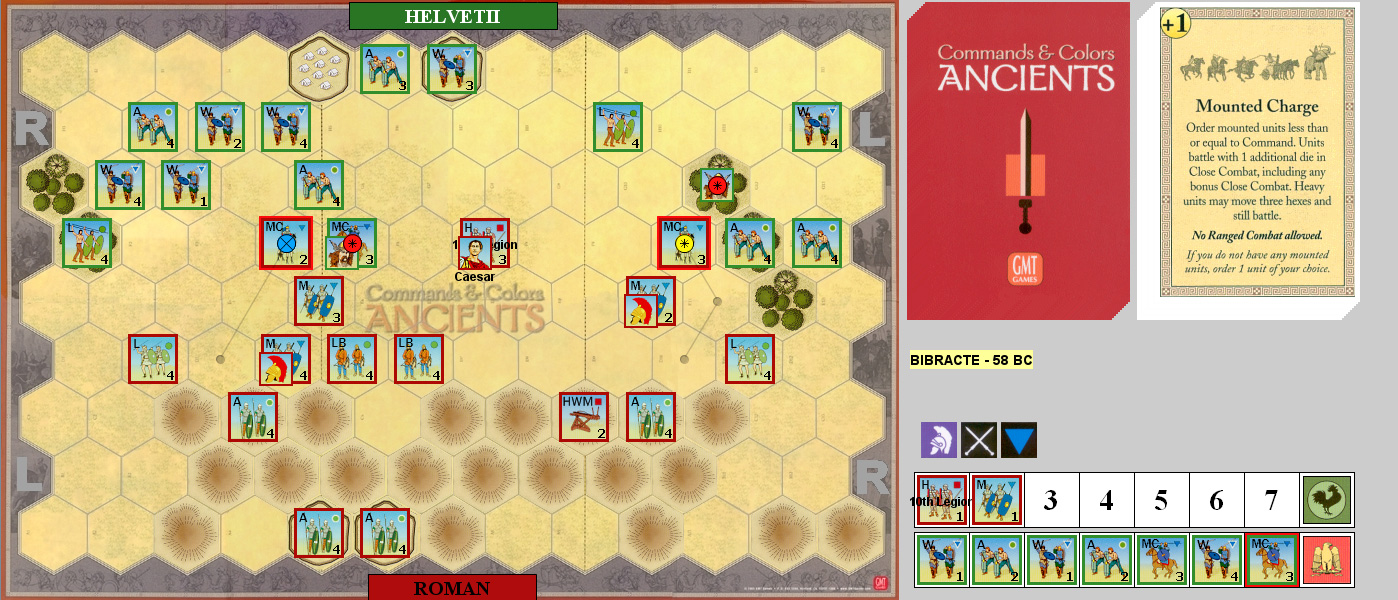
Patch Ordered Two Left to start the second game, and I Ordered Two Center to pick off a block with ranged fire, and Patch got closer with a Line Command. I used my Line Command to come down off the hills, and did another block with ranged fire. Patch launched a Coordinated Attack, but did no damage, and I Double Timed to get both Heavies into contact, and took three blocks across two units, but wiped out a Warrior and Auxiliary. Patch used Leadership Any Section to hit back in the center, knocking out a weak Heavy, and a block on another, but I did three blocks to two units in return, and forced two units to retreat, leaving Ceasar alone with the Heavy in nearly the exact middle of the map.
Out Flanked let my Mediums engage, and took two hits on one, but knocked out a Warrior and Auxilia. Patch Ordered Mediums to finish off the weak Medium, and do three hits to two others, but had two Warriors take nasty hits and retreat, as well as losing one outright, and a MC retreated off the board. Mounted Charge moved my MCs up, and I knocked out another MC. 7-2
Afterword
This is a heavily pro-Roman scenario, where they have good troops, bolstered by the Julian Legions rule, and Ceasar adds a die to the unit he’s leading (6 dice heavies!), and it’s 6 cards to four. However, Patch had a poor hand in the first game, and I was just able to keep going in the area around the right/center border and keep up pressure while doing well. In the second game, I just out-and-out diced him (his sixth unit loss was to a roll of four swords).
Still, the hills and the HWM add some nice interest, and that woods separating the barbarian left flank makes their situation worse, though it can be used defensively if the Romans attack there.
Discussion ¬