
Strike Patrol
After Hatten, the next big game with Patch was a round of Star Fleet Battles. None of the Y164 scenarios really appealed, but there’s a number of ships with a Year In Service of Y165, which means there’s already a few lead ships available. Patch also wanted to get back to the basic Federation ship, so we did a basic patrol match built around the Federation strike cruiser from Module R9.
I gave him a CAR and a CS, which total 254 (this was to show off the early refit as well as to make the CA as close a mirror of the CS as possible). So, I took a D7C and D6 as the Klingons, for a total of 249 (remember, there’s no UIM yet, so the D7C is 136, not 141).
The CS is an interesting idea. It loses half the labs of a Fed CA, moves transporters, battery, and probe to the saucer, lowers the engines so the side phasers are LS/RS, and rear hull goes from four to two. All of this is more compact, and movement cost is 5/6, instead of 1. In-universe it’s an ancestor of the eventual Fed BC classes, but it was originally inspired by fan-movies-era Decatur-class.
I took all speed-12 drones on the two Klingon ships, with the D7C having a pair of Type V-X drones, and the rest Type II-X. The scenario starts at Weapon Status II, and the D6 prepared a scatterpack to make up for the slow drone fire rate. I also took one T-bomb per ship.
All ships were going speed 15 for the first turn, with some EW up on all ships. Initial maneuvering took up the first turn, and I was surprised when Patch fired a proximity photon from each ship on impulse 19 at range 29. One hit the D7C’s #1, which exactly bounced off of reinforcement. On impulse 28, range dropped to 22, and I volleyed all disruptors at the CS, hitting with four for eight damage, of which two registered.
Both of my ships sped up to 21 for turn 2, with a hope of controlling the range and trying to wear him down with a saber dance. Naturally, I couldn’t judge approach rates that well, and it became obvious I’d be getting inside of range 8; adding to this was the fact that I maneuvered poorly, and the D7C got out of arc before I realized it. I launched the scatterpack on impulse 10, and Patch immediately fired a pair of proximity photons at it, hitting with both to blow it up. The CAR turned in, and I launched my available three drones on 13, and the D6 fired two disruptors, missing with both, while two ph-2s did four damage, with none registering on the shield.
On impulse 17, the D7C turned in, and reached a range 4 oblique shot on 19. Both of Patch’s ships fired 2xph-1s for 15 damage, and the the CS fired an overloaded torpedo that missed. The D7C fired off the disruptors (one overloaded off of battery), 3xph-1, and 2xph-2. Two regular disruptors hit, and phaser rolls were mixed for 22 total damage, with 20 registering on the #6. The CS and D7C turned off, but the CAR was a hex behind, and now it’s turn was up, hitting the D7C with a 14-point overload and 4 phaser damage (horrible rolls, two 6s on ph-1s) to do 18 damage to the #5.
For turn 3, I slowed back down to 15, while Patch boosted to 17. We both circled around, arranging a pass off our right sides, and on impulse 22 the D7C fired disruptors at range 15 for one hit, which didn’t register on shields. On 27 the CAR turned in, getting range to the D6 down to 15, at which point it fired, getting two hits, and five damage on the #1 (…I may have marked that wrong). I followed up with a couple of ph-2s, but couldn’t get a good roll.
Turn 4 saw us both at speed 15. I was still past the oblique while Patch turned in, and I launched a new set of drones to give him something to do. I then turned so that if we went straight, we’d pass about 10 hexes from each other. Patch then turned in. Ranges dropped, the D7C reached the oblique with the CS at range 9 on impulse 18 and fired, getting three disruptor hits to register five damage on the #1. On 22, the D6 reached the oblique seven hexes from the CS and both sides fired. All four disruptors missed, while one (of two) photons from each Federation cruiser hit the D7C, with one ph-1 from each did a total 23 damage, and the one battery left on the D7C reduced that to 22 to exactly take down the #2. The next impulse, the D7C fired the boom and right side phasers, which did 16 damage on good rolls (the ph-2s especially). Patch fired two more phasers per ship, with okay rolls for 10 internals through the down shield, getting the once-only warp hits and two phasers. The D7C turned off, and Patch swept the closest drone to turn the opposite way. With everything shot out, the D6 turned in, and ended at range three behind the Federation ships but out of arc.
Patch wanted to get away and went speed 20 with no EW for turn 5. The D6 was already in range, so overloaded all disruptors and then went speed 11. This was the bottom of turn mode 3, but even that was already satisfied, and it was the slowest speed that went on impulse 3. The D7C went speed 15, largely limited by the need to repair shields. On impulse 2, Patch moved, on impulse 3, the D6 turned to get the disruptors to bear.
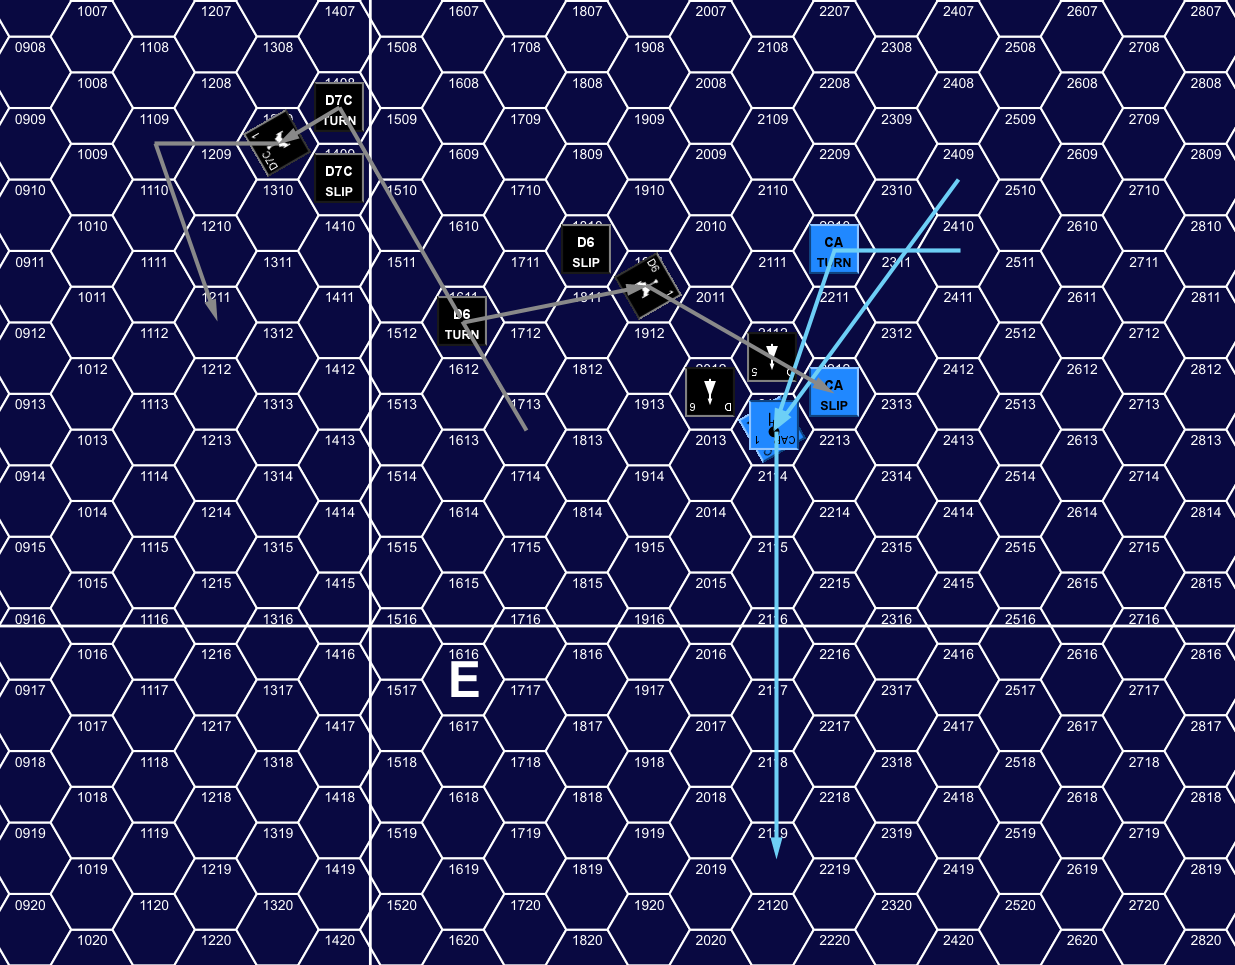
Beginning of Turn 5, showing movement from Turn 4, Impulse 24 to Turn 5, Impulse 11.
I had debated who the target was going to be. I’d been picking on the CS to try and get some power hits and reduce it to the CA’s power curve, but hitting the CAR to give it maneuvering problems different from the CS’s was also a plan. But, since this was on the rear, I stuck with the CS. Patch fired six phasers across both ships, with poor rolls doing 23 damage, 21 of which register, reducing shield #2 to one box. Meanwhile, three disruptors hit, and at range 3, ph-2s are flat, and the boom phasers did 11, for a total of 35 damage on the #3 and 11 internals, which got two phasers, the once-only warp hits, and the APR.
The CS then turned to follow the CAR, which dropped a T-bomb out the shuttle bay. I was surprised four impulses later when my drones did not set it off. He just wanted the ships to have to go around. On impulse 11 the D7C fired at range 12, getting three disruptor hits though the down shield for another nine internals for another phaser and warp hit.
The rest of the turn was spent with me getting my two ships back together, and Patch swung around at the bottom of the turn. For turn 6, we both had minimal EW, and Patch slowed down to speed 12 while I went back to 21 since I had anticipated a need to chase him down again. I continued on course, and Patch turned to another passing engagement on impulse 6 with an anticipated range of 5. I launched more drones at that point, and Patch boosted ECM. He slipped in on 8, and we fired with a range 8 oblique pass (D7C to CS/CAR; the D6 was at 6, but still a hex away from the oblique).
He fired a phaser at the closest drone, and a pair of photon torpedoes at the D6, while the D7C boosted ECCM and fired at the CS’s weak #6. One 12-point photon hit to do 9 damage to the D6’s #6, while two disruptor hits and decent phaser rolls did 13 damage to get three internals for another warp hit. The next impulse the D6 fired, getting three hits for another 9 internals getting two more phasers and two warp hits (and finishing off the forward hull). I turned off, and Patch fired five photon torpedoes at the #5 shield, but only one standard load hit, and even with a pair of phaser-1s the shield held.
Afterword
We called it at that point, as Patch was going to leave, and I didn’t have much more that I could do (the D7C had shot out the phasers earlier, and the D6 only had two points in the capacitors). We both had problems with dice early on, the D6 especially rolling poorly enough that I was thinking of the old stories of Klingon players marking off crew units when they missed…. However, when it came down to it on turn 5, I got good, if not great, dice for a solid hit through an intact shield. It’s the sort of thing I’d been afraid of getting hit with from Patch the entire time. And he got a good chance on turn 6, where at least I’d presented the option of firing on the D6 with the intact shield or the D7C which was further away. As it was, his dice were terrible on that point, and Patch did not want to hang around when he was down six phasers and a good amount of power.
I got 5 points for the difference in BPV, and another 32 for both of Patch’s ships taking max T-bombs, and 25% of his BPV for forcing disengagement (63.5). Patch got 20 points for my drone upgrades and one T-bomb per ship, and 10% of the D7C’s BPV for doing internals (13.6). That is 100.5 to 33.6 and a Substantive Victory for me (just shy of Decisive).
Patch said the CS does feel nicely flexible next to the CA, the extra power at speed meant he generally had some in transporters (presumably the spare fractions) and had more for EW. My first round of internals showed just how dangerous it is to have minimal aft hull though. Four 8s meant he lost the hull and the APR on a fairly small set of internals, and it’s not that unlikely.
I was also noticing that Patch was facing the same difficulties I’m seeing in soloing a Fed vs Klingon campaign in my spare time. I’ve seen it stressed that the problem with the disruptor is that you have to get into firing position twice to match the damage from the photon torpedo once. However, the one-turn arming cycle means that you can take whatever opportunity presents itself. With a photon torpedo you tend to want to find a “good” opportunity instead of merely an “adequate” one, and Federation ships can end up waiting through quite a pummeling. This is only made worse by the proverbially iffy nature of getting hits with them. As speeds move up, this becomes more of a problem, and I really don’t understand why UIM and DERFACS (especially) were seen as necessary.
It also explains why the Federation starts experimenting with other weapons. The flirtation with the plasma torpedo is interesting, and might have worked out if they’d ever used anything bigger than the plasma-F. It also explains the later reliance on drones and superior fighters. Drones are the kind of stand-off weapon to help with reloading turns, and emphasize their general superiority in phasers.
Discussion (2) ¬