
HF1 Black Day in Hatten
With Patch and I’s journey through Budapest finally over, we’ve started in on the scenarios from Hatten in Flames (wait, isn’t that a World in Flames expansion?). It’s a nice mini-HASL set, though I’m disappointed that there’s footnotes to the rules. It’s always good to see the thinking behind some of the special rules.
The first scenario is in the northeast corner of the map, and surprisingly features an American counterattack after the Germans have gotten into the town in the early morning of the 9th of January. I took the German defenders who have nine squads, the usual machine guns, a DC, a PSK, and a light infantry gun, as well as some concealment. They get three more squads partway through, and are trying to defend seven hexes for six turns (the first two of which have a dawn LV penalty to fire). The Americans get to line up on the other side of the street with thirteen squads ranging from elite to 2nd line, three MMGs, two BAZ, two 60mm MTR, and three M18 tank destroyers. An important note is the Americans only need to take six of the victory locations as long as they still have a functioning M18.
I had to setup defending everything, and went for a couple of layers, with the final defense planned for I4, which got the INF. From there, it can see three other victory locations, which should give it targets as the game goes on. The second concentration was H7, which had one of the LMG squads and an 8-0, with E11 and L9 being the main forward defenses. Patch set everything up in the south, ready to cross the Rue Principale (and near all four of my dummy stacks). He also forgot to setup two squads, which he noticed during turn 2, and explained some of his early trouble (I let him set them up behind the lines in M15 and P13).
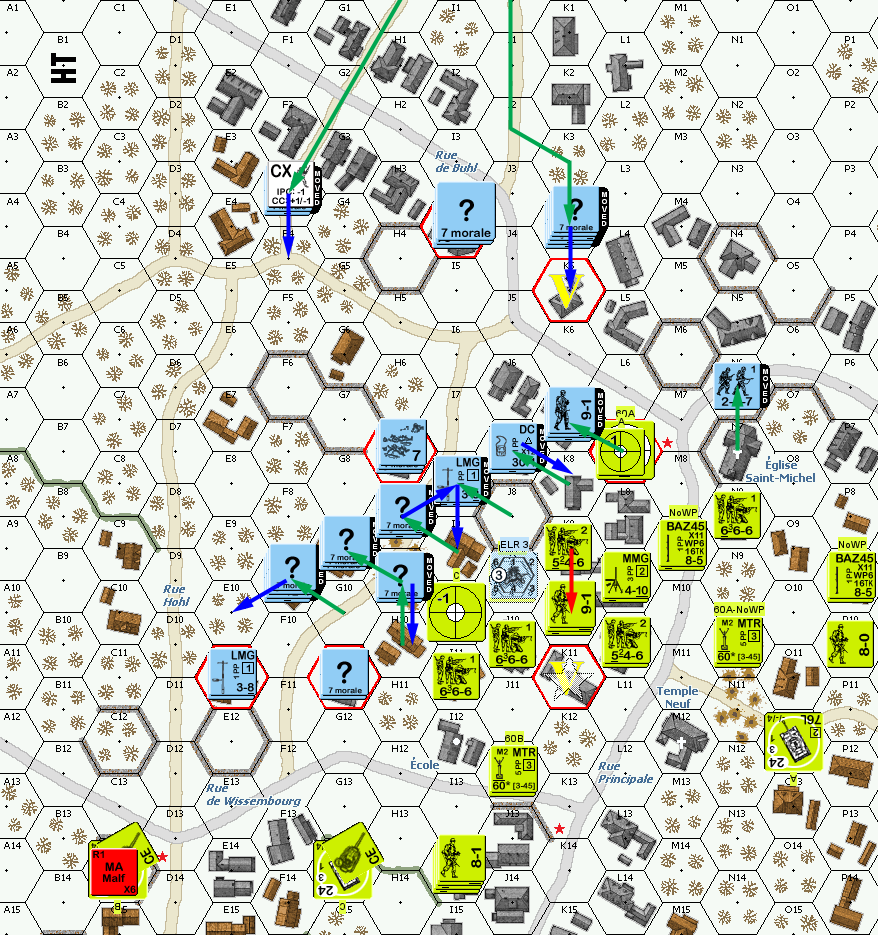
Patch started with finding one of his MTRs had no WP, and setting all the TDs to OpFire. His one effective attack eliminated my dummies in N9. He sent a HS dashing across the road to search… and rolled a 6 to not find anything. Thankfully, none of our fire did anything (thankfully, since he had a lot more of it than I did) except put out acquisition markers.
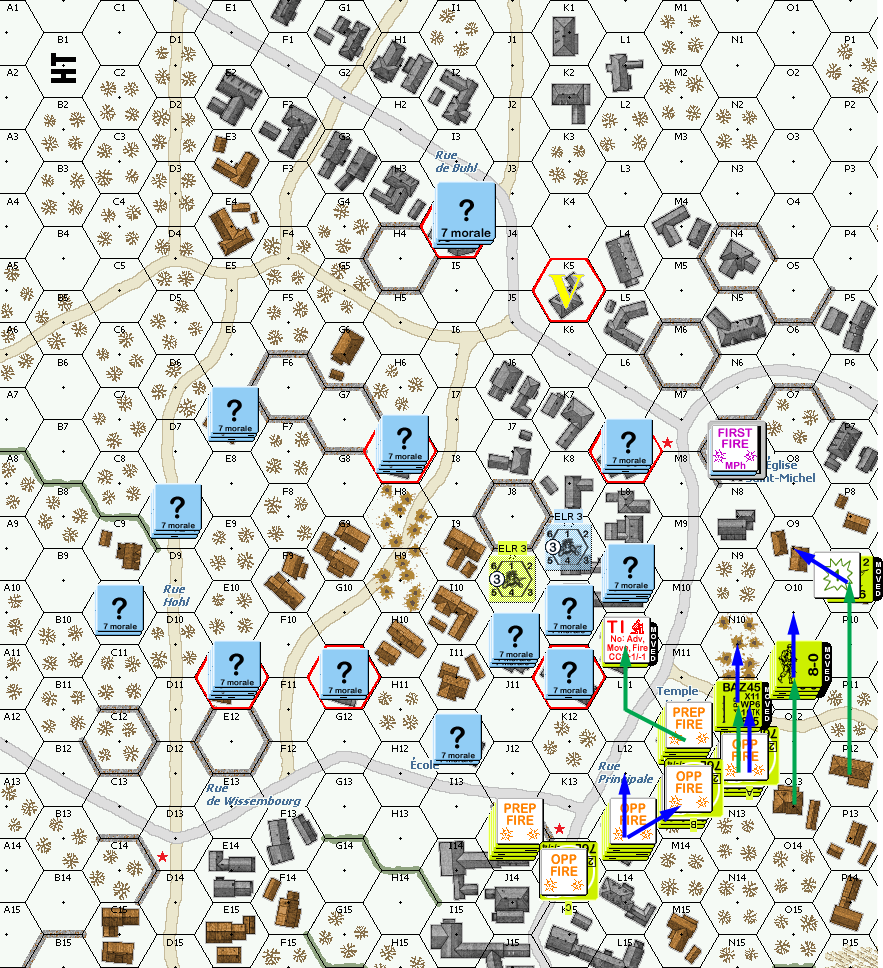
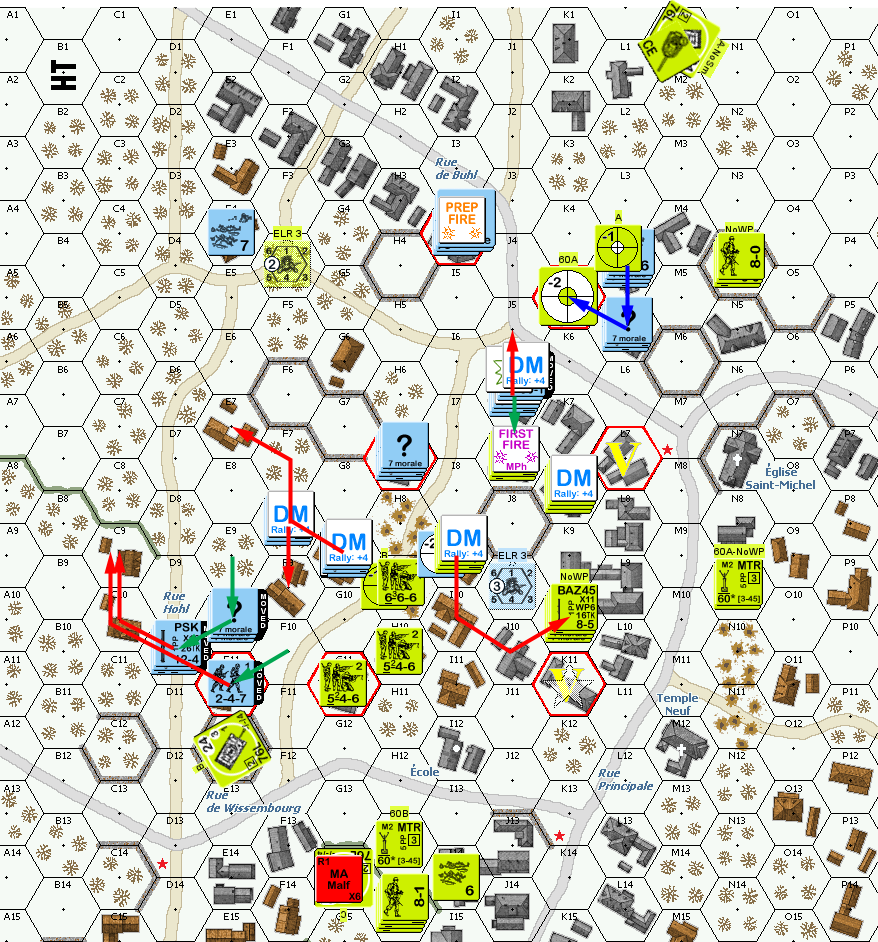
Situation, American Turn 1. North is to the left. The board goes another five hexes down (west), but the full width and east edge are shown. Victory locations are outlined in red.
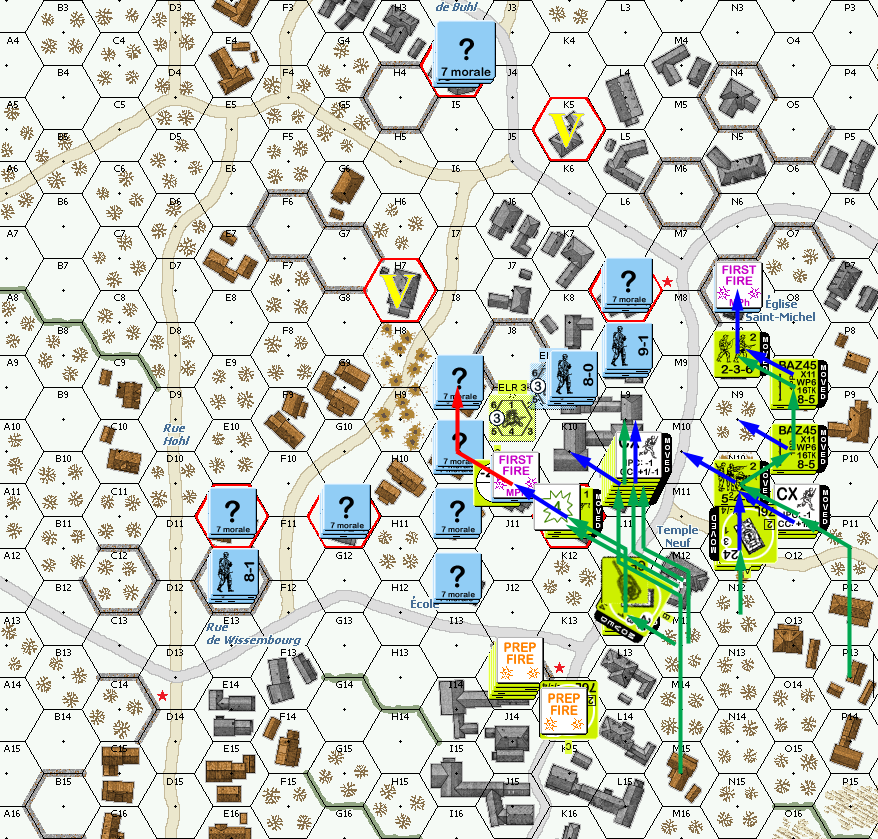
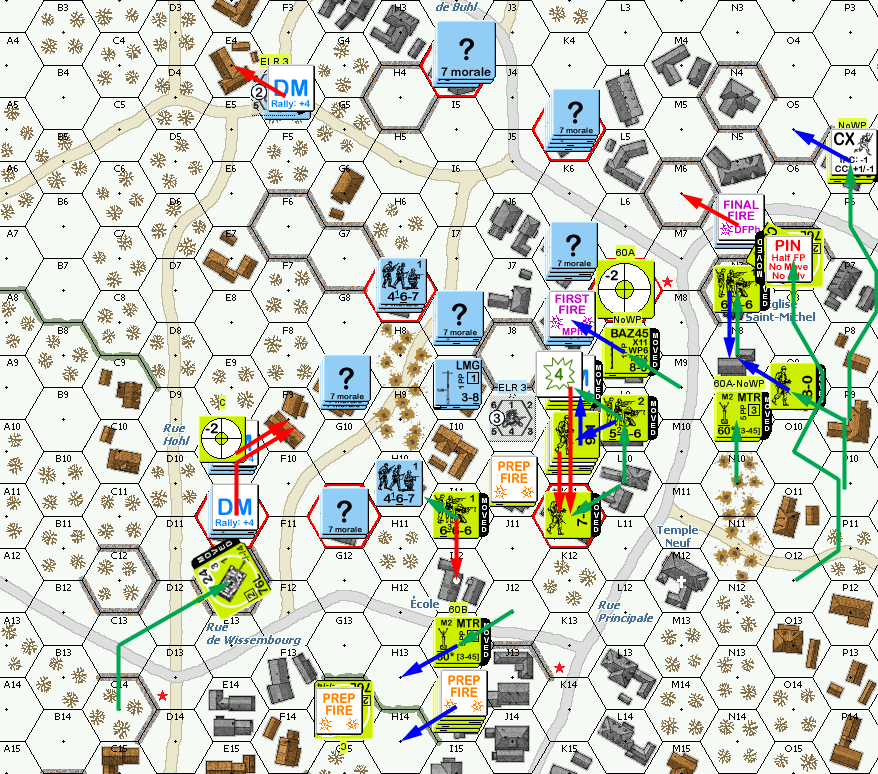
I considered a small amount of prep for my turn, but it wasn’t wise with the amount of American firepower out there. So, I skulked, and Patch fired at what targets he could, revealing and pinning one squad in J10, and malfunctioning the MTR that still had WP.

Situation, German Turn 1.
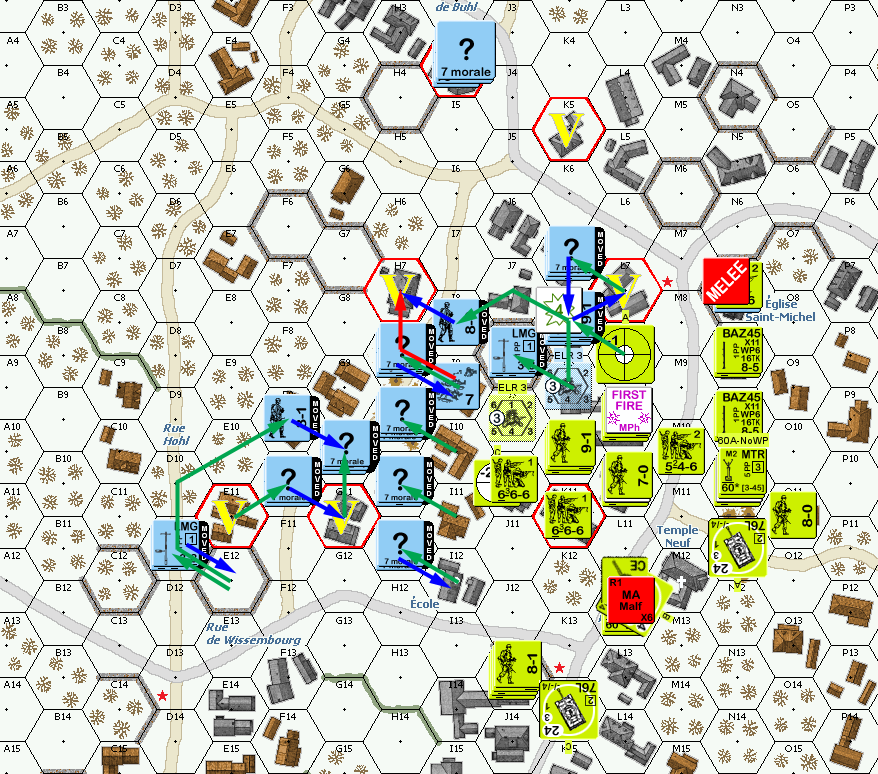
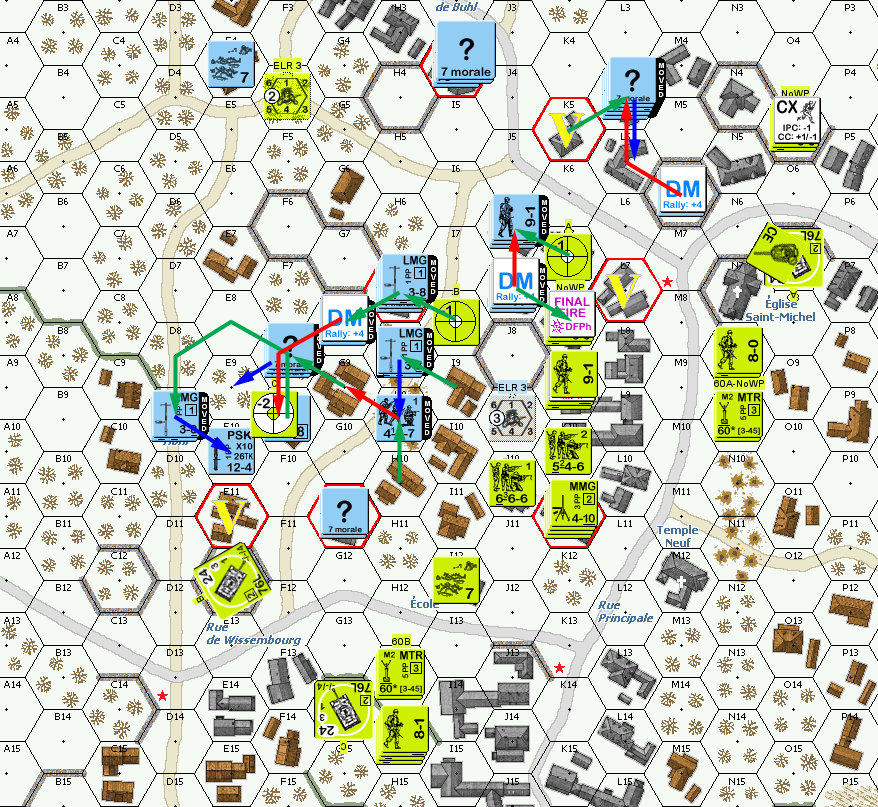
Sadly, he repaired the MTR first thing on his turn 2, and took a couple shots on his left flank with no result. This time his probing HS did much better, revealing dummies, two squads, two machine guns, and two leaders… and dying of the search casualties (-4 roll). I had a little fire, and a couple of good rolls, but Patch’s were just as good. Thankfully, none of the advancing fire (including a 20FP shot) did anything except malfunction an MA. I did self-break the victim of that 20FP shot, because he was about to be engaging two squads in CC. His south HS attacked mine in CC, and neither side did anything.
Situation, American Turn 2.
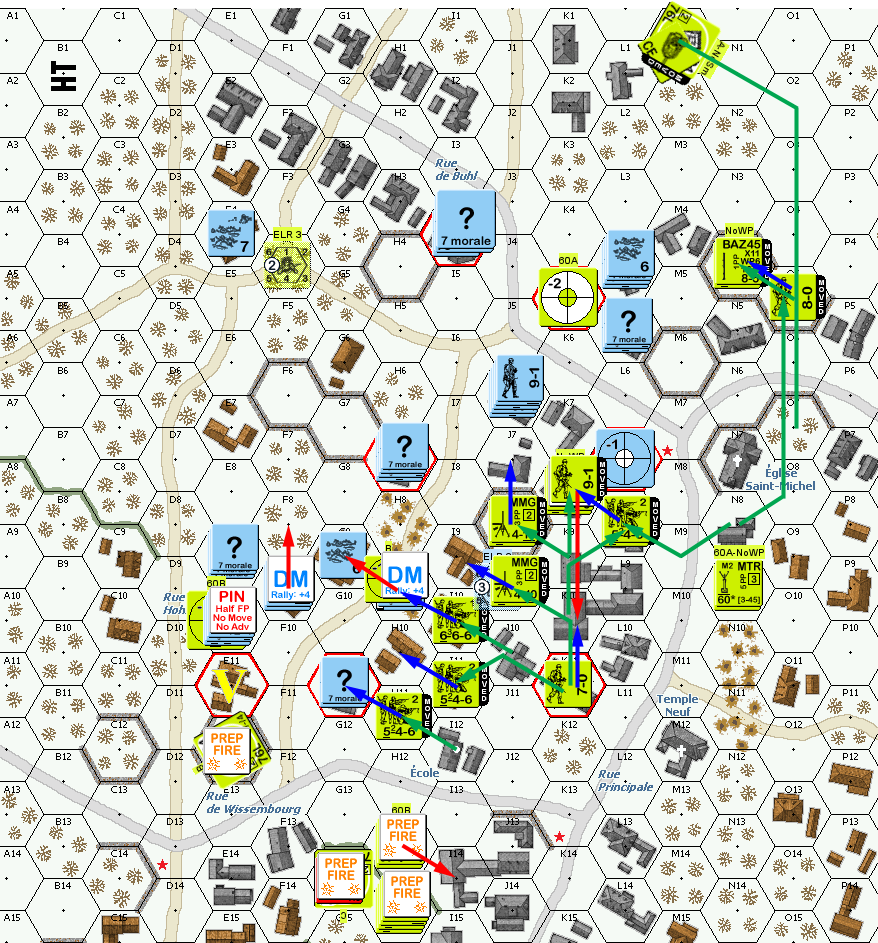
I failed my self-rally on my turn, and the TD failed to repair its gun. I contemplated a shot from E12, but decided that was just asking for trouble with my targets in a stone building, and them having a lot more firepower. I missed a shot he had at one point, and walked a leader through a hex, and then had another group move into that hex to skulk… thankfully I passed an MC on the leader, and the residual didn’t do anything. That was as exciting as the turn got, and the LV kept me from having any decent shots. The melee in N7 concluded with my HS victorious.
Situation, German Turn 2.
Patch’s MA refused to repair for his turn 3, but I didn’t get my squad back either. Thankfully for me, two WP attempts on L7 with his BAZ found no WP ammo available. A shot at J8 got a 1MC, but simply drove the squad fanatic. On the other hand, the big MMG stack in J13 broke my squad in E12, and several shots at K8 ended with them pinned. He was still slowly working his way into the center, but two of the TD circled around to the flank. I had a couple good shots, and broke two squads and pinned another. In return, he eliminated the dummy in I12, which set off my sniper to reduce his SAN.
Situation, American Turn 3.
I still couldn’t rally for my turn, but Patch got one of his squads back. The reinforcements entered with two squads and the 8-0 heading to protect K5, while the last squad went down the back road to come in behind the lines. Patch managed to pin my left flank HS in the street, but his only other result was malfunctioning the AAMG on a TD, while I managed to break another squad.
Situation, German Turn 3.
Things got better for Patch in his turn 4, starting with repairing both malfunctions, and self-rallying a squad. I at least managed my one rally. He managed to reveal the PSK squad in E10, and broke it and the 8-1 on the second try, and then eliminated the squad with two more breaks, and wounded the leader twice, ratcheting up the damage from 1MC to 3MC as fire continued.
He sent a squad into H10, which got bounced out by my squad, which apparently surprised him. As he pressed towards L7, I managed to ELR his MMG squad. One TD advanced on his left to DM my broken flank, while another advanced to next to the church, where my HS fired on it and pinned the crew. However, his sniper went off and broke the spare reinforcing squad in F4. During DFPh, I ELRed another squad, but when the INF took a ranging shot at K7, it malfunctioned.
Patch got encirclement on the HS in N6, which then ELRed to 2nd line. The flanking TD got a good AAMG shot at I8 to reveal and pin it. Patch got into CC in K8, but I got the ambush and withdrew out to J7.
Situation, American Turn 4.
I managed to self-rally the squad in F9, and repair the INF for my turn, while Patch’s two rallies failed. Beyond the usual skulking, my main goal was to get at the PSK dropped by the squad Patch had killed. My first attempt came under fire and broke, while the second one managed to avoid coming under fire by going in a circle, and ending adjacent to it. I also tried placing the DC on the squad that had attempted CC, but broke and ELRed under fire. Other fire broke and CRed a squad.
Situation, German Turn 4.
Patch rallied everything on his turn 5 RPh, including a self-rally, while I rallied the DC squad and picked up the PSK. Patch tried to smoke in K7, but had no smoke rounds in that TD. Fire on F9 CRed the broken squad that had taken shelter there. A TD pinned the PSK squad, but then malfunctioned the MA on a ROF shot, while the other one on that flank reduced and broke my fanatic squad with a K/3. The third one ended up moving off to the east edge where it could see K5 at a safe distance, and my INF couldn’t see it.
My fire managed to break a squad that had been marked as OpFire, and one of his MTR HS. He got into CC in G11, and was surprised to find out it was a HS. I got ambush again, and slipped out the front into the street.
Situation, American Turn 5.
I got nothing back for my RPh, and Patch rallied his squad. With too much able to see the adjacent roads, J6 was stuck, but thankfully I was able to break the stack in K9 with a MMG shot. The INF fired at I9, getting two hits which generated a hero and battle hardened the squad to 1st line, and then ELRed him back to 2nd and wounded the hero on the second hit. The DC squad attempted to Place on the American MMG squad, but broke to his fire this consumed his full FP shot, but the later final fire still broke my remaining squad there.
DFPh also eliminated my last dummy stack (with a K/2…!). A mix of good and bad rolls got a CH on my PSK squad, but only a 1MC, which broke them. However, that set off my sniper to break G11. He also broke the HS in E11, giving me nothing intact west of H7.
Situation, German Turn 5.
For his final turn, Patch still needed to get at least four of the remaining five victory locations. This was looking a lot more likely now than it had been, with two basically guaranteed and H7 cut off from help, but the eastern two were still a problem. It became a worse problem when we both rallied a squad during RPh; mine was the MMG squad in J5.
Early moves concentrated on surrounding H7. The malfunctioned TD cruised up the Rue Hohl, DMing what felt like the entire German army in the process, and then headed for I6. The INF caught it with a HEAT round as it went by to turn it into a burning wreck. The east edge TD came forward, and I couldn’t get any effect on it before it got into J5 for an overrun. The MMG stunned the crew as it came in, but the OVR did a 2MC, to break the MMG squad… but sent the broken DC squad berserk! (By the way, the OVR flowchart indicates that stunning the crew would halve the FP of the OVR, but we couldn’t find anything in the actual rules that says that.)
His MMG squad tried heading for I4, but I pinned him in I6. A squad from K10 got to K6, but a shot from the INF pinned him. Then the squad+8-0 in N4 circled around to get at I4, with K5 having yet to fire. However, I didn’t quite predict his route, so he got to put an orchard between me and him. I didn’t matter; I had a crap die roll anyway. I4 itself got a 1MC on them, but they both passed.
But I wasn’t able to do more than pin one of the three squads adjacent to H7. The berserk 447 couldn’t finish off the TD in J5, so it couldn’t throw the DC at the 9-1 preparing to help in I4. His fire from I3 pinned the INF crew. Patch advanced into four victory locations, two of which involved CC. In H7, my leader was still concealed, which got me another ambush; I couldn’t very well leave, so I went after everyone in a HtH attack that missed, while Patch wiped me out. I would have also gotten ambush in I4, but the crew being pinned prevented it, and Patch knocked them out for no casualties. Small consolation, my squad took out the TD in J5.
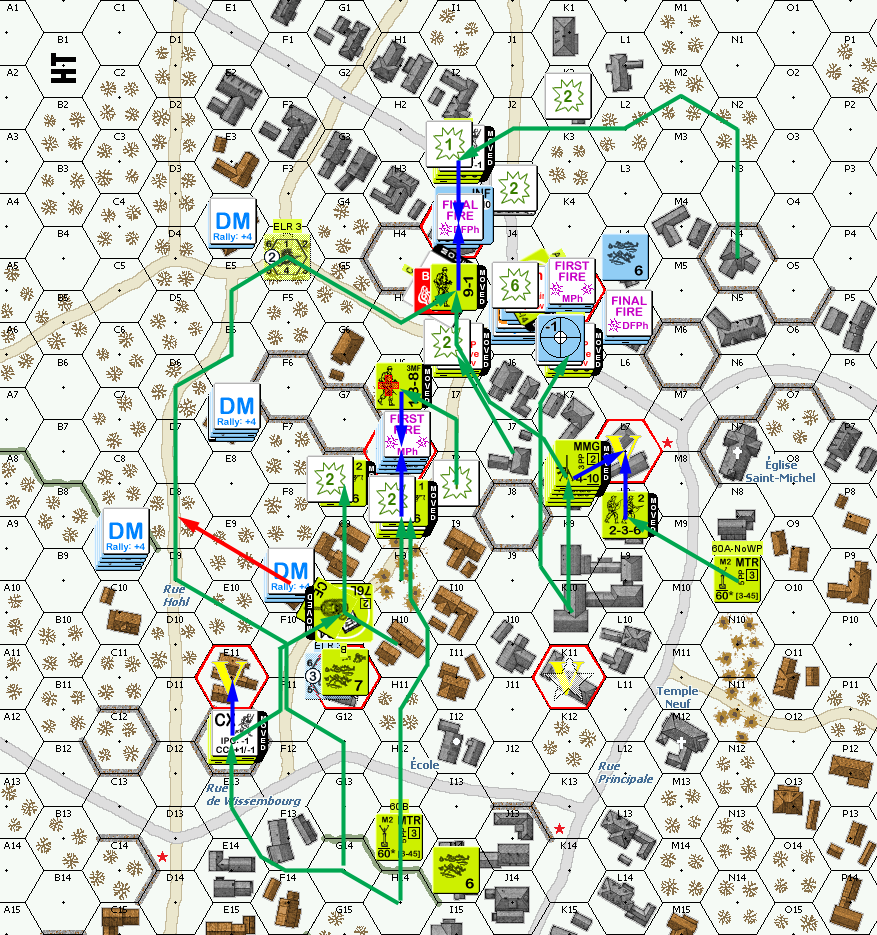
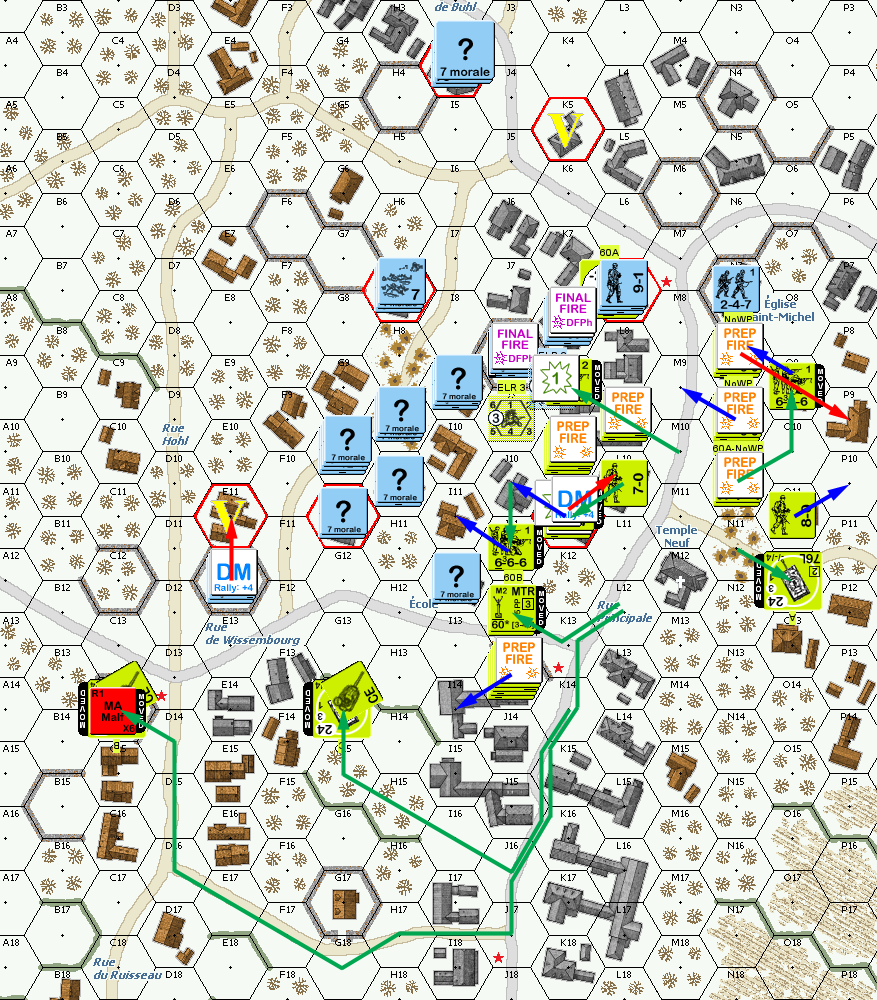
Situation, American Turn 6.
Technically, I still had my turn to prevent a win, which meant retaking a victory location. Patch rallied the two squads in K8, meaning I wasn’t going to get close to L7. The survivors of J5 went from under one burning wreck to another, only to break after Patch’s third attempt on them. K5 assaulted into the street, and broke to fire from I4. The squad and leader in L5 tried getting there, but Patch got them with a MMG shot from L7 I hadn’t seen, and broke the squad after the leader went heroic. (I was really hoping for a berserk from that HOB, it would have gotten me there short of any K/KIA results, and I4 was looking at FPF when I entered.)
Afterword
Patch was ready to give up after turn 2. He felt that time was slipping away and he hadn’t gotten anywhere. I feel his turn 1 was more cautious than it should have been. Of course, I knew how thin things really were with half the initial line being dummies.
Turns 4 and 5 were just really punishing, with a lot of my guys breaking. And I couldn’t really rout anywhere good. With lines of sight being what they were, I often couldn’t ignore close by buildings going in the wrong direction.
Also, while my sniper went off twice, it probably should have gone off another two to four times more than that. Patch rolled a lot of 3s during this game. My die luck wasn’t bad, especially since I wasn’t also rolling a lot of 11s and 12s like Patch did. Seeing five malfunctions in a game this size is a bit much, but not a lot over average. Seeing them almost all them repair immediately (and none of them went away permanently) is a more unusual, especially since none of them were MMGs/HMGs with the better repair chance.
I think Patch’s best move was moving the two TDs around the flank on turn 3. I couldn’t get at them, and they did a lot to just collapse that flank, which let him do everything else. I don’t know if I had any great moves, but putting the INF in I4 was definitely the way to go. Until the very end, that location was looking nearly impossible to get at, and it did have some great shots.
Discussion ¬