
FB17 Stalingrad Redux
After our adventure in the desert, it was time for Patch and I to return to Budapest one last time. (Well, final return to Buda; I hope to talk him into “End Station Budapest”, which takes place in the other half of the city at some point.) It’s taken far too long, but we’ve finally reached the end of this journey.
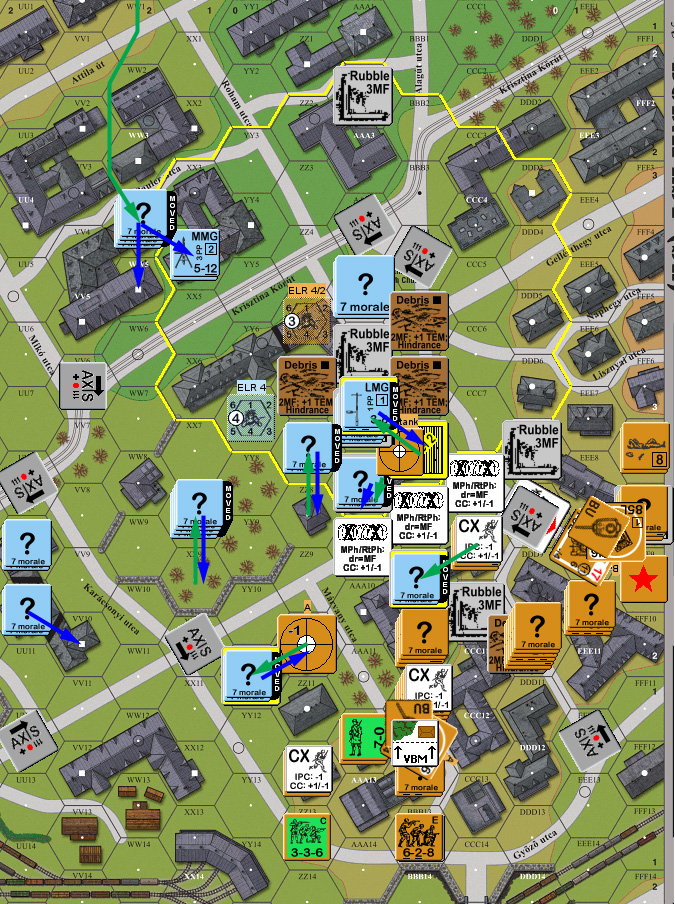
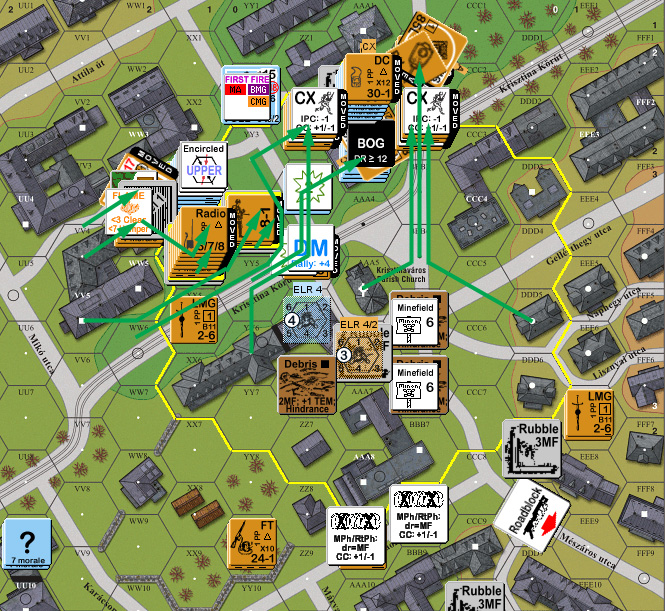
The last scenario takes place along the southern edge of the map, with the rail line from the rail station in the last two scenarios right at the edge of the map, and the Bloody Meadow just to the north. The Russians are headed for the Krisztina Kürút, and win if there’s less than one unbroken squad-equivalent within three hexes of the Krisztinaváros Parish Church at the end of five and a half turns, with a 32 CVP cap. I eventually decided I wanted the attacking Russians, largely so I could use an OT-34 flamethrower tank.
The Germans get seven and a half squads (mostly a mix of three different kinds of SS squads, but there’s non-SS as well), some mines, three hexes of wire, a roadblock, a 75mm ATG, and a Panther. They’re all at Ammo Shortage 4, suffering from food shortage, and gas shortage. They get most of the available map to set up in, and Patch made the most of it, centered on the two biggest buildings in the victory area (which had a few hexes knocked down by pre-game rubble checks).
The Russians enter on turn 1 with twelve squads (two of which are assault engineers), plus another three squads of BVR (who don’t count for the CVP cap), with good leadership (the Germans only start with two leaders—this would be important), MGs, a DC, a FT, two T34-85s and the aforementioned OT-34.
Initial rubble blocked some paths in the south, and Patch stymied a lot of potential moves by putting the roadblock in DDD8/EEE9. Worse, most of the west entry area for the Soviets is blocked by rail cars, leaving a bridge over the rail line the main legal offboard vehicle setup hex there. I eventually settled on entering one T-34/85 there, and the other two tanks on the south, with one taking up position behind the roadblock, and the other going east through many twisty alleys, all alike. Hopefully not to be eaten by a panzerfaust.
Once again, both sides get to buy reinforcements for the first few turns from a short schedule of available units. I spent the entire first turn’s lot on OBA. It comes with a 7-0 leader, and that was handy, and if I was going to use it, I needed to get it moved into position as soon as possible. He was put in charge of a couple squads meant to be the ‘second wave’ of the main attack.
The BVR entered as far north as they could on the west side, in the face of a German “?” in AAA13. I finally started moving in with the main west force, and the HS there opened fire, with my squad surviving a PTC, and then pinning to 1MC in the next hex. This left the 9-1+MMG squad to armor assault to take up positions looking down the Márvany utca.
The south didn’t go nearly so well, as the limit of the Russian entry area is a street that I wanted to get east of, and Patch had (what turned out to be) a LMG sighted right along the length of it, over the roadblock. The first probing squad ate a 1KIA, and the rest of that platoon armor assaulted into a 2MC from resid to break my 8-0 and reduce a squad to a HS of broken conscripts; at least the elite squad passed.
…And then my sniper went off, killing his 9-1 in ZZ5h1, and the LLMC reduced the 468 SS squad to a broken 237 SS HS. This also took his MMG out of action.
Things got better during AFPh, when I managed to break the HS in AAA13, since the BVR would be asking for trouble taking them on in CC. Of course, Patch pointed out I couldn’t use the tank FT from behind the roadblock, as it’s a bow-mount (I had kind of been thinking that BBB7h2 being a level up from me would do it, but no; finding a way to use the FT was a bit of a challenge with this set up…).

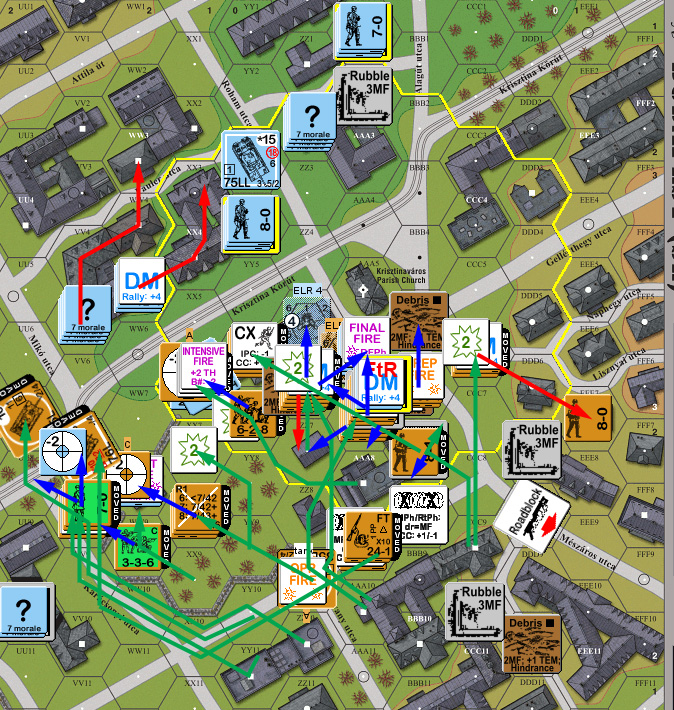
Situation, Russian Turn 1, showing the full board. North is to the left.
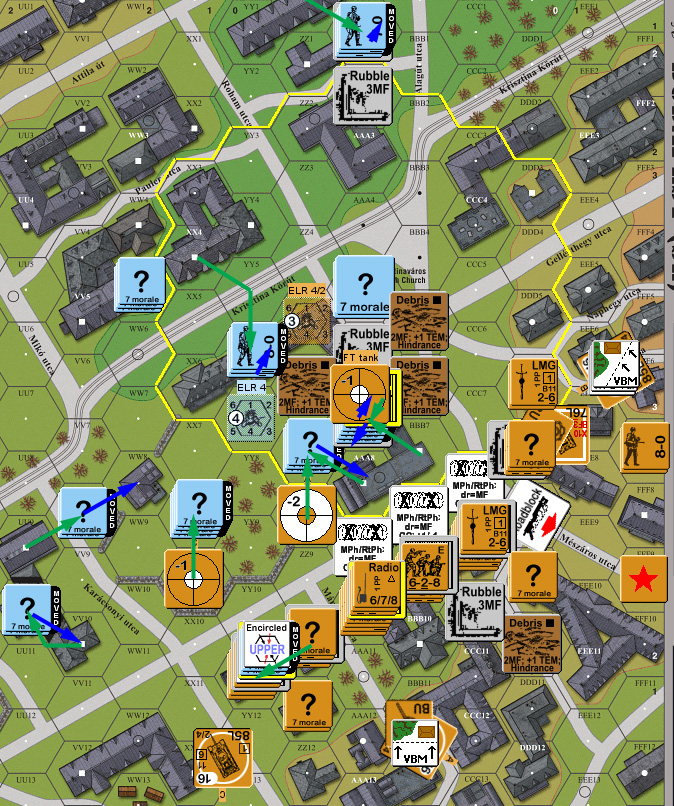
Nothing rallied for Patch’s first RPh, and his reinforcements (8-0 + 658/PSK) entered on the WW hexcolumn. They headed straight for the built up area in the NE, and next to the broken MMG HS. Otherwise, he generally skulked. The big problem was one of the T-34/85’s MAs malfunctioned on a ranging shot.
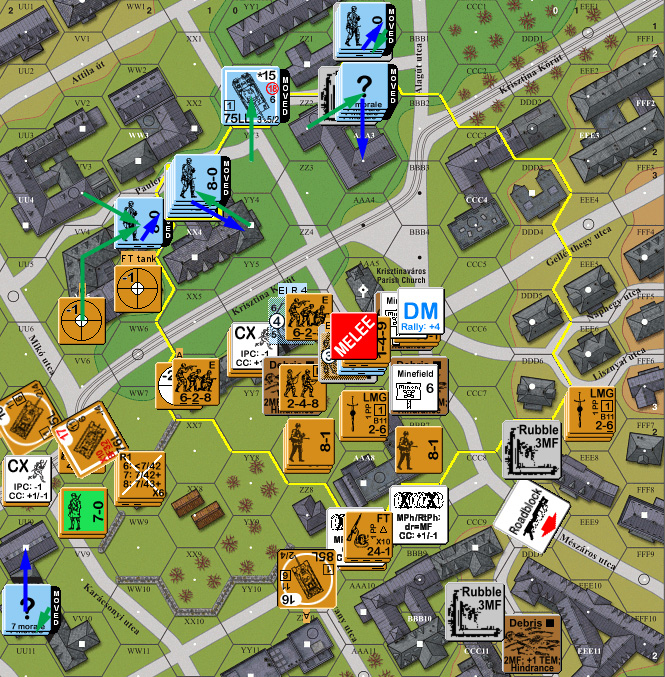
Situation, German Turn 1.
With that malfunction, I decided to take another T-34/85 for my second turn, which left two additional points for the third turn. I didn’t manage self-rally on either of the units in FFF7, nor repairs on the MA. The other T-34/85 took a shot for my only Prep Fire, but missed (with low odds). The main goal was to reveal/eliminate the second line of “?” in ZZ10 and BBB9 by getting up close and personal. The two southern tanks went east, looking for spots largely protected from the Panther but with LOS to the central buildings, and spending a lot of bypass MPs to not go very far.
I had started thinking BBB9h2 was a dummy, but he then used to reveal units, including the 7-0 and radio, which surprised him. The regular FT got a 3MC on him for a break during AFPh, which caused FtR. Despite similar thoughts on ZZ10h2, I didn’t go into CC with it, since the only thing available was a CX conscript squad, but most of the rest of the building was stuffed with troops.

Situation, Russian Turn 2.
Patch rallied the MMG HS for his turn 2 RPh while my MA was permanently eliminated, showing the wisdom of purchasing that extra T-34/85. My 8-0 finally rallied, but reduced my broken squad with a 12 rally attempt. Patch took a 7-0, 467, and MMG as his reinforcements, and set up shop in AAA1. This is just outside the victory area, but the rubble in AAA2 gave it decent LOS from the higher levels. Everything else skulked, and one of the north-flank “?” headed in to help protect the walled area I was approaching. My plans to put OBA into that area was dashed by rolling a ’12’ for contact, malfunctioning the radio. Neither of us had any good shots, but I was a bit surprised that he did not re-occupy any of the WW9-YY9 wall, leaving it to me, other than what I was suspecting to be a dummy in VV10.
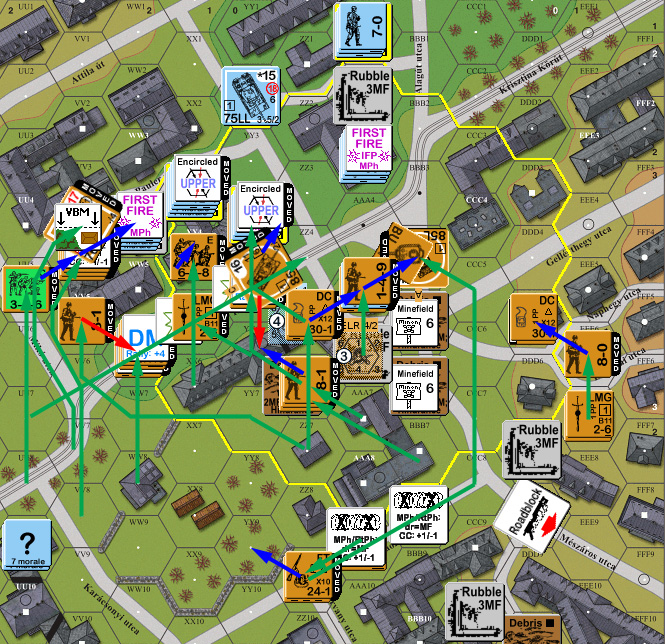
Situation, German Turn 2.
For my final purchases, I took two squads (447+628), and 8-1 and DC which came in on the west side bridge again. There was plenty of other tempting things available, especially the FT, but that would have cost me a squad, and I wanted some more bodies. My broken squad was finished off by another 12 rally. It was time to try and cross the wire into the victory area, and at least most of Patch’s troops had pulled back. But I OpFired the FT squad to give the one “?” there something to think about. (To a certain extent OpFiring a FT is a bit of a waste, but it’s also a 628 squad firing at range 2, and he was in the middle of the area protected by the wire, while I would be maneuvering on the edges of it.)
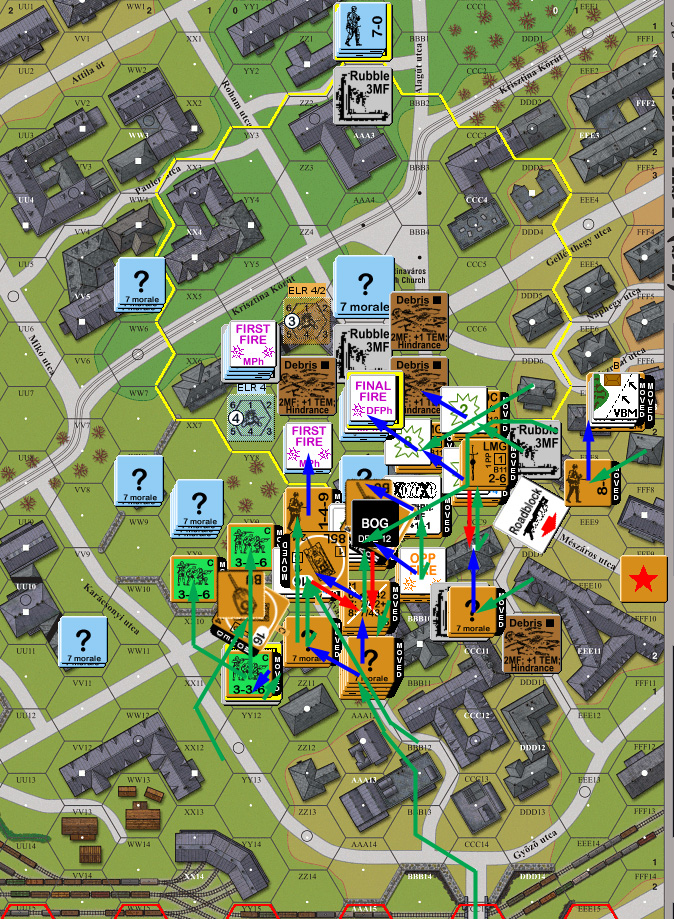
My first move was sending a BVR squad upstairs and finding that the “?” in YY11h2 was indeed a dummy. That let me start sending the rest of the troops in that building forward, though I forgot the new site of the MMG, which broke the first squad to move up. However, just to the south, I moved into the street and easily got under the wire. My first attempt on the southern flank broke in the wire, but then a Dash into BBB7 got across with Patch suffering from ammo shortage in two squads (on two different shots).
Dashes with two BVR squads got me across the wall with no fire. A Dash with a 628 through residual ended up with them across the street in ZZ8 with an extra hero. Another group got under the wire fine, but then took a 1KIA to kill my 9-1 and break the MMG squad, who CRed on the LLMC. The OT-34 went down the slope and into the wire, removing the first hex, but bogging in the third (I was expecting a shot from the Panther, since there was one point where I couldn’t help being fairly exposed, though it’d still be a +4 for HA, BU, and moving).
Patch finally revealed XX8 in DFPh for spraying fire against the BVR squads, pinning one, and malfunctioning his LMG from ammo shortage. The ATG turned out to be in XX6, getting acquisition on a T-34. My one successful shot showed AAA8 to be a Dummy (I had wondered, but just couldn’t put it past him to leave something real up there). I got into CC with Patch in AAA7h0 and ZZ7… and also discovered mines in BBB6. Thankfully, the 1MC from the latter merely made my assault engineers fanatic. Even with the hero helping, nothing happened in ZZ7, but a 12 on Patch’s CC roll in AAA7 let my guys go to h1, between two of his squads. Potentially very dangerous, but I figured he had bigger problems.
Situation, Russian Turn 3.
I did manage to rally one squad for Patch’s turn, but nothing else happened. Patch took a 467/LMG/DC as his final purchase. The ATG took two shots at a T-34/85, and bounced a round off the turret without losing “?”. Patch again pulled back, a bit further than I expected, largely retreating across the Krisztina Kürút. I manged to pin his squad pulling out of AAA6, which also pinned my sniper. Unexpectedly, the melee in ZZ7 finished with me taking out the German squad for no losses.
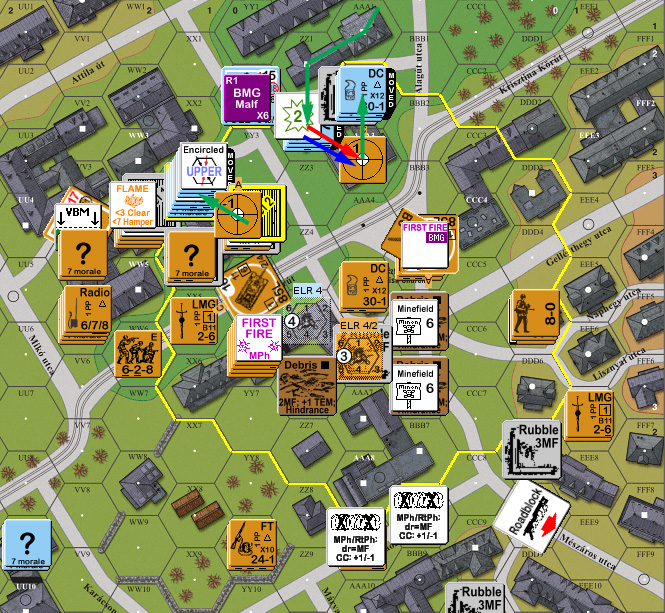
Situation, German Turn 3.
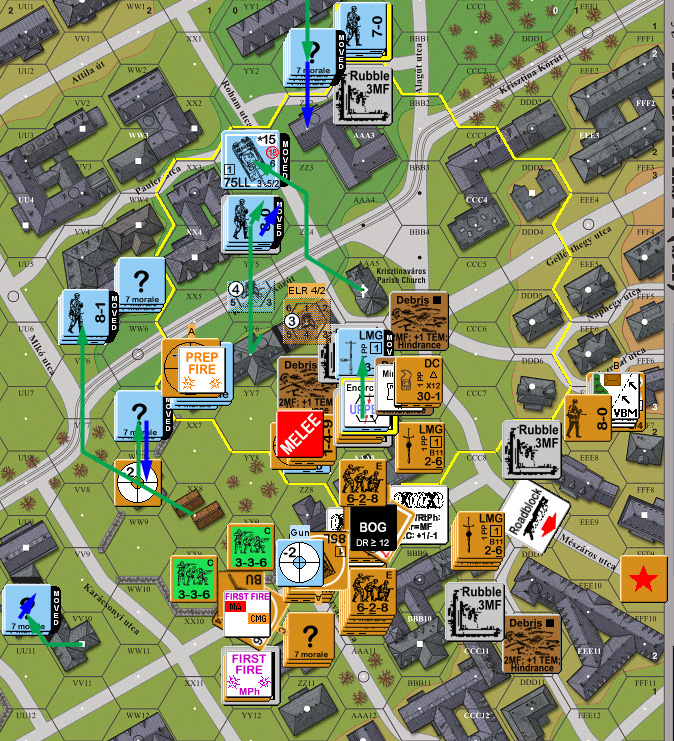
I rallied my two broken squads for my turn 4 RPh, with no other results. I prepped upstairs in AAA7, breaking the squad in h2 to conscripts on a very good roll. I contemplated having BBB6 Place a DC on AAA6 (which doesn’t involve a minefield attack), but decided to prep instead, for no effect. The T-34 targeted by the ATG OpFired, hoping for a shot after the ATG got revealed. I used a BVR squad to force a reveal on WW8 (which was the “?” that came over from the north end last turn), which turned out to be a 467. I sent more its way, and it eventually used spraying fire to put residual on XX7/YY7, killing a BVR squad with a 1KIA in the process. That did set off my sniper, who pinned AAA6 for me.
That allowed me to run a squad adjacent to the ATG, and then I ran another into its hex to force a reveal there (taking, and surviving, residual twice). I tried sending a squad around the south side towards the church, but the MMG in AAA1 reduced it to a HS, and then broke it (on separate shots). With the ATG presumably occupied, the remaining tanks circled around to the north of the walled area, where they could start softening up the next block. The OT-34 un-bogged easily (the last two times I’d bogged, I’d Mired, and in one case Immobilized), and passed its stall check, only for Patch to make a desperate PSK shot when it parked which missed and broke the firing squad. He then pivoted the ATG for a shot at it, but all he got (besides Acq…) was a Low Ammo counter. Then IF scored a hit, which thankfully bounced off the hull (we later remembered that IF is allowed with the ammo shortage). I had been afraid he’d take a shot as it passed through the OpFire T-34/85 hex, using Acq and overstacking for maximum mayhem, but he didn’t think of it (and it would have suffered +4 for Case J2…).
Patch tried a final PF check during DFPh, which failed only because of ammo shortage. I finally got to use the OT-34 for it’s main purpose, and got a 2MC on VV5, breaking his 8-1 to 8-0 and pinning the squad there. The OpFire did not disappoint, with a hit for a 1KIA on the revealed Gun which destroyed it. A large firegroup fired on WW8 for a 1MC, which he passed. My fanatics in the minefield advanced out fine, but found the other 6 factors in BBB5, and were reduced to a broken HS on a 1MC. I got into WW8 and AAA6 for CC; in the former, I ambushed the Germans, declared HtH, and wiped out the squad. In the latter, I only avoided ambush thanks to my hero, and there was no result.
Situation, Russian Turn 4.
Patch’s leader self-rallied for his turn 4, but he lost the malfunctioned LMG, and nothing of mine came back. He continued skulking and pulling back, with the Panther backing up one more hex, and there was no fire on either side. The melee ended with me killing the Germans for no loss, despite Patch switching to HtH (and I would have gotten him regardless).
Situation, German Turn 4.
I rallied my one broken squad (leaving two broken HS), and actually repaired the radio, now that there was no real time to use it. I started by Dashing a couple squads across the Krisztina Kürút, and surviving all the shots against me (with AAA3 suffering ammo shortage). A little to my surprise, the front two hexes of the YY4 building is where all the stairwells are, so I got upper-level encirclement at that point. A later shot from AAA3 did break my 7-0 and pin a squad as they tried to cross the street. The third T-34 headed south to come out on the hill overlooking the last bit of the victory area, but stayed back out of the Panther’s LOS. The OT-34 squeezed into the rear street (Pauler utca), and the squad in WW4 found a PF which barely missed and caused a K/1 to them.
On the other hand, a later attempt to get across the street met a 1KIA from residual, and a HS broke to it. Patch’s force was actually quite thin by this point, but I was still taking casualties every turn. The final T-34 went down the Krisztina Kürút, carefully stopping out of LOS of the Panther, but able to see AAA3, which was going to be important for the last turn. DFPh malfunctioned the Panther’s BMG. The OT-34 got a great roll with the FT, for 3KIA/1KIA (vs the concealed leader), and putting a flame in WW4h1 (that’s usually Patch’s job).
Situation, Russian Turn 5.
Nothing happened in Patch’s turn 5 RPh, and, backed into a corner, he had one prep shot between adjacent buildings, which thankfully had no effect. Most of his movement was out of sight, so what I could see drew lots of fire, which was ineffective. My shot in reverse of his prep fire got a PTC to pin one HS(+MMG). Even better, LOS from YY5 to ZZ2 turned out to be clear, and my T-34/85 got a hit to break the MMG squad, and bring him down to 2.5 unbroken squad equivalents going into the last turn.
Situation, German Turn 5.
I managed to rally two HS and the 7-0 on my last turn, leaving only a single HS in EEE7 broken. Patch repaired the BMG, and his 7-0 in AAA3 grabbed the MMG from the broken squad. With the OT-34 and other troops right there, I already had what I needed for XX3, so my entire attention was on how to get at AAA2. The T-34/85 in YY5 started up and zipped across the Roham utca to crash into AAA2, keeping the MMG from firing. The Panther naturally took a shot, but missed by one, and the T-34 bogged in the building, which was fine, and better than expected (I more expected cover from a burning wreck…).
The other T-34/85 armor assaulted down the Alagút ucta, stopping behind Patch’s refuge, and then I ran my DC squad in to Place it on AAA2. The fanatic HS then followed suit with their DC. I moved in more troops as insurance, but a K/1 from the Panther’s BMG killed a HS and reduced a squad, and broke my 8-1. The surviving HS also passed a 2MC in the next hex to get to ZZ2. The 7-0 tried a PF vs the T-34 in DFPh, but didn’t have one to hand, XX3 got a NMC on the big stack next door to break my 7-0 and a 447, leaving the concealed 628, and BVR 336+7-0 fine.
AA2 really had no choice to keep concealment against a pair of DCs, but the first one rolled a 2 for a 2MC that broke the squad, and he nearly (3!) got HOB from a NMC on the second DC. I tried adjacent fire on XX3 to strip concealment and failed, but the OT-34 got another great roll for a 3KIA vs the visible units (which were all the MMC anyway). And the scenario ended with only an unbroken German 7-0 and the Panther left.
Situation, Russian Turn 6.
Afterword
The scenario has a CVP cap just to keep the Soviets from throwing everything away in an effort to get at the Germans. 33 CVP is a lot in a scenario this size, and at the end of the game Patch was still at 20, 7 of that having come from the recalled T-34, even though I averaged about one squad killed per turn. Meanwhile, I was gobbling up German units in return. Getting into AAA7 and trapping a squad there was pretty big.
MVP goes to my sniper for that turn 1 kill of the 9-1, with attendant break/reduce of the MMG squad. Without that, the advance would have been a lot harder than it was. However, once the OT-34 got into action in the late game, it put in a solid performance, and takes second place. We didn’t have a lot of rubble, but what there was was important, as that one roadblock basically cut off all remaining easy vehicular access to the center of the board. I took the OBA more out of a desire to actually use OBA for once (I don’t think I’ve ever gotten past an SR), and the radio stymied that. But the 7-0 helped speed a platoon on its way during entry, so it wasn’t entirely useless, just not worth 6 purchase points. I don’t think Patch had any standout units. The Panther can be one, but with low ammo and fuel, I understand why Patch was cautious with it.
Patch commented that his mines would have been better in BBB6&7 (one hex down from their actual placement), though they certainly ended up working where they were. There’s a number of places they could have been handy—AAA8/BBB7 come to mind, though it’d mean that he’d need to exit the building via AAA7 when pulling out. XX7/YY7 in front of the ATG could have been nasty. Of course all that presupposes a west-heavy advance, and their setup would be better if I’d gone more heavily south.
I would have loved to have gone more heavily south, but the east limit of the Russian entry area is just evil. Allowing FFF8 would change things a lot (which I’m sure is the point!). I also bet that any game that has BB7 and AAA7 rubbled looks a lot different for that entry. (YY6 still looks straight down the road, but it doesn’t have a Level 2 Location.)
This is another ‘lose more slowly’ scenario, but it is an excellently tense one. The Russians have everything they need but time, and one wrong move could get very expensive. Play tended to be a bit slow for us simply because of all the things that needed thinking through. Over the years, I’ve gotten to enjoy city-fight scenarios more, and this is a good smaller scenario of that genre.
Discussion (3) ¬
Because I have so immensely enjoyed your Budapest AARs over the last few years, I have created 7 more Budapest scenarios set on the Pest side of the Danube, set for publication by MMP next year. 🙂
I can’t wait to see them! If you want any help from me and Patch, I think we can oblige. 🙂