
95 Descent Into Hell
After finishing the first two of a three-set of scenarios on Crete from For King and Country (and originally from ASL Annual ’89), Tracey and I went for the third, after swapping sides. So this time I’m the invading Germans, and I need to take the bridge from the first scenario, and take out the AA guns from the second one.
This version gives me some interesting extra decisions. It’s a nine-turn scenario (longer than either of the originals), and the Germans arrive in two waves of gliders, on turns 1 and 4. It’s fairly obvious that the first wave came in on the guns, and the second on the bridge ‘historically’, but there is nothing that demands that here, as the gliders can come in anywhere you want in the three-board play area. The British on the other hand, are limited to setting up in accordance to their original areas in the first two scenarios.
His setup around the bridge was not dissimilar to mine (though definitely different), while the AA Guns were parked at the ends of the runways and facing outward, with everyone else in nice easy reach of them. (That kind of invites just landing on the runways as the AA has to change CA to fire on them at all, but the Germans will probably take some point-blank -1 shots as they get out, which certainly scared me off.)
After some debate, I opted for going after the guns first, and possibly bringing on the second wave to help with that, and then everyone can rush the bridge in the extended time at the end (our play of “Tavonritis Bridge” showed just how fast that defense can collapse). So I concentrated on the southmost gun, with a few landings on the long board-11 hill to keep the NW busy. The AA fire was completely ineffective (common, and helped by the same beginning-of-game dust as “Bofors Bashing”), just leaving me a couple of landing DRs for my more ‘daring’ placements. Naturally, I rolled 6-6 for the main one, causing it to go long, and land past the woods it was supposed to land in front of (and on top of a British unit!). Another one in that set landed one hex short, putting it in a sunken road, but both did well on the crash drs. In the other main group, a couple went a bit long, putting one in brush, and one on top of another glider, and one was a hex short, but all of those landed fine as well.
Tracey’s only DFPh fire was at the glider that landed on top of him, and even TPBF was unable to harm the glider. Similarly, my only fire was in the same hex, and couldn’t do anything to him. An old Gamesquad thread wonders if there’s a CC counter immediately placed from my guys emerging on top of his, but it never came to a solid conclusion. We played it as ‘no’, which allowed me to advance out of the hex (the British were still concealed from me having no units on board when they fired, and I didn’t want to accept a likely Ambush).
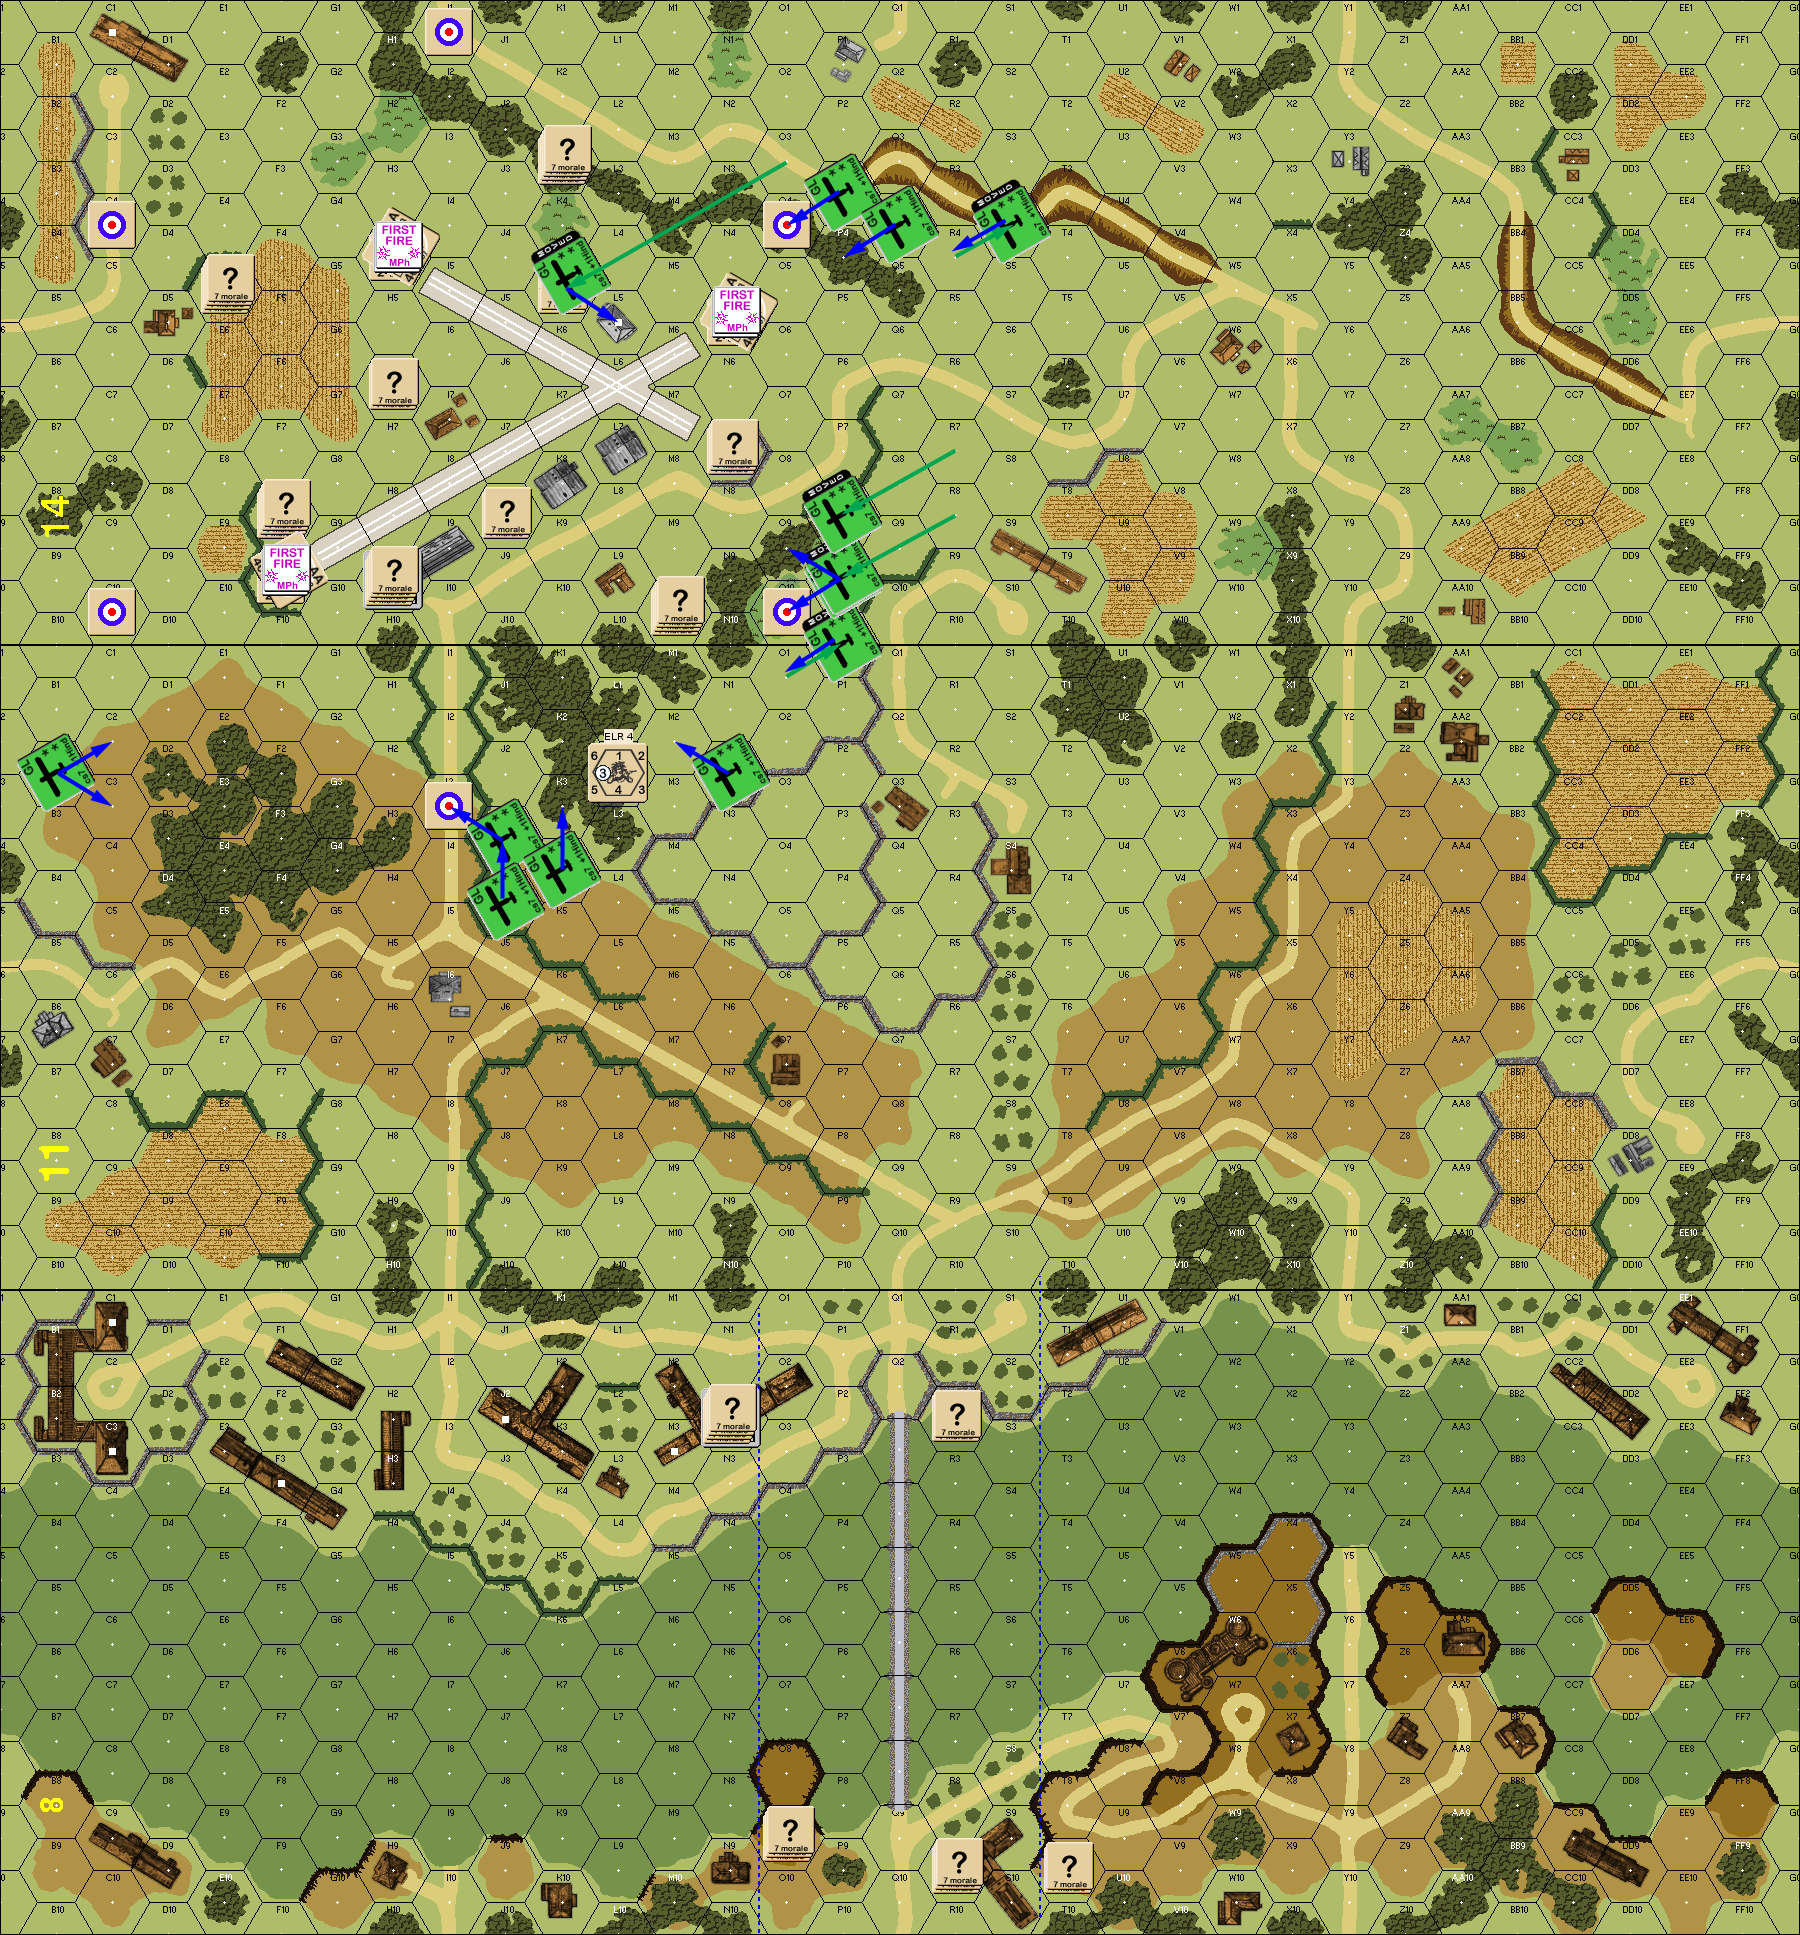
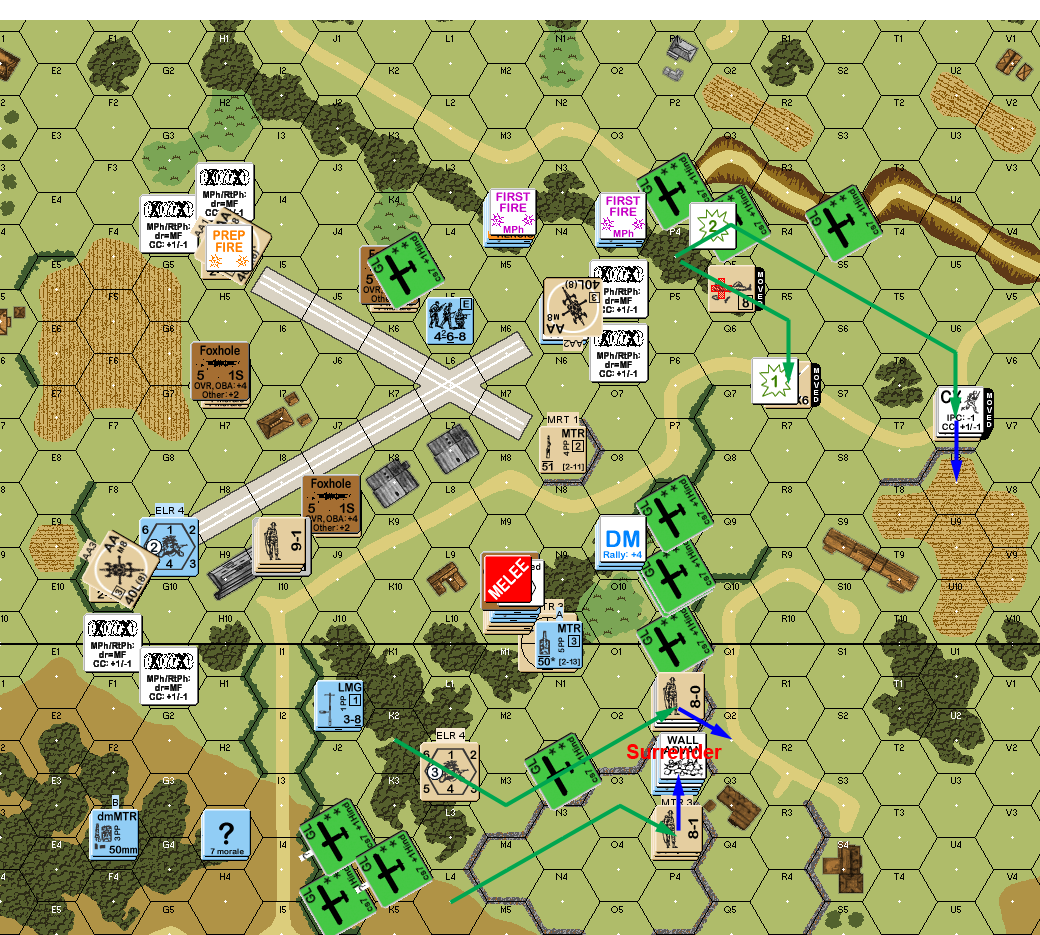
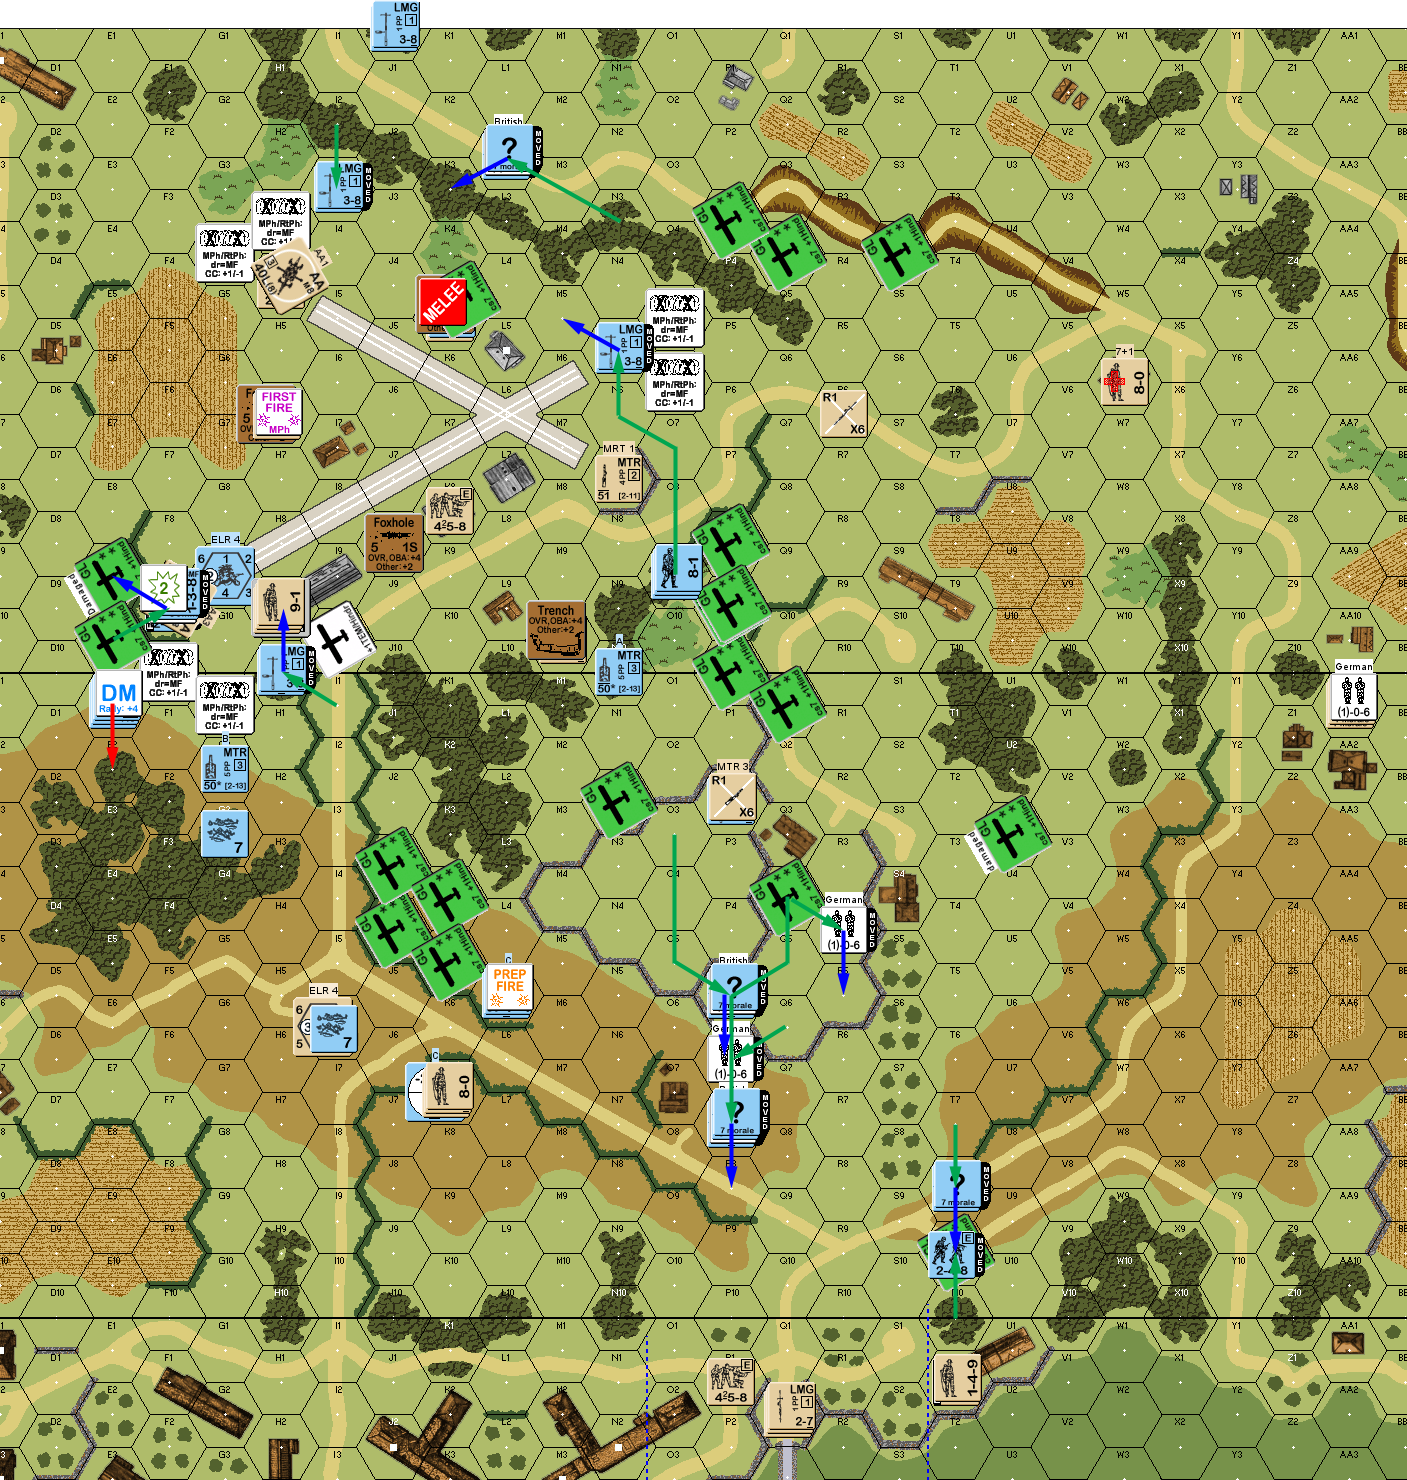
Situation, German Turn 1, showing the full board. North is to the left. I need to clear the British from between the blue lines on board 8, and destroy the three AA guns. There is Moderate Dust for the first two turns, and Light Dust for the third. As most of the action was on board 14, any time I don’t give a board with a hex number, that’s where it is.
Once out of the gliders, the fortifications came into view, with the wire split into three two-hex segments in front of each AA, and foxholes in the expected places. One AA got a result for his prep, breaking my MTR HS in 11C2, and a squad got a lucky 1MC against my stack in 14O9, breaking a squad and a half. Tracey redeployed to the northwest, and his stack in the east woodsline kept out of sight while moving towards my main landing force. I didn’t manage to do anything to him, but I did manage to Encircle the N5 AA position.
Routing was a little complicated, as my guys in O9 inevitably moved towards the stack in M10. Thankfully, they would have been able to get away from there, but he didn’t reveal himself, so they ended in N10.
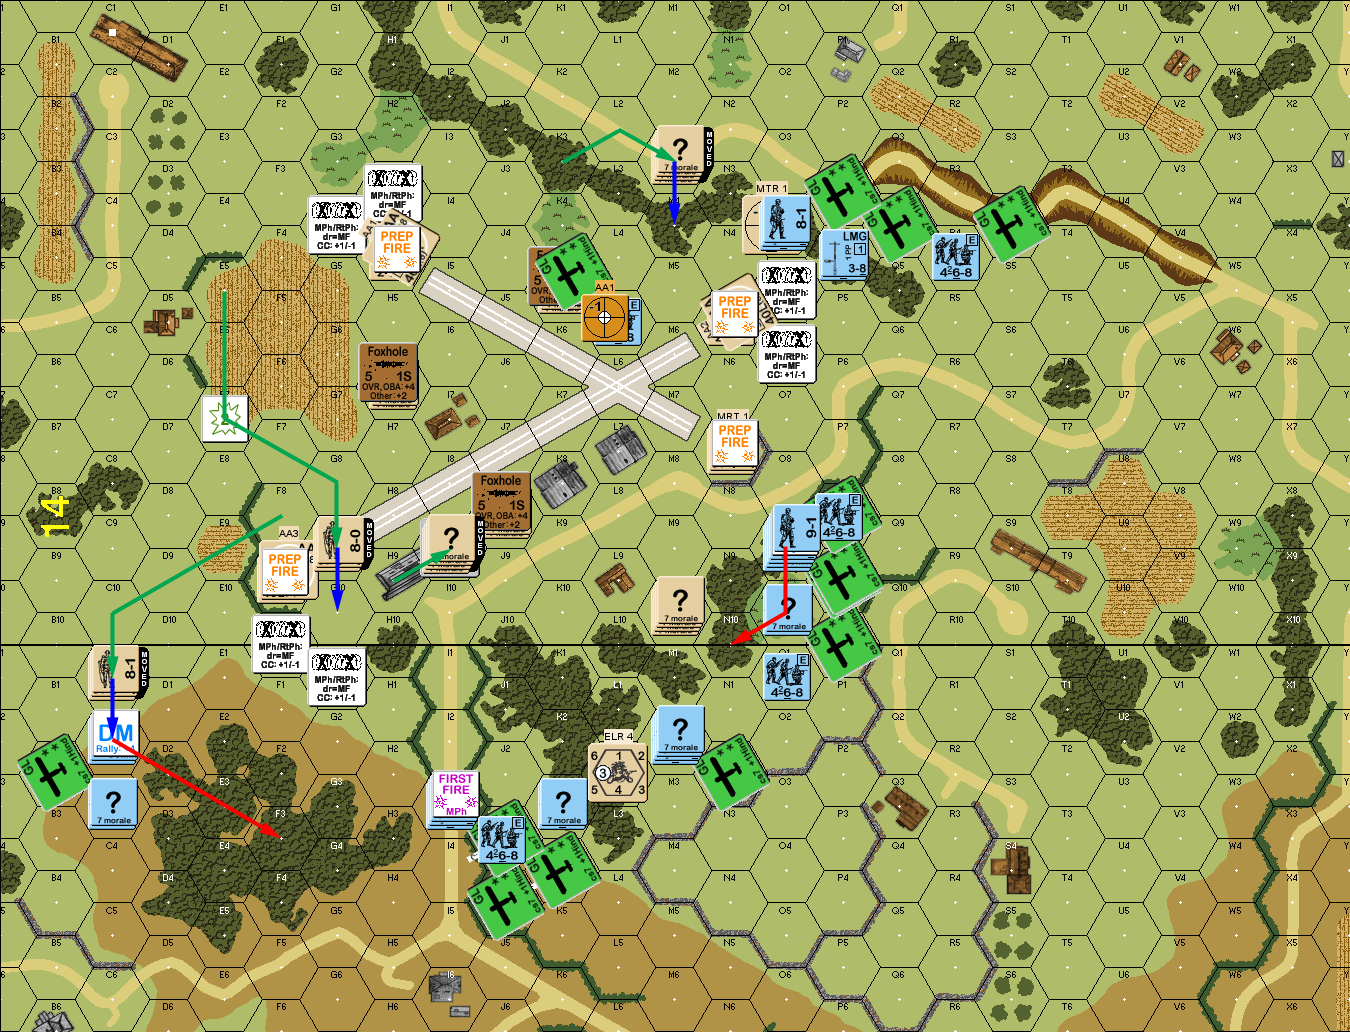
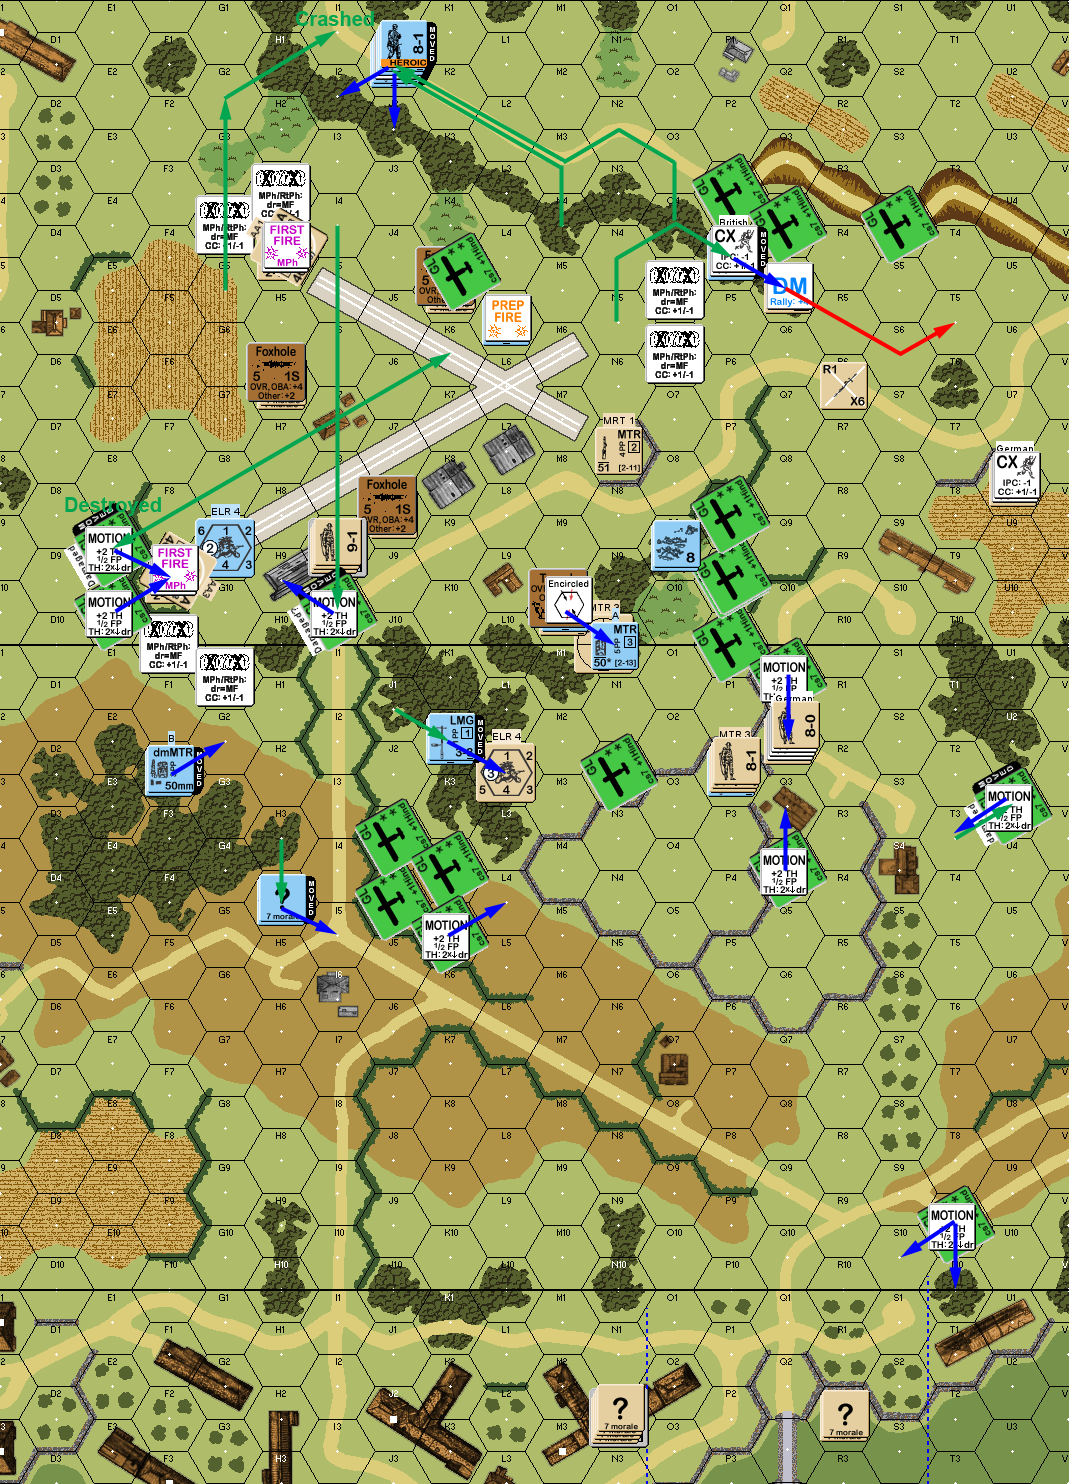
Situation, British Turn 1.
I didn’t get anything back for my second turn, and put Encircling fire on N7 for my prep (including a 1MC that he passed). My main goal for the turn was to deal with M4 and M10, and so put a lot of pressure on both during movement. During movement, he did no more than pin a squad, which forced me to put a second one into L10, as I needed an attack that could possibly get a result to get Encirclement, and turn an 8-0 heroic. During Final Fire, he broke my squad in the open in M3, and malfunctioned a MTR.
My broken squad was forced to surrender, but I then came in with a squad and the heroic leader, while two squads and a leader piled into M10. Thanks to a poor roll, the British leader still being concealed, he got ambush in M2, and withdrew out, while both of us rolled quite high in M10 for no result.
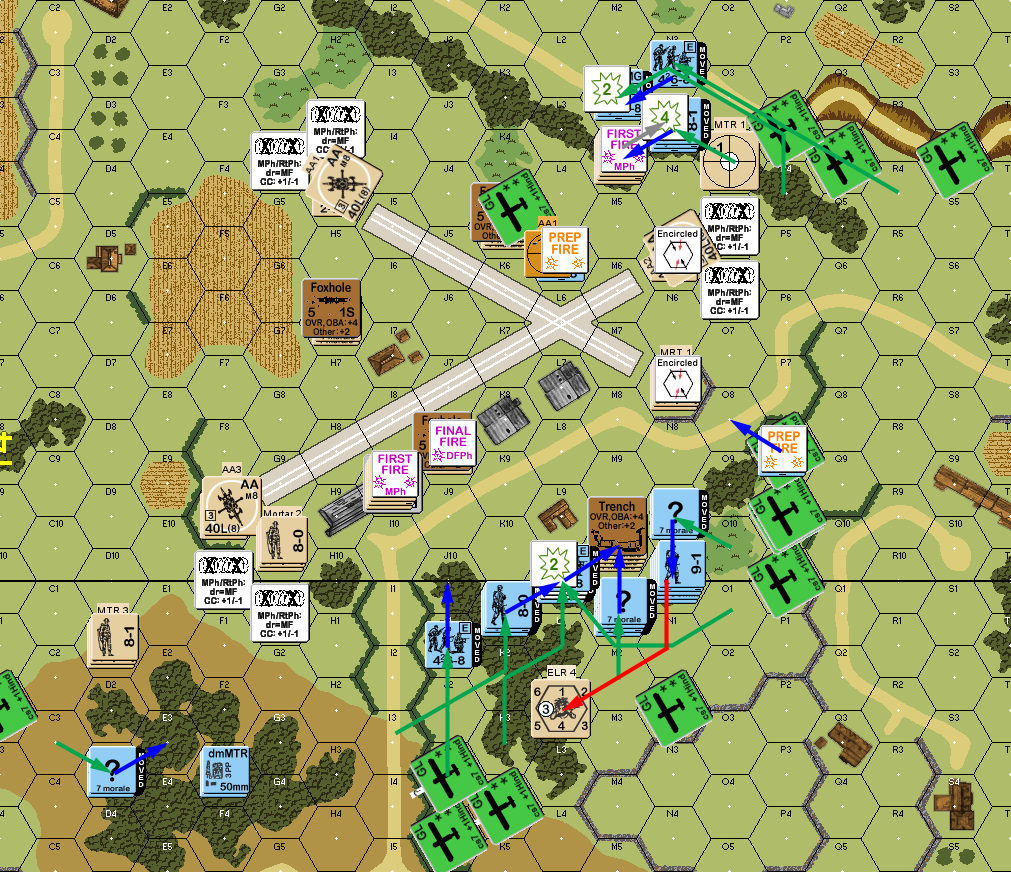
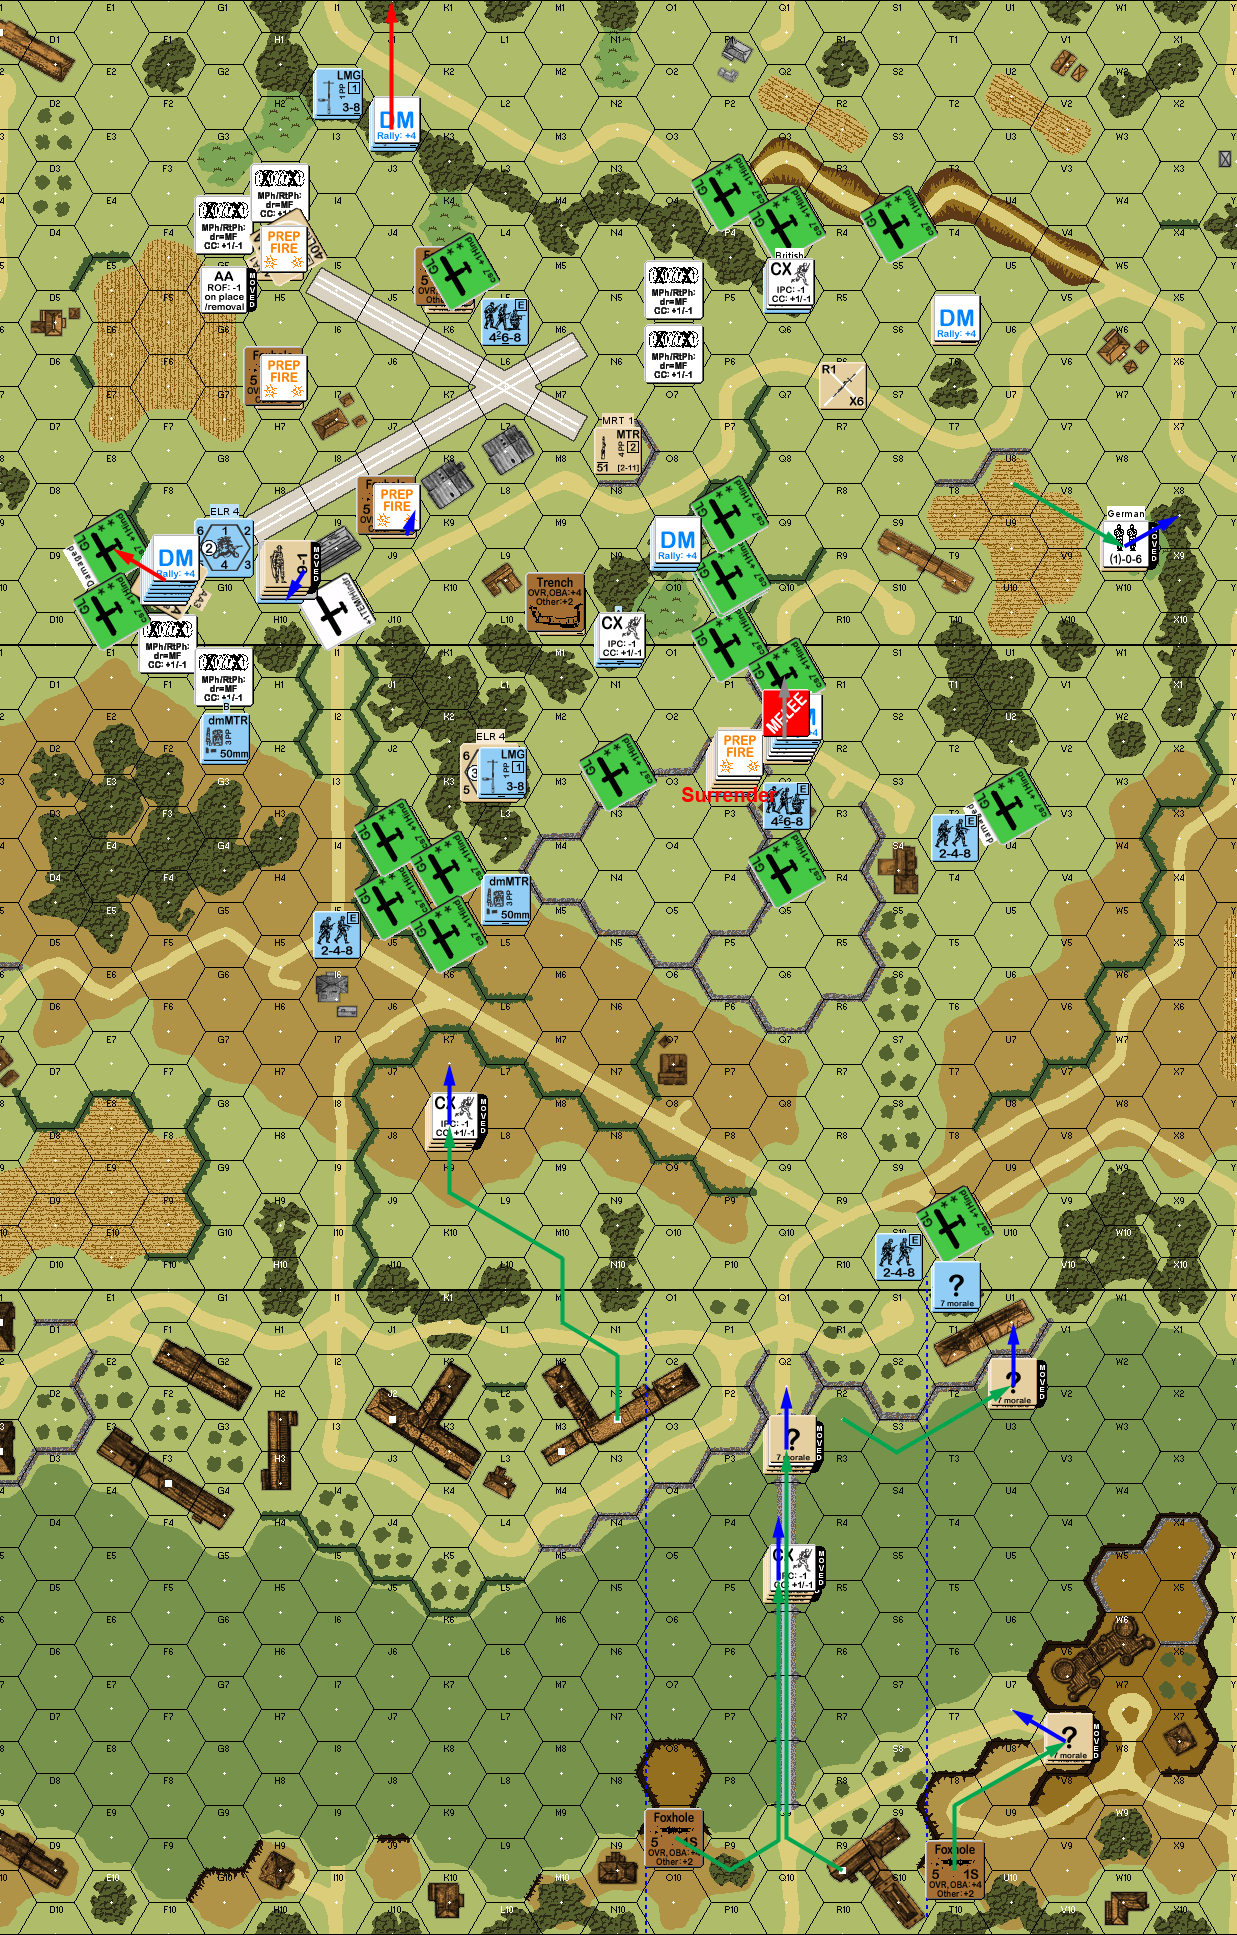
Situation, German Turn 2.
The only RPh result for Tracey’s second turn was me recovering a dropped LMG and MTR. He had plenty of prep, with one good shot from an AA that ELRed my squad in 14J10, and another shot broke my 8-0 in L10, but the two squads with him were okay. Most amazingly, the squad in O8 survived adjacent fire with no trouble. This let him get into my back area, and started a lot of big problems for me. Naturally, I tried to stop that, but the one shot I had was blocked.
My fire was limited, but effective, breaking N7 and the AA crew in N5. Routs were fun, as N7 surrendered to me, and my guys ran all over. In fact, I did an illegal rout with my broken 8-0 that I should have spotted, but I’m sure I was too fixated on the squad and a half in 11L2 to really think it through (and of course, that version put him with a broken squad to hopefully rally…). The Melee in M10 continued with no result for me, but Tracey managed to kill a squad and my leader in there.

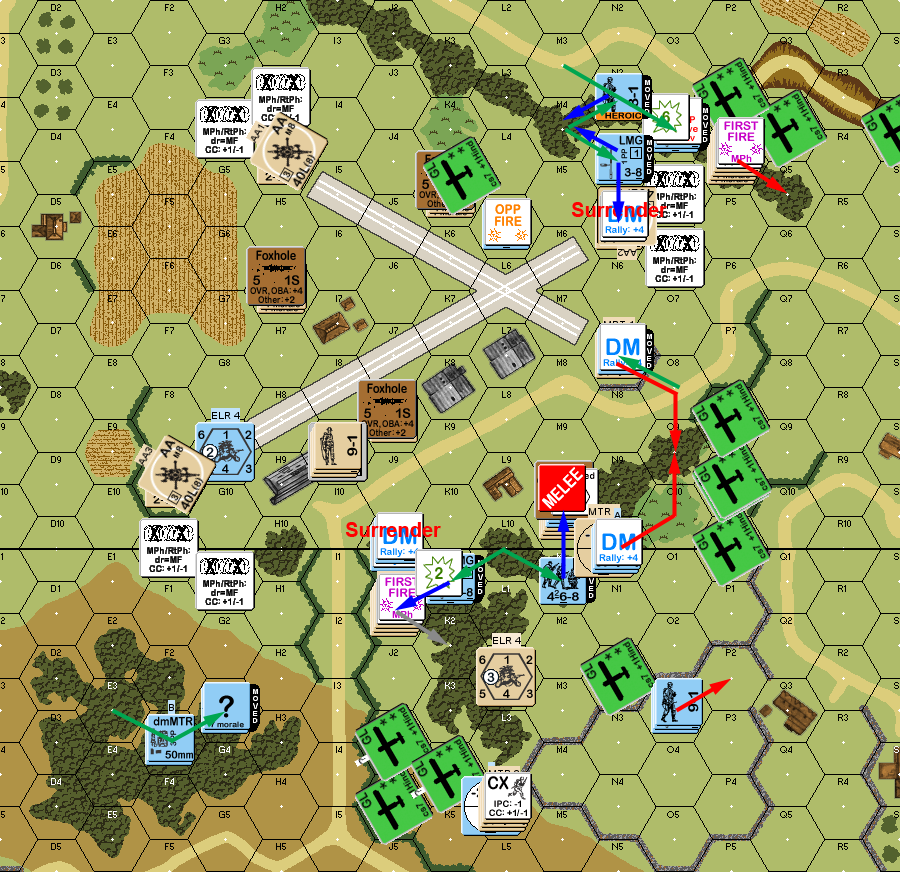
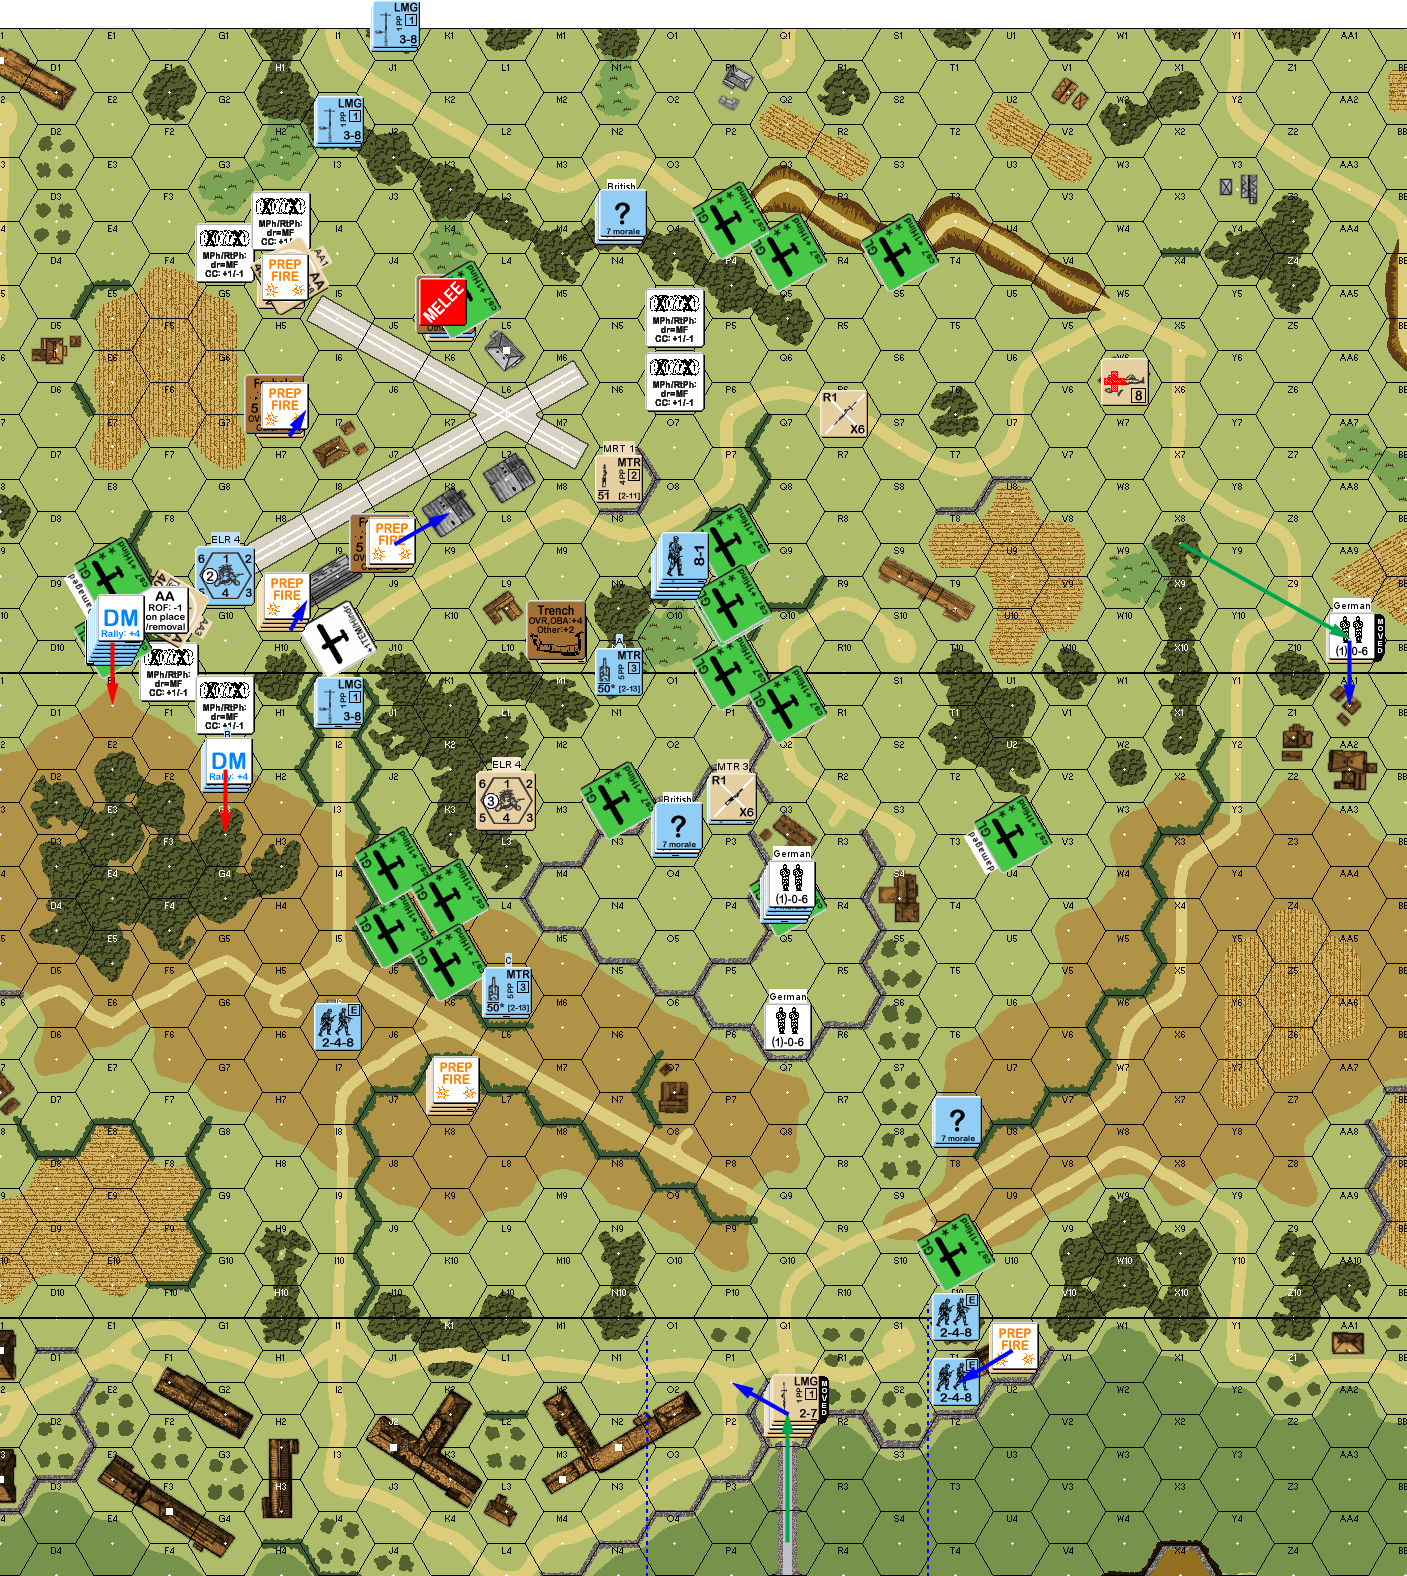
Situation, British Turn 2.
The only result of my turn 3 RPh was for my HS in 11O3 to go away on a ’12’. Prep was limited to hitting his men on the 11L4 ridgeline with a MTR, but despite a couple hits in the light dust, couldn’t get a result. Unfortunately, they were in woods, so when the British MTR fired back in DFPh, the airburst broke my squad. My attempt to advance on the close AA also had some trouble, as my squad in O8, crossed the wall, and took a 1KIA from the AA at the other end of the runway; thankfully the prisoners died, but that still broke the squad.
Fire into his prisoners killed some without troubling the squad, but I broke the British 8-0 there. My 8-0 and squad in 11J1 surrendered, as did the N5 gun crew. I put another squad into the M10 Melee, and attacked his guys who just took prisoners in 11J1. However, he Ambushed me in the latter, and withdrew out of the hex, while there was no result in the Melee.
Situation, German Turn 3.
Tracey’s turn 3 RPh was poor for him, with a leader wounding on a ’12’ self-rally, losing a malfunctioned MTR, and me successfully recovering the AA Gun in N5. He continued going after my back area, surrounding the guys who routed away last turn, and attempting to get at the squads that had just routed to O9. However, a -3 shot (helped by my heroic leader) got a 1KIA through the dust to stop that.
I spiked the AA in my DFPh, but lost another squad to prisoners in RtPh. He then attacked and killed the leader there in CC. In M10, I finally killed the British squad, but at the cost of one of mine.
Situation, British Turn 3.
I managed to self-rally my MTR section hidden in the board 11 woods for my turn 4 RPh, while nothing else happened. I was now faced with a heck of a decision. I could just try and take the bridge, and hope it went fast enough that they could race east to help with the guns, but reinforcing the current effort seemed like a much better idea. The question then became how to make that work?
I decided, with things already desperate, to go full daring coup-de-main (which would have worked better with the dust). Two gliders were to land on either side of H4, three near F9, and three landed around 11Q3 for a daring action-movie rescue of my prisoners. The last two were tasked with starting to set up a west perimeter to start probing board 8.
Unfortunately, even with the ROF penalty of going back into AA mode, Tracey had much more effective fire this time, with some good ROF shots. He shot down one glider (meant for E9) outright, and damaged three others. Of the two meant for the H4 gun, one evaded to the other side of the wire, and then crashed short of the tree line, eliminating a squad and leader, and the other ended up west of the airfield, landing on the road. One meant for the F9 gun evaded short of the goal… and then went long on the landing, ending up one hex long from where it started, and came down safely. Of the ones away from the AA guns, one landed a hex short and was damaged upon landing.
His DFPh turned the damaged glider in I10 into a wreck, which, at least as I understand it still allowed survival, just after CRing from a squad to HS, and nearly damaged another (with my 9-2), and he ended up malfunctioning a MTR. Overall, I lost 3.5 squads plus the 8-0 in this stunt, and wasn’t even really threatening the H4 gun. Advancing fire did no more than malfunction a just-arrived LMG. In F9, I killed the gun crew in CC, but I got no result with the daring rescue in 11Q2.
Situation, German Turn 4.
Not much happened in the British turn 4 RPh, including me failing to recover the AA Gun so it could be destroyed. Tracey fired into the Melee, getting a 1KIA, killing his own squad and my 9-2, breaking his leader and my squad, who then turned into a HS from a failed 2LLMC, reducing his prisoners from two squads to one, and wounding the captured 8-0. The remaining crewed AA fired at J2, killing my heroic leader (leader life expectancy is very poor when heroic), and breaking the squad there, and then fire at F9 broke my entire stack there.
Freed from the threat of gliders landing among the defenders, the board 8 troops started rushing east, giving me a bigger future headache there than I had really thought about. Worse, LOS in the area is pretty bad, so my scouting guys weren’t even stripping that as he moved. I managed to Encircle 11P2 in DFPh, and a 1MC broke that leader, and the LLTC pinned the squad there. Tracey advanced downstairs in H9, and wiped out my HS in CC, while my broken HS withdrew out of 11Q2, and the prisoners killed their broken British SMC guard… rolling a 2 to generate a new 8-1 leader. Sadly, I just had no way to re-arm the prisoners….
Situation, British Turn 4.
My turn 5 RPh was no help, but I broke the British squad in 11P2 in prep. And with that settled, I started sending more west to bolster what was happening near board 8. DFPh managed to reduce a broken squad and pin a HS in 11T10.
Getting desperate, I advanced into the foxholes in K5. It had been long enough that I couldn’t remember that he had been shown as real at the start, and he hadn’t done anything since my landing on him, and firing at him hadn’t managed to force a reveal. So, I took a chance and engaged the “?” in CC, and was reduced to a HS in an Ambush.

Situation, German Turn 5.
Tracey didn’t get anything for his turn 5 RPh, but I rallied a HS in O9. Prep was plentiful, breaking my MTR team in 11G2 again, but fire at my big broken stack in E10 wounded my leader, but also battle hardened a HS to fanatics and generated a hero. Suddenly the threat to F9 was on again!
Of course, in DFPh, I got a great roll against the squad in 8U1… who went fanatic and generated a hero. On the board 11 hill, I got several hits with my MTR, and pinned his squad, but his sniper went off and broke my HS in 11I6. He went for CC against my HS in 8T1, and killed him, while the Melee in K5 continued.
Situation, British Turn 5.
I got nothing back for my turn 6 RPh, but Tracey rallied a wounded 8-0. I continued moving west, and tried to find a way for the vestiges of my eastern troops to approach the third AA, while my HS recovered the second one in F9, taking fire that wounded the hero. This allowed me to destroy that AA Gun, getting me to two of three. I also got lucky in the K5 Melee, knocking out the British squad… at the cost of my own.
Situation, German Turn 6.
Afterword
I actually conceded the game shortly into Tracey’s turn. His AA managed to break the HS in I3 in prep, leaving me with three intact HS (one of which was guarding a HS of prisoners) with which to try for the third Gun. I didn’t think that was going to happen, and taking the board 8 bridge was a lost cause as well.
Things really went bad on turn 2 when Tracey got behind my line, and started rounding up a good chunk of my force. Without that problem, things would have been different, but I’m not sure just how to have prevented that, other than having the squad that broke in J10 hiding in the woods to guard that route.
I can claim a little superiority on Tracey, since I successfully took out one of the AA guns with just the initial wave, which is something he just missed doing. The second AA took the second wave to do, so it’s a really difficult job for the Germans. I’m thinking they may just have to be very gutsy and land practically on top of them, and trust to the dust to protect them from AA fire and small arms of nearby squads. Basically what I tried and failed to do after the dust cleared. I tried for sweeping north, taking everything out as I went, and that was a disaster, though it started fine with all the encirclement I could force. My main problem with landing on the guns initially is you don’t know where the wire is, and could get hung up on it.
Which brings to mind a thought—putting wire directly on the AA. Any Germans going after them will have to get through that first, which will really slow down attempts to eliminate them.
Despite the problems (we have three German losses for the three scenarios, though Tavronitis Bridge was really close), they are fun scenarios, and a good way to see some glider landings. I still need to get some paratroop practice off my bucket list….
Discussion ¬