
93 Tavronitis Bridge
When I asked Tracey what he might like to do next, he mentioned an upcoming date at Pegasus Bridge, and asked for something with gliders. My thoughts immediately went to the first few scenarios of Annual ’89, which were reprinted in For King and Country. They’ve long been on my general ‘to play’ list, so arranging for the first one was no problem, and Tracey took the assaulting Germans.
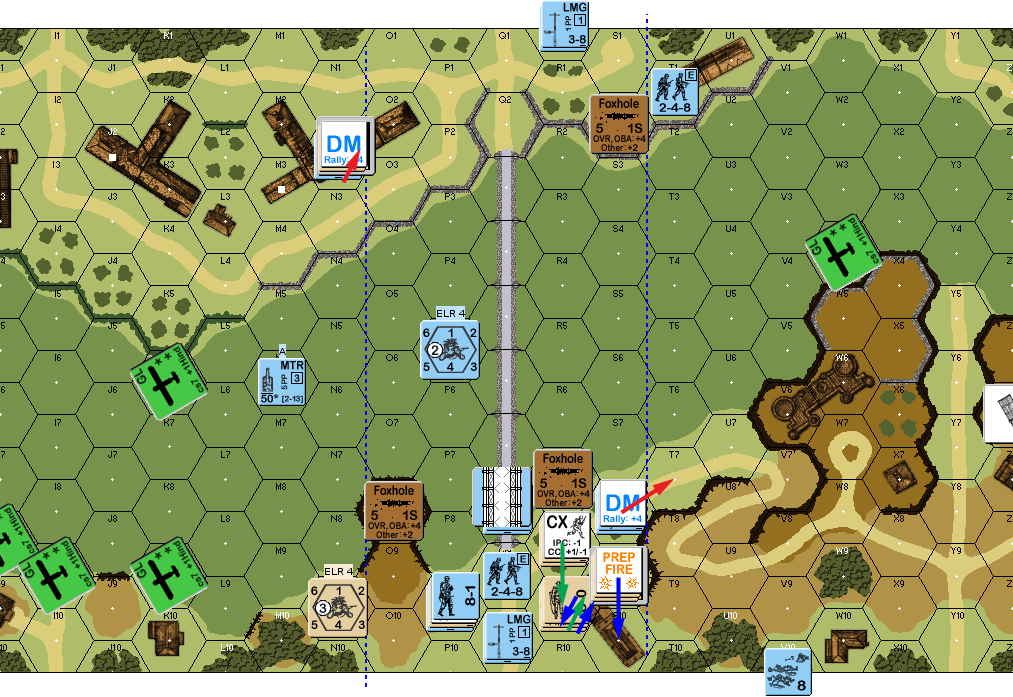
The eponymous bridge stretches across the board 8 river, which here is a dry Level -1 valley. The British (actually New Zealanders) sets up within three hex rows of the bridge, but the Germans win after 5.5 turns if there is no Good Order British Infantry (not MMC…) within two hexrows of the bridge. They get five elite squads, with two LMGs and three foxholes to defend the bridge, and given the record (even of the revised scenario), we used the German balance that says I can only set up one MMC in the valley. So, I concentrated my defense around the one large building (R9), with a squad+LMG up on the O8 promontory, and the other LMG squad down in R7, while another two were in/near the the building. The last squad was Deployed and guarded the other end of the bridge. I was a little nervous leaving them out there with no support, but hoped they could tie up more than a squad for long enough to be critical in this short scenario.
The Germans get ten elite squads, with 3xLMG and 2xlight mortars, which all come in by glider on turn one. The initial wind is coming from the northwest (the board ID # corner), so the gliders have the entire central stretch of the riverbed to land in (assuming no initial wind changes). Tracey landed in two groups, with six gliders landing to the north, and the remaining four to the south, hard up against the cliffs that surround the hexrow Y road.
The Brits have nothing on board that can provide Light AA fire against the gliders as they come down, but an SSR gives them two 4FP AA attacks from other nearby AA, which did nothing for me. No one in the northern group had any obstacles on their approach, and came down fine. The southern group had potential problems: W4 had an obstacle in the form of the level 0 river bank five hexes before the landing hex, and landed safely. Z4 only had three streambed hexes behind it, and there was a building on the stream bank, to add another level of obstacle, but only undershot the ILH by two, landing safely in the middle of the streambed (probably a heck of a downdraft). AA5 had a similar building problem, but four clear hexes between that and the ILH, and also landed two hexes short. BB5 was like W4: four clear hexes, and the Level 0 stream bank in the fifth. It rolled double-6 to land two hexes long, in Z6, which… really should mean the glider smashes into the base of the three-level cliff (it’d just be coming in way too low), but instead wrecked from landing in the blind hex of building AA6.
I didn’t know it at the time, but this was about the worst possible thing that could have happened, since the wrecked glider was carrying a squad and his 9-2.
However, I didn’t have any great shots at the downed gliders, and everyone else was able to disembark without trouble.

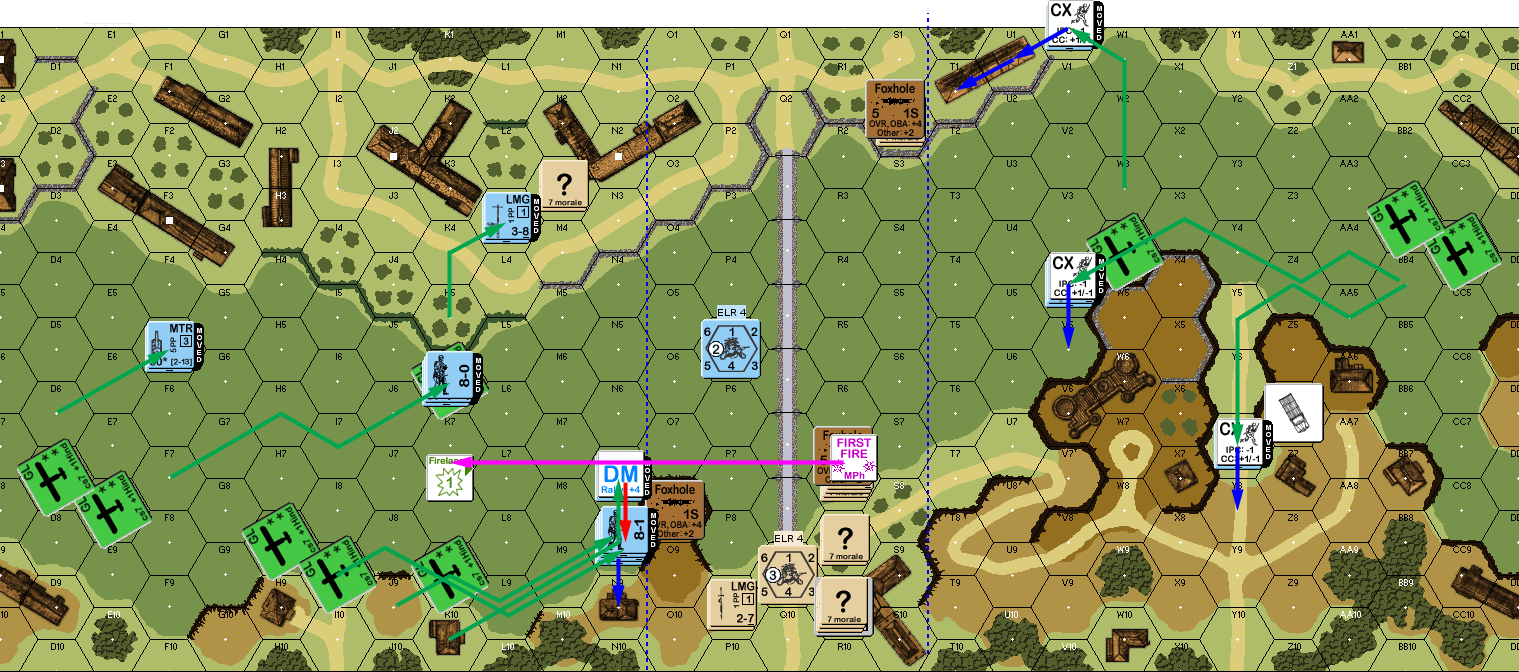
Situation, German Turn 1, landing in gliders. North is to the left, orchards are olive groves.
I mostly sat tight for my turn, though O8 tried a shot at J9 for no effect, but took fire in return that broke him. Thankfully, HA meant no Interdiction as they scrambled back to P9. Otherwise, I generally skulked, and stayed out of trouble.
Tracey didn’t fire during his prep, preferring to advance to contact. One squad started around the base of the O8 promontory, and broke as I set up a fire lane to keep him out of the middle of the riverbed, but apparently he’d already planned on staying behind the cliff. Meanwhile squads moved up to both my “?” HS on the east side of the bridge, but did not advance into CC with the squad that came adjacent. Both MTRs shifted to the east side of the streambed, giving them potential LOS to my main positions.
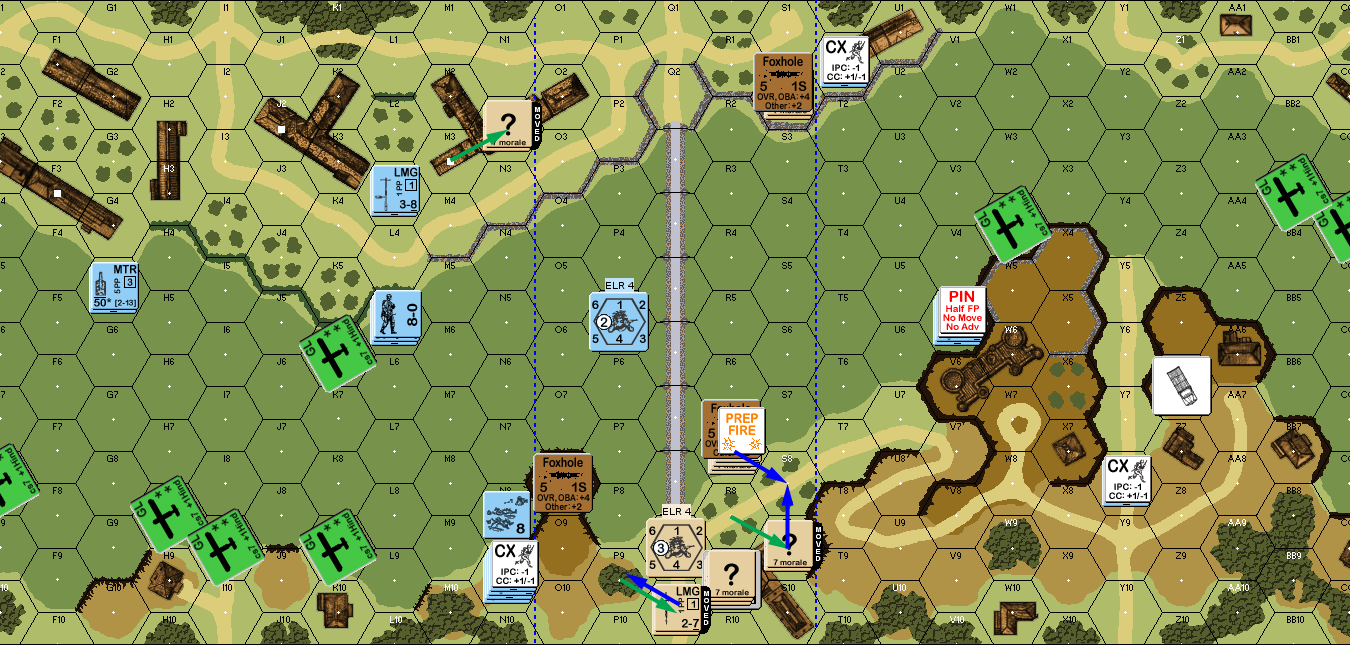
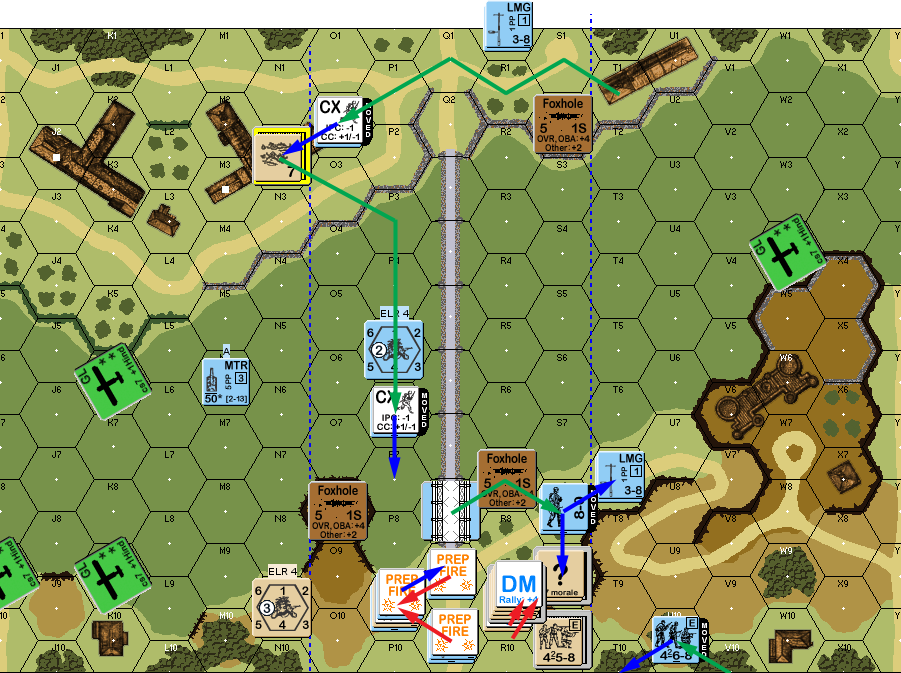
Situation, German turn 2. (An uncaught error here: V0 Advanced twice without me noticing.)
I managed to self-rally P9 for my second turn since Tracey had been unable to fire on them. R7 fired from its foxhole, but couldn’t do more than pin V5. Past that, I skulked where I could (S2 had nowhere to go). Despite that, a long-range shot from N9 broke my HS in N2. That did set off my sniper, but it just pinned one of the just-fired squads (it nearly got his 8-1).
I advanced back to P9 to make him stay a little cautious with his main force, with R9h1 keeping an eye on that area as well. A squad went into S8 to have some visibility to the south, and keep an eye on the exit of the hill road (and I pulled the 8-0 out of the R7 foxhole, which had been a pure mistake in setup; he couldn’t do anything useful there).
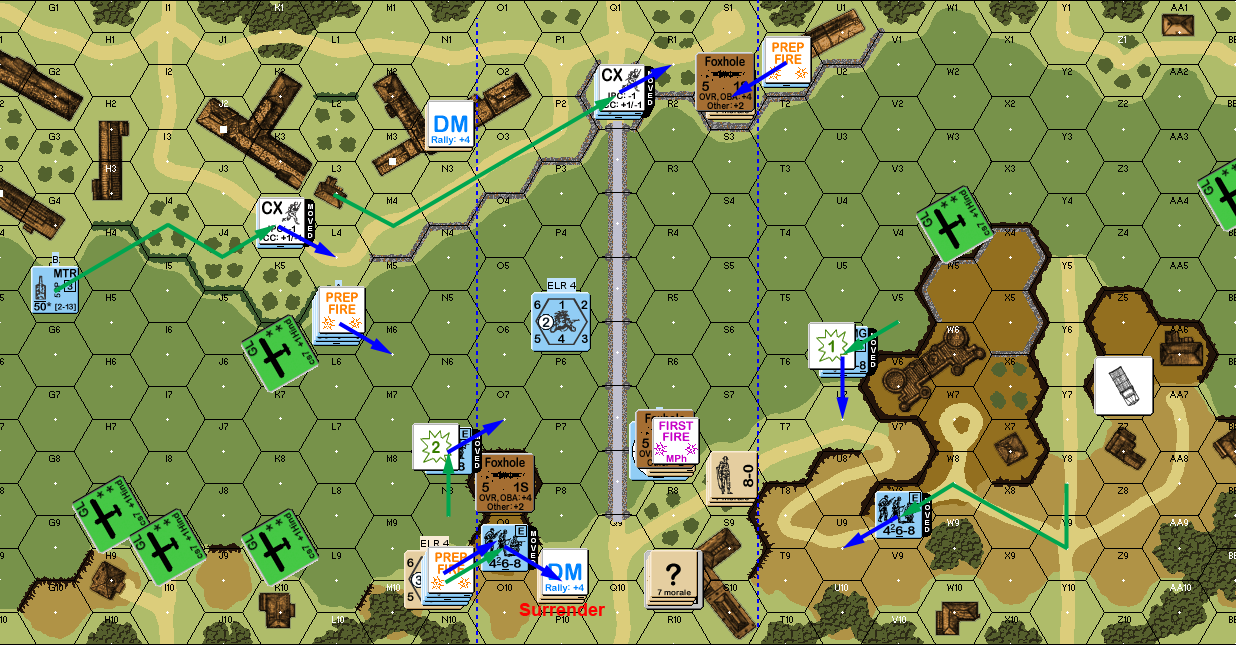
Situation, British turn 2.
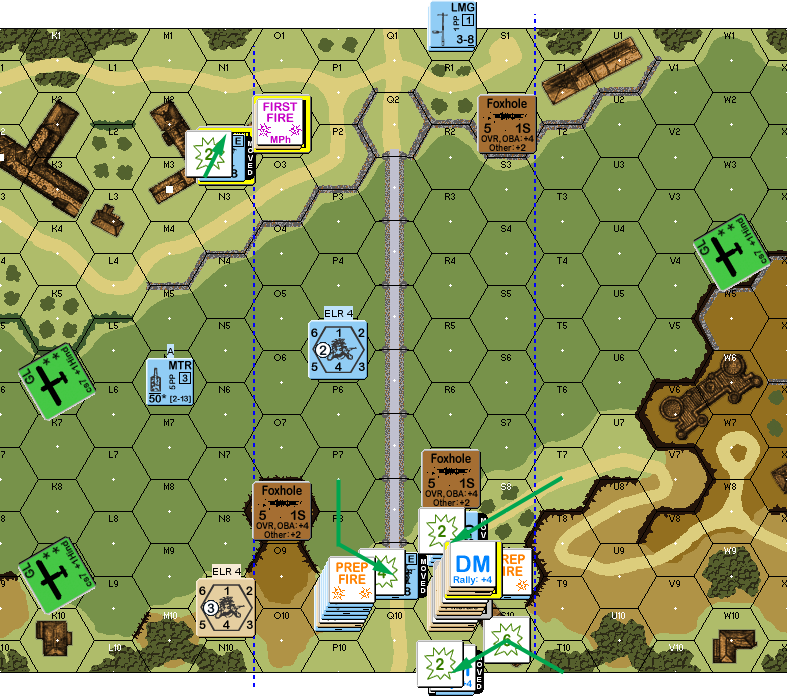
Tracey got his one broken squad back on self-rally for his turn 3. Prep fire at S2 didn’t work, but he broke the P9 squad again, with the main consolation being that the 8-1 and LMG squad wouldn’t be moving. He abandoned one MTR to race the squad forward, while the one that had been confronting my now-broken HS raced south to help against my remaining “?” in S2. In the center, he basically crept forward, using Assault Movement, and my fire was unable to affect them.
I found I had a big hole in my defensive plan when I realized that P9 could see T1 and V8, leaving them nowhere to rout, and forcing them to surrender. He advanced into CC (and the foxhole) in S9, and had no effect, while I did not attack to maintain “?”.
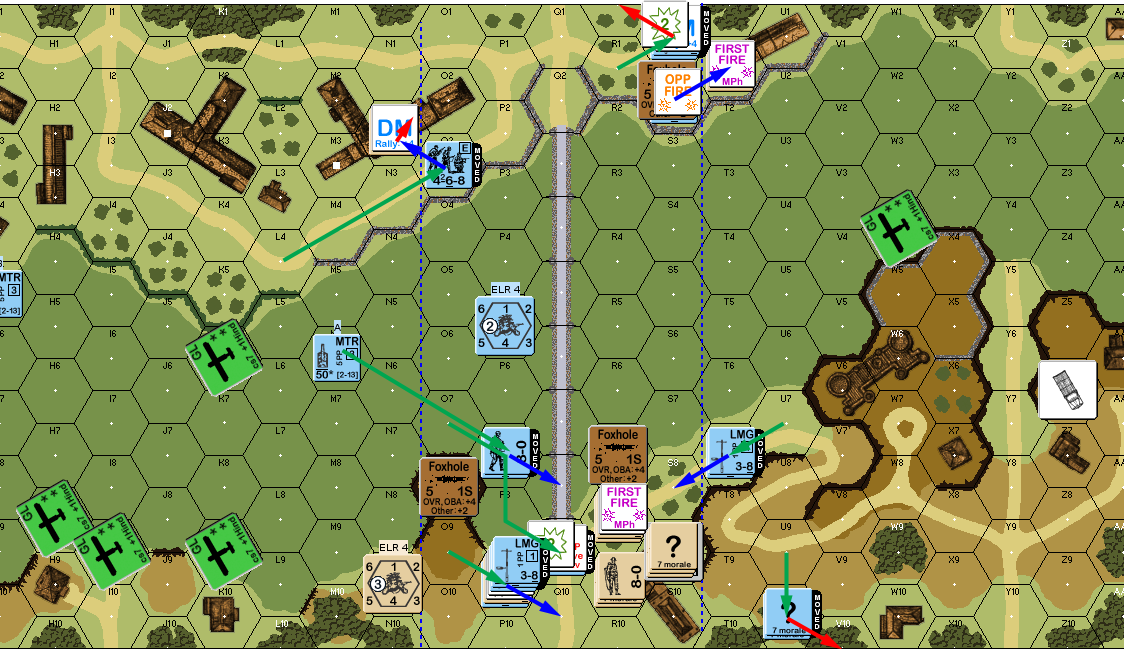
Situation, German turn 3. (Yes, we’d both forgotten about the 2MF cost of olive groves at this point.)
Nothing happened for my RPh, but R7 managed to reduce O7 to a HS with a K/2 in prep (the HS passed the 2MC, sadly). Movement was entirely pulling back out of sight, and Tracey couldn’t get any effects, even against the “?” in S2. I pulled him out into the T1 building, and the foxhole-squad climbed up the bank to R8, while the h1 “?” went to S9 so that most of his guys couldn’t see him, but they could fire on U9 as he moved.
There was no activity for Tracey’s turn 4 RPh, and a shot at R8 did nothing, while S2 declared Op Fire. The other squad (R1) tried flanking T1, but broke to my fire. His HS climbed up the bank, but pinned in Q9. He tried to sneak around the back way with the southern hill squad (AMing into the U10 woods), but I managed to reveal and break him in Final Fire. His Advancing Fire (of which there was plenty) did nothing, even the Op Fire at T1 did nothing.
He advanced into CC with my HS, and this time, with no “?” to help, he killed the HS, but not before I had reduced his squad to a HS.
Situation, German turn 4.
With two-and-a-half squads adjacent to my final building, I was feeling a bit up against it. S9h1 prepped, and broke the LMG squad in S8, which made me feel a lot better about my chances. Even better, defensive fire all rolled high, as R8 pulled back into the building (he literally could not rout in R8), and my remaining “?” crept upstairs to h1. Advance was a literal reshuffle, with the “?” going back to the ground floor, the squad there going up, and the one in the back shifting from S9h1 to S10.
Situation, British turn 4.
Tracey self-rallied V10 for his turn 5. P9 Prepped for another good shot, that broke my 8-1 in R9h1, but the squad was okay. The adjacent squad and a half, needing access to the stairwell, opened up on the ground floor position, and broke my “?” squad. He raced his east-side squad across the valley, while the HS moved to try and take care of my broken HS (he should have done it the other way around, as he just couldn’t get at my HS in one move). My R9h1 squad did well, breaking the Q10 squad, and then getting three shots at the Q9 HS with its LMG, and finally breaking it on the last one.
This left him unable to advance into the bottom of the stairwell, though he was at least able to get into S9, with better cover than standing in the front yard. Much worse for him was that I was able to self-rally N2h2 for my last turn. Tracey only rallied the T7 squad, but he still had his own turn, and I was much to busy to re-DM things. I did take a shot at Q9, reducing the prisoners, and breaking the squad. I also got a 2MC against T10, but it merely generated a hero and made them fanatic.
Situation, German turn 5.
I reshuffled one final time, with my brokies in R9h2, a squad and “?” 8-0 in h1, and a LMG squad in h0. N2h2 advanced to O2h2, which put them inside the goal area, but inconvenient to get at.
Tracey missed his final self-rally in R0, but got 2.5 squads back in P9. My 8-1 & squad rallied in R9h2, giving him three Locations in one hex to clear in one turn. 1.5 squad+LMG prepped at R9h2… and broke everyone there. h1 was the final inaccessible problem, which remained so when the 8-1 and final squad fired on it for no effect.
His HS charged to h2 of N2, and my HS couldn’t stop them. P7 moved up the bank, and survived a 2MC. His fanatic+Hero moved through S10 into R10 (for a hero-modified advancing shot at h1, no doubt, possibly also encircling), but while my shot in S10 did nothing, they took a 1KIA in R10 to kill the hero and break the squad. T7 moved up to R8, and also survived my fire.
With my h0 squad looking at a 13:5 CC, it came down to advancing fire at R9h1, and a Final 10 on 8FP just couldn’t do it. British win on a very desperate defense.
Situation, German turn 6.
Afterword
I’m mostly happy with my setup. The two HS on the east side did at least as well as could be expected, especially making the last turn extra chancy, as a good DFF roll against his HS might have shut everything down right there.
O8 is the big question. It seems like a good idea, but it was vulnerable, and easy to cut off. My 8-0 was completely wasted in R7, and putting it with the more cut-off O8 is an idea… but he’d have probably just been rounded up with the squad. W5/X4 is another possible defensive perimeter location, and one the Germans will have trouble going after… but it’s a long ways out. The British need to stay near/in the victory area.
I think the northern set of glider ILH was perfectly fine, but the southern set was asking for trouble, and Tracey got it. Three out of four had to roll for a safe landing, and any landing that goes long is likely to end the way Z6 did. (I do think there should be a modifier to the Crash dr for a final landing hex at least two Levels above your ILH. Once you set your landing path, you can just slow the descent, not stop it.) I’d probably stick to the T2/W4 area, though Z4 really is a tempting place with access to the Y5 road.
Some of Tracey’s late-game prep decisions surprised me, but they were the right ones. Especially on the last turn, he had enough easily make sure R9h0 wasn’t getting out of CC (short of Withdrawing from a successful Ambush…).
Overall, I was a bit surprised I made it to the end in as good a shape as I did, and expected to collapse about turn 5. Instead, we had a very tense last turn!
Discussion ¬