
94 Bofors Bashing
After invading Crete in Tavronitis Bridge, Tracey went and did it all over again with “Bofors Bashing”. This is a companion scenario that originally appeared in Annual ’89, and was reprinted in For King and Country, depicting the main glider landings at the nearby Maleme airfield.
This time the Germans get thirteen elite squads with decent leadership, LMGs, and a couple small MTRs. The British are defending the board 14 airfield with three 20mm AA guns, and the Germans need all three to be eliminated to win (a blown repair roll is good enough, so the Brits can end up eliminating guns for the Germans, especially with IF). Beyond the guns and their crews (which set up in the open unconcealed), the Brits have nine squads, a trench, three foxholes, and six wire (note: none of these can set up on a road), and three light MTR. The wind is blowing down the longer runway of the airfield, and the first two turns have moderate dust, going down to light on turn 3 before going away entirely.
I had the defenders again, and played around with a few ideas. My eventual defense had the AA guns on three sides of the airfield, pointing towards it, and my troops were disposed so that there were some defenders available for each gun. Since even the reprinted version was showing a tendency to British wins, we played with the German balance, which has the British player break three of his MMC before the game begins.
One AA went in 14G8, with the trench in 14H7, with a squad, and another squad in building I7. Also, a MTR team was in F9, and a foxhole+squad in H10. All this should do a good job of protecting the main runway if the Germans felt like landing directly on it, and made a good screen for the north end of the field. the second one was in M9, with the 9-1+LMG squad in a foxhole in N10, with wire stretching from there to 11J2. A broken HS was in N9 and a 8-0 and broken squad in J10. All of this protected the west side, where the Germans have a lot of room for a landing and coordinated charge. The third was in K5, to protect the second runway, with a (broken) MTR HS in K3, a LMG foxhole (w/8-1) in M4 and a MTR squad was in O4. This was generally to protect from the east, with the tree-line keeping anyone else from seeing out there. The south was relatively unprotected, but the last two wire were in O6 & O7.
Tracey didn’t land directly on the airfield, but seven gliders coming in south of the field, with one more coming in near the west tree line at 11M2, and four landing at the north end, and the last one going for the hill in 11B2. With three light AA Guns already in AA mode, things started looking bad for the Germans… until I remembered the dust rolls. My first two rolls killed a glider and damaged a second, but the dust lowered that to no effect and an evade. Despite some good ROF, I was unable to get any other results (lots of +3 dust). All the gliders came down safely, with the evading one going long from O7 to J9.
DFPh wasn’t any better. I managed to put some ACQ down with my MTRs, but couldn’t hit, or get any results against the gliders, despite all the shots available. Of course, Advancing Fire was just as hopeless.
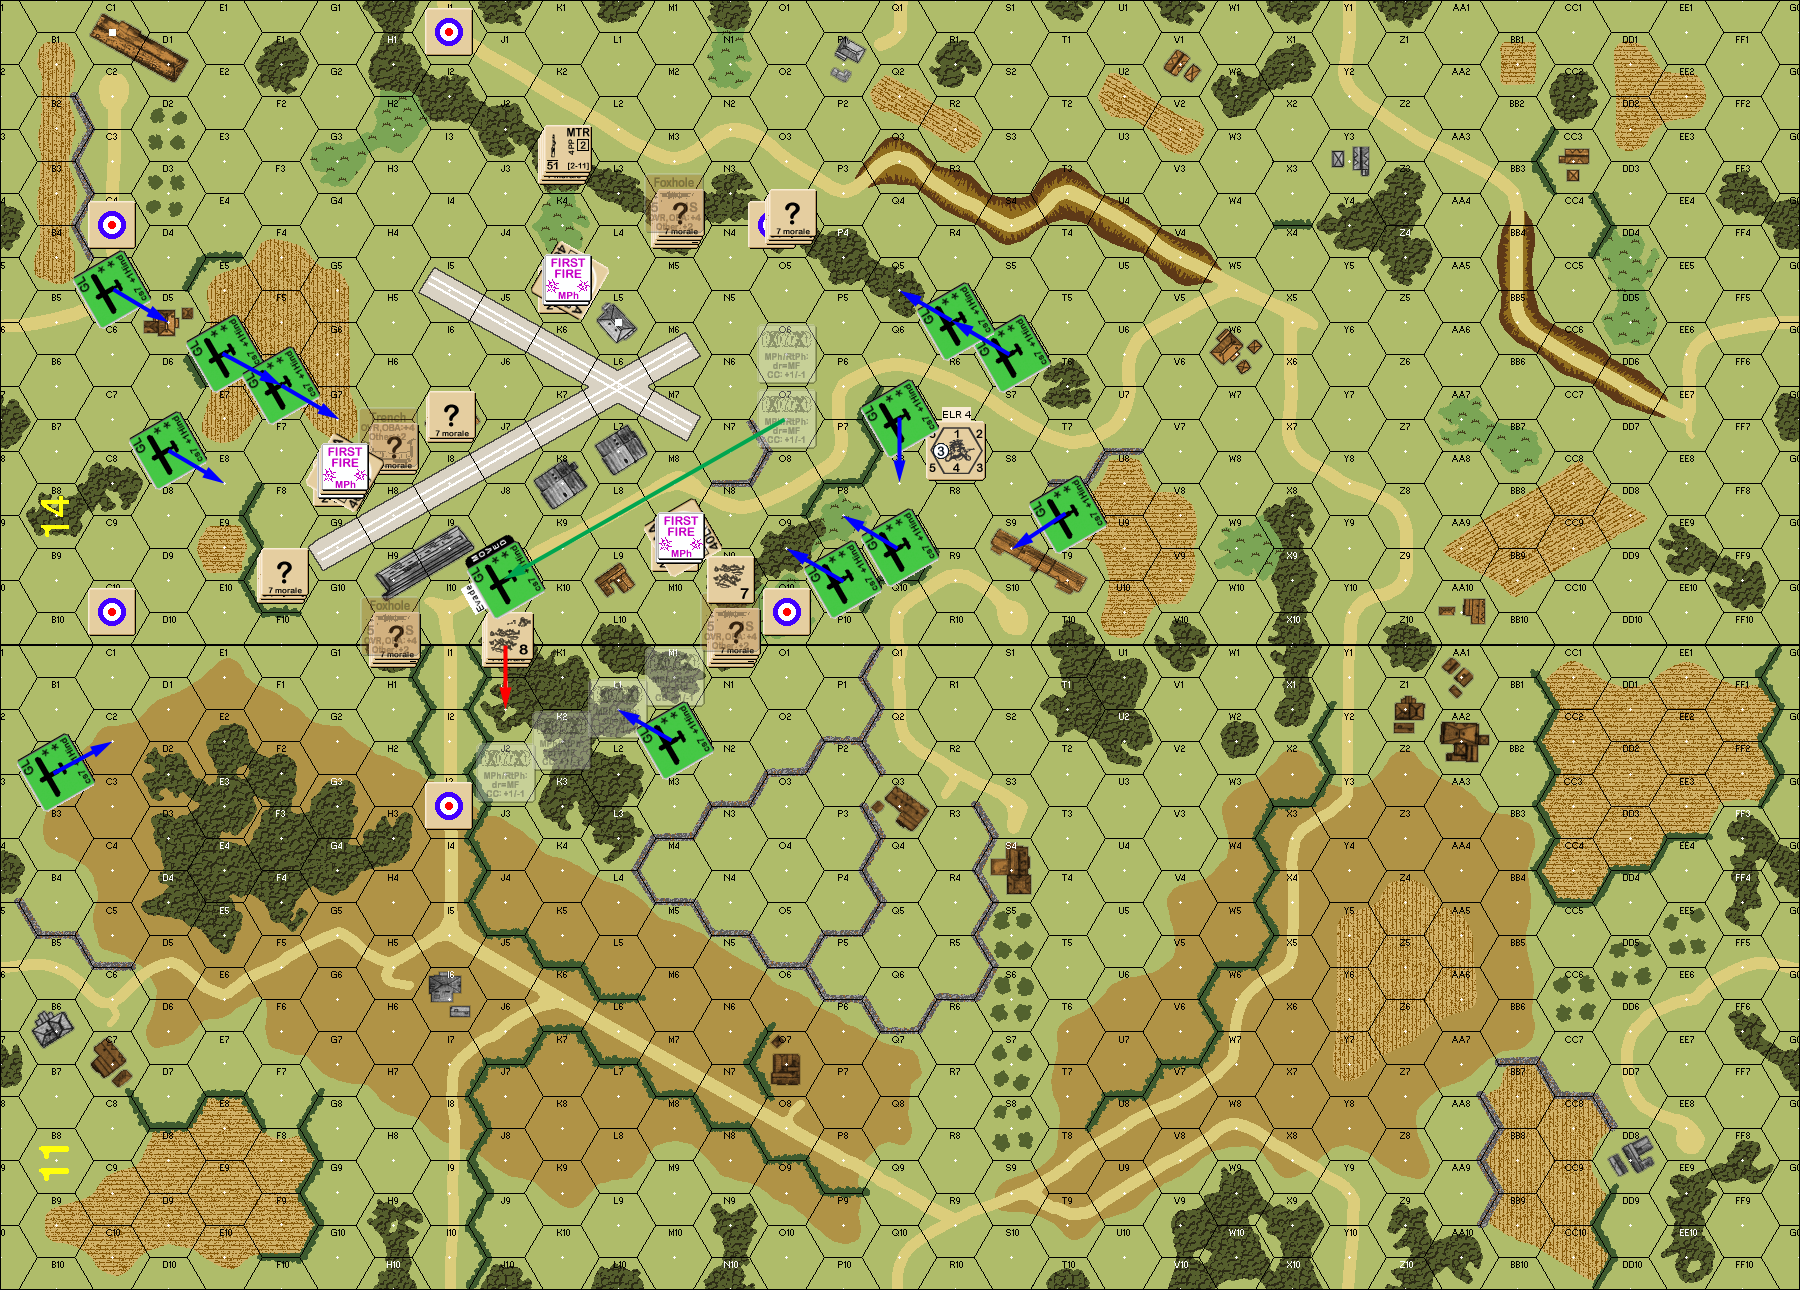
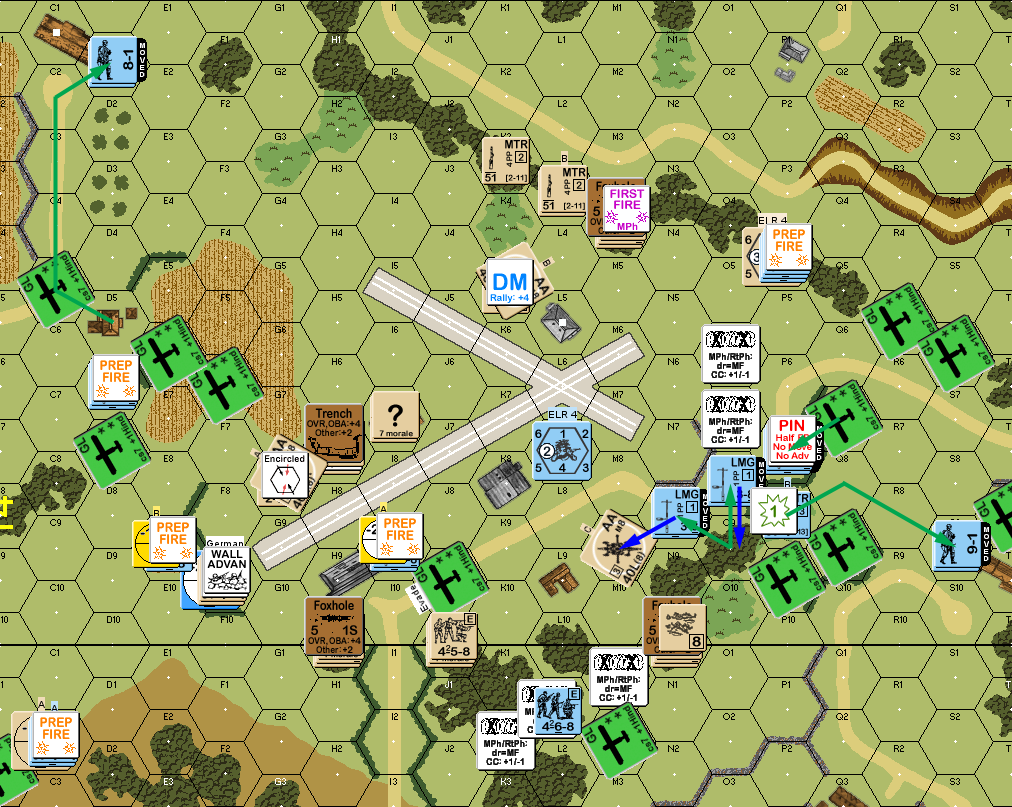
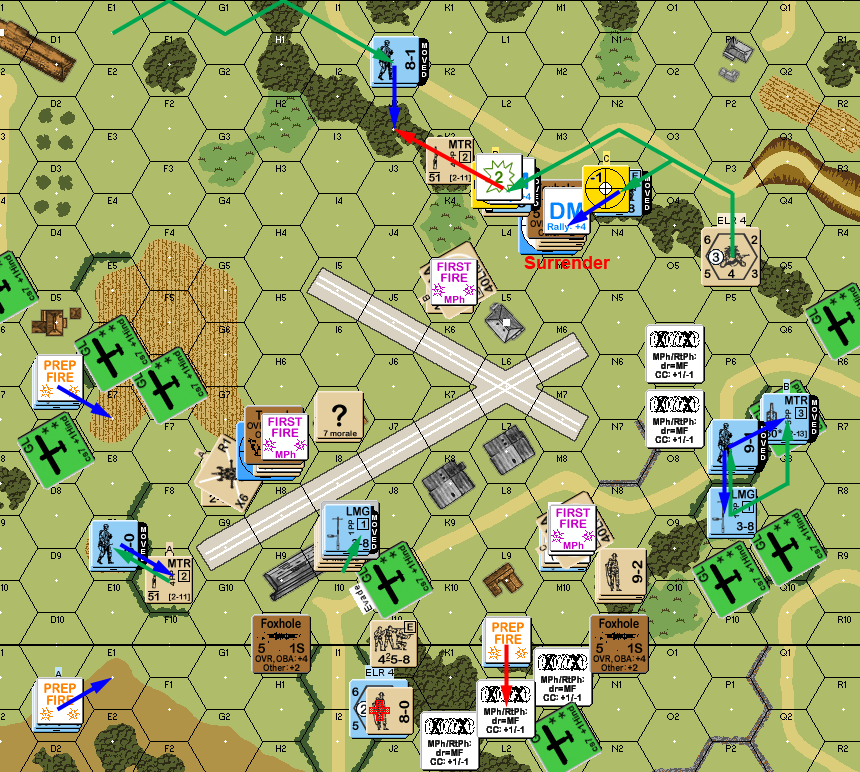
Situation, German turn 1, showing the entire play area. North is to the left, and orchards are olive groves.
I still couldn’t rally anyone for my turn 1 (two of the three were DM again), but Prep got a couple of needed lucky shots through the dust, with a 1MC from the AA breaking G7, and fire from H7 breaking F6. Tracey didn’t manage anything in DFPh, though he did assemble his two MTRs. The big problem for him was that while gliders provide a Hindrance like normal vehicles, they do not grant TEM (which is unusual). So G7 had no cover to duck behind, and surrendered to my squad in the trench while his other squad survived Interdiction to rout to his leader.
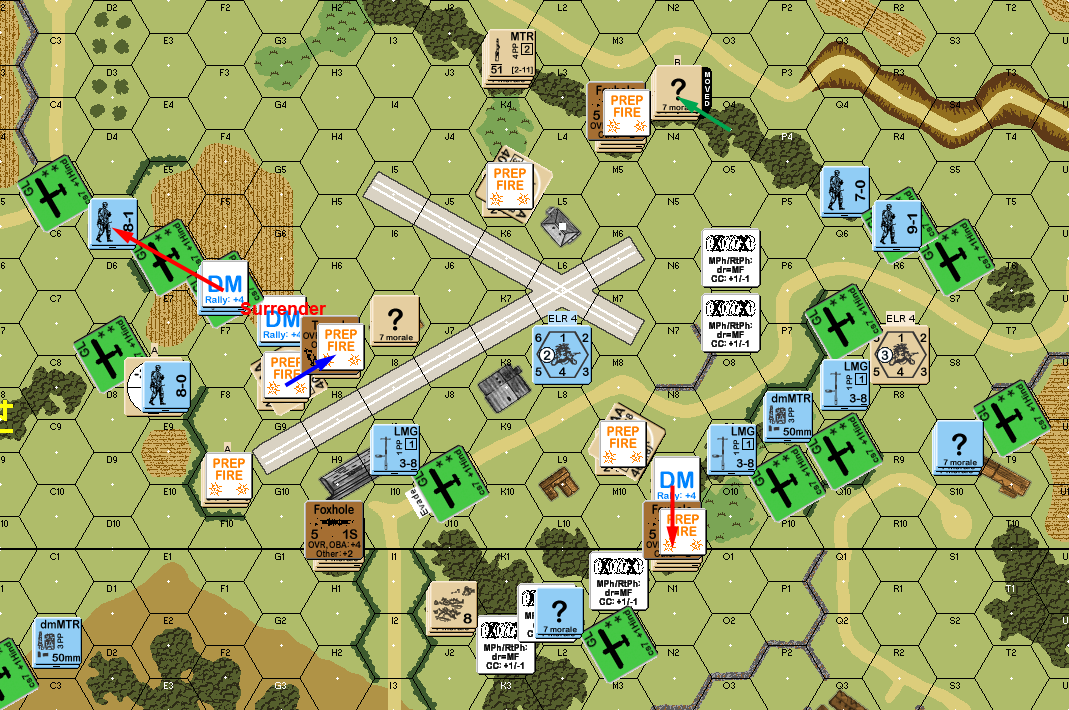
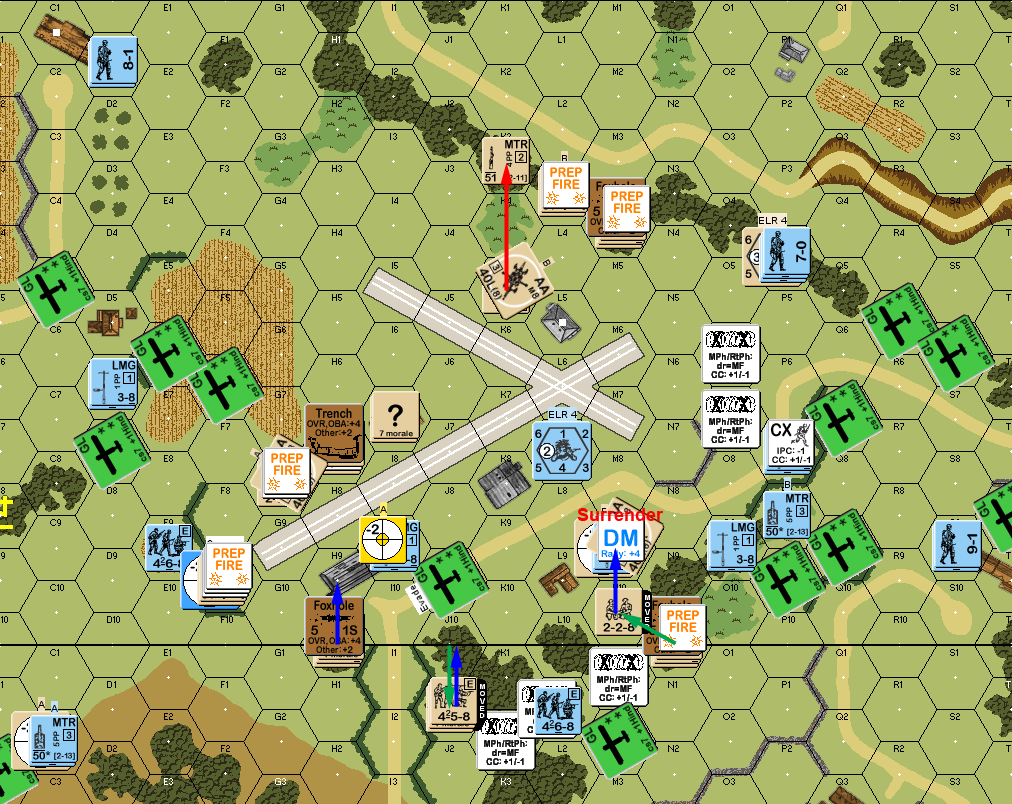
Situation, British Turn 1.
Tracey managed to rally his squad for his turn 2, while I rallied the squad in 11J1, giving me a shot if L1 got off the wire. His prep fire had a couple of highlights: While he couldn’t affect the crew of the AA in M9, he did get Encircling fire on it, which not only made the crew easier to break, but gives a +1 to their fire; not good when the AAs are the best thing I have going…. And one of his MTRs got a CH on K3 killing the 8-0 (1KIA from the CH) and the HS (K/1).
I did just as well. A squad tried to go around to the northeast, in full view of my AA, who rolled an IFE ‘2’ (+3 dust…) for a K/2, which broke the remaining HS. (It rolled another ‘2’ during Final Fire, but the squad passed the resulting 1MC. I also finally realized that much of the time the AA should be going for regular ITT shots instead of the 8FP IFE. It keeps ROF up, and the acquisition can help counter all of the dust.
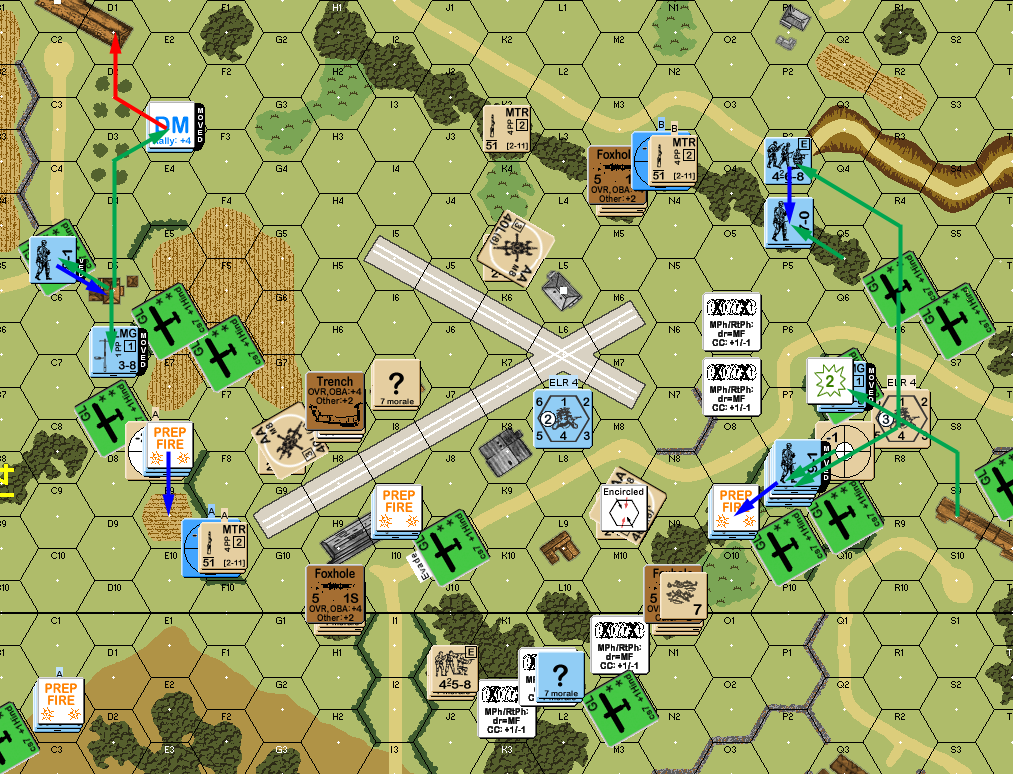
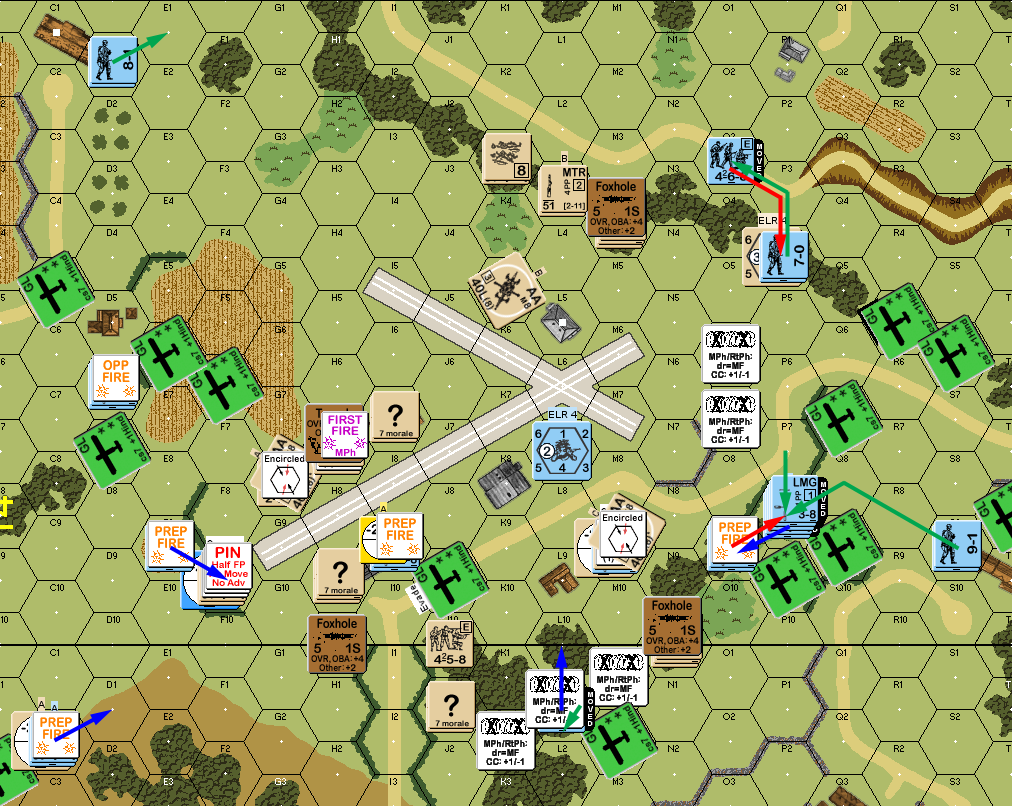
Situation, German Turn 2.
I still couldn’t rally my last broken squad for my turn, but Tracey had advanced on my position in F9, and I managed a 1MC in prep to break his 8-0, though I didn’t affect the squad. However, that set off my sniper, who broke his MTR squad in P8. I had a bunch of other fire, but couldn’t do anything more than pin a squad with another sniper activation (lots of morale checks and PTC, he just passed everything). Tracey’s fire wasn’t much better, with the exception of killing my broken HS in N10 with a break, and he put the AA in G8 under encirclement while breaking the crew in M9.
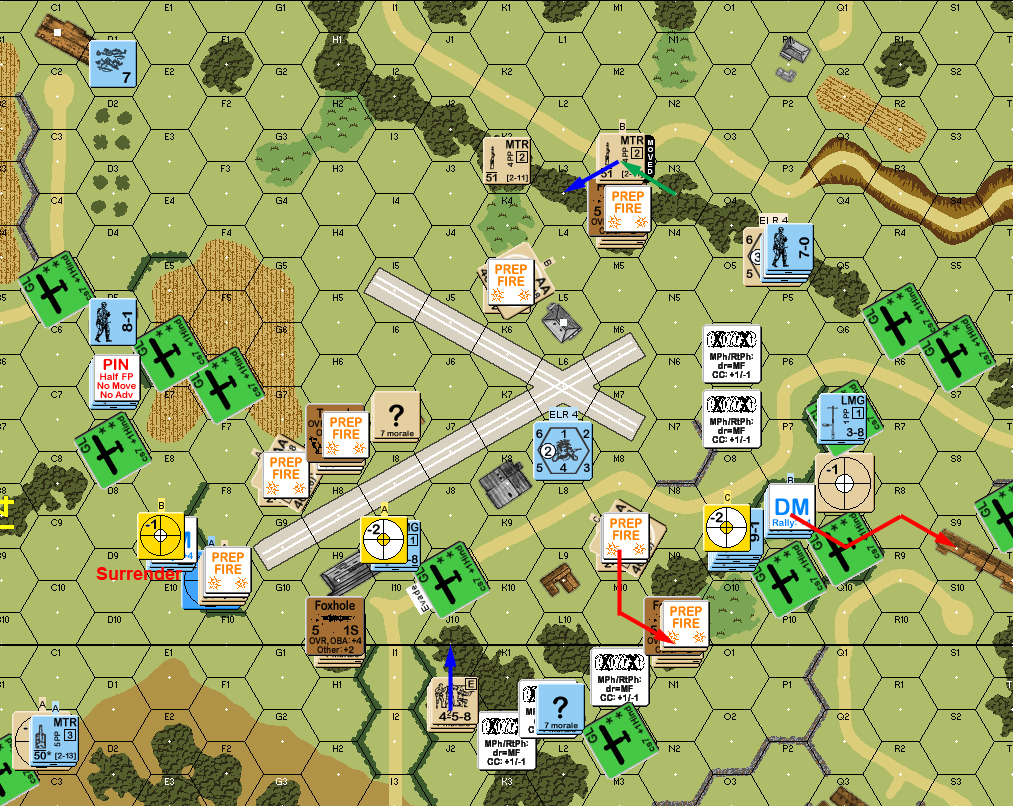
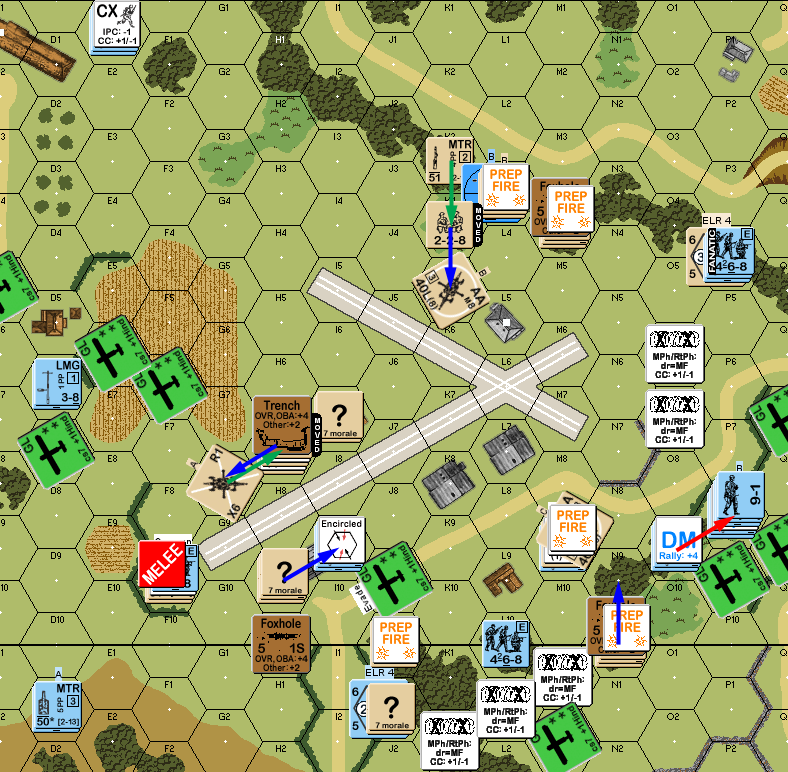
Situation, British Turn 2.
Neither of us rallied anything for Tracey’s turn 3. Dust went down to light (d6/2 round down instead of up), but it didn’t make a lot of difference, as prep fire rolls tended high. His one good roll was two squad + 7-0 at K5, which broke the crew in k5, so now two of my AA were out of action. This led to his first real push, where three squads advanced out of the woods/hedge cover on the southwest side. I managed to pin one, while the others just AMed to the wall anyway. The duel that had developed between E9 and F9 continued, with his prep doing nothing, while I managed to pin him so he couldn’t advance into CC.
Situation, German Turn 3.
I managed to rally one crew (in N10) for my turn, while Tracey rallied both broken units and Recovered the AA in M9. Naturally, M9 was a focus of my fire, and I managed to reduce his capturing squad to a broken HS with a K/2, since they couldn’t qualify for the emplacement TEM (something I had missed at first).
Situation, British Turn 3.
The dust cleared, and somewhat to my surprise, I managed to Recover my own AA in M9 (I had recently gone three 6s in four tries to recover in another game) for Tracey’s turn 4. His prep fire didn’t have a lot of luck, though he managed to pin my squad in F9. He finally got under the wire in 11L1, but didn’t care for tangling with all the British in the area. He also continued his leader and HS on their journey around the northeast, but I managed to pin the HS to delay him further. In the south, a squad moved up the outside flank, and just barely came into LOS of my squad in L3, but a NMC just made them fanatic and generated a hero!
However, in Final Fire, the squad fired their MTR at this suddenly worse threat, and got a CH with a ‘2’ IFT roll to kill the hero and break the squad (and I just realized I got that wrong, despite calling it out earlier the game; I applied the 1KIA to everyone, when it should have just gone to the Hero, and the squad take a K/2). This did activate his sniper, who wounded my 8-0 in 11J1. Worse, I malfunctioned the AA in G8. On the other hand, I also broke a LMG squad in O9 during Final Fire.
Tracey finally got into CC with F9, and reduced me to a HS, while I did nothing in return.
Situation, German Turn 4.
I self-rallied my crew for my turn 4, and Tracey rallied his fanatics with a HOB… that didn’t do anything since they were already fanatic. Prep saw me get encircling fire on I9… which I could have done a couple turns earlier, if I’d seen it. I also broke a squad in O9 again… but I also malfunctioned a MTR. Movement was minimal, and consisted of one crew crawling back towards its gun, while the crew in G8 left for the cover of the trench before advancing back (now that encirclement was gone) to recover, and hopefully repair it).
In Final Fire, one of Tracey’s MTRs got three critical hits in a row(!), for a K/1 and 2MC on my squad in L3, eliminating it on a double-break, and breaking my LMG squad+leader in M4. However, my sniper went off during this to kill his 7-0. The Melee in F9 concluded with the loss of my HS, but I had advanced a concealed squad into I9, where it failed to ambush the Germans, and refused to attack, while the German attack against the “?” did nothing.
Situation, British Turn 4.
Tracey rallied one squad for his turn 5, while I failed leader self-rally in M4, but recovered both AA guns. His one good prep thankfully did no more than cause my 9-1 to battle harden. He continued closing in on the east side, with his interrupted journey finishing behind the tree line, and his squads in P4 moving to either side of M4. The K5 AA swiveled around and took a shot that broke one squad, but that didn’t really take care of the problem. Better, I broke the L10 squad in DFPh, taking another source of worry out.
Situation, German Turn 5.
For my rally phase, Tracey managed to rally one squad, while my crew in G8 worked fruitlessly on unjamming the gun. He had moved upstairs away from my “?” in I9, and I re-encircled them in Prep. The K5 gun fired on J2 to re-DM, and then switched to M4, where a critical hit wounded my captured leader, and broke his squad. The rest of the turn was quiet. I only moved one leader, so he could DM 11L1, and the only fire result for the rest of the turn was pinning my crew in G8. My only advance was following I9 upstairs, and this time I got Ambush… but there was no result. My leader in M4 attempted escape (my squad failed the TC), and couldn’t do anything but start a melee there.
Tracey’s 6th RPh was simply a failed self-rally, and failed repair attempt on my gun. The 8-1 and HS headed around the back of the woods line to stop the Melee in M4 before things got out of hand, and his fanatics headed for K3. They took two shots without trouble, and then an IF shot hit for no effect, and a shot from I7 did nothing. His 9-1 stack tried moving forward, but a 12 on a 3MC reduced the squad there to a broken 1st Line HS (our only ELR failure of the scenario). This was followed by a K/1 from my gun crew as his north-side squad tried to get at G8. In M4, my prisoners eliminated the broken guard squad even as the new arrivals recaptured my men. In I9, both sides rolled low for mutual annihilation. However, neither side got any result in K5.

Situation, German Turn 6.
This left very little to the Germans, and it got worse as my prep broke the squad in F8, and pinned P7, and I could freely send a squad towards K5, to relive the gun crew. Tracey conceded after his defensive fire turned up empty.
Afterword
Generally speaking, my defense worked as planned. Each element had enough to operate on its own and slow down the Germans, until one or more of them could get local superiority. Four leaders really help with this, and I think the G8-I7 position (most in danger of being surrounded) worked very well. Tracey did threaten all three main positions at one point or another, and eventually nearly eliminated the east-side defense, but it was too late to really pay off by that point.
Tracey’s deployment certainly had some interesting bits. The MTR on top of the E1 hill was not something I’d really considered, and it was a constant threat. I think he would have done better to put a bunch of gliders down in the area right behind the west tree line, instead of largely concentrated at the open south end. Really, just concentrating near any one of my positions, and then having a secondary force near a second (like the four that did land at the north end), may have done very well, if he could overwhelm that first position quickly. That does leave the unattended third gun as the major challenge, as I set up to have a fair amount of clear fields of fire between them.
It’s well worth noting that while all three British guns survived, all three were under serious threat at one point or another. A bad roll near the beginning, and he could have made a serious grab at G8, though the other two squads were there to feed into that fight. He did grab M9 briefly, and only the elimination of other threats allowed me to go save K5 at the end.
Discussion ¬