
9 To the Square
Martin and I went back to a mutual project to play through more of the initial Beyond Valor scenarios after I grabbed a hill in Italy from him in Regalbuto Ridge. This time was scenario 9, “To the Square” set during the Russian advance into Warsaw near the end of the war, and is a ten-turn slugfest on four boards, which took us nearly five months of PBEM to get through.
The Germans defend across three boards (1, 20, and 21) with fourteen squads (split between 467 and 447s), good leadership, two 50L ATGs, six hexes of wire, and a roadblock. He also gets 8 “?”, 2 squads can set up HIP, and he gets to place six rubble counters in the forward two boards, and then randomly generate two more hexes of fallen rubble. The Russians attack from board 8 with twenty 447 squads with adequate leadership (not too bad for Russian mixes, actually), four T-34/85s (w/9-1 AL), and a module of 80mm OBA. Oh, and both sides get a HMG, 2xMMG, and 3xLMG. The Russians have 10 turns to take building 20H3, or exit 30 VP off the opposite (west) edge.
Martin had the Germans, and set up a loose line on board 1, all at level 2. There was a noticeable gap in the I-O section, but it was backed up by a second line at the edge of board 21. There was also back up for the south half in 1Z9, 21L8, and 21J5h2. Invisibly, HIP squads went in on the north and south ends of the board 21 line, with the wire protecting the victory building from a front assault, the roadblock at the south edge of 20, and the ATGs near the north edge of 20.
I debated possible courses of action for a while (including rushing into that I-O gap, or setting up on the level 2 portions of board 8 for long-range 85mm, MG, and OBA spotting), but eventually decided to go hard against the south edge, looking for a board exit. Holding the flank with the board edge would be good for the start, but I figured a shift north to cross the board 21 graveyard would probably be a good way to go. In fact, if Martin built up too much in front of my south-edge drive, I would drive NW and assault the victory building. A functioning T-34/85 is worth 7 EVP, and with all four being 28, just shy of the 30 VP goal; the AL brings them up to 29. I hoped to keep them intact and use Riders to carry a squad off-map and bring me over 30, while they could also help with a quick shift in focus, and I set up with one tank having Riders.
I prepped a T-34 at 1X2, and naturally missed, but at least it should start forcing him out of there (Op Fire would have been smarter). Thinking the south gap was a bit large, I did some searching as I prepared to send tanks into unknown territory, and found nothing. I moved into 1Z2 to draw fire… and did, surviving a PTC. A second move to X2 got SFF in X1 for no effect, and another squad got into the building through Y3.
The T-34 with Riders dashed forward to BB6 with exactly enough MP to unload, and to my surprise Z9 did not fire. Presumably he didn’t want to come under accurate fire from the tank, but I felt keeping me out of building Z6 would be worth it. I showed Martin had the right I idea when the MA got a ‘2’ in AFPh, but didn’t manage an Unlikely Hit with a subsequent 5. Overall, the initial turn went very well, as I figured to have at least one broken squad from the rush on 1X2, but that didn’t happen. If only I knew where the AT and HIP were….
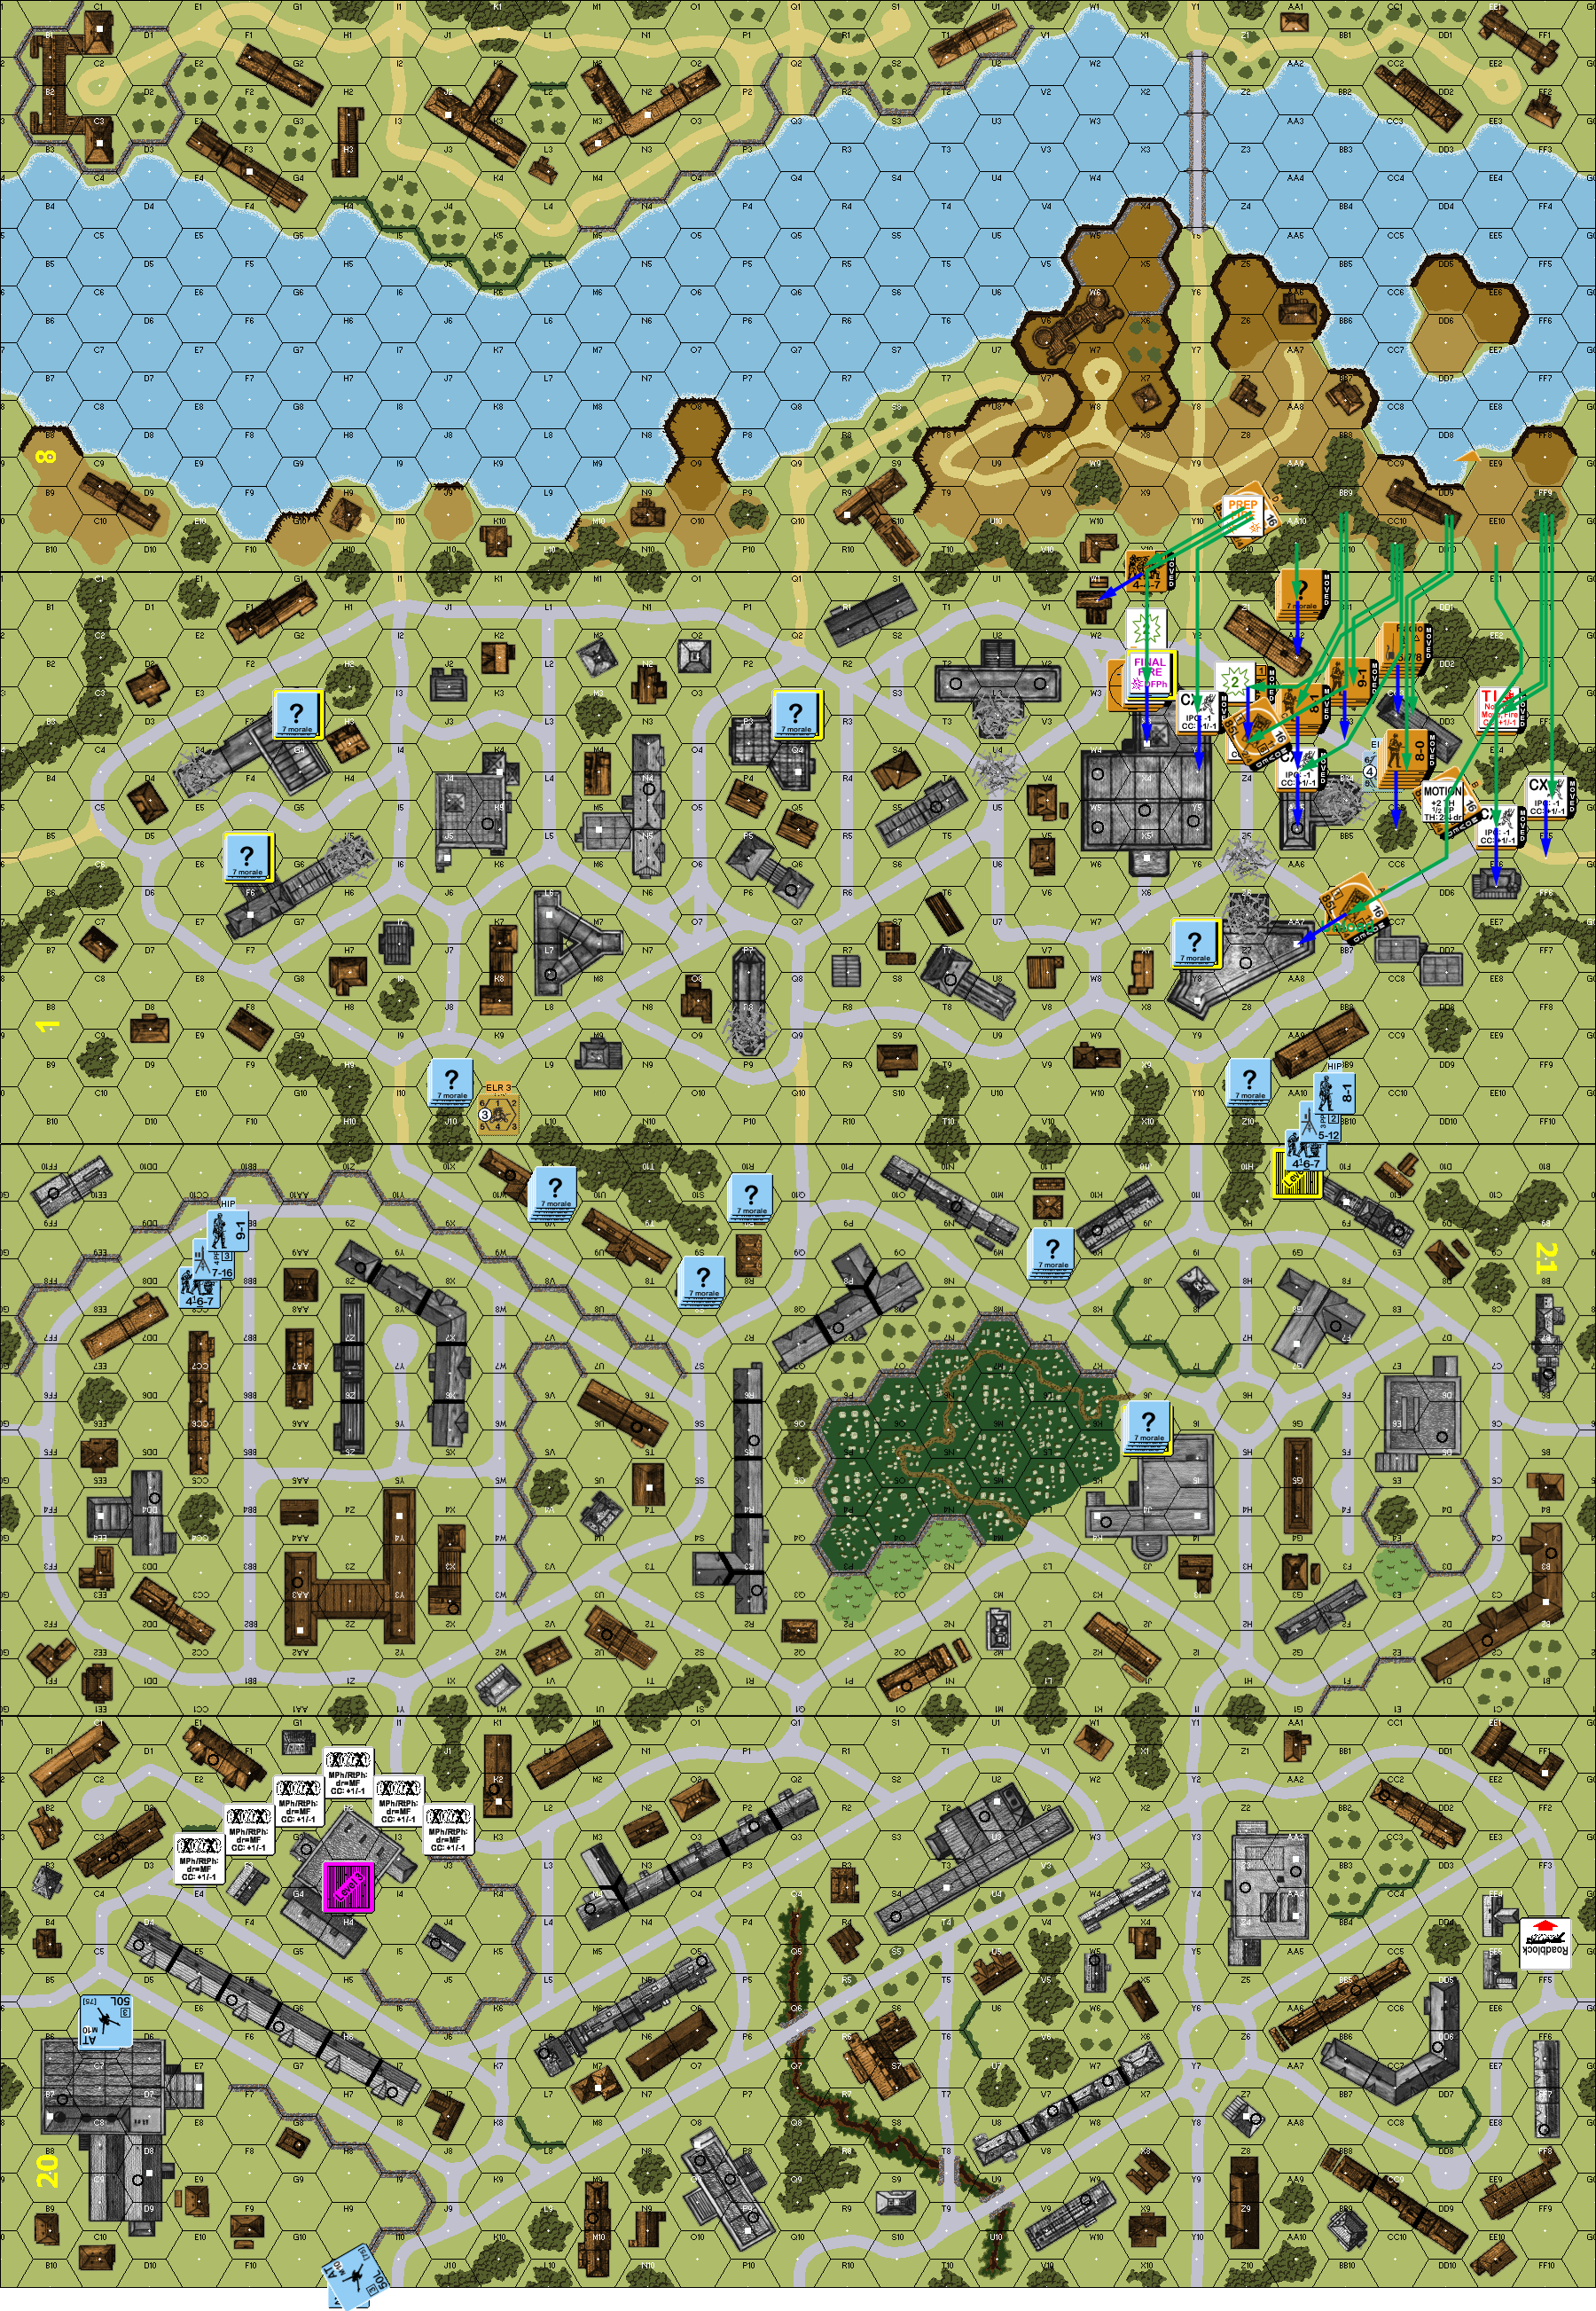
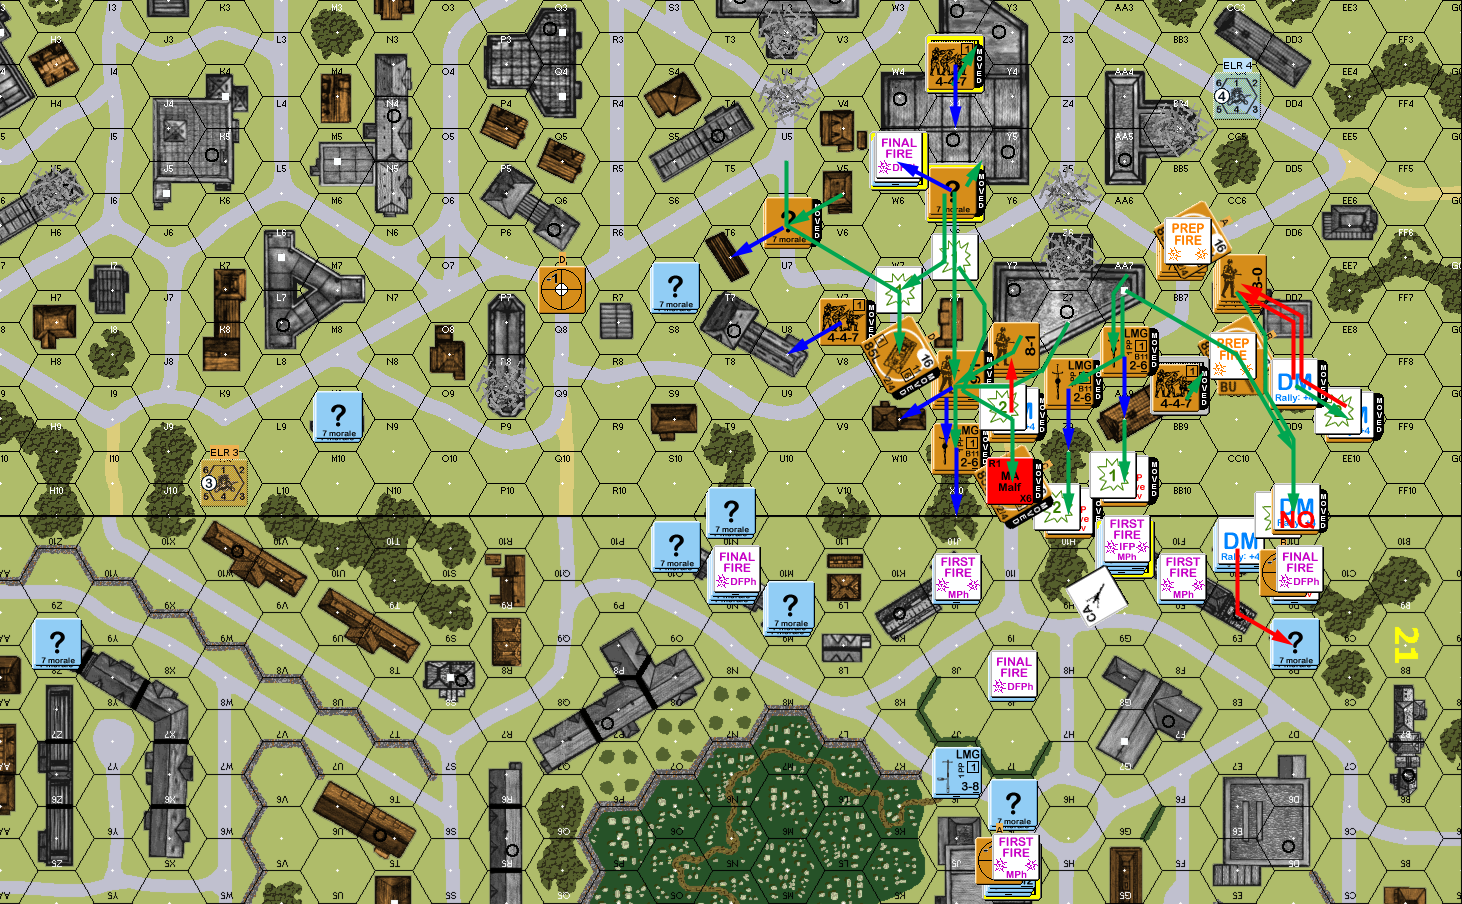
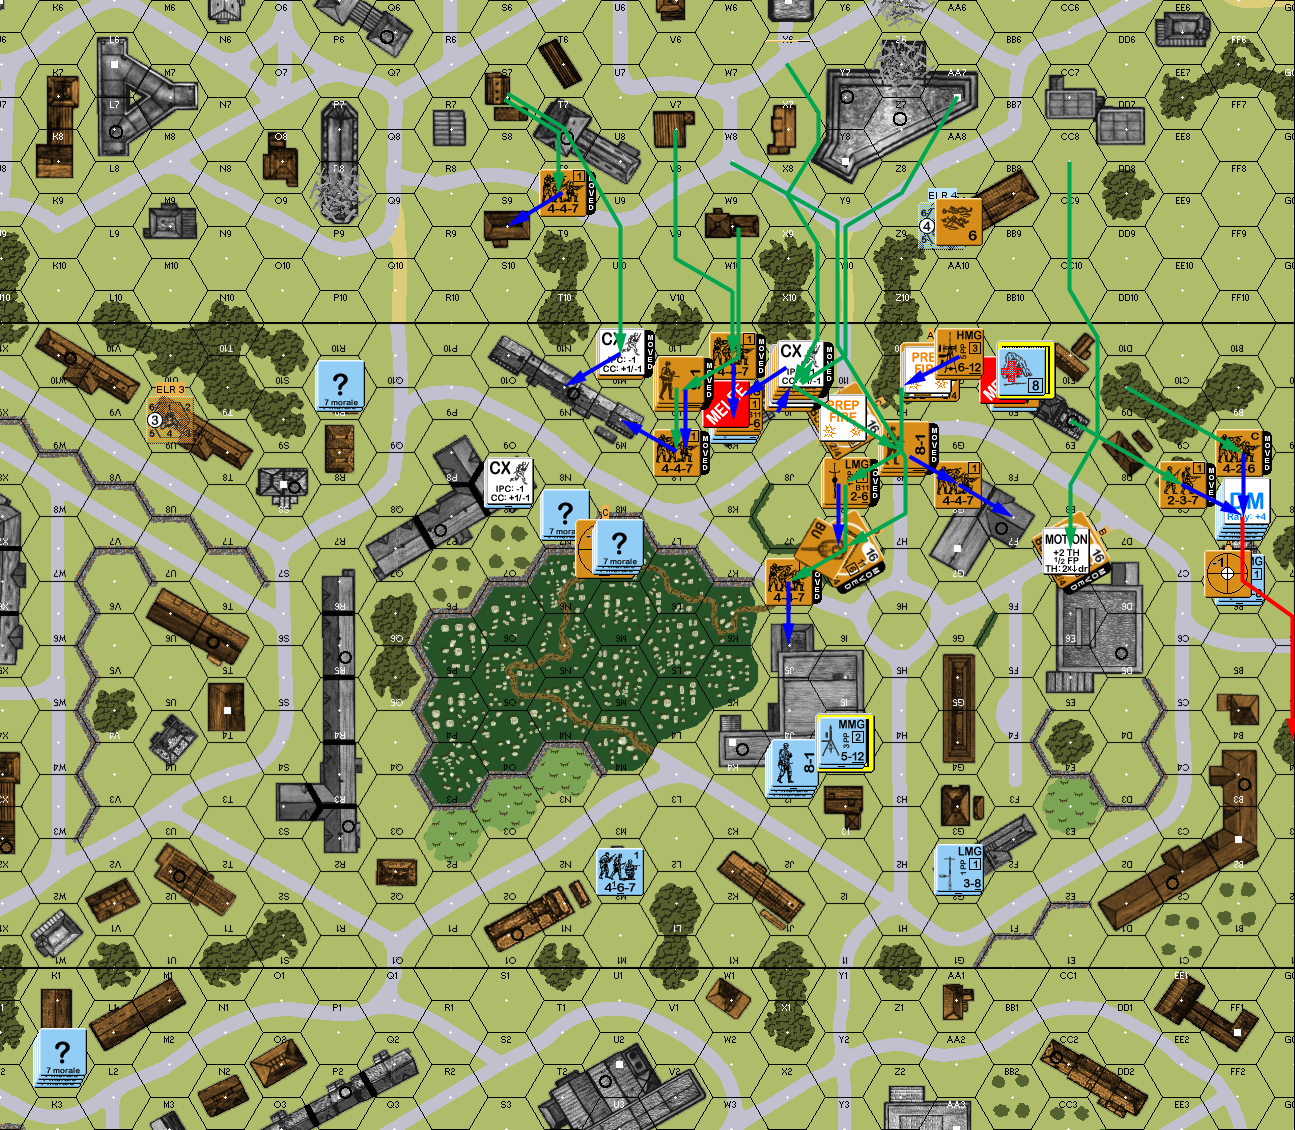
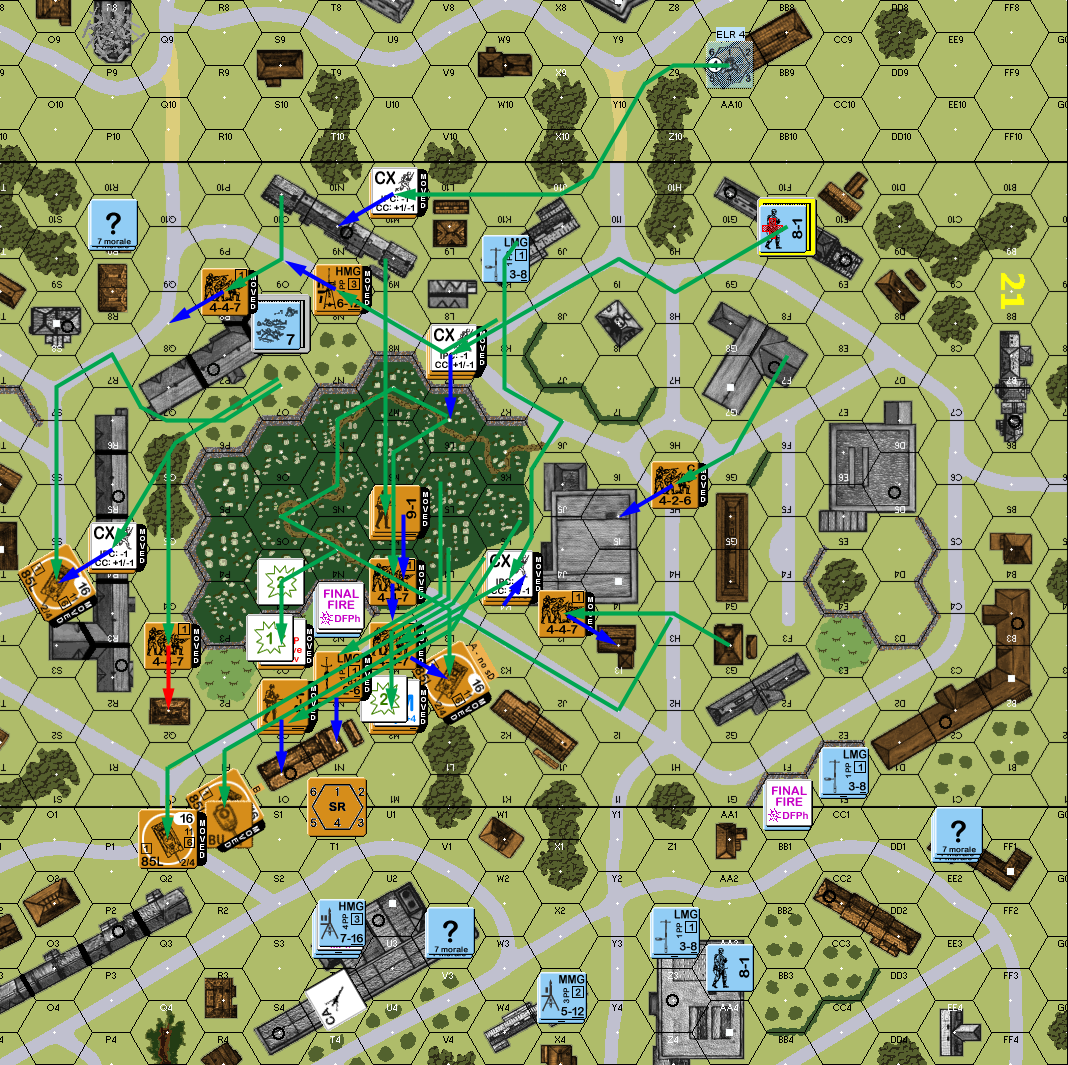
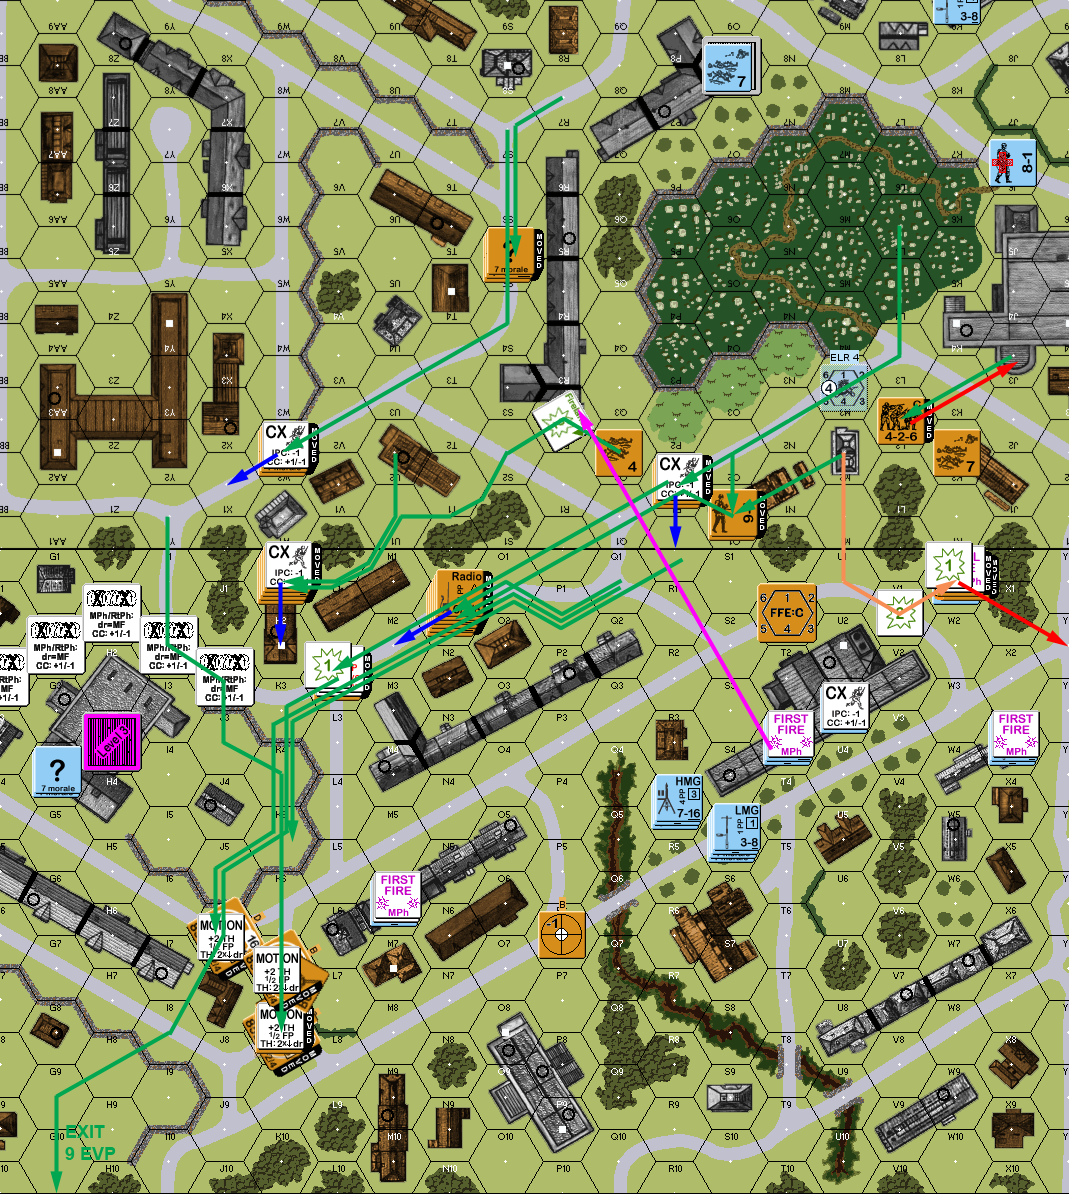
Situation, Russian Turn 1, showing the hidden parts of German setup. North is to the left, 20H3 is the one hex with a Level 3 Location. Two T-34 moves (which started in 8CC10 & DD9) are not shown for clarity. AL is with ‘C’ in 1Z3. My Sniper is out of position thanks to forgetting to move him after changing plans.
Naturally, Martin’s turn was occupied with racing everyone towards the point of attack. I managed to reveal one squad as it moved downstairs, but past that, I couldn’t see any of it. My fire was limited to a blocked shot at 1R6, and the T-34 in 1BB6 started ranging shots at 21I5 (whereupon he advanced back to J5).
With a smaller scenario, it’s not too hard to have a plan to shift the defense depending on where the attack is, but across a full board width, its very difficult to really anticipate what you might need to do. I note a fair number of Martin’s units ended where someone else began, and wonder if he’d purposefully set up relay teams for this.
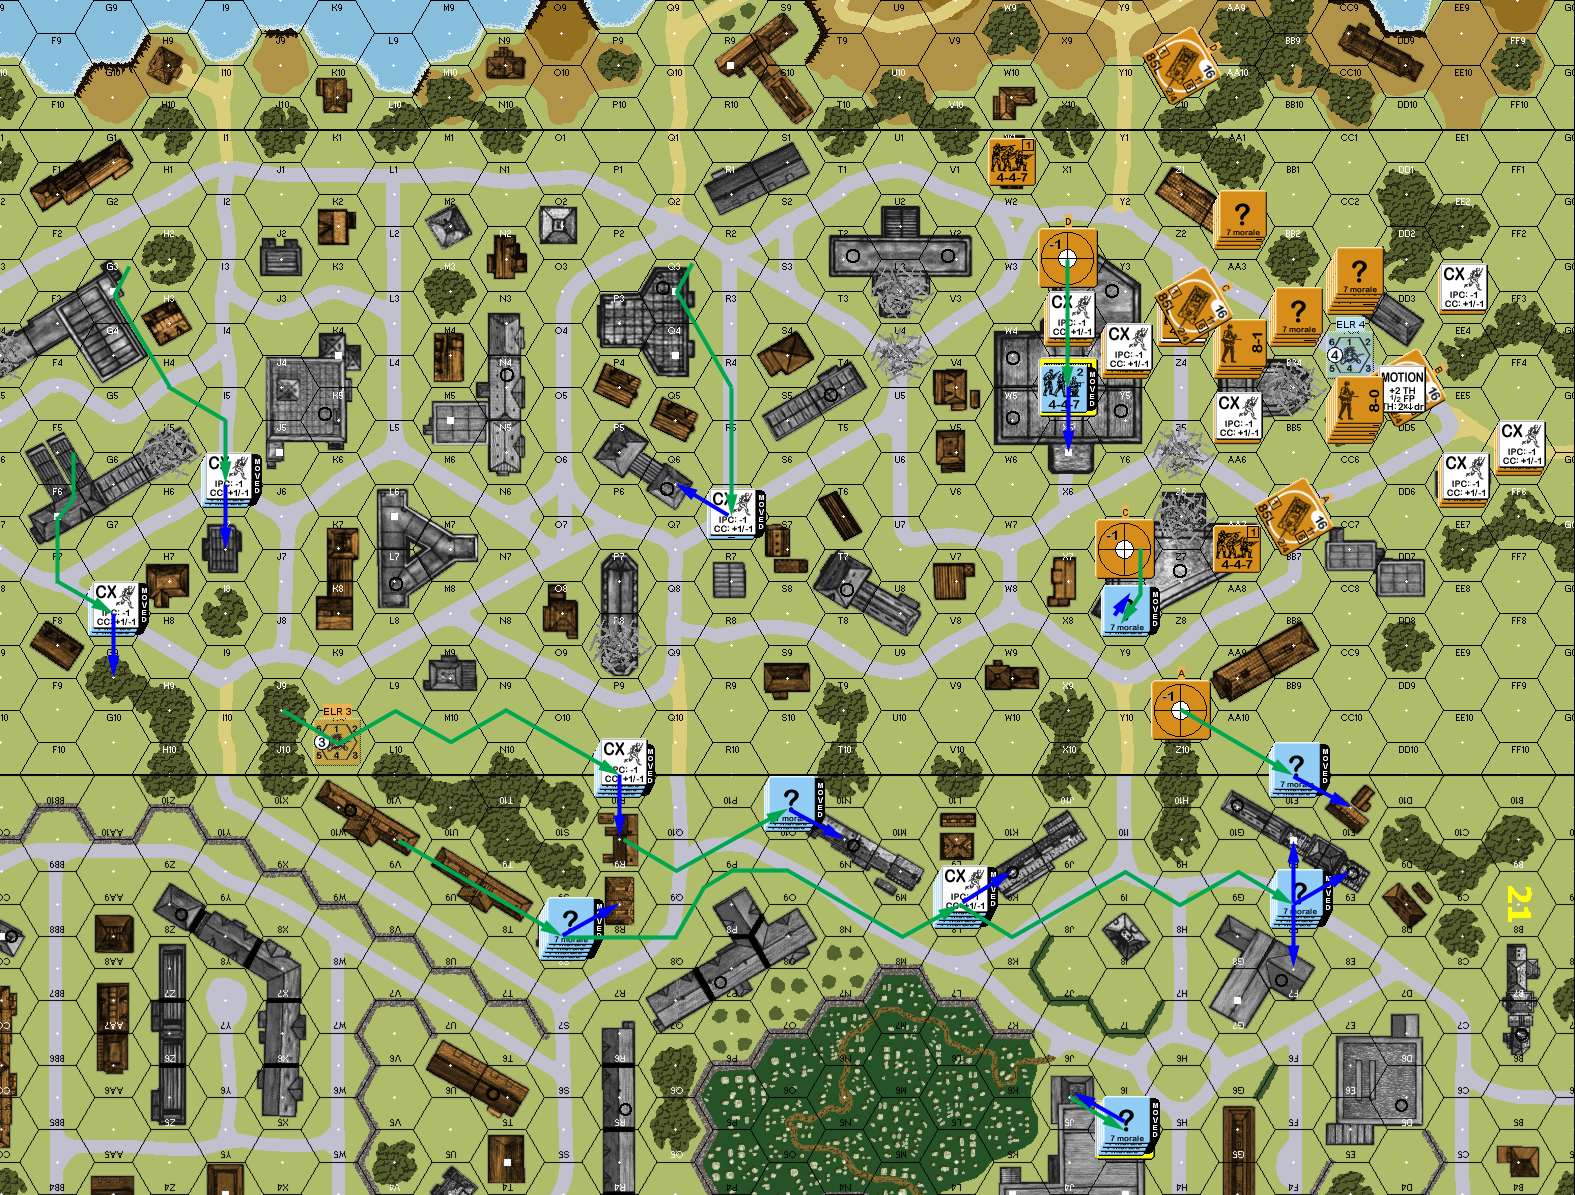
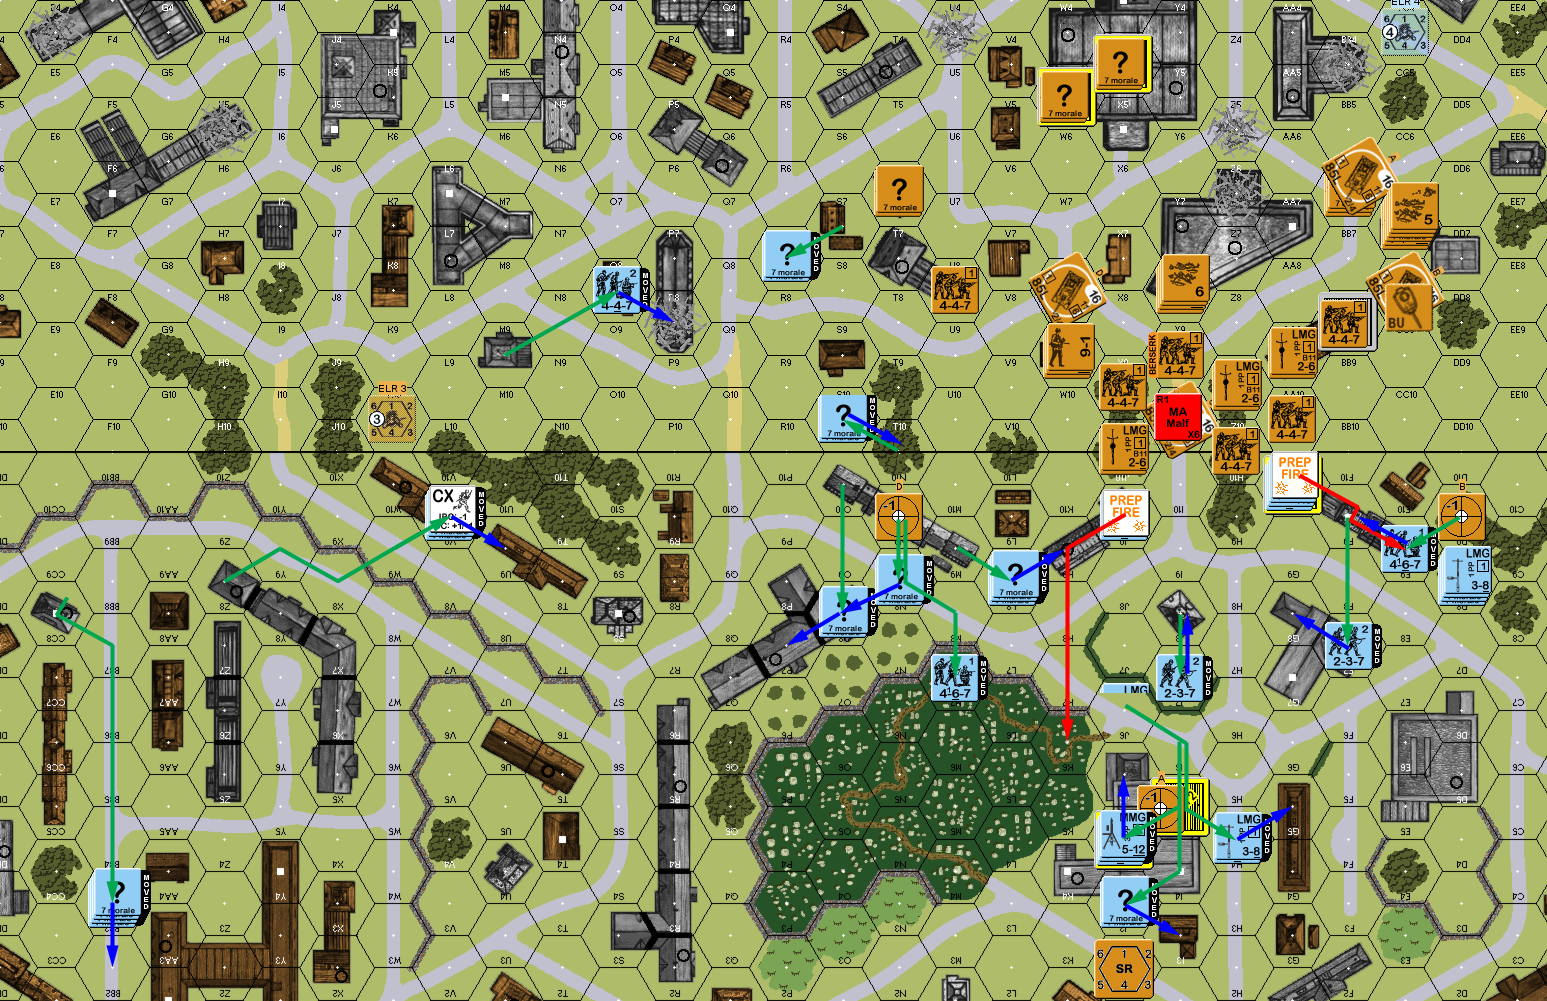
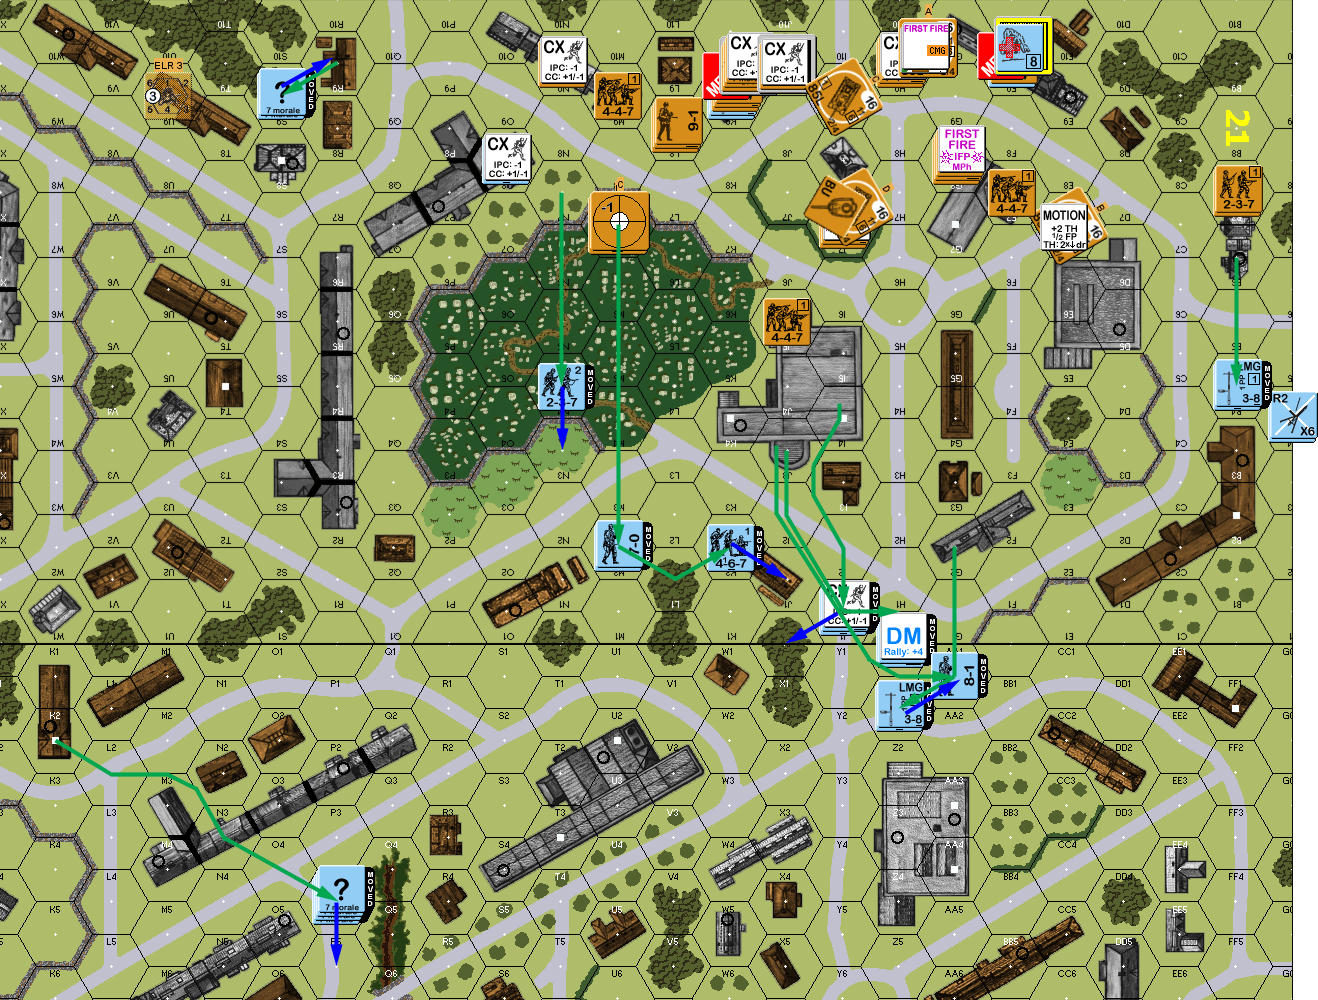
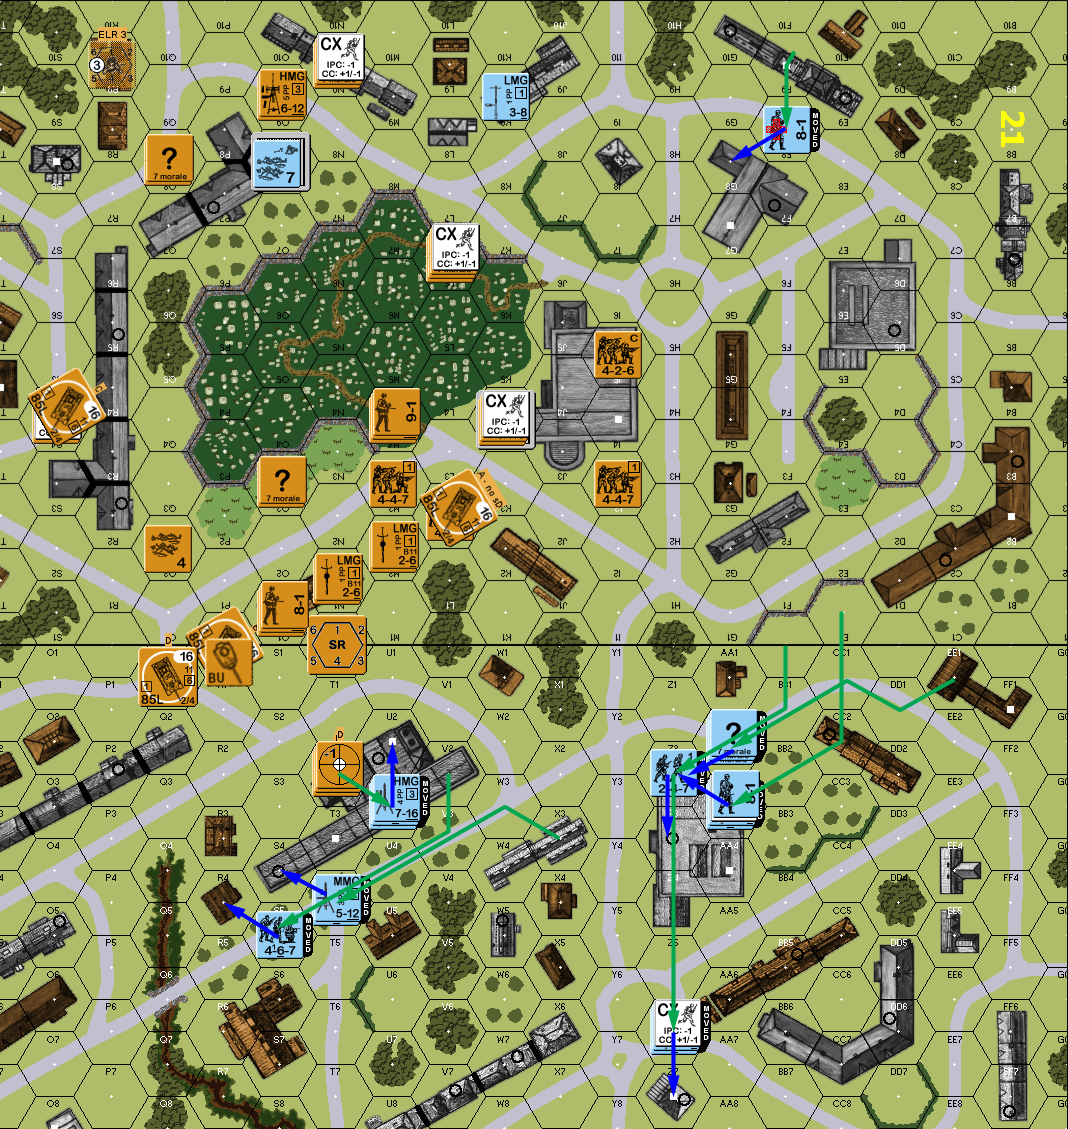
Situation, German Turn 1.
My first goal for turn 2 was to isolate 1X6 and Y8, using upper level encirclement, which was easy enough for the former, and Martin didn’t fire to interfere with my move to Y8h0, but did break a rush to X6h1. Later fire revealed the entire group around 21F9, but couldn’t get an effect. My return fire pinned a LMG squad, but the only other effect fire had was to malfunction the MA of the T-34 in 1X6.
This turn also let me sort out a screw up in setup. A 8-0 had the radio, and also ended up accompanying the HMG squad. Since he had a SW of his own, he wasn’t helping lug that thing around. I got a different 8-0 to the HMG, and the observer set up shop under the T-34 in 1BB6, which could see the top of 21I5/J5. I send a CX squad up to 1Y8h1, and found that it was indeed just a Dummy, leaving just the squad in X5h2 behind my lines.
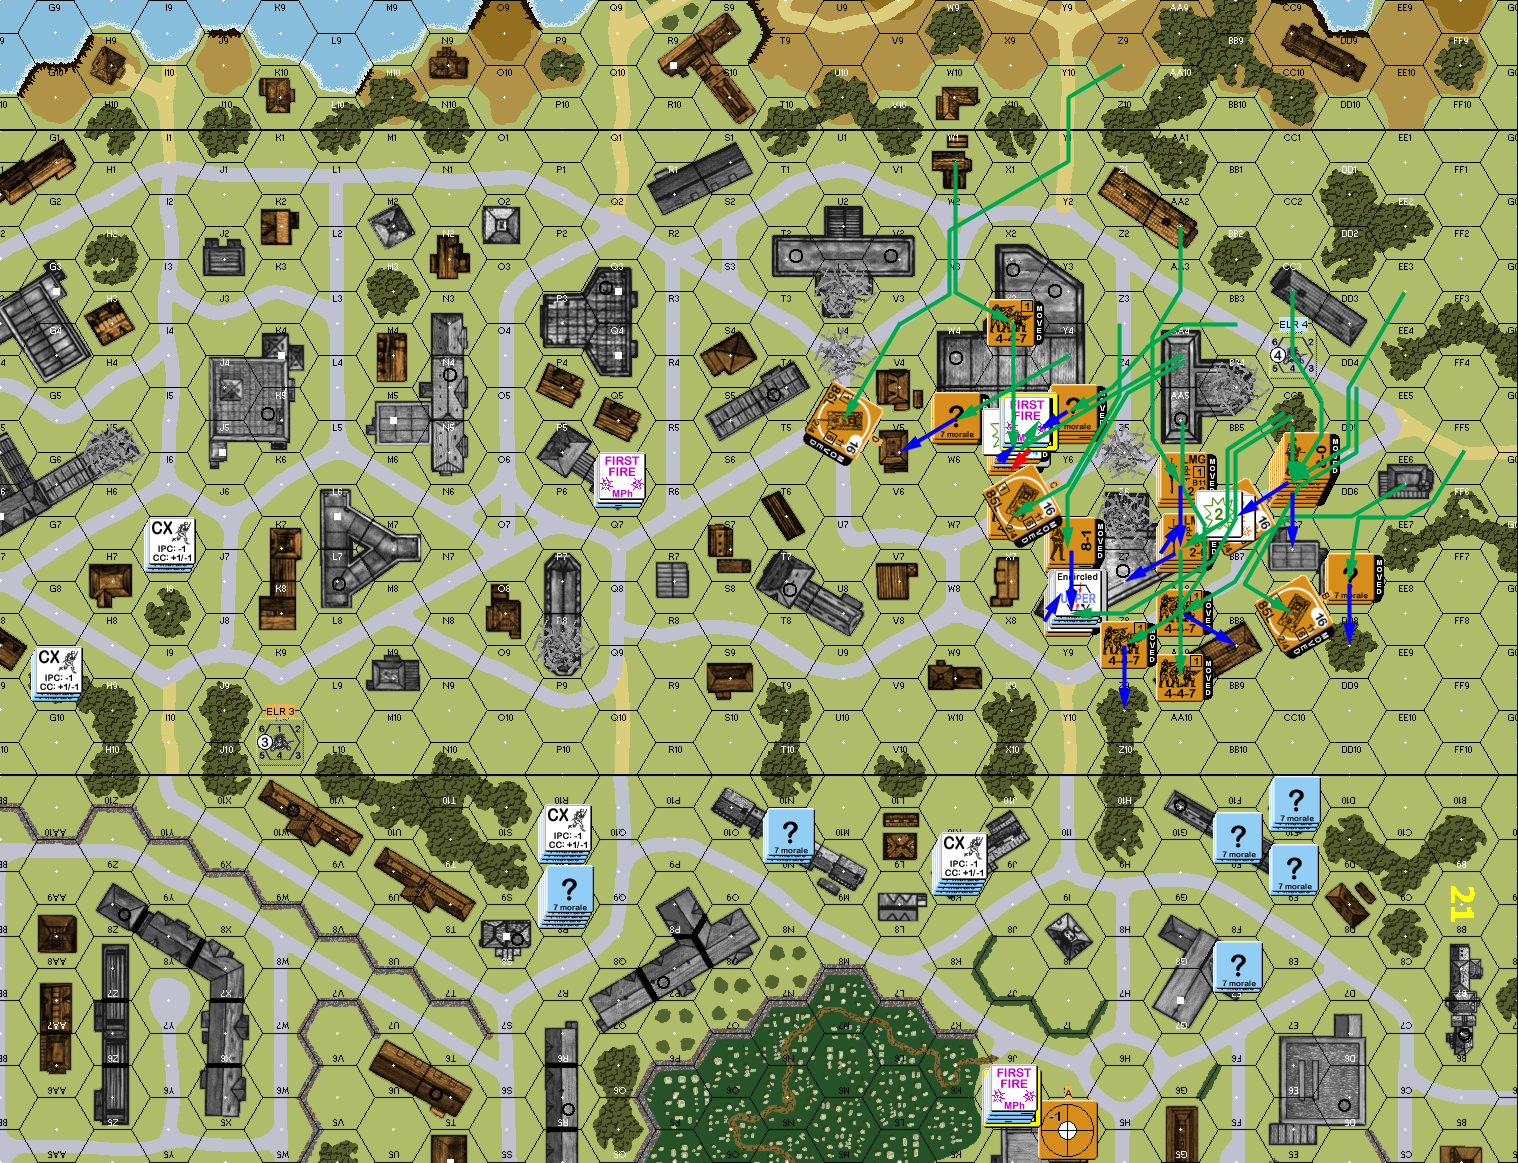
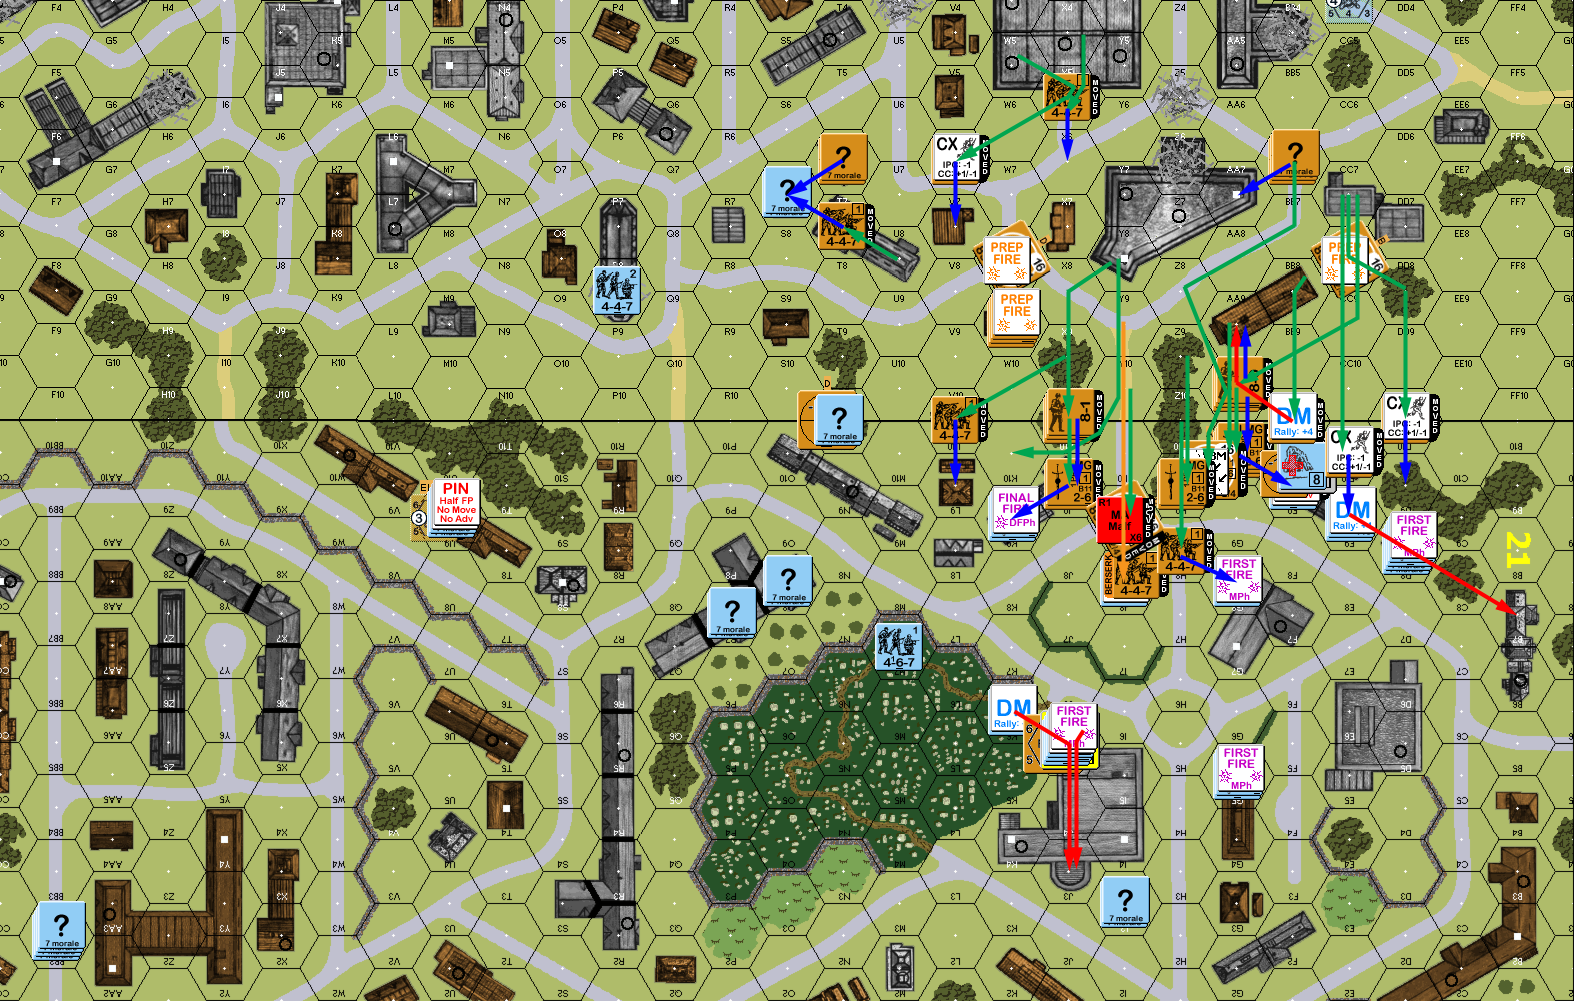
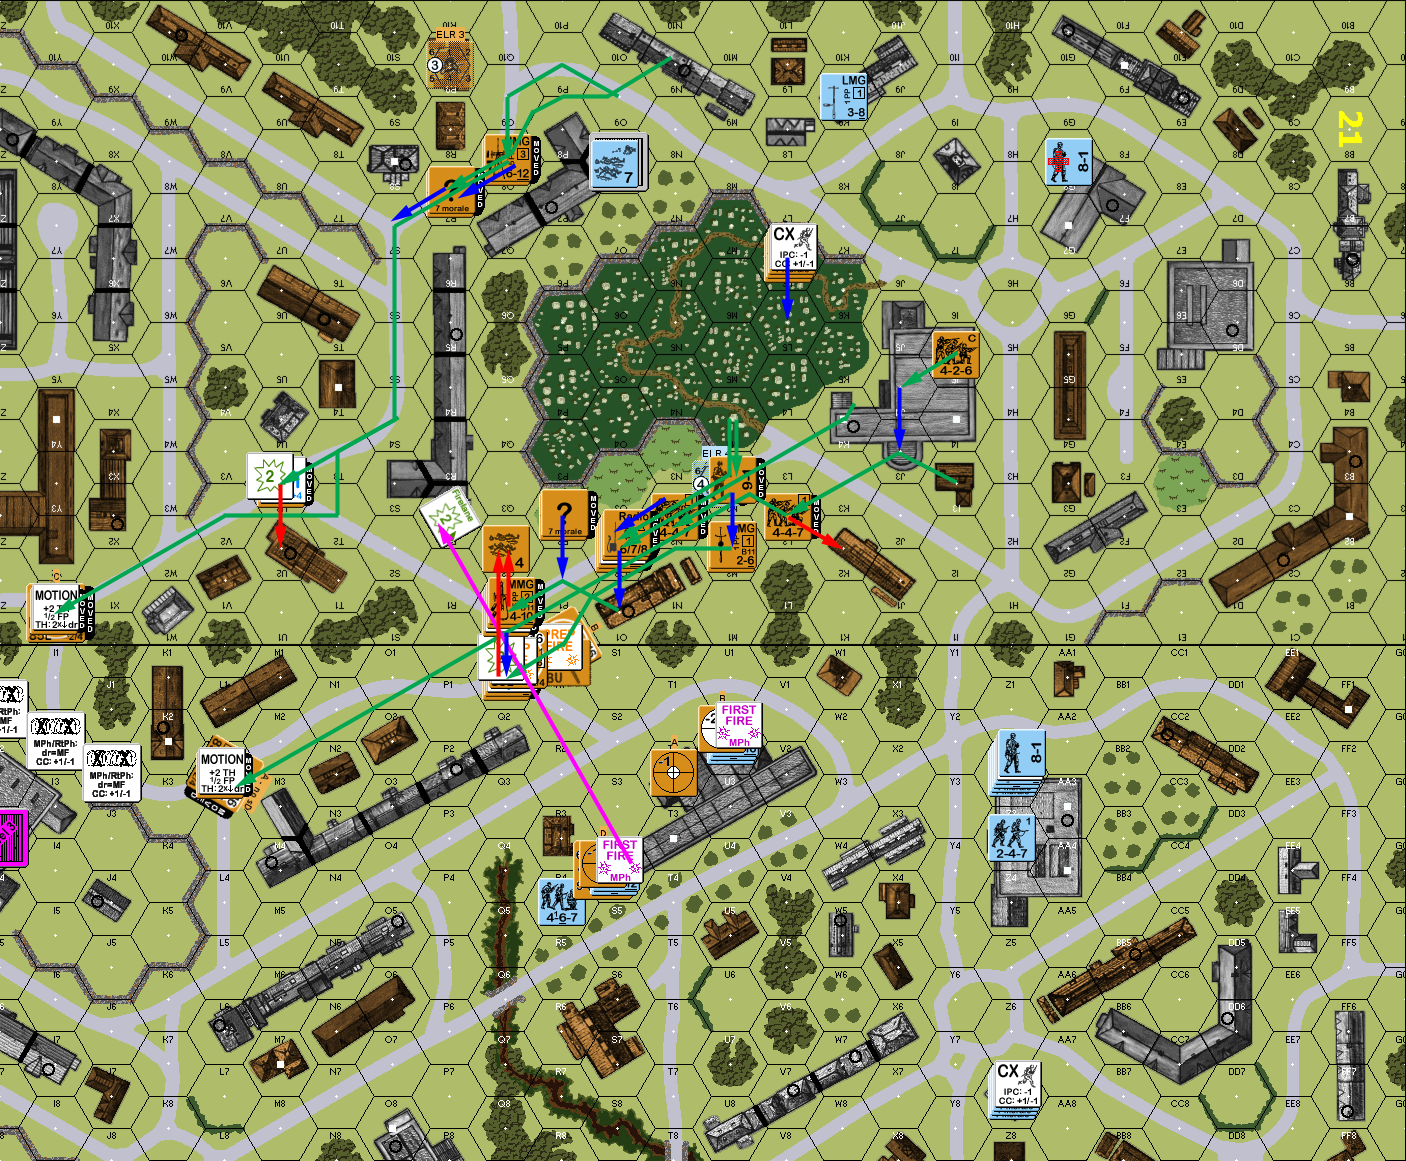
Situation, Russian Turn 2.
The only activity for Martin’s second RPh, was my rally and repair attempt, and nothing happened. He started by dashing a squad across the street in front of a T-34, and the CMG reduced it with a K/1, but the HS got across safely. After that, there wasn’t much I could do, and I forgot to call up my OBA. The real concern, of course, was that an actual defensive line was appearing in my front.
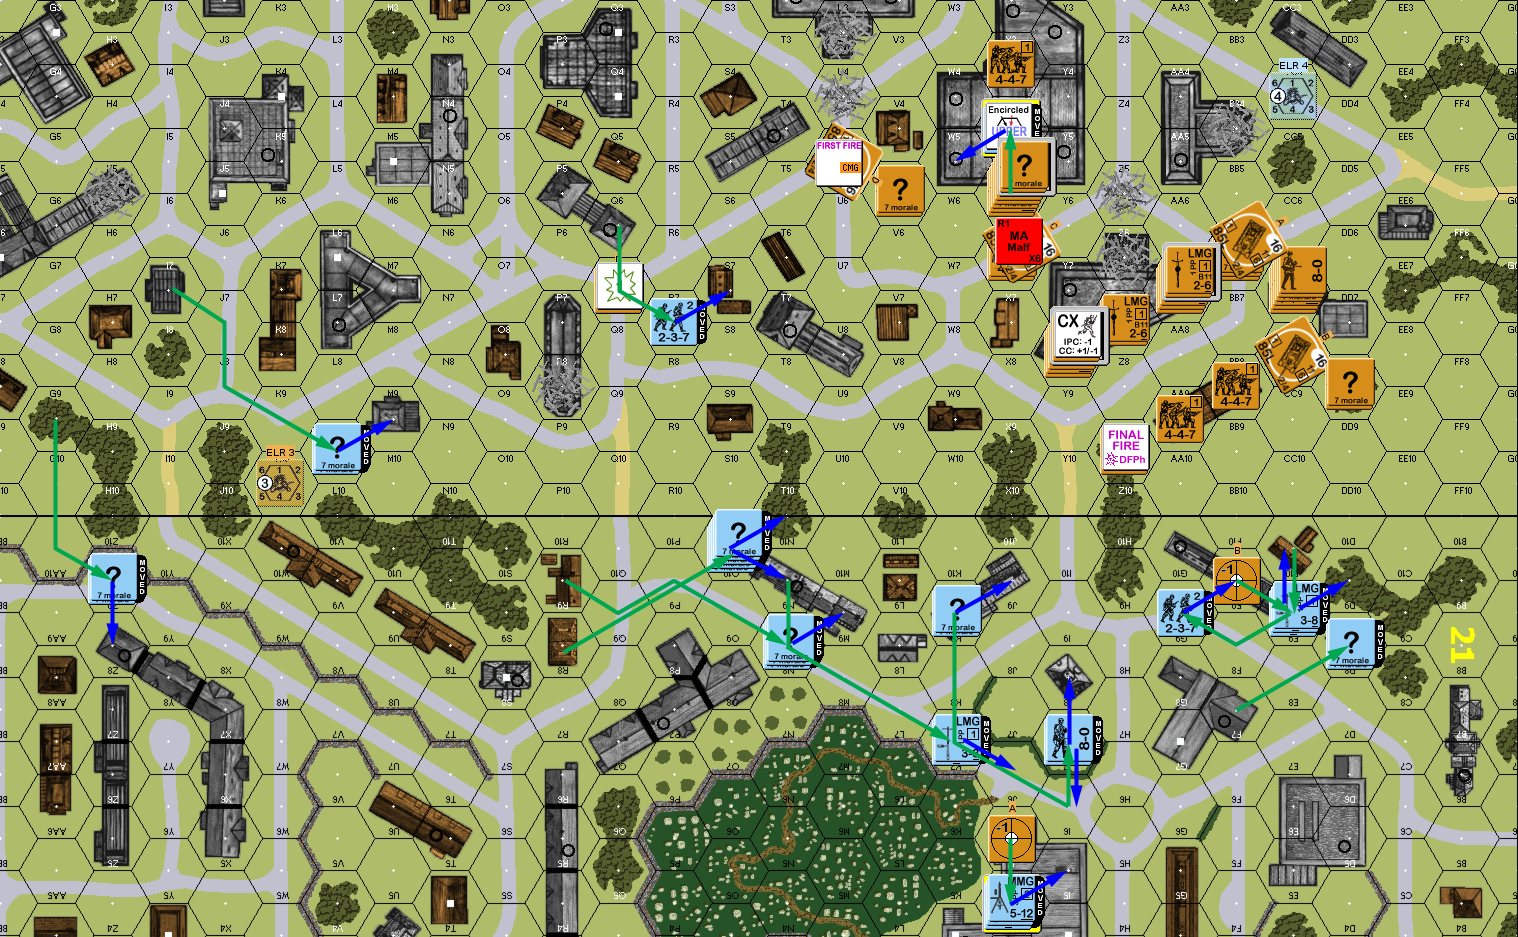
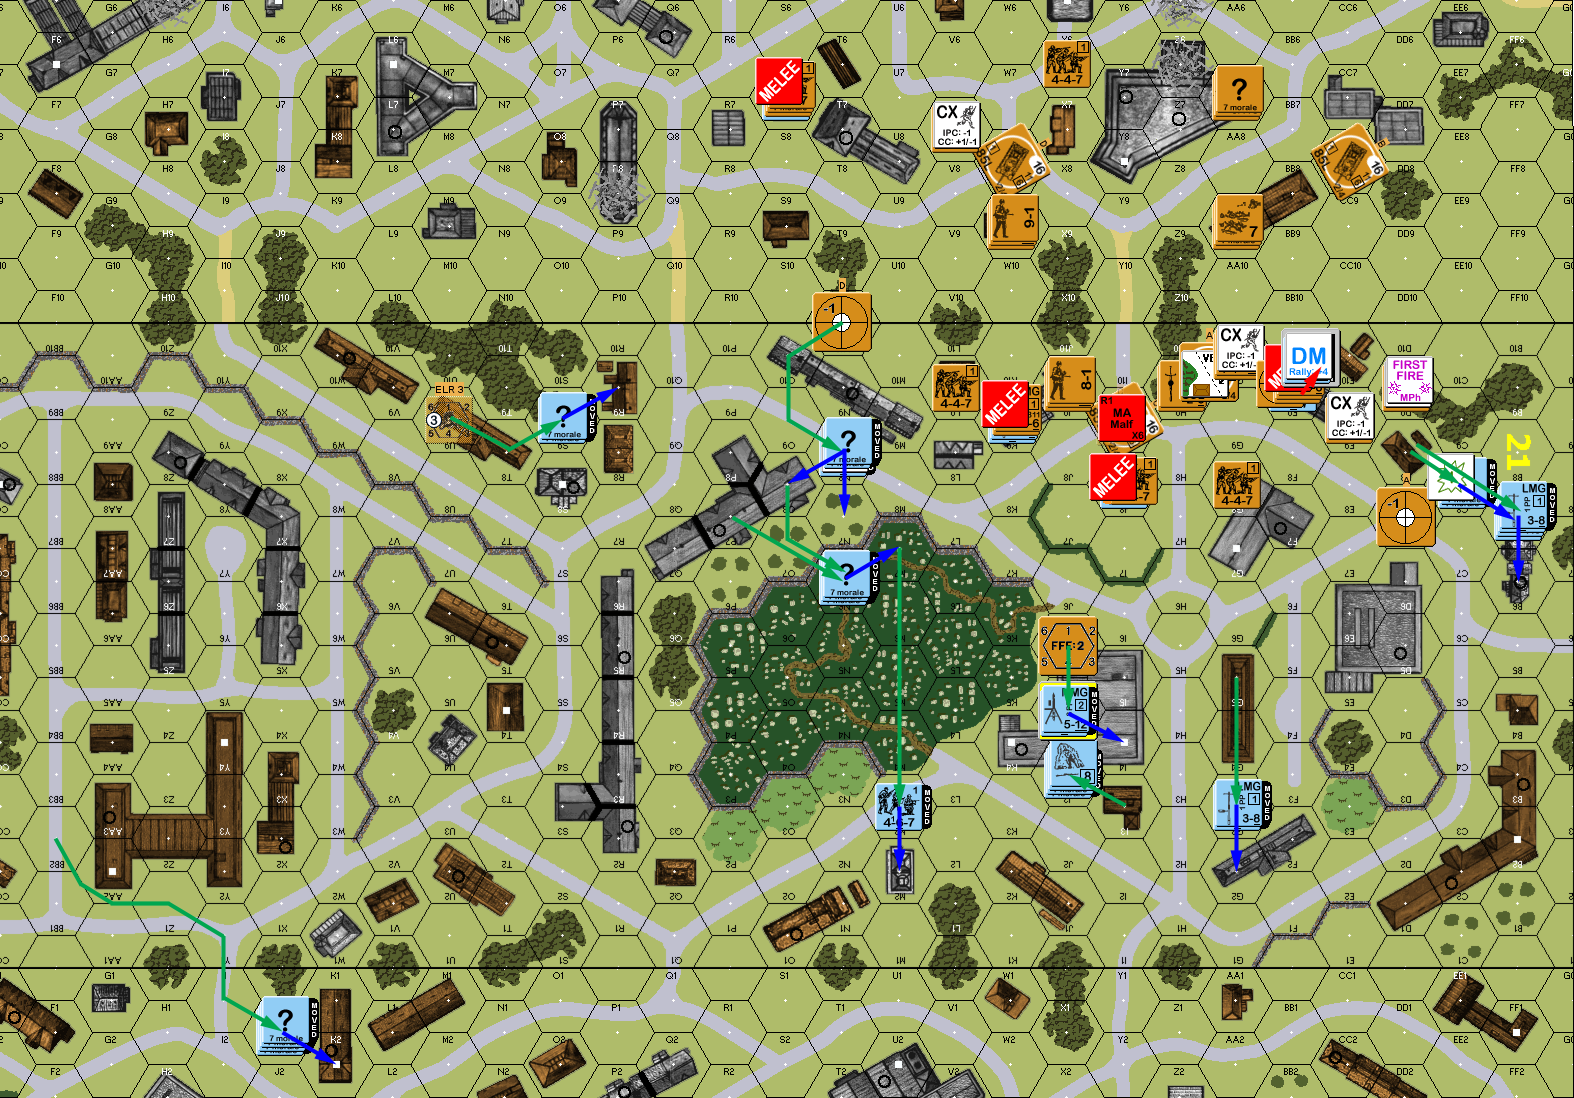
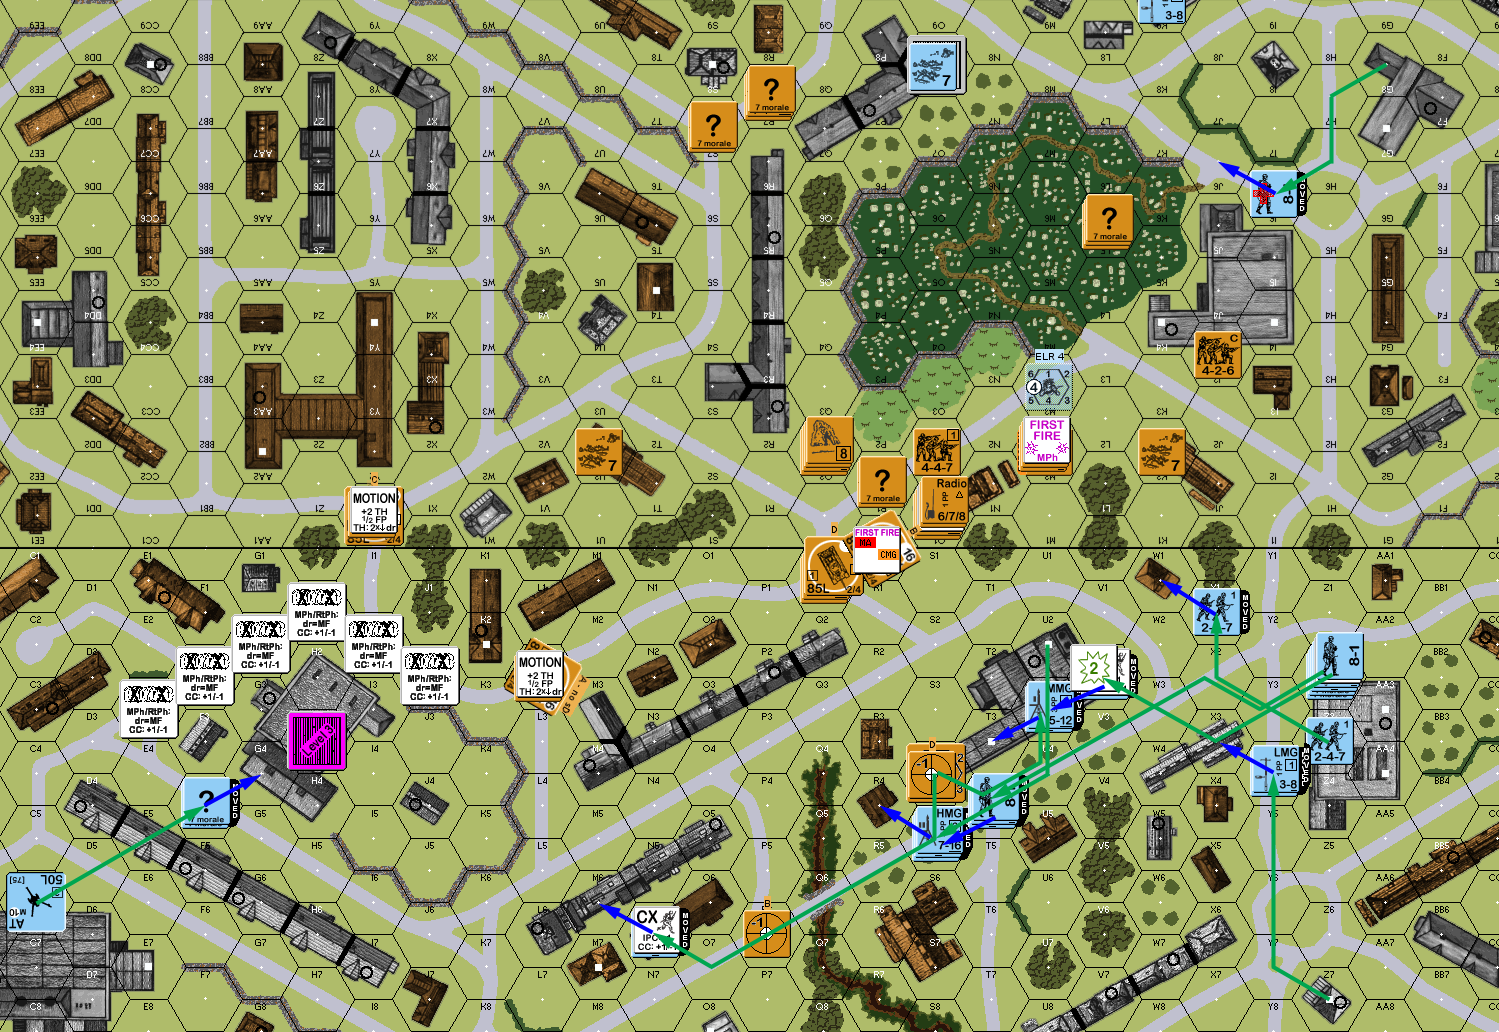
Situation, German Turn 2.
I rallied my one broken squad for my turn 3, but the MA refused to unjam. I had a major problem of a solid line having formed in 21F9-D9, and smaller problems with troops in and near to I8, and a flanking concentration around N10. There was also still the squad in 1W5h2, a HS in S7, and of course the MMG in 21I5. Keeping to schedule was going to be a real problem. I called in the OBA on 21J5, but the spotting round came in out of sight behind the building in J2. I got an 85mm hit on E10 to break the LMG squad, and then a ROF hit on D9 that pinned the squad there, opening up possibilities where I wanted to do my main push.
I sent a squad through the area with the aim of getting to 21C10, and advancing next to his leader in D8, but the pinned squad killed him with a 1KIA (which also cowered for no resid, and instant Final Fire…). A squad tried working its way into the F9 building, but pinned in H10 from fire from J9. A LMG squad worked it’s way into 1X9, taking fire from the HS in 21I8, which cowered for no effect. 1AA9 moved forward, but pinned to fire from the HS in 21F9. A squad from 1CC7 tried to get at the pinned final fired squad in 21D9 for CC, but broke and ELRed as they got adjacent.
And then another attempt to get around the south failed as he revealed a 8-1 & MMG squad in 21G10h2 to ELR another squad crossing open ground in what should have been an area where everyone was tied up. This ended up cancelling the entire turn’s plan to rush 21G10-D8 in failure, but before I realized that, I sent another squad forward to be hit by a K/1 from the same source and break.
Elsewhere, his fire was ineffective as I moved all but two squads out of building 1X4. The T-34 parked in front of the building armor assaulted with two squads over to the I road, but the squads both broke to fire from 21I5, halting that advance. Final fire was mixed, managing to reduce a broken squad, in 1Y9, but also sending the other one there berserk, and aimed right at 21I8.
Somewhat surprisingly for this kind of fight at this point in the war, No Quarter is not in effect for either side, but Martin declared it to eliminate my broken squad in 1DD10, rather than have to worry about them while pulling back. Despite all the problems, I was still adjacent to 21G10 with a couple of pinned squads, another line came up, and a LMG squad advanced next to J9. I advanced into CC in 1W5h2 with a concealed squad, and only got Ambush because he was CX, and eliminated the last Germans behind my current line.
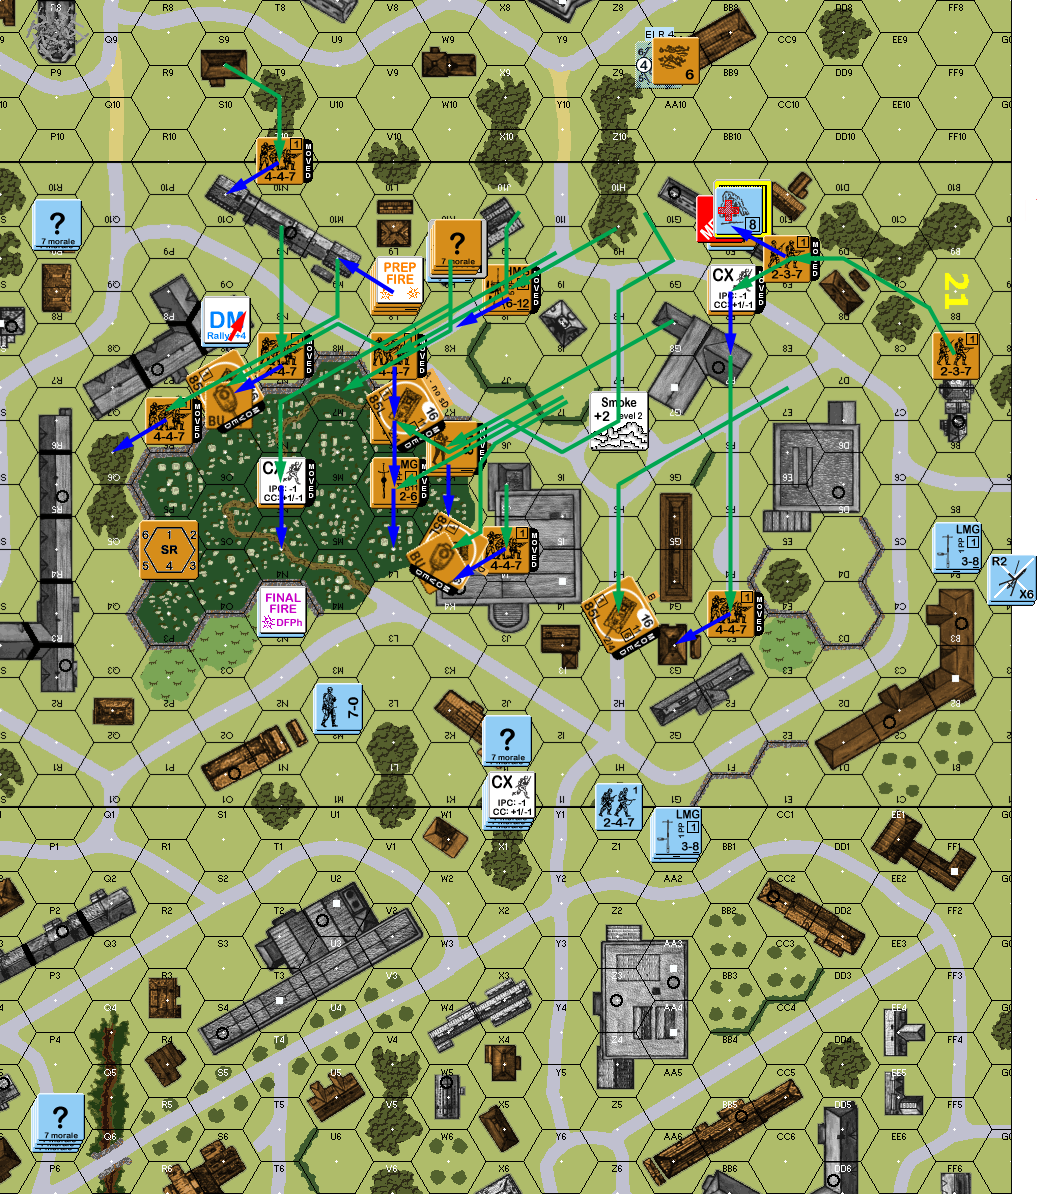
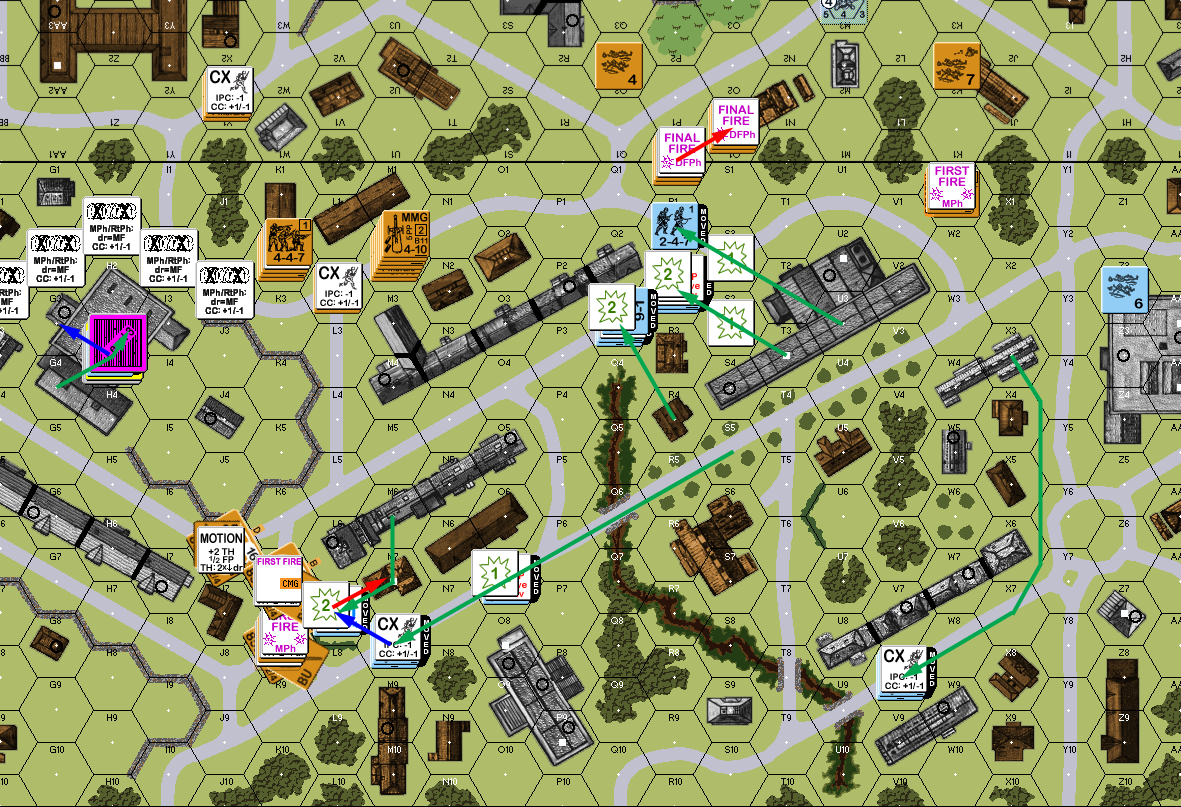
Situation, Russian Turn 3.
Nothing happened for Martin’s Turn 3 rally, and I had left him some nasty choices. He decided to prep J9 and G10, and only got a malfunctioned MMG for his trouble. Movement was largely out of my LOS again, and some of the further units continued moving up. To my surprise, this included a HIP stack in CC8h1 that started racing towards board 20 (it turned out to be his HMG+9-1).
My radio maintained contact… and didn’t have a lot of choices. I put a new AR back on J5, got an extra black chit, and the SR was accurate. A four-hex firegroup put 20FP into G10 for a… NMC that wounded his 8-1 on a ’12’ and broke the squad. On the other side of the road, J10 got a 1MC to break the squad in J9, and break open that entire area… you know, other than all the Germans just a couple hexes further away.
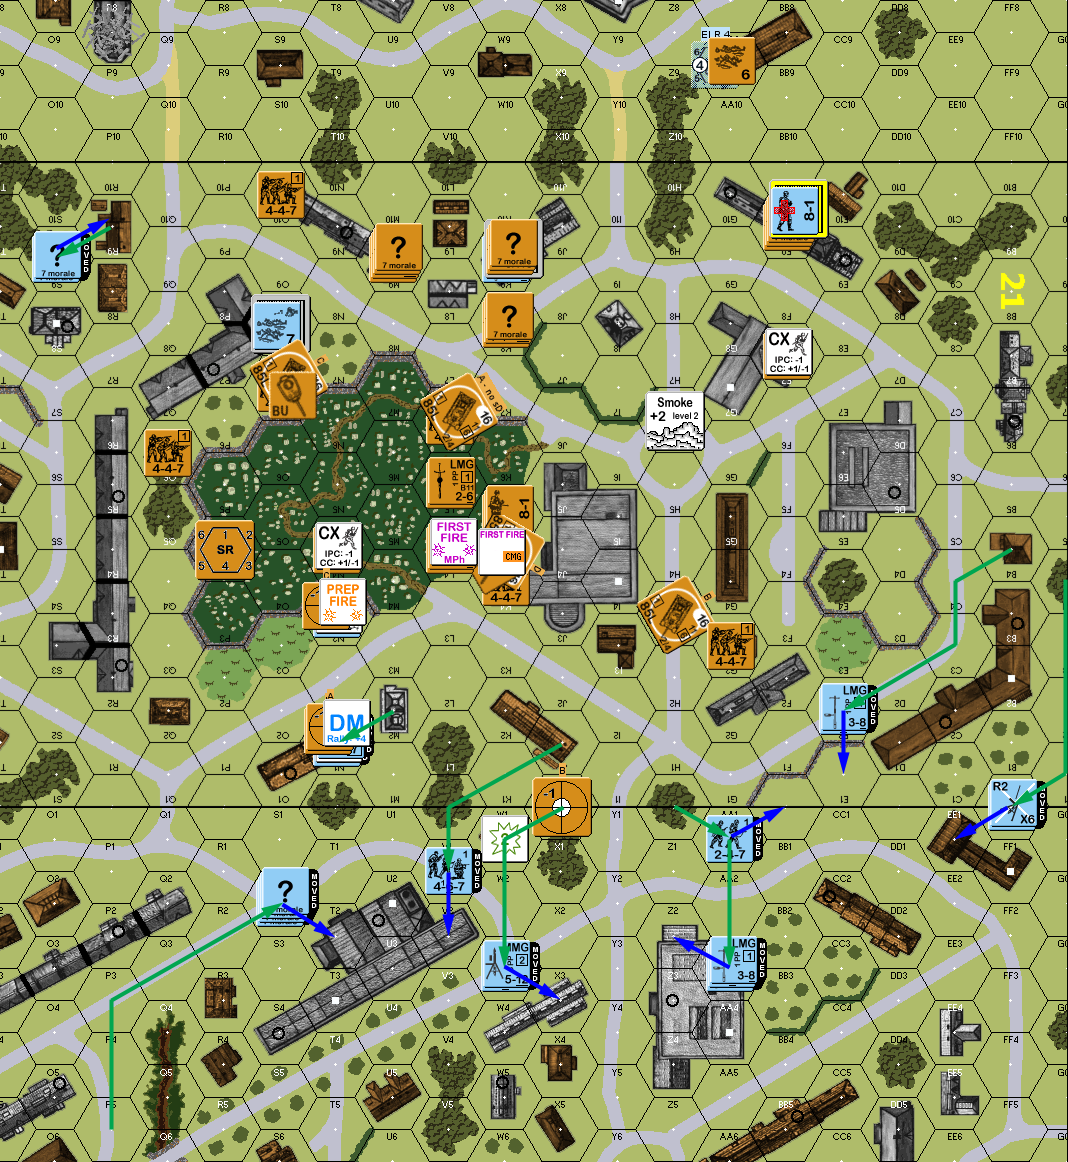
Situation, German Turn 3.
I rallied everyone for my Turn 4, and Martin rallied a squad in 21D8, but my T-34’s MA was still malfunctioned. A bit to my surprise, the SR on J5 hadn’t scared away the MMG, so I Converted in place (and now I had a Known unit there), and the FFE broke the 8-1, though the squad was fine (and set off my sniper to pin U9), and the broken squad in the K6 graveyard was merely DMed. Two of my T-34s prepped without hitting, and the MMG in 1W9 also failed to get an effect. The berserk charge shrugged off a couple of morale checks and got into I8 without trouble. Personally, I felt he should have tried a bit harder to do something about me having a squad in such a central location (especially vs a HS), but I can’t blame him for wanting everyone available for the rest of my moves (still, M7 was unlikely to be needed for much else).
I pressed forward towards last turn’s objectives, and this time his fire in the south had little effect, breaking one squad out of the three and a half fired on (and he got away, thanks to NQ). I AMed next to K9 and got him to fire for no effect, and then sent an HS into K10, which took a 2KIA on SFF. At the end, I moved up two of the T-34s, including putting one in bypass of H9/G10; his nearby squad tried for a PF, but only pinned itself, on top of its other troubles.
The turn ended with five different CCs. In 1S7, I had two squads vs a HS (I had forgotten he had been reduced), but there was no result, though I kept one squad out to stay concealed. In 21K9 we both had a LMG squad, and got no result. I8 (the berserk charge) had no result. G8 was another squad vs a German HS, and this time I knocked him out. In F9, his pinned squad managed Ambush to reduce one of my two squads there. The good news is I had backup near all the Melees, but I had hoped for slightly better results.
Situation, Russian Turn 4.
Nothing happened for Martin’s RPh, and he spent his time pulling away from the defense line that I had just shattered. This meant pulling away from a few things I had been worried about, such as the M9 building, though both flanks of my advance were turning into problems.
I didn’t have much to fire at again, but I did fire into the I8 Melee, as my berserk squad was much less likely to break. This was correct, with his HS breaking to conscripts, but my squad rolled too well, and set off his sniper, who killed my 8-0 in 1AA9, and the LLMC reduced the squad he’d been trying to rally.
The Melees generally shook out in my favor. The broken HS in 21I8 was eliminated by my berserk squad, I CRed the squad in K9, and finished off the HS in 1S7. I lost a squad in 21F9, but I did at least reduce the German squad there to a HS.
Situation, German Turn 4.
My HS that had been DMed by seeing their officer shot by a sniper of course didn’t rally for my Turn 5, but my T-34 finally repaired its MA, while Martin got a 8-1 and squad back in J3 (safely out of the way…). The two lead tanks fired, but didn’t manage any hits. I was starting to get truly worried about falling behind schedule (I still needed the better part of 20 hexes to exit), but one of my better bets was to break enough Germans to make them unable to offer resistance later. And there just wasn’t a lot of choice at the moment.
I concentrated on flooding into the area that had opened up, and set up to turn him out of another defense line. One T-34 parked to take the graveyard under fire from another angle, and the last one squeezed between a couple of buildings to get into board 21, and stayed in Motion as it couldn’t get anywhere with infantry cover, and I didn’t trust the terrain to not have someone fire off a PF at him, or an AT gun not suddenly pop up nearby.
I had also turned his broken MMG squad out of 21B7, and he opted to rout across to B4, rather than be caught adjacent to my advancing squad and a half, but my T-34 in G10/H9 could Interdict, and he lost a 8-0 when the squad failed the roll. There was no new CC, but I fed a new squad into K9, still with no result, while in F9, I lost another HS to bring us to a HS each in that fight.
Situation, Russian Turn 5.
Nothing rallied for Martin’s Turn 5 RPh, thankfully including the wounded leader above the Melee in F9. He pulled back, and prepared to set up the next line at the far end of the graveyard, and get out of the next block. Everything went smoothly, with me checking all sorts of just-blocked shots (by firing) until he tried bypassing a woods hex to reinforce the south… in full view of a HMG. The squad was reduced on a K/1 and the HS and 8-0 broke.
I drew a second black chit for the OBA, and put an AR on 21L2, but unfortunately, it went long/west again, and well out of LOS. The HMG got another shot at the stack it had stopped and killed the leader with a ’12’ MC, but the HS got a ‘2’ to battle harden to 1st line, and then pinned from the LLMC.
I finally won the Melee in K9, but F9 continued without result.
Situation, German Turn 5.
Nothing rallied again, and the second attempt with the OBA drifted off to the north, but the blast height was easily visible. I Prepped the MMG in L8, and thankfully broke the squad in O8, which helped free up movement possibilities.
This was also when I finally got around to really reviewing the graveyard rules, and found that my plan of advance over it was workable for infantry… but not so much for vehicles. Still, one T-34 moved into the graveyard to provide support, after using its sD in H6. Driving another one around the graveyard in bypass of building J4 wasn’t much better. I managed to feed another HS into the Melee in F9, and finally knocked out his HS for no loss.
Situation, Russian Turn 6.
Martin managed to self-rally the HS in A4 for his Turn 6 RPh, along with the wounded leader in 21F9, now that it was too late to shift my odds in the Melee. He continued falling back, but M2 relied on the poor angles to protect him as he moved out, and the acquisition tracking showed I still had LOS, and one MA got two hits (with ROF) as he moved into N1 to break the 7-0 and pin the HS in place; a later DFPh shot got a 2 KIA to wipe out the stack. I also found a clear shot as a MMG squad moved back, but it didn’t do anything.
Mostly, he moved his thinning defense more directly into my path. I corrected my SR, with a new one falling in N0. His HS in N3, and my squad in N4 blazed away at each other, but we couldn’t get any results.
Situation, German Turn 6.
I self-rallied my HS for my Turn 7 RPh. I was getting concerned, as I had four turns left, and I was just now ready to move to the edge of the final board. On the other hand, there was nothing visible between me and the victory building. A quick move to the north might well get me in there nearly unopposed, though I figured the as-yet unseen wire, roadblock, and at least one AT gun were there. The main holdups were the remaining German unit to my north, the HS in N3, and finding a way to keep the Germans from racing that way as soon as my intent became clear.
I had already planned on going mobile, putting a squad together with the T-34 in O7 to hitch a ride last turn, and it only now occurred to me that that wasn’t going to work in the middle of an orchard. …And the rowhouses made the route out of there more constrained than I’d bothered to think about.
To my surprise, N3 did not fire at my first attempt to bait him, with an adjacent squad in the open, but then fired at the squad in the gaveyard as it shifted over the wall, pinning it on SFF, but freeing me of the threat of PFs as tanks drove by. I mostly lined up on the street behind the O1 building, but one squad went into the M2 stone building and was broken by the HMG. Two of the T-34s lined up to provide cover between O1 and 20Q1 next turn.
Final fire reduced the squad in Q3 to a broken conscript HS (hmm, I think that was a CA violation). There was plenty of other fire, which thankfully had no effect, though my sniper did go off, and reveal the “?” in R9 to be a Dummy, alleviating that concern. My advancing fire got a K/2 on N3, to get rid of that, and now all I had to think about was the line of German MGs right in front of me….
Situation, Russian Turn 7.
Martin continued maneuvering for his turn. He ducked out of sight in the center, and shifted north, concentrating in buildings 20Z2 and U2. I couldn’t find any real targets, and my attempt to call a FFE on the latter building failed, as I couldn’t see anyone who would get hit, nor the base level of the hex the SR bounced to. In fact, at Level 1, I couldn’t really see the base level of anything except S3 (where I’d put the AR).
Situation, German Turn 7.
Now I was positioned to make a run directly towards the victory building, but at the same time, I was still working my way towards a possible exit. I tended to favor the latter a bit more, as I wouldn’t end up playing blind-man’s-bluff with the location of a HIP gun, and just needed to avoid any real surprises with the T-34s. The only RPh result was the malfunctioned German MMG finally going away permanently. The two forward T-34s were going to provide cover, so they prepped, but couldn’t get a hit against the German positions.
As ever, the plan did not survive contact. My first move was racing a back squad down the roads towards the victory building, and it broke to HMG fire, though I did start getting a glimpse of the wire in front of the building. My first try moving down the line of tanks broke to a MMG putting down a FL. My next attempt pinned a leader, which stopped the MMG he’d been guiding. The two mobile T-34s both loaded up Riders and moved out, one swinging north to get a good view of the defenses around the victory building, and the other straight down a road towards it, with the Riders braving the FL on the way to no effect.
Final fire broke a squad in L2, adding to the brokies I suddenly had scattered about, with no go leader support prepped. I ended up self-breaking the pinned 8-1 so he could rout to where my first broken squad was going, and where last turn’s broken HS ended up. With luck, I might get them back.
Situation, Russian Turn 8.
Martin’s self-rally for his Turn 8 in O8 failed, but my squad in 20M2… went berserk. Suddenly aware of where I was headed, Martin didn’t fire anything, and started heading north. The remaining MMG headed south to keep things stable in there, but the HMG and LMG went along the road north behind his current building line, while the north flank squad raced ahead. Moreover, he revealed the Gun in C8, and the crew raced for the victory building. I still figured the other Gun was in the building, and I would now have two crews to mop up—if I could.
I corrected my SR two hexes to T2 and Converted to FFE, and it errored (after another Black extra chit) in my least-desired direction to T1. It was still covering part of the target building, and providing some cover thanks to the FFE Hindrance, but the cover wasn’t as good as it might have been in, say, S2 instead. And of course erroring into T3 would have been very rough on the Germans.
Situation, German Turn 8.
My Turn 9 1st MMC self-rally succeeded in 21U2, and my 8-1 rallied in Q2, bringing the squad with him. This was decision time: If I was going to go for the building, I had to commit now, and hope that I could drive out the two crews I figured were in there, one of which I guessed was in 20H2. I could have corrected the FFE one final time to hit the Germans more directly, but the Hindrance was enough, and I wanted him to hurry the MMG down the road to the north.
The berserk charge started for U2, and then re-targeted for W1 when that came into view, taking two shots from W1, one from X3, and the FFE on the way, suffering no worse than a 2MC, and passing everything easily. Because of the problems of ensuring Control, especially since I’d really only have a couple units to really try it with, I decided on trying to exit. The 21Y1 T-34 went first, having to go through a couple hexes of Wire, if it had bogged, or fallen victim to a sudden side ATG shot, I would have aborted to assaulting the building. Since that went well, the second one successfully exited the board with its squad of Riders on board.
My lead squad for the building rush was pinned by fire, but everyone else made it through a new firelane from the MMG. The remaining three T-34s all ended in Motion near 20K7, turrets pointed down various avenues of approach. The squad in M6 successfully found a PF, but missed with a shot at the last T-34. In Final Fire, the HMG got a K/2 to reduce a trailing Conscript squad and disrupt the remaining HS. My latest set of ‘zekies broke the HS they’d charged, so they went routing out of the way.
Situation, Russian Turn 9.
Nothing happened for Martin’s Turn 9 RPh, and it was time to race after my tanks in hopes of a good PF shot. His MMG tried to go east, and get a line on the charge towards the victory building, but since I hadn’t maintained contact the FFE:C went away in RPh, and I was able to get a K/1 on it immediately, though I only pinned the HS after another couple of shots.
The HMG squad came out, and came in LOS of my berserk squad, who managed to pin them on a 1MC. The LMG squad charged down the road, and their leader pinned from CMG fire, but the squad got two more hexes from road bonus (survived fire from the Riders), and a late CX, at which point I tried a MA Motion shot. With a 6,1, and +2, it missed by… 1, since that was my AL. Good for Motion, but not quite what I needed.
To my surprise, the squad already on the scene moved out to L7. I figured he’d go to L6, try a PF and eat the backblast if it meant killing a tank, and try for CC if that failed. The good news was they were the only ones who made it to CC range at all, and they broke on a 2MC from a CMG. Advancing Fire was of course two PF shots at the closest tank, one of which failed because of CX (couldn’t find one), and the other went wide on a 11 TH DR. He also broke my two HS in the open in R0, but they’d already done their job during first fire.
Situation, German Turn 9.
For my last turn, all the attention was on the T-34s. The first one tried for sD to mask the tanks from more PF shots, but came up empty, and then moved to exit off of I10, only to find out the missing ATG was in H10! Rather than try a single 50mm shot against front armor, they reached for a PF, got one… and missed! My second tank also failed a sD attempt, and then moved off of I10, with the squad failing to find a PF because of CX again. The third one also exited off of I10, and was too far away for the squad to even make a PF attempt (also, the first move was into bypass of I7, where the CAFP was out of LOS).
The Russians win with 33 EVP!
Afterword
It was an exciting battle all the way through. It mostly went according to plan for the first few turns. Turn 3 was a big problem, and had me worried about falling behind schedule ever after, but turn 4 did a lot to fix that, and it’s possible I might have been able bull my way to an exit with enough aggression.
But, if I was going to go for that kind of action, I would have just concentrated on getting the victory building. If I hadn’t been convinced that the last AT Gun had to be in there, I probably would have gone for it. The general plan was for the second T-34 to move up to 20I4 and unload, and then the squad would advance in, which would block the stairs. Given just how little I could really get in there, it would have been a different kind of exciting, but it still would have been pretty close.
I think the main thing was having a workable, but flexible plan. The entire way, I was keeping a careful eye on where everything was, and if I could divert to the victory building, or find a way around the Germans using the speed of the T-34s.
Discussion (2) ¬
Thank you for the nice AAR. I appreciate the pictures, the details, the explanation of the tactics used and the reason why of certain choices.