
J114 The Marketplace at Wormhoudt
After finishing up To the Square, Martin proposed a scenario from Journal #8. It features board 12, and more notably, the marketplace there is not only not SSRed out of existence, but is likely to be a central part of the climax of the scenario.
The evacuation of Dunkirk is underway, and the Germans are starting forward again. The British are holding Wormhoudt as part of the perimeter, with twelve squads (mostly 1st Line), a HMG, MMG, a pair of light MTRs, a pair of ATR, and a 40mm AT Gun. A pair of A10s show up on turn 2, and then a pair of Matilda IIs on turn 4. The main defense is of the board 12 village, while the tanks have to cross board 16 to get there, and the Germans start in a small corner of board 19. They have fourteen squads (mostly 4-6-8 SS with a couple assault engineer 548 SS), with good leadership, the usual MGs and MTRs, as well as two DCs and and two ATRs. Two each Pz IIIs and IVs enter on turn 1, followed by a pair of unarmored halftracks towing 150mm INF on turn 2.
The Germans have 7.5 turns to get more VPs than the British, with each building on board 14 giving as many VPs as it has locations, with a bonus for the Marketplace, added to the CVP totals. The Germans also have a CVP cap of 45, which mostly means don’t lose the tanks and a bunch of infantry.
The Germans also get one free Smoke FFE at the start of the game, which he put in 19L8, and errored to N7. I hadn’t properly thought about that part, and it pretty well closed down my plan to keep him to a slow pace across the open areas of the board. I had set up concentrated on the woods line near the edge of board 19, with a Dummy off in the X6 farmhouse, and an ATR and MTR on my left flank, where they could cause some interference, and then presumably fall back… with little to no cover, but at long range. Naturally, the main line would need to fall back after a couple turns, and then the fight for the town would begin, with my ATG in 12P5, the HMG and 9-2 in O4h2 (the type of thing I’ve found to be too vulnerable, but at the opening ranges…), and the MMG over in U5. He opened up with his MTRs on the flanks of my main line, but missed.
His first move was a HS who was pinned as I set up a fire lane, but after that, he moved in his tanks, and used smoke dispensers (succeeding three out of four times) to create another barrier of smoke behind the FFE, and then the assault engineers put down another hex. This left me with little to do, as most of the shots were poor, if not outright blocked. Worse, shortly after the tanks drove CE through the FL with no result other than his sniper pinning a backfield squad, the LMG malfunctioned, shutting down the FL.
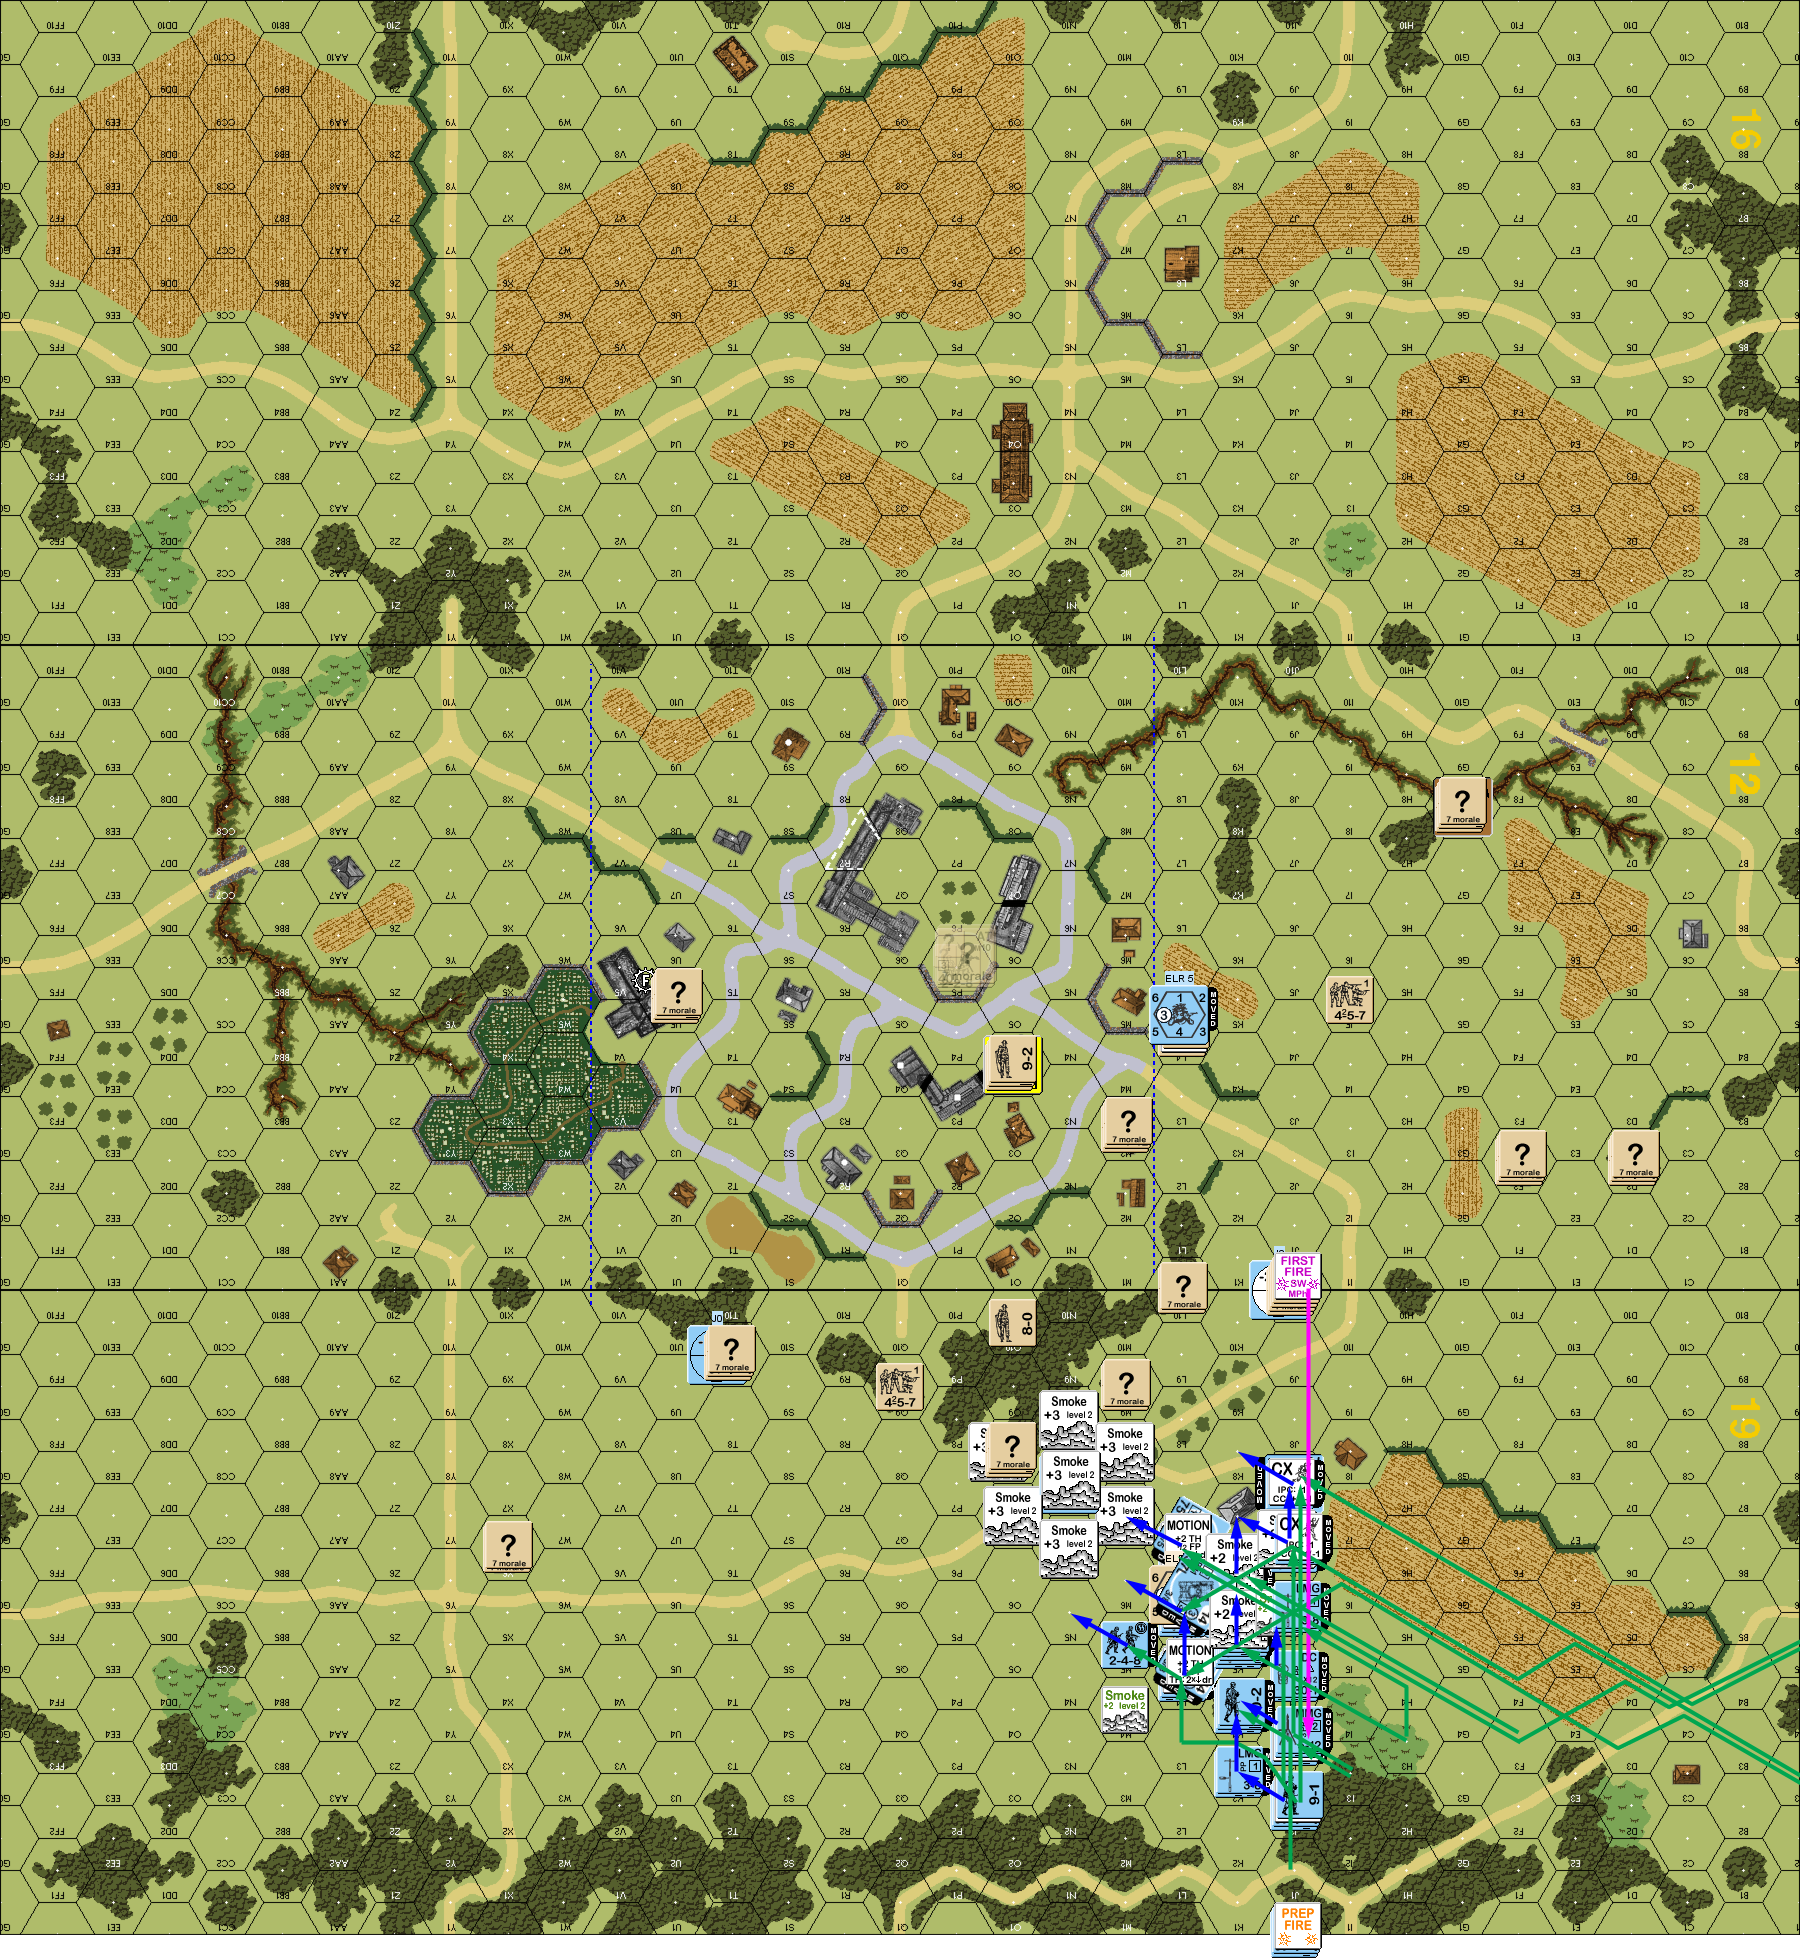
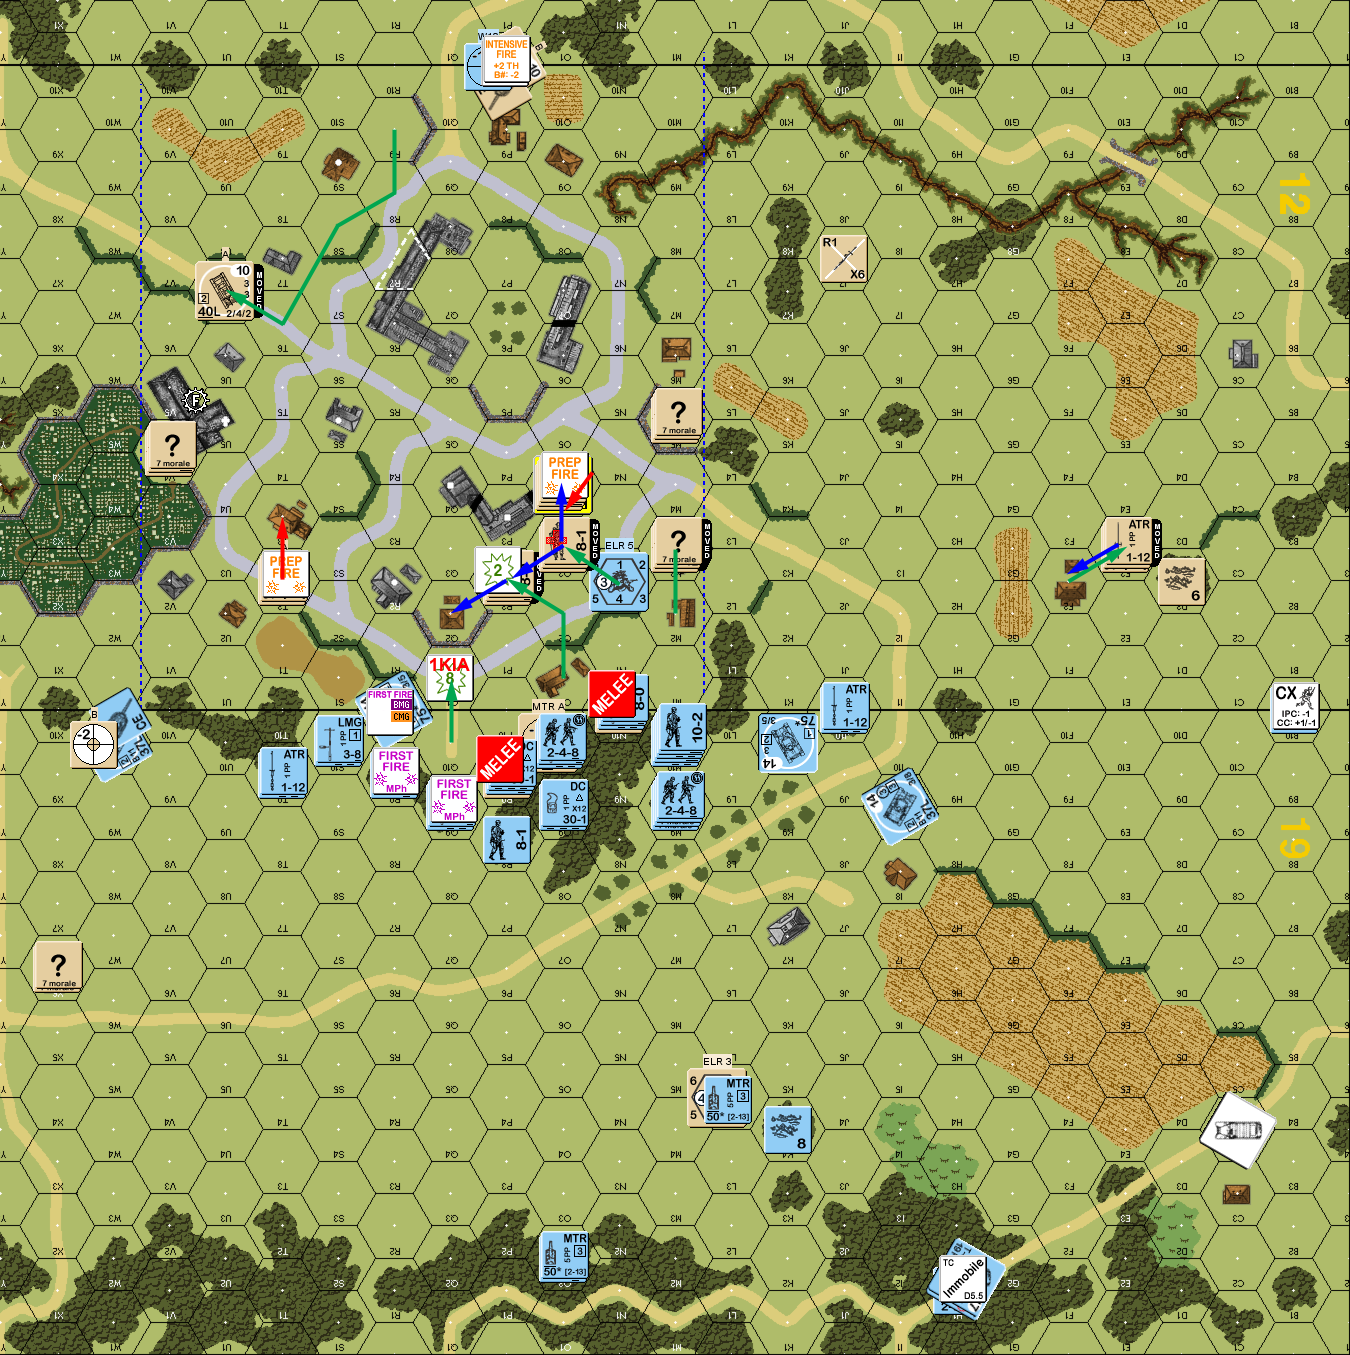
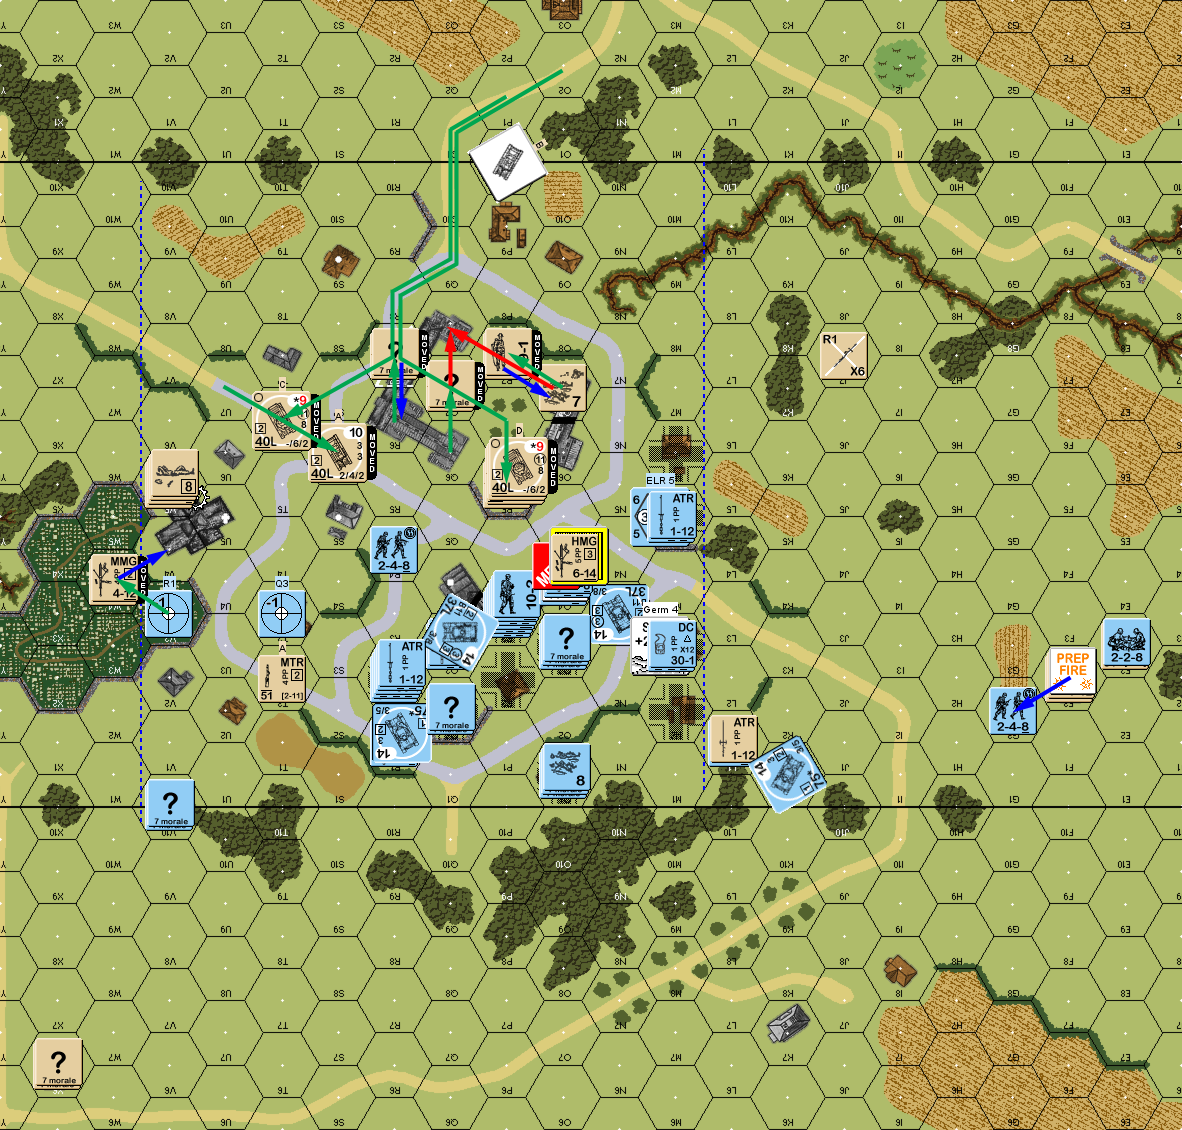
Situation, German Turn 1, showing the full board. North is to the left, the victory area is between the blue dashed lines, and many buildings have been redefined as two-story buildings instead of multi-story. There should be a bunch of shellholes scattered around board 19, but both of us missed them during setup.
Nothing happened for my RPh (sadly), and prep was a blocked shot from my left-flank MTR. Most of my MPh was falling back in the center, and trying to reorganize my left/south flank. I had been fairly concerned that he’d try to go around the entire tree line, and force an entry to the south (since all his vehicles could enter in that area), so I’d had a few squads covering all of that. Now, they were a bit further out of the way than they should be…. However, the real problem was closer, as he pinned my LMG squad as they tried to move out of J10, and then broke the 8-1 as he tried to get out.
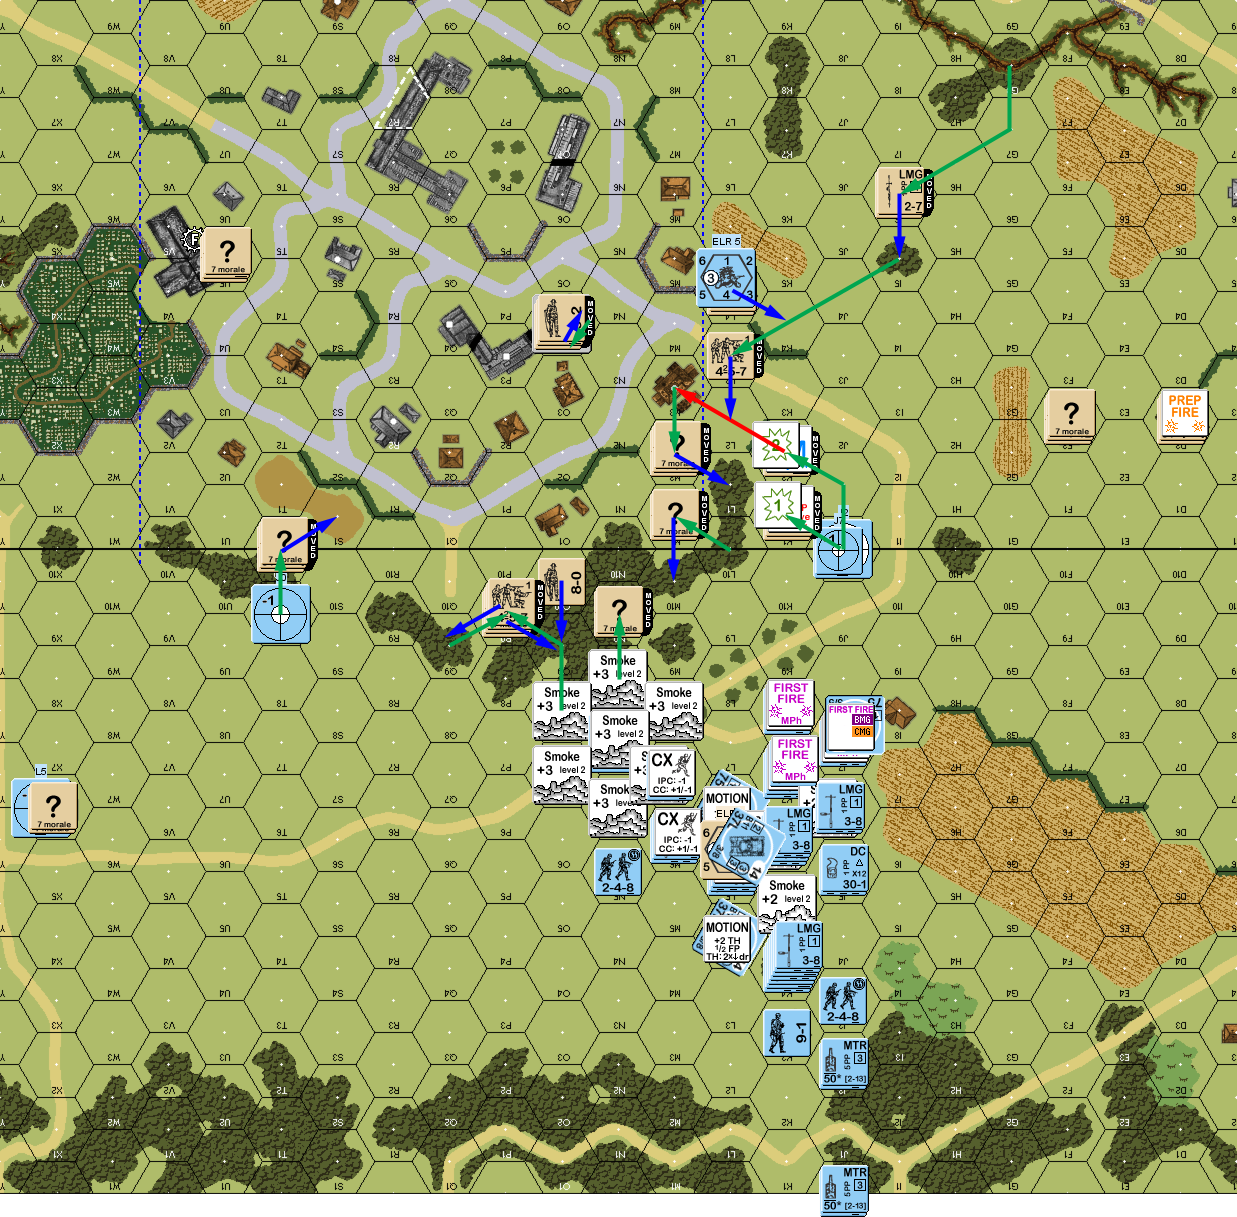
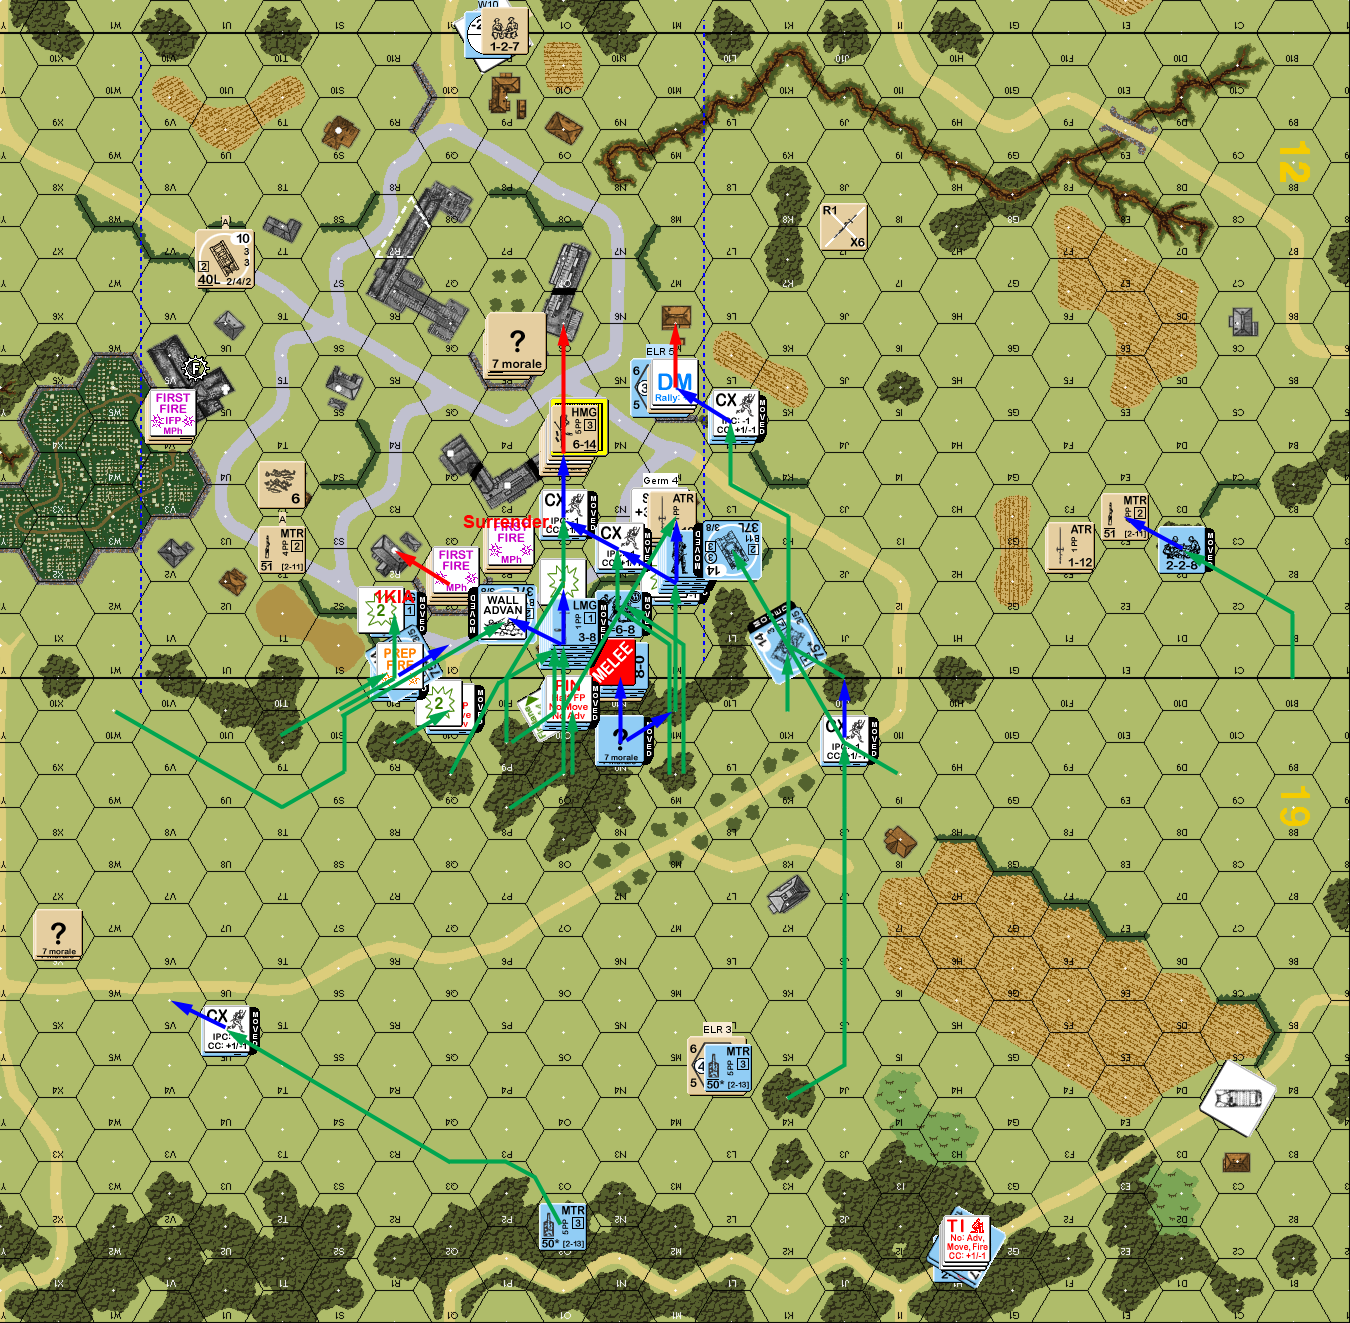
Situation, British Turn 1.
Nothing happened in Martin’s turn 2 RPh, and he skipped prep. The smoke was starting to dissipate, but he led off with a Pz IV using a smoke dispenser in L9, and then overrunning the LMG squad in 12K1. My ATR was adjacent, but while they could hit, they couldn’t penetrate the front armor, while the OVR eliminated the squad and malfunctioned LMG. The existing smoke still cut off most shots, and slowed his advance some, but Martin made sure it was well covered with still more smoke, with two more dispenser attempts (both failed), and some smoke grenades.
The one thing he didn’t properly anticipate was how vulnerable the entering HTs were. The first one entered well back in his starting corner, but as it passed by the 19D5 gap in the hedge, my ATR in 12F2 took a shot, and got a hit for a surprisingly good 7TK (I’ve been too used to only having armored targets for them) to kill it and the INF, though the crew survived. I’m not sure where the second one was going to go, but after that it turned down the board edge road, far from anything I could do.
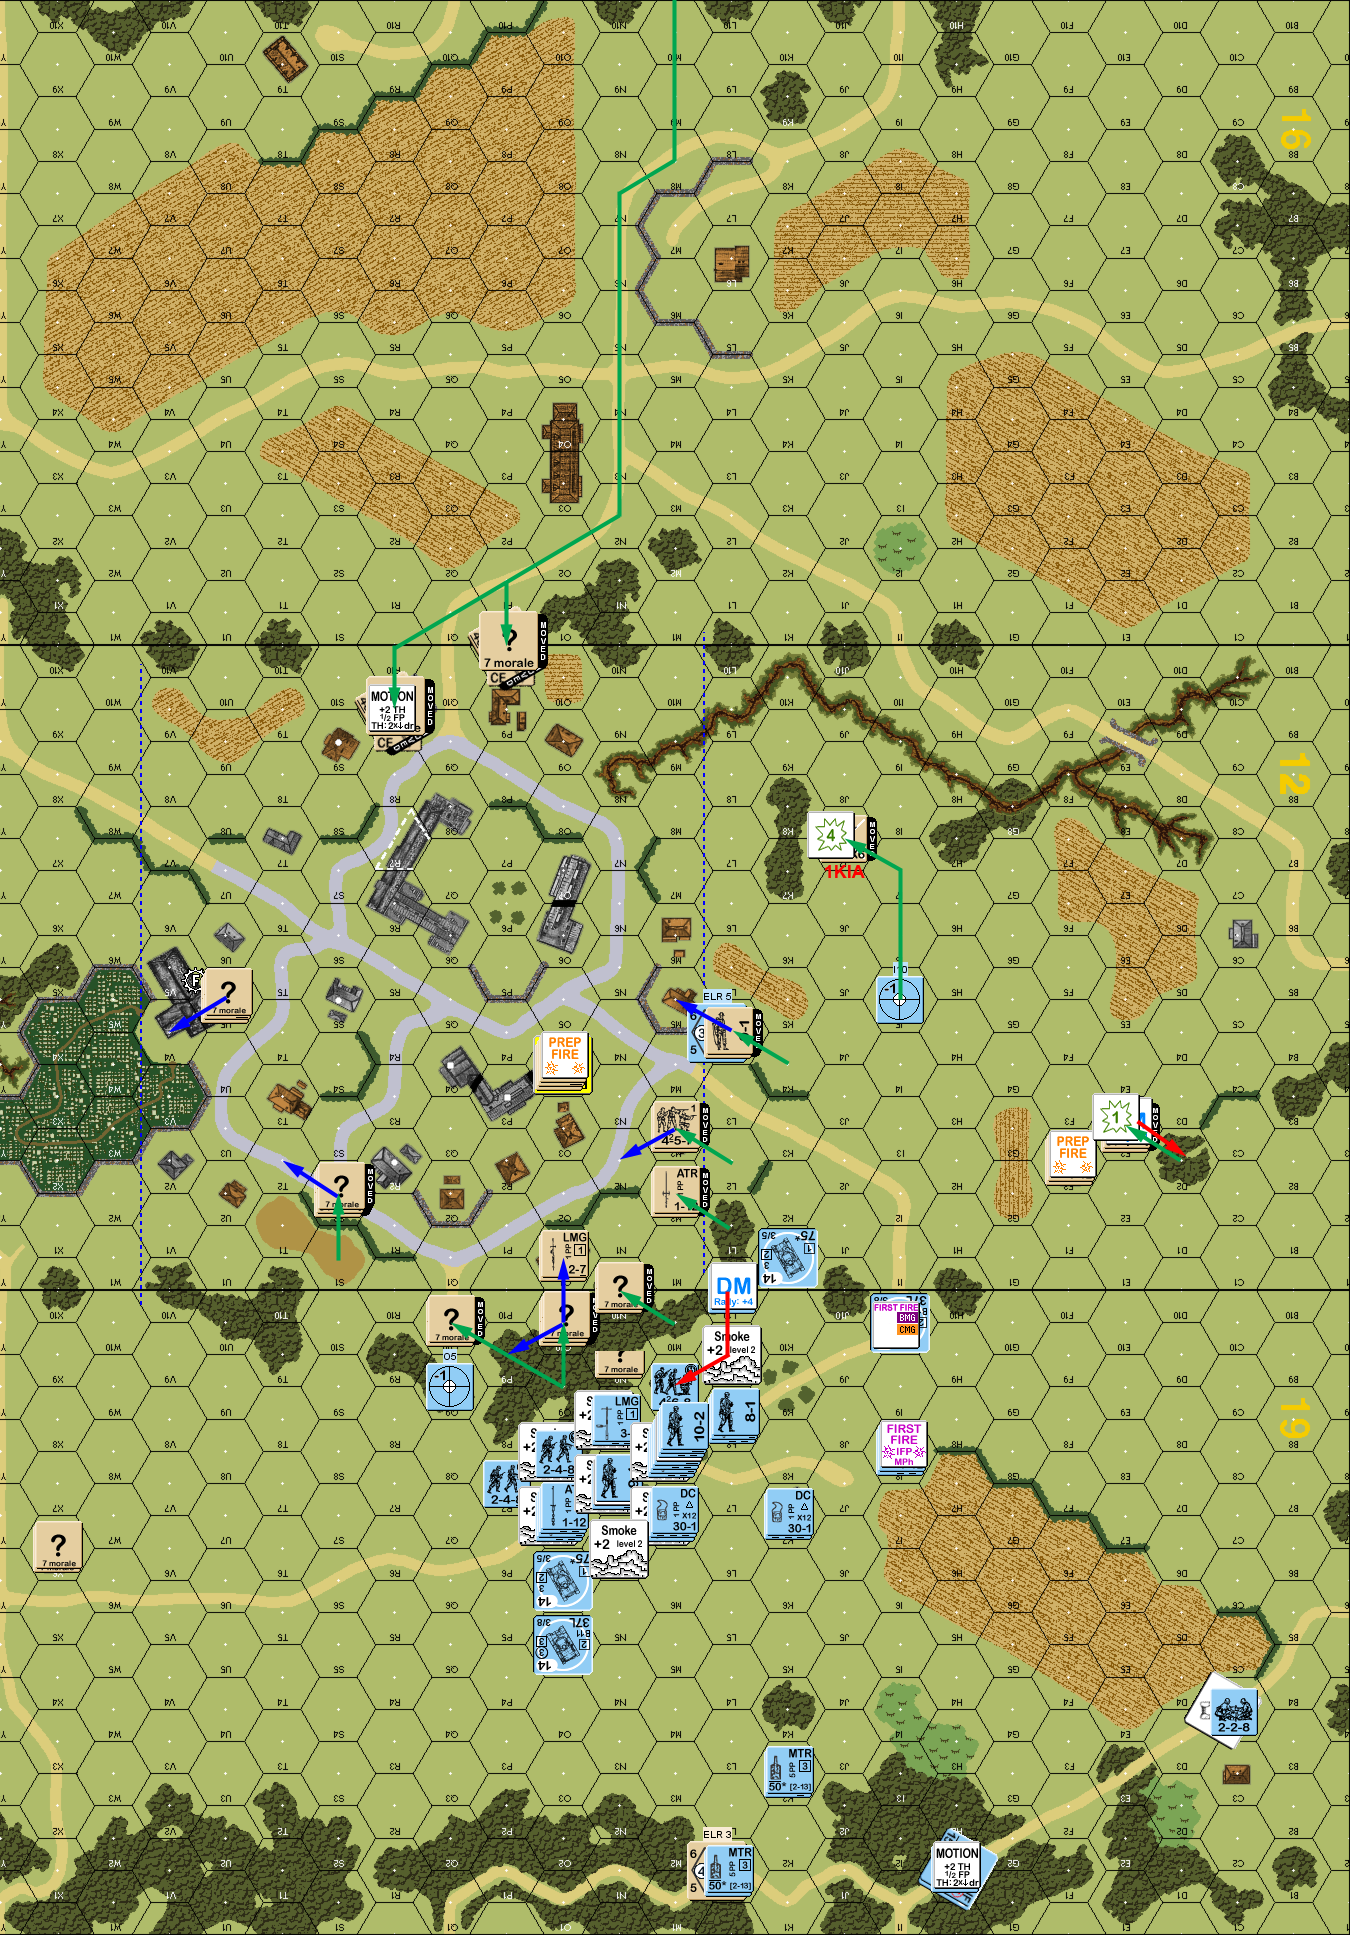
Final Fire (what little there was) didn’t do anything, but Martin managed to reveal and break my LMG squad in Q9, with my sniper activating to pin a MTR HS in K3, and then it activated again to break the one in L1.

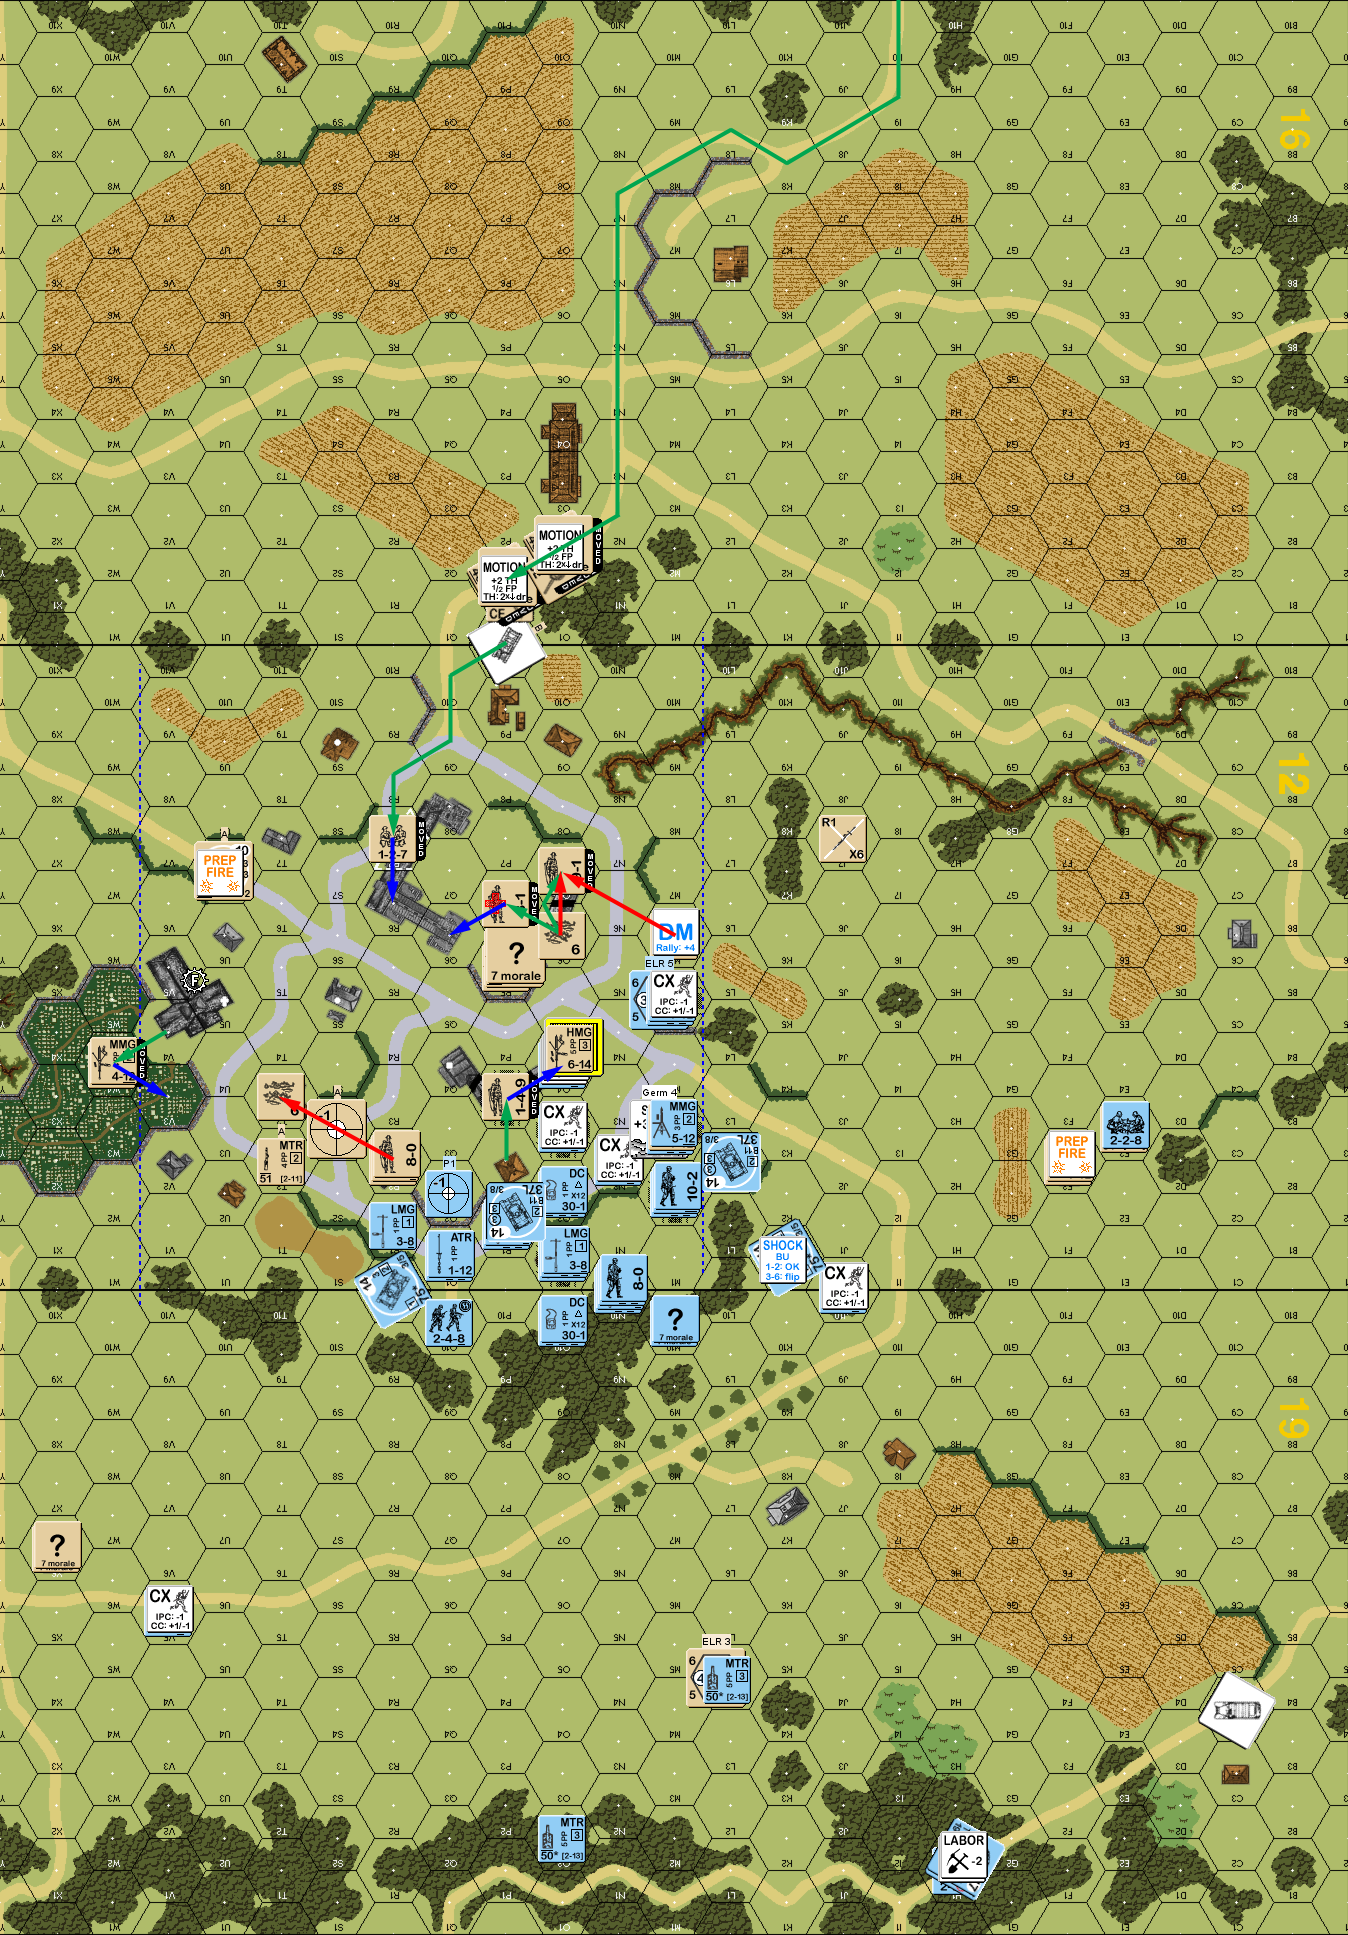
Situation, German Turn 2.
My 8-1 self-rallied for my turn 2, but naturally the leaderless broken squad didn’t. Prep broke his squad in L10, meaning he could no longer see the other side of the woods line. Movement went less well, as the MTR squad in 12D2 crept out of cover, and was broken by long range fire. Much worse, my attempt to get my squad in I5 out wasn’t well thought-through. I didn’t think about the range of AFV machine guns, and they took a KIA. The good news was that my sniper went off again, and immobilized the remaining HT, effectively putting his second INF out of the game.
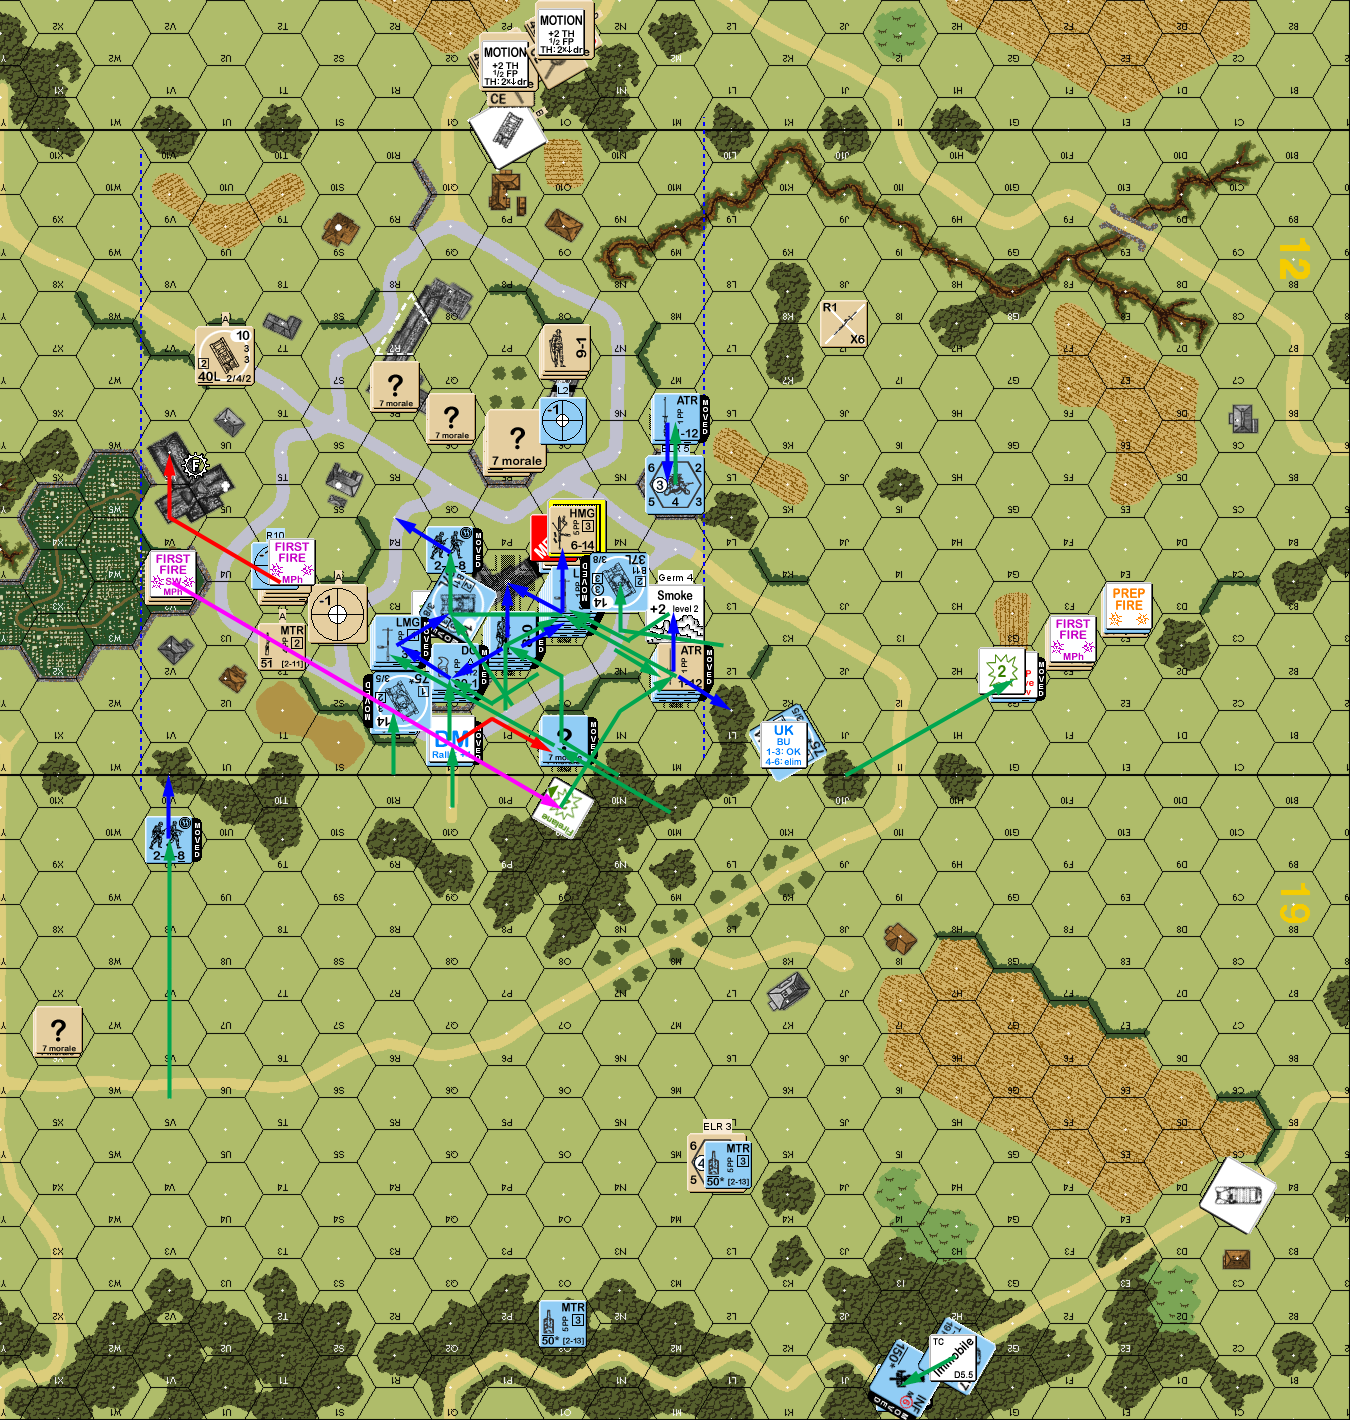
Situation, British Turn 2.
Martin rallied his MTR HS for his turn 3 RPh, while I rallied the squad in O1. All the smoke finally went away, but my plan was to defend the back edge of the woods line, and move/rout back into the village proper, with a fair amount of lateral LOS to tie things together.
Unfortunately, it just wasn’t that good a plan with German armor superiority. Die luck didn’t help much, with most shots to establish my residual ‘fence’ rolling high, and his HS passing the 2MC of my one good shot, which set off his sniper to wound my 8-1 and pin a squad. The HMG at least managed to break the first full squad to come into view. Residual rolls didn’t really do any better (they were lower, but there were still no results), putting an impressive amount of infantry in front of my loose line. He also shifted to his left, where my line wasn’t nearly so well developed, and put a Pz IV across my planned escape route. On the other flank, he had worries about my ATR, with the Pz III doing a bit of a circle to stay out of LOS, while the Pz IV reversed out of its LOS (the ATR fired while it was starting, but missed).
Final Fire was mostly my HMG trying to double-break the M10 squad, but they passed everything thrown at them, which did set off my sniper to break his MTR squad in L4. What I hadn’t really seen was that his left Pz III had gotten a clear shot at one of my A10s. I hadn’t even suspected a range 14 LOS across the width of board 14; while he missed, now my armor was in trouble too. The Pz IV got a 1MC on 12N2, but but it just caused my pinned squad to to battle harden and generate a hero.
However, he did pin my squads in 19Q10 and N10, and then got into CC with P9 and N10, neither of which had any result, even with 3:1 odds in P9.
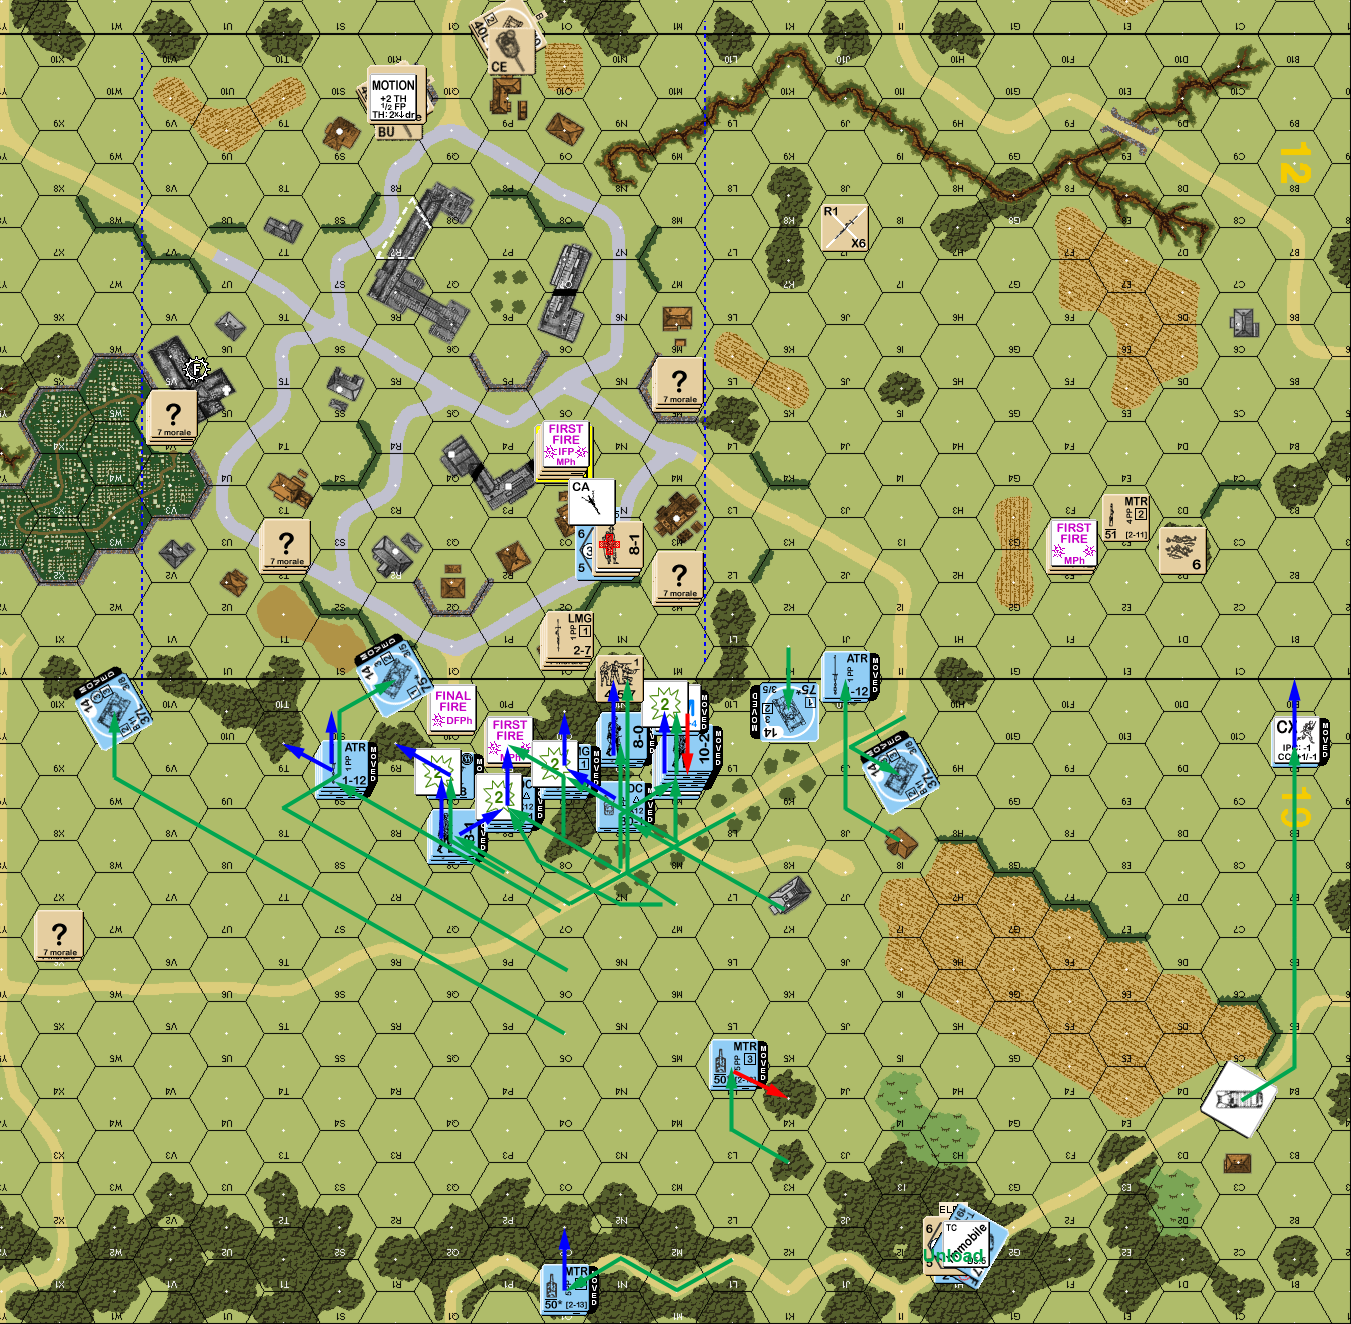
Situation, German Turn 3.
I didn’t self-rally my HS (expected) on my turn 3 RPh, but Martin did rally a HS. My HMG tried shooting it out with his good stack, but couldn’t get anything to happen. My A10 took two shots at the Pz III (IF) but couldn’t hit, and couldn’t force them to button up on a PTC from the MGs. The other A10 tried covering, but failed on a smoke dispenser attempt in R8. My attempt to get out of Q10 failed, with the squad taking a 1KIA in 19Q1 (P10 might have been slightly better from a firepower standpoint, but I’d be forced to surrender on a failed MC). But O1 managed to Dash across the road, and N2 had no trouble pulling out.
Naturally, the Pz III got a hit on my A10 and killed it, though the crew survived (the smoke would have saved it), while the other Pz III managed to double-break the HS in D2 to eliminate it. Even worse, the 10-2 stack got a 2MC on my HMG that ELRed the 9-2 and reduced the squad to a broken 2nd line HS on a ’12’. My other MTR had been in T2, which was open, but gave it a nice air burst shot at O10. Naturally the MTR missed, and return fire now ELRed the HS there. The Melee in P9 came to its inevitable end, while N10 continued without result.
Situation, British Turn 3.
Martin self-rallied a HS and rallied his one broken squad for his turn 4 RPh, while I manged to rally my 9-1, but not the HS in O4. His only Prep was smoking in 12M3 with his Pz IV. He sent a HS in to ‘bump’ my concealed ATR position in the smoke, and a 4 -2 shot at them didn’t have any effect. Another shot in the open at a HS only pinned him. In fact, he walked through several -2 shots with no trouble. However, a squad advanced to R1 and took a 1KIA from my MMG. However, that set off his sniper to kill my 9-1 in M5, which broke the squad there on the LLMC. This compromised the plan, as they were mostly going to cover the N3/N2 area with the ATR smoked in. Also, it let him move at will on that end, since there just wasn’t anything left.
Worse, he came into view of the AT Gun in P5 (he should have seen it earlier, but I didn’t think about his crew seeing it from halfway across the board). With the only unknown out of the way, he really had free reign. A Pz III maneuvered into the village, while the other confronted the smoked-in ATR and covered the south-end of the village. This also left him a target for the other ATR, but it couldn’t penetrate. Advancing Fire from the first Pz III also broke the squad in Q2, and he also broke the HS in P2, which was forced to surrender, taking out most of the center.
Martin sent a second squad into the N1 Melee, and had no trouble eliminating my squad for no loss, while two squads and the 10-2 piled on my ATR squad and eliminated them in Ambush.
Situation, German Turn 4.
I couldn’t rally anything for my RPh, but my remaining ATR managed to Shock the Pz IV facing it in Prep. I didn’t have a lot to do, with only one intact squad left, though the pair of Matilda IIs raced down the roads to the outskirts of the village.
Martin kept various brokies under DM, but didn’t actually manage to do any damage. The one real thing I did do was fairly daring: My hero advanced into CC in O4. Between being stealthy, and the German HS being CX, he had a good chance at Ambush, and not a bad chance at killing the HS, which would free and rearm my captured HS. Sadly, the Ambush did not happen, and nothing happened in the CC.
Situation, British Turn 4.
Martin’s Pz IV flipped to UK for his turn 5 RPh, while I rallied HSes in O7 and T3. He finally got my flank ATR largely out of action by moving his INF up to it on one side, and then a HS up on the other side; I shot the second one, but only pinned it, but also pinned the crew in Final Fire. Naturally, he pressed into the village, claiming most of the center, and got in position for further gains. He put another squad into O4, but with a melee already present, my HS tried to escape, but failed their attack. However, this gave him two targets to take care of, and while he killed the hero, my prisoners were still at large, continuing the melee.
Situation, German Turn 5.
Nothing rallies for my turn, and worse, the Pz IV recovers from UK. My major move was to move the A10 up, cover it with a Matilda, and park the other Matilda on top of the AT Gun (where it could be nicely HD). I should have reversed those first two. The Pz III in Q3 engaged the A10 in DFPh, and hit twice, burning it on the second try (it wouldn’t have done much to a 11/8 Valentine…).
Naturally, the melee in O4 ended with the death of my unarmed HS. Martin had encircled F2, so I advanced out to take on one of his HS in CC before both them and the crew piled in on Martin’s turn. And naturally, neither side did anything to the other, leaving my ATR tied up in melee.
Situation, British Turn 5.
Given the maxim ‘don’t give up early’, I kept it going into my turn 7, but the next two turns have even less to say about them than the last. Martin’s advance was slower than I would have figured, but he still had plenty of time, and all my attempts at giving him something to worry about only caused me more trouble. The 8-0 and both HS with him recovered by my 6, and and I tried advancing towards S5, only to be shot up before going more than one hex. The 10-2 drove off the AT crew, and then his tanks could get around the rear of the P5 position, and pick off a Matilda.
By my 7, he controlled all the buildings other than some one-hex buildings on the north fringe, the church, the marketplace, and the O6/O7 rowhouse, and unequal melees were raging in the latter two. Outside of those, I had two leaders and a HS still unbroken.
Afterword
I mentally wrote off much hope of a win during turn 3. The Pz IV in R10 meant my line was too far forward, and I was going to have a heck of a time pulling out 4.5 squads that were going to be needed for the rest of the scenario. I’d already had some problems, losing a squad to an OVR, and another to an ill-conceived run out of the flank.
Overall, I had too much on my left/south flank. I had been worried about that area as a way around the woods mass, but didn’t think as much about the right flank of the same area. It did partially work, as I got an early kill of a HT+INF, and Martin had a heck of a time dealing with that ATR for a couple turns. If the rest of my defense had been working at that point, it could have been a big deal.
But, I just never had a way to deal with those tanks, and I could never figure a way to get any sort of advantage in the armor battle, so I went down pretty hard. Another problem was the fact that board 14 features smaller buildings than I’m used to, so there was a lot more LOS among them than I expected. I expected to be backing the HMG out of its perch once the Germans got close, but on turn 3, I realized his 10-3 had LOS even once I went down a level (I had been counting on O3 to block a lot of LOS at that point, and I lost the HMG as usually happens when you set it somewhere really visible.
My defensive plan wasn’t bad, but Martin’s plan was much better. I needed to have less on the south end, and more on the north. A better position for the AT Gun might also have helped (one that’s not revealed as soon as it comes in view), but I’m not sure what that would be. I wasn’t really fond of any place to put it.
Discussion ¬