
J123 Charging Chaumont
Way back in 2010, Patch and I decided to play another DASL scenario, and picked J123 “Charging Chaumont” from Journal #8 as our next game. Unfortunately, VASL didn’t properly support the DASL overlays at that point, and we ended up playing J124 Cobra Kings instead. A couple months ago, we finally remembered to get back to this, now that the overlay extension has no real problems with the setup.
Patton’s drive to relieve Bastogne during the Battle of the Bulge runs into opposition, and a mixed force is sent to take the town of Chaumont. The Germans defend boards b and g with five 2nd Line squads, a crew, two MGs, a PSK and eight “?”. Two more squads, an 8-1 and LMG show up on turn three along with two of four vehicles. The Americans are trying to take the large E1 building on board b in six turns and have eight and a half squads (mix of 667 and 666), a HMG, two MMGs, three BAZ, a DC, two Stuarts, two halftracks and three of five vehicles.
The vehicles need a special mention. Both sides get to choose what they want before setup (and keep in mind the Germans don’t see theirs for three turns). The Americans have a choice between four Shermans (one with 9-1 AL, one with 76L, one ‘fast’ 15MP one, and one with a stabilizer), and a M16 halftrack. The Germans choose between a StuG III w/8-1 AL, a JgPz IV, a StuH 42, and a Hetzer. Also, conditions are muddy, and all hedges (which there’s a lot of) are barbed-wire fences from Kampfgruppe Peiper & Pegasus Bridge (mud = +0.5 for open ground, and crossing barbed wire is +1 MF, for not uncommon costs of 2.5 MF for an open ground hex!). The overlays add a four hex orchard (while clearing out some fences), and a two-hex woods near the second-largest building.
Patch took the defending Germans, and set up with a string of units in the north, and another in the south, with one set of three “?” in bH4 and a final set in bE2h2 in the victory building. It was a fairly solid-looking defense, especially as I didn’t really think about how much of it was liable to be Dummies with my off-board entry. I entered in roughly three groups: the smallest was to head down the H0 road and approach his forces in the bC4 building directly (if slowly) while the main force entered around the gE-G area with the stabilized Sherman (I wanted the on-the-move accuracy to try dodge his anti-tank capabilities), a Stuart and both HTs. The last group was two squads with toys and 8-0 along with the Sherman+AL and M16, entering in gA3, where they could immediately duck out of LOS in the sunken road and come up near the D4 stone building.
Reality wasn’t so kind. I sent in a scouting HS, and then a squad to hold down the wire in gF0/F1 to let another squad through. With all the mud, and wire, getting much of anywhere was a challenge. Armored Assault not only provided cover, but allowed for ready traversing of the barbed wire for a 7-0 and MMG squad. They got through the orchard and into the road where the MMG in bD4h2 opened fire to ELR the leader to 6+1, and pinned the squad. The MMG kept rate, and so fired at the next group as it entered at gA3 with Armored Assault for a NMC that pinned both entering squads, and Patch’s sniper went off to pin mine. The M16 entered behind them and stunned to a NMC from the residual.
The entire north force was stopped before it had a chance to get into the sunken road.
Thanks to the mud, the main group had a bit of a traffic jam, and I had some trouble figuring out where to park everyone, but ended up with fairly good positions for the main elements. Thanks to the earlier excitement, the southern Stuart and squad made it to the gK2 bridge without incident. Not at all to my surprise, bK4 was a PSK squad, who thankfully missed a shot at gE4, and couldn’t find a PF. Naturally, the hex got a couple of Acq markers in AFPh, but the gyro-equipped Sherman malfunctioned its MA trying to get a ranging shot on the MMG nest.
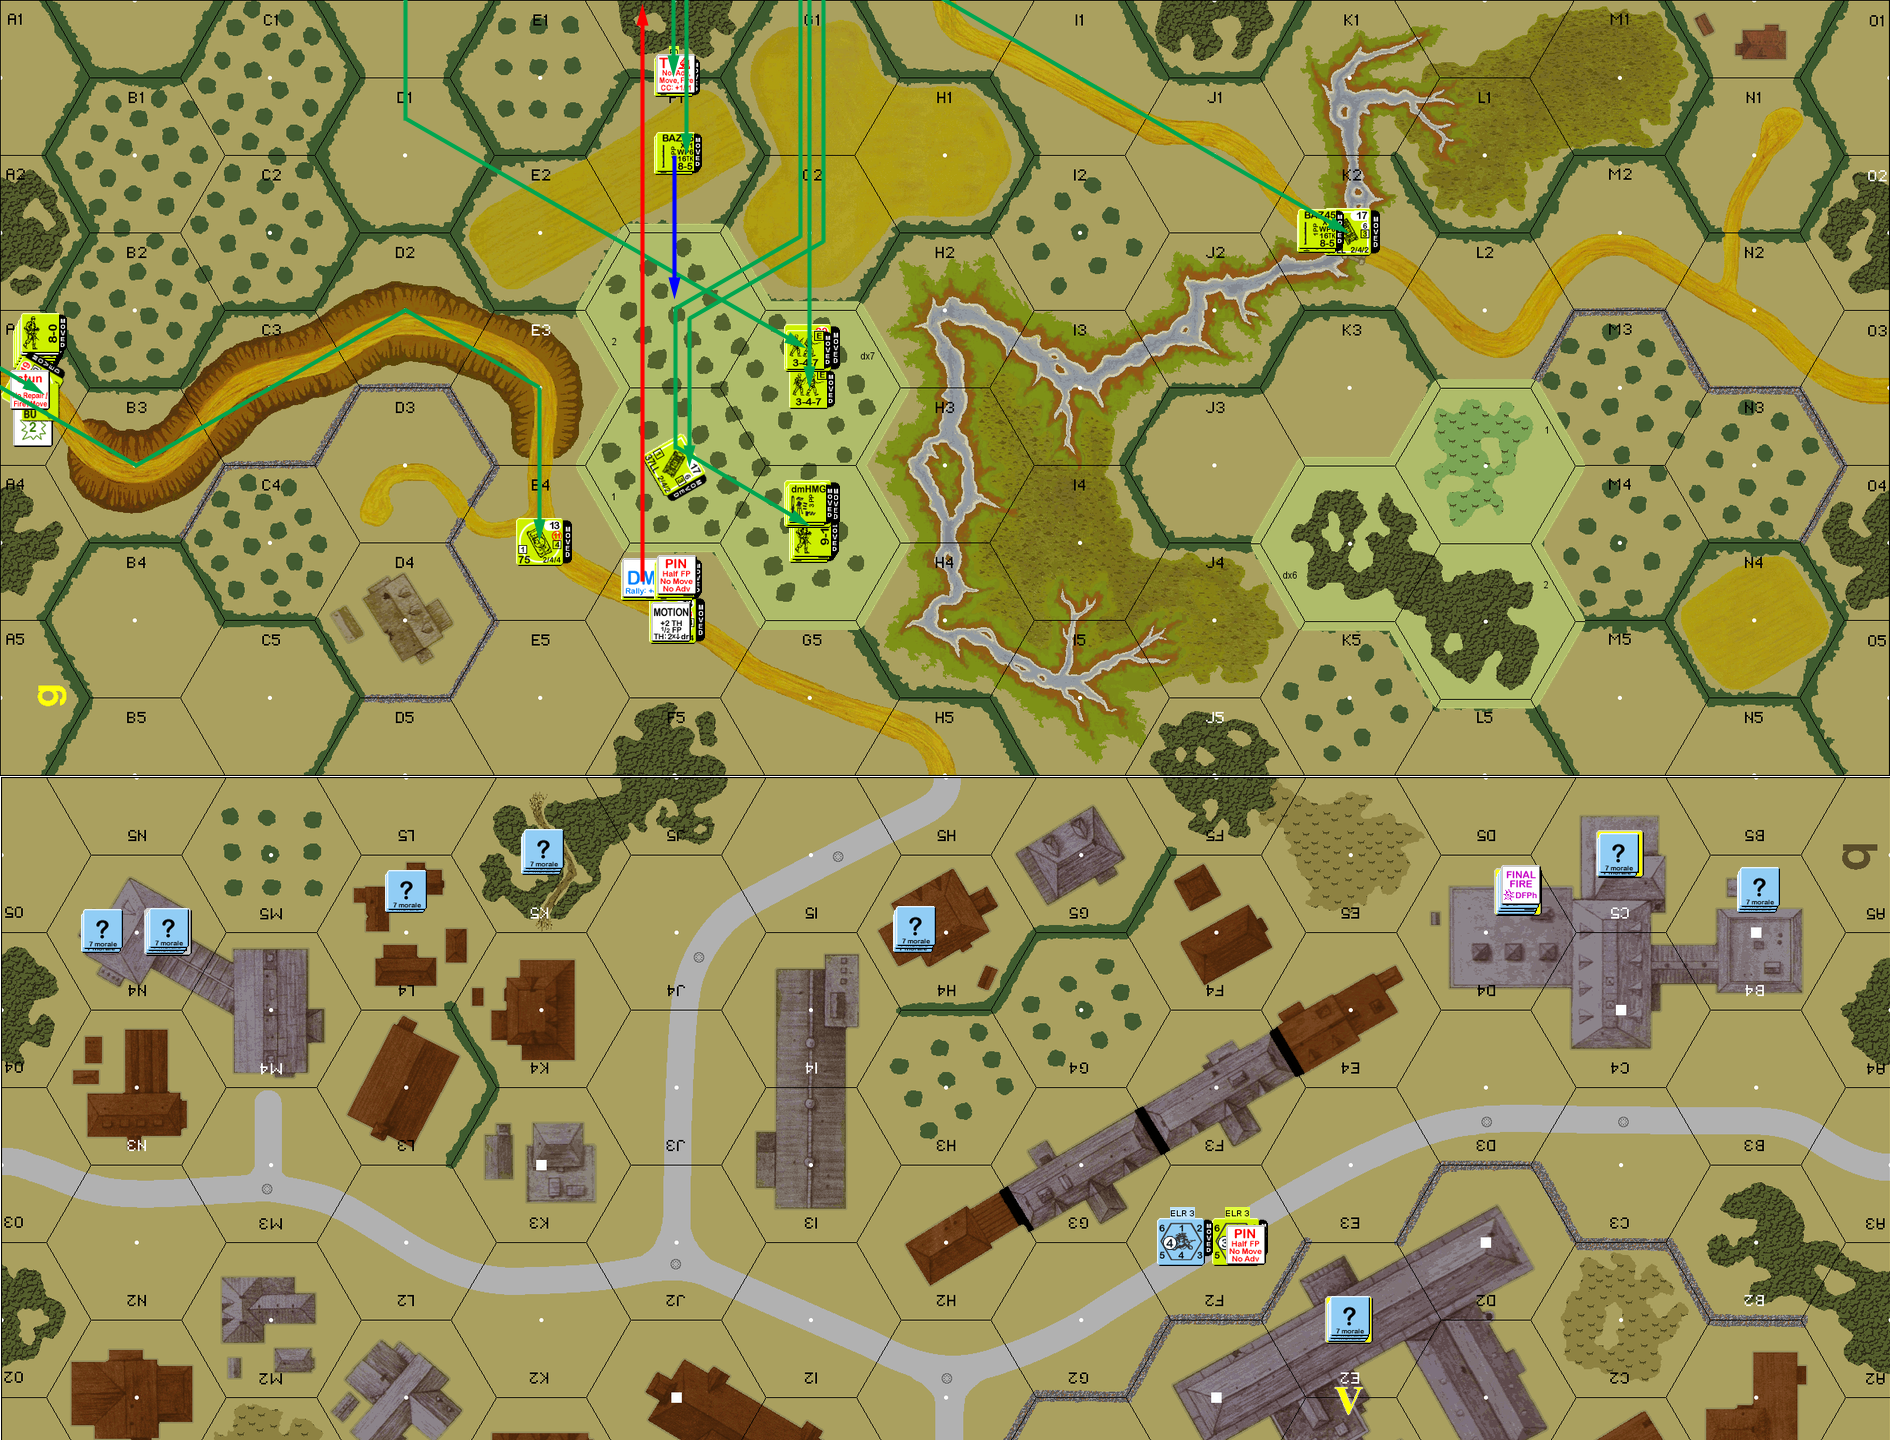
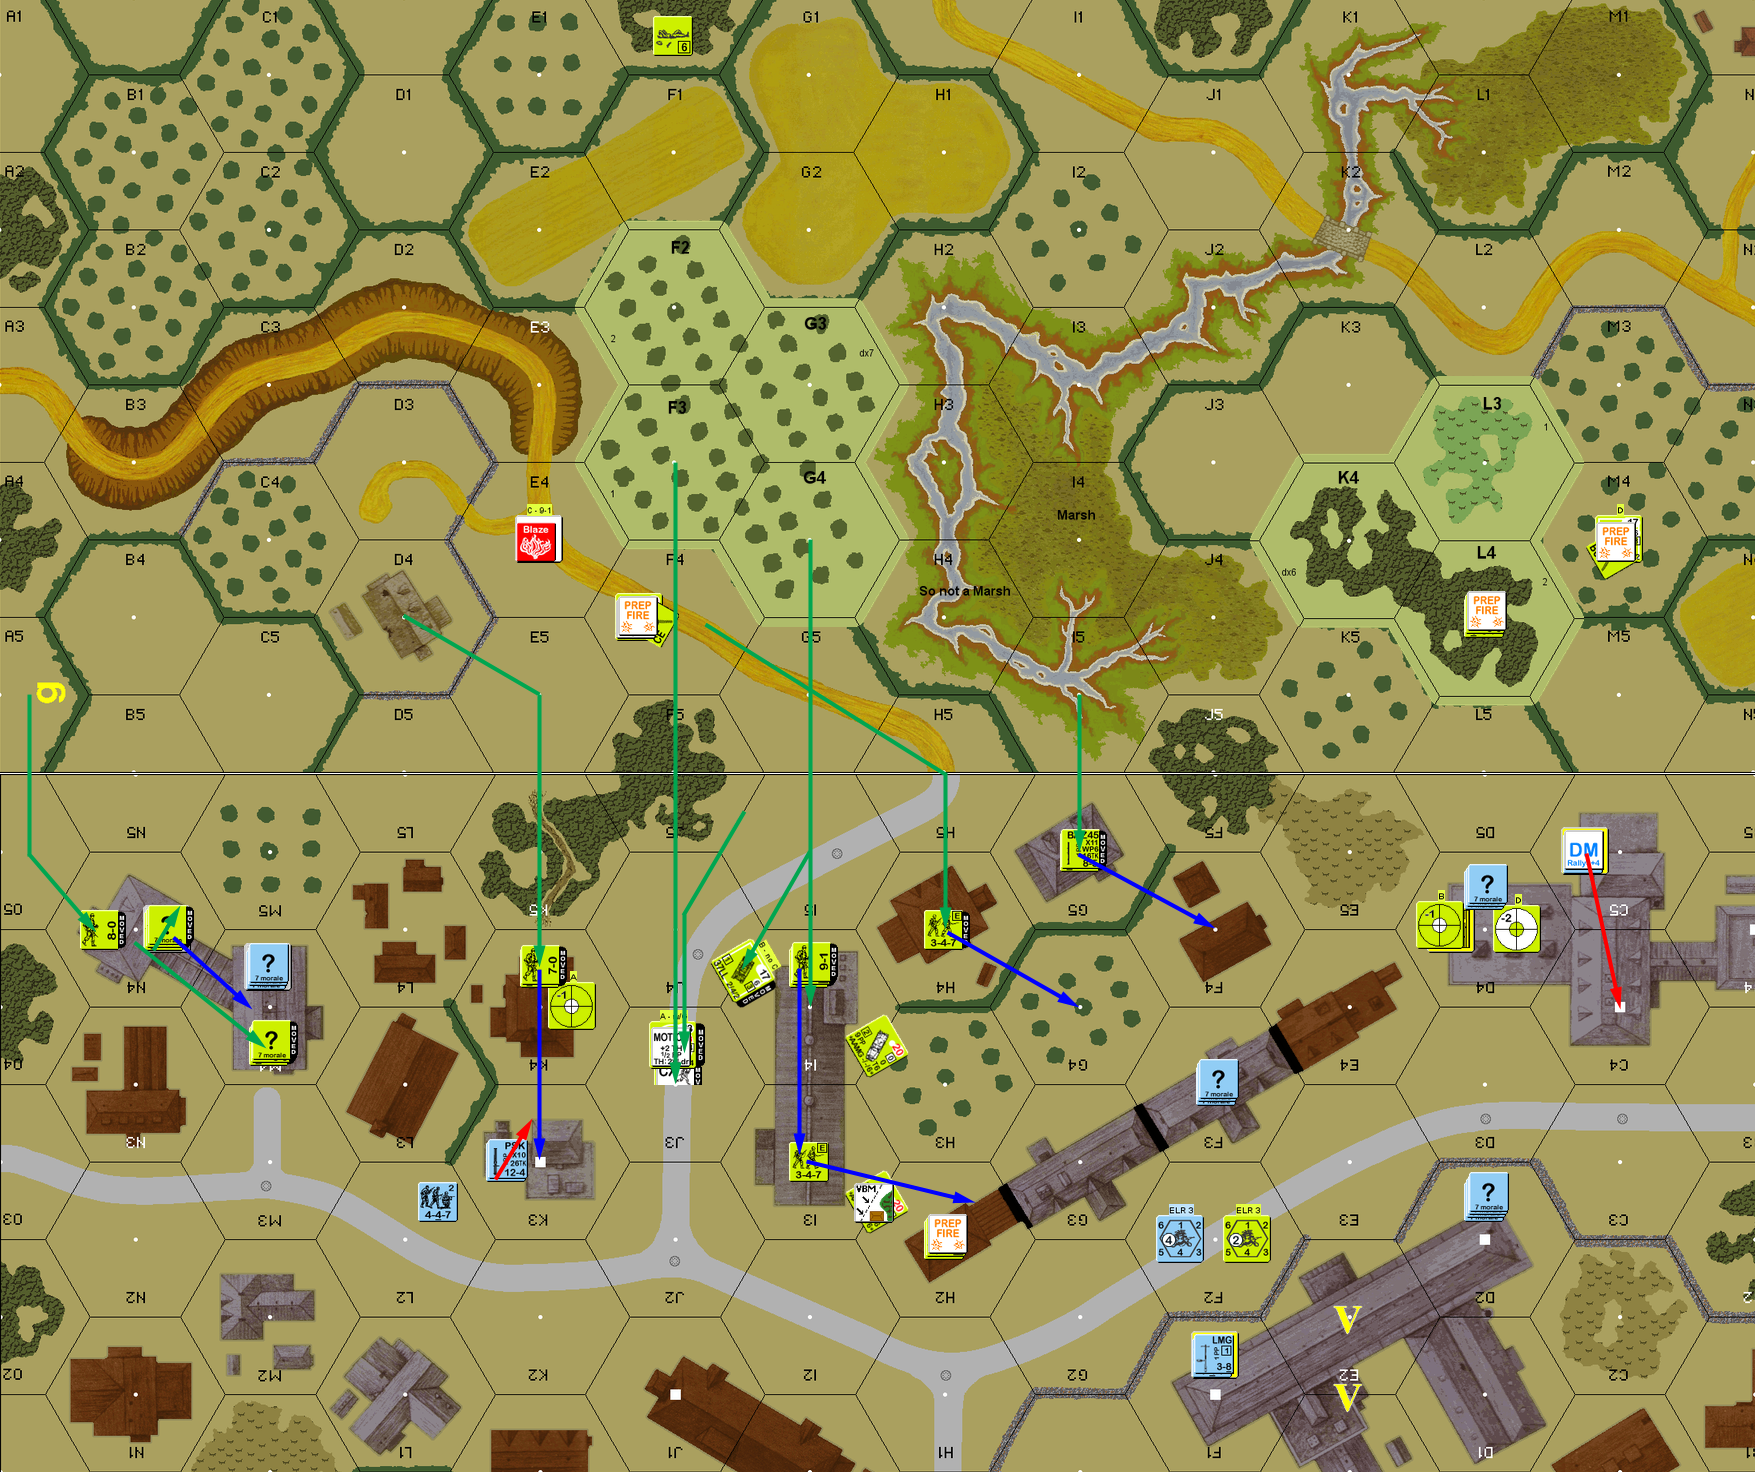
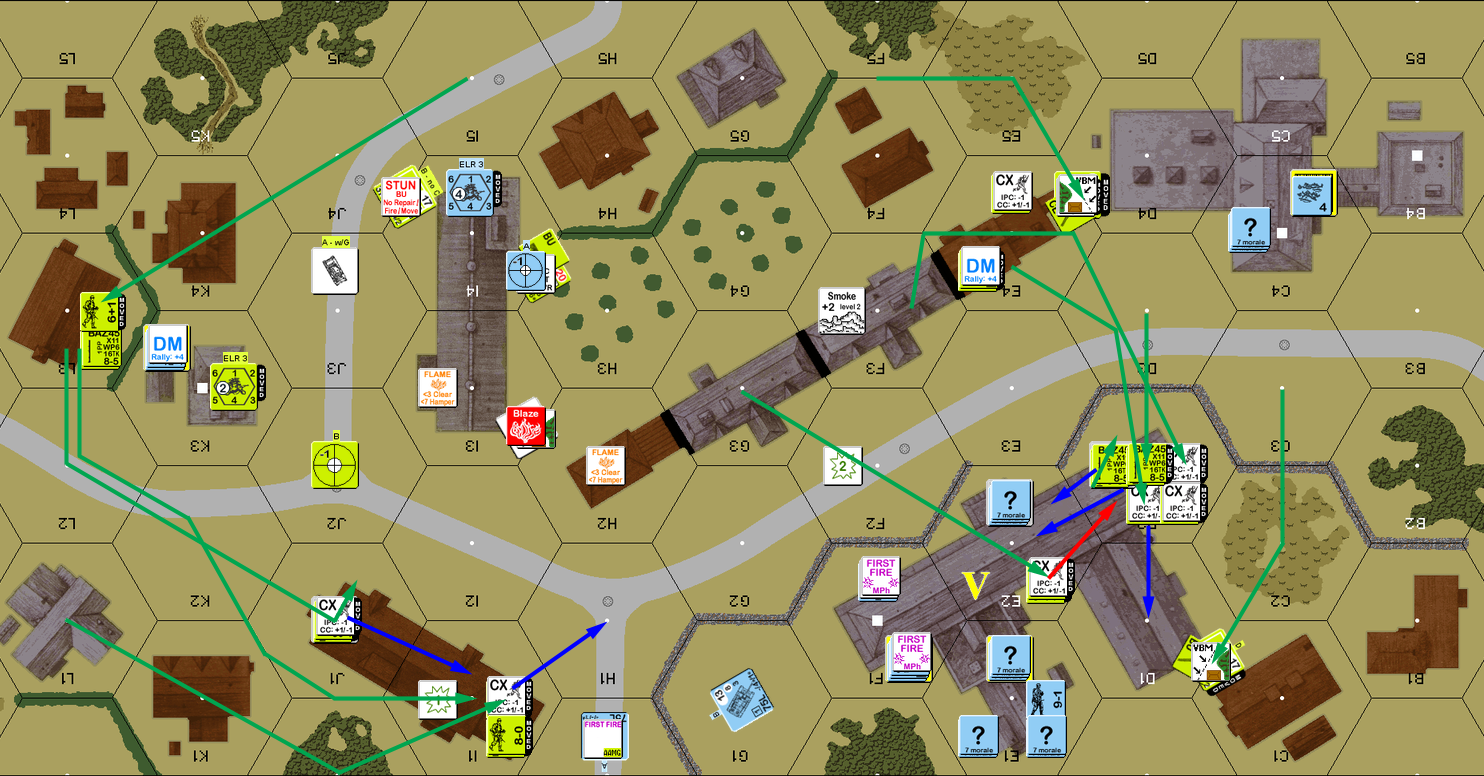
Situation, American Turn 1. North is to the left, EC are mud, orchards and grain are out of season, all roads are paved, and all hedges are barbed-wire fences.
As expected, nothing happened for Patch’s turn 1 RPh. His MMG broke and ELRed my MMG squad (I hadn’t contemplated the fact that a in-Motion tank wasn’t cover… Patch didn’t think of it earlier than that either, and his PSK got a CH on the AL Sherman to burn it. They then pulled out a PF, which thankfully missed the moving Sherman (and would have missed without Motion for that matter).
My DF was mostly high (a fair number of 10s), and had a number of Cowers, but one good shot was canister from a Stuart to break and ELR the PSK squad (a bit late…), who promptly ran back to K3. My broken squad had a possibility of advancing into gF5, and Patch revealed a LMG squad in bE2 to prevent it, so they routed to D4.
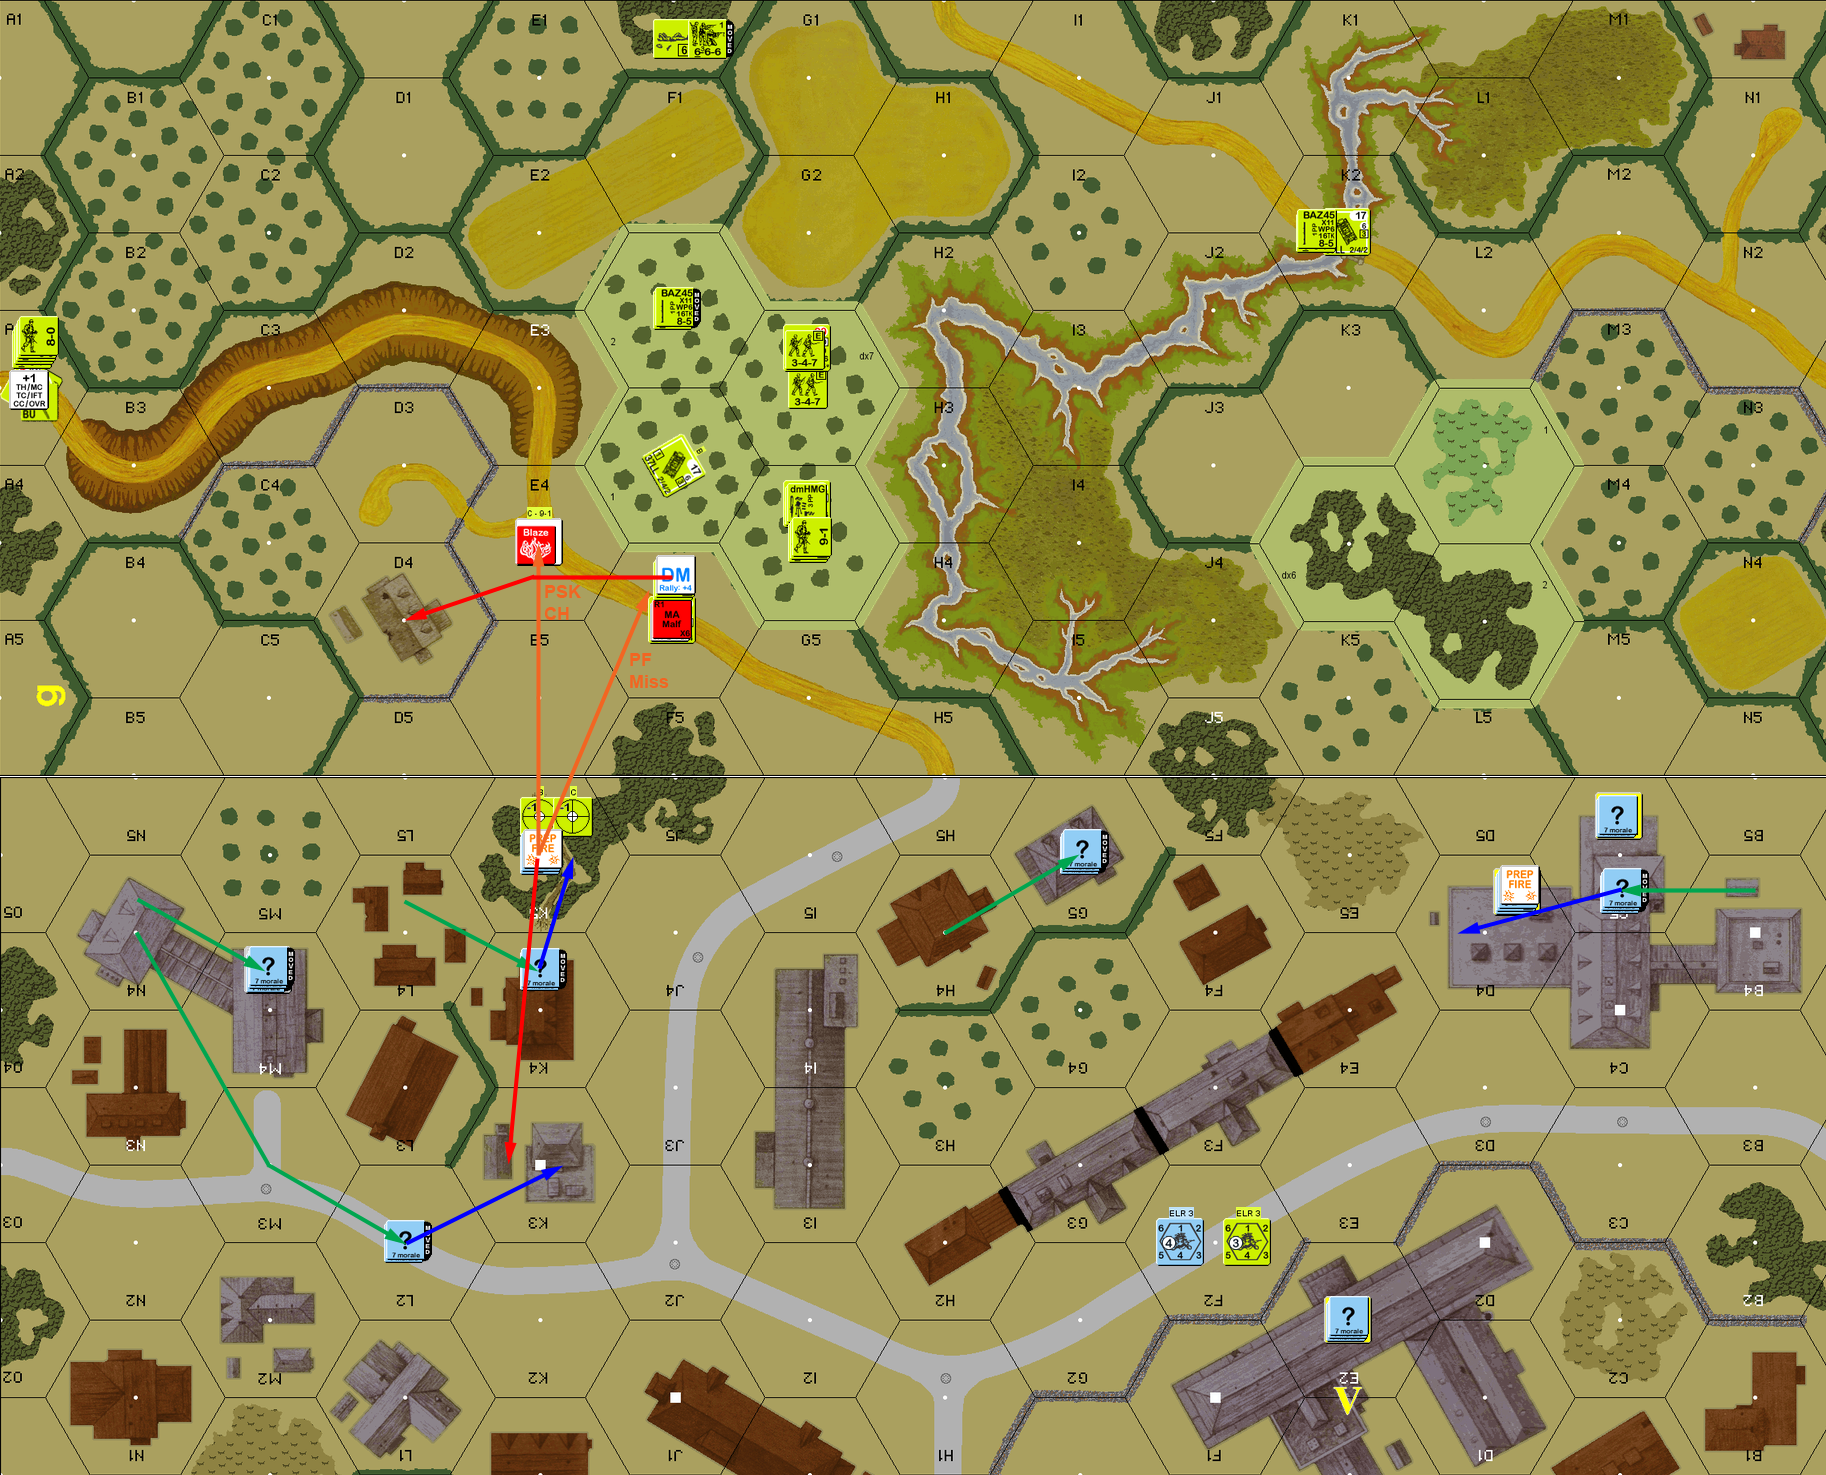
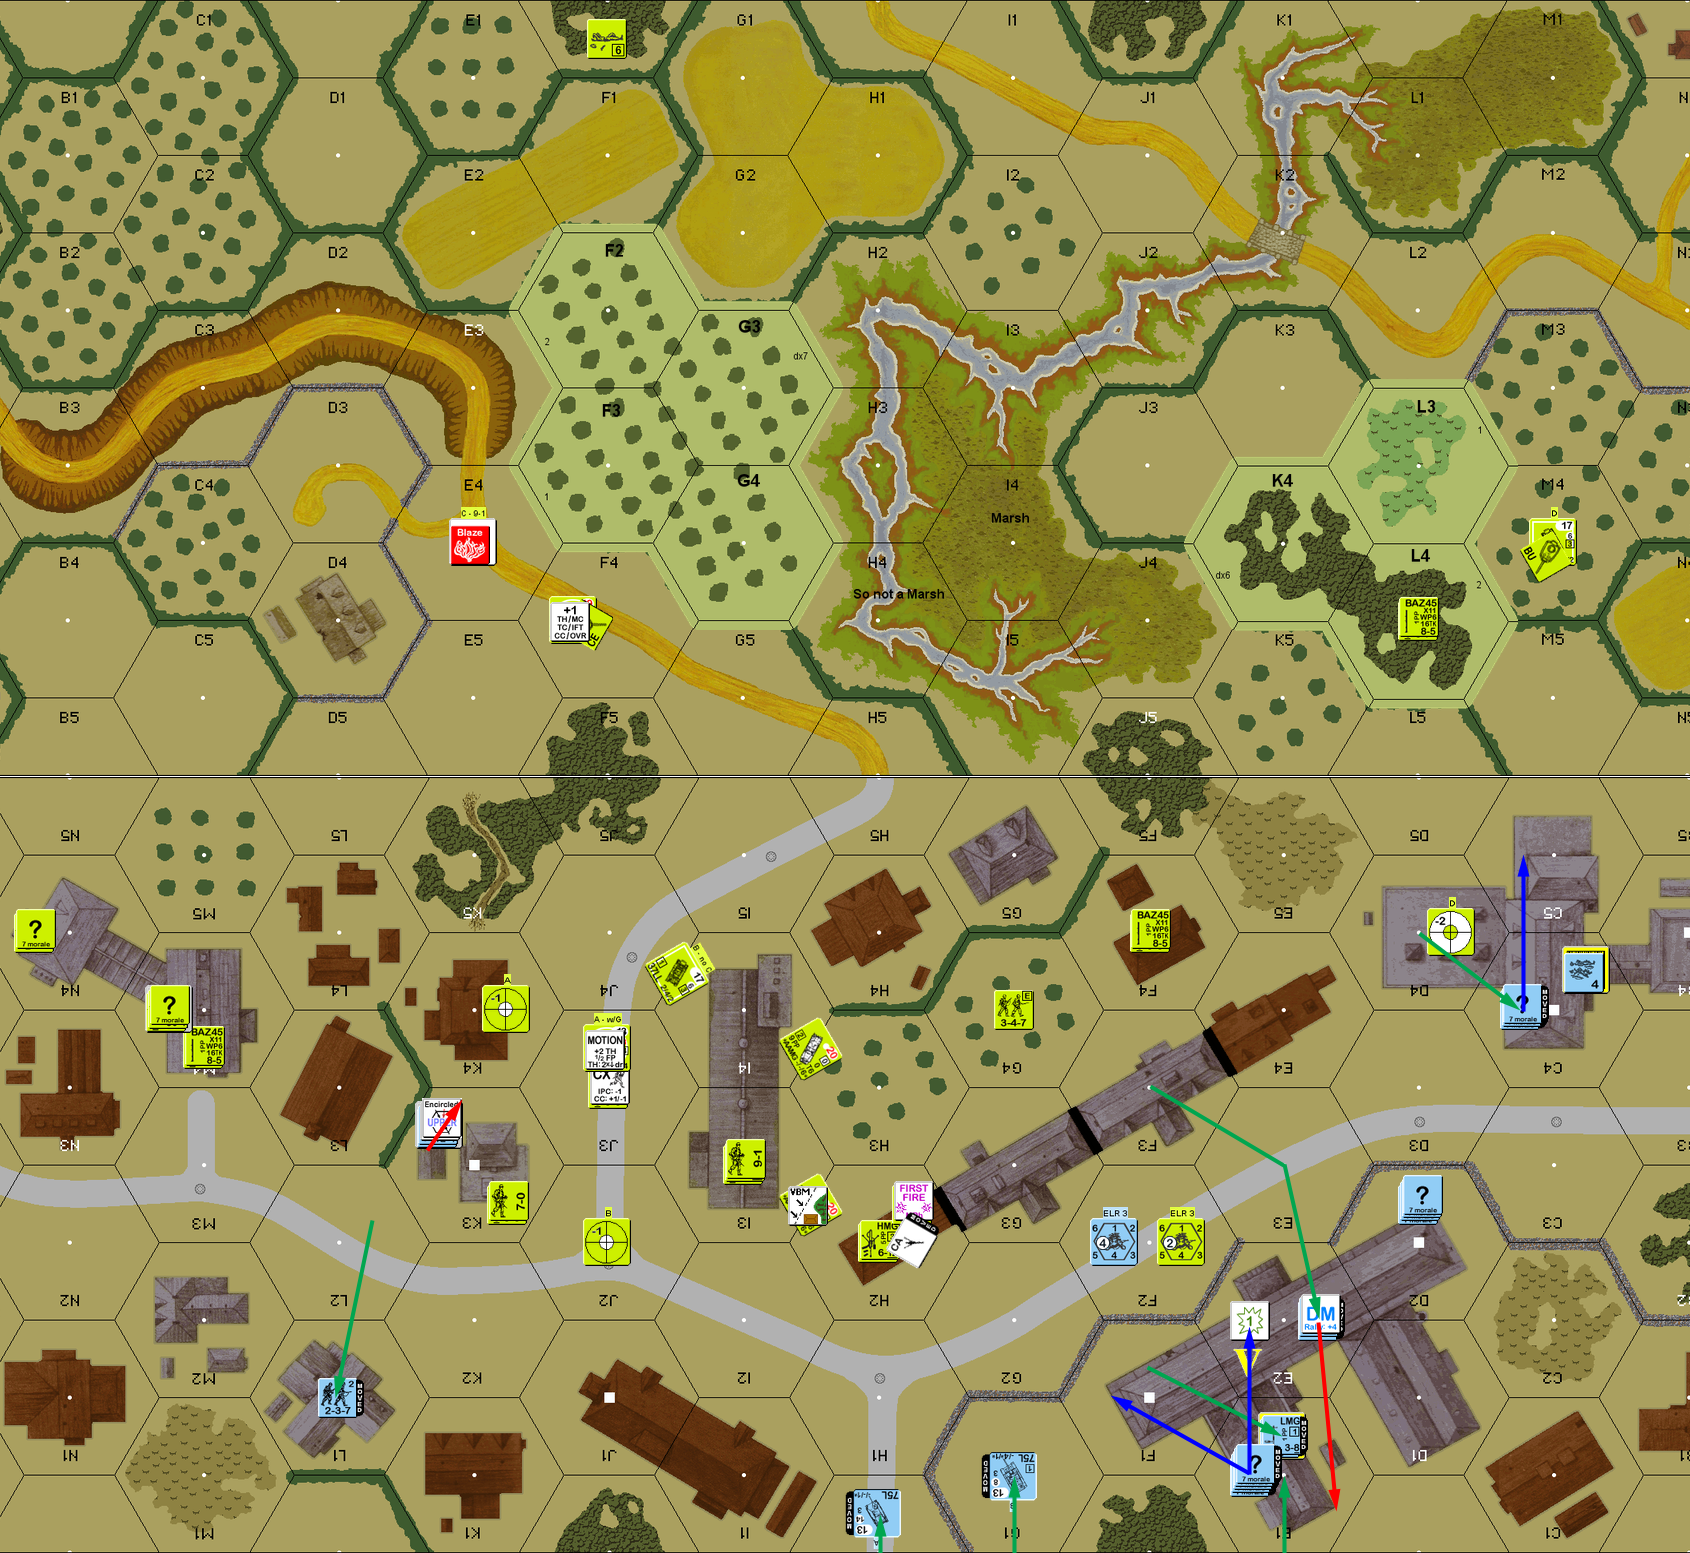
Situation, German Turn 1.
My 1st MMC rally was a ‘2’ to rally the MMG squad and give them a new 7-0 leader. Which was good, as the 6+1 in F0 refused to rally, and the remaining Sherman’s MA was still jammed. F3 tried another canister shot at bK5, but the previous one had been the last round. The other MMG in G4 took a shot at bD4h2 for a NMC, which they passed. The just-recovered MMG took a shot at the K5 woods… but malfunctioned the MMG.
I was suspicious of the “?” in bK5, but wanted to test that assumption; but the HS I was going to send into the hex got pinned in the road by fire from E2. The north entry group attempted to go down the edge of the board, heading for building bN4, and took fire from the MMG in D4 again. This time the leader pinned, and the two squads were fine, allowing them to get into the shadow of the building. The Sherman moved around the gF5/bJ5 woods staying in Motion, while the M16 moved into its previous location and went CE again (thankfully getting no effect on the residual there).
With his known major elements fired, I got more ambitious with my M3 halftracks. The one with my HMG HS went straight through the middle and unloaded in bH2. As soon as the HMG could be assembled, I’d have a nice little firebase near the victory building. bK3 turned out to be a real squad who fired as I unloaded, but didn’t do more than pin me. The HT followed it in, and unloaded a HS into bI4 to provide backup.
The BAZ/Stuart team in the south split up, with the tank getting a nice position in the woods that could see most of building bC5, while the BAZ squad got into woods at a two-hex range. Another BAZ team got into the stream and advanced adjacent to the “?” in bG5. They turned out to be real (I had been wondering when they didn’t fire on the HTs as they went by), and prevented my guys from gaining concealment.
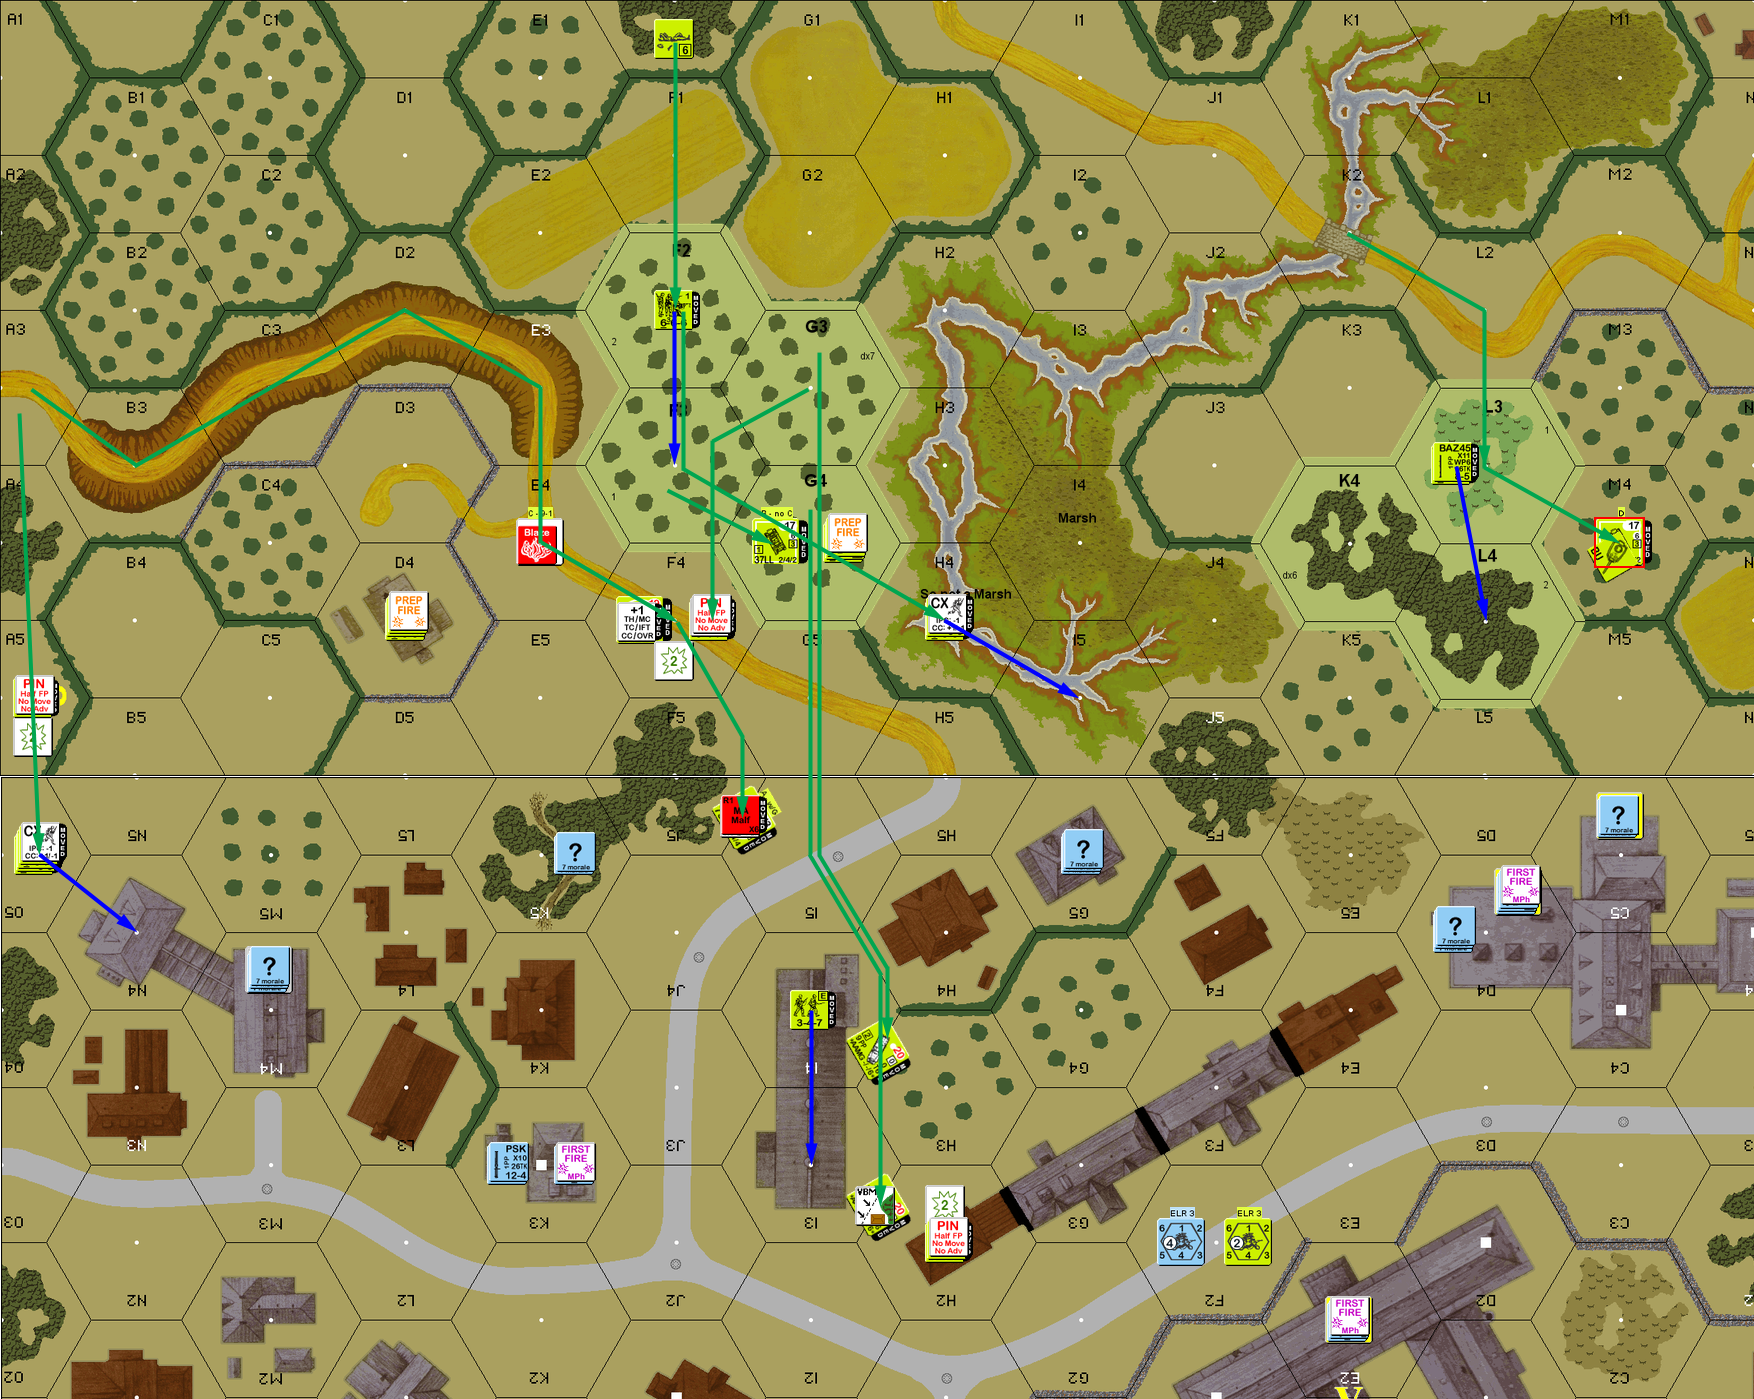
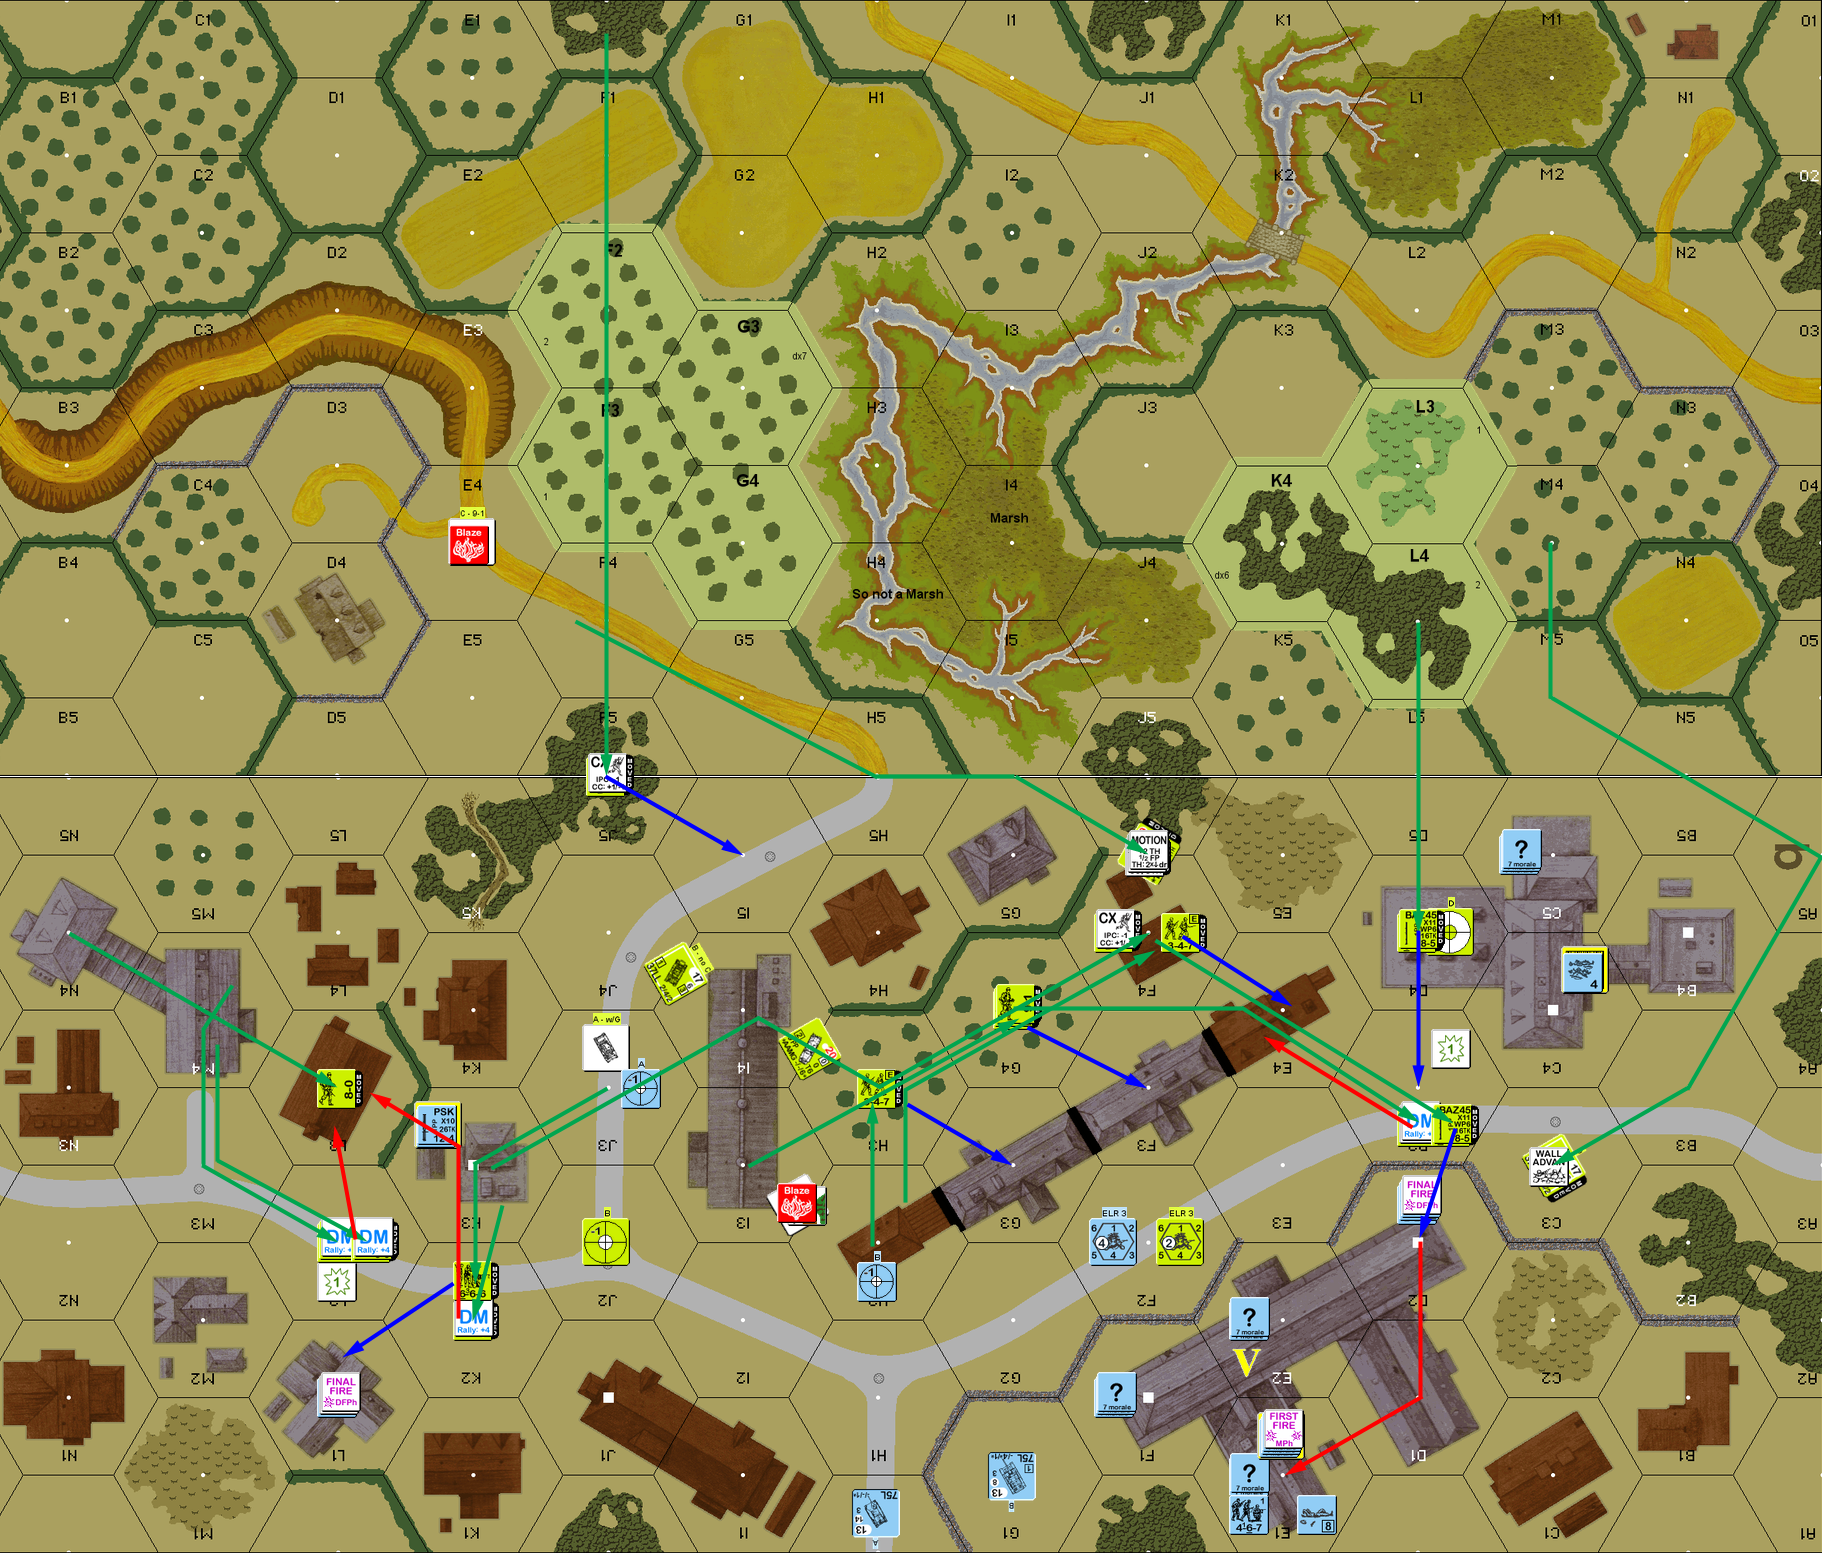
Situation, American Turn 2.
bK3 failed his self-rally roll for Patch’s turn 2, while my 6+1 failed self-rally again, but my Sherman finally repaired its MA. He had no Prep, and the MMG team evacuated the building completely, heading for a final defense stand, while the “?” there skulked in the back. G5 also pulled back, and advanced into the rowhouse in F3. He tried to evacuate K3, but his squad got pinned in the street by fire from I3.
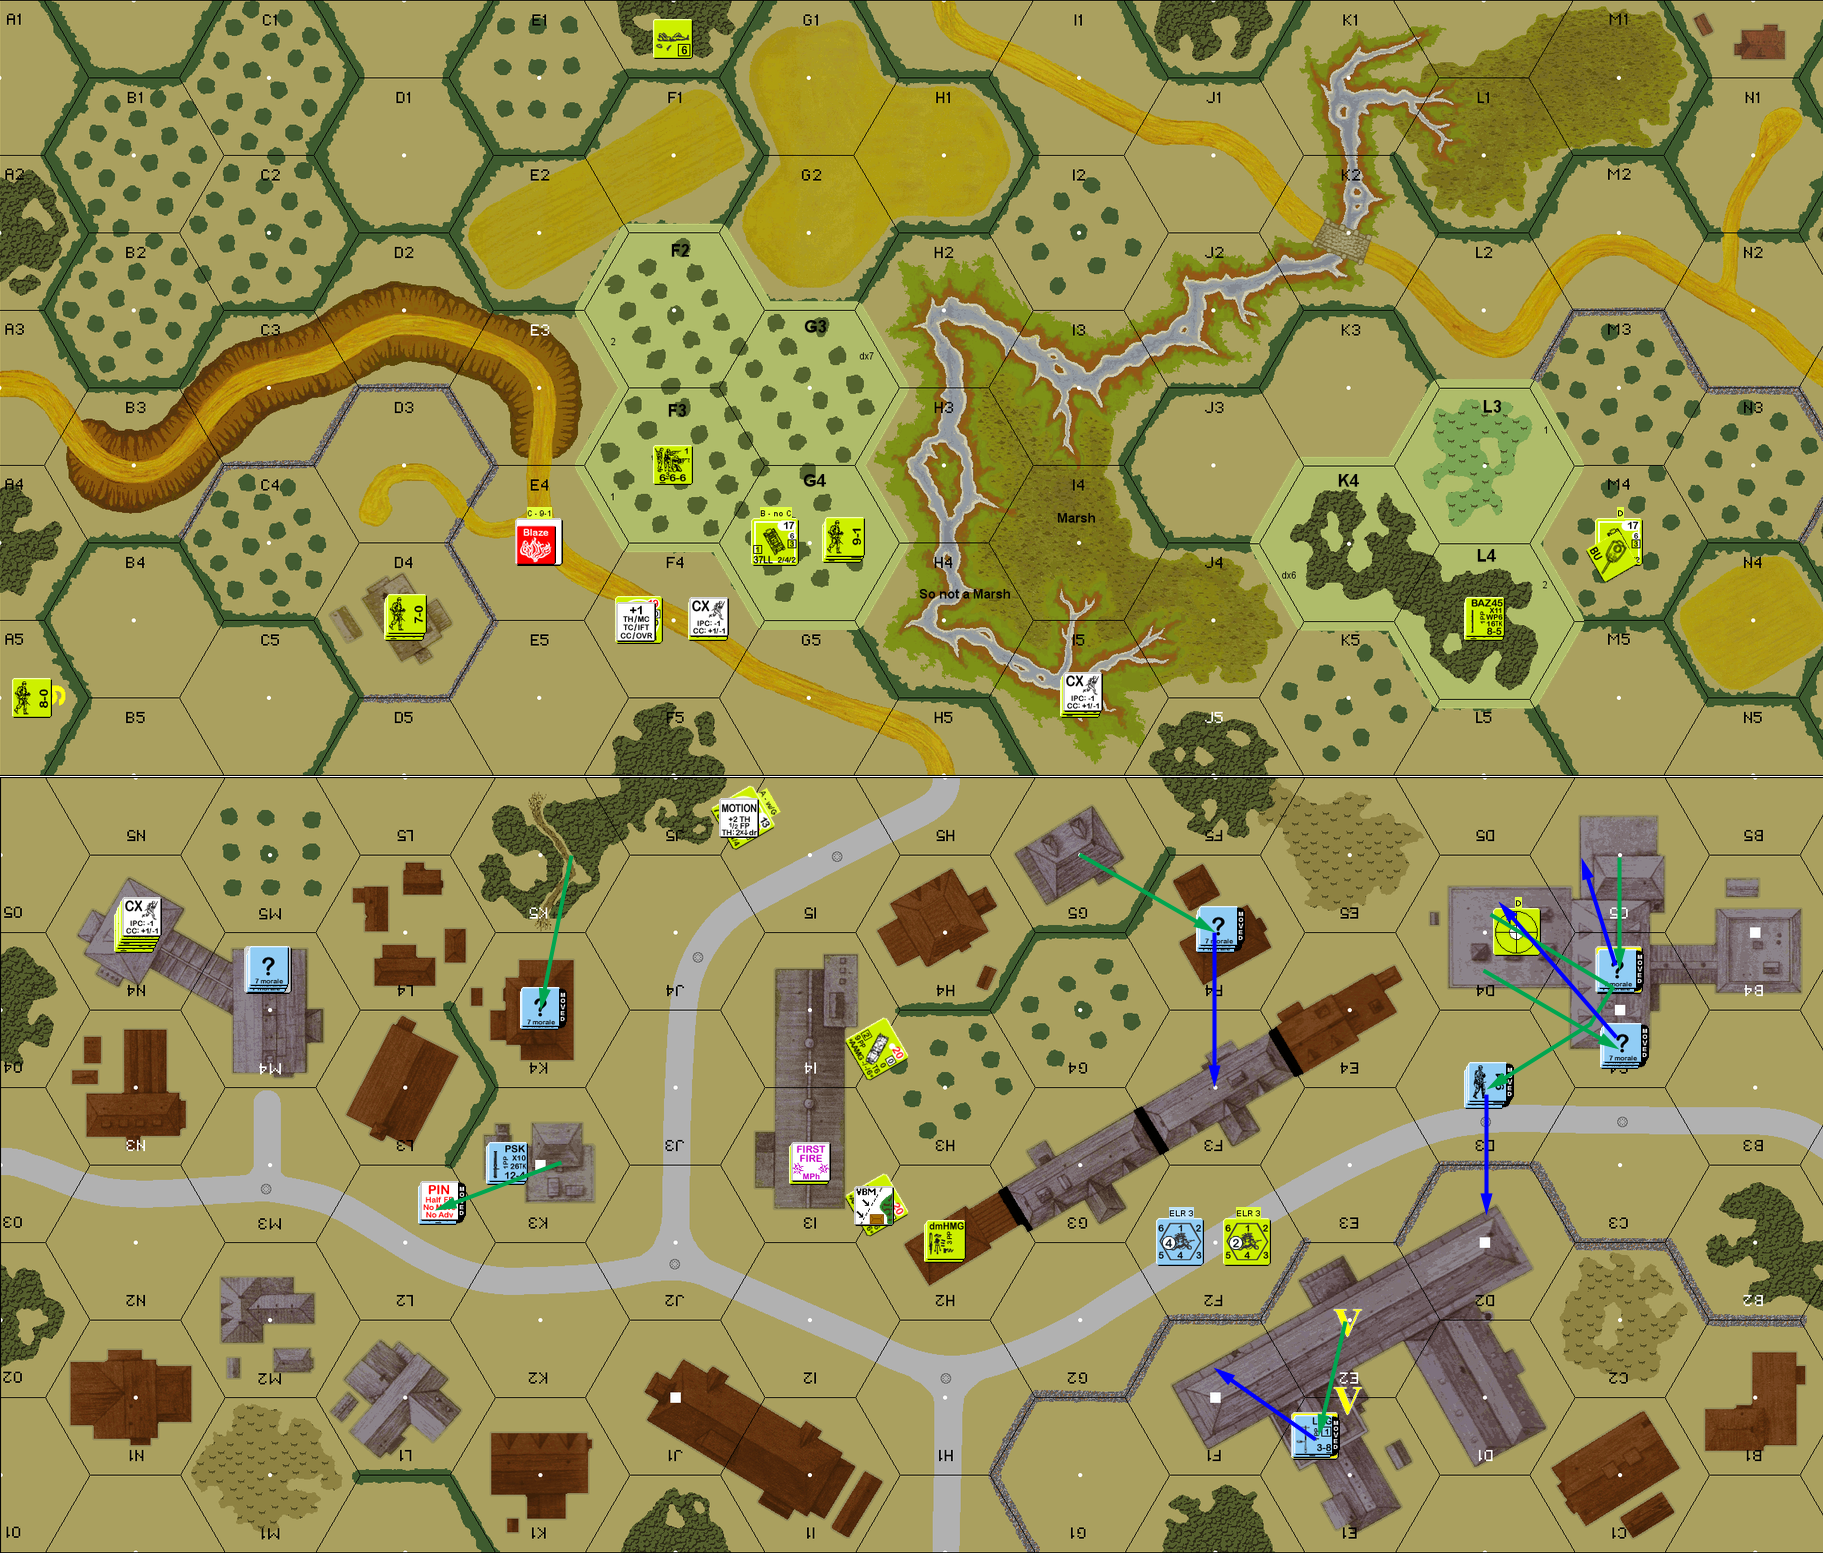
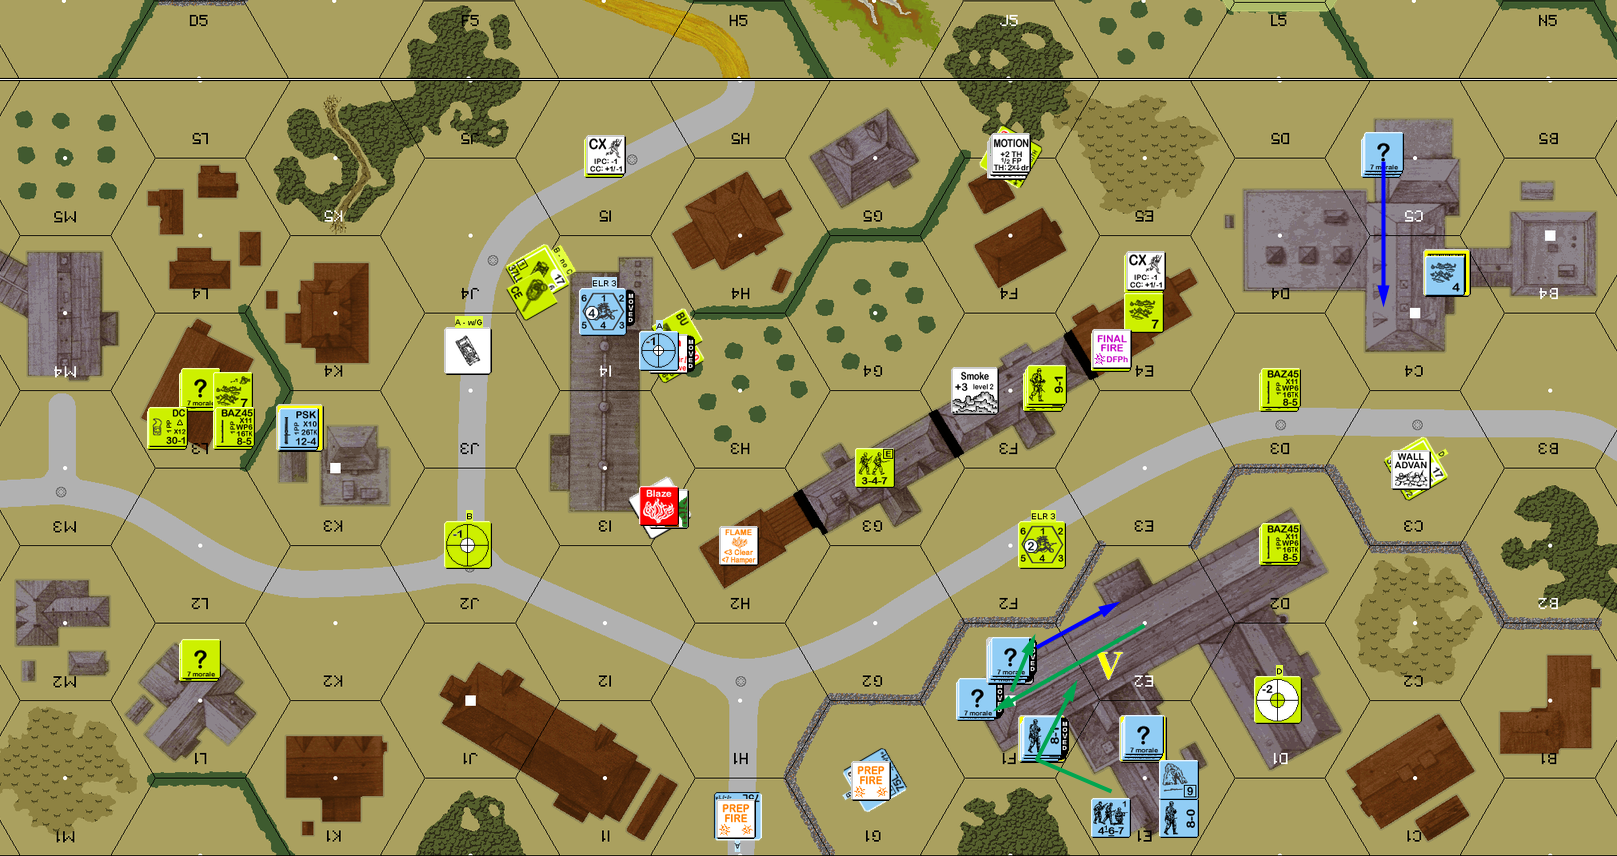
Situation, German Turn 2.
My 6+1 still didn’t rally on my turn 3, and I lost my malfed MMG permanently. The M16 was finally in action as it fired on bC5h2 twice (keeping ROF while it was lowered for IFE & TCA change!), revealing a squad but otherwise unable to do anything to them. However the L4 BAZ got a hit for a K/2, leaving them a broken conscript HS. I fired a bit more than might be called for, but that certainly made things worthwhile. D4 (the ex-MMG squad) moved across E5 without drawing fire, and got into K4, which turned out to only have a Dummy (which is what I had figured).
The Sherman stayed in Motion in J3 with a Stuart parked behind it with Acq on J2. Hopefully, that would put off any direct confrontation between our armor. I got into the line of buildings opposite the rowhouse in strength, and prepared to assault the “?” in bM4h1. Defensive fire had no effect, but I got a ‘2’ with squad advancing fire to get a K/1 on bL2, though the HS passed the MC. M4 turned out to be Dummies, which wasn’t entirely a surprise by that point, but given the 6FP squads nearby, I wouldn’t blame a real squad for keeping concealment either.
Situation, American Turn 3.
Patch commented that he had expected to still be holding the center at this point, and later mentioned that the original thought was for his armor to go to G1 and C2, which could have been a challenge for me. But as his center had fallen apart, the two vehicles prepared to enter at G1 and H0, while all the infantry set up to feed directly into the victory building at E1. When they came on, it turned out he’d taken the StuG and the Hetzer. The StuG with its AL was no surprise, but I wasn’t sure what the other would be. Apparently, he wanted a good tank hunter with armor and small size, though he mentioned later that he nearly took the StuH.
Neither of us got anything with our single rally attempts. I didn’t get many shots, but he Dashed the bF3 squad+leader across to E2. I expected he’d go to D2, where the E2/F2 wall would cut off LOS to my HMG. I took the shot offered, and a 1MC broke both of them. Sadly, a further shot in DFPh (to try and double-break them) malfunctioned the HMG. Even worse, both of his AFVs got hits in AFPh, to kill the nearer M3 HT and the Sherman.
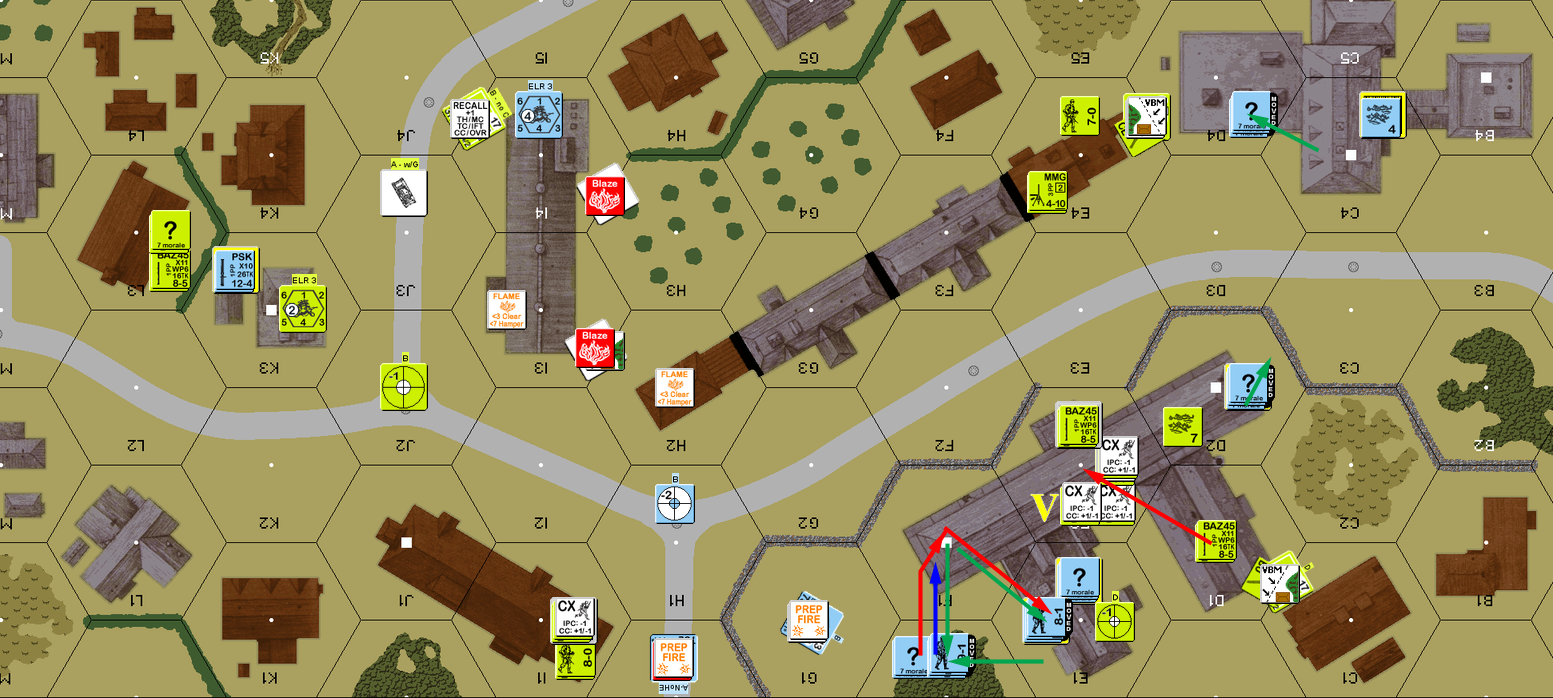
Situation, German Turn 3.
My leader finally rallied for my turn 4, but I lost the HMG permanently. The good news is that it did it immediately, instead me trying to lug it around for a couple turns before going away. Patch also rallied the squad the HMG had broken on a ‘2’ to battle harden them to 1st Line. My main goal was to get to, and hopefully inside the victory building, while tightening the cordon from the north. I tried to dash across the street in front of his HS in L1, and broke to his fire, but at least he cowered. My DC squad tried to get past, but broke to FPF which also pinned the HS. Then the BAZ squad followed and broke the residual. Finally, the squad in J3 moved over that way, and survived another FPF shot (which generated a 1MC) so I could take care of the menace.
I had figured (correctly) that the remaining stack in bC5 was a Dummy, and ignored him for the rest of the game, allowing the BAZ squad on that end to move up, and the Stuart to work its way to C3. A HS moved to D3 (with WA), and broke to MMG fire from D2. However, a followup squad survived the residual and SFF intact. Patch naturally self-broke rather than face 2-1 CC with his crew pinned by a BAZ shot, and I advanced in to take my first Location in the victory building. A squad also advanced into L1, and took out the HS there in CC for no loss.
Situation, American Turn 4.
Patch rallied his crew and one leader in E1 for his turn 4, but I couldn’t rally anything. The Hetzer took a shot at my second HT and missed, but the StuG smoked in F3, keeping my remaining MMG from being much use. He shuffled around the building, working his way up the north stairwell, and getting his better weapons to places to interdict more units coming in. I took one shot at him, with the only result being his sniper going off to stun my remaining M3 halftrack.
Situation, German Turn 4.
The blaze from my dead HT had been spreading, but it hadn’t actually set any new blazes when I rolled Gusts for my turn 5. It was a shame, we’d just been talking that I’d like Gusts to set F1 alight, but it wasn’t eligible yet. I rallied everyone… except my BAZ squad; the guys I most wanted, while Patch rallied his remaining 9-1. The good news was I had a decent route into the building. Going through D3 put me out of LOS of the MMG in F1, and gave me the wall TEM from E2. However, my attempt to run the 9-1+MMG squad in there was a disaster. They went through E4 (taking the far-side rowhouse bypass), and the MMG got a K/2 to reduce the squad and break it, while the 9-1 continued on to the building. In the course of this, both of our snipers went off, and STUNED my I4 Stuart, while mine… went off course to CR the broken squad in bK3h2, instead of breaking something in the victory building.
My next move was Dashing a HS into E2, where his F1 squad had a clear adjacent shot thanks to having claimed WA… and I rolled a HoB on the resulting 1MC to generate a hero! It was being a turn of wild results. Patch got inventive in my second HS Dash to D2, and did a Snap Shot with the MMG as they left E4. But at 1FP, it didn’t do anything. In Final Fire, the Hetzer blew up the remaining HT… and then Patch remembered there was infantry next door. It had rate, and so took a shot with HE… and the MA malfunctioned. The StuG turned to fire on I1 also, but missed. E1 fired at E2, and broke the HS, but the hero was fine. My only result in advance was a 1MC from the M16, which pinned the leader and crew in F1h2 (almost…).
I sent the 666 squad in I1 out into the street, but the 546 failed PAATC, keeping me from trying to take the Hetzer out in CC. I advanced into E2h1 and was Ambushed (he was concealed), and Patch Withdrew out to D2 rather than deal with a 6:4 CC.
Situation, American Turn 5.
Nothing came back for either of us on Patch’s turn 5 RPh. The StuG got a CH against the squad in H1 to kill it with a 2KIA, and the Hetzer’s AAMG had no effect on a shot against I1 before he started another turn of skulking. The good news was the Stuart had gotten back there and could actually fire on the entirety of the E1 hex with canister, doing a 1MC (NMC vs “?”), which everyone passed, while the M16 broke his squad in D2h2 on two shots, keeping rate, so as to have time to swing the turret back to cover the rest of the building.
My next attempt to destroy the Hetzer was throwing a DC at it, but placement was poor and it did nothing (even rolling a ’12’ vs the throwing Location). However, the squad was at /h1, and could also see the woods that Patch was skulking in to avoid all the adjacent Americans, and a NMC broke two squads and pinned his 9-1, leaving only a concealed 8-0 in the hex able to re-enter. Patch’s men at E1h2 fired down at my squad in D1 and broke it with a 2MC (my sniper went off from that, but only re-DMed K3). Rout sent one squad all the way to his final redoubt in E1h2, while the other stopped in F1h2 to block stairway access.
Situation, German Turn 5.
I was in such a hurry for my final turn, I forgot 1st MMC rally until too late, but did manage to rally the squads in L3 and E2, while Patch rallied the squad that had routed all the way to E1h2. With a full turn to go, I could technically win by taking the building on the German turn, but figured my ‘safest’ bet was to somehow break two squads, a crew, a 8-1 and, a concealed 8-0 in prep and Mop Up the building. Nothing Patch had outside the building would have a chance of taking back control.
And prep…. came really close. A shot from I1h2 followed by another round of canister Encircled the Location, and the canister broke everything but the crew, which pinned for the LLTC. Determined to make it work, I IFed canister… and malfunctioned the MA. The M16 concentrated on F1h2, hoping to clear the stairwell blockage, but only managed a single break to reduce it to a HS.
My last attempts to get at the building from the north were sadly also a failure, with everything breaking to CHs from the StuG (which both yahtzeed the RS for 24FP attacks against everything; it’s amazing they all lived). It malfunctioned its AAMG in the process, but that didn’t get me anything I needed. I had hoped that the “?” in F1 was a Dummy, but found out he wasn’t when a HS tried to go through there. He failed a PTC for an Infantry OVR, but the 9-1 passed one to bring along the hero and BAZ squad. Patch’s leader fled to E1, and the squad stayed there while the hero and 9-1 proceeded to h1, where they were joined by the squad already in E2h1.
Fire had no effect, Patch’s remnants routed out of the stairwells, leaving me to advance up to Level 2. My squad on the ground floor advanced into CC with his 8-0 and eliminated it without trouble. The HS advanced into F1, leaving his 9-1 a poor choice of where to advance into the building to prevent me from getting control… if he could survive to advance.
The hope was that I could still somehow break that crew, and then force FtR on everyone in his rout and take the building then. What I hadn’t thought about is the StuG had pivoted to fire the AAMG already, and in his prep it smoked in hex F1. With the MA on the Stuart down, and all the smoke I couldn’t touch the crew, and he survived the turn, to retain Control and a win. Barely.
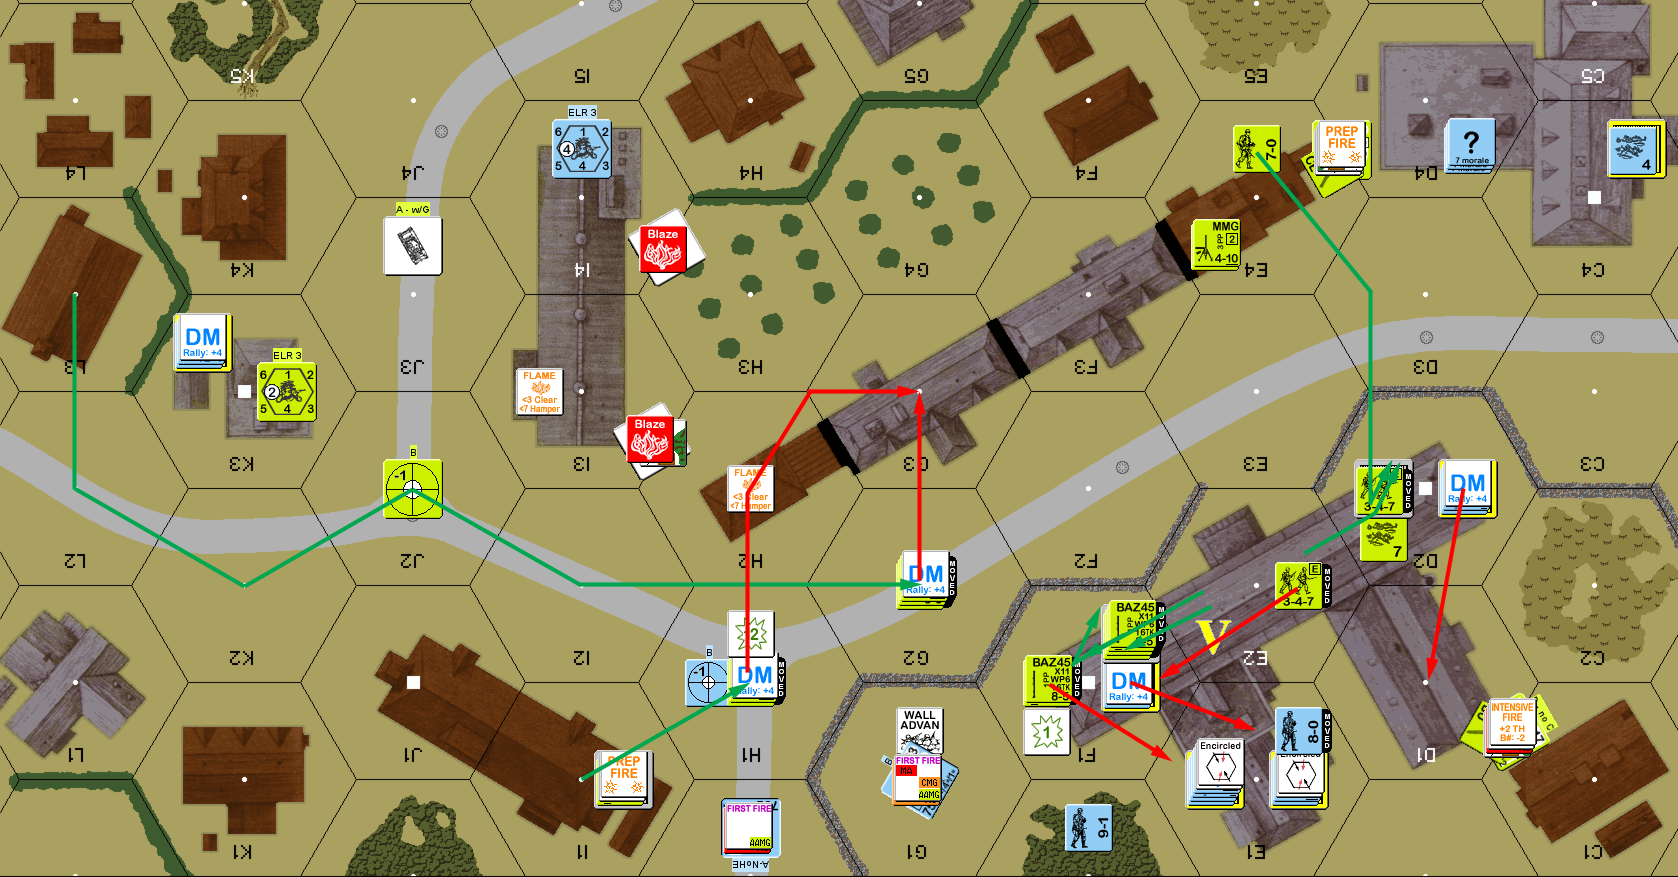
Situation, American Turn 6.
Afterword
Play swung violently back and forth all game. I had been somewhat mentally willing to throw in the towel after the first turn. I hadn’t gotten near as far as I wanted in terrain that was slow to get through, and both of my 75s were down. There were plenty of opportunities left, so I kept at it, and turn 2 was a surprising turn around. I was still coming to grips with how many Dummies were still out there, but the two HTs moving through his line suddenly gave Patch a big problem. Between needing to get the MMG back for final defense and a lucky BAZ shot, the C5 defense collapsed, and I was able to get at the victory building with enough time to try and clear it. However, his armor killed two vehicles on their turn of entry, and one HS broke three squads in turn 4. Any of those getting through at that point (especially the BAZ, who would have teamed up with the nearby Stuart), would have made things a lot easier.
The last couple of turns was fairly solid play with some goofs, but also saw a number of missed opportunities thanks to the dice. The primary means to at least give the German armor too much to do were the BAZ that didn’t rally on 5 and the Stuart who had gone CE for a better chance on a first shot, and got recalled by the sniper. All my MGs basically evaporating was a major problem. And I didn’t even think about Patch smoking me in, so I mostly saw the armor as a roadblock, and ignored it more than I might have.
My main concern all the way through was the fact that I was going to have to secure a fifteen Location building. And Patch is no slouch at defending large buildings. Overall, I have to think Patch’s luck was a bit better. I certainly had some fantastic rolls, and he had some bad ones, but he’s not the one who malfunctioned three weapons, and lost two of them permanently.
Patch commented that he’d have been tempted to take the M4A1(76)W as the Americans, but otherwise agreed with the armor choices. Which points up the nice bit on this scenario: every vehicle choice on each side has a reason to pick it. I figured with three BAZ and a DC in tight terrain that his vehicles were best countered by my infantry, especially as there wasn’t anything I could choose that could take a hit from a 75L, much less a PF, so they had to be support vehicles.
I’d really like to see more scenarios exercise the climate conditions other than ‘mild with no wind at start’ too. Though the mud rules need better cross-referencing, as there’s an extra Secret Bog DR for vehicles off of paved roads that is never mentioned in the Chapter E Mud rules (it’s only mentioned in Bog, under D8.23). That was caught after the first real cross-country vehicle move, and Patch did Secret DRs for most everything, but I never Bogged. Most of my moves were fairly short (DASL ranges helped), and it sounds like the rolls were mostly mid-range (i.e., ~7) when five hexes was a fairly long move, though Patch mentioned one occasion near the end where I would have bogged in the next hex.
We also both got thrown by the board b art on a few occasions, wanting to think of the H2-I5 stream as also being marsh, as the I4-J4 marsh art quite naturally flows into it. It’s obviously not marsh, but at separate points, we each got fooled into thinking those stream hexes were also marsh.
So, there’s a fair number of wrinkles with all the unusual rules, but it’s a really tense situation, and great scenario.
Discussion ¬