
J124 Cobra Kings
After the wrap-up of the last scenario (which coincided with a bad week for me), I asked Patch to put forward a scenario suggestion. He came up with the interesting J123 “Charging Chaumont”, which we had to cancel be the deluxe overlays don’t seem to have been redone for the new VASL deluxe boards yet. Instead, we ended up with J124 “Cobra Kings”, with me as the attacking Americans.
It’s Christmas Day 1944, and the Americans are attacking into Assenois in the drive to relieve Bastogne. I enter into a pair of deluxe half-boards with a mixed force of Shermans, halftracks, and infantry, and have five turns to clear one of two full boards that the Germans set up in of any GO Infantry. This is at dawn, so there is a +2 LV for the first turn, and a +1 for the second turn. In addition, I pick hexrows, and the Germans roll to see if any buildings are rubbled in them; finally, all Germans without a leader are TI for the first player turn, those with a leader are merely Pinned.
I enter in two turns, with the first turn’s forces being a 76 M4A3E2, two 75 M4A3E2, four halftracks, an armor leader, a hero, 8 squads of infantry, and various toys. Since all Infantry must enter as Riders, some of them have to be on the Shermans. Patch gets 12 squads, two 88s, and two Hetzers enter on turn one.
Patch initially forgot to HIP his roadblocks, which forced a re-setup, and a move away from his first plan. Sadly, we also forgot the +2 LV for most of my turn, which did hurt some. I am continuing my habit of failing PTCs and MCs with Riders, but passing all the Bail Out MCs.
Taking a look at things, I decided I liked the western (bottom) route better, mostly because I knew a fair amount of my force would end up using the sunken roads, and the east one forces turns. One squad of Riders was pinned and Bailed out successfully, only to be broken by Patch’s Sniper, while another Broke and Bailed Out in the middle of the entry board. I managed to unload five squads + hero successfully (one of these was due to a mis-count on a Sherman’s movement—the error was probably more than made up for by forgetting the +2 LV on the shots that pinned/broke me).
In the APh, I advanced squads into both ground-floor stairwells of building bC4, Encircling two groups of units on Level 2. I also advanced a MMG squad into D2, while the Hero that had been with them stayed outside with his BAZ. The one flame set by the pre-game rubble checks went out in the wet conditions.
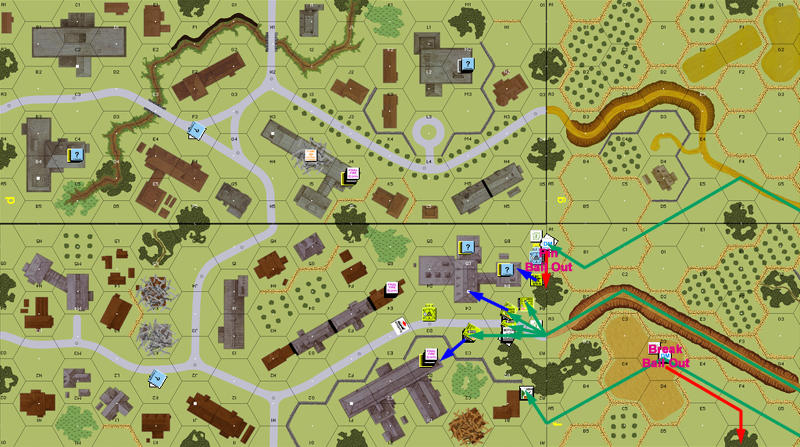
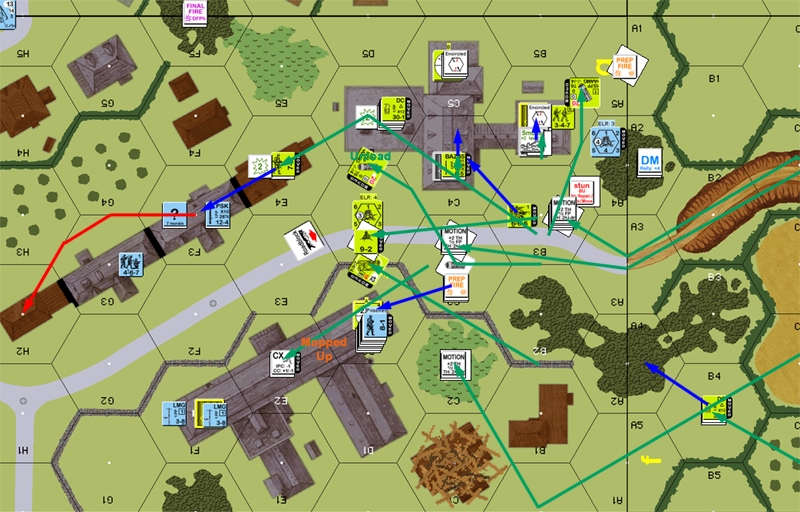
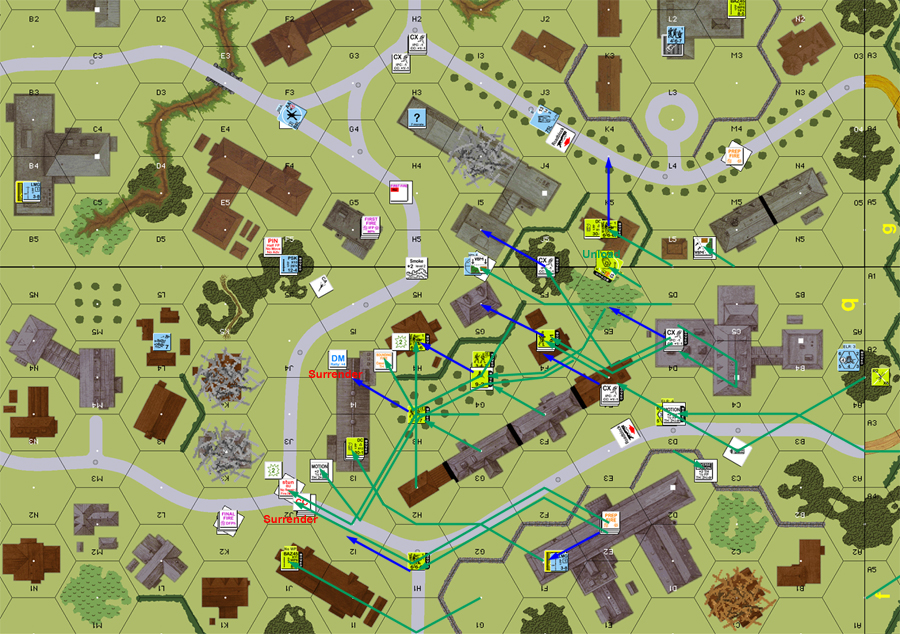
Situation, American Turn 1, showing full setup.
The leader that had been broken in fD3 immediately came back in my rally. The squad didn’t, but getting them on my turn would be fine.
For Prep, Patch fired a PF at my Sherman parked in the middle of the main road, and thankfully missed. bD2 took a 36FP +2 shot at C3 and killed the halftrack parked there. However, the crew survived, and the Hero passed the 4MC. The bad news was that his Sniper went off again, and re-DMed the broken squad in A4.
His defenders on the east end started moving up from dM2. Some of the middle defense in dJ4h2 went downstairs, and the rowhouse defenders in bE4 skulked and split up. Both Hetzers entered on the east road and took up covering positions out of sight.
My defensive fire was notable for a hit on D2 from my Sherman in B3, after revealing the 9-2 AL (…this, also, was a mistake; we forgot the +1 for my overstacking). All three squads and the leader failed the resulting 2MC, seriously unhinging his defense. Worse, there was no good routing from it.
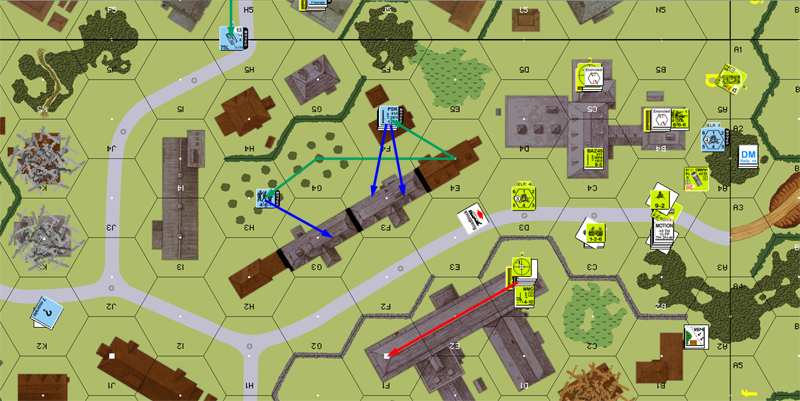
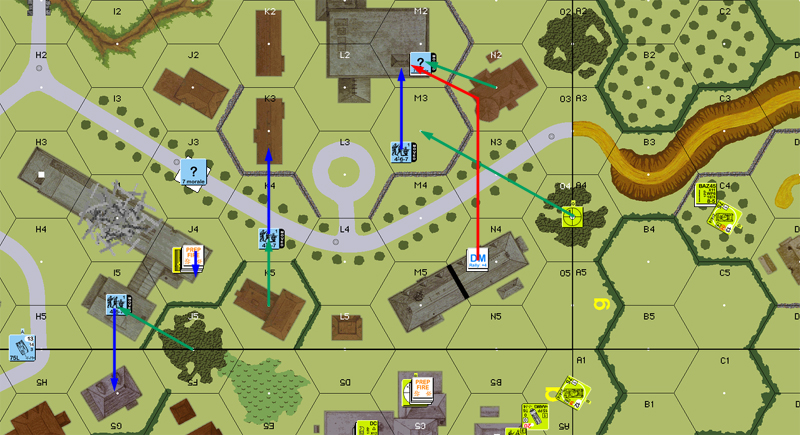
Situation, German Turn 1 in the west.
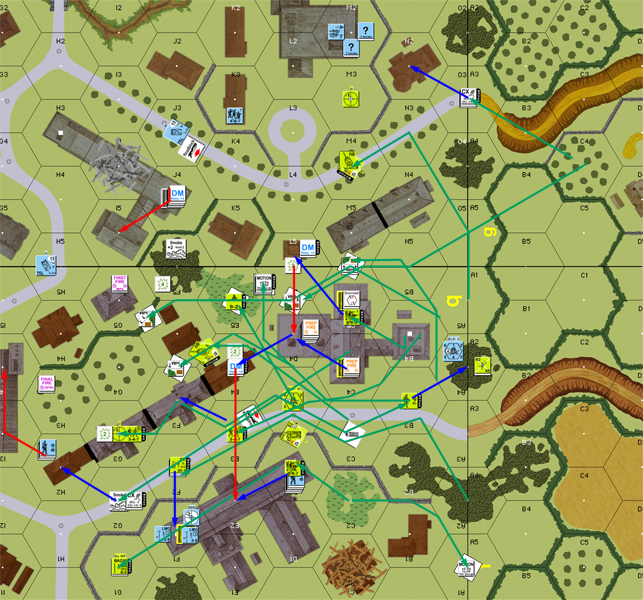
Situation, German Turn 1 in the east.
“I wanted a scenario with the Americans again. It seems we’ve not played with them much, and I really wanted to see those 666s on the board once again. I really liked the look of Charging Chaumont, but those dang overlays wouldn’t work, so I decided to give J124, Cobra Kings, a shot instead. Jumbo Shermans, 88s, Hetzers, and the famous US .50cal. This one has a lot going for it.”
Set-up
“This one really sucks for the Germans. +2 LV on turn 1, and most of my stuff will start TI, and what isn’t stacked with a leader will be Pinned. Ack! I really need to watch my set-up, or Rindis will drive right up, unload, and pop into CC on turn 1. Even on turn 2, with a +1 LV hindrance, grants the US a lot of maneuverability. My 88s are useless against the Jumbo Shermans and their 18 frontal AF, but the Sherman’s 75mm and 76mm guns are equally useless against my Hetzers. The PSK and my ‘fausts are the real tank killers in this game, assuming I can hit.”
“Pregame rubble is largely unimpressive. Two miss completely, bK3 falls into bK4, and dI4 catches fire. I would have liked rubble to have fallen into a road and form another roadblock, but was not to be.”
“I see the roadblocks as key to stopping Rindis as early as possible on turn 1. To that end, one roadblock goes in bC3/B3, and another goes on dJ3/K4. bC3/B3 does give Rindis a HD position, but I can set-up in Lvl 1 locations and see over it down to bA3. I deploy two hs and park them upstairs in bB5 and bC5 to hit anything in the middle, take potshots at tanks, and force Rindis to spend time digging out my units. A big fat stack with a leader, 3 squads, and two LMGs go in bC3h2 to try and get some meaningful turn 1 FP out. The MMG goes with another stack in dJ4h2 to do the same. There’s a 7-0 and two squads over in dM2h1 to hit anyone trying for a flank, and far in the rear at dC4h2 is a 467 and LMG. He forms a last ditch reserve, will be hard for Rindis to dig out, and may get a sneaky LOS now and then. The 88s were tough, as they can’t set-up in buildings or rubble. There are zero good locations in woods terrain, so I’m really stuck with setting up non-emplaced on a road. I pick bK2 and dF5, as they give me the best long range LOS, and Rindis can’t hit them from HD positions, nor can he hit them on turn 1 or 2, freeing the guns of the LV penalty. My plan here is to force Rindis to dismount, and just fall back.”
“Sadly, Rindis points out that I didn’t take advantage of my ability to set the roadblocks up HIP, and I give it a rethink. I leave dJ3/k4 where is it, but I shuffle the board b obstacle to bD3/E3. I moved because I wanted Rindis to keep guessing as to where I may be, but boy o boy moving that roadblock was a mistake. Not only did it leave bE4 wide open, but it opened up the bD4/E4 hexside to vehicle bypass, which Rindis exploited heavily later in the game. Of course, leaving it further out also opens the roadblock to a clearance attempt.”
US Turn 1
“Rindis enters heavily on board F, and in an annoying start, we both completely forget about the +2 LV hindrance, allowing me to get some fire out that strips infantry from two tanks. It doesn’t stop Rindis from getting entry into buildings bE1 and bC4, however, which was to be expected. Becoming encircled in bD4 was not expected, though I do enjoy the sight of all those AFVs next to my units.”
German Turn 1
“bB4h2 takes a shot at a Jumbo Sherman in bB3 and misses. I give bD2h2’s situation a long, hard look, and I decide that it’s worthwhile to try and nail the ht right below me. The crew is exposed (my elevation is > the range), and I like the +2 LV for return fire (+5 in my favor). Though it is bad to stack, I think I’ll live, and can then bail into adjacent locations to interdict the turn 2 forces, and force Rindis to spend turns digging me out. I get an 8 on the 36 column of the IFT, killing the ht, but the crew survives, and so does the Hero. >.<“
“In movement, bE4 realizes how exposed he is and bails. A PSK shot against bB3 just wasn’t worth the risk this early in the game (7 TH, +1, but I’ll have to eat the backblast), so I decide to play a little at and mouse and fall back along the rowhouses. The Hetzers enter and one moves up to the roadblock in dJ3, and the other remains in the board center to see what happens before deciding on a destination. The stack in dJ4h2 breaks apart so I can cover the center, and dM2h1 moves across the road to cover the center and hopefully get a flank ‘faust shot on a Sherman.”
“Staying in bD2h2 turns into a disaster as Rindis fires with the Sherman in B3, misses, then reveals the 9-2 AL to turn it into a hit. Everyone breaks, and that flank collapses. T_T Thankfully the infantry isn’t there to exploit it (yet), but that’s 25% of my force, gone. I seriously need things to improve. I route as far back as I can get, with the hope of finding a way of getting at least one unit out of there alive.”
After a quick setup of my Turn 2 reinforcements Patch gently reminded me again that orchards force Bail Out. You’d think I could remember something like that from week to week. Anyway, the turn 2 forces consist of another four Shermans (no Jumbos this time) with four squads riding on them. I sent two more down the main entry road I used before, one through the middle, to put out a flanking force, and one on the west (bottom) edge to follow the one there.
That last was serious error, as I hadn’t really thought about the effects of roadblocks and walls on vehicle movement. Namely, once past the bB1/B2 wall, there is no way out of that little area. Worse, it can’t even be used to its full potential, since the rubble in bC1 left too small of a gap to bypass D1 and use G1 as an armored pillbox location.
At any rate, I rallied my squad left back in fF5, while Patch did not manage to get his leader in bF1. This lead to me declaring Mopping Up in D2 and capturing three squads and a 8-1. Neither of us had actually used Mopping Up before, so that was something of a surprise (well, I have used it to guarantee full control of a building that might have HIP, but not to get rid of brokies). It was well worth it, though it was a shame I had to use my MMG squad for that. I would have much preferred to move them up than go TI. Prep from bA5 Pinned his HS stuck in C5h2, but also activated his Sniper, which stunned a HT.
I moved the west-edge Jumbo up to the Roadblock, and started moving in on his troops trapped in building C4. My attempts to Smoke them had a bunch of trouble, halting one squad before they even moved, but finally got it on the third try. This was needed, as it kept him from firing a PF at my tank with the AL as it moved out. Patch’s fire was mostly ineffective, including a missed PF shot. However, the 88 got a CH on bE2, killing the crew from the HT, which I had moved up there on a K/4. Patch, not liking the pressure that was coming to bear, self-broke bF3 and routed him to H2.
I advanced into CC in bB4h2, and narrowly avoided an Ambush. As it was, I easily got him at 3:1 odds, while he missed. That just left C5 to clean up.
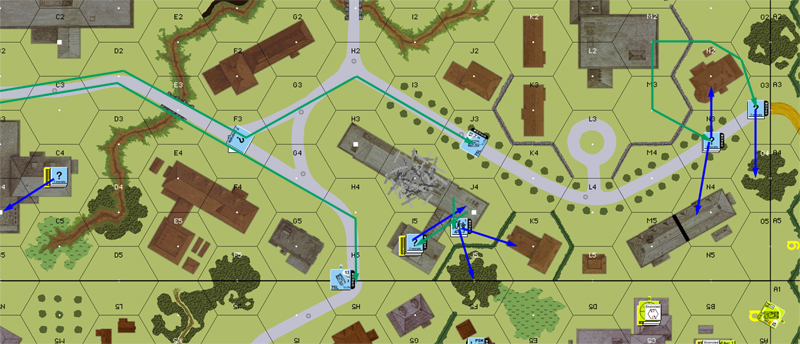
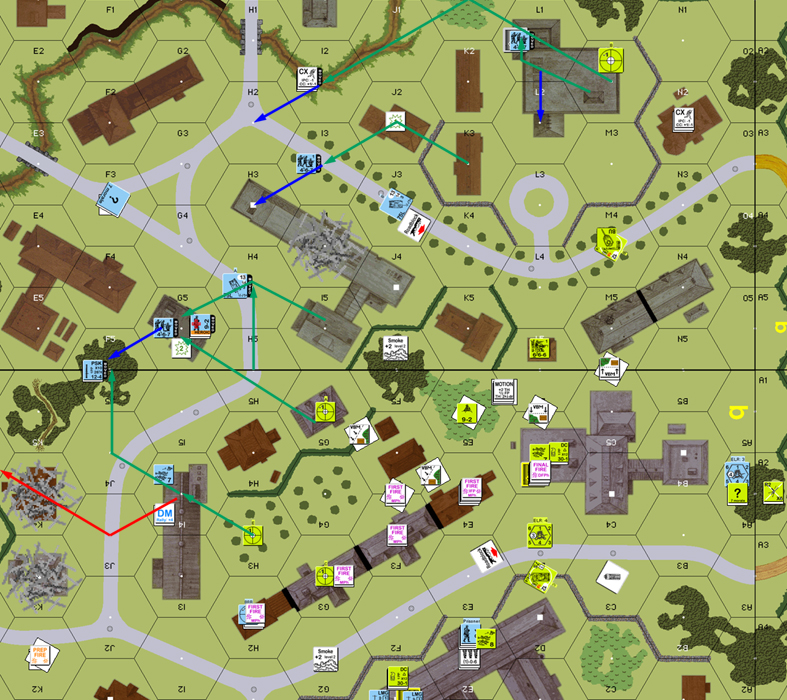
Situation, American Turn 2.
Nothing happened in RPh, and Patch naturally lead off with PF checks. C5h2 Pinned when it tried, and dN4 broke from backblast on a miss. Mostly though, he fell back to the next line of defense. The good news is that I had forced him out of a decent chunk of board b, and the remaining forces were potentially a bit fragile after the mass surrender. There wasn’t much in the way of shots left after that.
Situation, German Turn 2.
“Oog. I have such a paint-induced headache tonight.”
US Turn 2
“Rindis sets up his turn 2 reinforcements for entry, and as I like a friendly game, I point out that he’s set to drive his riders through orchards again and let him reposition the unit. Rindis is set up to reinforce the center and west, and I’m a bit nervous about that with the breaking of my platoon (which remains broken when my leader fails to rally).”
“The breaking of my platoon turns into an epic disaster when Rindis declares Mopping Up and captures the lot. I so wasn’t expecting that, and had visions of finding some way of escaping with at least one squad, or failing that, making him spend time rounding me up. The only good news is despite the heavy western push, the roadblock is proving a formidable obstacle and Rindis can’t find an easy way around it. I’m thankful that, despite surprising me with the Mopping Up action, Rindis doesn’t seem to be in a rush to try and clear the roadblock. The amount of infantry and the multiple DCs I think make it a worth a try.”
“Rindis swarms into the center, but can’t get close enough to take out both my HS in building bC4 this turn. Nor can he me enough headway into the central rowhouse or building bD1, when my 88 CR’s a probing crew on a critical hit. Rindis ends his movement with a lot of stuff on the front line, but his FP isn’t really facing my main line. He does threaten bF3, and since he can get into bE4 without risking any defensive fire, and I’ve lost enough infantry already (and don’t want to lose that Psk), I break and run to bH2, where I should have one turn to rally without DM as no one can see that location.”
German Turn 2
“Gads, there’ a lot of Americans running about.”
“No one rallies this turn, and Rindis’ halftrack recovers from its stun effect. With the main American thrust identified, I need to reshuffle my defense. With the .50cal poised to come on line in US Prep, I need to get out if it’s LOS in bD4, yet still interdict the advance. But first, I make some nice panzerfaust checks against those lovely Jumbos, but miss and break in dN4 when I take a bad backblast result.”
“I move about to cover the OG approaches in the center, and the bE5 brush. dO4 retreats, as I can’t risk breaking there as well from gC4’s return fire. Anticipating a retreat with the broken unit to dM2, I move a 467 back that way to prevent an easy capture if he doesn’t rally. dK5 also moves over to dK3 to cover the Hetzer as Rindis can now easily switch his axis of advance (though the dJ3:K4 roadblock remains undiscovered). In all a quiet turn.”
“Rindis has three turns left to clear a board, and though he has a way to go it is doable, but I think he needs to get very aggressive. I think he needs to be up to the I column at the end of turn 3, across the J road turn 4, and close off any counterattack axis turn 5. The biggest bonus for me is Rindis is having trouble untangling his armor, but one thing I have learned is Rindis is very good at finding sneaky movement paths. If he does blow through my defenses I have a plan, but I’m keeping it under my hat as the game is still in progress.”
Well, the forum ate the first version of this, so it may end up a bit more summarized than normal:
Rally was frustrating for both of us. I didn’t get my squad in bA4 back, and Patch got neither of his back. This left H2 with a leader but no squad, giving me a bit freer hand to advance. My Prep was only a couple groups, but I finally broke the HS holding out in C5h2, and my HMG got a 6-shot tear at J4h1. I broke the 9-1 leader and MMG squad early, wounded the leader, and then… he got a HOB to Battle Harden him and make him a hero. Thankfully, the squad stayed broken, but I never got a double-break either.
It was during this turn that I finally started waking up to just how out of position I really was with my armor. I hadn’t properly thought about the fact that the roadblock and walls kept the Jumbo bypassing D2 from going any further. If I had thought about it, I might have tried clearing the roadblock, but I didn’t even think of it until much later. So, he had nowhere to go, and the turn 2 follow-up Sherman had to turn around. Getting into G1 would actually be good, but the rubble in C1 chokes that route off.
I continued having problems with Riders. Patch managed to break two different squads as my armor moved up carrying them. One Bailed Out fine into E4, while the other CRed to a HS in dL5. I did manage to get a couple of sM shots off to provide cover in the center and against the 88. I had thought of using Smoke, but was surprised to find that in short supply on the Jumbos.
My Hero ran through the east-side building into G1, which at least gave me something to interdict any movement to spread out to the west and present a broader front to fight on. The 88 got off four shots with one hit, and thankfully I passed the resulting 3MC.
Now I remember why this turn took so long…
Despite the opportunities in the situation, I didn’t get all that far this turn. A look at the map shows some of the reason why: bD4/E4 is a heck of a bottleneck, and I’m lucky that Patch had no way to try any shots that would have left wrecks in there.
US Turn 3
“Everyone’s on board and LV modifier is gone, which is good, given how often we forget it. Rally is bad all around, and I fail to get my PSK back into action. Now I’m very concerned about losing him for FtR in the upcoming turn. I do hope I can get him out of there.”
“Rindis eliminates the last of the resistance in building bC5, but the two HS did their job well (though bagging a tank would have been nice), and he also breaks my 9-1 and 467 in dJ4h1, which is manning my main strong point. The trouble with firing on broken units, though, is you never know what will happen. ROF from the .50cal results in my wounded, broken leader Battle Hardening and becoming Heroic. If the squad dies, at least the Hero can now man the MMG with some effect. Still, for now, there’s a hole in the center.”
“Movement is interesting as Rindis tries to shove a company of infantry and tanks though a gap 2 hexes wide. dE5 or dF5 are rather limited locations for an 88, but I’d love to have one there. All that bypass movement, though, slows everything down and the center turns into a quagmire. Rindis ends up about 3 hexes short of where he needs to be at the end of turn 3, and his vehicles are horribly out of position to try and clear my line. Given how little casualties I’ve inflicted, my biggest fear is Rindis will use VBM freeze to isolate a pocket of my line next turn and pour into my rear. As all I can do against this force is fall back and trade hexes for time, and I cannot lose that ability. I need to get into the K column rubble and see if I can’t anchor a defense there with the 88 and the Hetzer. Nonetheless, this delay is huge for me and may well make up for the loss of that platoon in building bD1.”
“I’m not that concerned about events on board d, and I’m content to hold around the roadblock for now. The approaching Jumbo Sherman is harmless to me as his 75mm gun can’t penetrate my 14 armor, though my only chance is for a DI shot. My infantry can trade space for a turn and protect my flanks, then I can reverse out of there. I’m also keeping a sharp eye out for a careless VBM move that may give that Hetzer a flank shot.”
“Biggest surprise of the turn was when Rindis redirected a Sherman from bC2 back around the bA2 woods. I don’t know the intent of this, but for all practical purposes it removes this tank from the game. There was nothing keeping him from simply going from bC2 to bC3 and into the center. I think it was simply counter fatigue.”
“And for those wondering, with bC1 rubbled, there’s no way around building bD1 as bD1/bC1 isn’t clear for VBM. The extreme west flank is closed unless Rindis tries driving indoors.”
“The extreme west flank is closed unless Rindis tries driving indoors.”
Which also never occurred to me….
Patch’s 8-0 grabs the PSK from the broken squad in bI4 instead of trying to rally them. The two squads he does try to rally, dI5 and M2 both do. Meanwhile, I get nothing from my two rally attempts, and I realize, a bit late, that the big mess in bE2 does not include a leader.
Prep consists solely of a ranging shot from the 88 on H2. Movement is mostly Patch pulling back, with very little chance for me to fire on him. H3 tried to pull out, I fired a big fire group at him, Patch pointed out that part of it couldn’t thanks to rowhouses, and an extra +1 hindrance from a halftrack, and we spent a while discussing whether one of the tanks would add another hindrance (no). Seriously, the longest fire resolution we’ve ever had, sorting that out. And after a FP and a modifier downgrade, I still break him on a 1MC.
My only DFPh shot pins the crew of the 88. They’re fairly vulnerable out there, but pinning them on Patch’s turn isn’t really a help.
Situation, German turn 3.
“Which also never occurred to me….”
“I find my line of thinking is, if there’s some possible bad outcome, it equates with ‘can’t be done’. I really need to adjust that mode of thinking.”
German Turn 3
“There’s no decent chance I’ll get that PSK squad rallied, and rather than have him eliminated for FtR, and thus lose the PSK, I transfer it instead to the 8-0 so I can haul ass out of there and give it to someone else next Rally. Ironically, two squads that needed a ‘5’ or better do rally, leaving me in a much stronger position than I was a turn ago.”
“I try pounding H2 with the 88, but can’t get the impressive results I did before. Deployed as I am in OG, I really need to get some results here before I go down. I wish I could have found a better spot for them in woods or the like. In movement I get who I can back behind the mid-board road for the next line of defense, and I sprint with my 7-0 stack on board d with the goal of getting them back into the deep backfield for a counterattack onto board b if Rindis is successful in his push forward. I leave one squad behind in building dL1 to interdict his probing squad, and threaten his flank and rear on his board d advance. I note that my 7-0 stack could wander into bI1, making their removal rather difficult due to the gully, but board b isn’t Rindis’ target so I have to give that sneaky idea a pass.”
“As Rindis pointed out, we did have a lengthy discussion over just what his FP attack against what my erroneous move in dI4 should be, and after all that I promptly break anyway. If I had seen that shot I would have used AM, but at least I can still rout out of that building and across the road.”
“Rindis Pins my 88 crew in Defensive fire. Despite the awesomeness of the 88, they’re still just an 8 ML unit in open ground. Not sure how much longer they’ll last. If they can only survive the next Prep Fire.”
James Taylor pointed out:
“I find my line of thinking is, if there’s some possible bad outcome, it equates with “can’t be done”. I really need to adjust that mode of thinking.”
German Turn 3
“There’s no decent chance I’ll get that PSK squad rallied, and rather than have him eliminated for FtR, and thus lose the PSK, I transfer it instead to the 8-0 so I can haul ass out of there and give it to someone else next Rally.”
“FWIW, you could have opted to try and rally the squad, and then in the MPh tried to recover the PSK using the leader, at a cost of 0 MF and no exposure to DFF. If he rolls a 6 he still doesn’t get it, of course, and that makes the move more risky than having both the opportunity in the RPh and the MPh.”
“JT”
“Hmm, ok. I was thinking recovery from broken units was only in Rally. I also missed that I needed a dr to do so. Thanks.”
Okay, again, let’s see if I can start working on playing catch up with my life. 😛
My squad in bF1 recovers a German LMG, and all my rallies, including the self-rally in E2 go well, finally getting the squad stuck in A4 back in action. Patch’s leader hands off his PSK. At this point, I figure I’m a bit rushed, but if I can keep control of the situation, I can pull off the win. The main problem is that his squad in dB4 can run downstairs and onto board b to deny me a win for control of that board. I plan on trying to get a HT through the gauntlet of German fire to cover the open ground portion that move. That leaves it more up to chance than I’d like, but it’s really the best I can easily do while I’m working on driving him out of the center. The biggest obstacle to that plan is, of course, the 88 in bK2, though they’re potentially quite vulnerable. More problematic is the PSK in J5, and the MMG in dG5.
In prep, my MMG in bE2 forces the 88 crew to Pin again, while on the other flank my Sherman misses a shot at his squad in dL2h1. For movement, I start by running my Hero up to bJ1, where he could potentially cut down on the crew’s options, though as Patch points out after checking the rules, Pinned units can’t use IF, so they’re probably just getting one shot anyway. I move out a HT into I2, two hexes away from the 88 and stop to use the AAMG. The 88 fires at 10+5 TH…
…and malfunctions on a ’12’! The HT fires back to no effect, starts, moves into J2… and the crew breaks/stuns to fire from dG5.
sigh
A second halftrack moves up to Bypass between H4 and I4, stops, fires the AAMG across the street to try to take out the PSK and gets a NMC that Pins the leader, but sadly has no effect on the squad. Worse, his Sniper activates and kills the 7-0 back in bA4.
Various events have put weapons in odd places. I end up abandoning both a DC and a BAZ in E4 so there’s PP available for carrying the HMG, while the recovered squad in A4 drops the malfed MMG to move up and recover the BAZ. The Jumbo with the AL moved up and put a sM into H5, which helped cover the next Sherman as it maneuvered to deal with a Hetzer. Finally, I ran my squad guarding two squad’s worth of prisoners and a captured leader up to try to cross the street at J, and get into K3, which was important for trying to keep him from putting more in the way. I pass the PTC generated by the residual, but his further fire generates a 1KIA result, which naturally nails my squad out of four targets. The prisoners all CR, and can’t rearm as there’s an American HT still present in the hex.
Nothing happens in defensive fire, but I get a couple nice rolls in AFPh that go to waste. A Sherman bounces a shot off the Roadblock in front of his Hetzer in dJ3, and the squads in the same Location get a MC on L2h1 which he passes. Another shot activates his Sniper, who promptly takes out the squad in dM2, who was going to keep his force in that building busy. To rub salt on the wound, the resulting 1MC causes his Pinned leader to Battle Harden and become Heroic. At least I knock out his two unarmed HS in J2. The wounded leader survives to be recaptured, and the squad in I4 surrenders as well.
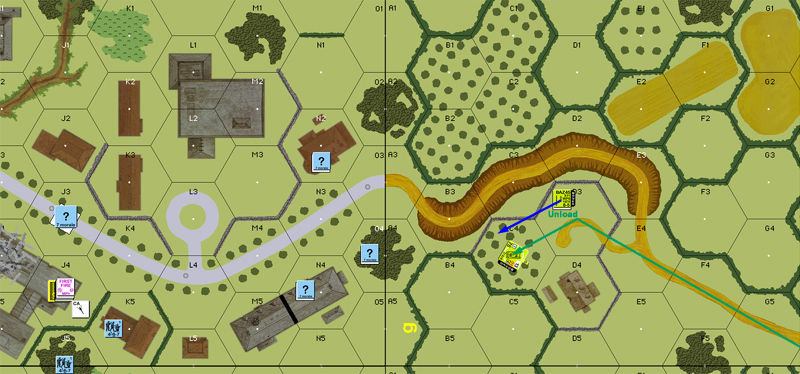
Situation, American Turn 4.
Things had started out well, with Patch missing some critical rolls, but things evened out in the end. The loss of the squad and the stunning of the HT in J2 was especially bad. I needed to start getting across the road to slow down any redeployment in the area, and I completely failed to manage it. Maneuvering armor in the tight area choked off by roadblocks was continuing to be especially troublesome, and I was getting a bit incautious with my armor as time pressed.
US Turn 4
“Rindis rallies several units and claims a dropped LMG, and I transfer the Psk to a squad. Rindis notes that he has discovered an unintended, but cunning, plan. My reserve squad and LMG in dB4h2 can, on the last turn, go CX, move down to the safety of the gully in dC5, then advance into bM5. With the cover of a stone building, those are pretty good odds of success. I just hope Rindis doesn’t get a vehicle into bM5.”
“Rindis sadly Pins the 88 crew, and I expect to get swarmed and overrun. A Hero moves adjacent, and I’m forced to hold my fire as a vehicle is the biggest threat. A halftrack moves first, and I have no choice but to fire as I fear an overrun. I fire, malfunction the 88, and Rindis charges ahead but goes down to a stun from the MMG in dG5. Rindis continues his halftrack bounding fire fun by pinning my 8-0, but my sniper activates and kills a 7-0 in retaliation. Not huge, but I’m slowly taking a toll on Rindis’ officer corps. Lots of armor moves up, but the endless VBM is really slowing him down. I wonder how it would have gone if I’d placed the roadblock in bC3/D3, or if Rindis had successfully cleared it. In an exciting move, Rindis moves a squad and a stack of prisoners into bJ2, and I kill the guarding squad with a 1KIA. Wow.”
“Defensive Fire is ineffective, and Rindis isn’t able to generate anything good in Advancing Fire either as my Sniper breaks the only squad on the northern flank, which ended the threat to that flank, and he Battle Hardens my 8-0 into an 8-1. The Psk has just become much more effective. My crew, about to die in CC with the Hero, voluntarily breaks and flees to bN1. With a broken Gun, there’s just no benefit to sticking around.”
“Bit of a mix of a turn. Rindis captures a squad, but I figured he was dead when he broke. OTOH, I killed a leader and a squad, broke a key unit, gained an 8-1, and have two Shermans in my gun sights for Prep Fire. Rindis may feel that it was a wash, but I think I definitely came out for the better.”
“The key to a victory, though, will be holding out in the last block behind the rubble line. Rindis has two turns left, and I think he needs to be very aggressive in Turn 4. He simply has to get into the rubble next turn. I am spread very thin, but if I can get positioned to cover the road and get those key OG shots, I’ll have a chance.”
The thread breaks off at that point, with the game still unfinished. All these reports were really nice, but took a lot of time and effort to produce as I was running back through the log pasting together images and drawing in all the arrows. It had been a continual struggle to keep it up, and there were plenty of times when I’d get a couple weeks behind and have to really buckle down and spend a lot of free time catching up again. Still, let’s try to get the end of this tale told:
Patch, needing to cover more ground against my advance, deploys. Or tries to, only succeeding one time in three. The squad back in L4 fails to rally, and he fails to repair the 88 in bK2. While rally didn’t do so well for him, Prep makes up for it, though he didn’t need much there. I just couldn’t get the good Shermans where I needed them, and the remaining 88 and a Hetzer burn my leading tanks in bG5 and dK5. The Hetzer then goes on to IF across the roadblock and break squad w/DC that was threatening to try and blow it.
Patch pulls the crew out from the malfed 88, and my Hero takes a BAZ shot at them, taking a wound from backblast on a critical hit. The crew survives the resulting 3MC, but activates my Sniper who breaks his squad in dG5. (Sadly, not also taking out his leader on a RS yahtzee.) Finally, I see a long range (well, long in this terrain) MMG shot in their second hex of movement and break the crew there. Patch rearranges a few other things for his final defense, notably shifting bJ5 over to L4, and dH2 down to E5 so that he can establish a nice little line in Advance. I had little I could do to interfere, and nothing managed to connect. (Well, I did have one ‘2’, but I’d forgotten all the smoke in the area, and had a +6 Hindrance to block the shot.) I did manage a single DF shot to pin the squad in dF4.

Situation, German Turn 4.
To open my last turn, Patch’s wounded leader in dG5 recovered the MMG from the broken squad rather than take the low-ish odds gamble that he could rally the squad. He did rally the squad in L4, creating a nice backstop to his position on board b. I only had a DM self-rally attempt that failed, and no useful prep.
Not having any time left, and needing to somehow clear the last of board b, I charged forward to engage Patch’s line from L3 to J5. My first move got my wounded Hero killed while forcing some fire. Patch had thought he was firing on a squad at first, so he may have held fire if he’d realized. The MMG squad back in F1 abandoned its SW and charged in to absorb more fire, breaking to a low roll that killed the prisoners with them. Then I started moving up the closer units, getting a squad into the rubble in K3.
Moving up my Jumbo with AL into H5 caused lots of pauses from both of us. I finally had one of the heavier Shermans where it was needed, but of course it wasn’t really capable of killing his Hetzer. For once the reverse was true, forcing him to have to rely on PFs. The leader in G5 was already occupied putting down a FL, and a successful check from F5 missed. Sadly, its fire into G5 was ineffective, leaving the FL up.
Then disaster struck. I knew that Patch’s squad at the top of dB4 was perfectly positioned to just duck downstairs and reoccupy some corner of board b that I couldn’t see as soon as it was his last turn. I had been sending my HT forward so that it could cover the open area and try and break him as he moved. It wasn’t much, but it had the mobility I needed. But it failed mechanical reliability when I tried to start it, giving me even more to successfully accomplish with just the little infantry I had left.
Further moves got me more broken squads (and dead prisoners…) and had to concede. It had needed a decent amount of luck going into the turn, and I just didn’t get any. I was using all the prisoners I had to absorb any K/- or KIAs, and it worked. RS picked the prisoners every time that turn. But, I also failed every MC I took. The plan was to have enough to get into CC, hope to get lucky there, and hope to have enough FP not in CC to have a shot at anyone who tried to get back to board b. No such luck.

Situation, end of game.
Postscript:
Patch likes to point out that missing the -2 LV for the first turn had a big effect on things. He figures that the idea is that the Americans should be able to just charge up and get in the Germans’ faces the first turn, and not doing so put me well behind schedule. I have to say the big break in building bD1 made up for a fair chunk of that. I really goofed up on the roadblock. I didn’t realize just how badly it would shut down the Sherman’s movement, nor did I think about the fact that the infantry could clear it. With that out of the way, I could have had a lot more area for the armor to play in, which would have helped a lot. Finally, I just had some really bad luck at some critical junctures for the last couple turns.
Discussion (3) ¬
I don’t recall much from this one other than I kept waiting for you to push forward hard, and it came too late. Lots of thought went on into trying to figure out how to keep some sort of line together, and where I could sneak a unit somewhere back onto board b. The Hetzers were fun, and I’m glad I got those shots off to kill a few tanks.
I still blame the stupid Sherman tricks with the roadblock. If I had not gotten myself blocked (literally and mentally) with that part, I might have been able to put together the assault you were expecting.
Or maybe not. >.<;