
SH53 Border Incident
Crossposted from the SFU blog on BGG
After our last big game, Patch suggested we do an SFB game next. After rooting around in the scenarios for our current year (Y160) a little, we decided upon “Border Incident”, a scenario originally meant to showcase a miniatures boxed set, and featuring the new Romulan KR ships.
The Romulans created an incident designed to test their new ships in battle—a battle balanced well in their favor. An old “Warbird” ship attacked a Federation outpost and then fled into the Neutral Zone, drawing a Federation CA after it. The new Romulan ships Proconsul and Tribune were waiting in ambush, and the first test of these ships seemed well under control. Unfortunately for the Romulans, it did not go according to plan.
The scenario starts with the CA closing in on the WB+, with a KR and K5R showing up on turn 3. A Gorn CL shows up to help the CA on turn 4. Patch volunteered to take the ‘allies’ in the scenario, so he wouldn’t have to worry about reading the cloaking rules in detail (only the WB+ cloaks, the KRs don’t have them for this scenario), but ran into trouble. A 50-point plasma torpedo requires a lot of respect, but I don’t think he really comprehended just how limited a sublight ship is even with cloaking reducing damage. The WB has three choices, move one hex on impulse 32, do one impulse tactical move (turn) anytime from Impulse 2 on, or spend no energy, and get one free turn in place on impulse 32. This means where it is is a given, and only facing could be variable. With the WB+ facing away from the CA at start, staying out of arc of the Pl-R on approach is easy.
Studying the situation again now, I’d go speed 21 (the WB+ is 20 hexes away) to get into its hex on impulse 31. Assuming the WB+ goes, and stays, cloaked for this, 6xPh-1 at effective range 5 should do 12 points of damage (after reduction from cloaking effects). The Photons should be half full overload, and half standard (all allowed as prior arming for WS-III; no further overloading is done for flexibility and lack of energy), and then reserve power dumped into the photons to overload them for the point-blank shot. And that’s where this plan is iffy, since there’s a decent chance that all four will miss (1:16), but with full reserve power put in, there should be 2×16 and 2×12 point shots, and lucky rolls will easily kill the WB+ (average looks to be ~16, for a total of 28, or not enough to get through the armor, more’s the pity). No matter what happens (well, other than the WB+ blowing up), on impulse 32 watch the WB+ move first (if it didn’t Tac), and move into a hex it’s not in. On turn 2, go speed 4 and launch a Wild Weasel while reinforcing the shield facing the WB+. The WB+ probably started decloaking on Impulse 32, and fires (after Tacing to face the CA) on Impulse 5, and the WW moves on 6 before it impacts, so the only damage done will be from the phasers. If the WB+ doesn’t launch the R, there’s a problem, as you’ll still be ~5 hexes away at the end of the turn, and limited to speed 14, with the KRs coming on.
And it’s the KRs on turn 3 that keep this from being a walkover. With one more turn, the CA can counter anything the WB+ did to counter all of that, and two-three would allow another pass that can probably punch through whatever’s left on the rear shield and do damage that it can’t recover from. As it is, it should be noted that with 9 total power, shield damage is probably permanent, as there’s not enough to regenerate them with (I’ll note here we used the original Basic Set WB+, not the Y1 version with two more impulse power as the scenario was published ages before that came out).
As it was, I went speed 1 to get a little closer to where the KRs would show up, and Patch went speed 20, cautiously approaching from one side and behind. Not liking how things looked, Patch aborted the attack run on Turn 2, boosting speed to 22 and ejecting all four torpedoes to re-arm them as standard/proxes. He held to speed 22 on Turn 3, and I entered at the bottom right with the KR doing 21 and the K5R at 23. Patch basically went straight for the Gorn entry point, while I tried to close the distance. Towards the end of the turn, the CA started turning around, and hit the K5R with one out of two prox photons.
For Turn 4, the CA slowed to 21, with the just-arrived CL going 20, while both of the KRs went 23. The CL turned to parallel the CA for a bit, and then launched a plasma on impulse 8 before both ships turned off. I closed to range 15 on impulse 12, and bolted both plasmas… from the K5R at the CL. I’d been thinking that the K5R was like the Battle Hawk, and had a pair of Pl-G instead of Pl-F, and had even been allocating based on that. They both missed anyway (6s…), and I corrected the announcement later (including the fact that they couldn’t have done damage), but if I’d realized at the time, I would have been bolting from the KR instead, as it also hit range 15, but I kept the heavier ship’s weapons in reserve. I then turned the opposite way from Patch’s ships, and headed for the WB+, which had long since been left behind.
On Turn 5, Patch’s ships slowed to 17, while the K5R maintained 23, and the KR pushed up to speed 28. The WB+ dropped power to the cloak… and put it into tractor instead. On Impulse 18, I reached the location of the WB+, which tractored the KR, giving it a pseudo speed of 14 (and the WB+ stayed at one, since it had the only point of impulse power used for movement). For Turn 6, I stayed the same while Patch increased to speed 20 on both ships. Range between our groups was a bit over 30 hexes at this point, and Patch started a big circle with the likely intent to start getting behind the WB+, since even though the KR was keeping it part of the fight, it still only turns one hexside a turn. At the end of the turn, the CA hit 2-for-2 with prox photons at range 16 to do 8 damage to the K5R’s #6. I burned 1 battery, since it’s cheaper to recharge that than repair the box, and then ended up burning the other battery during Turn 7 EA as I didn’t want it to slow down with a weak shield and Patch getting closer, and it was also on final turn of arming the two F-torps.
Everyone maintained speeds for turn 7, and the K5R launched two torps on Impulse 5, and then started turning off to get the weak shields away from him. Patch turned in, and launched a torp from the CL. On Impulse 10, the K5R fired the forward phasers at the CA, hitting with one to do two points to shield #6. After that, both sides widened the gap a bit to run out the plasmas. I was about ready for the WB+ to drop tractor so the KR could come to help the K5R, but it didn’t quite come to that. I was at least expecting a few phaser shots at the weak rear shields of the K5R as it ran, but not even that happened.
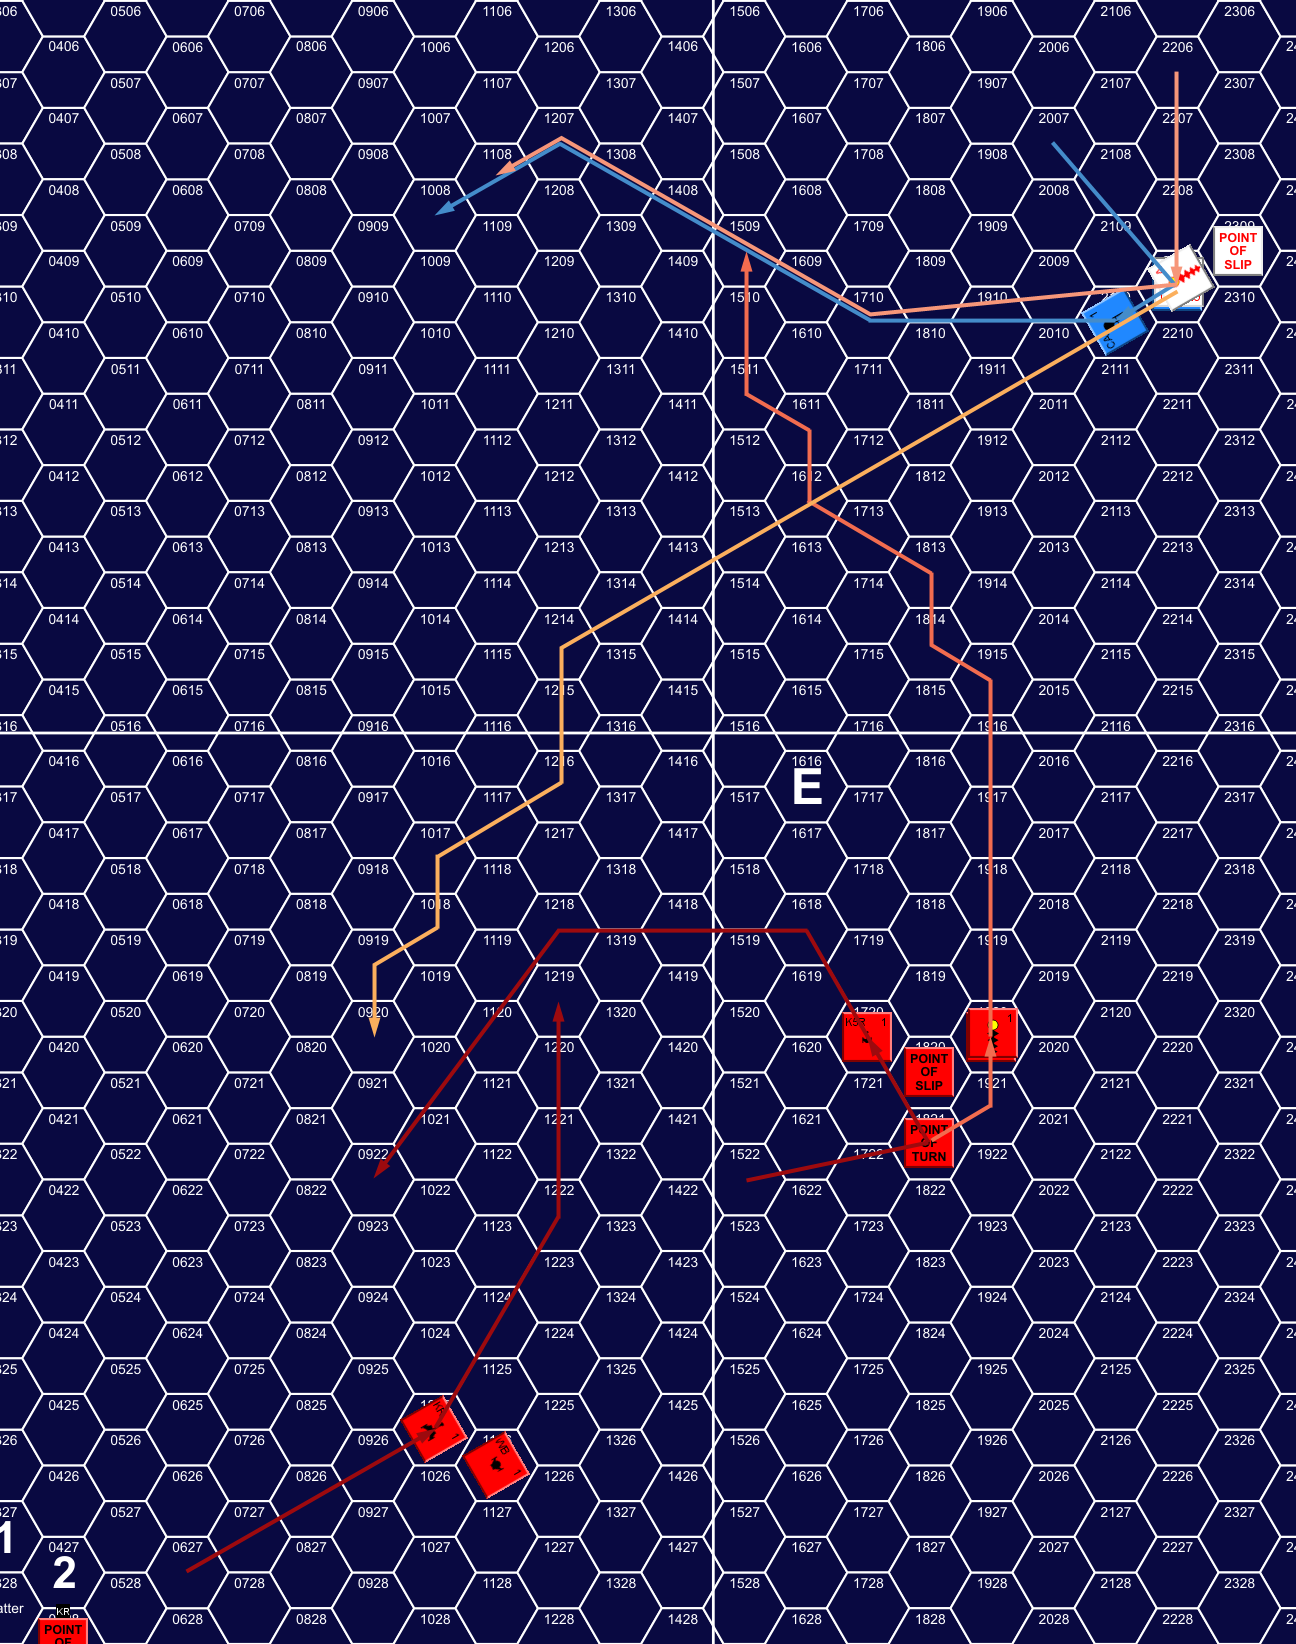
Turn 7, Impulse 7, showing movement from Impulse 1 to 24.
Everyone but the K5R maintained speed for turn 8, with it dropping to 21 as it started shield repairs. Patch’s ships had gotten solidly on the left side of the KR by the end of the turn, and on Impulse 2, the CL fired the other plasma torpedo, which I’d expected to see during the main part of the pass (this was the first fire from the ‘A’ launcher, so it hadn’t been loading last turn). With the K5R another 10 hexes away, and still headed away, it was time to clear for action. On impulse 3, The WB+ dropped the tractor beam holding down the KR and launched it’s plasma-R torp. The next impulse, it started cloaking in case the G from the CL was headed for it, and the KR fired the boom phasers at the CL, doing 5 points to shield #5 with poor rolls. I ran out the plasma and started turning back towards where I’d left the WB+, the R caught up to Patch’s ships a couple impulses later while still strength-20, where massed ph-1 fire with good rolls eliminated it on Impulse 26.
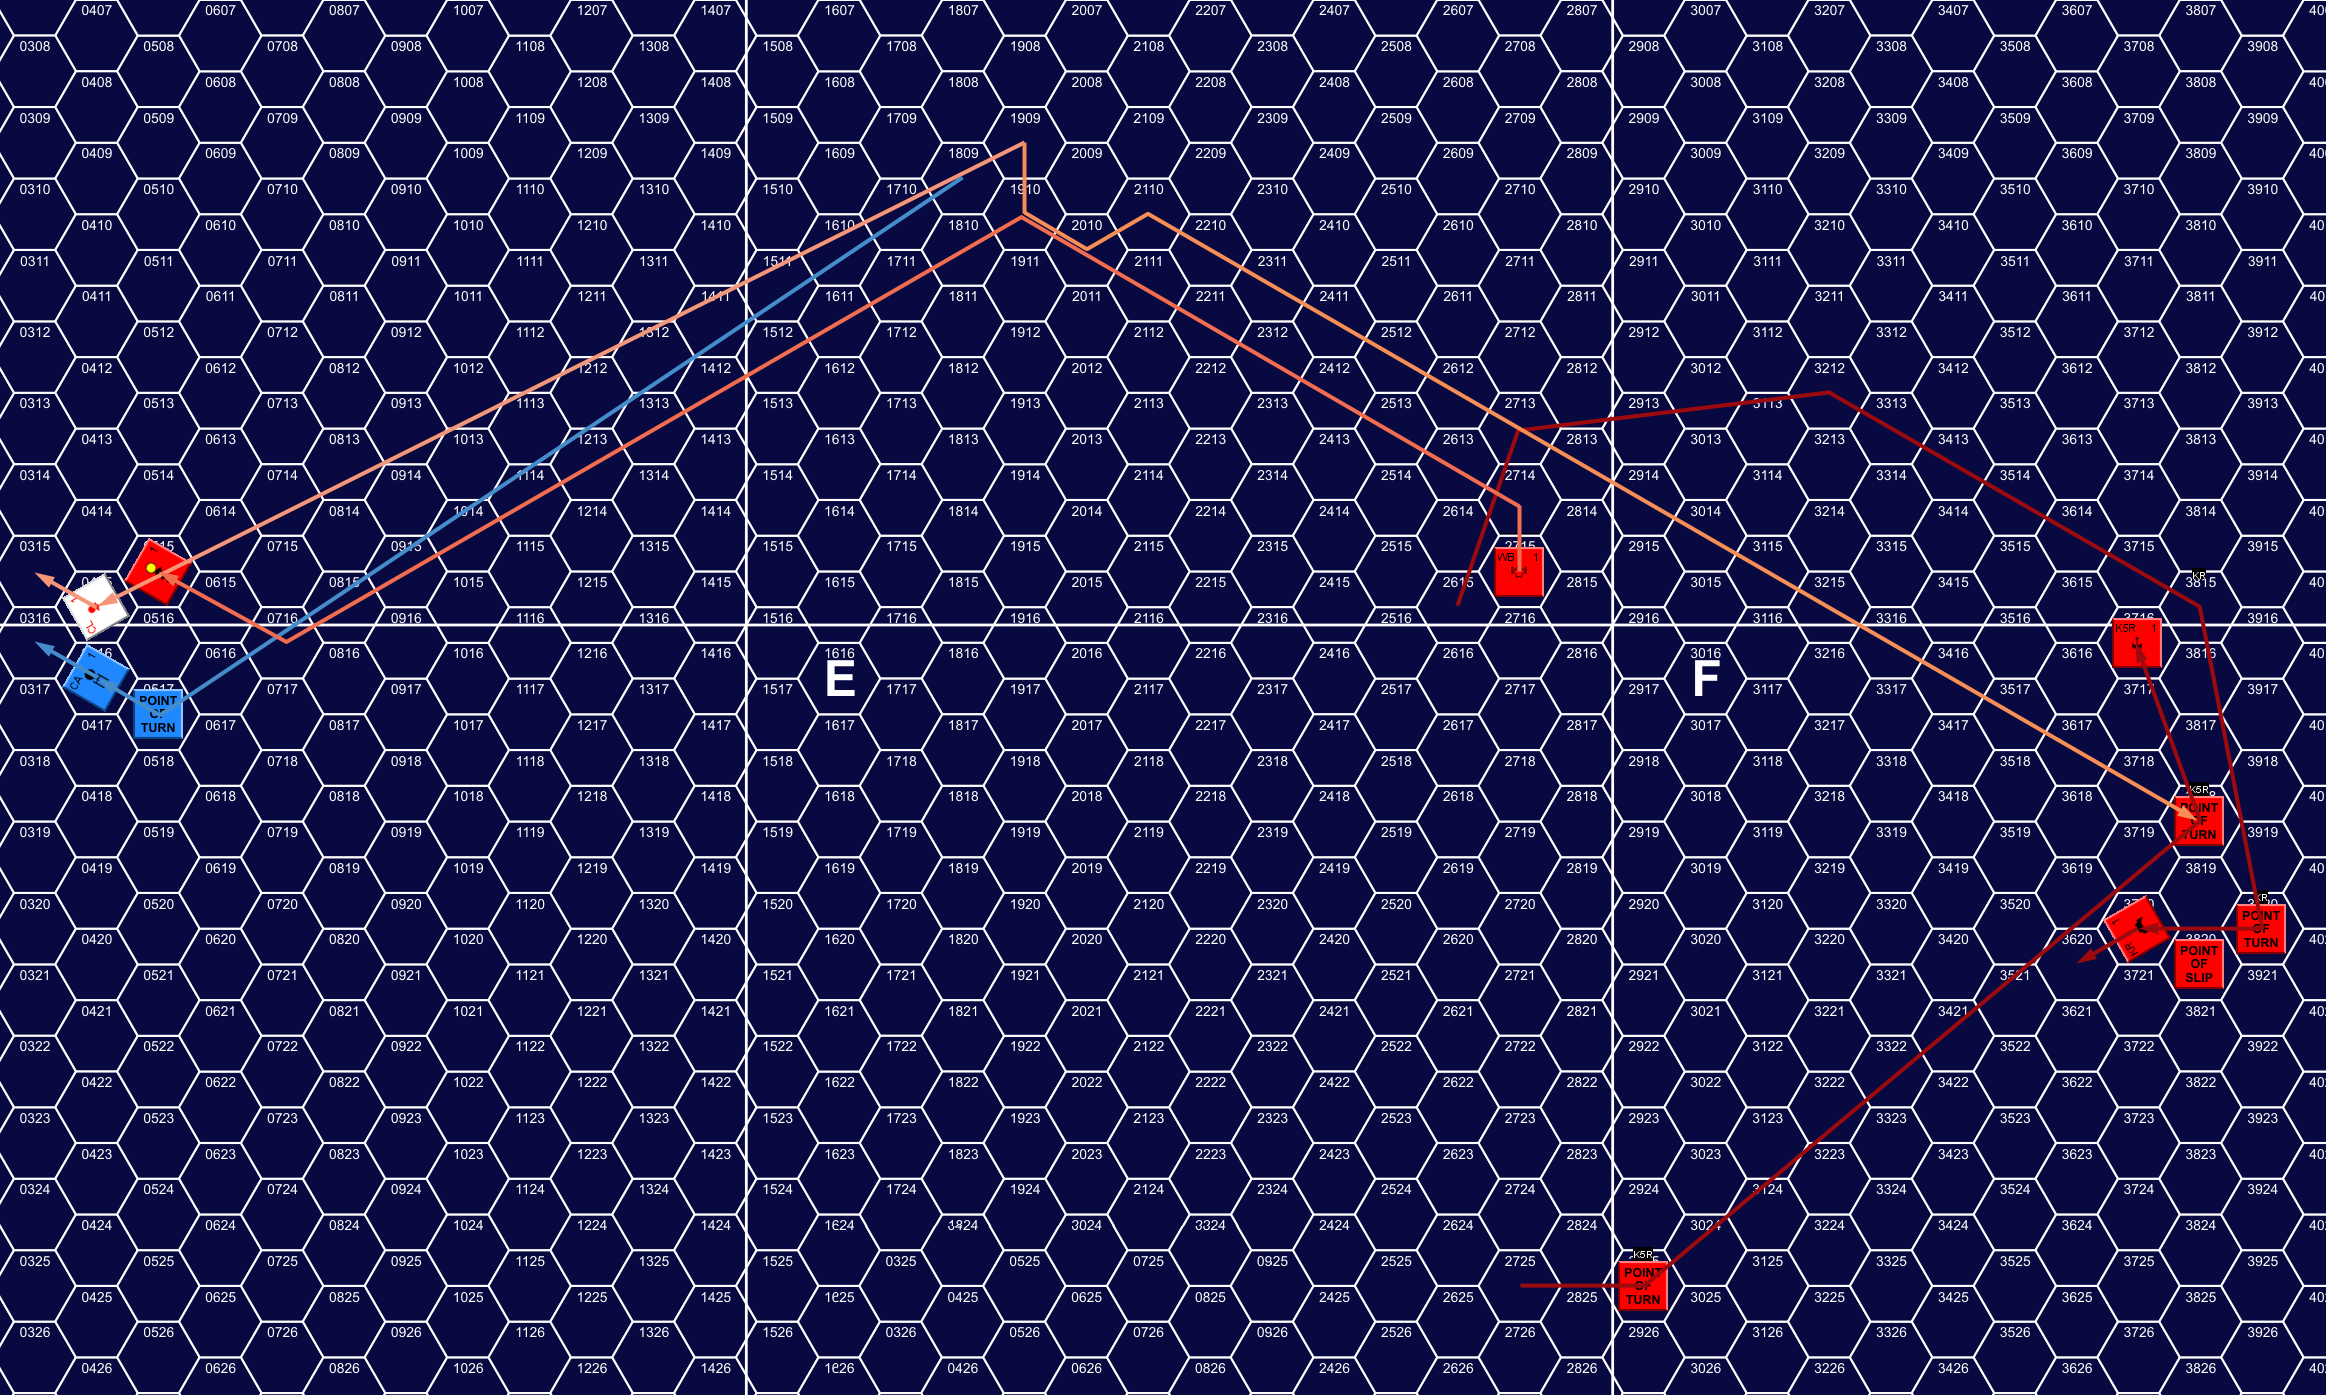
Turn 8, Impulse 26, showing movement from Impulse 2 to 28.
For Turn 9, Patch’s ships slowed to 16 and the KR dropped to 26 (to recharge phasers) while the K5R stayed at 21. The WB+ re-tractored the KR as it went past on Impulse 9. Patch turned to cross my path on Impulse 18. I was nicely bunched together, but of course the K5R was going faster, so it was doing lots of sideslipping to try and keep from getting too far out. To my surprise, instead of doing an oblique shot, he turned in directly on Impulse 30 at a range of 11 (from CA to K5R). The K5R ended up turning for an oblique shot on Impulse 32, with any plasmas (which would reload on Turn 10) forced to go a hex out of the way, and only the CL was in arc.
The WB+ dropped the tractor in EA, and got ready to fast-load the R as a plasma-F. The KR went 27 with everyone else staying at their previous speed. The K5R launched both Fs on Impulse 1, while the CL launched from his ‘B’ tube (which could only track the F5R), while the KR and K5R both launched a shuttle. On Impulse 2 the KR launched both of its torpedoes before turning off on Impulse 3, launched a second shuttle on 4, and then transported a TB between itself and Patch’s ships on 5.
We’d had a nice clean game to this point, and suddenly it was messy.
On Impulse 6, Patch turned off the opposite way as me, bringing this pass to a close other than the in-flight plasmas. Patch opened fire on the Fs on Impulses 9 and 10, reducing them before hitting on Impulse 11 for 7 and 4 points on shield #6 of the CL. The two Gs from the KR were targeted on different ships (to keep from putting all my eggs in one basket), but moved together until near the very end, when Patch’s ships moved indifferent directions, and one had to HET to target the CA. Both hit on Impulse 15 for 11 (after being fired on) on the CL’s #4 and 15 on the CA’s #5 (reduced by three for reinforcement). With it’s cover scattered, and the CA headed somewhat towards it, the WB+ cloaked around this point. Despite the arcs, I had lost track of the fact that Patch’s plasma had to be targeted on the K5R (between weeks), but sorted it out, and managed to get it to hit at the one-point bracket, where I found out it was a psuedo. The CA continued circling around the shuttles I’d launched, with the CL following a few hexes behind, and on Impulse 32, the closest one fired on the CA, but missed.
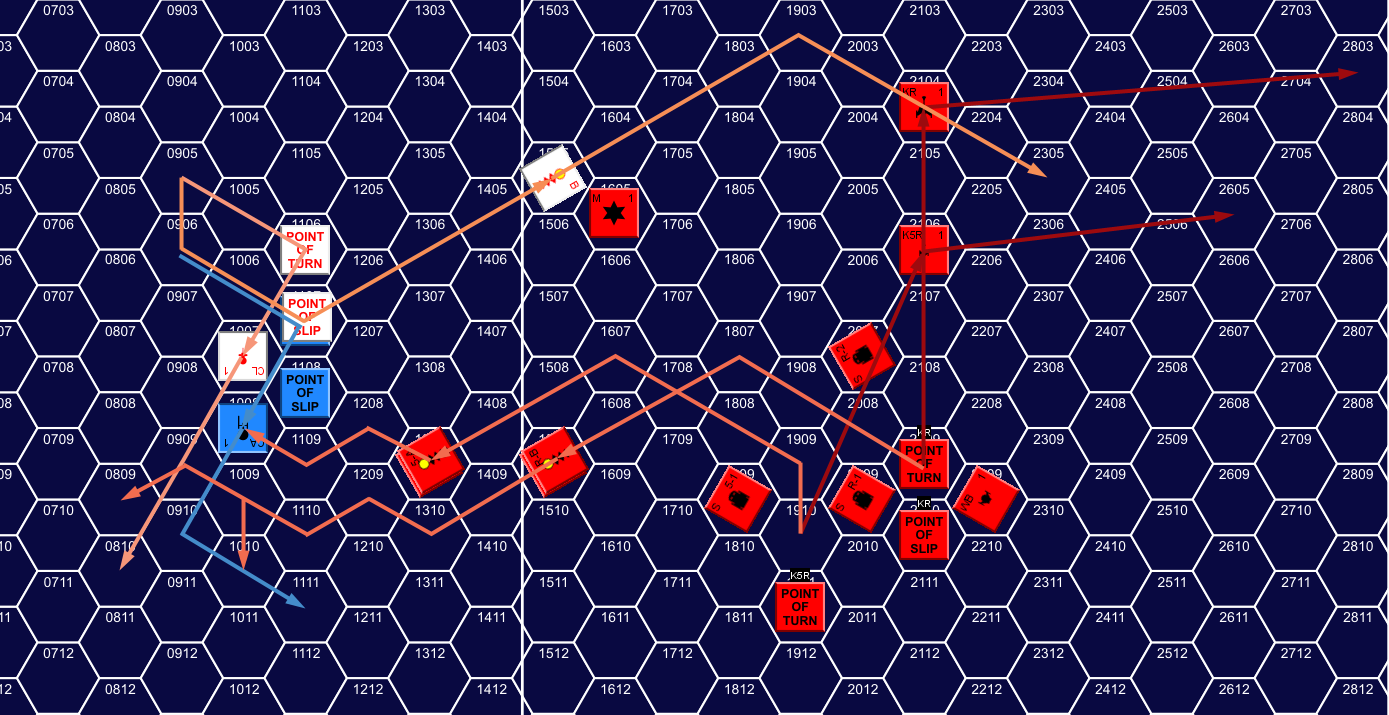
Turn 10, Impulse 8, showing movement from Impulse 1 to 16.
Patch’s ships stayed at speed 16 for Turn 11, while the KR, having to pay to load torpedoes for the first time, slowed to 25, and the K5R sped back up to 23. With my tubes empty, my plan was to circle around behind my mine and try to work my way back to the WB+ next turn and then line up for another moderate-range shot. The CA turned, presumably to head after the KRs, but his path would take him close to the WB+. After a little hesitation, I decided to uncloak and fire off the R, which would still barely be in arc when I finished. On Impulse 8, I was decloaked and both the WB+ and the CL launched a plasma. The shuttle fired again at this point to do 4 points to shield #4, while the WB fired the near-side phasers at range 4 for 9 points to #6 with good rolls. The CA turned in, and took the plasma on #6 to take 35 internals. This took out three phasers and a photon, as well as all the hull and batteries, which was more than I was expecting, though the 9 extra internals certainly helped some. Patch conceded the game at this point, though we worked out what his pass on the WB+ would be.
The CL retained lock-on when the WB+ recloaked, keeping the plasma torpedo active, which hit and did the full 20, followed by the B tube, which hit for half damage, cracking shield #1 and getting the armor. The CL’s phasers did another 5 at point-blank after range and damage adjustments. The CA… had a problem. It turns out the photons were standard load, and with the batteries gone, they couldn’t be overloaded for a point-blank shot. The three remaining phasers did 2 each after all the adjustments for another volley of 6. The WB+ was nearly crippled by losing the plasma torpedo and three phasers, making it effectively mission killed until the plasma tube could be repaired in some fashion (two turns just to bring it back as an F-torp, three for G, and five for R).
Even as it was, the CA could manage a range-2 shot (effective 9) into the down front shield, though it might not be worth it. Still one should hit, and that’s probably 4 points (or 2, or 8). Or if you assume that Patch spent a point or two of battery before being hit, assuming he’d lose that much, that’s two 10-point torpedoes at (effective) range 5. Or he could have just fired them as the WB+ cloaked out for an effective range 5-8 shot anyway, and not even have to worry about further reduction from cloaking effects, but that would have had to be on shield #6 instead of #1.
The scenario uses the Standard Victory Conditions, which gives me 4 VP for being under Patch’s BPV (after adjusting the KR and K5R for not having cloaking devices), and then gives Patch 12 VP for me taking one TB on each ship:
| Romulan | Allied | ||
| Difference | 4 | 0 | |
| Options | 0 | 12 | |
| WB | Damaged | 4.5 | |
| KR | 0 | ||
| K5R | 0 | ||
| CA | Disengaged | 31.25 | |
| CL | Disengaged | 23 | |
| Total | 58.25 | 16.5 | |
| 353% | |||
| Decisive Victory | |||
Afterword
If he’d had a Wild Weasel available, Patch could have even afforded to use that; take the WB+’s best shot while decelerating, and wait out the plasma. The KRs were far away and empty, so he’d be back up to speed before I could do a lot. But it was obvious that he hadn’t gotten around to re-reading those rules; and his life is busy right now, so maybe this wasn’t the best time to go into a scenario that really needs a few things we haven’t been using. (We’ve used Gorns a couple times in the past, so I wasn’t expecting it to be so bad; though I admit I only got around to brushing up on the rules on the day we started.)
On my end, its been over two decades since I’ve flown a KR, and I’m not sure I ever did much with the K5R, which was running thinner on power than I expected. I was very thin on power on both the entire time, though the KR was pushing up to 28 (to get 14 while towing the WB+), while the K5R wasn’t really going over 23. Both were holding suicide shuttles until that final pass, which freed up some power at the end. Of course, this meant that Patch had the EW edge on me the entire time, so any phaser shots I took were at a +1, but the 3 ECCM on the plasma torpedoes took care of that for me. The last pass was where things felt like they started coming back to me, and I knew what kind of ranges I wanted to use, and was in control of what I was doing.
Patch needed to cut back his EW and push his speeds a little higher, which would get him at around the K5R’s speeds, and give him that much more room on the plasmas. He was complaining that the CL was running out of power also, but at 2/3 MC, it should be able to get to speed 24 without trouble as long as it’s not busy recharging phasers and the like. And as long as we were trading moderate-range shots, he needed to be picking on one of my ships. It looks like he was trying to pick on the K5R, but when it was running away on Turn 7 he should have been taking phaser shots at the rear shields. There’s not a lot there, and a little damage now could add up later, especially since it already needed to nurse the hurt #6.
On the turn 10 pass, there weren’t a lot of great options for him, and I assume all the shield damage to the CL is part of what made him go for the ‘frustration overrun’ on 11. Part of the problem was being down to speed 16. At 20, he would have pulled the plasmas out another couple of hexes, and the Fs were already fading fast. Outrunning the Gs might still not have worked, though he’d certainly have the phasers to knock them down a bit (expended on the Fs). Or, if he’d been holding overloads (which as we know he wasn’t), he could have gone in to overrun the WB+ at that point. Even if everything was on the CA, taking the Fs on #6 and the Gs on #1 would be doable, and some phaser fire could even keep the shield (barely) intact. The WB+ was reloading and could only do a quick-load F (which I thought I was about to do), and Patch could probably arrange for a couple turns of close-range shots to reduce it even under cloak. He was too respectful of its (admittedly nice) shields; once through, there’s not a lot of internals in there. Another long-term strategy would have been to fire prox photons at it while it was being towed by the KR. As I’ve noted it doesn’t really have the power to repair shields, and after some hits, I’d have to start thinking about if I really wanted to be carrying a well-armed boat anchor with me.
At any rate, despite Patch’s frustrations, it was nice to be in a KR again. I haven’t been playing as the Klingons much recently, so this is the first time I’ve been in one of the more nimble cruisers in a while. This was the scenario I most wanted to see out of Y160 (because of the KRs), though I’m hoping for a nice afternoon session of “Coming of the Meteor” at some point, and we’ll see on the other scenarios.
Discussion (2) ¬
Great AAR! Thanks for providing all the maps to make it simple to follow.
We are playing this very scenario this week (after having slogged from Y120 to Y160 in 5-year increments).
I’m looking forward to seeing if the plucky WB can survive till the KR arrives.