
J32 Panzer Graveyard
After finishing up Lagus Assault Guns, Tom suggested trying out J32 “Panzer Graveyard” from Journal 2, and we got going at the beginning of March. A January ’44 scenario in Italy, it has a worn-out German force with a lot of tanks assaulting a stiff British defense in the board 46 town. The Germans attack with twelve squads (ranging from first line to conscripts), a few MGs and four Pz IV Hs with a 9-1 AL and four Pz III Ns. The British are defending with ten first-line squads, a HMG and a MMG, two PIATs (who are assigned to 1-2-7 crews), a 6 pdr AT gun, a Churchill IV and a Sherman III, and some concealment markers. There’s a small cluster of buildings added across the street from the main town that serves as a possible jumping-off point for the Germans.
This ordinarily should be a 1/2 map scenario. But instead, it uses all of board 46 and 18 (including an overlay with another level 2 hill). This is for the use of the Pz IIIs, which set up on the various hills, ready to shell the defenders, or smoke them in. The Germans have six turns and need to control 20 buildings (out of 30) in the British setup area at the end of the game. While they have lots of armor support, they have problems; all German MMC are Lax, and their ELR is only 2. Finally, there is a +1 LV on the final turn.
I took the British defense, and spent some time trying to figure out what I wanted to do. There’s three main ways for the Germans to approach this, the main obvious one is the center area, jumping off from the built up area. I figured an approach from the east had a lot of open ground to go through before reaching the first buildings, and then tended to hit the least-dense parts of the town, with the graveyard, woods, and orchards, though all of that was harder to defend. Meanwhile, the west side had some open ground as well, including an extra small hill, but with some cover just on the other side of the road that forms the setup areas. I put some light forces (including a Dummy in 46W7) to slow down an east-side assault slightly, while defending the west more heavily with the HMG in EE4 and a PIAT in the brush in DD2. Another HS was in the brush in EE1, which was as far forward as I dared to go there (and there was no concealment terrain forward of there anyway). LMGs were in Y5 and W5 to provide Fire Lanes against advances in the center area, with the HMG centrally located in BB5. I had a hard time figuring out where to put the tanks and ATG, since anywhere exposed could lead to them getting easily swarmed, with eight German tanks out there (though the Pz IIIs would struggle to kill either of mine even with a rear shot with a Final TK of 3; 5 with HEAT on a 9 or less), and a good number of PFs available. The Churchill anchored the main line of defense in the northeast in Z7, with help from a PIAT in Z9 (with a crucial error that I’ll get to later), and a 7-0 Z6 to act as a preliminary rally point. The Sherman was in CC7 to cover the central street, and possibly anchor the defense once the first line of buildings had fallen. The ATG went in GG7 facing SE, in case armor tried to go around the west flank and cut off my defenders (and I had problems finding anyplace that could see terrain I wanted to cover).
Tom’s setup surprised me, with the bulk of his forces in the center, but largely a hex back, and out of sight from my line, and three squads (and two HS, with his HMG & MMG) on the eastern flank backed up by two of his Pz IVs. He had figured my ATG was around EE2 (exactly the type of forward position I avoided) and stayed away from the brush. Most of his Pz IIIs were behind them on the board 46 hill, but one was backing up the main force in 18Q2. One Pz III fired, placing Smoke in V5, while the eastern Pz IV first pinned my HS in U7, which then ELRed to fire from his MGs. Most of his center forces fired on my other visible unit in AA2, forcing a 1MC which they passed. The last Pz IV fired on W7, but missed.
Tom then started showing off aggressive armor tactics my moving the second eastern Pz IV into Motion VBM of V8. I attempted CCRF, but pinned instead. Having locked up my primary defense, he advanced two squads and a 9-1 towards the building, but a good roll from W5 managed a 1MC that pinned the leader and broke a squad. This activated his Sniper, who broke the squad that had been the target of all his fire earlier. Past that, there was little left to move, other than some of the Pz IIIs advancing up to the rest of his troops.
My LMG squad Final Fired on his MG stack, and with another low roll, broke both HSes with MGs. Not only that, but my Sniper activated, and hit the same hex, with a three-way tie (out of four units), to fatally wound the 8-1 and then break the squad in the hex. The only CC was with the VBM Pz IV in V8, and my squad only missed because of being pinned.
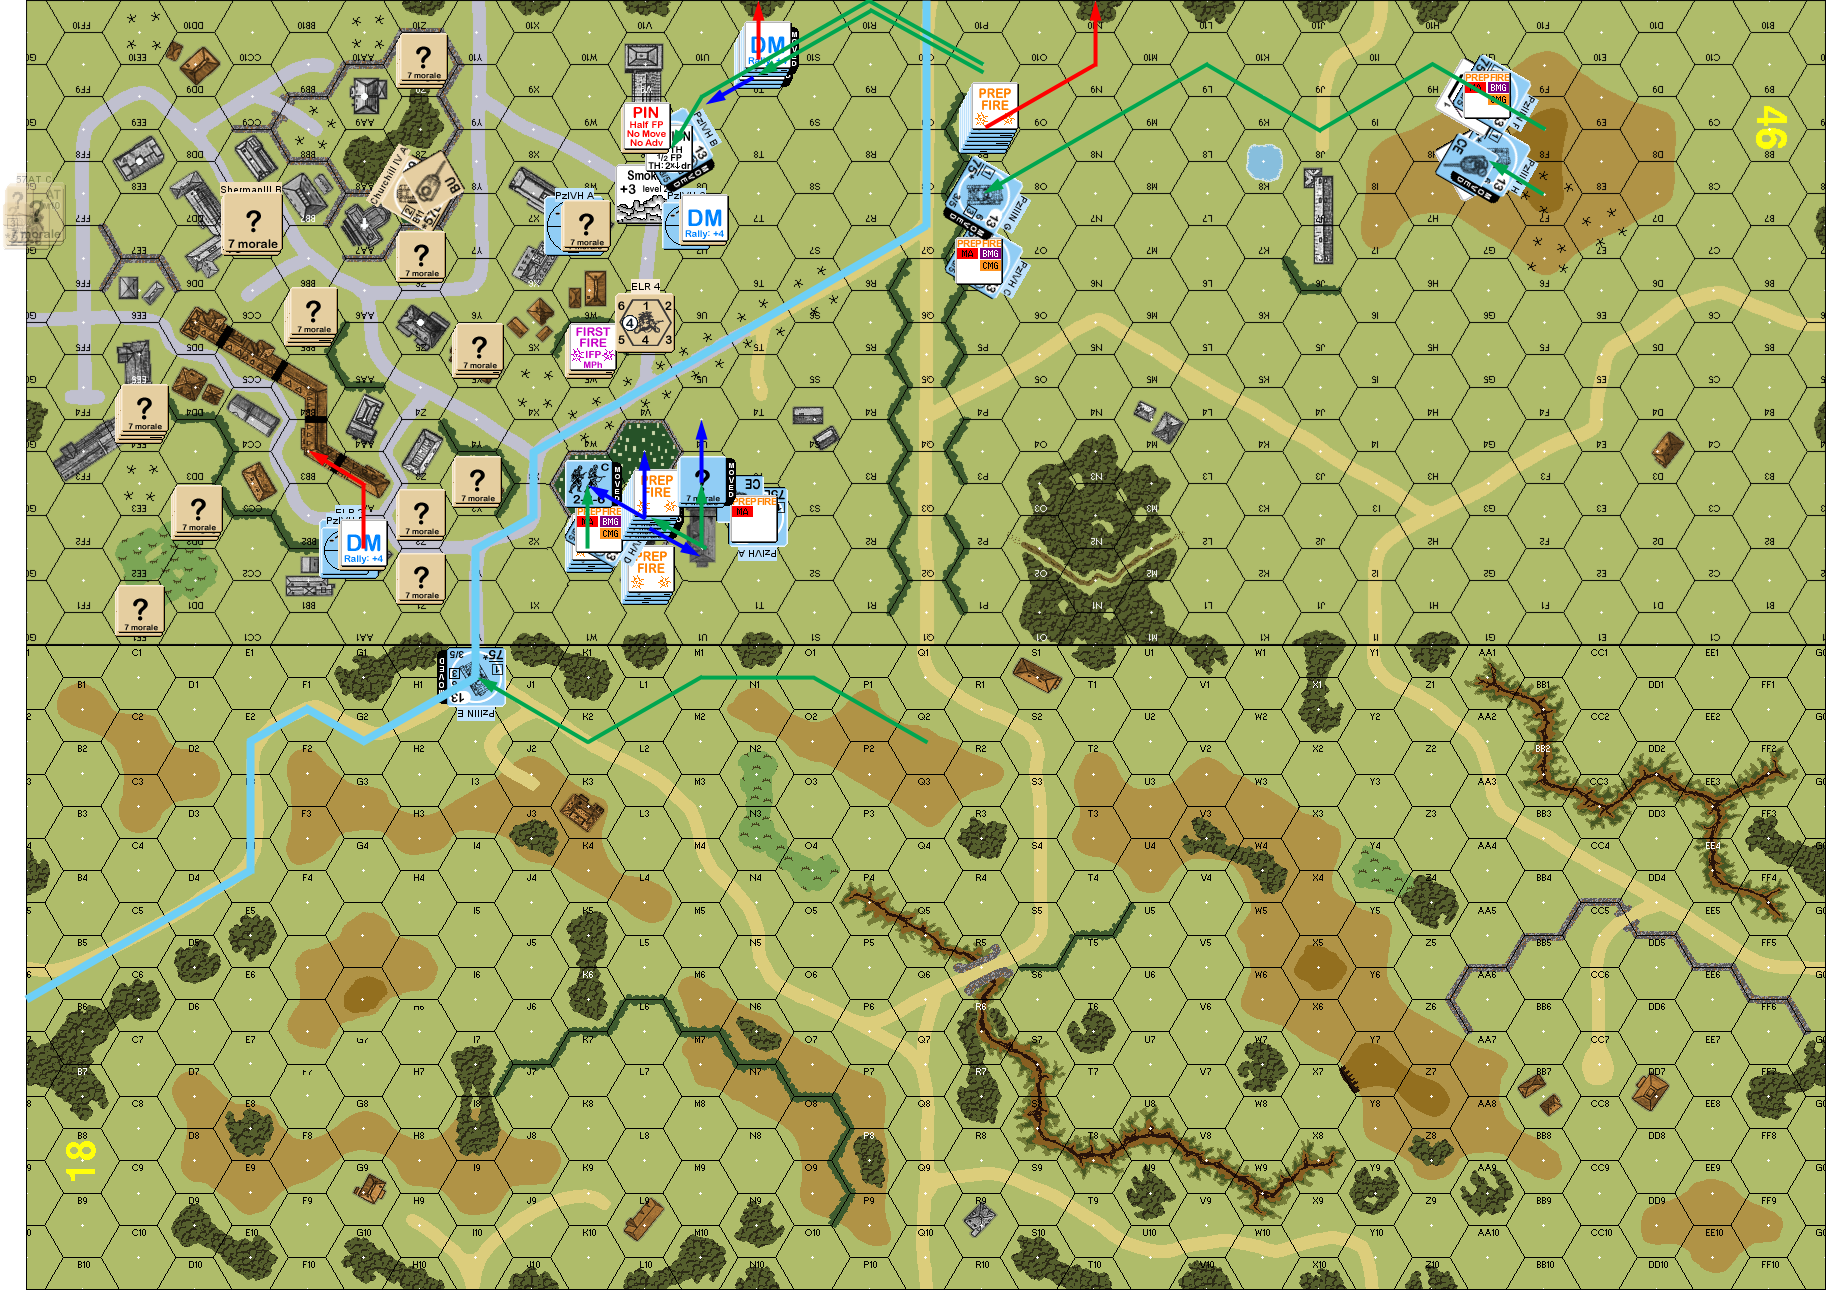
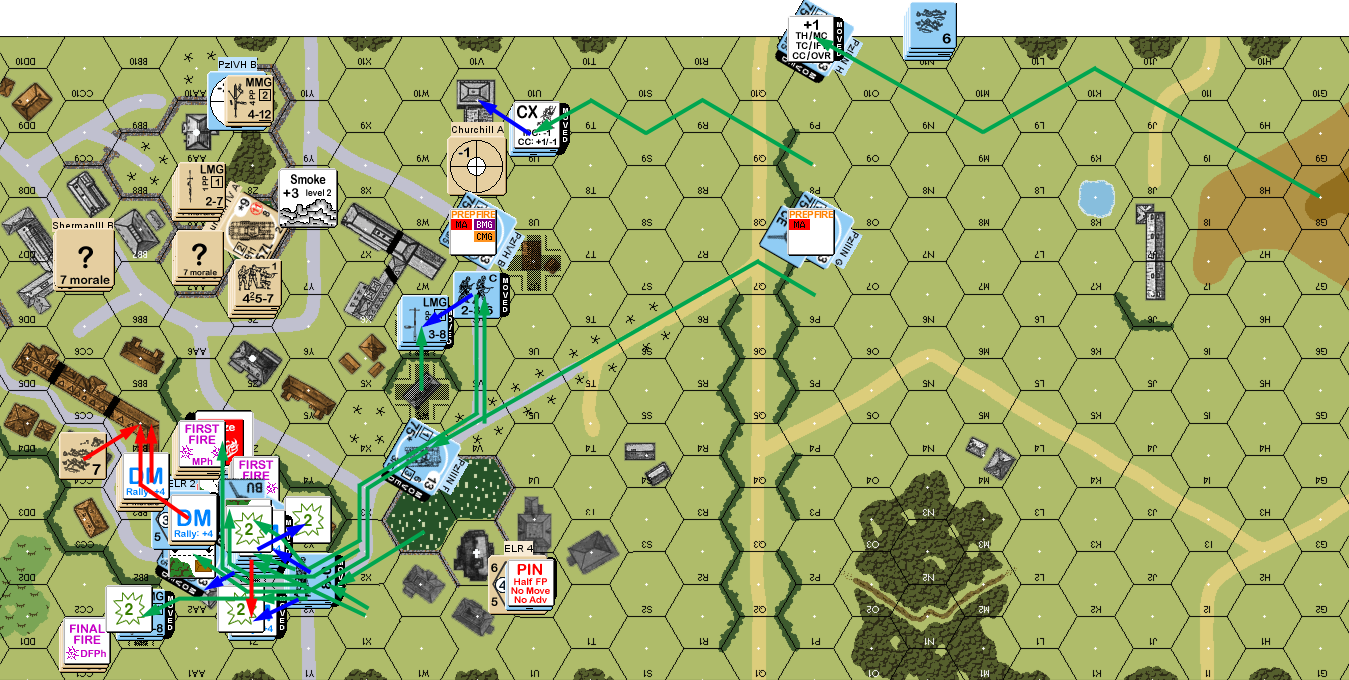
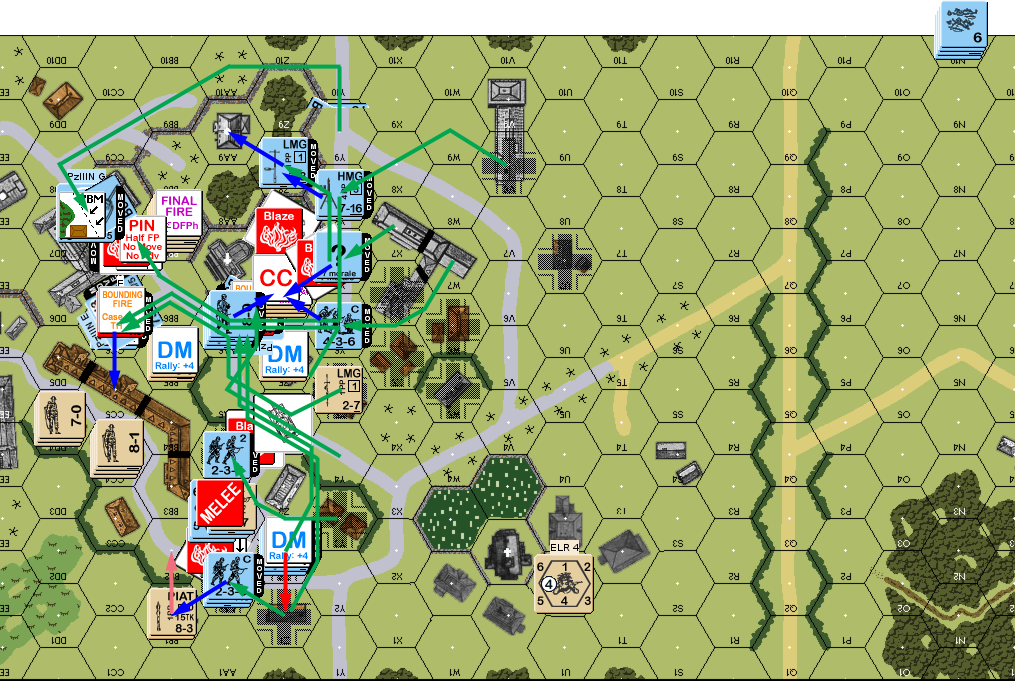
Situation, German Turn 1, showing the full scenario area, and my HIP Gun. The blue ribbon is the dividing line between the British and German setup areas.
My self-rally was unsuccessful, and none of the Germans had a leader with them. My forward squad Dashed back to X7 to form the main part of the second defense line, while both LMG squads pulled back a hex. On the west side, the forward HS ran for the town, and I decided to be risky with the PIAT, and sent it towards 18G1. If he made it, the Pz III in I1 would at least be distracted from aiding the main assault on the town for a turn. I figured he’d probably break in the attempt, but as a crew he could self-rally. Instead a good roll killed the crew and left the PIAT in CC1. The HMG shifted from the west into the rowhouse, which freed the MMG to head over to support the Churchill. Final Fire pounded a few positions, eventually eliminating my broken HS in U7, breaking a LMG squad, and revealing and breaking a squad in Z2.
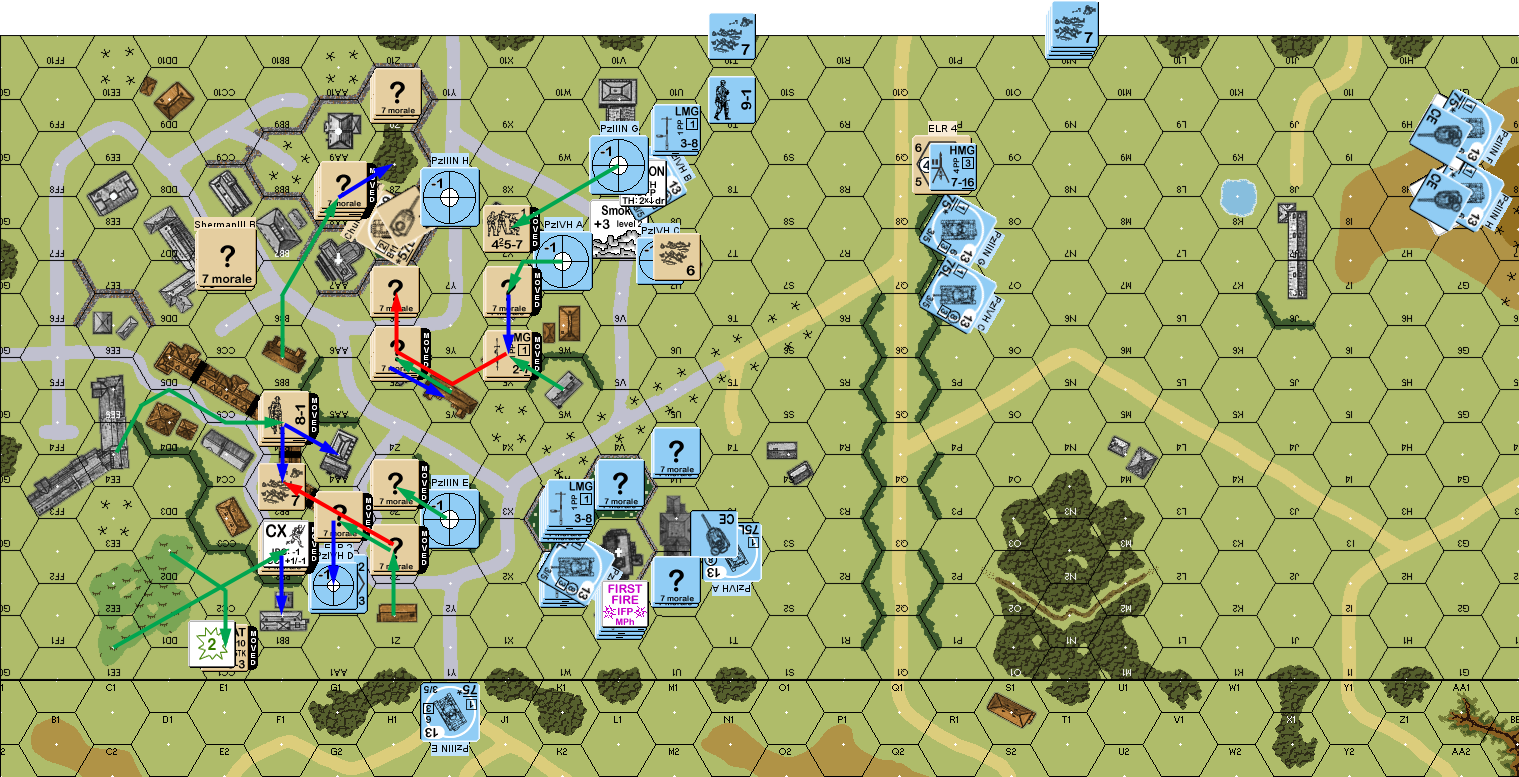
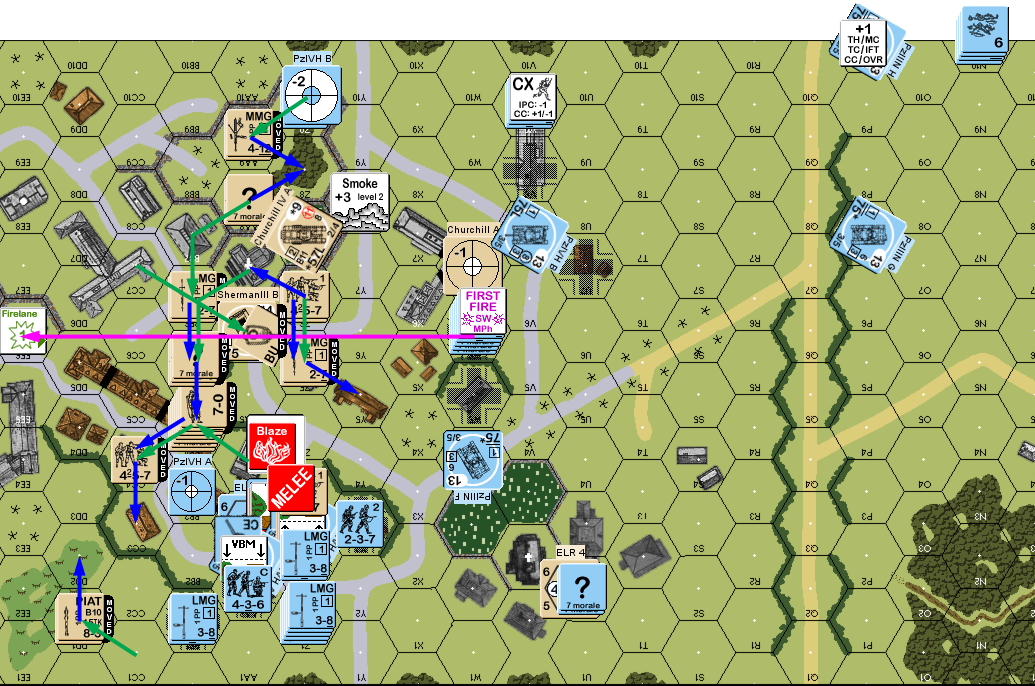
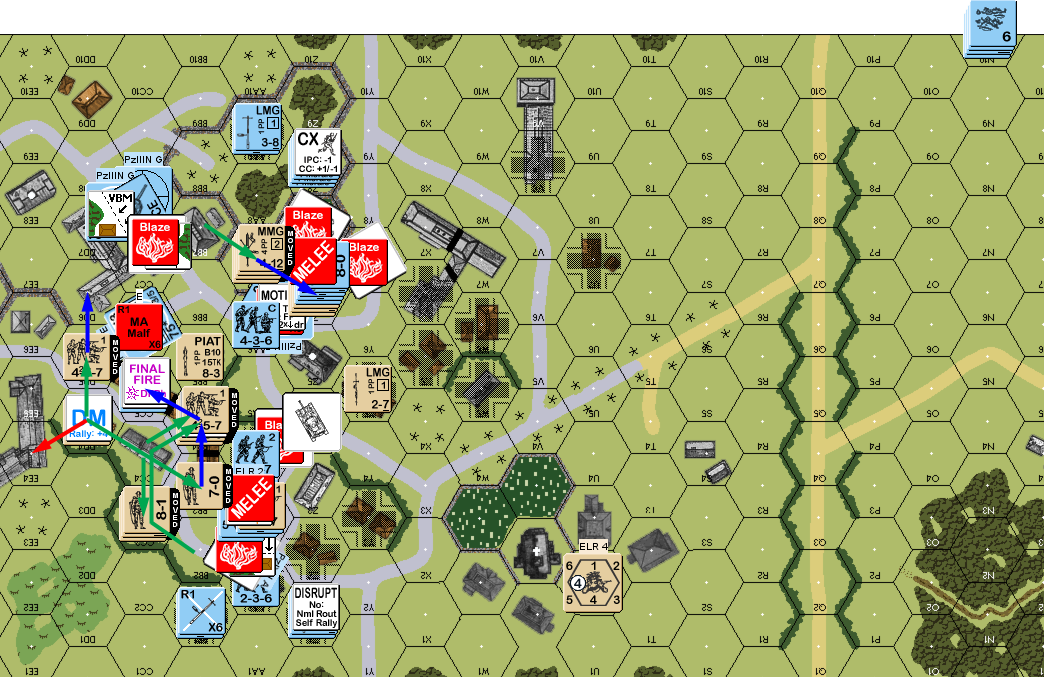
Situation, British Turn 1.
Turn 2 started off with Gusts, which effectively got rid of the first turn’s Smoke. Tom self-rallied his squad in T10, but of my three broken squads, only the one not under DM came back. One Pz III placed more Smoke in W8, but activated my Sniper, which stunned a Pz III back on the hill. The Pz III in 18I1 started up and then dispensed Smoke in Y2, with a Pz IV trying, and failing for the same thing in W4, before a Squad managed to place Smoke grenades there. However, despite getting the cover, the squads in the area mostly milled about instead of advancing. The exceptions were a squad and a half that assault moved into V4, and two squads who Armor Assaulted two hexes with the second Pz IV in the area. I fired on them, but could only get a PTC, which they passed.
In the east, the two Pz IVs moved up near the W7 building, and he occupied U7 for his first victory building, while a squad ran back for the abandoned HMG, and the 9-1 went back to get the squad and two HS in N10. My Final Fire broke the squad in V4, and in the AFPh, the tanks put a nice line of acquired markers from X7 to T5, as well as on Z8 and AA2 (pinning the squad there in the process). In APh, he occupied W5 and W6 to bring his total to three buildings, and most of his tanks went CE.
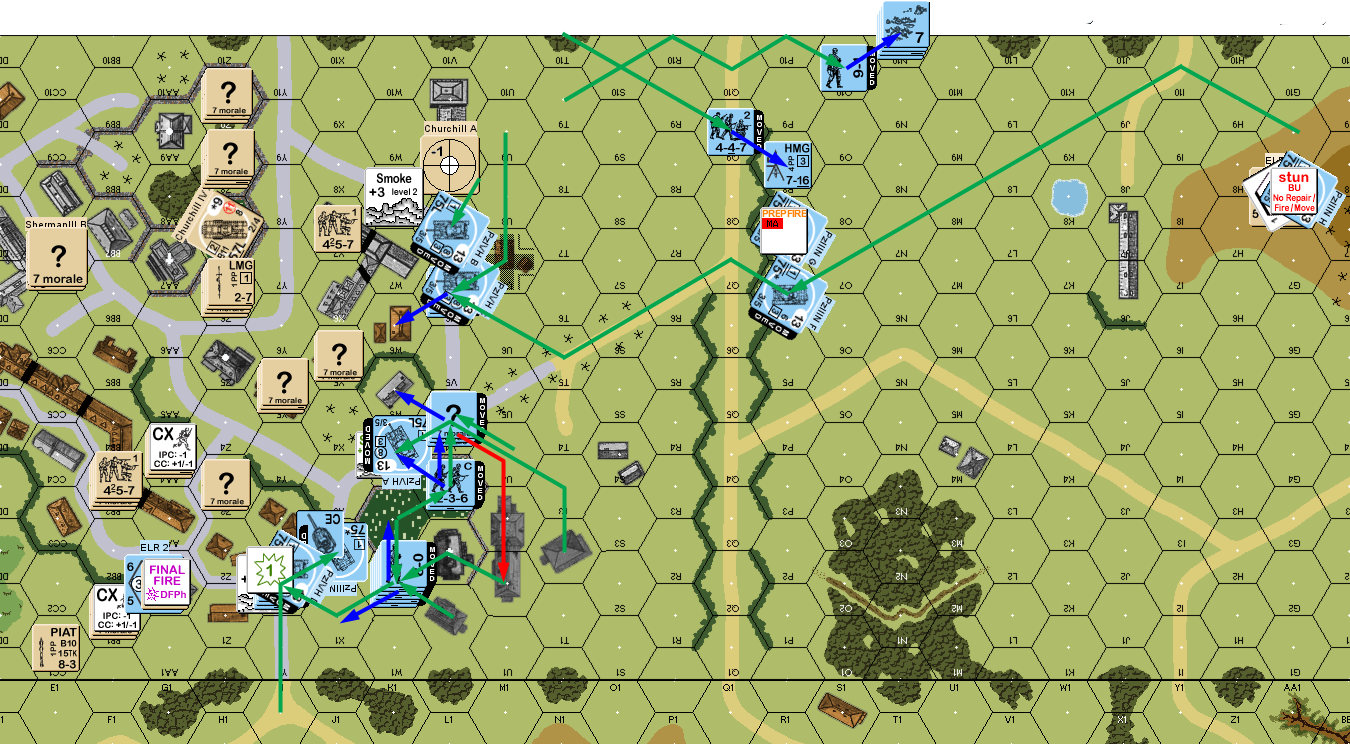
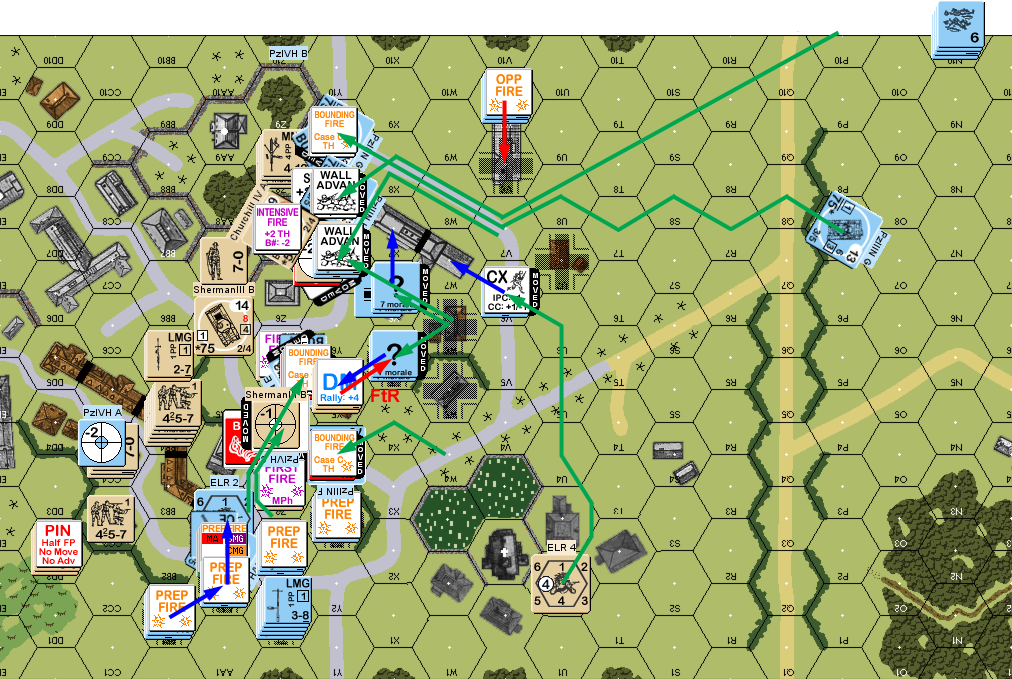
Situation, German Turn 2.
I got both of my squads back for my turn, while Tom recovered his HMG and rallied the two HSes in N10, while missing on the squad there. I fired on a few of his units, pinning a squad in Y2, and declared Opportunity Fire on my HMG to get rid of CX before firing on W5 (the only thing in LOS). I partly skulked, and partly rearranged my line a bit. I tried to get extra men on the extreme southwest flank (to replace a likely break of my firing unit in AA2), but my Dashing squad broke in the street.
AA2 did indeed break on a 3MC, but my Sniper went off again, and killed his 9-1 in N10, which then caused the squad there to reduce, and re-broke the two HSes there (ELRing the one that wasn’t already a conscript). A Pz III managed to break my LMG squad in Y5 and eliminate my Dummy, but further fire malfunctioned its MA. A Pz IV pinned my 7-0 in Z6, and re-broke the squad there.
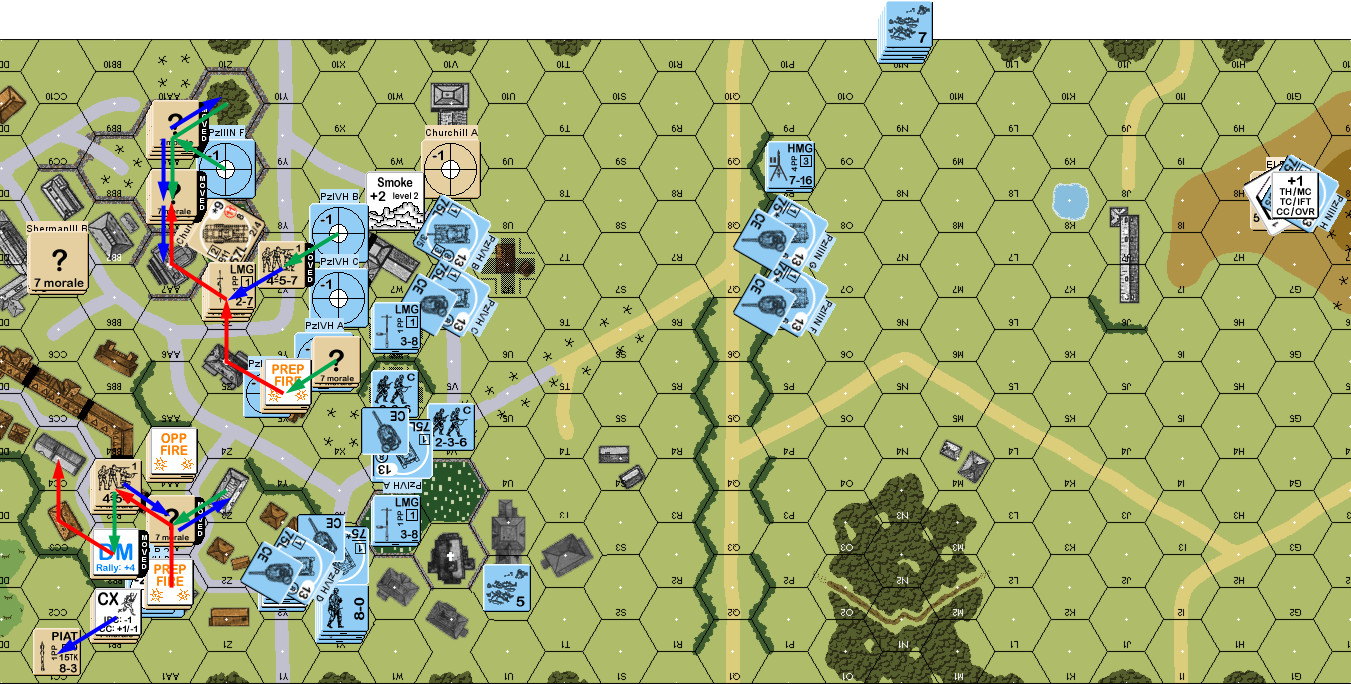
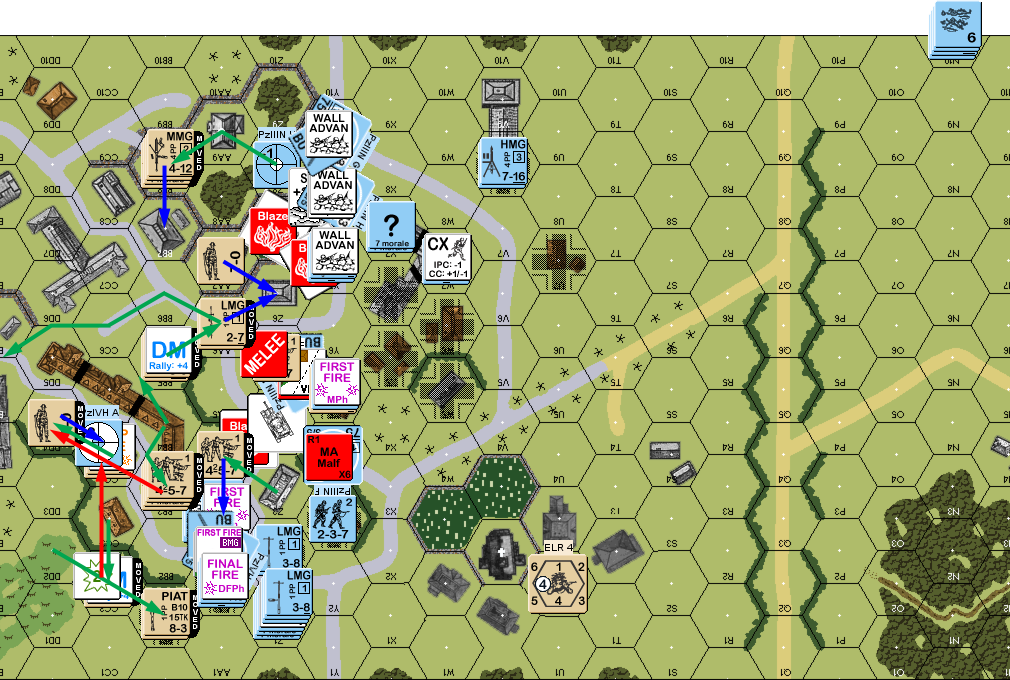
Situation, British Turn 2.
Tom successfully self-rallied his squad in U2 for his turn 3, and Deployed a squad in X1, but did not get any result on MA repair, while I rallied the broken squad in Z6, but failed to recover my dropped PIAT. A Pz III placed Smoke in Y8, and fire on Z9 revealed my MMG there with no effect, but my Sniper activated again, and I relocated it to Y4 (the most likely result was just DMing N10 again, and getting my surprisingly active Sniper into the middle of his main assault was a priority). Tom showed it was going to be a hard turn when the first thing that moved was the western Pz IV, which worked it’s way through the Narrow Streets to my HMG position. I left residual in a couple hexes as it moved (I hadn’t known where he was going), and pinned, when I tried Street Fighting it with Z3. I was tempted to try the HMG’s 3 ROF and 6TK vs the 3/4 side armor, but passed a PAATC to roll a ‘2’ on Street Fighting, burning the tank (…and smoking in my own position) while generating a 7-0 leader (and incidentally killing his AL)!
The two other tanks in the area followed, and ended in bypass of AA3 and AA2. Then the Pz IV in V6 joined them in bypass of Z3. He then advanced with the Infantry, occupying Z2 and BB1, though one squad broke and ELRed from all the residual scattered around. (Also, in this section conscript squad was accidentally picked up with a Pz IV and moved a couple hexes, and then moved on its own again; it was very hard to pick out in the crowd while under the tank, I had to go through the logs a couple times to spot it even when I knew the squad hadn’t started there.) The main group in X1 advanced into a good residual roll, and a squad and a half broke to conscripts. This activated both our Snipers, with his breaking my forward squad in AA3, and mine pinning his squad in U2.
Advancing Fire pinned my HS in CC1, and caused the CMG on the Pz IV in Z3 to malfunction. In Advance he occupied buildings V8, Y2, and AA2 to get up to 8 Controlled buildings. In Z3 my pinned squad couldn’t even get close to a result on the Pz IV bypassing the hex.
Situation, German Turn 3. Sometimes, you just wish you had a Deluxe board.
For my turn, I rallied the squad in AA8, and one of the three in BB4 as well as recovering the PIAT. This gave me two active squads in the SW section (one of which was the HMG squad); I needed more, but had been afraid I wouldn’t have gotten anyone while under DM. Tom didn’t get any of the mess in Z1 back, and failed to repair his CMG, skipping MA repair to avoid a possible Recall.
I shifted the remaining PIAT crew over towards the rowhouse, while also sending one LMG squad that way, and advancing the other back into the central block in Z5. I tried to figure out some way of getting the Sherman at the all the Panzers overrunning the SW section, but everything required way too much movement. Still, it was definitely time to get it in action, and it moved into AA6, where it could try to slow down the big stack that had accumulated in W6. Despite a lot of firepower, poor rolls in DFPh saw no effect other than a Pz III malfunctioning its MA, and a LMG malfunction. My AFPh pinned a squad. Z3 continued to show no result (helped by the fact that that was the tank with the malfunctioned CMG, so it couldn’t even attack back).
Situation, British Turn 3.
Tom skipped both his MA repairs this time, and couldn’t repair either malfunctioned MG. None of his rally attempts worked, while both of my squads rallied in BB4. Prep fire pinned my PIAT HS in DD2, but several shots failed to affect my HMG in CC4, and a big 20FP shot at Z3 failed after Cowering reduced it two columns. The Pz III in bypass of AA3 took a shot at Z3 for no effect and then crossed the central street to end in Bypass of Z5 (and nicely out of LOS of the Sherman). The squad there tried taking it out, but missed the CCRF roll. The Pz III in W4 moved forward, and broke my squad in Y5 with MG fire, and then ended in Y4.
Then the Pz IV causing the Melee in Z3 started, and circling around the building put itself in the street in Z4. My squad tried Street Fighting it, but while they passed the PAATC, they missed the attack. The Sherman was forced to stop covering the east, and just barely got a hit (and ROF!) to kill it before it could fire. The one Pz III still completely healthy moved up from its position back at the starting hedgeline, and took Wall Advantage in Y9.
This pointed up a problem that I should have thought about much earlier. I’m used to either being in clear terrain behind a wall (which automatically delivers WA without needing to mark it), or being in a building that I would much rather have than the directional +1 or +2 of a hedge or wall. Here, however, the Z-hexrow near the church all has +1 terrain, so I needed to declare WA to have it. Tom now took advantage of my mental lazyness to take advantage of my MMG and Churchill.
The Pz III fired on the MMG squad (no effect), and bounced a shell off the turret of the Churchill. Then the Pz IV on that side drove up to take WA over the Churchill; the Churchill fired as it Bypassed X7 and missed, and then got a turret hit with IF as it rolled into Y7 to burn it. The group in W6 split up to occupy buildings X5 and X6, and a squad moved up to Y7. The Churchill fired on them as they moved up, but had no effect.
My MMG managed to break his Op Fired HMG squad in V9, but nothing else had any effect. Desperate to stop as much as I could before he started taking the Z7 block, the Sherman fired on X6, and malfed the gun on an IF shot. His squad in Y7 pinned on its first PF check, but then got a Critical Hit on the second to blow up the Churchill. Thankfully, nothing else was able to do anything productive. My broken squad in Y5 bounced into his concealed HS X5 and was eliminated for FtR. He advanced so as to have been in every hex of building X6, guaranteeing the ATG wasn’t maintaining Control of it, and advanced into Y5, putting him at 11 Buildings. In Z5, there was no result from my squad or the Pz III.
Situation, German Turn 4.
My only activity for my turn 4 RPh was MA repair, which eliminated the gun and recalled the tank. Meanwhile, Tom had one good roll, a ‘2’, which ended up Disrupting his conscript HS in Z1. I attempted to move the PIAT crew back to the NE side, since I was out of AT possibilities there, but they were spotted in bypass and broken. I attempted to shift to a heavier defense on the south side, but one squad was broken on his way over (he was a bit of a distraction), while my PIAT HS got into BB1 and reclaimed control, sitting next to a Pz IV. However, two squads and my 8-1 all gathered in BB3 with two different objectives: One squad was to move on into CC3, while the other and the concealed leader would advance into AA3, and try to Ambush (with a 4 modifier difference) and eliminate the squad there. I had expected the Pz IV to either try and do something about the PIAT or keep firing on the HMG; instead it fired on BB3 and broke both squads. When they routed out, Tom was left in Control of the Rowhouse.
The PIAT hit and burned the Pz IV, but I compounded the problem of suddenly having two few GO squads in the area by sending the one regular squad left into CC with AA3 anyway. Naturally, I didn’t get Ambush, and neither side got a result. I also realized a bit late that I should have sent my 7-0 forward and advanced him into the Melee in Z5 to improve the odds there. As it turned out, he wouldn’t have helped against the tank, but he would have shifted the odds on the tank’s attack, and kept it from reducing my squad to a HS.
Situation, British Turn 4.
Tom self-rallied the HMG squad, and finally rallied the two squads and HS in Z1 (which finally got him Control there), only missing his roll to repair his LMG. Meanwhile, nothing of mine rallied. The Pz III in Y4 moved up and fired on the melee in Z5, breaking the HS with a 2MC (okay, so the 7-0 wouldn’t have been a big help), and then moved into bypass of Z6, who couldn’t quite get a result with CCRF. The Pz in Z5 pulled out, fired on Z6 (PTC, which was passed), and then parked itself in CC6. The Pz III in Y8 then swung around the same way and ended in bypass of BB7. However, the MMG squad rolled another ‘2’ for CCRF, burning the tank and creating an 8-1 leader.
But, I now had very little left in the center, and Tom sent his forces that way, ending up with two squads and his 8-0 in AA6. There would have been a third, but my HMG had a clear LOS to the stack as it bypassed Z2, and disrupted the LMG squad (I had somewhat higher hopes than a 1MC for a 6 -3 shot…). To add just a little more drama, AA3 caught flame from the burning wreck in bypass of AA2. My PIAT crew and the HS in Z5 were surrounded, but Tom wasn’t taking prisoners, and so they were eliminated. He had managed to slip a HS into CC6, and now it advanced into CC5, causing my three broken squads to be DM again, while also taking building AA9.
He got a squad into BB1, but I Ambushed him, and the HS slipped out into BB2, leaving Control of the building to him, getting him to 15 buildings. He advanced two and a half squads (the last concealed) and the 8-0 into Z6, the Pz III was still there, but no one was able to do anything in sequential CC. In AA3 the Melee continued without result.
Situation, German Turn 5.
Good rally rolls got me two of my squads back (and was just one off on the third), while Tom had no rallies, and missed on MA and LMG repair. The PIAT HS moved to get a shot at CC6 (which missed… this time), while the HMG continued holding down the SW flank. One squad moved to get into building DD6, so he couldn’t take it easily, and they might fire on anyone who got into the area. Another squad maneuvered to get at the HS in CC5, and hopefully eliminate him, while I fed an extra leader into the big Melee in Z6. My 7-0 was going to advance into the Melee in AA3, to force him into a 1:2 attack, but the flame turned into a Blaze there, killing both sides before he got there. Advancing fire broke, and then eliminated the squad in AA6, giving him one less mobile unit for the last turn.
I managed to capture the HS in CC5 in CC (reverting Control of the rowhouse back to me). The Melee in Z6 started with me rolling another ‘2’ to knock out his best squad, destroy a LMG, and generate an 8-1 leader. I was kind of tempted to pull the units out of the hex, but stayed in to keep the other squad and a half in Melee. He tried a 1:1 vs everything and missed, and then my left over 7-0 rolled a ‘3’ to CR his HS+leader (…and the RS picked both units, killing the HS and wounding the 8-0). At that point, Tom conceded the game with one full turn to go, and Control of 14 buildings.
Situation, British Turn 5.
Afterword
By my calculations, Tom could have taken Control of 6 buildings on his last turn to get up to the needed 20 (21, if the Melee then went his way)… assuming my fire didn’t stop any of that, which was very unlikely (one squad would have had to take a 16 +1 shot from my MMG squad at the least), and then I should be able to take a building or two back on my turn without much trouble (AA4 would be empty and adjacent to a HS of mine under this plan).
Luck generally favored me all throughout the game, starting with a very active 4 SAN for the first couple turns that completely smashed his heavy-weapons section on the east side. It certainly felt like every time I needed a PAATC I pinned, and I had a lot of 8s and 9s in CC. But when I did roll well, it tended to be ‘2s’, and while Tom lost his two best leaders early on, I had gone from three to six leaders at the end of the game.
However, Tom did a very good job with aggressive tank driving, and a lot of his gains came from locking me up with VBM; it is a very good thing that I got Journal 12, and read “A Dose of Antifreeze” between turns 1 and 2, which helped clarify my thinking a lot. In addition, my defense generally worked about the way I intended, though one of my principles was to maintain control of the big rowhouse from AA4-DD5 by using its size and orientation to make it hard to get. I forgot that for a moment, and accidentally let him have it during turn 3. Turn 4, was the real crisis point for me, as he finally got through one of my initial defense lines (Z7-Z9; I didn’t consider the squad and a half forward of there more than a delaying outpost), and I didn’t stay conservative enough, and nearly let him get through the main defense in the face of his main concentration. But, by that point Tom was too spent to really take advantage, and the HMG was just too dangerous to advance on.
In fact, Tom’s main force was in the V2 area, and it ended turn 1 where I felt it should have started. There should probably have been a Pz III in 18J2 and I3, and between the two, smoke in Y3 (or Y2) was very likely. In fact, I was expecting to see 3+ Smoke shots a turn, and there was two on the first turn and one each on the second and third (though the use of sD on turn 2 made up for the lack, and allowed the tanks to move).
For my part, I really needed to have better answer as to what to do with my ATG. At the least, I probably should have pushed it out towards FF8 during my turn 3, after the collapse of the Z-hexrow. For setup, I’m thinking switching it with the Sherman might do well. It seems inevitable that someone will end up in the AA6-BB6 area, and it can be part of the final defense for an attack from almost any direction (which is why the Sherman was there, actually). Or maybe swap with the PIAT in Z9. And of course, I really needed to have declared WA in Z8 and Z9 to begin with.
I’ve heard good things about this scenario in the past, and having played it now, I agree. It’s a really tough proposition for both sides, and it’s not often you get to see a tight fight in poor armor terrain depend on tanks this much.
Discussion ¬