
A94 Last Defense Line
By the time I finished Panzer Graveyard with Tom Arnold, I was engaged in a (currently delayed) game from a set of four in Annual 96 that were rereleases from SL. I proposed “Last Defense Line” from that set, and Tom took the defending French.
It’s May ’40, and the French are defending half of boards 3 and 4 with eight squads, good leadership, two MMGs, a Brandt MTR, and two 65mm INF Guns, with two foxholes. The Germans enter with 12 squads, very good leadership (five leaders), a MMG, four LMGs, and a Radio for 80mm BTN OBA. Complicating the French defense is the fact that before play the German picks a random chit to determine his goal: either eight turns to get 12 CVP, nine turns to take five buildings in the board 3 village, or ten turns to exit 12 VP off the opposite side. No matter what they draw, the German job is made harder by being unable to go CX.
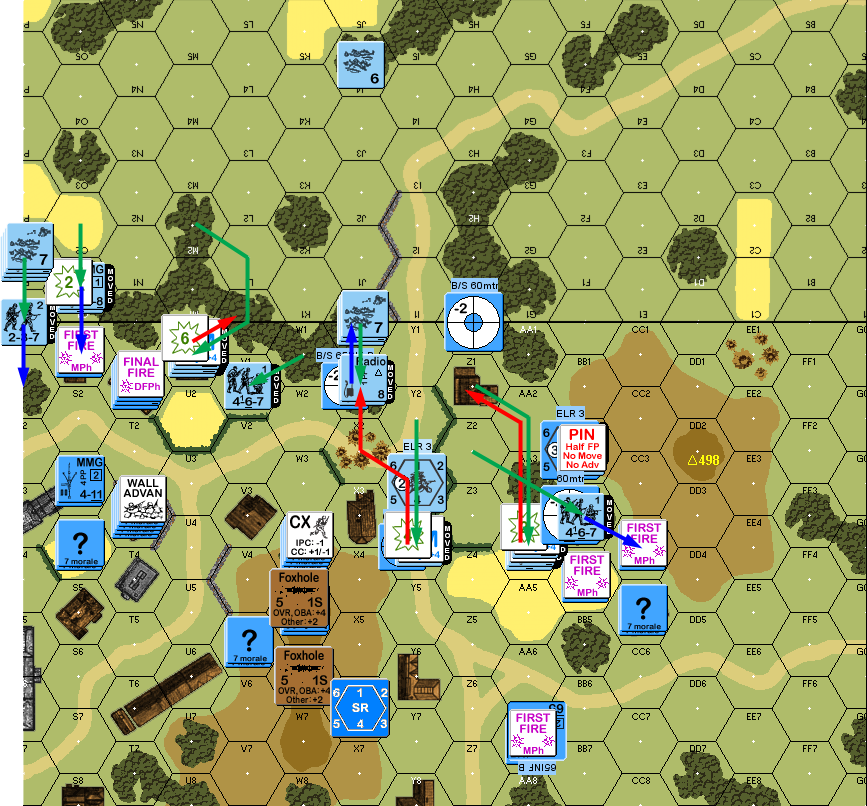
I drew Chit 1, and so needed to inflict 12 CVP on the French, with an initial plan of pushing to contact as rapidly as I was allowed. I figured it’d help create the idea that I needed the village or exit. There was little fire until near the end of movement, his MMG stack was able to pin a squad in my 10-2 group moving deep in a grainfield, and a pair of squads on the south side managed to break a leader and squad while pinning another squad. A DFPh shot ended with activating his sniper, who broke the HS that was covering my south flank.
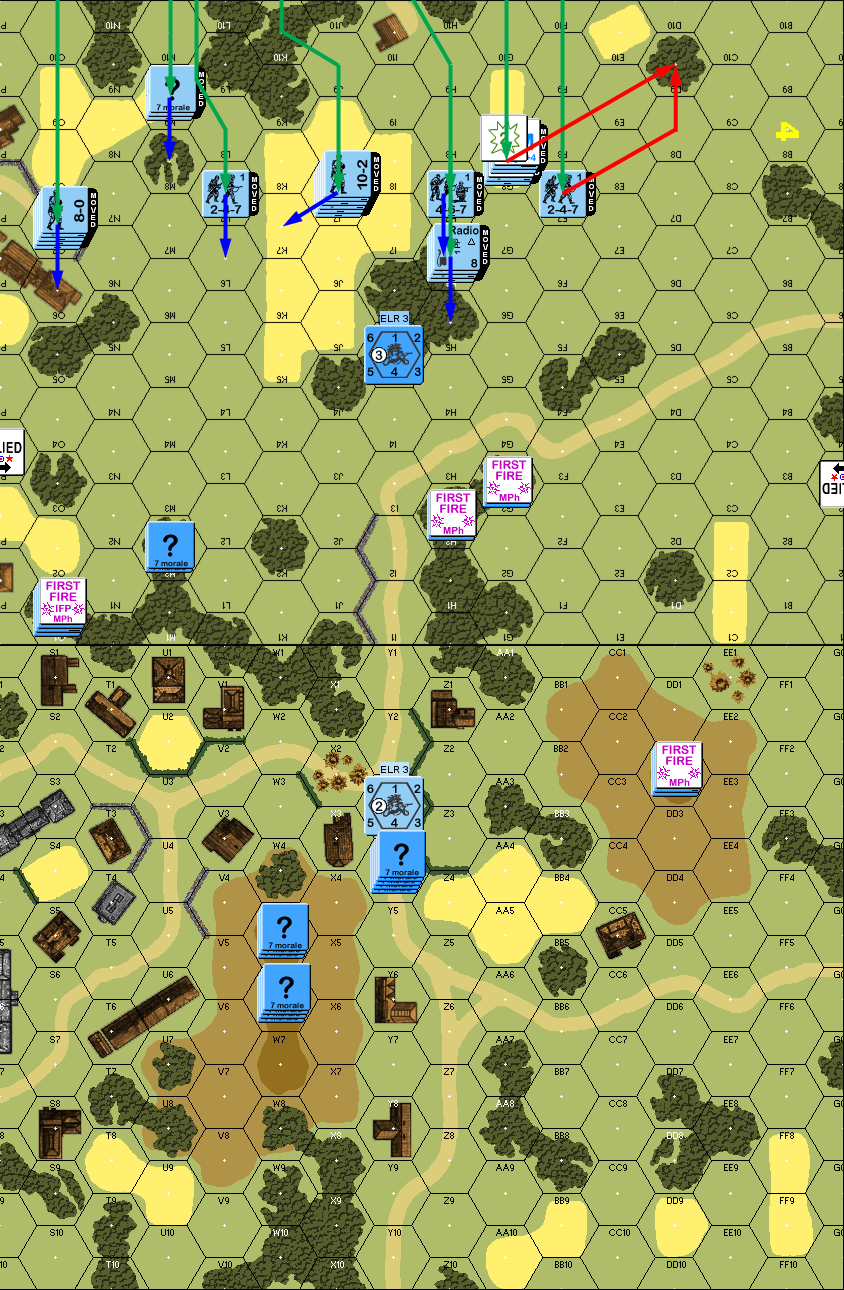
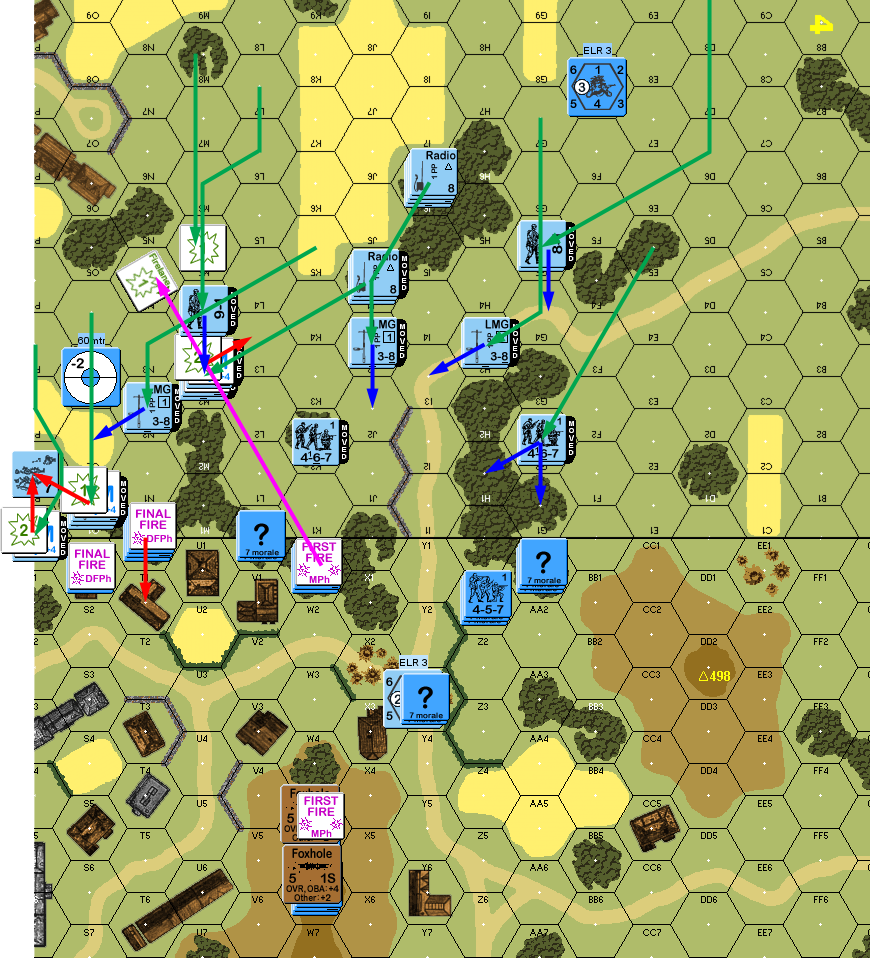
Situation, German Turn 1. North is to the left, Allied markers show the limit of the French setup area. And by SSR, grain is in season in May.
Tom deployed a squad in his central position of 4Y4, while my leader self-rallied, but the squad rolled a ’12’ leaving a pair of broken HS with him. His MMG position fired on my 10-2 with no effect, but his pair of squads in 4H2/G3 broke my artillery observer, halting my plan to try and get some OBA onto his positions in a hurry, as well as breaking the squad with him. However, his fire at my broken HSs malfunctioned his LMG in 3DD2. He skulked with one squad, and 4Y4 split up to go in three different directions. My fire was unable to do more than pin a squad, but but I got my MMG assembled.
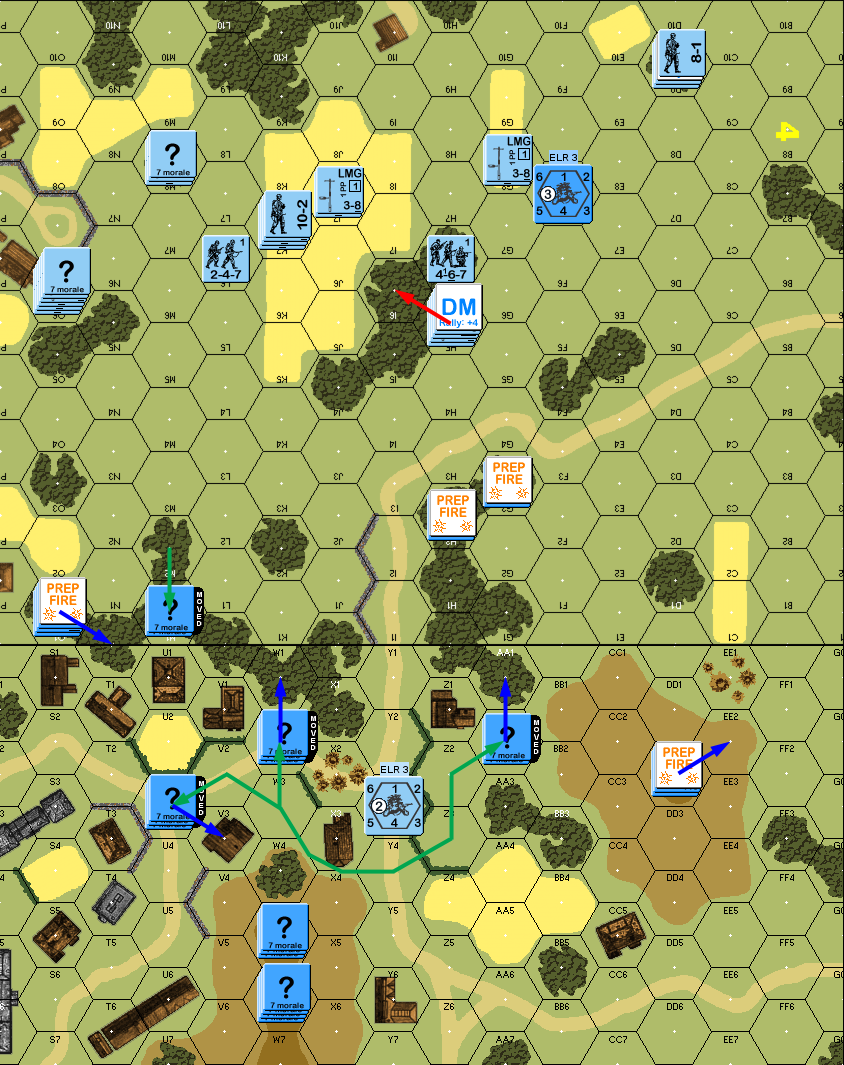
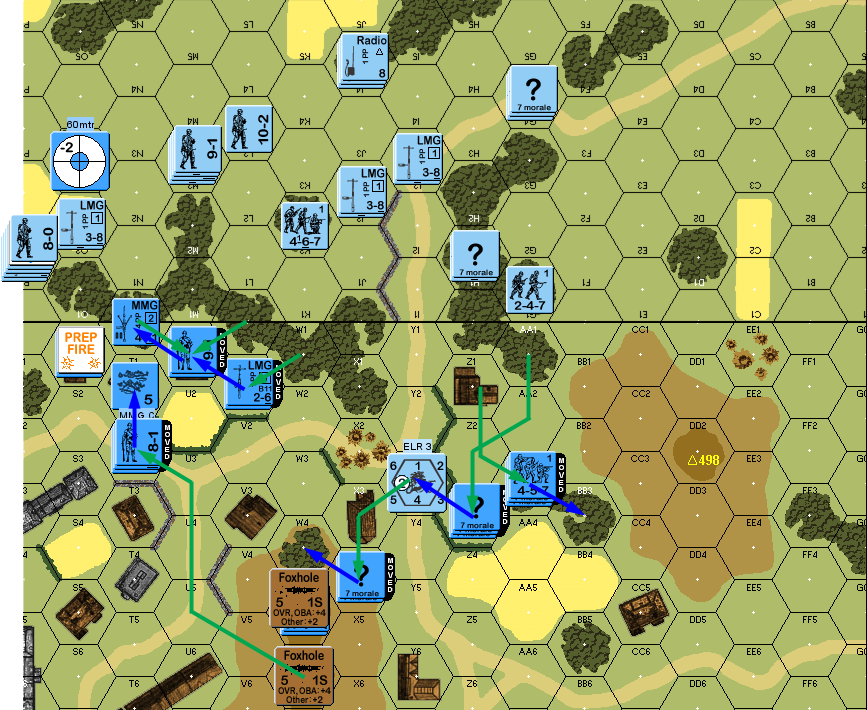
Situation, French Turn 1.
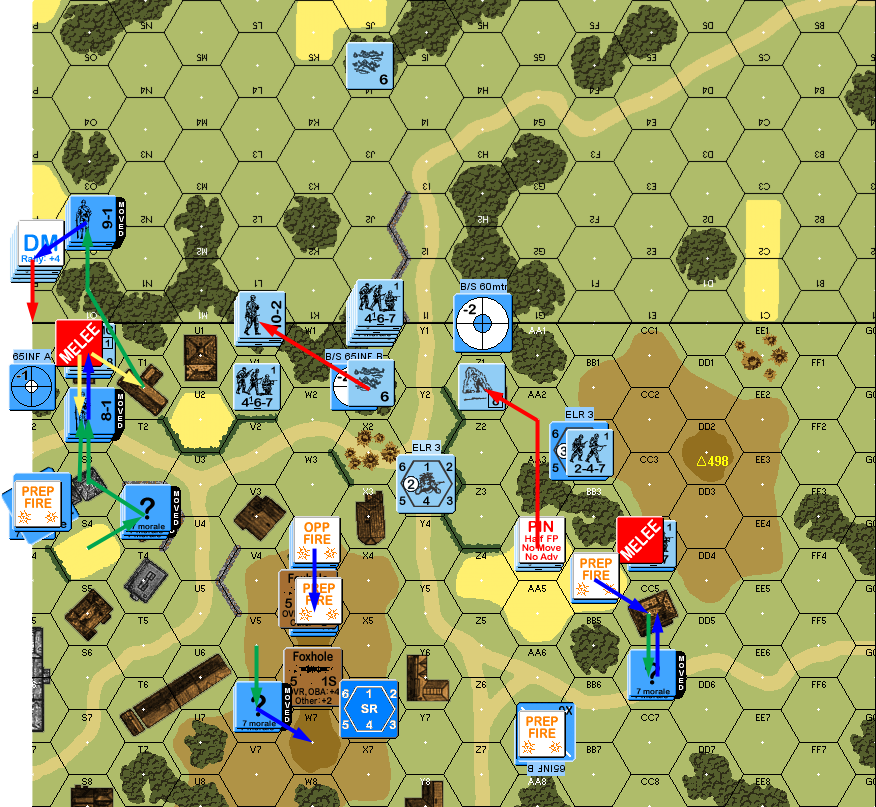
My FO did not rally for my turn, but the squad with him managed to self-rally, and one of the HS in 4D9 rallied, while Tom failed to repair his LMG. I prepped at 4G3, and rolled high before starting movement. Sadly, defensive fire was fairly effective, with almost all of my north-flank platoon getting pinned short of their goal (the one squad unpinned had the least ambitious goal), the rallied squad in the center promptly broke again, and my 9-1 broke, with his squad pinning after one hex. The good news is that a squad made it over to the south to start flanking his two squads.
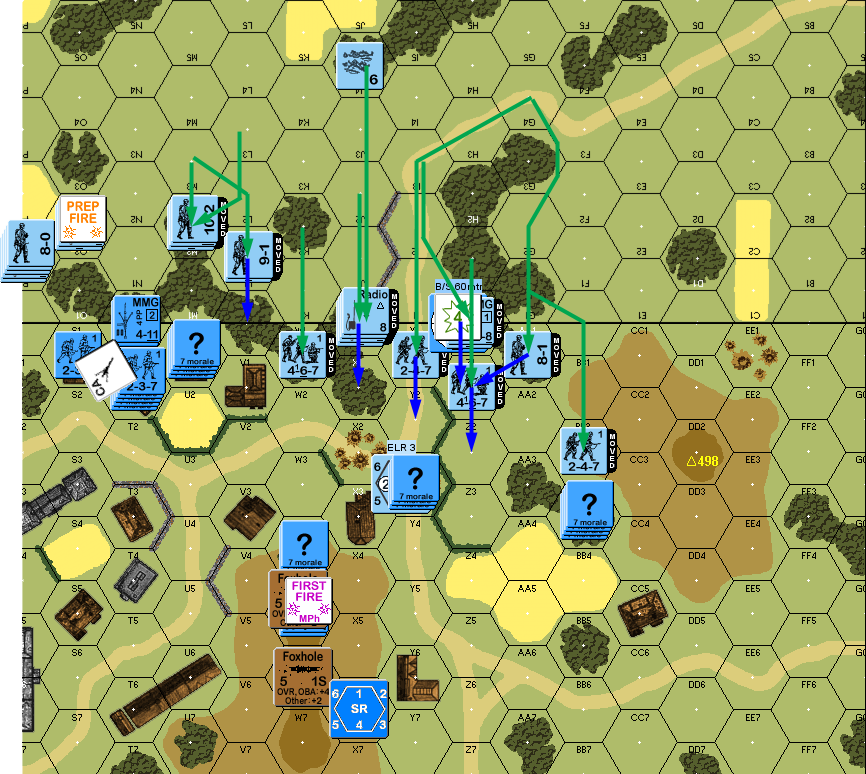
My advance got around the side of hill 3W5 enough that I could see his two foxholes there, and his MTR opened fire from the hilltop. My fire revealed and pinned a HS in 4M1, and caused the squad in 4H2 to go berserk! Even better, I was able to insure that their target would be my 10-2 and MMG.
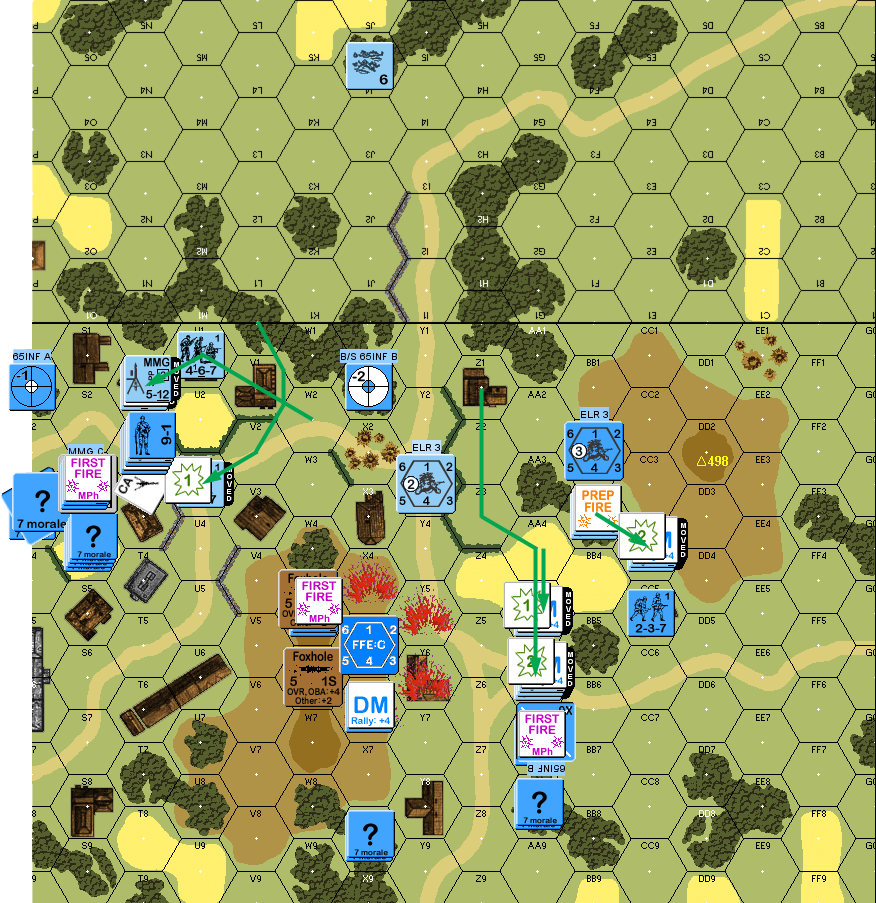
Situation, German Turn 2.
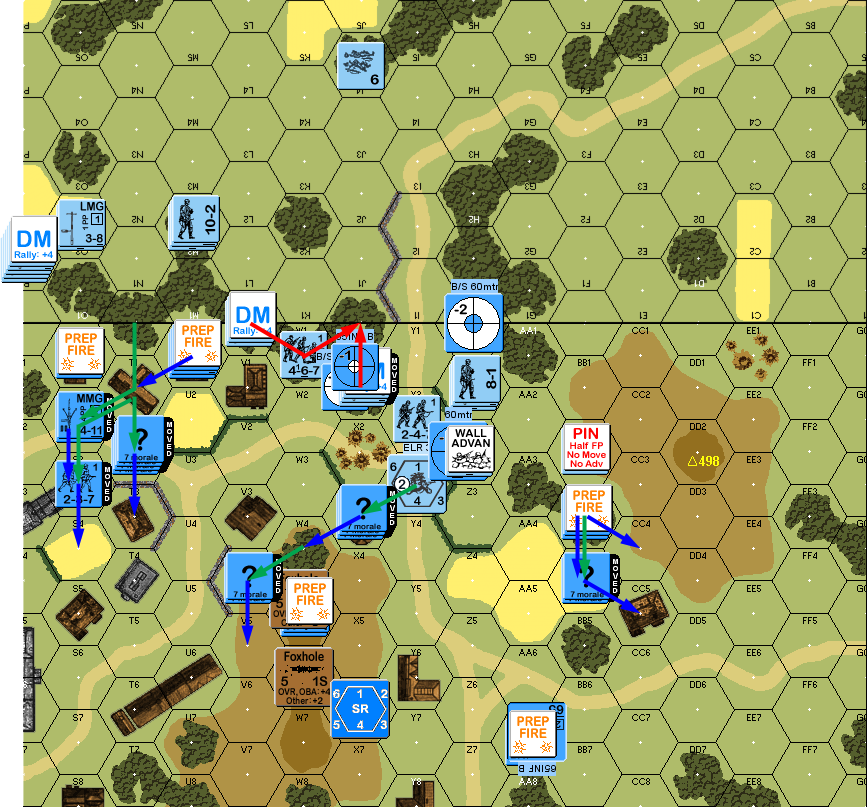
Tom still couldn’t repair his LMG on his turn, but both of my leaders rallied, though my broken squad and HS did not. MMG fire broke my squad in 4O2, but the other MMG and the MTR back on the hill failed to have any effect. His second LMG opened up in 3W1 and broke the HS across the way in 4K2. As expected, the berserk squad didn’t survive his charge, taking two 2MCs and failing both to be eliminated. The other squad in the area pulled back, but I managed to break and ELR it. Just about everything else stayed out of sight. I attempted to get a start on the OBA cycle (probably a bad idea with my current lack of LOS), but couldn’t make contact.
Situation, French Turn 2.
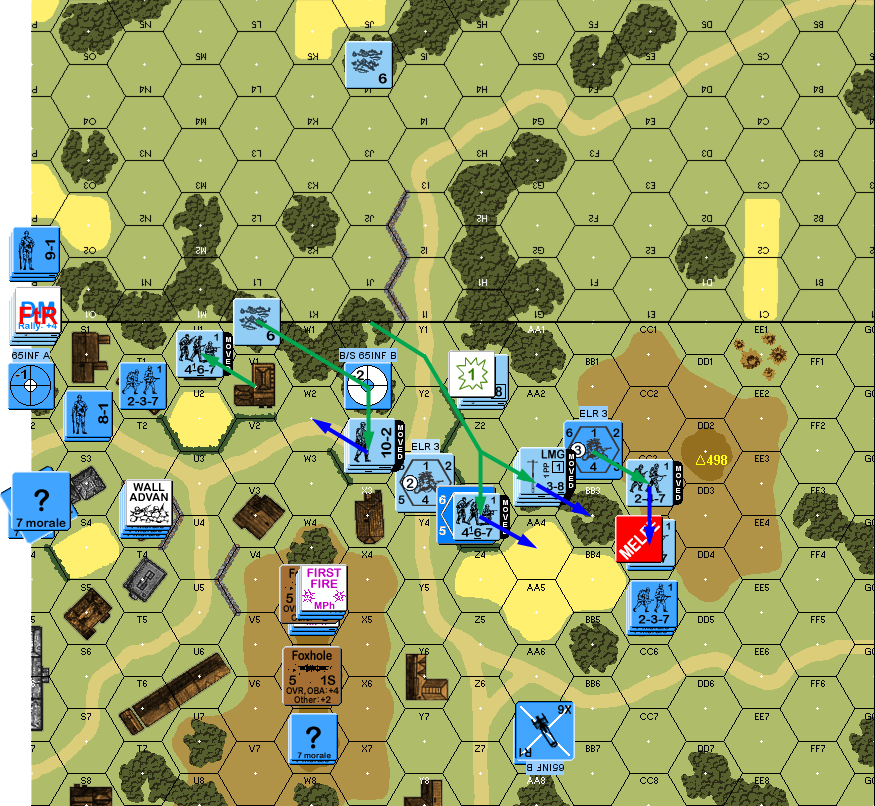
I got the re-broken squad in 4I6 back for my turn, along with the HS in D9, but missed on my self-rally and the HS in J4. Tom failed to repair his LMG again, but his squad in Z1 battle hardened back to 1st line (would have gone berserk, if there’d been any Germans in LOS). Mostly I was trying to take advantage of the spits of woods in front of the French positions, but I made a second attempt to get around the north flank of his defense. The first squad took point blank HS fire fine, but rolled a ’12’ on a 2MC from his 9-1+MMC to reduce him to a broken 2nd line HS. The second squad broke to SFF from the HS. Much of his units already engaged, I tried to pass the 10-2+MMG squad into M2, which would probably force him out of the woods, but the 10-2 broke on a 1MC, and the LLTC pined the squad in M3.
My advancing fire pinned the 9-1 and reduced the MMG squad (through a ’12’) in 3T0, which would have been great if my second squad was still intact. At the least, it meant he was unlikely to interfere much with my guys routing into 4P1. In the meantime, my southern flank came up, and moved into the big woods area near the hill, and one squad took cover behind a wall facing 3Z1 (he was also exposed to other units, but they had other problems as well.
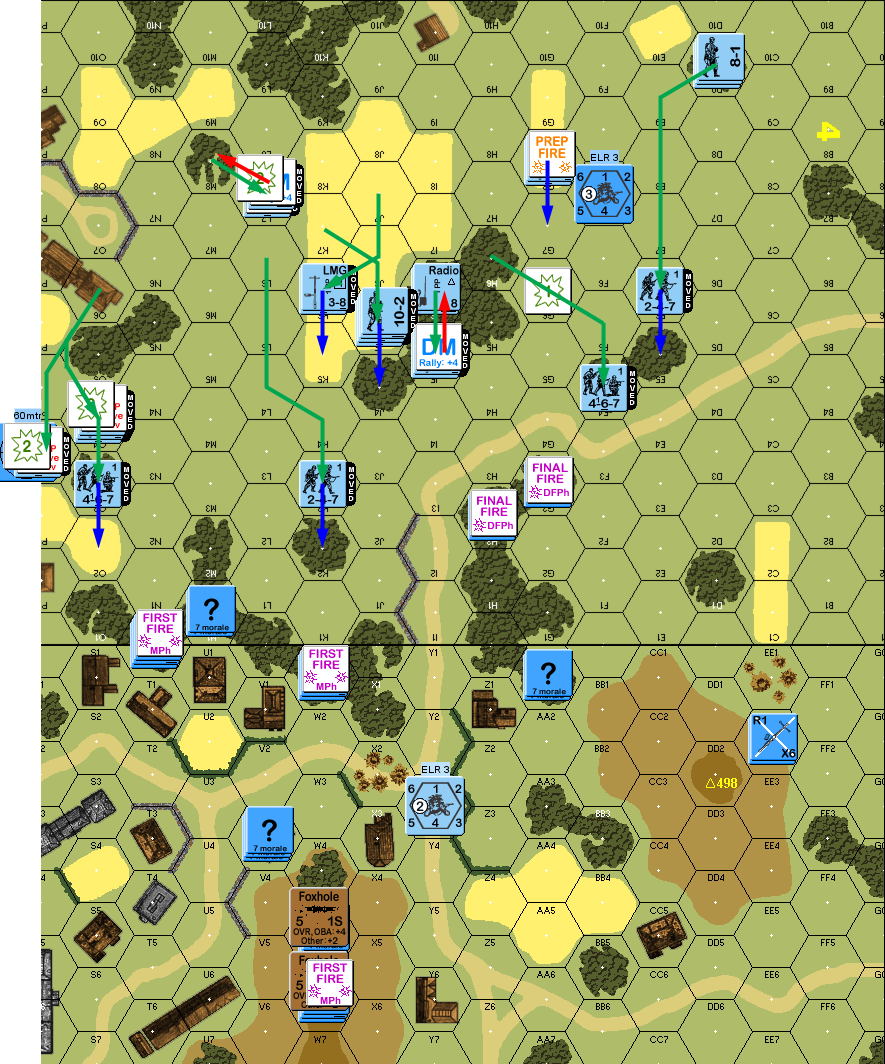
Situation, German Turn 3.
Tom still couldn’t repair his LMG, and didn’t get his HS back, and surprisingly, his leader in 3T0 didn’t even attempt to pick up the abandoned MMG. But while my 10-2 self-rallied, nothing in 4P1 rallied, including the one squad not under DM. Somewhat to my surprise, the first thing Tom did was send his second MMG down from it’s hilltop position to stiffen the defense behind the woodsline. This time, I got contact with the OBA, and called an SR on 3X0, which then errored to X6, which at least had a visible blast height. I also kept my group of brokies in 4P1, as I figured that I’d be pushing the French away from the building soon, and the other option was the woods in O3, which the MTR was zeroed in on.
Situation, French Turn 3.
Nothing in P1 rallied for my turn, and neither did the non-DM HS in 4J4. Meanwhile, Tom finally repaired his LMG, recovered his MMG, and rallied his HS (on a ‘2’ that battle hardened them back to 1st Line), and deployed a squad in 3BB3. I prepped at the recovered MMG to no effect, and started movement by unsuccessfully trying to draw fire with a couple HS. My next move found the MTR’s boresight hex in 3Z0, but thankfully it had no effect. Mostly, I moved up to just behind the woodsline so I could advance into and start flushing him out of the area right behind it. His only shot was an unsuccessful one from the MMG, but Final Fire pinned a HS and a squad and re-DMed the stack in 4P1. In return, I pinned the MMG HS, but wasn’t in position to take advantage. I possibly should have routed 4P1 back to O3 at this point, but I expected that Tom might be too busy to fire on them again, and I didn’t want them in woods where the MTR could be more effective against them.
Situation, German Turn 4.
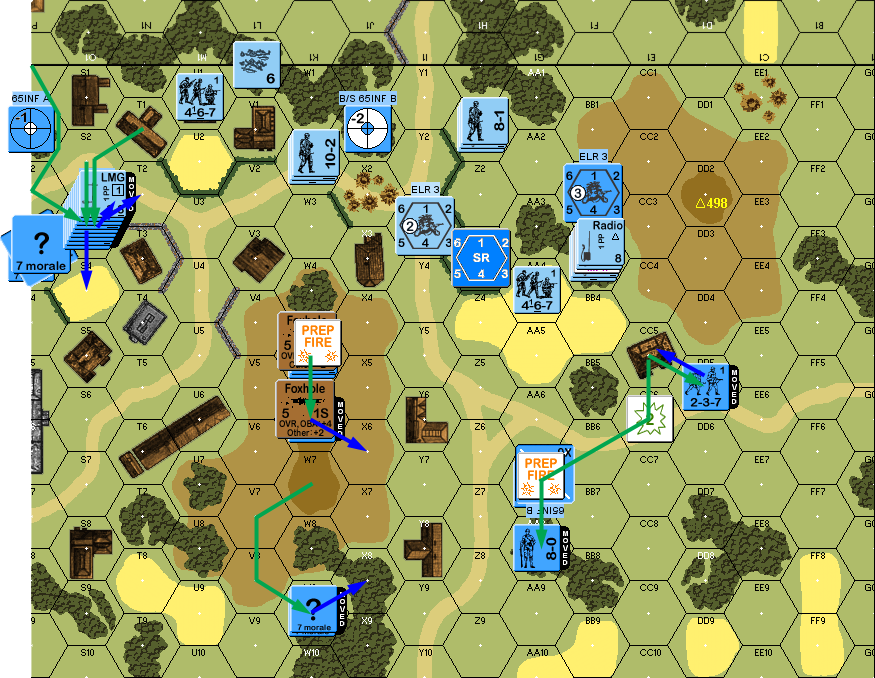
Tom had no activities for his turn 4 RPh, but I managed to rally the HS in 4P1. A concern of mine was that I hadn’t seen either of his INF yet, and as I advanced into 3X1 it occurred to me that it would make a good spot for boresighting, perhaps from 3T3. Well, I was right about the boresighting, but the Gun was in AA7, and a ‘2’ effects roll killed my 8-0 FO and broke the squad with him, though the radio remained intact. Other fire pinned a HS and broke my squad in 3V0.
Tom largely pulled out of the small row of buildings on board 3, setting up his main defense in the loop, with the MMGs in S3 and T3, and he took WA in T3, obviously expecting that I might try to get in close there.
Situation, French Turn 4.
Despite a good number of rolls, I got nothing back for my turn 5. I tried to put pressure on the main line in front of the village, but while I was able to advance on S1 without much trouble, my 10-2 and the squad with him broke to Tom’s fire. In the center, my HS broke to fire from the INF as it advanced on it (I had been hoping to draw fire from the hill with him). The plan was to bring up two and a half squads to challenge his two HS in CC, but the HS was pinned by his sniper before he could move, and my 8-1 broke to his fire, with his accompanying squad pinning from the LLTC. At least my 9-1 was able to advance and pick up the radio unchallenged.
In some much-needed good news, in DFPh Tom malfunctioned both MMGs and the MTR during DFPh. He also DMed 4P1 again with the MMG shot from 3S3, and at this point I really should have pulled them back, as it was obvious that LOS was a little too open in there for them to get a proper chance to rally, but I stubbornly kept them in position. I advanced into CC in 3S1 and CC4, with 2:1 odds (full squad vs HS in each), and blew both rolls, leaving them both in Melee.
Situation, German Turn 5.
Tom was unable to repair anything for his turn 5, and he lost the MMG in 3T3 permanently. Meanwhile, my 10-2 rallied along with his MMG squad, and rallied both squads in X0. But I still couldn’t rally anything in 4P1. Tom Intensive Fired the INF, trying to break the remaining squad in AA4, but malfunctioned the Gun. The other INF revealed itself in R3, and got a ‘2’ on its first hit to kill my HS in R1. This left him free to move his LMG stack in T1 through to trap 4P1 against the edge of the board and the rest of his forces. He then moved most of what was left in the village adjacent to the Melee, while his reserve unit picked up the malfunctioned MMG.
With the radio back in my possession, but the SR now out of LOS, I made contact with the Battery, and accurately put a new SR in Z3. Otherwise, none of my fire had any effect, but Tom put 4J4 under DM, and fired into the Melee in S1, pinning my squad, but eliminating his own HS on a ’12’ 2MC. He also got a K/2 vs my squad in AA4, breaking the remaining HS. Tom refused surrender in 4P1, eliminating one squad while the other Low Crawled away to P0. He advanced into CC in S1 and Ambushed and eliminated my squad without them being able to do anything. Over in CC4, he reduced my squad to a HS, while I missed in return.
Situation, French Turn 5.
I didn’t get anything back for my turn 6, and while Tom didn’t repair anything either, I was definitely feeling the time pressure with 4/12 CVP, and three turns to go. I was still hoping to take out most of the French south flank, which would be 3 points for the two HS and leader, and 2 more if I could eliminate the Gun. If I could get up to the crew and eliminate them, that would be a total of 11, leaving me with a need to get another point somehow, if things went great. To that end, I mostly shifted what was left to the center, and advanced a squad to try for another 2:1 CC in T1, but he pinned during DFPh. Fire on 4P0 eliminated the remaining broken squad, and finally broke my 8-0 there, leading to his elimination for FtR.
I advanced a second HS into Melee and we both rolled ‘3’s, leading to the elimination of everyone in the hex. I had a hard time deciding what to do with my 10-2 stack, as he could easily put himself in a position to be surrounded and in a lot of trouble, but he stepped into the open, and dared the French to brave his -2 DRM. (I considered moving into X3 and trying to assault the hill next turn. It was a bit too high-risk for me.)
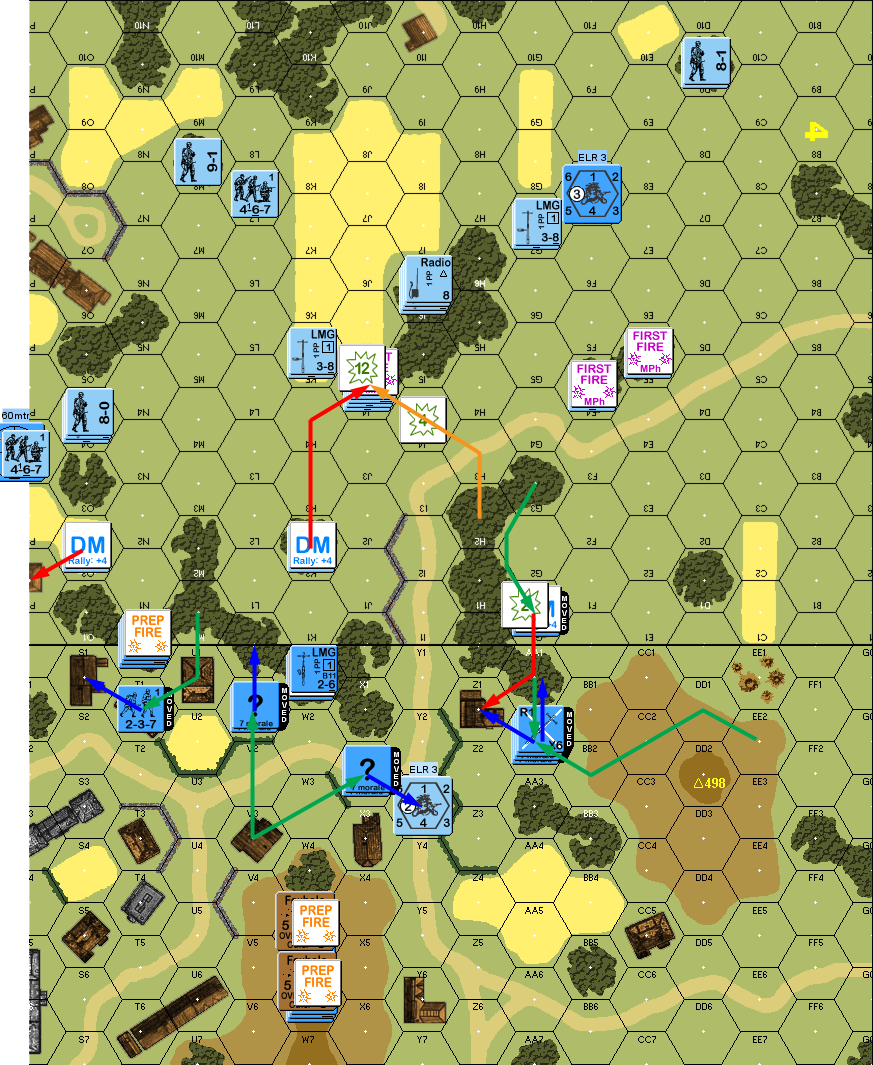
Situation, German Turn 6.
Tom repaired his MMG and INF for his turn, but lost the MTR permanently, and I rallied the leader and HS in Z1. The INF fired AA4, causing a NMC that the squad passed, and then malfunctioning on the ROF shot. Tom mostly pulled back, though he picked up my LMG and established a large stack in S3 before scattering them again in APh. I regained Contact with the OBA, and called for an FFE on W5, which drifted one off to V4.
Situation, French Turn 6.
For my turn, the HS in 3V0 self-rallied, and Tom failed to repair the INF. I Corrected the FFE onto the near slope of the hill, and broke the HS in the open in X6. At this point, I figured I’d need the next (last) turn to take mop up everything on the south side, and I decided to try and go after the 9-1 with a squad and a half in the open in T2. If I could get my 10-2 to bear on him, I might manage to actually eliminate someone with a -2 shot. Or there was always CC.
My first move successfully distracted his 1st-level MMG, but still broke my squad that was trying to advance against the remaining HS in CC5. My other two units in the area also broke to more local fire as I tried to get up to Tom’s positions. I sent in a HS as part of an attempt to surround the 9-1, and he survived a shot from just a HS. The 10-2 moved up, and died of a K/3, which pinned the squad. At that point, with just him and an unmoved squad as my only GO MMC left, I conceded.
Situation, end of game.
Afterword:
This is only the fourth time I’ve had OBA. The first two times (in CGs), I never got an SR down, as the leader would break or get killed before I could get to that point. The last time was in Budapest, where I couldn’t get LOS on my SRs, and when the leader moved up, he walked right into a HIP HS. So at least this is the first time I’ve successfully called down an FFE, though that was a lot more trouble than expected with the leader breaking early, and then getting killed shortly after the first SR. At least his replacement was more successful.
My main mantra in ASL is ‘there are no winners in CC’. However, it’s the most likely way to actually get CVP, and considering I almost always had an odds advantage, I expected better than a 2.5:1 loss ratio (I would have been very happy to trade 1:1). And that was when I could get to CC, there were a lot of times my guys pinned just short. If CC had gone as expected (one stalemate and one win), things would have been a lot different.
The entire northern force was a big problem. Three squads and an 8-0, and only the leader and a HS was unbroken for the bulk of the game. I kept expecting things to move forward enough that 4P1 would be safe, and that kept them under DM for turns, and eventually got the lot of them eliminated.
Turn 5 was a big turning point. Sure, Tom malfunctioned four weapons, and only got half of them back (eventually), but two squad not under DM failed to rally on my turn (this was a problem on 4 and 5), and then half of everything else broke, including the 10-2 (again!). It’s also when he got his second ‘2’ first shot result from his INF. After that, my chances were a lot longer than they were going in, and I couldn’t recover.
Discussion ¬