
174 Lagus Assault Guns
After a bit of a delay, Tom Arnold and I got together for another Vassal ASL game, this time with a scenario from the recent Hakkaa Päälle. The Russians have taken the offensive in Finnland in mid-’44 and are back to trying to break the defenses that stopped them in the Winter War.
In this scenario, the Russians enter with eight squads (split between 1st line and elite rifle squads), a couple leaders, a HMG, a T34/85, a SU-152, and a IS-2, and then get six squads of (628) assault engineers with a couple FTs and DCs on turn two. The Finns defend with ten 648 1st line squads, a MMG, hero, PSK, two Sturmis (StuG IIIs in Finnish service), and a 81mm MTR. They’re actually in two groups, but one setup area is just a subset of the other. One squad equivalent gets HIP, and the Finns get to assign two of their available PFs to any unit(s) they wish (probably the hero, but one each to the hero and best leader seems like a good idea). The Russians have seven turns to either take 5 of 7 buildings in the board 17 village, or get 5 squads (not squad-equivalents) and two AFVs past a ‘finish line’ that lies behind the village.
Tom had the defending Finns and set up a defense scattered along his setup line. Interestingly, he used all his available Dummies (6) as large “?”, giving me five possible locations for his two Sturmis. It looks like the normal approach is along the west flank, going through some cover, and driving right at the village where there’s some open ground for the AFVs to operate. I decided to go on the east flank, in the board 32 woods, and try to drive for the goal before he could get everyone to focus on me. Better yet, there’s a nice gap at the beginning of the path that leads towards the village. By securing that, I can keep him uncertain as to which way I’m going. In fact, if he puts too much in front of me, I can switch goals in a hurry. Patch was by while I was setting up, looked things over, and had much the same idea, which was neat.
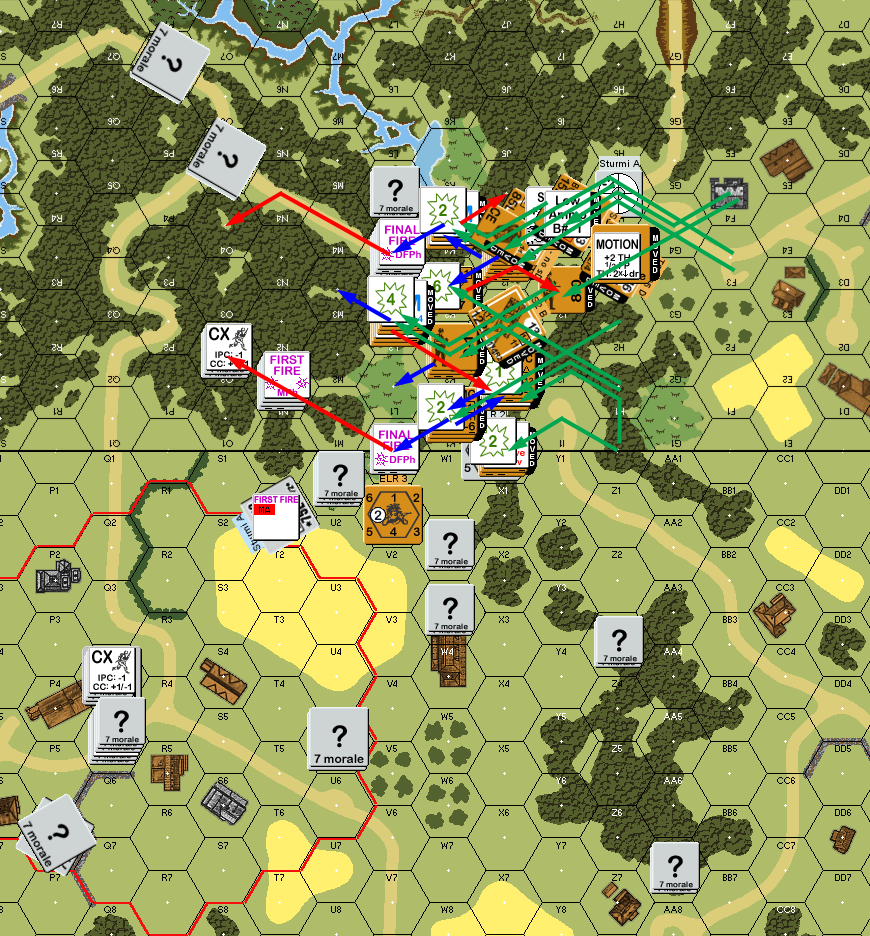
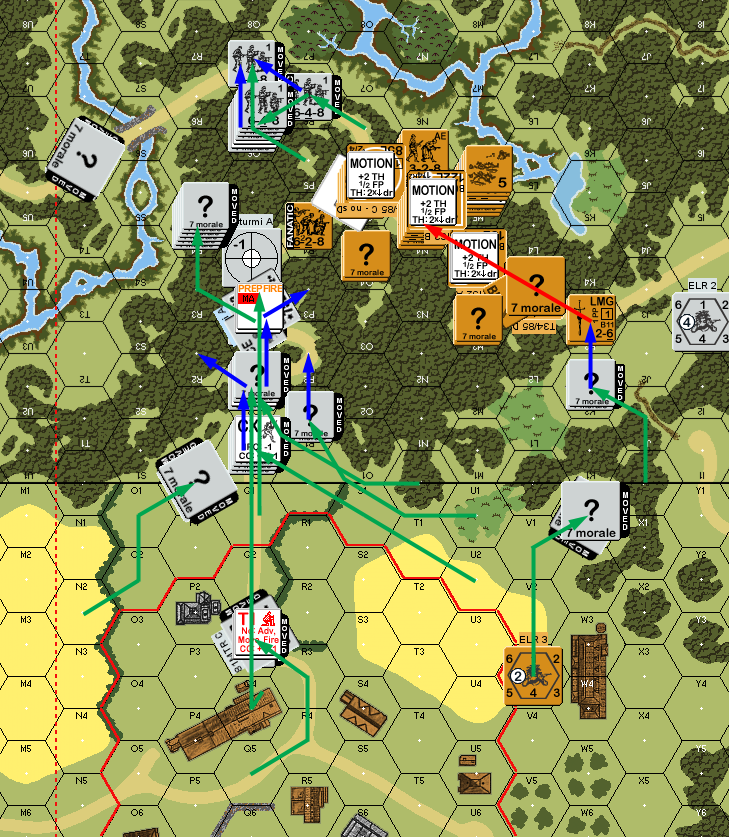
My initial advance had the two T-34s, covered by a pair of squads, holding my west flank. The main drive went up the 32A5 road, seizing the initial groups of houses for some cover. Tom only made one attack, revealing two full squads at the ‘gap’, and broke two squads who were armored assaulting up the road, while pinning a leader. I put acqusitions on the two squads, and on 17X2.
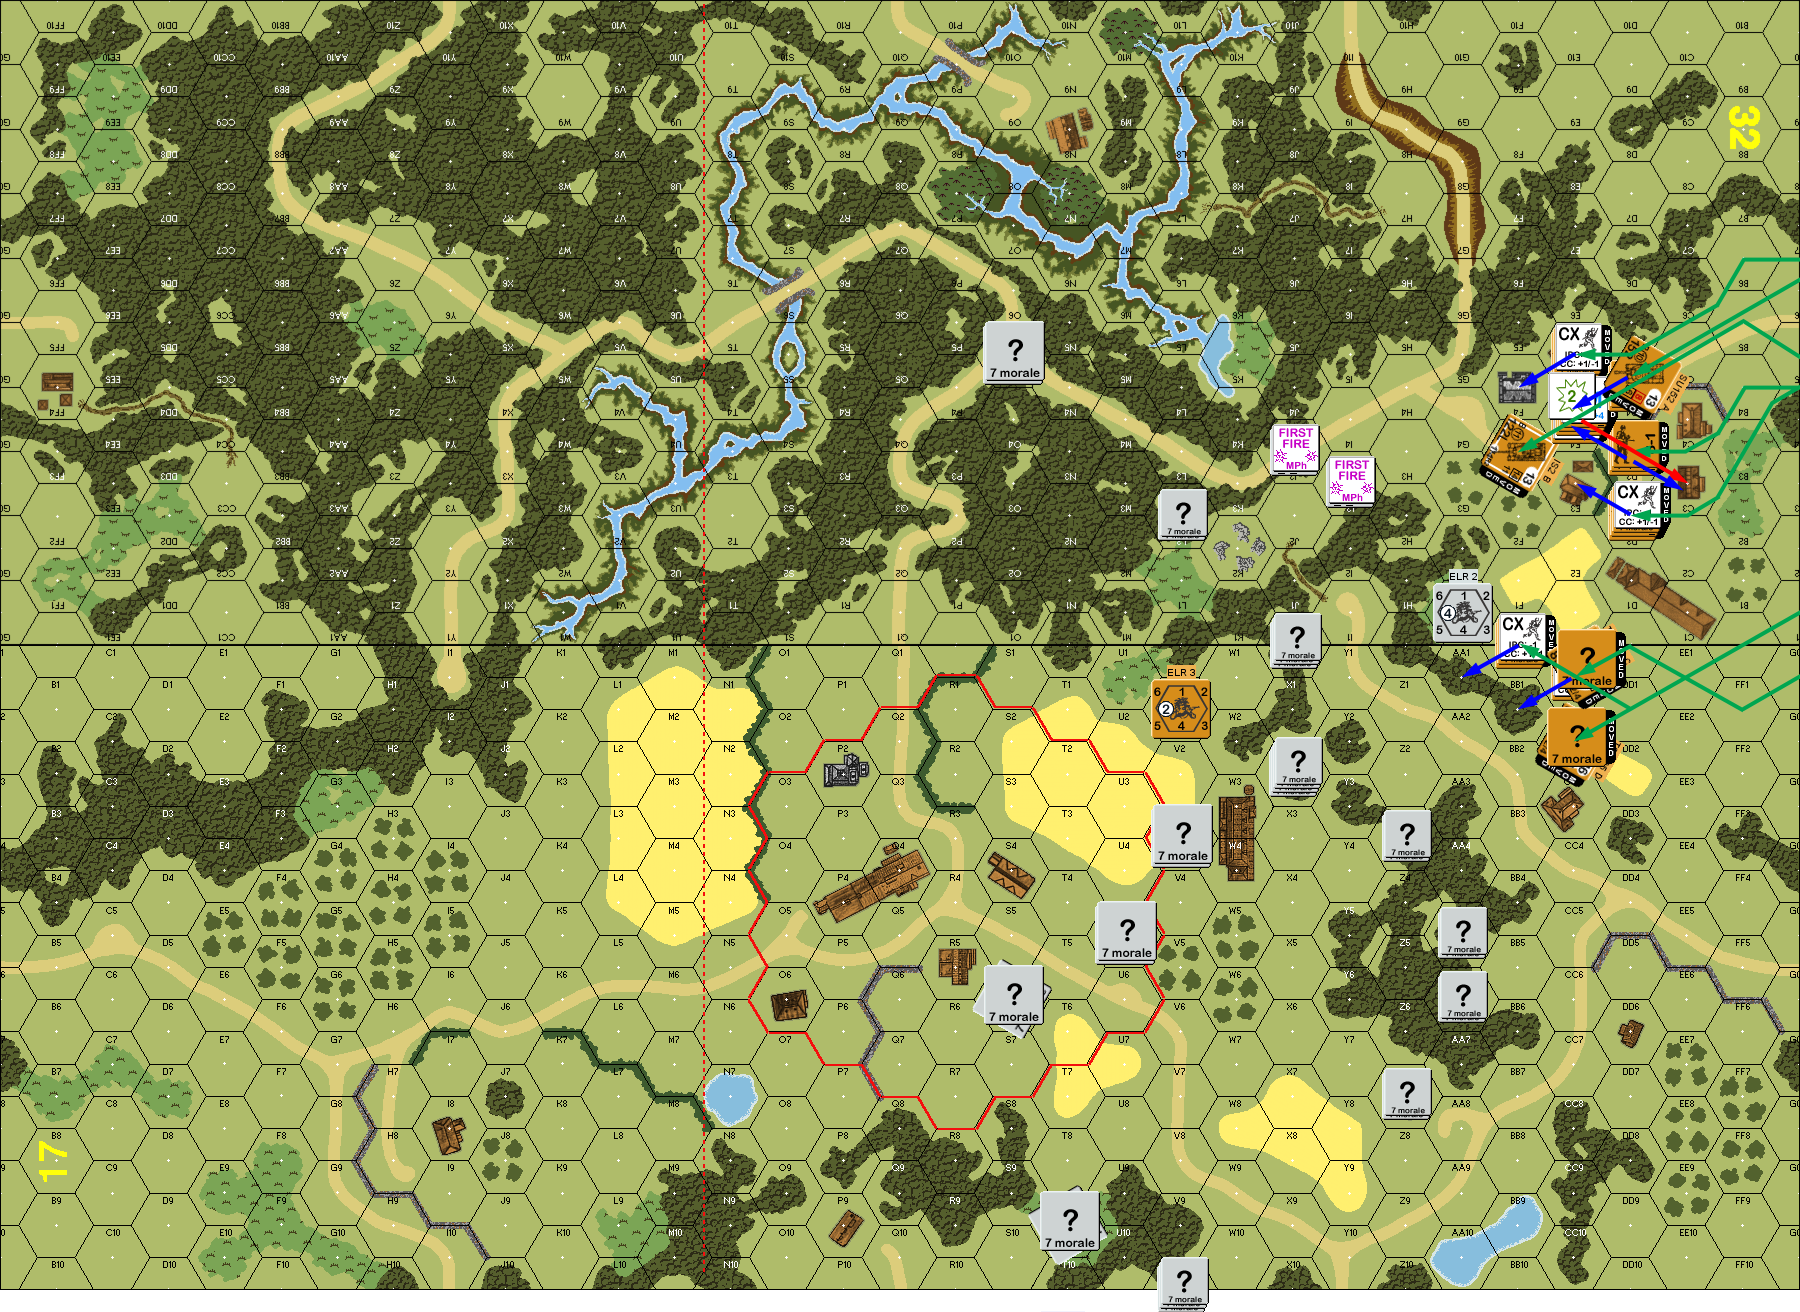
Situation, Russian Turn 1. North is to the left; the red circle is where the victory buildings are (two are covered by Finnish “?”), and the dashed line is what the Russians need to cross. As usual, green is movement, blue is advance, and red is routs.
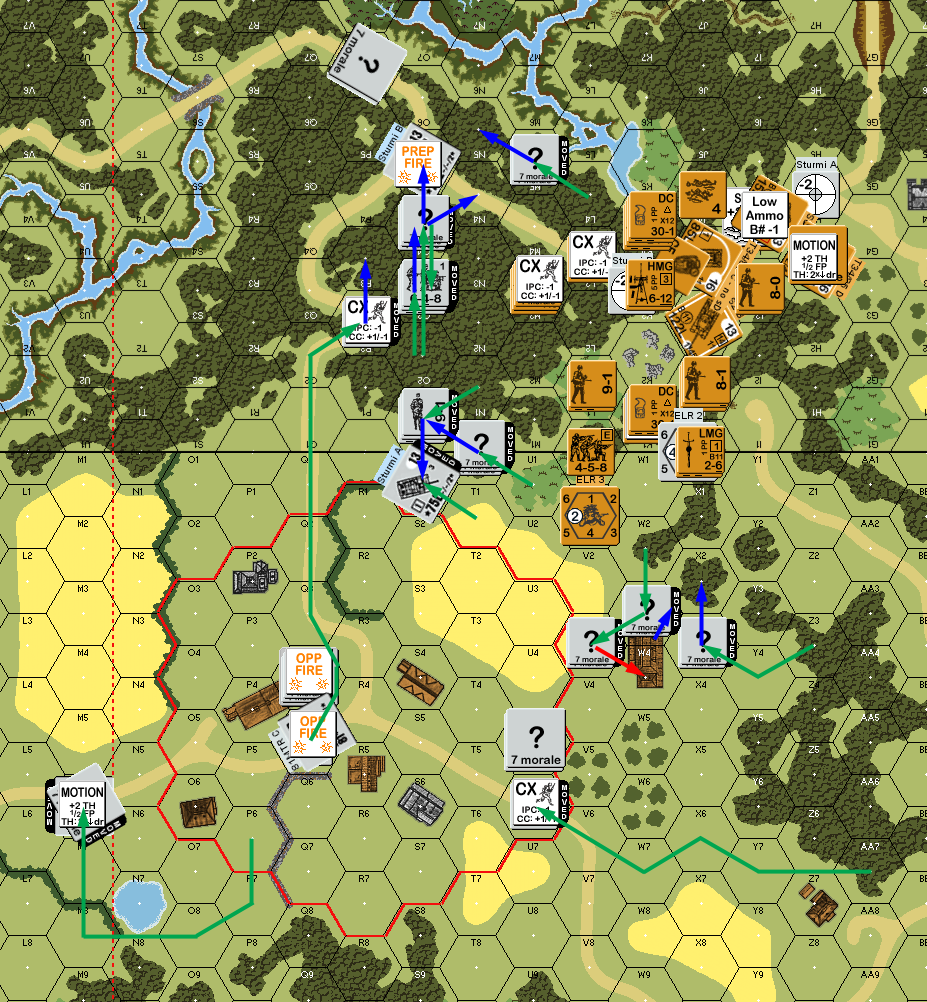
Tom tried to self-deploy the two squads at the west end of his line (one succeeded), and both of my squads rallied. The westernmost part of Tom’s line naturally started moving to cover my advance while he moved out of the way of my firepower. Two of his possible Sturmis also moved: one on the extreme west (which turned out to be real) moved up to cover the gap in 17U1, while another started only three hexes from there and swung north, apparently ready to try to crash through the woods in 17J0 and block the road where it crosses the goal line. I had no shots at him, and only put down another acquisition in 17AA4. Three of these “?”s changed VCA during AFPh, including 17U1, and to my surprise, 32O5. His split squad shifted to flank the remaining full squad in the west, forming a three-hex line anchoring that side of his defense.
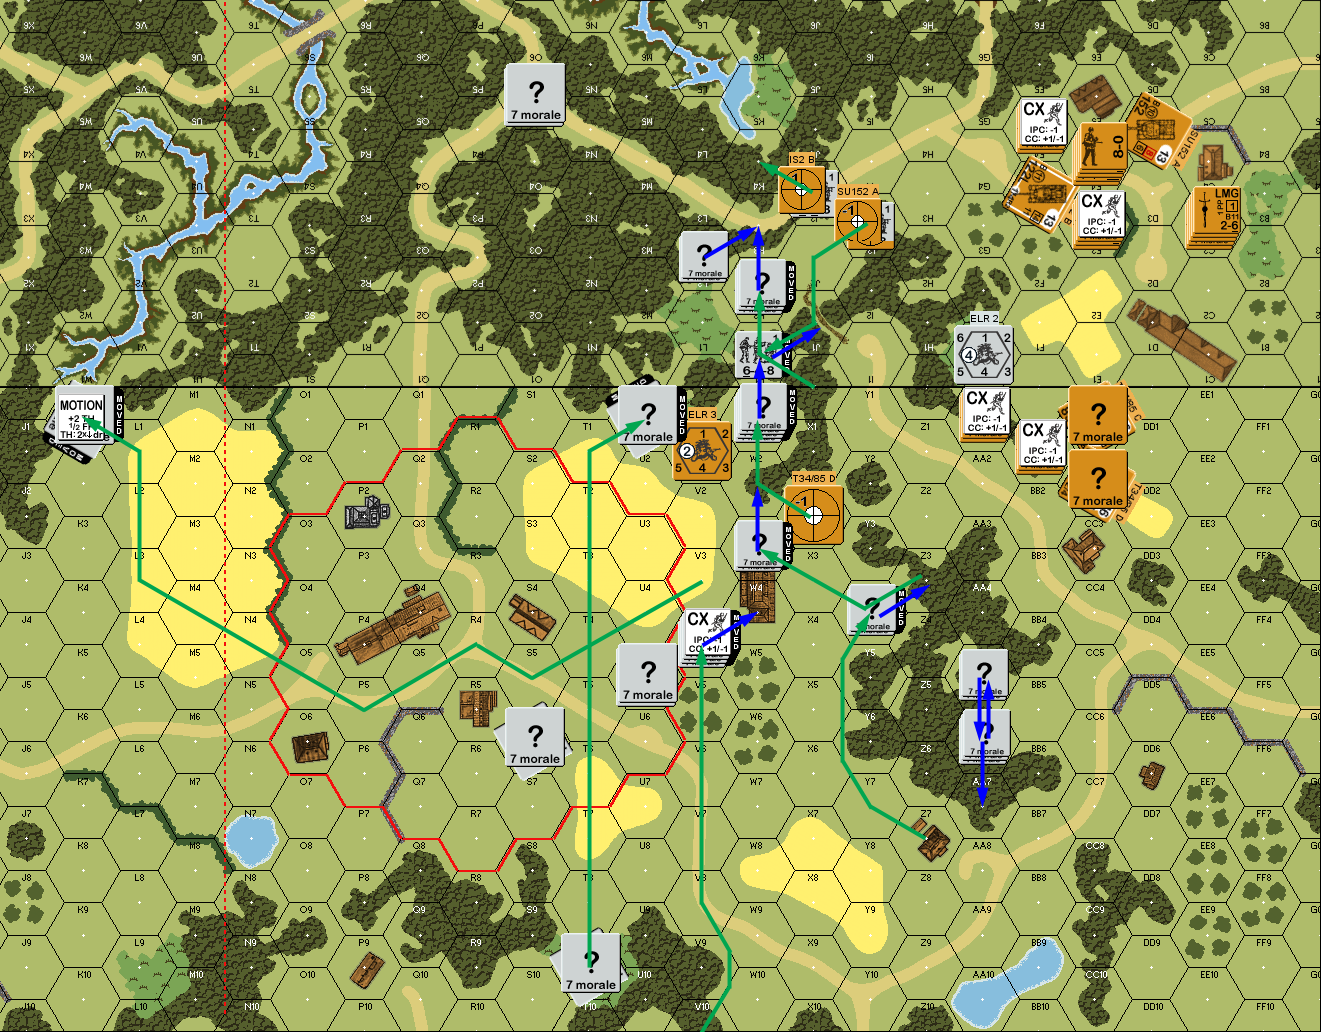
Situation, Finnish Turn 1.
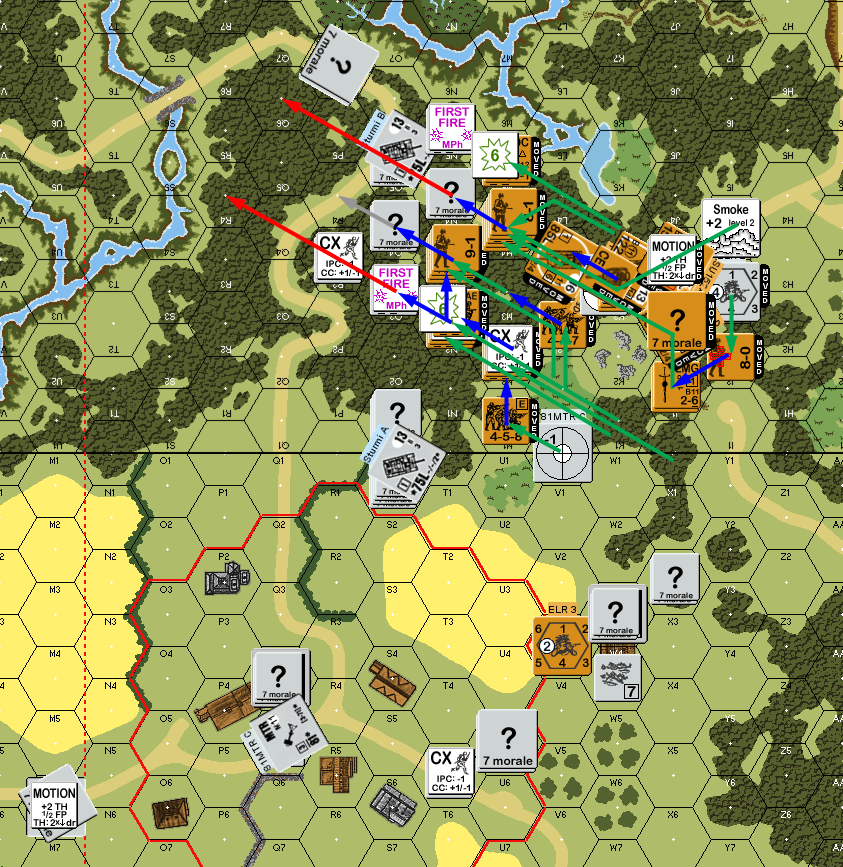
I briefly considered bringing my two platoons of assault engineers in on the west and trying to get close to the village while the initial force had everybody’s attention. But, I stuck with the initial plan, and half (with the only leader in the reinforcements) headed to near the 32J2-L1 ‘gap’ to help secure it, while the other half followed the main body up the board 32 road. My lead squad in 32F2 crossed over to the woods on the east side of the road, and drew two firelanes, from a LMG and the MMG. The first was no trouble, but the second broke and reduced him to conscripts. My other leading squad broke to to a 1MC as I tried to get a position at the head of the gap.
Meanwhile, the IS-2 positioned itself in Bypass of 32I3 to try and drive him out of the gap, and the SU152 positioned itself to look down the start of the woods-road. Tom revealed his MTR in 17R8 when he dismantled it during DFPh. It’s not a bad position; it’s hard to get at, it can fire on the closest two buildings, but LOS is blocked to most anything else other than the upper level of P4-Q4, though it can see some of the approach to the town. The only effect of what advancing fire I had was the SU152 going under a Low Ammo counter early in the game.
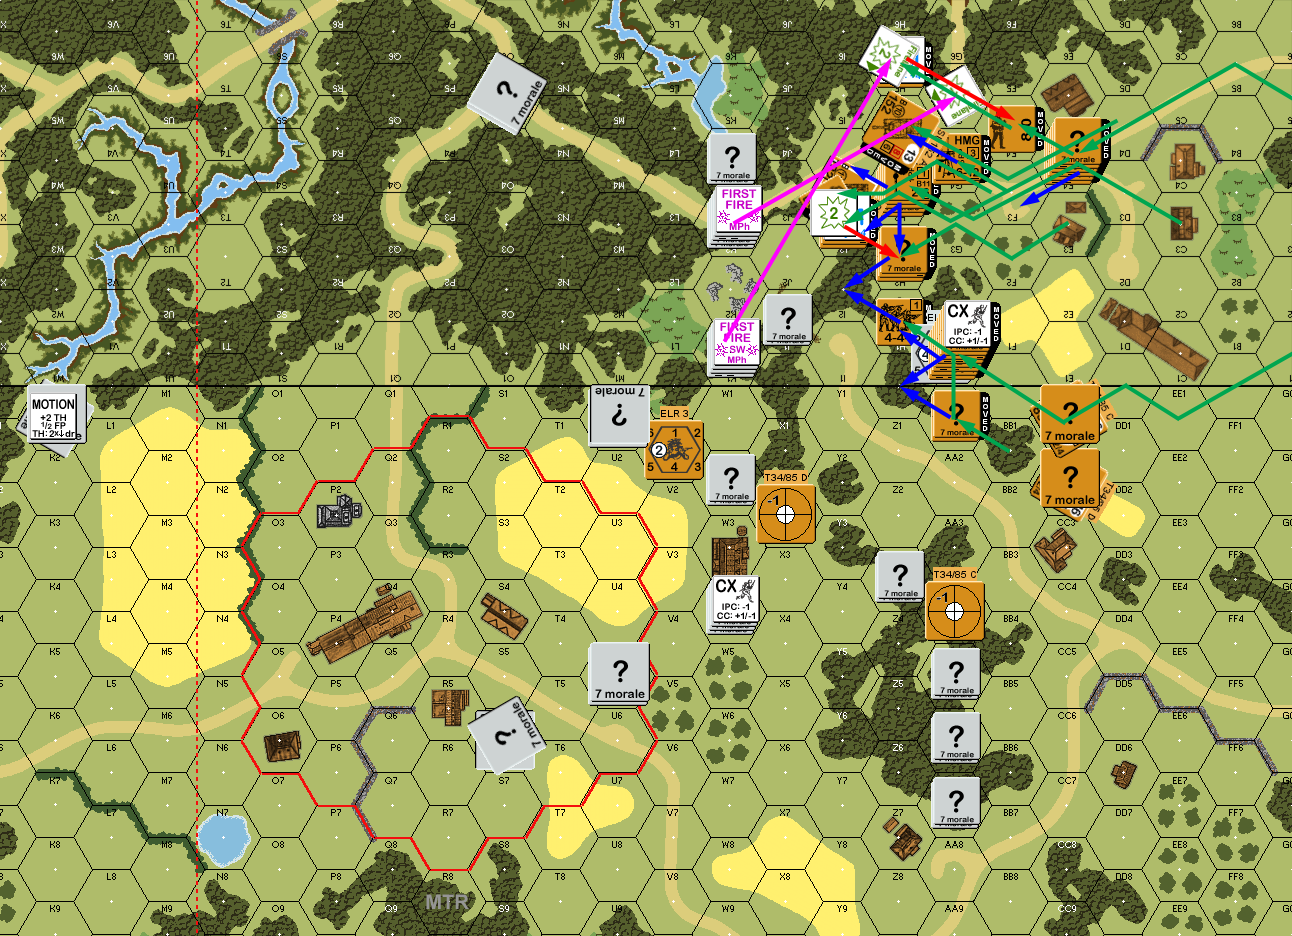
Situation, Russian Turn 2.
Nothing happened in Tom’s rally. He reversed the “?” in O5 to a new position in P6, which told me it was probably a Dummy getting out of a possibly revealing LOS. 17U1 also reversed into T1, and I managed a LOS to confirm it was an actual Sturmi. S6 started, and took up position at the intersection in 32O5, which I figured meant it was also real. Very oddly, K1 turned around and headed back to the village, taking a Hull Down position behind the wall. The MTR team ran to the same wall, and Tom revealed a HIP stack in adjacent 17S8 (spotters for the MTR…), who promptly ran into the village. Much of the western line shifted NE, giving him a good amount of force in the woodline near the village, and near the gap that I was just getting up to. My only fire were a couple shots at 32K1 in Final Fire, but couldn’t do anything to a concealed squad.
He revealed K1 to return fire, but got no result, and his Sturmi found a clear LOS to the SU152 (at +3 Hindrance, but still a real problem, since the next shot would be 10TH +2).
Situation, Finnish Turn 2.
I got both broken squads back again for my rally. Having finally gotten relatively close to his line with most of my troops, I started pushing into point-blank range trying to find or create an opening. My first attempt met a K/3, but the resulting 237 HS actually passed the MC. I dashed a squad across the board 17 road, which met a 2MC, which he passed. However, Z3 did not fire, and not wanting to walk into a 6FP -2 from him really caused me problems with that part of the line for the entire phase. I got a second squad adjacent to 32L3, and he malfunctioned his LMG on SFF, and then got a 1MC with FPF. I passed, but activated his sniper, who pinned my Dashing squad in J0. I rushed another squad adjacent in the tree line, and he FPFed again for a K/2 that left an intact 328, and again for NMC that my HS also passed. I had expected to see the other squad fire, and was annoyed to see him not at least pin to three FPF attacks.
A move down west side of the gap got MMG fire, and SFF from L0, but had no effect, and then I passed a 1MC from FPF. I sent another squad into K4, and his squad succeeded on a fourth FPF, and my squad broke to a conscript HS on a ’12’. I moved a final squad into L2 at the other end of the line, and the squad fired a fifth FPF, which reduced the squad on a K/2, and the remaining HS broke.
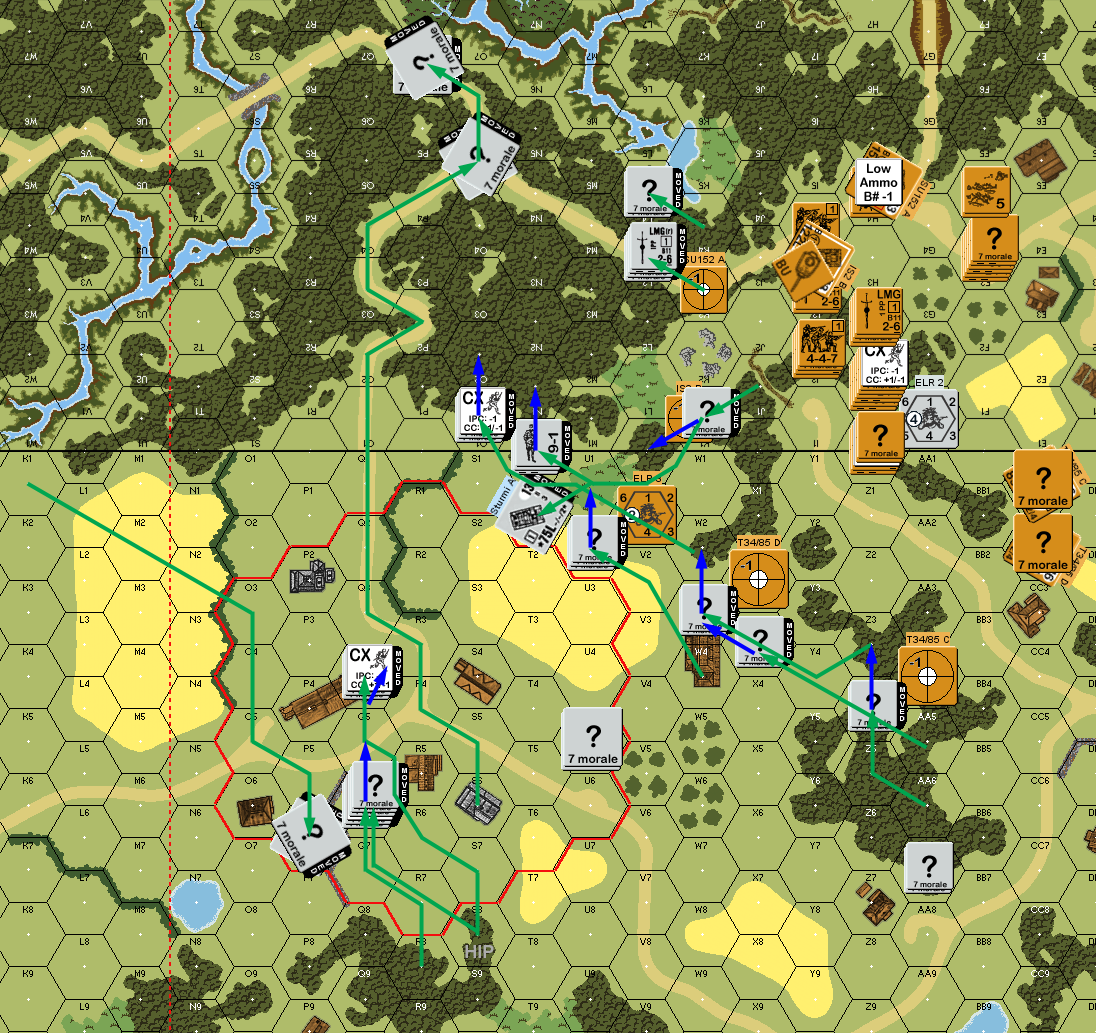
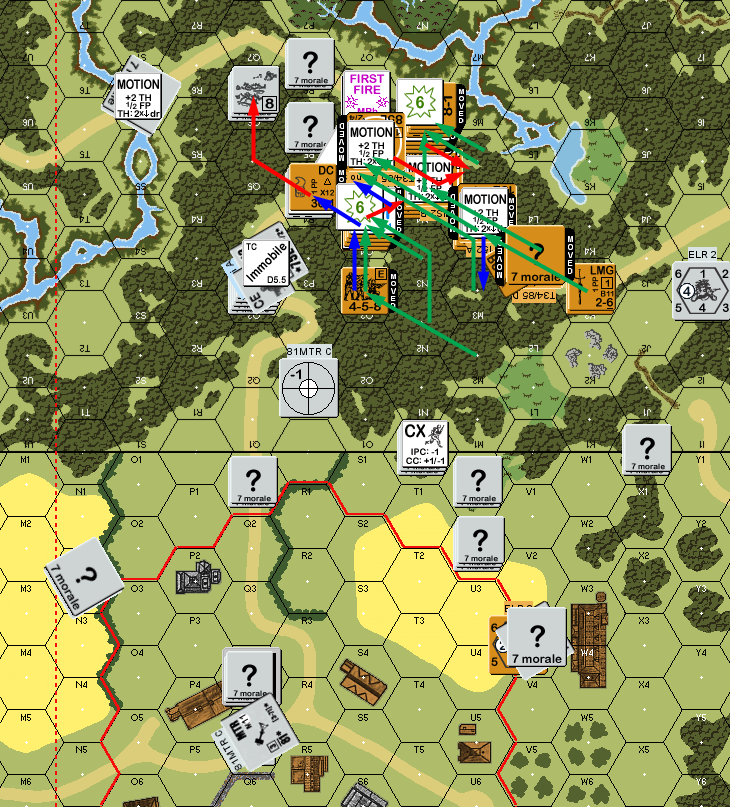
One T-34 circled around the back, and stopped in I4 to use it’s one-use smoke dispenser in the LOS between the Sturmi and SU152. (I was thinking that would make a +6 Hindrance to block the shot, but hadn’t realized the IS-2 didn’t count as a Hindrance as its CAFP was out of LOS of the Sturmi.) After that, it moved up to J3 and stopped short of the residual and other firepower (and possible PF shots), as it had gone CE to help with the sD attempt. The SU152 started, and the Sturmi missed cleanly with an ’11’, and it parked itself a hex later, behind the T-34. Meanwhile, the IS-2 moved through the entrance to the gap to J2, trying to come to grips with the Sturmi. The second T-34 moved out and ended in Motion in H3, waiting for the SU152 to get out of the way. (I realized at that point that I should have left the other one and the SU152 in Motion so they’d have more options next turn; neither was going to have anything to fire at.)
Tom reassembled his MTR in 17Q5 for Final Fire, and the other Sturmi revealed itself in O5, and hit with the MA to break the remaining HS in K3 to conscripts. I managed to pin the squad in L3 in AFPh, but didn’t get an effect against the still-concealed second unit in the hex. A second shot with the LMG malfunctioned it, and a FT went away on its first shot when it fired against L0. An adjacent shot at L0 did nothing but malfunction another LMG. To round out an awful phase, the IS-2’s shot at the Sturmi in 17T1 turned out to be blocked. So much for taking care of half my armor problem. The two squads looking at CC self-broke and got out of the way of the Russian adavance, just leaving a concealed squad next to a CX HS in contact.
Situation, Russian Turn 3. Vehicle movement not shown to keep from reducing clarity further.
Both Finnish squads rallied for their turn, and my only result was eliminating a LMG. The Sturmi in 32O5 took another shot down the road, but missed, so my HMG there was safe. His MTR declared Op Fire, with the unit next door in 17Q4h1 spotting for it. With both Sturmis found, Tom continued exercising the Dummies, and ran his hero in from the village to the woods (it had been with the spotter HS, and was visible as it went down the road). Mostly, he tightened up his line in the woods ahead of me, and near building 17W3, which would protect against a sudden turn to the village.
My only fire was in DFPh, and my main result was turning one of his squads fanatic, which also set off both of our snipers. His killed the broken HS in J4, and mine broke a HS in 17V3. His MTR fired on 32L0, but couldn’t get a hit.
Situation, Finnish Turn 3.
I didn’t get either of my remaining HSs back, but my LMG was repaired, while Tom’s HS didn’t rally, and his malfunctioned LMG went away. My HMG fired down the road, but couldn’t get a result on concealed defenders on a bad roll. I initially advanced on both ends of the line in the woods, and again survived the initial fire, though Tom’s sniper went off again, wounding my 8-0 and eliminating a broken HS (tied RS). The armor started turning into a proper column, with the T-34 advancing two hexes to L3, and then the IS-2 inserted itself behind it in K3 (even paying for entering my sD smoke from last turn, which should have been removed in my Prep…), and the SU152 moved up one more hex, while the second T-34 moved into the gap to help hold the end of the column from any Finns who wanted to pick off separated units, like the broken HS+LMG in J1.
Unlike last turn, after the first two shots, the Finns did not fire again until Final Fire. The Sturmi in O5, with two capable tanks now staring down the road at it, fired at the troops in front of them, a bad roll after a hit only did a PTC (w/NMC for the FT squad), which pinned a conscript squad, while everything else was ineffective. My fire wasn’t much better, only pinning squads in O3 and N4. The latter had refused to fire, and I had been thinking that it was a leader (and therefore probably holding a declared PF). Both pinned squads self-broke and got out of the way of the Russians again.
This left two CC possibilities, and I wasn’t ready to waste a DC squad on a 1-1 fight. I did go into O4, which was still concealed, but at least so was I, and I had a -1 leader to help. Sadly, I only had a 458 squad, and the Finns had a 648. I had forgotten that the Finns were stealthy, and thought I at least had an edge on Ambush, but blew that roll anyway, though the CC rolls were horrible, and the Finns Withdrew after both sides missed.
Situation, Russian Turn 4. Vehicle movement is again not shown.
Tom missed rally on one squad, but got his HS back, and the other squad became fanatic. I still couldn’t get the HS in J1 back. The Sturmi fired twice at the troops right in front of it, hitting once, pinning my 8-1 and breaking the FT squad. His just-Withdrawn squad got a 1MC, which ELRed and wounded my 9-1 on a ’12’, and broke the squad with him. Tom’s remaining HIP HS finally put in an appearance in 17V5, and headed east to the fighting. The second Sturmi made a run to back up the first one, but an ESB attempt Immobilized it in 32Q3, where it couldn’t see anything further than a hex away (it looks like he was attempting to park it in P4).
My only defensive fire was the T-34 vs the Sturmi, which hit and knocked it out with no crew survival (I was one off of a Dud, which would have given the IS-2 a turn).

Situation, Finnish Turn 4.
I got my wounded leader and both squads back for my turn 5, just leaving the odd HS at the back of the column broken (he had been chased off by fire from a Finnish HS last turn, but would have failed even without DM). Tom still did not get his one broken squad back. I attempted to put smoke in the intersection, so I could close with the current Finnish line easier, but the squad broke before they could try (and they would have failed anyway). I decided to try and force more defensive fire (and him to reveal concealed units) this time by trying to Place my two DCs on his units. The first squad went in where the previous fire occurred in O2, and survived residual, SFF, and FPF to successfully place its DC, but the second squad broke to First Fire as it moved up in the first place. (I had already moved my conscript squad at this point, and only after he refused to fire at them had the thought that they should tried to move on into a Concealed Finnish stack to force a reveal, instead of having a repeat of last turn where I couldn’t do much because most of his men were still concealed.)
I ended up squeezing three squads into each of the new front-line locations (well, 2.5 in one), but only three broke to First Fire, the third one being an additional squad that moved into O2, leaving me one intact squad on that flank. Knowing I was behind schedule, the tanks moved up three hexes this time, the lead T-34 occupying the hex with the wreck of the Sturmi, and adjacent to a still-concealed Finnish unit. It and the next two stayed in Motion to try and minimize needed movement costs next turn, and the second T-34 joined the line, stopping in L3 to help protect the end of the line.
Final Fire had a mistake that I didn’t catch, involving fire from the squad that had already used FPF, this pinned a squad in O5, and ELRed the other two (the conscripts disrupting)—this should have just broken the two squads and disrupted the conscript. Fire at N5 pinned my FT squad, but did nothing to the 8-1 and intact HS. The Placed DC only managed to pin its target, but fire from the squad broke it.
Situation, Russian Turn 5.
Tom got both of his broken squads for his rally, and I got all three of my good squads back, but unsurprisingly missed on both of my conscript squads. He tried making his next stand a little tougher by entrenching a squad in Q6, but couldn’t dig fast enough. The bulk of the reserve arrived from the west, and occupied the bank of the river a little back of the road. The rest of the line squeezed down to two hexes, which allowed a very high concentration of firepower.
Situation, Finnish Turn 5.
With two turns left, I was in trouble. I knew I was at best barely on schedule the entire game, and had never managed to get ahead of the curve as I needed to. I had nearly conceded the game near the end of my previous turn, as it was pretty clear I just had no way to get through the Finns in two turns. But, looking it over, I saw some possibilities, and pressed on. The real problem is that I figured I needed to get past the current Finnish position somehow, as my only real chance was to have LOS down the final stretch of road, so there was some chance of getting it clear for Infantry to move through on my last turn, surviving shots from just off the road—somehow.
The good news was both of my conscript squads rallied, giving me nine GO squads to work with. Given how most assaults work, and the amount of Finnish FP out there, I was surprised during the entire game at how much my force stayed intact. I moved up a 628, but two squads fired on him, even with a crap roll (11), 24 FP generated a 1MC that broke the squad. The real problem was 12 residual was enough to keep me out of the hex.
My fanatic 628 tried to make it to the stream (if it could survive, it could advance into it, and then move across the finish line next turn), but the just-arrived stack was two squads, MMG, and 9-1, so a 36FP attack was able to easily get a 1KIA to finish that idea. I made another attempt to draw out fire from the group on the road, but like on previous turns, he refused, and it was time for what I figured would be needed at some point, but could never get a good situation for: an overrun attempt the forces holding the road.
Naturally, that stack contained the hero, who had one of the declared PFs, and used it to burn my lead T-34 as it entered the hex. The IS-2 was unable to even attempt an OVR at this point (thanks to needing to get by the wreck of the Sturmi, and the wreck of the T-34 + smoke, it couldn’t even generate enough MP through ESB to try). Out of viable options, I conceded at that point.
Afterword
I knew going in that I was going for a very tough option. I figured the threat to the village through the gap would give me just enough time to get down the wood-road before the defense solidified. And that partly worked. The last turn showed just how much worse things could be with more than a squad per hex to deal with. At the same time, I could never really come to grips with the Finns, and despite attempting it every turn from 3 through 5, I only got to CC once, and that was still at a disadvantage.
I would also like to note that the record of this scenario is currently 6-3 in favor of the Finns, and a note on the Scenario Archive mentions one of the Finnish wins was with the Russian balance. The balance is to replace any two Finnish squads with 548s, which would help some, as it’d reduce anything they did by a column. The imponderable would be if they’d be ones that I was dealing with a lot. I have a feeling that they’d probably end up on opposite ends of the defense, so maybe one of them would have been one of the I5/J5 pair that I spend the entire game dealing with.
However, I’m not sure that would have made a big difference. Tom did a great job pulling back just enough to keep my advance to a grind, and used the Finnish self-rally ability to pull out and re-form when threatened. About the only thing I really think he should have done different is when the lead T-34 was adjacent to his squad on turn 5, they should have tried for a PF. The odds weren’t great, but they were about to self-break and run away anyway, so pinning would not be bad, and if he killed it, that would be two wrecks in O5, forcing me to detour through the woods and risk Bog.
The main thing I think I could have done different is be more aggressive with the tanks. But those darn declared PFs were the entire reason I didn’t. I was nervous enough about just the regular odds of getting killed by one, but when the only real roll is the TH, the odds are just bad. His fire discipline convinced me that a squad was a leader waiting with a PF, or I would have possibly gone another hex on turn 4. Of course, I was really trying to get Tom to fire to reduce regular PF options, and he never bit. The best chance was probably turn 1, when I knew those two units had to be squads, and that they would be relying on regular PF usage, but taking a chance with a 1/4 of your armor force, that is needed for victory, before having any real idea what the Sturmies are going to do, and of course blocking the road you’re going to use, on the first turn is a bit much.
The good thing was I was making progress the entire time, and the prospect of getting that lucky break was there the entire time. Turns 3 and 4 at least started better than expected, with squads walking unscathed into fire that I expected to just break them. In both cases, the luck didn’t last, and there just wasn’t anything left to do by the time movement wound down, with opportunities slipping away. Turn 3 especially got brutal, with three weapon malfunctions, and a squad surviving FPF five times. But those moments kept me coming back for the rest of the game.
[Quick note: If you enjoyed this AAR, please consider throwing a little money my way on Patreon. These writeups take a lot of time, and the “thank you” would be appreciated. Otherwise, I will note that just ‘following’ me there (no money) will still generate emails to you every time one of these posts.]
Discussion ¬