
FB7 The Terror of the Castle
Patch and I headed back to Budapest after our second desert adventure, reaching the end of January 1945 with FB7 “The Terror of the Castle”. Having been the defense the last two games, I took the attacking Soviets, and while the ROAR/Archive record is a little thin, it is showing a pro-Russian tilt, so I gave Patch the Hungarian balance (an at-start Hero).
Even for Festung Budapest, this is an unusual scenario. The Hungarians are defending against a Russian assault that will take them to the base of Castle Hill and have three different setup zones (four squads + MMG & HMG in the Postal Palace, two squads in the victory buildings, and six squads in most of the rest of the available map). The Russians have twelve squads (three of which are 628 assault engineers) a MMG, two FTs and two T-34/85s, entering from offboard. But, up to six squads (three each, in two buildings) can set up on-board, within the Hungarian setup area. The scenario is nine turns long, with control of the Z12/BB11 building Locations evaluated every three turns to grant one VP. Best two out of three wins.
A large part of the strangeness is the fact that the side that claims a VP goes last for the next three turns, meaning that the turn order will flip somewhere along the way (probably turn 7, as the Russians start out going first, and are unlikely to get the first VP). Finally, both sides get to purchase reinforcements (which appears in several FB scenarios, but this is the first we’ve gotten to that does it), with the Hungarians getting theirs on turn 4 and the Russians getting theirs on turn 7. Oh, and on turn 7 the Hungarians get a flamethrower in the possession of any unit they wish. The Hungarians are up to Ammo Shortage level 3, and as ever, there is ground snow.
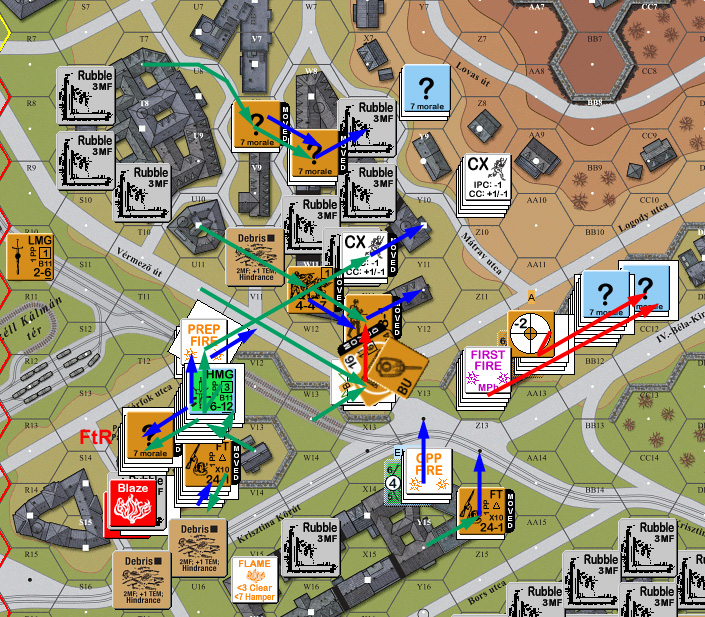
Looking at some on-line discussions of the scenario revealed that one of the Russian set-up buildings, CC15, was essential for the Russians to use to suppress likely Hungarian defenses. Naturally, the pre-game rubble checks knocked down eight of the thirteen hexes of this block, including the entire useful SE end (mostly thanks to falling rubble taking out further hexes). I didn’t quite like the direct, close, route to the victory buildings, with a large number of Hungarian ‘?’ lined up along the Bela-Kiraly ut, and ended up entering my forces on the north end, with the MMG, a FT and best leader in the CC15 block, ready to advance into the intact Y14 area, and the FT and DC in the Postal Palace, out of immediate LOS and ADJACENCY to the Hungarian defenders in the upper floors.
Despite my best efforts, Patch could see most of my movement, and I lost a Dummy stack in W17. A pot-shot pinned a squad in R14 as they tried to reinforce the Postal Palace. My main stack entered along the Vermezo ut in Armored Assault, but HMG fire from the Postal Palace broke both the 458 and 628, even after the 8-1 passed. Further fire also broke the leader who was going to guide the backup troops through the high MF cost rubble, but the squads were okay. The HMG got several ROF shots, pinning the 8-1 and CRing the 458 on its last shot. The 8-1 self-broke to stay with his men, while my 8-0 was wounded trying to find safety in R6.
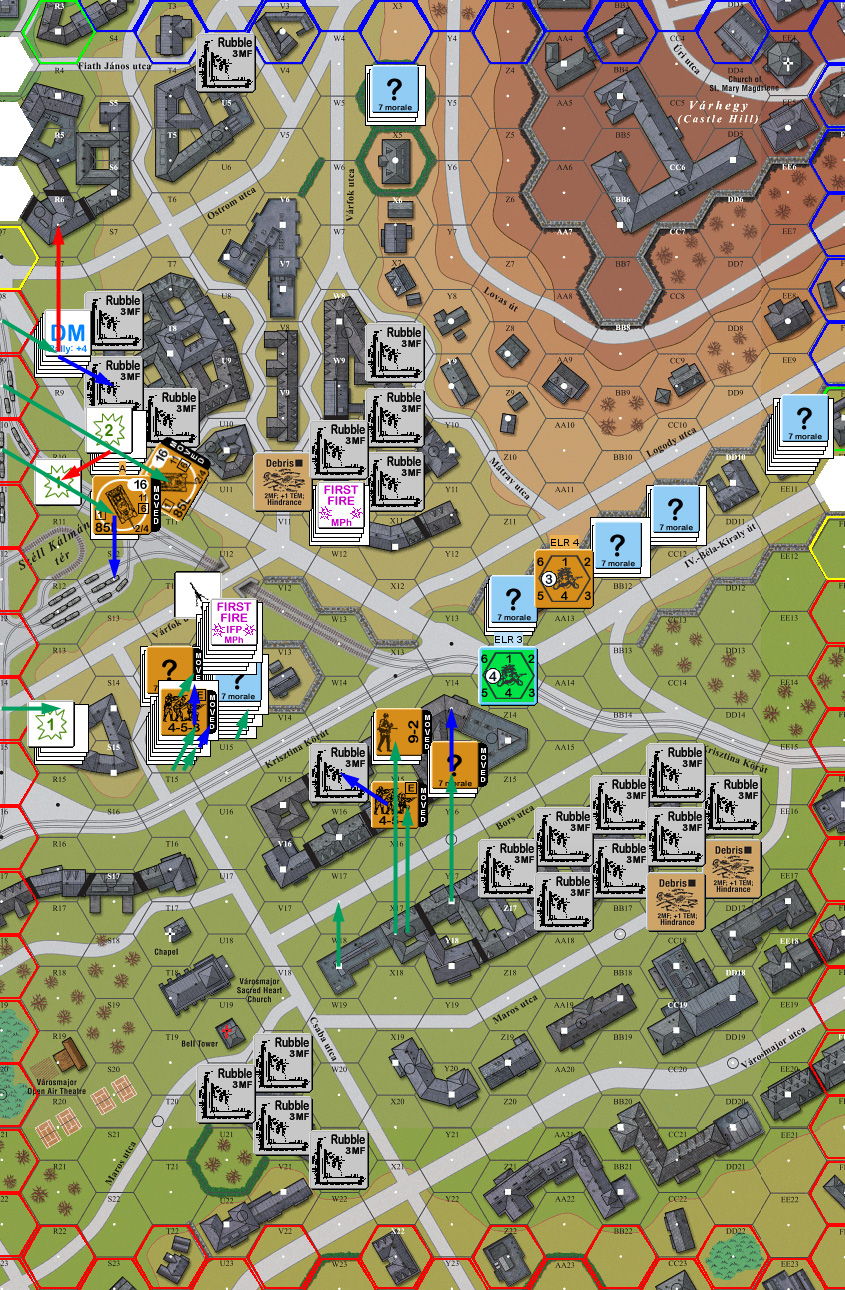
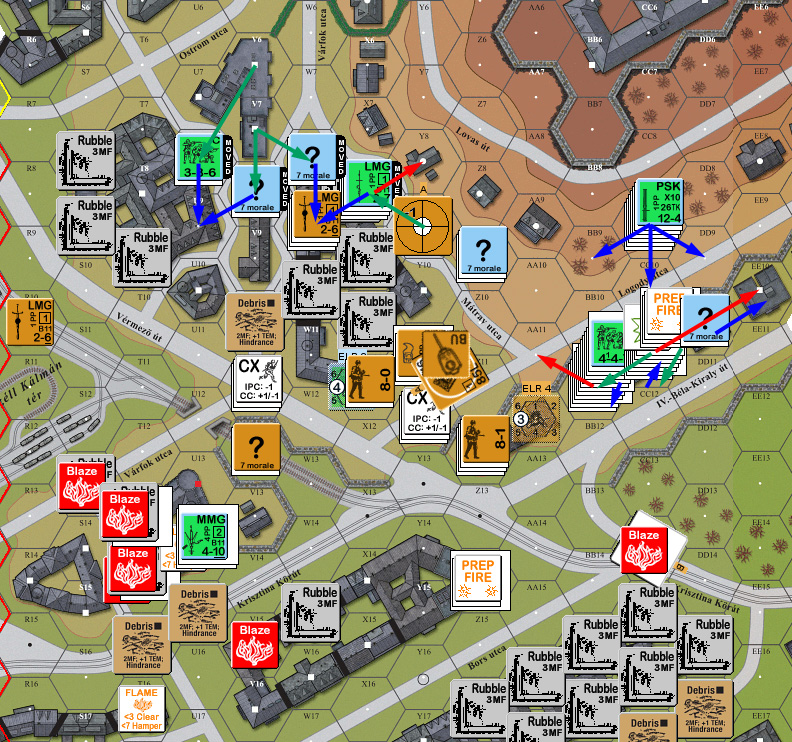
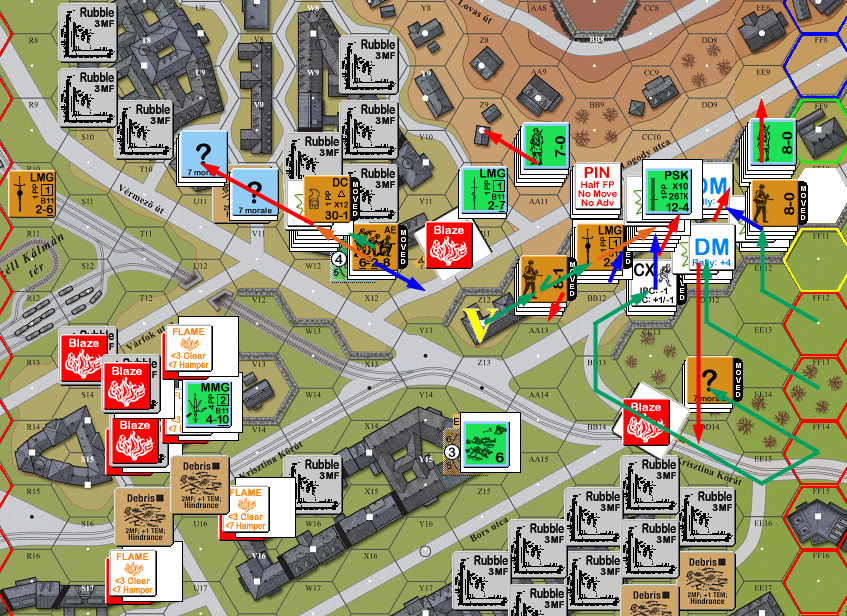
Situation, Russian Turn 1. Colored hexes are off-board entry areas (red=Russian, blue=Hungarian; yellow and green only have one legal entry hex). North is to the left.)
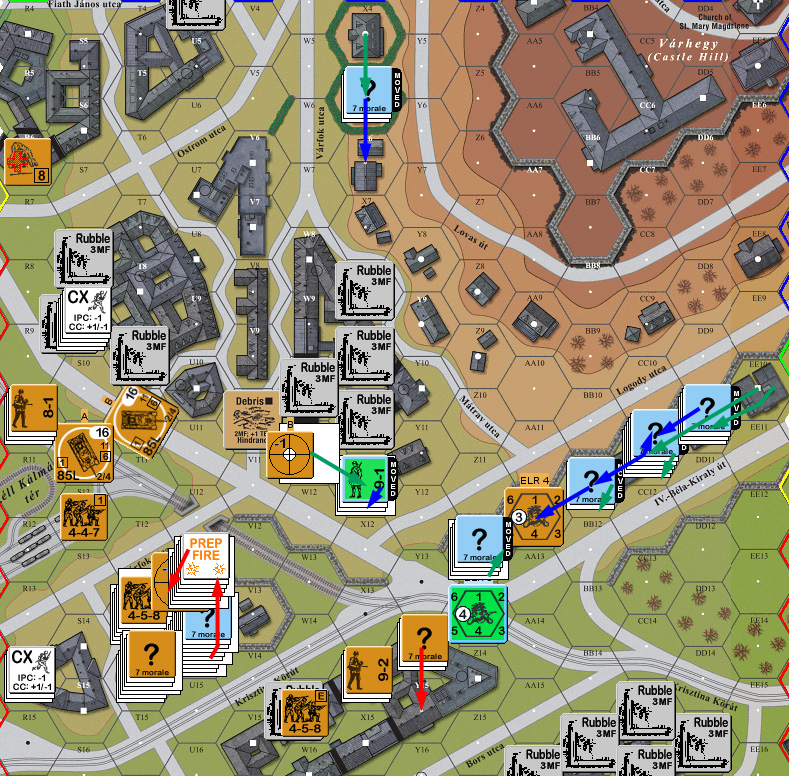
I got lucky in Patch’s RPh with my 8-1 rallying immediately, and followed it up with a ’12’ for the HS in R10 to CR into nothingness, dropping his LMG in the process. Patch’s only fire was another shot there, but only DMed the remaining broken 628. His outpost in W11h1 ducked out of sight of the T-34 shelling it, but Patch wasn’t happy about staying in LOS of the MMG across the way in X14. My fire Encircled the HMG in U13h3, and the T-34 revealed and broke his 347 squad in h2 (I was using ATT, but at only three hexes away the MA couldn’t reach h3, which was four levels above, or h0 [empty] due to LOS over the crest line). Sadly, that activated Patch’s Sniper which revealed and broke my FT-squad in Y14. My h2 squads in the Postal Palace then got a 2MC on the 347 in U14h2, which ELRed to a conscript HS on a ’12’. My FT was in T14h2, and fired through the interior courtyard of the Postal Palace to break the 8-0 and HMG-squad in U13h3 (an SSR automatically placed a Blaze in T14/c at that point).
The broken units in U13 fled down to the cellar, while the squad in U14h2 went upstairs and over to U13h3 where the abandoned HMG was.
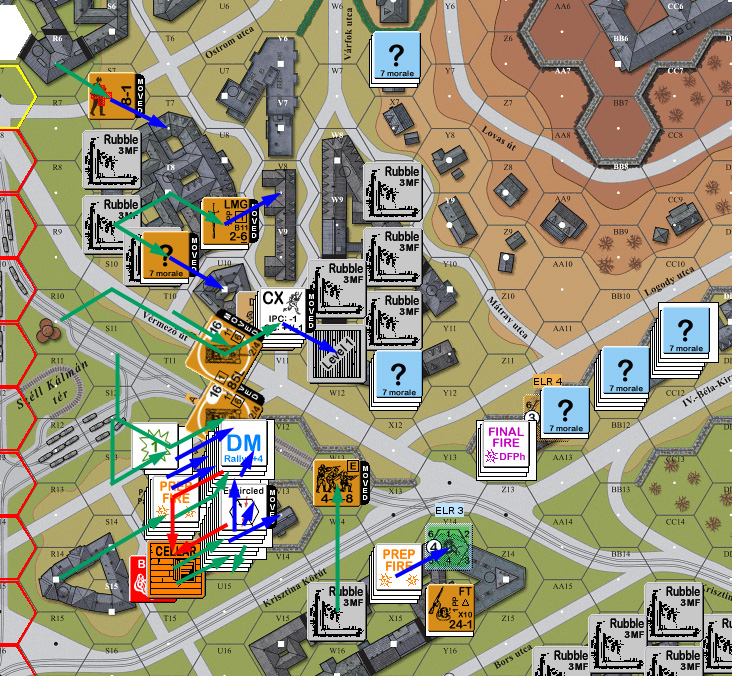
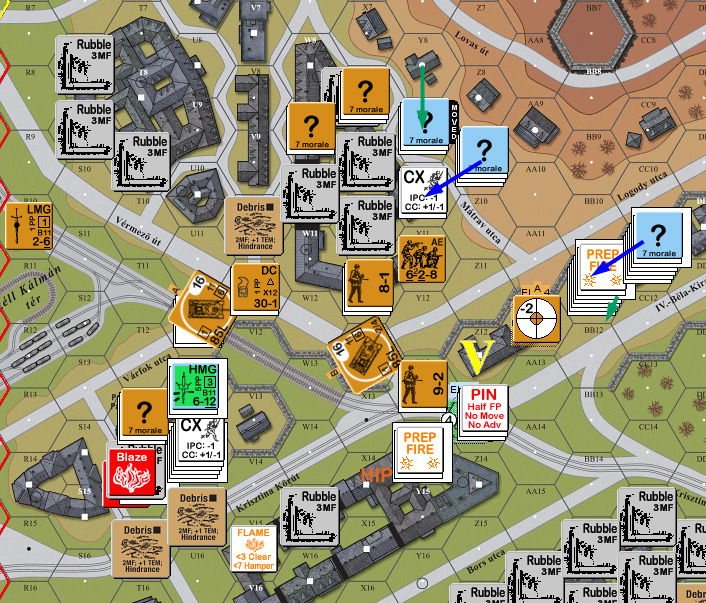
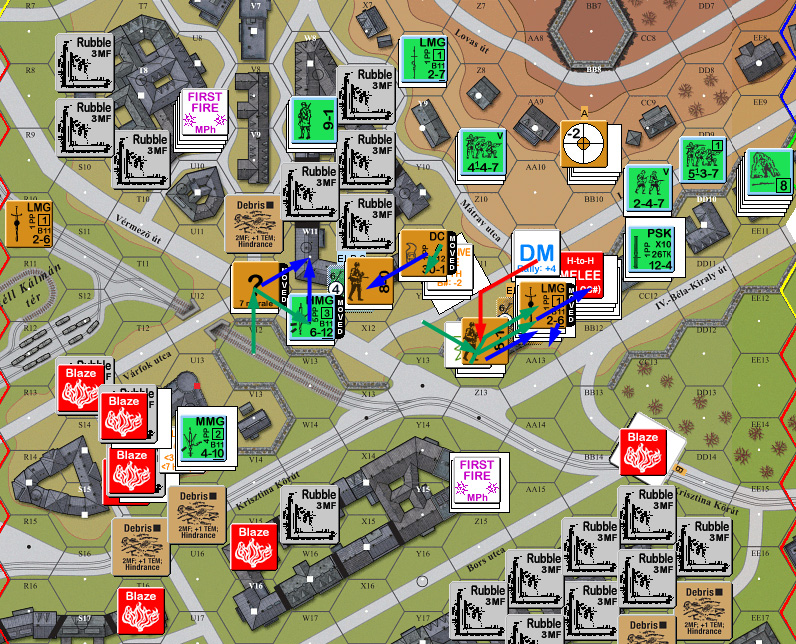
Situation, Hungarian Turn 1.
My wounded leader and the squad in R10 rallied for my turn, but my FT-squad naturally failed his self-rally attempt, while Patch had no luck with the force in the cellar of the Postal Palace. I prepped a squad in the Postal Palace, and the MMG to Encircle U14h3, but malfunctioned the MMG in the process. My main activity was shuffling around the Postal Palace, getting ready to seize the HMG. The FT moved to U14h2, and managed to take Patch’s two best shots from U14h3 without a result.
Naturally, most of my advancing fire was ineffective, but the FT broke the MMG squad in U14h3 (this was getting fairly surprising; I’m used to my FTs going away by the second shot), so I was able to advance into the Locations of both MGs.
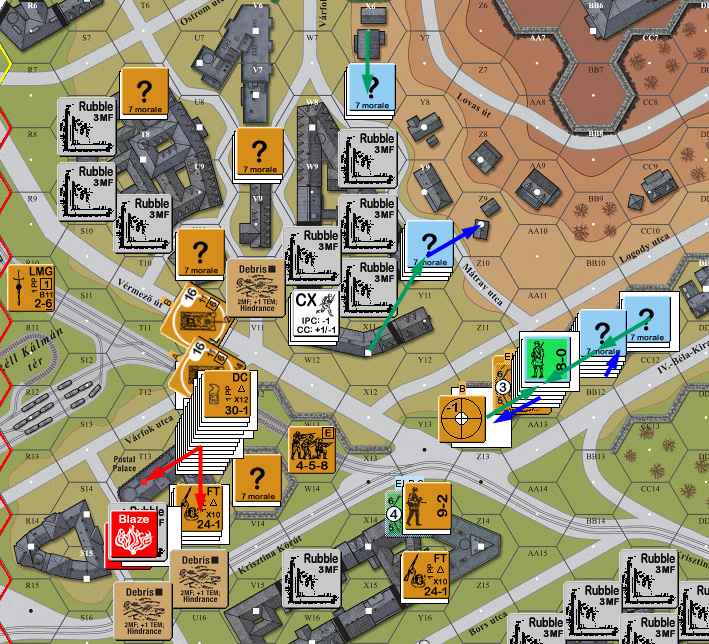
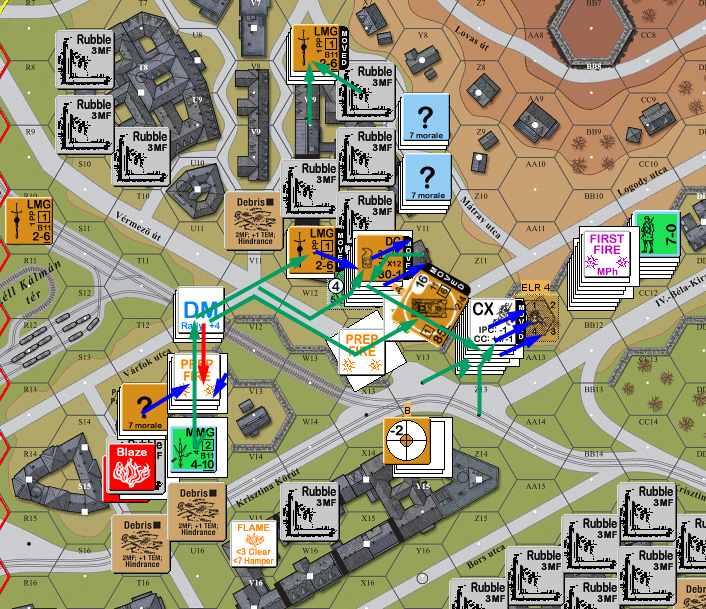
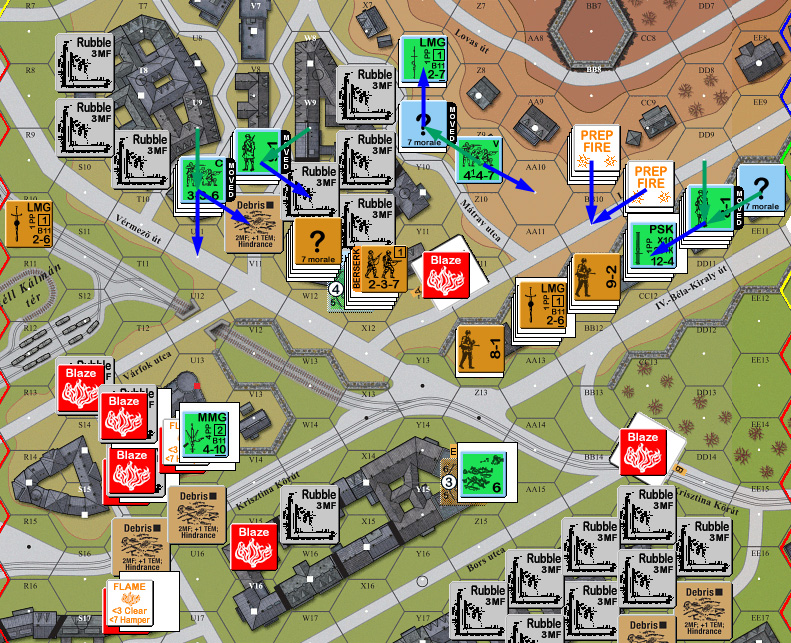
Situation, Russian Turn 2.
Patch didn’t get anything back in his RPh, but did roll Gusts, which immediately collapsed T14, eliminating two of his broken squads, caused falling debris, and later caused a Flame to appear in V15. I had no trouble recovering the two Hungarian MGs, but my malfunctioned MMG went away on a ‘6’. Patch also pointed out that I’d been accidentally dragging along my LMG from R10, but had never actually recovered it (it ended up sitting there for the rest of the game). Patch slowly pulled in the defense around the victory buildings, leaving me with very little to shoot at.
Situation, Hungarian Turn 2.
I got my broken FT squad back for my rally, and Patch couldn’t get his leader in the Postal Palace to rally while under DM. One of the T-34s had a decent target, and got a hit on AA12h1, ELRing the leader and breaking the squad there. While I no longer had a MMG there, I Opportunity Fired the 9-2 and squad in Y14, anticipating he’d have to reveal concealment across the way as I moved up.
I had to shuffle things about a bit, especially since the guys on the spot to grab those two MGs were not the ones I would have preferred. The 628+DC dropped the HMG to run back out of the Postal Palace while a 458 grabbed it, and the 628+FT with the MMG lugged everything down the stairs to ground level. The 458 I’d gotten near the victory building went over the wall (uphill, in the snow…) and then reduced to a HS with a ’12’ on a 2MC from Z11.
Patch revealed a 8-1, Vannay squad and MMG in BB11h1, and tried to get my FT squad, but only malfunctioned his MMG. My FT in turn killed his Hero and broke the squad in Z12, while the 9-2 couldn’t do anything. After revealing my 8-1 in T13h0, the rest of the Hungarians in the Postal Palace were finally eliminated for FtR, thanks to the burning cellar in T14.
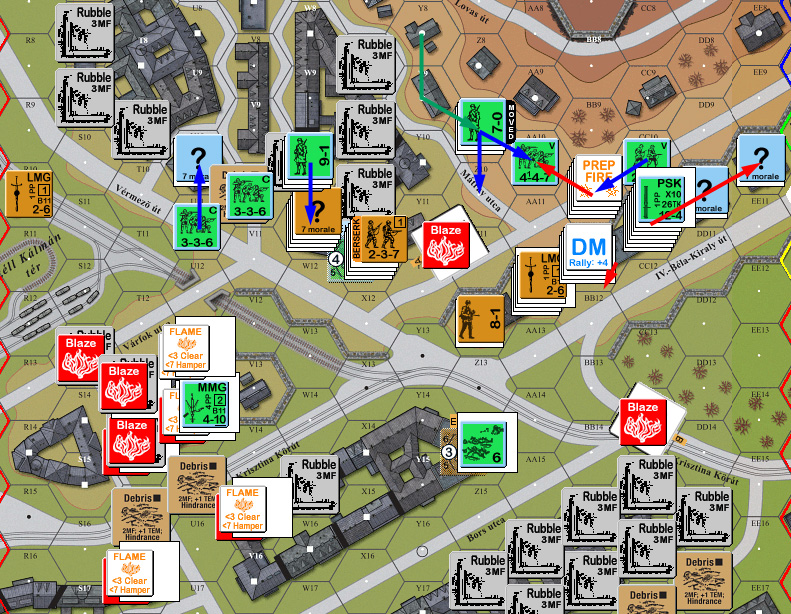
Situation, Russian Turn 3.
Patch lost his MMG in RPh, while all rallies missed on both sides. In Prep, Patch revealed his HIP squad in Y14h2 and fired on my FT squad adjacent. He survived the resulting NMC fine, but was then pinned by the Sniper going off. For the previous two turns, Patch had had some odd pauses as I moved through the V10 area, and I had figured his HIP squad must be near there (say, in W11h2), so this was a decided surprise.
His only moves were to skulk a leader downstairs in BB11, and to inch his ‘?’ stack in Y8 towards the action. My fire only pinned the formerly-HIP squad and activated his Sniper to strip concealment from and pin my squad in X8. The Z9 force advanced down the hill and killed my squad there in an Ambush. With the end of turn 3, Patch scored the first VP.
Situation, Hungarian Turn 3.
I couldn’t get my one squad rallied for my turn, but Patch got his 7-0 and two squads in CC11 rallied. I decided to drop the captured MMG to rush the squad (which still had the second FT) over towards the main action, but Patch just managed to break them as they left the Postal Palace. The two squads that had been adjacent to the victory area got in, and took three locations between them (Z12h1, h0, /c), while I Dashed a third squad across from X11. Patch was relived when my squads next to his looming concealed stacks backed off, but I really didn’t want to face another Ambush.
There wasn’t any effective DFPh or AFPh fire, but a flame spread into T13h0 from the rubble, showing that it was indeed becoming time to get out of there. I advanced my three squads in Z12 to AA12, taking three locations there, and putting me at 6/16, two short of what I needed, and one turn late; though fairly obviously on schedule for how the scenario should go.
Situation, Russian Turn 4. I illegally advanced from X11h1 to Y11h1….
Patch purchased his reinforcements, putting a 8-0 with 447 Vannay squad and two 347s on the east edge and a 9-2 with 447 Vannay+PSK and two 537s on the south edge up the hill from the victory buildings. My HS in X11 didn’t rally thanks to having been DMed by Patch’s Sniper (sure beat getting the leader wounded), but the FT squad in U13 did.
Facing two 458s and a 447 plus a 9-2 (in the cellar), and a FT (in h2), Patch pulled out of BB11. His ground floor group went up to CC11h2, and later advanced to the roof, with a PSK in tow. The south-side entry marched along the hillside, untroubled by a couple high rolls from me. The fire continued advancing, with a flame spreading into U14/c, and a Blaze breaking out in T13. Patch was doing quite a squeeze play on my outpost in the east, with reinforcements moving up to them, and a concealed stack moving in on the other side, so I was surprised when that stack moved up the hill instead of moving adjacent.

Situation, Hungarian Turn 4.
I rolled Gusts for my turn, which collapsed T13, and showed I really wanted to get out of the Postal Palace. Rubble fell into S13, and the gust direction was pure west, which blew the flames into T16. I still couldn’t get my HS in X11 back. I successfully ran the second FT squad over this time, but he got pinned in the road at Y12. I attempted to get two more squads into the victory buildings, but one of them broke, while the other successfully Dashed over. I also got my 8-1 over there, after moving up my 8-0 from the Postal Palace, leaving only my last Dummy in there.
Patch had bad luck with a shot being subject to Ammo Shortage, and tied Random Selection to turn two of his brand new squads into conscripts. I pushed a squad into the next victory building (9/16), and managed to only pin on a 24FP attack. The 447 followed up, and got no effect from the resid.
After struggling for a while about what to do about the PSK on the roof, I parked the T-34s in CC14 and in bypass of Y11. (If I’d been thinking a little more clearly, I’d have put the former in EE14; out of likely PSK range, and the same one hex of hindrance to CC11 that I had in CC14.)
Patch broke the 447 in DFPh, who, stuck between CC11 and Z14, routed down to the cellar of BB11. The flame in V15 from the previous Gust turned into a Blaze. The eastern guard started pulling back, as the 9-2 and FT squad advanced into BB11, giving Patch something to really think about.
Situation, Russian Turn 5.
Patch deployed his Vannay squad in CC9 for his RPh; sadly, my only result was to CR a broken 628 in Z12. Rather than skulk out of the victory area, Patch fired his stack in CC11h0 and broke one squad while pinning my leader and FT squad. Then he fired two and a half squads and the 9-2 in CC11, and the FT squad went berserk on a HoB result. His PSK on the roof got a hit on the T-34/85 in CC14 to burn it.
Movement was fairly minimal, with his still-concealed east-side reinforcements, and one stack from the hill moving in on my eastern guards, and squads moving into BB11h1 and CC11/c (adjacent to my broken squad). I tried to stop the latter move, but the squad passed the MC I generated. Thanks to going berserk, the FT squad was no longer pinned, and hit the primary target of Patch’s two-squad + 8-1 stack in CC11h0 for a 2MC that broke the entire set. W9 hit the biggest adjacent stack (X8) and managed to break the squad, and reveal the leader there on a good roll. With no other targets visible, I finally realized that the remaining T-34’s position was not bad for firing on the roof of C11, and killed the PSK squad with a lucky IF hit.
The number of fire spread rolls was getting out of hand, but the only action was T16 turning from a flame to a Blaze. And then it was time to face the reason why I had been antsy about moving into BB11: there wasn’t really anywhere to rout to. The squad in the cellar came up, spotted the Hungarians in BB11h1, left for Y11, Patch revealed Z9, which halted them and caused FtR. The squad in h0 Low Crawled to AA11 (on the way to Y11; they couldn’t see Z9 from where they started).
Patch moved into CC in both W9 and BB11. I narrowly avoided Ambush in the former, but still died without doing anything in return. With my leader pinned and the squad berserk, Patch had no problems Ambushing me in BB11, and declared HtH, but then blew the attack with a ’12’. I stuck around, and missed my attack, leaving the Location in HtH melee (and me with much better morale…).
Situation, Hungarian Turn 5.
The only rally I managed was the HS in Z12 (which at least was well-placed to help out). Patch didn’t get anything, including missing the recovery attempt on the LMG I left in W9. The T-34 turned its attention to the PSK and leader that had just come into LOS, and got a hit which pinned the HS. Following that up with the MGs simply malfed the BMG.
The remaining forces from the Postal Palace (HMG squad and Dummy) made it over to the W11 area, I got the second FT squad into the victory area, and I finally claimed the level two Locations of Z12/AA12 (9/16). Patch burned the T-34 in DFPh with the PSK, but at least it activated my Sniper which broke his squad in Z14h2. Flames started in U14h0 and T16h1, and U14/c went up in a Blaze.
I formed a new line of eastern defense in W11, and put a 328 HS into the Melee, which gave me exactly 2:1 odds. I got his squad, while Patch missed his roll.
Situation, Russian Turn 6.
Patch got his entire stack in EE10 back for his rally, and recovered the LMG in W9. I would have loved to have done something about it, but there’s just no way for me to see ho in that area. The HS in X11 finally rallied, on a HoB that sent him berserk. Even better, I rallied the squad in Z12. Patch prepped his PSK and got a hit against BB11. Thankfully, the 9-2 passed, and made sure everyone else did as well on a 2MC/3MC (FT). He then prepped the other units in the area, but only got a PTC on the FT squad, which they passed.
Patch crept closer, but kept out of LOS. My FT got a 4MC on the squad in CC11 to pin (!) Patch’s only unit in the victory buildings. The only other things I managed was pinning a HS in CC10 (keeping him from coming inside…), and re-DMing Z14. Flames spread to V15h1, U13h0 and U13/c.
With 9 victory Locations, I took the second VP, and thanks to the SSR, the turn order flipped so that I was going second instead of first, giving me another Hungarian turn to get through before getting to move and receive my reinforcements. Also, Patch would now win ties on Location control, so I needed to hang on to at least as much as I currently had.
Situation, Hungarian turn 6.
Patch also got his free FT at this point, which he gave to his Vannay HS in BB10, who then handed their PSK off to a 537 in the hex. After rallying the squad in Y8, he opened up his PFPh with a 30FP +2 shot at BB11 which he rolled a ’12’ for, causing Ammo Shortage in a 347 squad and a PTC (/NMC for the FT squad). The 9-2 was fine, but the HS there got a ’12’ which eliminated him through Booby Traps, and the FT squad got a HoB… to go berserk. Again. Next, the FT fired, and broke the 9-2 and CRed the berserk FT squad. The PSK fired, and went away with an ’11’.
Movement was confined to Patch moving up a squad a leader from Y8 to Z9. The berserk FT generated a 4MC which ELRed the 8-1 in CC11, but only broke one squad, with the other two pinning. The second FT got a K/3 against BB10 to eliminate the HS and CR the squad on a tied RS and broke the 9-2 and remaining HS. The squad+LMG in AA12h1 got a K/1 to reduce the squad in AA10 (and then pinned him on the ROF shot).
U13/c got a full fledged Blaze. Patch advanced into W11 with a 9-1 and 447. My Dummy finally died, and the CX HMG squad kept ‘?’ in the hope of living through the phase, but Patch got him anyway.
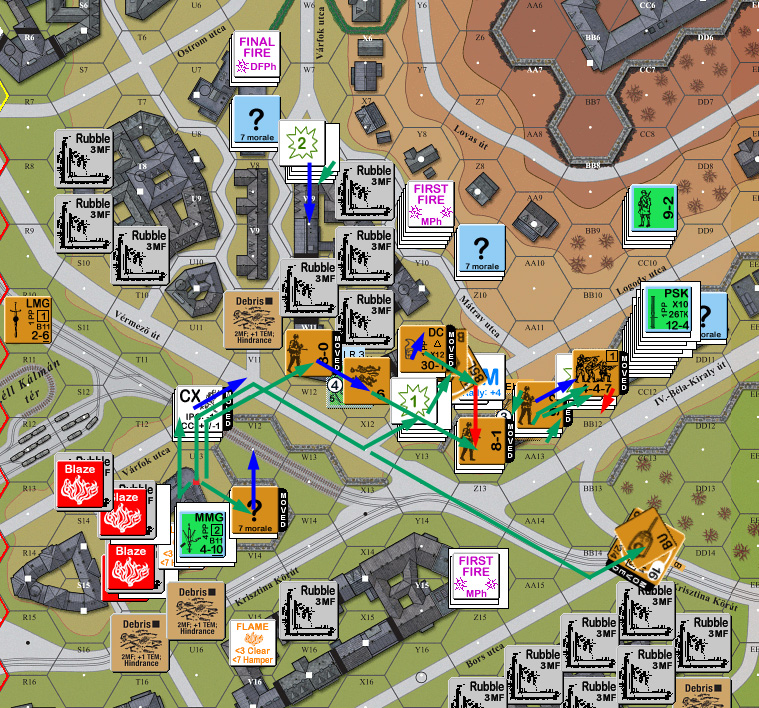
Situation, Hungarian Turn 7.
At this point I got to purchase my reinforcements, and took an 8-1, 8-0, 2×628, 527, 2×447, LMG, MMG, all lined up on the south edge, where I expect a lot of Soviet assaults start. My 9-2 failed to self-rally, and Patch failed to pick up his HMG, but his HS in BB10 did recover his FT. He also rallied his 8-0 in EE10, but missed two MMC rallies and another leader. My FT in AA12 fired, but ran out of fuel (I was way overdue for that…), and pinned his FT HS anyway.
Both berserk charges went well, with W11 suffering Ammo Shortage to boot. With W11 otherwise busy, my squad in X11 placed a DC on him to get rid of the stack that had eliminated two of my squads in CC. With only one non-fired squad left along the Bela-kiraly ut at that point, I rushed the road and with the reinforcements. He broke the 447, and pinned the first 628, but then suffered Ammo Shortage and broke on a FPF shot.
Things were going quite well, and then his only DFPh shot caused a 1MC which broke my 8-1 and both squads in AA12 (and CRed one of them on a ’12’). My DC broke his leader and pinned the squad while leaving my zerkies unaffected (except for ringing ears). The second FT ran out of fuel when the re-berserked HS tried firing it, but still broke one squad and pinned the other.
Flames spread to S17, while the one in U14h0 went out and U13h0 and T16h1 turned into Blazes. I decided to continue consolidating on the victory area, and sent the squad+leader in X11 to Y12 to try and protect against a rush on the now empty end of the buildings instead of helping out in W11. Both sides wiped each other out there, and I got a ‘2’ in CC11 to kill his squad there before they could even make a planned 1:4 attempt on me (darn it, forgot leader promotion).
Situation, Russian Turn 7.
Patch got his leader back in his RPh, but that was it. I self-rallied my 9-2, who was alone, but at least couldn’t be forced to rout somewhere unwise now. Patch’s FT broke my squad in BB11h1, and busied himself moving his remaining forces forward. My only effective DF was to break the FT HS, and we pretty much called it there with his only decent-odds chance to scatter me gone.
Patch did run through the next turn or so on his own to see where things might go:
“I jumped into Y12 and it went into H-t-H melee. I threw a 7-0 into EE11 and your CX units to hope for the best, and failed. I threw a leader into DD10 and CR’s a leader and your 628 but died. I got into AA12, and your counterattack into BB11 ended up with everyone broken. The broken units in the AA12 cellar died for FtR. You were able to advance a lot up close, and won in Y12.
“My last turn I broke AA13, broke the leader in Y12, and got up to the wall with the FT. The 9-2 and FT HS Pinned there, but I managed to rush into CC11. X11 Pinned, and so I couldn’t Advance into Y12. Even then, there was no way I could retake locations in building BB11 to reclaim it, though the FT in AA11 is still a source of trouble for you in an attempt to hurt AA12. That leaves you with the easy win.”
“If the damn FT had lived, I would have given this a run to the end, I think.”
Which was close to my thinking. I was worried about having to play whack-a-mole with victory Locations, but I had the advantage in that now that the reinforcements were in play.
Afterword:
Patch had been down on his chances for quite some time, but I have to say, I got lucky. This is by far the best luck I’ve had on flamethrowers, and the entire routing situation in BB11 threatened to just eat up units. Going berserk actually saved me twice, but nearly cost me a good squad and FT in CC. I also had about three different fire phases where some good rolls really gave me what I needed.
Early on, the Postal Palace was a worry, but the accident of the entire CC15 area collapsing (forcing me to use the X14 area), and the fact that I entered on the north side made it easy for me to get encircling fire on his positions there. With hindsight, putting a Hungarian squad into X14 (or nearby) would have complicated that quite a bit, and kept the Postal Palace from being nearly so cut off. Of course, with only six squads to cover the bulk of the map, and several possible Russian approaches….
I was really worried about getting squeezed between his defenders and reinforcements in the mid-game, but I don’t think Patch pushed nearly as hard on the east side as he could have. (I’m also a little surprised that he didn’t send a single squad after the abandoned LMG in R10; but like I couldn’t spare the attention to grab it, I suppose he couldn’t afford the diversion for 2 more FP either.) Patch’s HIP location was very good, especially since it was the cause of all my rout problems, but the Sniper got him about the time he could have started being a part of Encircling fire on my guys.
Castle Hill itself is interesting; the top of the hill is dominated by large stone buildings surrounded by a stone wall with cliff hexsides. There’s no way in or out of this compound on the map, but it is within the Hungarian setup area, and Hungarian reinforcements can enter into it. Thankfully for the Russians, the Hungarians have no access to MTRs in this scenario, because BB7 would be an excellent location for one. In fact, about the only way to really take advantage of this would be with a MG in the reinforcements.
I have to say that Bill Cirillo is quite the pryomaniac: This is the second FB scenario to feature a large out of control fire, though without any wind it wasn’t nearly the pain it was in FB18 (where it wasn’t really his fault; Patch managed to light that one unaided with his ART instead of a SSR).
At any rate, the scenario is certainly rough on the Hungarians with all the Russian toys out there, but I’d be willing to give them a try; they certainly have lots of possibilities.
Discussion ¬