
DA11 Sicilian Midnight
Patch and I had planned to play our previous game on Vassal, but after our FtF session, we had a backup plan—the other scenario we had been considering. We got started in May 2010…:
After our little FtF Italian DASL foray, we went with the only other DASL scenario with Italians for our next Vassal game. DA11 has everything. DASL. Rare nationality (Italians). Mines. Demo charges. Roadblocks and foxholes. Alternate terrain (olive groves). Night.
Well, no tanks and no ordnance.
ROAR has a pretty even record, and since Patch got the Italians last time, I took them this time. ELR 1. sigh My main group sets up on/near the hill on board e. I also get four auto-HIP squads on board h, but one squad and the only available leader must setup with the roadblock, which must be in hH2 or hK2. The former is closer to the rest of the defense, but the latter is also a bit further from the American entry at the bottom of board f. Patch needs to take all four level 2 hexes of the hill and the roadblock in seven turns.
Hmm. The VC mentions that the Americans win at the end of any Game Turn where he controls them, so I’ll always get a final counterattack. Assuming there’s anyone to counterattack with, of course.
I opt to put the roadblock in hK2. I hope it splits up the offensive for a little bit.
Even with DASL boards the first turn is quiet as the first wave of Patch’s troops can’t get to my positions in one turn. (He gets a nearly identical set of troops on turn 2.)

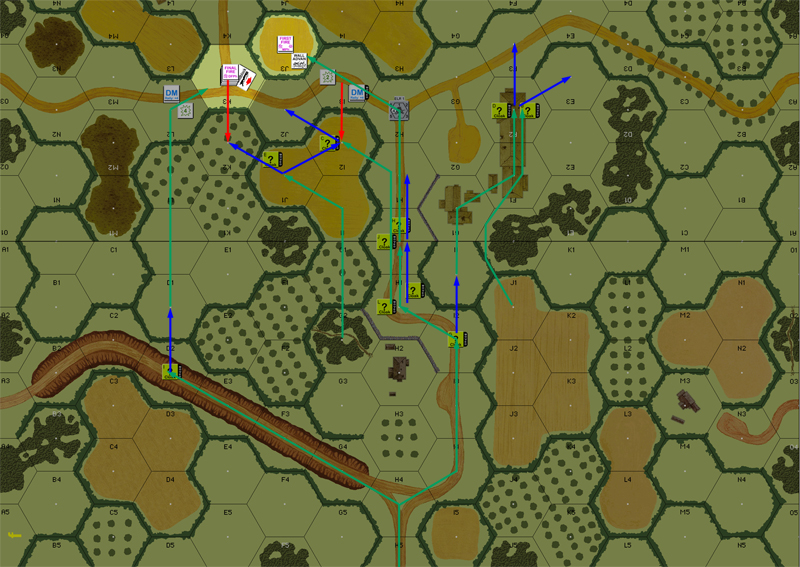
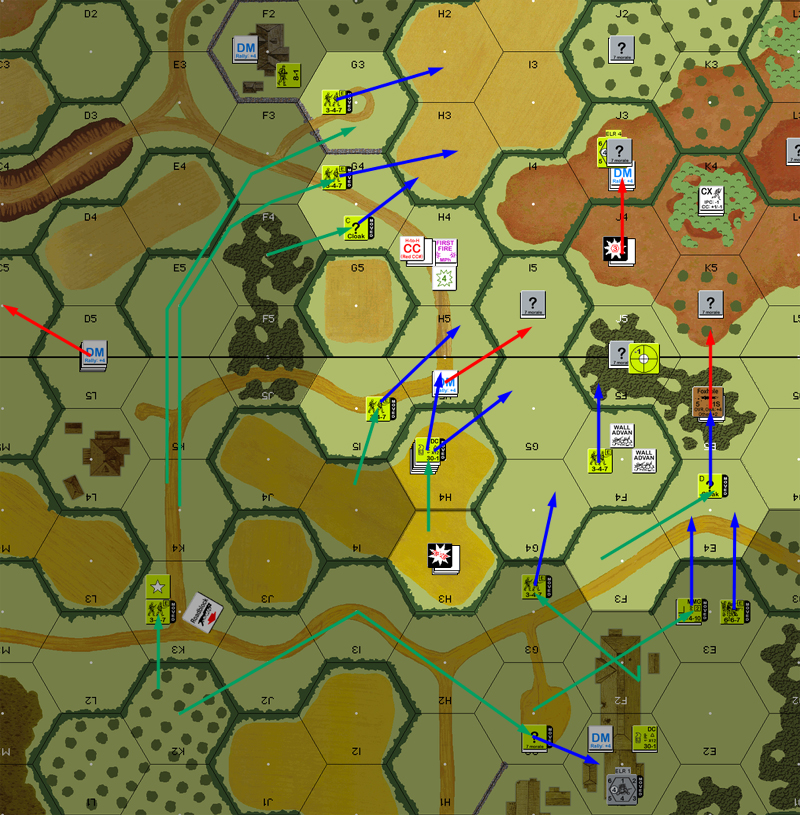
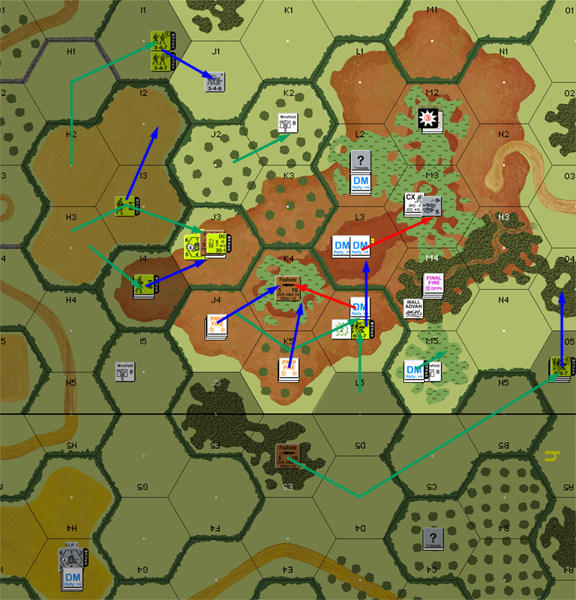
Situation, turn 1, showing my visible setup.
Patch quickly moves into hH2, and finds the roadblock isn’t there. He tries moving around it into J3, but finds a HIP squad who breaks his… HS. He then moves another Cloak directly into H2, revealing the garrison and roadblock… facing the wrong way. SFF breaks that HS. I was worried I’d just malfunction the LMG instead.
One problem with Night is there’s enough things going on that you’re bound to forget something. Patch should have had to roll for straying with one unit. Of course, he forgot road bonus on the first turn.
I’m a little surprised when one of his Cloaks splits off a couple ‘?’ in advance. Obviously, he’s needing to reshuffle a bit to get leaders to the HSs.
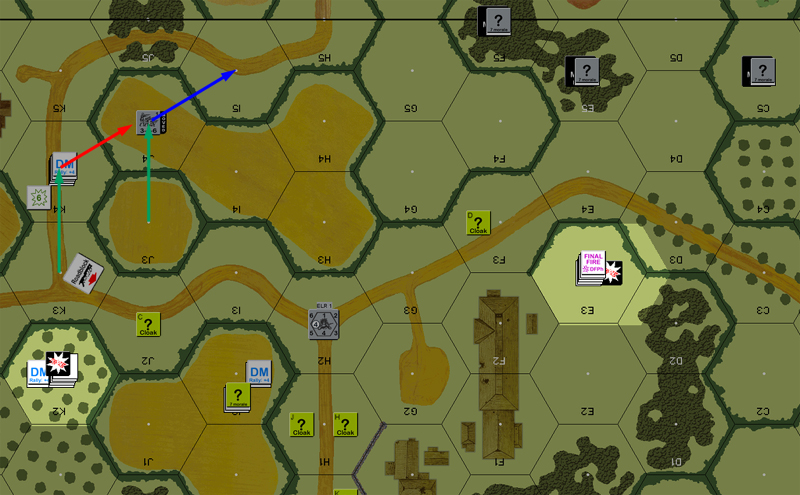
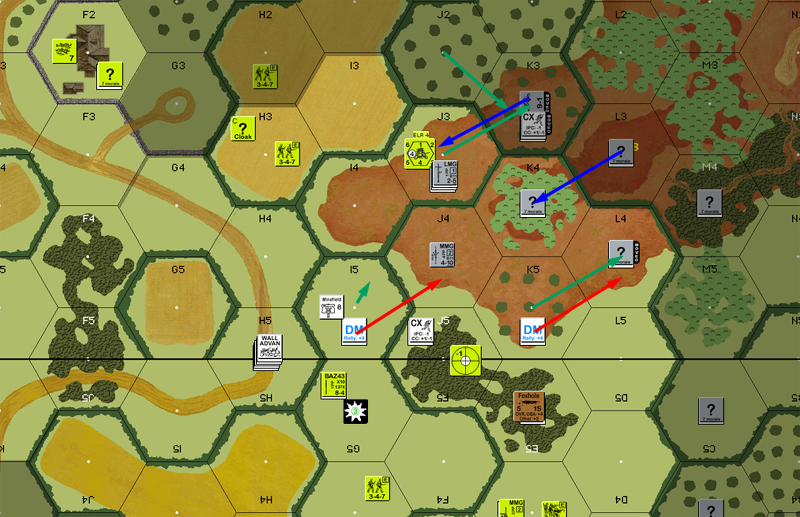
Situation, American turn 2.
For my second turn, the NVR went up to 4. I tried pulling out of the roadblock area, but entirely mis-read what he had left in Cloak E in hK2. After the split into I2, I expected a leader and maybe a squad. It was two squads + BAZ and an 8-1 (which is as bad as his leadership gets…). My attempt to move up the road got hit by a 12 -2 attack that generated a 1MC on my squad, and a PTC on the still concealed leader. Naturally, I broke and Pinned.
For DFPh, Cloak B revealed another two squads and 9-1 in hE3. He fired on E5 across the way for no result. This also released a number of troops from their No Move markers. I self-broke the 7-0 to keep him with the brokies and get him further away from the advancing American tide.
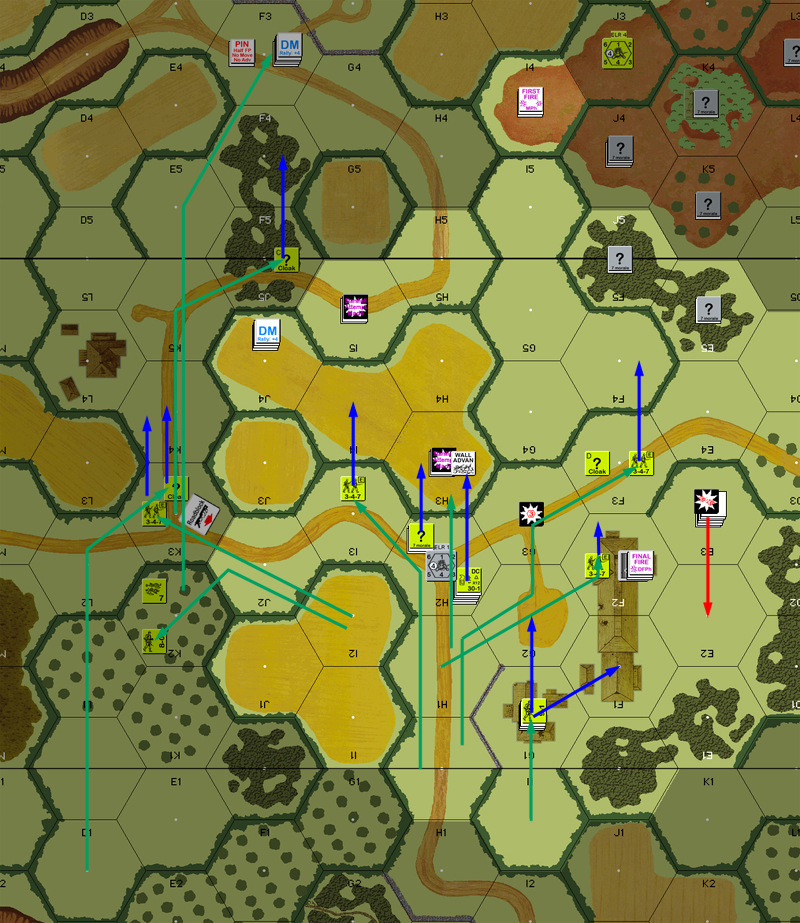
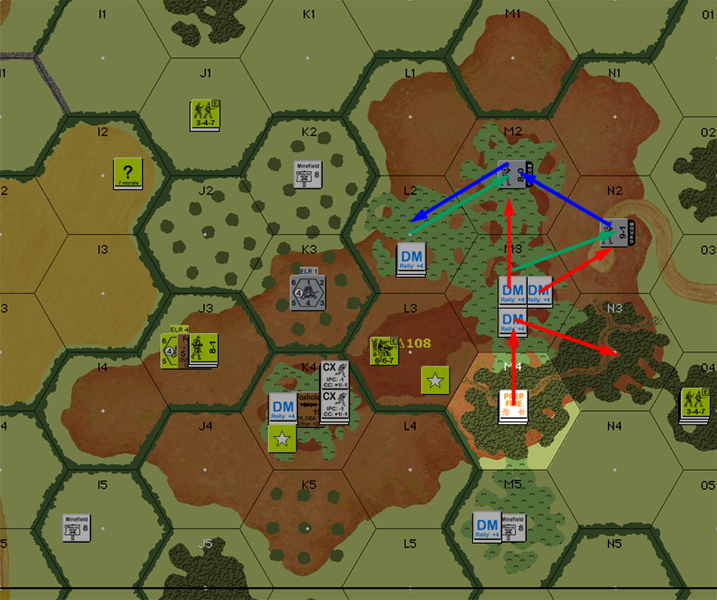
Situation, Italian turn 2.
“Gah. Sooo far behind on all of this.”
US Set up
“Trouble with letting this sit for so long. What the heck was I thinking?”
“Ok, the forces are about even, and I certainly have the FP advantage, but there’s an awful lot of HIP and mines out there. Night makes movement a bit slow, though I’m not that worried about straying on this map as a single starshell will illuminate a good portion of it. On the downside, that will make it harder for me.”
“I have two goals – control of the roadblock, and control of the 4 level 2 hexes. I expect the roadblock to fall easily, but the hill will be a tough one to crack. Ideally, I should let the turn 2 forces deal with the roadblock and use the extra time to head for the hill. Wish I’d thought of that earlier. :P”
US Turn 1
“Nothing to do but head straight up the road. I’m clustered in stacks, with three HS scouts and only 1 dummy. I’m going to try and leave Rindis guessing as to the identity of the main stacks as long as I can, and hopefully get some use out of the dummy. One HS heads down the sunken road to flank the roadblock if it is indeed in hH2, or get and advance look if it is in hK3. There’s an awful lot the mortar can’t hit on this map, so I want to get it into place around hH3 to fire on the woods and on some of the hill hexes as the game progresses.”
US Turn 2
“I move into hH2, and no roadblock is there. I shuffle west to hK2 in search of the roadblock, which is a mistake as I should have used these forces to push on the hill. I find one of the roadblock squads in hJ3, and a second squad in hK3 with the roadblock and the 7-0 at a cost of two broken HS. I break apart a cloak to allow my mortar HS to move into position without tying up a leader. I shuffle east through the hF1 building in search of more hidden units. I probably should have moved further east to flank, but elected to make a straight run in instead in the hopes my FP can punch a hole.”
“My reinforcements follow much the same path as Turn 1, with a second HS moving along the sunken road to help flank the roadblock.”
Italian Turn 2
“The NVR goes up to 4. Not good for me. Rindis abandons the roadblock and moves to reinforce the hill, but I reveal a stack in hK2 that breaks one squad and pins the 7-0. With his broken morale of 5 I have high hopes that his broken squads will stay broken for a good long time. I reveal a second stack in hE3 that tries to lift concealment on hE5, but fails. That’s going to free up a lot of No Move counters, but I’ve also reached the point where movement will be in his LOS, so I have to start lifting some of his concealment and break units.”
Patch initially forgets self-rally on his turn, and when I let him do it anyway he promptly rolls a ‘2’ and generates an 8-0 leader. I have a leader deficit as it is, I don’t need that sort of help.
hE3 Preps to no effect. One of his first moves is into hF2h1. He had commented earlier that that was a good spot for someone to be hidden. He was right. I need to be a little less predictable. An interesting note is the fact that if I fire on the American HS in the same hex, I won’t be able to SFF on anyone else (well, unless they go into hF2h0 also), but I can still Final Fire on an adjacent hex. I fire, planning to Final Fire on E3 later, and end up malfing my LMG.
Patch then raced the main stack in hK2 through the back way and around to the north flank of the hill. However, thanks to the high NVR, I got a good shot that pinned his leader and broke both squads. He then stumbled into my last surprise from the roadblock guards. I didn’t care to fire into two squads of annoyed Americans, but it slowed the advance.
As further second-wave Cloaks move up, I belatedly remember to attempt starshells and get one in G3, in a good place to force his Cloaks to either go slow, go far around, or lose the Cloak. He gives up Cloaks on a couple of HSes, and I lose a lot of No Move counters.
Managed to forget Straying again until just after the one move that should have rolled.
Most of his AF is ineffective, but he does break my squad in hF2… at too high a price. My Sniper activates, mortally wounds the the 9-1 in hE3 and the LLMC breaks both squads with him, one getting a ’12’ to CR and ELR to boot.
In Advance he moves into hF2h1 with my broken squad and dispatches it. He also piles everything into H3, giving me pretty hopeless odds. I narrowly avoid an ambush, and refuse to attack to keep ‘?’. It’s still 2:1 -1, and thankfully he rolls a 10 (Final 9) for a miss.
US Turn 3
“The joys of a friendly game. I forget my self rally, Rindis lets me do it anyway, and I promptly roll a ‘2’ and generate an 8-0. Thanks!”
“My next move is going to be across OG just about no matter where I go, so I need to start whittling down units. But despite a rather nice 6(+0) against hE5 for the second time, I fail to get a result. Looks like I need to scout things.”
“Building hF1 is a dandy place to hide more Italians, so I send a HS to check if anyone’s home. There is, and I find a squad in hF2h1. I’m not at all used to night and believe it is more protective than it truly is, and an enterprising end run with an 8-1 and two squads gets nailed in eF3 with two squads breaking and the leader pinning. I send what else I can that way to try and screen the broken units and continue the flanking push, and run into the last hidden squad in eH3. A starshell goes up and I can’t take the time to skulk up and retain concealment, so I shove HS up and lose their cloaking, freeing up a lot more No Move counters. Well, had to happen.”
“Defensive Fire is pain free, but in Advancing Fire I activate Rindis’ sniper, who attacks hE3. With his ‘1’ result he kills my 9-1, both squads break on the LLMC(+1), with one suffering CR and ELR on a 12. >.< I at least break the squad in hF2h1, but when I advance into hH3, I fail to kill the pesky squad therein.”
“Ok, this turn went poorly. I have 4(!) squads down, and no significant firepower facing the Italian line. I’m about 3 hexes back from where I want to be, and with the widespread loss of cloaking (and expected starshells), movement is going to be difficult and costly. Plus, I’ve not yet found the (potential) 4 minefields out there. Sending stuff to the west was a mistake, I think. I’m wondering if i should have left the roadblock to the follow-on forces, and tried to take it out around turns 3-4 instead. That would have placed much more up front facing the hE5/F5 woods and the base of the hill.”
No luck at all in my rally; Patch got a HS back and removed DM from a squad in eF3. For Prep, I fired on eF3 again, and CRed both squads. The 8-1 still refused to break though. Patch got one starshell on three attempts and lit up the southern side of the hill.
I attempted to fall back, but the squad in hH3 got hit as he pulled out and broke. In DFPh, a HS hit my little firebase in eI4 and broke it. They’d already done their share, but losing the LMG certainly hurt.
In Advance, I reshuffle the defenders quite a bit, including a pair of rules faux-pas that I didn’t understand for quite a bit, and sadly, part of my defense was built around.
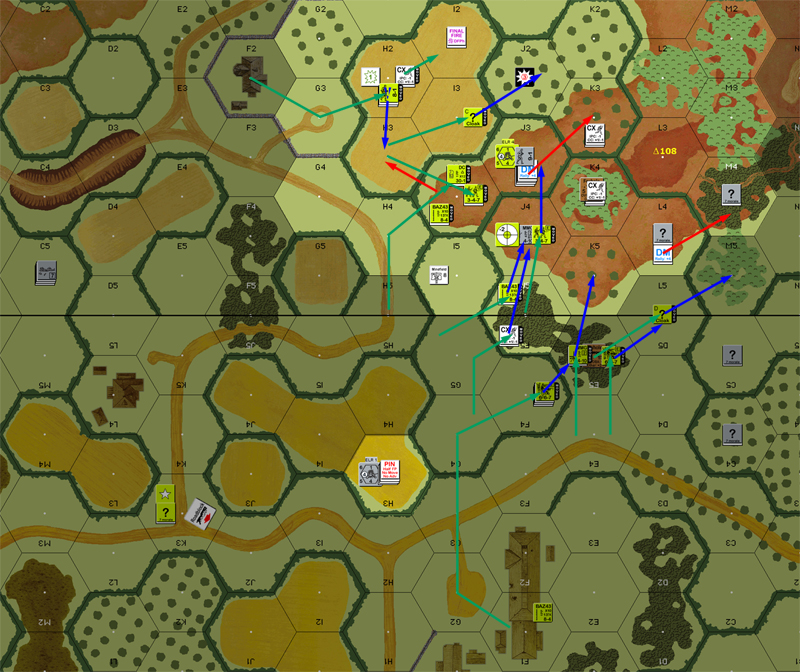
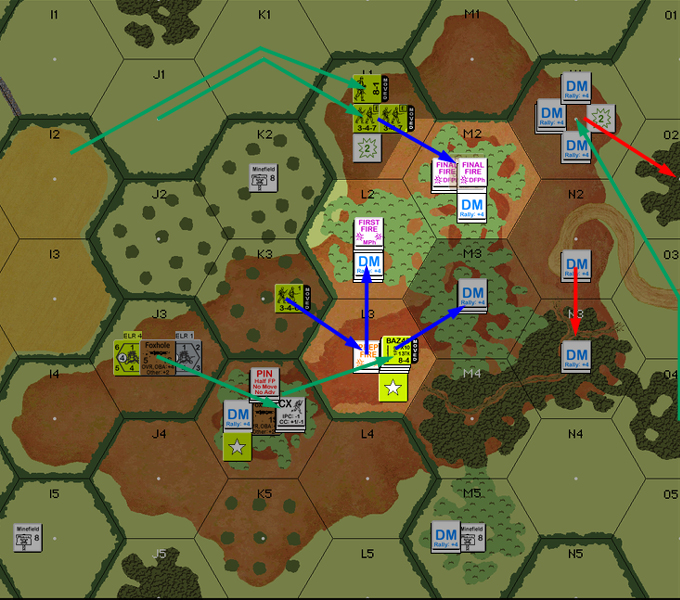
Situation, Italian Turn 3.
In his rally, one of the HSes in eF2 goes Berserk! In addition, he gets a squad back in hF1. All that happens with me is my 7-0 in hL5 loses DM.
In Prep, the just-assembled MTR shells hE5, and discovers there’s a foxhole there. Sadly, the squad there blows it’s roll, and the reduction from a 1MC to MC doesn’t even begin to help. The ‘Zerkie starts to charge eJ3, goes out into the road for better movement, and discovers a squad in eH4. They shrug off my TPBF, but my Sniper activates (2, warm), hitting hF1 and yahtzeeing the entire stack. The 9-1 dies of the wound, and while the subsequent checks fail, both fail the LLMC, re-breaking one squad and CRing the other.
With the north side of my defense neutralized, Patch rushed a couple more HSes around the back way and into the area. I revealed my MMG in eJ4 to try and get Patch’s big stack in hH4. It was about as good a target as I could wish for. No luck of course. His return fire was a k/2 which ELRed the remaining HS. Not the type of result I can afford.
In rout, I have little choice but to send eH5 into eI5, which has a 8-factor minefield in it. Thankfully, they take the MC in stride. In CC, my squad and the ‘zerkies kill each other. eJ5 turns out to be a Dummy.
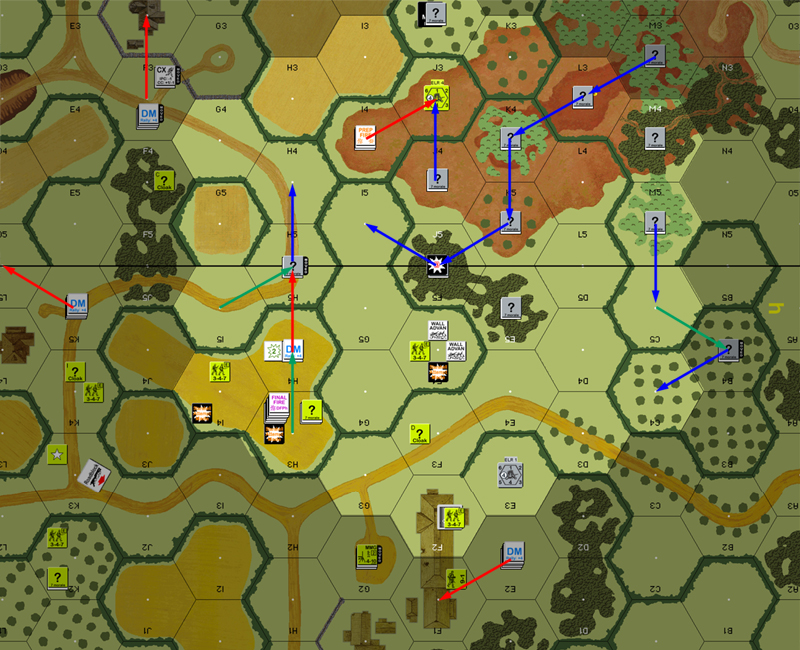
Situation, American Turn 4.
Italian Turn 3
“I rallied a HS and lifted one DM, but couldn’t get anything else on-line. The NVR continues to remain ‘4’.”
“Rindis opens his Prep Fire by firing on my 8-1 and broken units in eF3. He gets a 1MC on a 4(+1), and both squads fail! Two HS are plunked from the board, and I’m now down 1 squad with several others broken. Rangers my fanny — these guys are going down like conscripts. I send up only one starshell, but it’s enough to illuminate a good portion of the board. Rindis needs to redeploy on the hill, and I need to get some shots off wherever possible. I’m able to break a concealed squad making a run from hH3, and I break the annoying squad in eI4 that caused me so much trouble. But Rindis is able to move up into hC4 and hC5, threatening the midboard road and a flanking movement when I go up on the hill.”
US Turn 4
“Halfway through the game, and I really need another turn to reorganize. I just don’t have the FP to lift those concealment stacks with any efficiency. Matters don’t help when I rally one of the broken HS in eF2 and it goes Berserk! Where’s the fanatic unit and Hero combination when you really need it?”
“I fire my newly assembled Mtr in hH3 against the hE5 woods and find a foxhole, but still break the squad therein. Huge help there, but I can’t get a result against hF5 which I suspect may contain a second squad. In Movement the ‘zerkie charges towards eJ3, enters eG3, sees the unit in eH4, and changes target. He makes it in, but his Sniper activates yet again and hits hF1 where he kills my 9-1 and nails yet another HS. I have no 9-1s left in play, and the 8-0 I generated earlier is really needed now as there’s no officer on that flank anymore. I move the 8-0 over to hF1, and shove everything I can to the eG3 area. Since eI5 didn’t fire on the Berserk unit, I figure he’s a dummy so I’m not concerned about crossing the road again. I also get two squads and an MMG up to hE3, for a 16FP stack that can finally dish out some damage.”
“Rindis reveals his power stack, a 346 with the MMG, in eJ4, but it’s rather anticlimactic as he fails to get any result in Defensive Fire, but I hit him with a K/2 in Advancing Fire. As the turn ends my Berserk HS and the Italian squad kill each other off, and I discover that the concealed unit in eJ5 is a dummy.”
“A mistake goes unnoticed this turn as Rindis reveals an 8-factor minefield in eI5 when a berserk unit moves into it. He had failed to roll for an attack when the concealed stack entered, as it indeed is a dummy, and he thought dummy units ignored minefields. Neither of us noticed this mistake, and it pops up again later.”
“This turn came around better than I had hoped, even with the loss of my second leader and another HS. I have some firepower developing up front, and I’m finally at the base of the hill. There is the risk of the broken Italians in eH5 rallying and threatening the roadblock, but I’m gambling on them not rallying, and I think a lone 347 is sufficient to guard that victory hex. In Turn 5, I hope to be on the leading level 1 hexes, capture 1 or 2 level 2 hexes on Turn 6, and Turn7 will be the final rush for the final two hexes, eM2 and eM3. Those will be difficult to reach, as they are fairly far away MF-wise, especially at night.”
“This is the most active SAN 4 I’ve ever seen. I had fewer successful attacks with my SAN of 6 in North Bank. Unlike most games, I’m actually concerned about the Sniper activity but there’s little I can do.”
My rally goes poorly. My 7-0 in eC5 manages to to remove DM again. My 1st MMC self-rally rolls a ‘3’ to not generate a leader and not self-rally. Also, it was in eK5 where the adjacent American HS keeps him from even losing DM. My next roll in J3 is a ‘2’ for HoB. Given that I’m Italian, I don’t want HoB… not that it mattered; the subsequent ’12’ would have forced anyone to Disrupt. Patch meanwhile rallies a squad in hF1.
I attempt to put up a starshell to light up the center of board e, and possibly blind his troops. It goes off course to eC4, which is certainly far better than some of the alternatives. Patch puts up a second that lights up part of the hill, but I have some area to work with.
Movement is uncontested, though I lose my Dummies in eI5 to a minefield attack. Patch points out that the hills would have been OG anyway (he can see up the slopes I’d go up) and even with AM, I’d lose them. In DFPh the MTR malfunctions, he strips concealment on my Dummies in eK4 and CRs the brokie in eI5. I note we both missed a mine attack on the remaining HS when they routed. The times getting tough, eL3 advances into K4 and into the previously hidden foxhole.
Situation, Italian turn 4.
For rally, Patch gets a HS in eF2 back, the MTR is repaired and his 8-0 grabs a spare DC. I can’t roll below a 9.
The MTR pounds eJ4, killing the broken HS. I make two starshell attempts and get one to light up the north side of the hill. Patch almost immediately runs into the ever-shrinking number of surprises I’ve got left as he moves into eI2. One of his last cloaking counters is in I3, and I haven’t kept track of his numbers. However, given how it’s acted, I assume it’s a Dummy and open fire on H2. He passes the resulting 1MC (and his Sniper doesn’t go off), but activates my Sniper who Pins the MTR crew (a little late…).
I look on very nervously as a couple HSes, a squad w/BAZ and a 8-1 w/DC climb on to the shoulder of the hill in eI4. In DFPh, I reveal the 346 still HIP there, who, with the 9-1 gets a K/2. RS yahtzees the two HSes and breaks the leader and squad. Very lucky, but that’s why the 9-1 was there. I’m not sure if Patch just thought I was desperate to rally two squads already visible. Advancing fire eliminates more Dummies in hC5.
Patch mentions the initial goof with Dummies and minefields, but I’m in the middle of figuring out if I have to reveal the foxhole in eJ3 and don’t get what he’s saying. So, he’s quite annoyed when he stumbles into my second goof in eM5 with a minefield that had started with dummies in it. I was thinking in terms of not needing to pay MF for HIP Fortifications at night as long as no one is in LOS. If I’d realized the minefield trouble, I wouldn’t have set up as I did.
The one HS still adjacent to eJ3 moves in for CC with J4, while Cloak C moves to J2, pretty much confirming it’s Dummy status. Thankfully, he just misses his CC roll, while I get just enough for a CR that eliminates him.
Situation, American turn 5.
Italian Turn 4
“Rindis lifts DM from his 7-0, but there’s still a long way to go before he can rally himself and that squad, so I’m not worried about that section of the board for now. Rindis fails to rally a squad, but I am able to bring a 667 back into action in hF1.”
“We both put up starshells this turn, but most of the hill is uncovered which leaves several paths available for Rindis to reshuffle his defense since an illuminated unit cannot see into a non-illuminated location. It’s a fairly quiet turn, with the only big results coming when I reveal a dummy stack on the hill, break my mortar, and Rindis reveals a foxhole on the crest when he advances another stack into the brush.”
US Turn 5
“Three turns left, and getting on top of an unoccupied hill is looking to be a chore. Movement at night is a bear. Rally is good to me as I repair the mortar, grab a DC, and rally a HS. My troops are finally recovered from that horrendous Turn 3. Rindis fails to rally once again, and with his morale levels I’m not surprised. However, broken units can still be effective combat troops as I can’t move through them, and they’re blocking my movement paths.”
“In Prep my mortar nails J4, killing the broken unit there. A frontal attack just won’t have sufficient time available to push for all four level 2 hexes, so I start flanking around both sides of the hill. With the time elapsed playing this game, I’ve completely lost track of the number of HIP/possible dummy units remaining. I’m pretty sure the stacks in C4/C5 are dummies, and ignore them. Movement is helped on that end by the starshells which shield fire from the hill, but I have to deal with all the light to the north. I find a HIP unit in the wheatfield, which really shuts down movement on that side. I push up onto the hill, but a second HIP squad pops into play in J3, and nails I4 with a k/2 result that kills two HS’s. I really wanted to wipe out that little firebase, and so threw a HS into CC hoping for a melee at the worst. Unfortunately, Rindis kills him with no result on my end, so I’ve lost 1.5 squads this turn. I also discover the second 8FP minefield in M5, but luckily don’t break. I’ve made it onto the leading edge of the hill, but I’m still far behind. I really need to kill units over the next turn, or Rindis is going to win on time.”
With the excitement in eJ3 I forgot about another event at the time, and now again in this AAR (caught it right after the Wind Change DR). The MMG squad advancing into K5 found a HIP squad. Thanks to being concealed, I narrowly avoided being Ambushed, and stayed Concealed rather than risking 2:1 odds. In rally, I get nothing (not even with the 7-0 no longer under DM), and Patch gets a 8-1 and squad back in eH3 (despite DM). My only Prep shot is the entrenched squad in eJ3 who manages to Pin the squad and a half in J4.
Patch put up two starshells on four attempts and lit up everything but the back end of the hill. Reshuffling troops is a bit hard when there’s lots of firepower around and the movement costs preclude AM in many cases. Annoyingly, the squad in CC (not Melee…) broke as they pulled out of L4. I’m running out of intact troops all too quickly. The MTR causes more problems in DFPh as it promptly hits eK4 and breaks the squad that had just advanced into the foxhole there. His HS in M5 gets a good shot and reveals more Dummies in L4 (I would have loved to have pulled them out, but I couldn’t AM anywhere…). As I shuffle around for another line of defense, there isn’t much left, though Patch seems less than pleased when yet another unit goes into the K4 foxhole. The problem is that he’s about all that’s left to cover the SW half of the hill.
Situation, Italian Turn 5.
Italian Turn 5
“Indeed, the trouble with doing AARs long after the fact is it’s easy to forget what transpired, and I’m using Rindis’ blogs as reference, rather than viewing the replays again. I did stumble into a HIP unit in the olive grove in K5, and I fail to kill the concealed squad as Rindis chooses to retain concealment and not attack.”
“My disaster in I4 is short lived as I rally the leader and squad on the first go. Rindis fails to rally his 7-0, and time is rabidly running out for him to make a difference.”
“Rindis takes his best shot in Prep with the entrenched squad in J3 and fired on the stack in J4, pinning the squad and HS. At the start of movement I try to light up as much as I can, and largely succeed (with this scale map, it’s not that hard). Rindis tries to escape from K5, but is broken in L4. He skulks in M4, but I am able to break the entrenched unit in K4 with the mortar and reveal dummies in L4. I really wish I had kept track of units, as by now I should know if N3 is a dummy stack or not. Sadly, I have no idea. Rindis then advances another unit in the the foxhole location. How many times am I going to have to dig those units out of there? He also moves clear to J1, cutting off that flank. At 3MF to enter an olive grove, I really need those OG hexes to reach the back of the hill, but I just can’t get to them without taking fire. And that third minefield is somewhere. I’m starting to wonder if it’s in L1, N2, or O3.”
“Sadly, with 2 turns left, I need to start taking some chances to reach those back hexes. My routes are through L4, L1, or N2. Getting there through the terrain hexes are going to be too costly, and I’ll run out of time. I need to punch a hole in that J3/K3/K4 hedgehog, and I’m thinking that demo charge in H3 may just be a way if I can’t knock a hole in Prep. Either way, I simply have to take some level 2 hexes next turn or it’s over.”
In Patch’s rally, NVR finally drops—back to the original 3. Far too little and far too late to do Patch any good. The leader in eC5 refuses to rally, even without DM. In fact, all I do is remove DM in eM3 and and reveal a HIP leader in L2 (and by implication, an accompanying MMC…). Patch prepped with part of J4, killing the broken HS in J3, the MMG in K5 went on a rate tear, revealing that the new forces in K4 were Dummies on the third shot, pinning M4 on the fourth, and finally cowering to stop on the sixth (2,2 – would have been more ROF otherwise). The good news was that the shot that Pinned me also activated my Sniper, who promptly broke his MTR crew again, who had been designated as Op Fire.
I put up a single Starshell, which was a mistake, as it blinded me more than it helped on a bad drift. Patch started in on the northwest flank, having a leader drop a DC on J3 from out of the darkness, his last Cloak found my last minefield in K2, and proved to be a Dummy on a PTC. The HS in M5 breaks while trying to leave the minefield there. He moves up to L4, and two shots into open ground do nothing. However, he swings the unfired HS from J4 over that way, and they break from the resid.
I get amazingly lucky on AFPh. The DC only generates a NMC on an ’11’, which I pass. Fire from I4 has no effect. Fire from L4 pins, but does not break M4. Better yet, my Sniper goes off again, and I take the opportunity to relocate it to the middle of the action in eK3. In advance, Patch claims his two of the victory hexes as he moves into K4 and L3, and units pile into CC in J1 and J3. J1 goes as expected, with 2 American HSes killing my squad for no losses. J3 goes the same way; annoyingly I rolled one higher than I needed (4 out of 3), which would have put his 8-1 up for the CR lottery.
The hill is falling fast now, but there’s only one American turn left….
Situation, American Turn 6.
US Turn 6
“Two movement phases left. Things are really tight now. The NVR finally drops to 3, but at this point it wouldn’t matter if it dropped to 1. NVR only really mattered before all the starshells started going up. Rindis reveals a HIP leader in L2 when he tries to rally a squad, indicating that there’s still a HIP squad in that location. Good to know, as I have no clue how many units Rindis has left.”
“M2 and M3 will each require 5 MF to enter from a lower level, so I can’t enter those hexes if I have to go CX to get there. I do not think I can bully my way across the Lvl 2 hexes, so I have to push around the flanks. The OG hexes in L1 and N2 are going to be key, and I need to take K4 and L3 this turn.”
“First off, I have to get rid of that damn entrenched unit in J3. Prep Fire only eliminated the broken HS therein, but the MMG in K5 is well equipped with ammo belts and spare barrels. I get off no less than 6 shots (with the first 4 having a ‘1’ on the colored die!), stopping only because the MMG cowered on a 2,2. I’ve not had a tear like that for a while, and it is just what I needed. K4 falls as a dummy stack and I Pin the squad in M4. As I need to flank around that squad, that was huge. The down side is Rindis’ sniper, who is far more active than a SAN of 4 has any right being, breaks my Mtr HS on that final ROF shot. 🙁 I think he’s gone off about 6 times this game, and each hit has been painful. That HS was going to fall back to the roadblock in case that 7-0 stack rallies and counterattacks, and there’s just a lone HS there now to defend the end game.”
“In Movement things go even better for me. Rindis pops up a starshell, but it drifts and blinds his units. I am able to move adjacent to J1, toss a Demo Charge into J3, and move two squads and a leader over to O5 without Rindis firing a shot. I have to take a chance and AM into L4, but the Pinned 346 in M4 fails to break or pin my 667, but he does break a HS. I also try getting a CX HS out of the minefield in M5, but break on a 1MC. My last cloaking counter proves his worth by finding the last minefield in K2 and dies under the PTC.”
“Woo! Demo charges against 6 ML units! However, my 8-0 was a little nervous and I get a 13 on the 30FP column, and that pesky 346 survives just fine. >.< I hammer M4, but only get yet another Sniper activation. The backfield is no good to Rindis anymore, and he repositions the Sniper onto the hill.”
“In Advance I enter J1, J3, K4 (yay!), L3 (yay!), and O4. I shine in CC and kill the 346s in J1 and J3 with no losses. Despite it being DASL, I have been avoiding declaring h-t-h like the plague as that makes casualties far too likely and I can’t afford to lose anyone else.”
“Things are heavily in my favor, but I can still lose this one. If Rindis can skulk out of M3, keeping me from moving through there in the MPh, it will come down to how well I can survive the OG runs through L1 and N2.”
For my rally, the 7-0 finally comes back, but can’t remove DM on his squad. Patch deploys a squad in eO4. I forgot to mention that my LMG in M4 had malfunctioned on my first DFPh shot. Not only did it not repair, but my only prep (in M4) follows last turn’s ’11’ with a ’12’ this time….
Patch gets zero starshells on three attempts. My movement was entirely my two leaders skulking out of harm’s way. Patch breaks (and ELRs) the squad in M4 during DFPh, but my Sniper goes off, and wounds his 8-1 in J3 (who lives for a change). Rout gets entertaining. The broken squad in M4 was encircled, and routed up into brush for a record-breaking 10 MF (well, it’s a record for me). Meanwhile the squads on top of M3 scatter, thanks to the brokie-friendly night rules to cause maximum blockage. (Reflection after the game showed I should have routed L2 to L1, but I didn’t think of it at the time.)
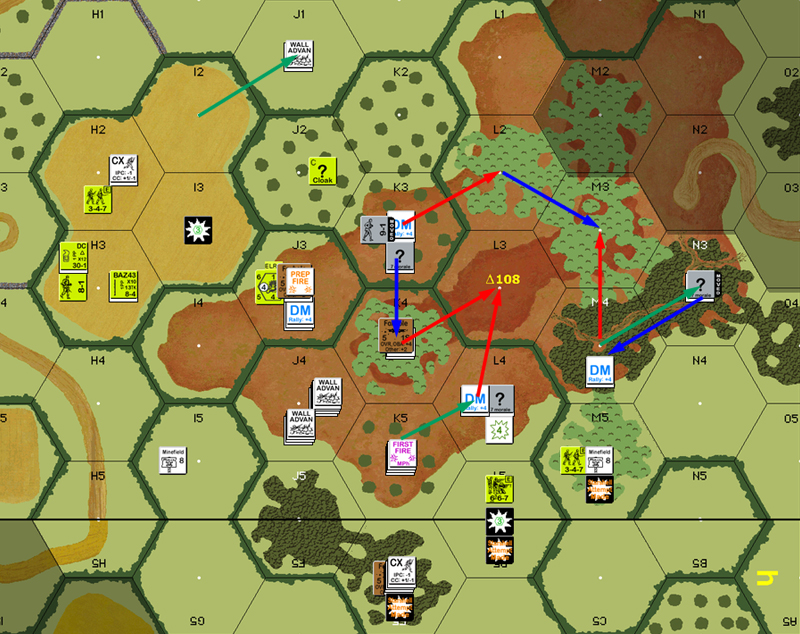
Situation, Italian turn 6.
Patch deploys another squad in J3 (which he had attempted, and failed to do the previous turn). Patch’s only prep is with L3, who manages a PTC against the 9-1 in M2. Patch’s first move is an end run around the east flank from O4 to N1. The HIP squad in a foxhole opens up and the resulting NMC breaks the 8-0. A HS follows him and breaks on a 1MC from resid. A second HS follows and does the same. A HS comes around the other flank from J1 to L1, and SFF from M2 does nothing. The squad in L2 reveals and opens up for a 1MC… which he passes. Darn. So much for that little breaking streak. The following HS from J1 comes up with no effect. His 8-1 comes up from I2, and I get a result from resid to blow his concealment, but he still passes.
My last chance with Final Fire from L2 failed. Patch opened up with L1 and got nothing. However, fire from L3 broke my 9-1. Not what was needed, since the extra factor was going to be a big deal in the coming CC.
In fact, CC goes the way it has been all game. Patch piles into both M2 and M3, while posting a HS backup in L3. He gets KIAs in both hexes, while M2 can’t even get a single HS. There are the broken HS and leader to deal with in M2, he kills them in the final, Italian, player turn. My 7-0 never managed to rally his squad, so there is no last-second counterattack on the roadblock.
Situation, American Turn 7.
It was close. With the string of bad MCs in turn 7, it looked like it was even going to happen for a moment. Moving a brokie into L1 could have done it, in fact. The Italian Sniper definitely gets the MVP award, having been very active for a 4 Sniper. Of course, Patch rolling 10s instead of 4s would probably have been better…. At least the general plan held up pretty well in practice, though my trickiness with the minefields and Dummies was illegal. I’d need to really rethink the minefields if I was to do this again.
Italian Turn 6
“Something I had forgotten to do last turn. There’s no longer a range issue in this game, and I need more units to maneuver so Rindis has to break two HS vs one squad. Yes, it does open up more hazards in CC (now 1:1 for Rindis vs 1:2, and a CR will kill the unit), but with two HS I’m more likely to get into CC. Rindis gets his 7-0 back way off in the boonies, but just can’t get the DM off that squad. It’s looking very good for my lone roadblock HS now.”
“Rindis Preps against L3 with the squad in M4, but fails to get a result. I also fail to get any starshells up, but I suppose it really doesn’t matter at this stage. Bad news for Rindis as I do finally break the squad in M4, and bad news for me as Rindis wounds my 8-1. This has been a bad day for American leadership. With only one movement phase left to me, Rindis routs to cause maximum blockage, but thankfully does not enter anyone into L1. If he had, the 347s sitting in J1 would not be able to reach the level 2 hexes even in the Advance phase (I’d have to go CX to reach M1, and since an advance into M2 would make me CX (Advance into Difficult Terrain), I’d be stuck in M1). I would have liked to have gotten the 8-1 in J2 with the 347s, but since he dropped the DC onto the Italian foxholes last turn, he couldn’t reach.”
US Turn 7
“This be it! It’s been a tough fight, but it’s still not my game. I deploy another squad, as this is going to go down to how well I survive Defensive Fire and a bunch of residual.”
“I Prep against M2 with L3, as he cannot move to enter any of the final victory hexes, but it’s a 6(+1) for no effect. Time to rush.”
“I move one unit at a time from O4 to N1, bypassing O2 to get around the broken squad in N2 blocking that route. Rindis breaks the leader, and the residual is enough to get the following two HS effectively eliminating all US strength on the right flank. I move the 347s in J1 one at a time up to L1, and this time Rindis just can’t stop the green tide as I get two 347s and an 8-1 into position. Advancing Fire from L3 breaks the 9-1 in M2.”
“In Advance I pile into L2, M2, and M3. CC goes very well and I kill all GO units in M2 and M3. The broken units remain, and with nothing left for Rindis to do when his broken 346 again fails to rally way off in the boonies, we go straight to CC and the final broken units die to seal the US win.”
Reflections
“I don’t think Rindis and I have done Night since Primosole Bridge. Again, I got hammered when I thought night offered far more protection than it does and I lost several stacks that were moving in the open. I could not believe how effective Rindis’ sniper was this game. He killed two 9-1s, wounded an 8-1, and killed 1.5 squad equivalents. For a SAN of 4, that’s unreal. In comparison, I think my sniper pinned a squad.”
“What would I do different… I think I would have tried harder to move around both sides of the hill. My attack really dropped into a frontal assault (though the Sniper and a nasty 4(-1) shot really forced my hand there), and although that will work, the Italian only has to play for time in this scenario. The minefields are useful in that regard, though I believe mines should be group together or else they are too easily bypassed. I’d have gone for four 6FP minefields in Eh4/eI5 and EL5/HC5 to close off the OG approaches. Once cloaking is removed, movement on this map is a nightmare, and forcing the US player into terrain will really slow him down.”
“Rangers vs Italians? It’s tougher than it looks, and the ROAR rating shows it to be fairly balanced. It’s worth a play, in my view.”
Postscript:
The annoying thing in this scenario is losing it via not quite figuring out the puzzle box of my Turn 6 rout.
But that’s beside the point. This scenario was an extremely tense affair all the way through, and both of us had a blast playing it. DASL and Night really feed well into each other, and this is in the ‘really need to play again’ pile.
Once again I toss a DC into the fray, and I fail to break the target. You’d think 40lbs of TNT would do more.
Beats the current game, where I can’t even manage to throw one of the things….