
VotG21 Defending the Voentorg
Valor of the Guards came with an impressive number of scenarios. However, still more were under development, and have since appeared in the ASL Journal. Patch and I have tried a couple out, starting in July 2010…:
With the appearance of new VotG scenarios in the latest Journal, a return to Stalingrad was contemplated. This particular scenario is an interesting one. The Germans have three turns to take a single ground-level Location of building Q10 (at the south end of 9th January Square). If they fail, they can try again, needing two Locations in three turns. If they fail that, they get three turns to try to take the entire ground-level of Q10. Each try is preceded by a mini-RePh to clean things up.
For some insane reason, I took the offense in this crazy scenario. 
Setup is restricted by the fact that all German MMC must be at least 2 hexes apart. I set up the MTR in the backfield, looking across the square. The HMG and 7-0 was on the second level of M8 to see most of the perimeter of the square without Hindrance from debris. A couple squads were tasked to advance up the west side to the Russian lines. My reinforcements enter from the north end, with the leaders clutching DCs, wondering if they’d ever get close enough to use them (note: by SSR, all the infantry enters as riders—about four months earlier than the rules normally allow).
Patch set up no one actually in the Voentorg (to avoid a pregame PTC, to be sure), and a nice group on both wings of it.
The opening fire isn’t bad, the HMG nails his ATR crew in the S8 trench, breaking him, but can’t force a CR. The bulk of the action of course centers around his efforts to stop the oncoming StuGs and their riders. Amazingly, while three squads pin, and the 9-1 leader breaks, causing them all to Bail Out in open terrain, they all make their Bail Out MCs and SW checks. I was expecting someone to die crossing the square, but it doesn’t happen. Of course, the only planned unloading I get to do is the 9-2 in Q5.
With most of Patch’s fire occupied, I try moving up on the extreme flank of his position in N11. A SFF shot misses the first AMing squad. A second-liner comes untroubled by the residual, but breaks to a HS on a k/2 FPF shot. If the roll had stuck with the rest of Patch’s defensive fire, he should have broken…. Finally, I stroll a squad and leader up from O3 to R6, because there is literally no one left to fire at him.
In AFPh, I put a couple Area Acquisition counters on the Voentorg. I decide to advance into CC in N11 anyway. It should keep him suitably distracted while the FT in O6 moves up. Despite a Russian edge on Ambush, the Final drs are 4-5 (he rolled a 6, and I still couldn’t get it…). And both sides did no damage to the other (H-t-H CC would have CRed me for no return, good thing I didn’t want it).
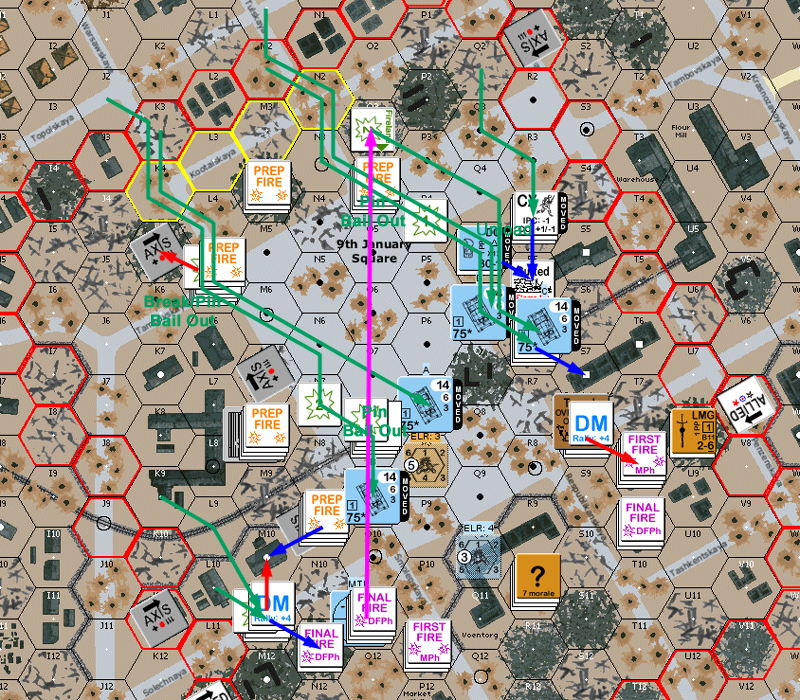
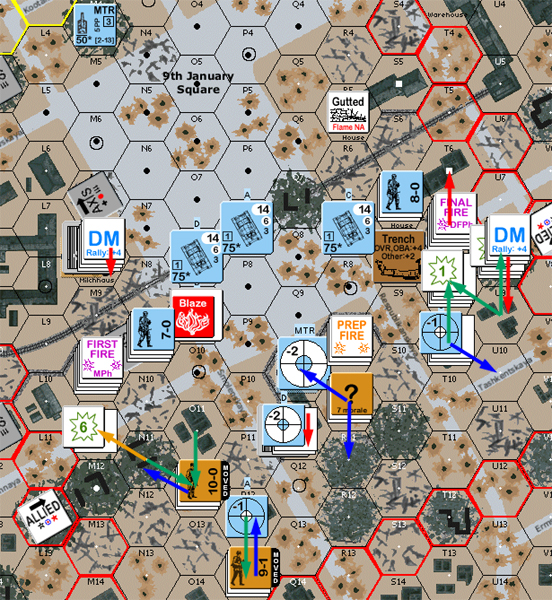
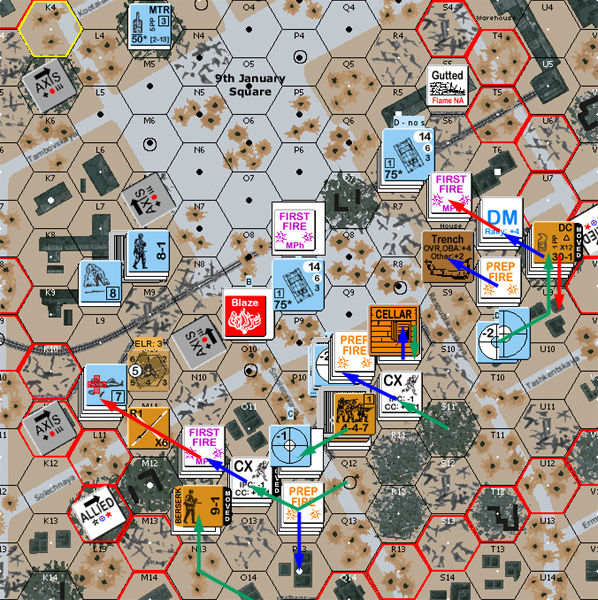
Situation, German Turn 1, take 1.
FC=Gorgon= cheered:
“Wow! Cool AAR and a cool scenario. This is what’s neat about the VotG scenarios. The CG is much more conservative since you need your forces for later dates. I cannot imagine the Germans moving guys as riders, if allowed, in a CG.”
“M”
‘Ol Fezziwig:
“That which you cannot imagine will be the death of you…”
FC=Gorgon=:
“I can imagine it. It just aint pretty.”
“Defending the Voentorg! Once again Rindis and I surge into the streets of Stalingrad. This is a bizarre one. Three three turn scenarios, with little refit phases in-between. I don’t care how balanced this is — it looks like fun.”
“Rindis elects to attack, leaving me as the defending Russians. IIRC, the last time we were here I was the attacking Germans, and lost. Let’s see if I can return that favor and keep the Soviets 2-0.”
Set-up
“Much of the initial set-up is directed, but there’s some freedom in what I can do. The German set-up is widely scattered, with a lot of nastiness coming in on turn 1. Counting MF and MPs, he can’t rush the Voentorg on turn 1, so I’m not seeing the need to set up there at the start (especially with the risk of CR with the pre-game PTC for units setting up within). Instead, I set up on the flanks. I’m looking for OG shots on the entering units, and I want to cover the front of the Voentorg should he make a turn 1 attempt for the building. I can set up FLs with the MMG in O11 and an LMG in T8, so the attempt is not without risk for Rindis despite the temping nature of the empty building. I exchange both 8-1s in my OB for 10-0 Commissars, and one is in T8 with an LMG. I have ATRs in T9 and P11, looking to strike at any probing StuGs, and there’s a third in S8 as part of the preset OB. Because I just may lose the Voentorg on turn 1, I have a reserve platoon in R10 for a counterattack, and who will be concealed at start-up. A -3 on an Ambush dr, with H-t-H allowed, is something for the Germans to fear.”
German Turn 1
“With widely scattered units, and no one home in the victory building, there’s much that Rndis can’t see and FP is fairly low. That does not keep him from breaking the 458/ATR combo in S8, however.”
“With most of the west flank Prep Firing, the majority of movement is with the entering forces. All come in as riders, and I give it my all with a FL out to O3 and a bunch of 2FP/4FP attacks. I’m better at Pinning units, who then pass their Bail Out NMCs, but I do get a k/2 for the first game casualties. Rindis piles a squad into N11, and my lack of CC luck returns and a melee develops.”
“Good news for the turn: the broken squad in S8 routs to T8, where my Commissar lurks. I knew placing him over there would pay off.”
Sadly, Patch’s Commissar does his job, and the ATR squad rallies in T8. Of course, my 9-1 self-rallies while under DM in K5.
Patch’s prep was very good, the Commissar and two squads in T8 breaks the FT-toting 838 in O8 (by one, rolled a 7 on a 2MC), then the ATR there (you know, the one who’s squad I broke last turn?), got a side hit on the Stug in S9, and burned it on a ‘2’ TK DR. O11 managed to pin my squad in N9, and U8 with the LMG in T8 pinned my squad in S7.
Patch swung his squad in P11 around to take part in the Melee, and stuck one unit into the victory building proper. My fire was completely ineffective, despite a few ROF shots. The advancing squad fired into the Melee, getting a NMC that pinned me, and left him unaffected. Amazingly, the Melee continued with neither side getting any result.

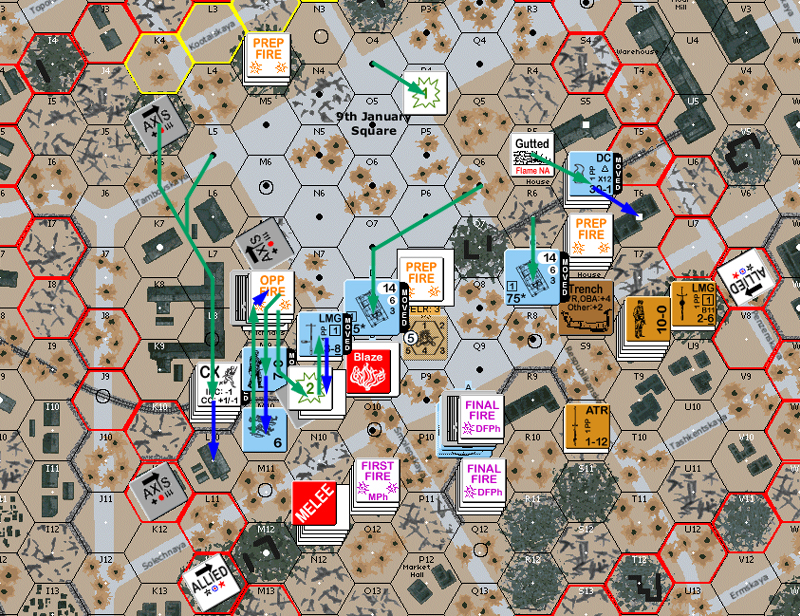
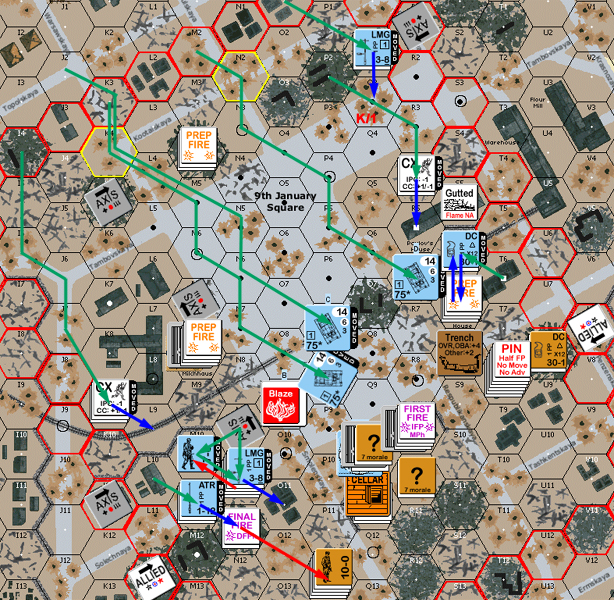
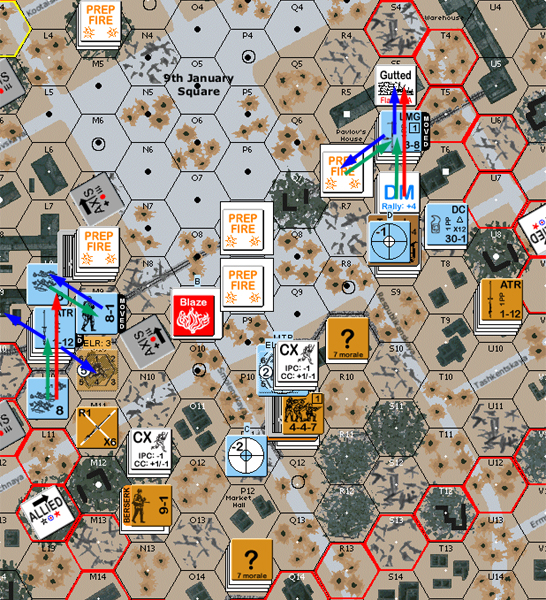
Situation, Russian Turn 1.
My broken 838 came back on my rally. Sadly, I missed leader creation by one. The HS in M10 refused to rally with a 8-1 on him and no DM.
Naturally, I didn’t think of Smoke until after I started Prep. Shame, I wouldn’t have minded smoking in a couple locations. Of course, I really wanted it on turn 1, but the StuGs are the only smoke I’ve got.
I came up with a clever idea to OpFire my HMG, but move the 7-0 out and the 8-1 nearby in to direct. …I’m not sure that’s entirely legal, but he could generally direct fire after moving, and couldn’t find anything about OpFire having a restriction. Sadly, terrain in Stalingrad is dense, and he couldn’t get there in time without going CX anyway.
Most of my movement was pushing my troops up, though the squad in N9 skulked out, and I had one StuG transfer from the east side of the square to the west. The 838 attracted a lot of attention as he entered N9, but survived without a problem.
Patch’s Sniper went off during DF, and nailed my Sniper, reducing him to a 2. Later on, he got a warm activation, and relocated it to P6. Patch had forgotten that FTs are not halved for Advancing Fire, and was surprised by my 12+1 shot across the street.
And the dice mocked me. I lost the FT on a ’10’. What was really bad was that was still a PTC, and Patch rolled 12s on both checks. One less on my roll would have wounded a 9-1 and reduced his squad—as well as kept the FT.
And the Melee continued with no losses on either side….
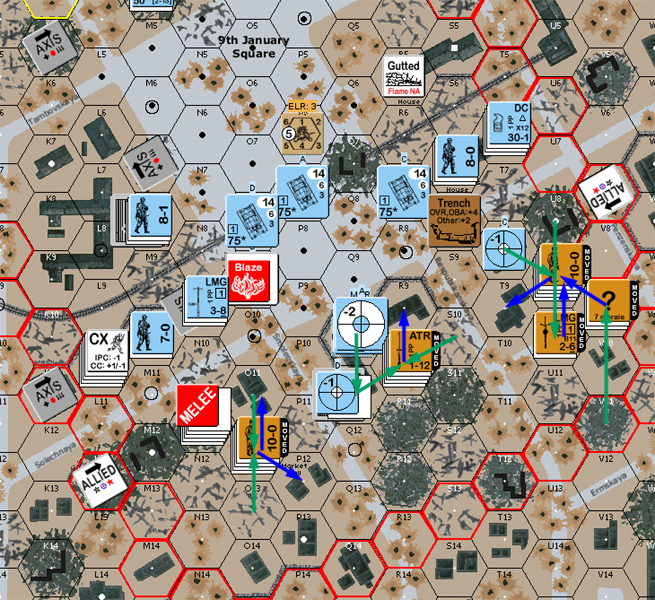
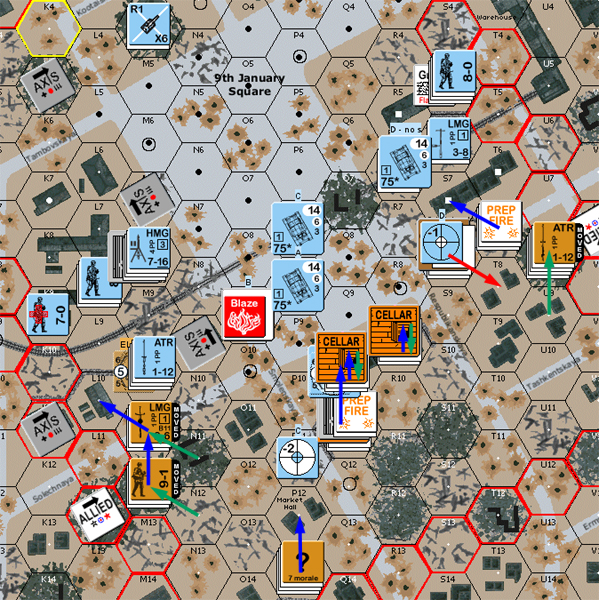
Situation, German Turn 2.
Russian Turn 1
“During set-up, I had trouble deciding where to set up the Commissar. I finally decided that, since I had a 9-1 in O11 per my restricted set up conditions, I had to place him on the west flank. That certainly paid off, as he quickly rallies the broken ATR squad. Sadly, Rindis also self-rallies his DM 9-1 leader in K5, but he’s so far back he’s effectively out of Part I. Which is really how I’m viewing this game. The German player has to much working against him in Part I, I see his real goal these first three turns is in getting into better positions for Part II, and inflicting what casualties he can. A rush for the Voentorg I don’t see as a wise move unless things have gone horribly wrong for the Soviets.”
“Prep Fire from T8 breaks the flamethrower-toting squad in O8, which is really nice. That and the 9-2 are the pieces that really worry me this game. Ok, to be fair, there are a number of pieces that worry me, but those are the top 2. I remove one of the lower tier worrisome units when an ATR in T8, with a nice flank shot against a StuG in O9, scores a hull hit and flames it with a ‘2’ on the TK DR. I think that’s rather nice compensation for losing Pavlov’s House (building S5) so easily. Pssst… Yakov… Wikipedia says you never lost this building. What gives? This is my flank we’re talking about here!”
“But I digress. O11 is able to Pin N9, and U8 Pins he squad in T7, but there’s really no infantry free to exploit anything on the flanks. I do have the ability to reinforce the melee, though, so I move the 458 and ATR from P11. I’m also able to AM my concealed units from P10 into the Voentorg, so now the building is finally defended. If I can maintain concealment, a German entry will face a -3 on my Ambush dr.”
“Defensive Fire is painless, and in Advancing Fire I gamble and fire into the melee. My morale is 8, his is 7, and I need every edge I can get. I roll a ‘3’ for a NMC, and Pin the 467 while I pass. Won’t help me in offense, but I am more likely to survive the counterattack. Sadly, Rindis survives the 2:1 and the melee continues.”
German Turn 2
“The broken 838 comes back first try. Supposedly there’s a upside to breaking enemy units, but I’ll be damned if I can figure out what it is.”
“I catch some Prep Fire, but the main point of this turn is Rindis’ shuffling of units further to the front line. The tanks move further up, and I really wish that ATR wasn’t trapped in melee as I could have another flank shot possibility. There is one highlight as Rindis moves a 548 across P4, and the 447 upstairs in Q10 rolls a ‘3’ on the 2FP column, killing him. I throw a lot of FP against the 838 as it moves up with the flamethrower, but just can’t get a result. As Rindis notes, I thought I was a little safer against the flamethrower as I didn’t realize its FP isn’t halved in Advancing Fire, but Rindis rolls a 10 for a PTC (which I fail with back to back 12’s). The good news is Rindis doesn’t have Booby Trap Level C, and the bad news is now I have to select a replacement for the top two German pieces that worry me. Hmmm… I select the HMG.”
“The melee continues. Ah, Herr Gruberman. You have a nasty habit of surviving…”
“We go on to Turn 2, where I get my reinforcements. I have a 10-0 Commissar, a 628, a 328, and a DC entering on the southern edge. I still feel good about the Voentorg, so I think I will reinforce the flanks.”
I got the HS in M10 back in rally. Patch skipped Prep entirely, and mostly skulked in movement while his reinforcements entered.
The big (and pretty much only) decision I had for the turn was what to do about the Melee in N11. It was already 2 squads to 1, and likely to go to three to one. Firing into it was risky, since I had the lower morale; but it was one of my only targets. I eventually figured with two targets to one, it was worth a chance. Certainly, I pretty much had to write off the squad as it was. The HMG had a nice LOS between my buildings at it and got a 1MC. Naturally, I broke while doing nothing to the Russians.
I was surprised when Patch stayed out of the T8/U8 line, instead putting a big stack on U9 and an Commissar-led ATR on T9. The new MMG took up station in P12, a great backup in case anything should happen on the west side. Patch got an easy kill in N11 (would have had it without the broken modifier). At least he also killed the ATR my squad was carrying.
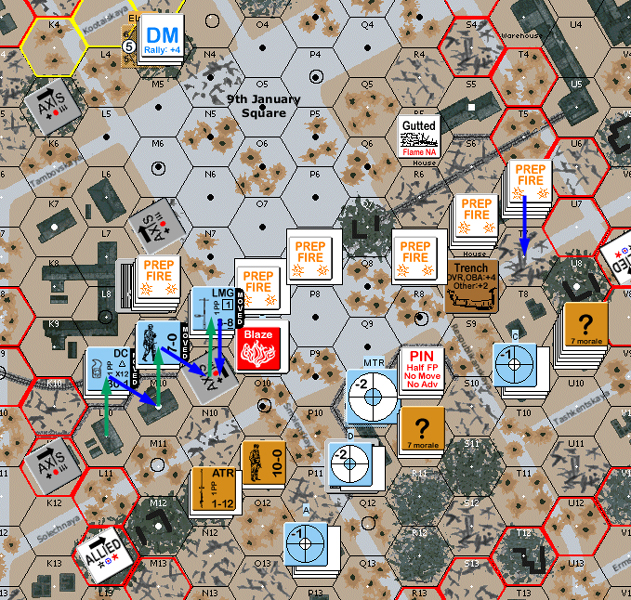
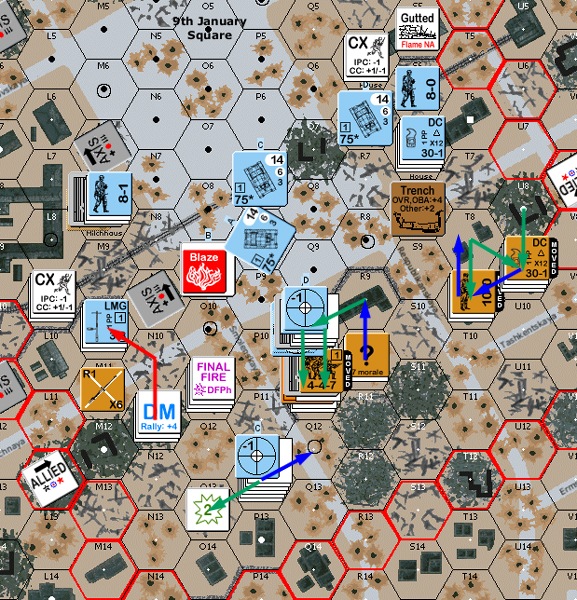
Situation, Russian Turn 2.
I blazed away, with minimal effect. Patch’s Sniper activated, breaking the MTR crew before they fired. One of the StuGs finally got a solid Hit on T9, only for it to be a Dud. Oh, and one of the squads in N11 went Berserk. I skulked on the west side, and as it was turn 3, sent a squad and 9-2 up into T7. I figured if it went wrong, he’d have a hard time exploiting it on the last player turn; otherwise, I’d be forward a hex for the next scenario.
Situation, German Turn 3.
Patch got Civilian Interrogation on his Wind Change DR, but as I had no concealed units (and I don’t get any fortifications or HIP), there was no possible effect. The poor ‘zerkie charged into a ‘2’ DR on a 12 -2 shot. A 3KIA has to be the best result I’ve ever gotten on the IFT. Bit of a waste, sadly. Subsequent dr malfed the ATR they had. Patch had considered throwing more in, presumably after much of my fire was tied up, but declined after that performance.
He put about half the concealed stack in U9 into U8. Sadly, the 4 +1 shot didn’t do anything but put down resid. Then he put ‘?’ into T8, and SFF Pinned that squad. Unfortunately, it activated his Sniper, who killed the MTR crew. He moved up a Commissar, and then CXed the remaining HS and DC in U9 and took the resid in U8. Counting on the 9-2, I used FPF for no result, FPFed again for the second MF, which got another Sniper activation to break the HMG overwatch HS (argh), but at least it broke the HS.
Final Fire managed to ELR the squad in Q11h1. Sadly, Patch’s Advancing Fire managed to Pin the squad in T7. After a little thought, I self-broke him and pulled back to T6. He still had a squad and Commissar he could put in, and while he may not have risked the Commissar, giving him a 1-2 fight, with HtH, losing the 9-2 was easier than I was going to risk.
Situation, Russian Turn 3.
It seems like it should be possible for the Germans to win this on the first go. A bit of luck with the Riders would help, but even as it was, the FT had the potential to seriously compromise the defenses on the west side and let me try to charge in for it. I am going to be regretting that loss for a long, long time. Remembering Smoke on turn 2 might have also helped. As it is, time for the second try….
Russian Turn 2
“Things have gone fairly well, and there’s no need to take chances. I think I’ll skulk this turn, sending my reinforcements up the flanks. The 10-0, along with a 628go to the west, and a 328 with the DC go to the east. Rindis gets a HS back in Rally, but I’m not that worked up by it for now.”
“I skulk, so there’s no Prep and movement leaves everyone outside of any real effective firepower. The only real event of the turn was Rindis firing into the melee. I had the option of entering in another 628 this turn, making things 3:1 for me, and so Rindis decided to play the odds and see if he could do some damage. He did, and the 467 broke, dying in the ensuing CC.”
“I don’t enter the CC, as 2:1 (-4) is more than enough, and I don’t want 3 squads in the same location. Instead I split into O10 and P12 to establish a first line and a reserve. To the east, I don’t take the T8/U8 line, as Rindis notes. There’s firepower building up there from the HMG, the 9-2, and the StuGs, so instead I take a step back. That allows me to gain concealment, and if Rindis enters T8/U8, I can hit it with 20FP(+3), throw a DC, and even threaten to advance into CC concealed with a lovely -3 on the Ambush dr. Go on, Rindis. Take those hexes. I dare ya.”
German Turn 3
“The front line unloads, showing just what I’m up against if I can’t keep Rindis off-balance. My ATR in R9 is Pinned, and Rindis scores a big hit on N11, sending a 458 with an ATR into Berserk status. A StuG also scores a hit on T9. I’m not as worried as I might be as I have the Commissar in U9, who can rally him on a ’10’ or less if he breaks, but Rindis rolls a ’12’ on the effect DR for a dud. Still, it’s a reminder of how deadly those 75mms will be. I really need to keep out of any -2 Acquired locations (will hit on a ‘6’ or less (41%) for Stone terrain). More than his infantry, those tanks will keep my lines moving.”
“To the west, Rindis skulks, and there’s just not enough for me to do in Defensive Fire. DI hits are damn hard to get with the ATRs, and I ping away to no effect. Rindis advances back onto the line, and moves a 9-2 and a 447 into T7, daring me to move into T8/U8.”
Russian Turn 3
“I get Civilian Interrogation on the Wind Change DR of ‘4’, but I’m not hearing anything I don’t already know.”
“Prep is another DI attempt against R7, to no effect. For the last turn of the Phase, I’m looking to see if I can’t bag another squad or two, and I’m facing the best chance I have to nail that 9-2. The Russians will counterattack.”
“To the west my hope is that the Berserk unit will live long enough to enter M10, perhaps drawing fire from N9 as well. I will then move O11 and N11 up into the street, relying on the Commissar’s increased morale bonus to help me survive. That falls apart as the Berserk dies in the street and I lose a valuable ATR when a 3KIA malfunctions it. The risk is too high now, so I skulk instead. I also skulk in Q11, moving so the burning AFV offers some hindrance bonus from the StuG. My big push, though is in the east. I AM into U8 and survive First Fire, then AM another squad into T8 but Pin under SubFF. With fire from the 9-2 drawn, I CX my DC toting HS and charge into U8. A 30(+2) is dangerous even for a mighty 9-2, but sadly, with a 9-2 at the help FPF isn’t as scary as one would think, and Rindis fires several times, breaking the 328. Further Final Fire breaks and ELRs a 447 in Q11h1.”
“I really wanted to nail that 9-2, but moving into CC now wasn’t looking that favorable, and I did not want to risk losing that 10-0. Rindis resolves my dilemma be voluntarily breaking and routing away, something that I don’t think of often enough. It was a good move on his part. I move up into the front line, and Part I ends.”
Thoughts
“The VC may be the best the Germans will ever see in Part I, but they’re the hardest for the Germans to obtain. The scattered initial set-up means the Germans don’t have that Turn 1 firepower available, and you’re spending most of these first three turns getting into position. I think you best bet is to use Part I to inflict casualties, take some terrain, and get into a good position for a Part II assault.”
“Rindis, however, took a beating in Part I. The loss of one tank is bad enough, but he’s also down 4 squads and I didn’t lose any. He’s going to need those three remaining tanks, and I’ll be gunning for them with everything I have. With my front line mainly intact, and the upper levels of the Voentorg available without that pre-game PTC, I’m in a better position than I was at the start of Part I.”
Actually, you did loose Mr. Zerkie. Not enough, with my losses, but it wasn’t nothing, thankfully.
“On a 3KIA, I assume so little is left I need to declare them MIA as their bodies can’t be identified.”
jwb3 pointed out:
One of the StuGs finally got a solid Hit on T9, only for it to be a Dud.
“Keep in mind that an HE hit can’t be a Dud. Of course, it’s still a ’12’ on the IFT result, so usually it’s as useless as a Dud anyway…! But in principle, if one gets a CH on a stone building on the 36+ column, that ’12’ could still be rather painful.”
“Usual high-quality job on the AAR — hope they keep coming for a looong time!”
“John”
“Whoops! Thankfully as you point out, it’s still ‘no effect’.”
“Years ago I had a German player nail my Stuart with a King Tiger for a Critical Hit. He rolled a dud. Boy, he was mad. :D”
“Thanks for the compliment. I sometimes wonder just what people think of these.”
The reset on these scenarios is interesting. You can either stay in place, or reposition freely within your original lines. Broken units auto-rally, but must return to the original lines. Annoyingly, the StuGs exit, and have to enter all over again. Also, the original restrictions on German setup are gone, allowing for a much more concentrated front. The SSR doesn’t say, but we assume the snipers stay in place, and don’t regain any lost number.
This allowed me to be in much better position for the second try. The west side had a good line, and I was still occupying the no-man’s land on the east side. I positioned a new HS to be the MTR squad, moved the 8-1 and HS back into position as the HMG crew, and repositioned the 838 squad in the back of the east side to help drive that flank forward with the new elite squad, while first-line squad and leader entered on the west side for some mass and hopefully get a good drive on the victory building going. The HMG had another good first turn by pinning the Commissar in T8 and breaking a squad (I thought he had escaped with a pin, but 2nd Ed adds an ‘unpinned’ clause to the Commissar’s morale bonus in A25.221). I had contemplated skulking on that side, but with the reduced FP I took the shot. Wouldn’t have bothered if I’d remembered the T7 debris, which pushed it to a +4 shot.
Things went horribly wrong during movement. The 838s got nailed for a K/1 on a 2 -2 shot I hadn’t really thought about. Of course, with the square to cross about the only way around it was to advance the slow way, one hex at a time. I piled forward on the west side, going for first line of buildings in his setup area, and to snatch up the sacrificial HS in the way. Defensive final fire broke a 467, but I already had a 7-0 ready to catch my brokies. Sadly, Patch was wise enough to self-break the HS back to P12.
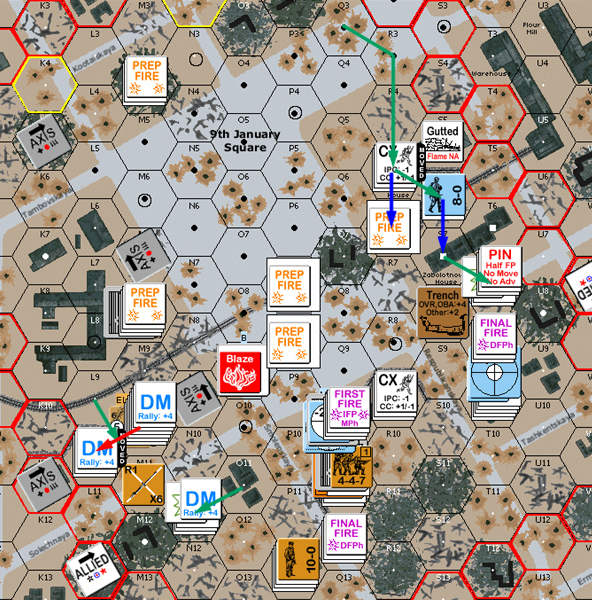
Situation, German Turn 1, take 2.
Patch got Civilian Interrogation on his wind change DR, but again, there was nothing to reveal. Both of his units rallied, thanks to the Commissars (two of them in such a small space is really rough). The P12 firebase managed a 12 +3 shot that just barely missed ELRing the 447 squad in N11. He tried to send the HS out onto the flank to cause rout problems, but away from his Commissar he broke again as he moved, and a SFF shot killed him. The best the rest of my fire did is to pin a squad that skulked out of CA of the StuG acquiring it in Q10h1. This apparently forced some re-thinking of the defense.
Situation, Russian Turn 1.
German Turn 1
“Rindis has advanced his front lines to the east, and is starting on the L10-T6 line. I’m a little surprised that the 9-2 hasn’t resettled with the HMG, but Rindis has chosen instead to use him in the assault force. He’s a little light to the east, but is prepared to advance in the west. I avoid setting up in the front line to the west for that reason, but I do dump a Commissar in T8 along with a sizable stack, hoping to get a shot at a StuG with the ATR, and to deliver return fire against the HMG nest in M8. Free of the PTC restrictions, I place units in the upper floors of the Voentorg, hoping to interdict any moving units. My second ATR is with the 9-1 in R8h1, where he’ll be hoping that -1 modifier will help with those Deliberate Immobilization attempts. I leave one of my HS in N11 to at least offer some FP against a western advance. If he breaks, he can rout back to the Commissar and MMG in P12, which forms my primary defense in the west.”
“Prep goes poorly for me, as the HMG pins my mighty 10-0, eliminating his morale bonus and I lose my ATR squad to a break. Movement goes better as I get a k/1 against a moving 838, removing a huge source of FP, and smoke, from the board. The StuGs don’t hesitate to move up close, but movement and size modifiers make DI attempts unlikely. Rindis also doesn’t cooperate and parks one in shellholes, and a second in debris, adding another +1 TH modifier, making any DI attempt a +7. Dunno if it was deliberate or not, but it’s a real good move on his part. Unfortunately, the Stug In P8 is in OG, and two hexes from a 9-1 directed ATR in R9h1, so I can tag him on a hull hit of ‘6’ or less. Yeah… I know what I’m doing in my Prep. Rindis makes a move across the M10-O10 road, and I can’t get the FP in play to stop him.”
“Defensive Fire doesn’t do any more damage than the lucky 838 k/1 result, and modifiers are too high for the StuGs to get a result, but acquisitions go down. No wanting to just throw away my HS in M11, I voluntarily break him and retreat to P12. I need an ‘8’ or less to rally or suffer CR, but it’s far better odds than I’d face in CC.”
Russian Turn 1
“Commissars rally both broken units in T9 and P12, so aside from the eastern ATR being out of position I’m in good shape.”
“P12 breaks the 447 sitting in N11. With two acquisition counters on me, I decide to give the DI shot a pass and AM to Q10, hoping for an Advancing Fire shot instead. (Note to self: next time take the damn shot). In movement I see if I can’t get that newly arrives HS over to M12 this turn, but Rindis breaks him in O13, then double breaks him for the CR. Ah well, just an idea. I skulk to the east and in the Voentorg, but Rindis finally scores a hit with a StuG and pins the ATR squad that moved to Q10h1. I’m certainly not liking the impact of those 12(+0) shots the StuGs get when they hit, so I see if I can’t get more units out of their LOS this turn. If he moves adjacent to anyone I do have MOL ability, and I’m hoping Rindis has forgotten that. I move the ATR and 10-0 back to T8, hoping that if Rindis breaks Q10h1, I still have an ATR shot against P8. I’m also not liking the two StuGs staring down the P hexrow, so I Advance the MMG stack to Q12 in a slow retreat to the board center.”
Cpl Uhl pondered:
“Keep in mind that an HE hit can’t be a Dud.”
“This comment piqued my interest – yet another rule missed or played incorrectly!”
“Curiously though, C7.35, in its entirety, says: ‘Any Original TK DR of 12 (regardless of ammunition or Target Type) has no effect.'”
“Now, HE can be used for a TK attempt, so in the case of a TK attempt, HE can indeed be a Dud, it seems. Yet that same round fired at infantry or as Area Fire, cannot. Hmmmmm…..a little rules inconsistency or am I missing something?”
“The end notes for that section say the dud result reflects the possibility of a round striking something non-vital on the vehicle, so I believe the thought behind the rule is the round always goes off, but there’s a greater likelihood for a non-result versus a vehicle compared to a soft target like infantry.”
jwb3:
“Now, HE can be used for a TK attempt, so in the case of a TK attempt, HE can indeed be a Dud, it seems.”
“Errr… Right, I should have said that “a hit that uses the IFT can’t be a Dud”, or something like that. I’ve done so little shooting of HE for TK attempts that I just equate HE with the IFT without thinking about it.”
“Yet that same round fired at infantry or as Area Fire, cannot. Hmmmmm…..a little rules inconsistency or am I missing something?”
“I’m really a layman on the subject, but I think it’s totally a rules inconsistency. I have read about dud rounds when it comes to torpedos, bombs, and I think artillery shells and mortar rounds, all of which obviously use HE. But I’ve never heard of a tank that survived because an AP round “failed to go off”.”
“I suspect the name “Dud” is a bit misleading for what the designers had in mind (as discussed in the footnote Patch mentions).”
“John”
“I suspect the intent of the rule is similar to many games, where they’re trying to avoid an ‘automatic kill’ and always give the target a small chance of survival due to fate. It’s not as necessary for the IFT, as you always have a chance of surviving a MC.”
“–Patch”
Chas Argent informed us:
With the appearance of new VotG scenarios in the latest Journal, a return to Stalingrad was contemplated…
“FYI, Tom Morin has given us 3 more VotG scenarios which will almost certainly be in another Journal, possibly the next one.”
Okay, time to start trying to catch up with events….
My rally did not go well, with nobody coming back (two chances in M10, one without DM). Patch transferred a DC to his Commissar. I attempted Smoke from R6 and P6; R6 had nothing, P6 missed. The only result of Prep was the wounding of my 7-0 in M10 to the Russian Sniper.
I started movement by showing I wasn’t entirely awake. I sent a leader and squad in Bypass of L10, where they could be seen, and Patch promptly hit him with a K/2, reducing the squad and breaking the leader and HS. I pulled back from O11 to get a little more cover, and fire from P12 and Q12 promptly broke the squad there. That left that entire flank open with only the HMG nest in M8h1 to protect it.
With only 4 1/2 squads unbroken, I contemplated moving my 9-2 up to try to drop a DC on T8. If it worked it might keep him to busy on the east flank to do much about the west. As it was, I moved my LMG squad up, and Patch immediately broke his LMG on DFF. I moved up the 9-2, took the resid, took the SFF shot, and then Pinned on the FPF shot. Which eliminated that temptation. However, it wasn’t going to happen. I figure I needed it as a threat to the main stack back in T9.
Things got worse in the west when a DFPh shot broke the wounded 7-0 and CRed the two broken squads with him.
Situation, German Turn 2.
Nothing came back in Patch’s rally. I had really been hoping my 9-1 would manage to get my front-line squad back. My horrible luck continued when Patch mortally wounded my 9-2 during prep, breaking the squad in the process.
With little intact on the front line, I didn’t have a lot of defensive fire as he moved up. My 9-1 in N11 threw his DC at N12 as his reinforcing squad and leader came up. A ’10’ Original DR netted me a 1MC for my efforts, and the leader promptly went Berserk, taking the squad with him. The good news was that they had already declared ‘end’ and couldn’t continue on into Melee. Patch also tried a squeeze from Q11 into O11, but one of the StuGs was able to Pin him in P11.
DFPh gave me some luck. A Stug finally got a Critical Hit on the Voentorg, killing a 9-1, 458 and ATR. The HMG reached across the square again, and broke one of the squads that had advanced into U8, despite the Commissar’s leadership.
Situation, Russian Turn 2.
“Boy o boy, it’s been a while. This is going to take some thinking.”
German Turn 2
“Rindis failed his rallies, and I transfer the DC to the Commissar. I really need that leader MF ability, and that 10 ML.”
“My biggest fear in this game is Rindis will drench the area in smoke and close for the kill. Thankfully I’m spared that this turn as Rindis discovers a lack of smoke in R6, and misses in P6. The rest of Prep is entirely in my benefit as my Sniper activates and demotes a 7-0 to a 6+1. Loooove that +1. Movement goes just as horribly wrong, as he moved in bypass in full view of Q10h1, and I nail him for a k/2 that reduces a squad and breaks the remainder of the stack. Rindis also pulls back from O11, but there’s enough firepower centered around the P12 MMG nest that my 16(+4) breaks the 447 there. There’s only the MG stack to cover that flank now, but he can see quite a bit if I try to move up that flank, and both tanks still cover the P column quite well.”
“To the west Rindis does a little better. He makes a run with a DC against T8, but I Pin the 9-2 after an awful lot of effort. Sadly, the Pinning of the 9-2 can be summarized as the only good news this turn, as my Final Fire targets the wounded 7-0 stack, and I break him and CR both broken units for a total loss there of 1.5 squads this turn.”
Russian Turn 2
“My turn to shine! I do like how there’s nothing left to the… left, and I’m going to see what I can do. None of Rindis’ units come back which makes it all the more attractive.”
“Prep Fire starts off wonderfully as I fire on the adjacent 9-2 for a 1MC and he rolls a ’12’, then fails his wound dr. The right flank is looking less and less like a threat. Sadly, I still can’t get any successful DI attempts, and I discover long after this scenario is over that the StuGs should not be getting the shellhole TEM, which I have been dutifully adding.”
“I try several avenues of advance on the left side. Rindis doesn’t test a LOS with the HMG, but he does toss a DC. In these last few games I’ve had quite a few events pop up that I’ve never had to deal with before, and this is one of them. Makes things more exciting. Things are even more exciting as the 1MC sends the stack Berserk. What is it about this flank that makes my troops lace up their Nikes? I try firing a squad across from the Voentorg to join the rush, but he’s Pinned in the road by a StuG. When those 75mms hit, it hurts. That also becomes exciting when Rindis scores a CH against the Voentorg and kills a 9-1 and a 458. Rindis also breaks a squad under the Commissar’s leadership on a cross-map shot.”
“Though things still look good, the sudden loss of my 9-1 is a sharp reminder of just how easily this can turn around. I want to retake the M12-O11 line, but I think I will curb my aggressiveness and play the defensive roll, forcing Rindis to come to me once I re-establish my front lines.”
“Sadly, I can’t comment on the rest of the turn as I’m missing the Log files. I await Rindis’ next update to continue.”
My third rally went poorly. I got two leaders back, and a LMG HS, but lost an ATR-toting HS to CR. Patch’s squad in U9 recovered. With those Commissars, about the only way to keep Russians down at all is to kill them. Worse, he recovered my DC left behind in T7.
A chain of ROF hits on P11 broke and reduced his squad in P11 to nothing. The MTR hit twice for no effect before malfing. The StuG on the east side and the HMG both tried to dig Patch out of the trench in S8, but couldn’t do more than Pin him. Movement consisted entirely of me skulking my few intact troops. Thankfully, Patch’s two shots had no effect other than reinstating DM.
Situation, German Turn 3.
The final RPh saw me get back my 548 squad, who was now out of position in L8, while a HS and 9-1 attempted to hold the line in M10. Patch managed to repair his LMG, making the east side just a bit more dangerous. He Preped with three squads in two attacks, and managed to Pin the leader directing the HMG.
N12, with no Germans in LOS, dropped out of Berserk (I think we got that right…). He cautiously moved up on the flanks, while the defenders of the Voentorg skulked in the cellars.
My close armor support in the east hit again, and broke the squad in the trench, but no other fire (on either side) was effective. In general, I was thinking of self-breaking M10 to pull him out of danger. However, at this point a third try on the Voentorg was not going to go anywhere, so I left them in place. However, Patch declined the chancy CC and occupied L10 instead.
(We did actually decide to see how it would have gone. He wounded my 9-1 while I got a KIA on his 628.)
Situation, Russian Turn 3.
At this point, I decided to concede. I was down to 5 squads (none below 2nd Line), while Patch had 8 squads (also in good shape; I generally killed those few that ELRed to conscripts). While I also have three StuGs for some heavy support, they have to re-enter at the beginning of each scenario. With only three turns to begin with, spending one getting into position is a big problem. I should eventually be able to dig him out, but we’re talking around eight turns, not three. Worse, the collapse of both fronts during the second scenario meant that I’d lost all the positional advantages I’d sought out during the first try. Getting at the Voentorg would be impossible, never mind taking all of the ground floor.
It’s a very interesting scenario, but in this case my troops got ground up too much for little gain to be able to take the objective. I still think losing the FT on the first shot was a real killer with my chances. The plan had been to try and grind my way to be in a real position to try for the second scenario victory from the west side.
FC=Gorgon=:
“This scenario looks really interesting. I’ll definitely have to give it a whirl. Thanks for the AAR as usual, y’all. Very informative and I love the play by play that you guys do.”
“M”
German Turn 3, Phase 2
“Rindis gets two of his badly needed leaders back, along with a lowly HS, but loses another HS to fate. My Commissar shows his stuff and brings his squad back. Plus, I grab the dropped DC lost when the 9-2 died in T7, and you can bet that will come in handy.”
“Lots and lots of Prep by Rindis. I didn’t expect my 447 trapped in the P11 road to survive unscathed, but Rindis foils my plan to send the broken squad back to the Commissar in P13 by getting ROF on his StuG and killing him with multiple breaks. Lots of fire is directed at my trench in S8, but this time I hang in there though I am pinned. Still, my flanks end largely intact, and there will be no rush for the Voentorg this turn. My defensive fire cannot generate any results as Rindis does a lot of reshuffling to deal with his latest setbacks, and the turn ends with the lines unchanged.”
Russian Turn 3, Phase 2
“Rindis gets back a 548, so he’s getting his FP back on line, but he just has so little left at this point. I repair an LMG, always a good thing to see with those dang ‘1’ repair #s.”
“I Prep, rather than skulk, as I still want to extend my front lines in case this goes into Phase 3. I want to try and nail another tank, and see if I can’t get into the L10-N9 buildings. Best I can do is Pin the leader directing the HMG, which is comforting, but I’d rather have pinned the manning hs.”
“Facing three tanks, I skulk heavily in the Voentorg and retreat into the basement. I move cautiously in the west, but Rindis isn’t trying for a number of LOS with that HMG that I think are clear, so my nails are worn to nubs for nothing. I get into the M11 road, and rather than risking CC, I bypass his stack and move into L10, thereby creating a little strongpoint that he will have to dig out, delaying him just a little more on his march to the Voentorg. I also advance into S7, so I will start Phase 3 ahead of where I was at the game start.”
“I really wasn’t expecting Rindis to go into Phase 3. I outnumber him heavily in infantry, and there’s no way he’s getting control of the Voentorg with what he has left. Yes, those tanks are nasty, but I do have MOL capability still, and if he moves close to try and force me out, I can start flaming tanks. As expected, Rindis concedes.”
Reflections
“I love quirky little scenarios like this. Nailing that tank was a huge plus for me, as was the loss of that flamethrower after one shot. My sniper was very active, scoring some key hits, but boobytraps never came into play and I couldn’t get a successful MOL out the door.”
“I tried hard to maintain the flanks so I could prevent a run across the square into the front of the Voentorg. Plus, one flank or the other may get that side shot (as I did) against a StuG and score a kill. That forces the Germans to hang back and can deny them the -1 modifier for range. Sadly, I lost 2 of my 3 ATRs, allowing Rindis to close in Part 2. Commissars formed a huge part of my defense. I threw one on each flank, and my plan was to fall back slowly, trading ground for time. My plan in the east was to lost the M12-O11 line in Part 1, the P12-P13 line in Part 2, and Part 3 would be the defense of the Voentorg from R12-Q10. Similarly to the east, my lines were to be S8-U8, T9-U9, and finally R9 to U11. I managed to hold in the east, but I did fall back to the west to my P11-P12 line, but was able to counterattack and retake ground.”
“Setting up in the Voentorg is risky for the Russians due to SSR 4. I gave it a pass and set up behind it, and I’m not sure that was the best plan. I counted on the flanks to control any assault on the Voentorg on turn 1, and since I started concealed, I could advance into any ambitious Germans with a -3 on the ambush dr. However, the lack of those two squads was felt when I tried to interdict the German entry. Next time I’ll throw someone in the building on Level 1.”
“I think the Germans need to treat Part 1 as a gimme to the Russians, and just use the time to get their infantry organized, snipe at poorly placed Russians, and get into a launch point for Part 2. Definitely try and take the M12-O11 line though. Part 2 should see lots of smoke going out from the StuGs as the Germans close for CC and those lovely DC’s and FT. I was really expecting a lot more smoke from Rindis. Rindis tried once, then I never saw it again. The blaze did a wonderful job of shielding the Voentorg from the HMG, which helped, and hurt, me, as it prevented a lot of my firepower from going out against that particular strongpoint. But the smoke it created is a clue to how effective the StuGs can be if they can get 2-3 smoke counters on the board.”
“Lots of fun on this one, and I’d recommend it.”
Discussion ¬