
E Hill 621
“Hill 621” is a classic scenario from the original Squad Leader game, and is much enjoyed in both the original and ASL formats even now. Like all the original scenarios, it’s not very historical, but it has a great ‘feel’. Both Patch and I had played it before, but not in ages, and not against each other. We got going at the end of March 2009…:
Well, Patch and I started our newest game last night. We’d talked over various possibilities while the previous game was wrapping up, and we eventually decided to visit an old classic, even if it will take a bit longer than the last couple games.
We’ve both technically played it before, but it’s been a decade or so for Patch, and the last I played it, it was SL scenario 5.
Neither of us had a strong affinity for a side, so we rolled off and I got the Russians.
With 48 squads… it was hard to come up with much operational subtlety, so I mostly lined up at the edge of board 3, and am trying to keep everyone out each other’s way until attrition shakes out a few bodies.
The pre-game MC broke two German squads, which promptly rallied in the RPh. The Germans set up near the west edge of board 4, in three stacks. With his middle stack, he made a mistake bypassing some woods 15 hexes away from the leaderless MMG I had set up in 3N1h2. The resulting 1MC was passed by the -2 leader and the first squad. However, the latter activated the Sniper who promptly Pinned that squad. The remaining two squads seeing their comrades hit the dirt pinned and broke, effectively halting the entire stack before they could get to the board 2 hills.
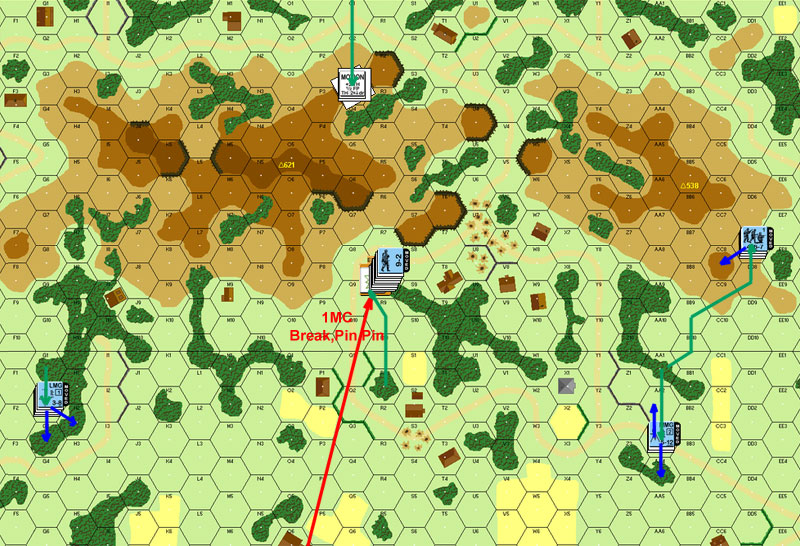
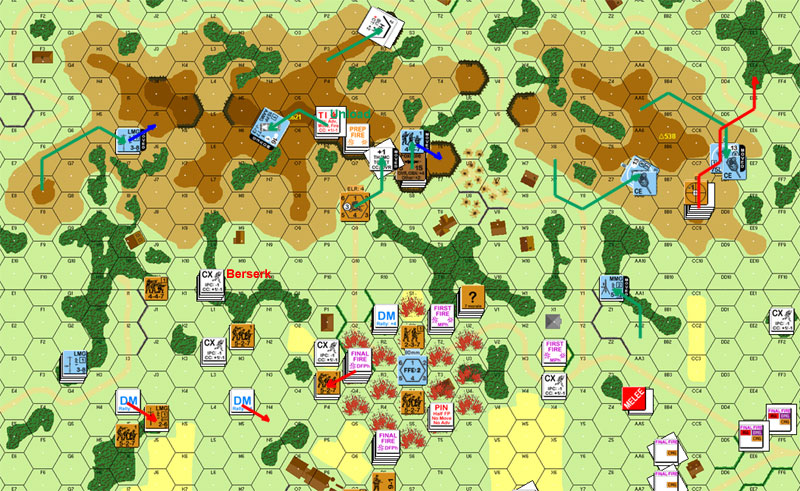
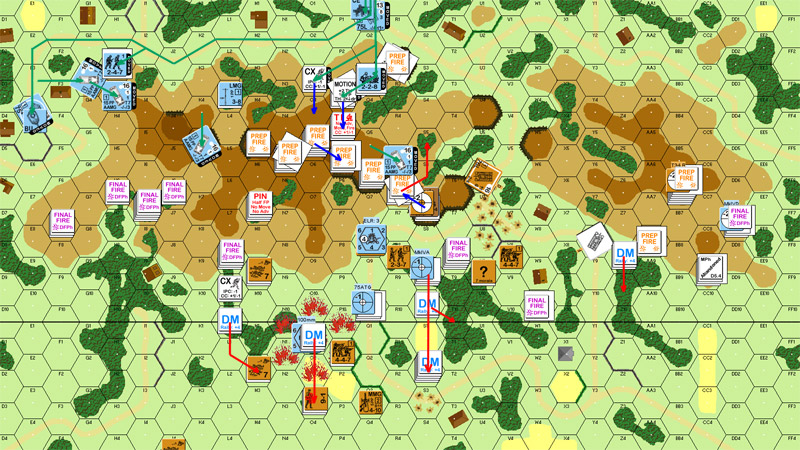
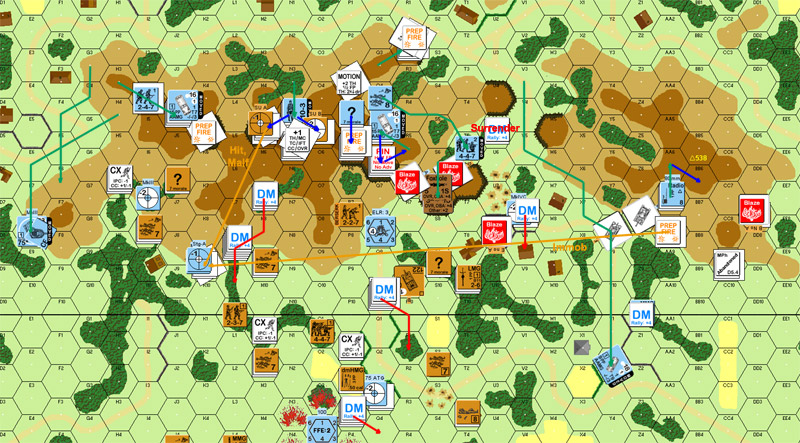
Situation, German Turn 1.
The broken German squad promptly rallied in my RPh. My only Prep was the MMG again, which pinned the squad that had advanced up to AA4.
Thanks to his middle group being out of position, I had a lot of freedom to move. They tried to fire a couple times with tricky LOS, but they were blocked. Overall, I had four squads broken, one by the Sniper. Not bad at all….
Situation, Russian Turn 1 after MPh.
Honza commented:
“Neat. I love the pictures. VASL is good in that way, you can save the pictures and reproduce them. I hope you enjoy the rest of the scenario.”
Uncle Joe chimed in:
“Looking forward to this aar, the VASL pictures and arrows make them top notch.”
“Jeff H has just beaten the living daylights out of my Russians, and even though I still have my last turn to go and I am adjacent to the victory hexes, there are sufficient German troops and heavy metal on the top to prevent me from getting there barring some seriously lucky DRs.”
“Btw, my tactics for the first rounds seem identical to yours. MMG’s in the stone buildings top level and everybody else run for it. Didn’t work too well for me, though :-(“
“One piece of advice: Look out for those mean halftracks that enter as reinforcements – Jeff has admitted they really are Schwere Panzerabteilung 503 in disguise – at least they act like it.”
“JM”
Yeah, Patch initially asked if I remembered I needed a leader to fire past 16 hexes. I allowed that it had slipped my mind, but it didn’t matter as the MMG was there purely to interdict board 4. The other one started in 3Q4 with the 9-1 with an idea of getting it into the multi-hex building, but the FL aborted that move to 4R7.
Halting Patch’s middle stack was well worth it, but it’s going to be a long slog for the MG crew to catch back up to the action.
Oddest moment so far was when the north-side group of Germans started up the hill, and I realized they’d keep concealment because there was no one within 16 hexes. First time I’ve had to look at that column of the concealment chart….
“Everything I’ve read about this scenario stresses not getting into a stand-up fight with the Russians on board 4. Looking at the board and Rindis’ set-up, I think there’s something to be gained with holding a few units back and interdicting the advance. I may use a few, but I think the time gained will be worth a squad or two.”
“Two squads broke in the pre-game MC, but rallied promptly. I set up interdicting positions in the 4G3 woods (blocking an end run along the south edge and around the 4I5 woods) and around the 4Y3 intersection to block the board center. The MMG is posed to flee if needed, but the screening squad in the 4AA4 woods may die there. The key to my defense, as Rindis noted, got nailed on a long range MG shot/SAN attack and stalled in 2R8. The absence of the HMG and 9-2 in 2S7 will hurt.”
“The broken squad in 2R8 rallies first time, so I’m back in form as Rindis begins his charge. His advance is more conservative than I expected. The MMG in 4Z2 throws out a firelane that seriously hiders the center advance, and te 2R8 stack tries some sneaky LOS attempts that unfortunately fail. I break 4 squads. Not bad, but I would like to have seen 2-3 more from the 9-2 stack, who didn’t do much due to his location. Biggest flaw in my Defensive Fire was using the 8-1 to direct fire, which prevented him from using his Radio to call in a fire mission. >.< Realized my error right after I rolled the damn dice. I much prefer calling in OBA during Defensive Fire, as my opponent has no chance to avoid the SR. Now Rindis has another movement phase to run away from it. Thankfully, Rindis fails to break any of my units in his Advancing Fire so I’m at full strength for turn 2.”
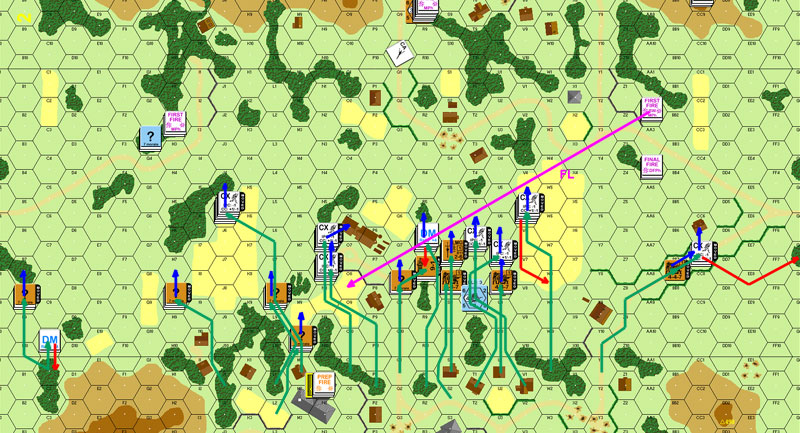
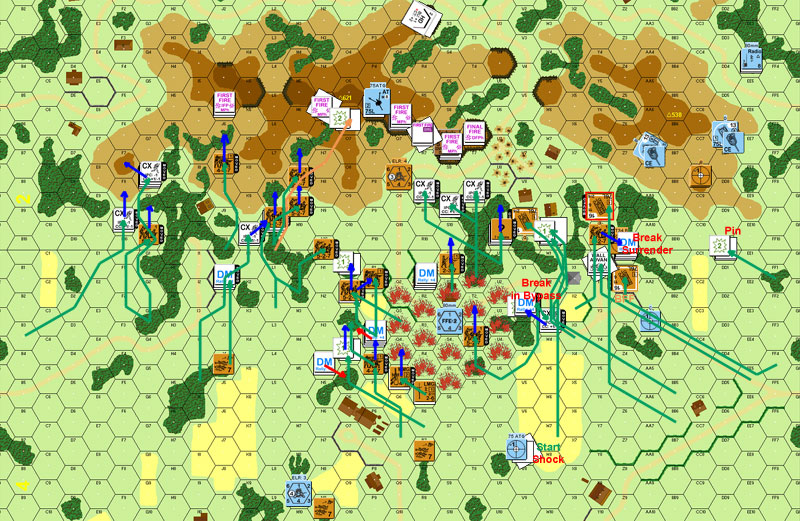
Patch immediately called down an SR during his Turn 2. The AR was right in the middle of the brown line, but it went 5 hexes off and into 3S1; safely out of the way—for now. The squad with the observer attempted to entrench, but only got a labor counter for their troubles. He preped with the two other North-side squads, and broke a 447, and Pinned two other squads.
Of course, the stack 2R8 moved out, and there was now nothing I could do about it. He moved one South-side squad and LMG back to a shoulder of Hill 621, while the other skulked in it’s advanced position.
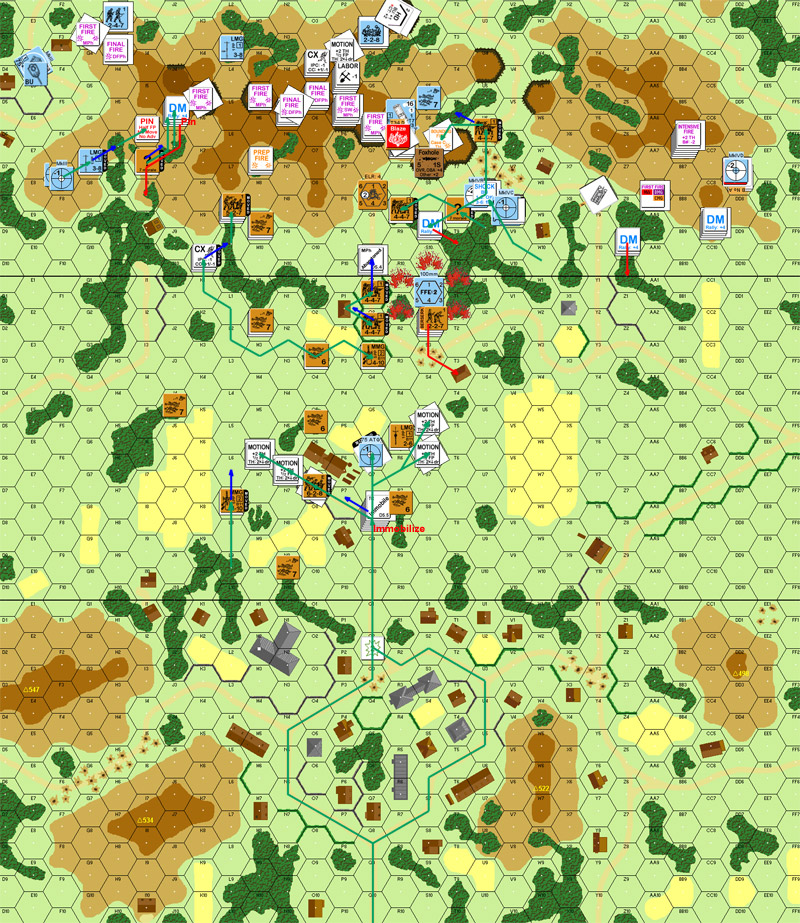
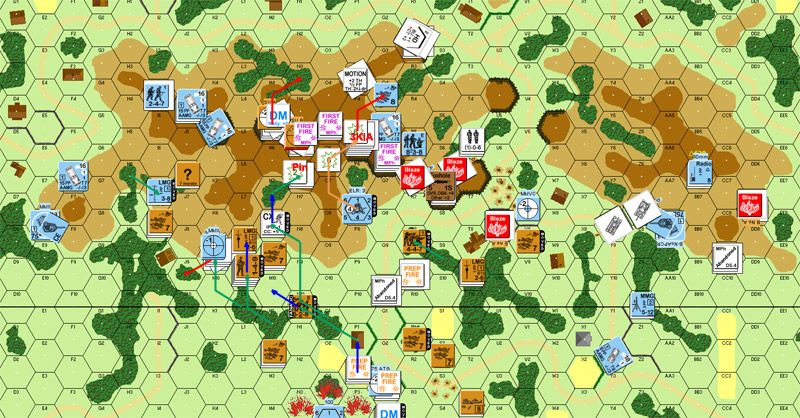
Situation, German Turn 2 AFPh.
My second turn took a while. I’d done a lot of the initial probing and started in on the bulk of the movement phase by email, and finishing it off still took the bulk of tonight’s on-line session. My rally phase went well, rallying 3/3 and only leaving 2 brokies on the board, one in an out-of-the-way position. I decided against any sort of prep fire and started moving.
Thankfully, Patch’s early shots were pretty bad, and escaped pretty lightly with my opening moves, which gave me a chance to completely swamp the forward South-side squad. As things went on, his rolls got better. Also, his Sniper was quite active, in part because of the number of fire lane attacks I had to go through. He Pinned two squads before they even got a chance to move…. My Sniper went off once, and stunned one of his MkIVs.
I knew he’d put the MMG’s FL back up as soon as he had a chance, so I lead that part off with the 9-1 and MMG so they’d take the 4FP +1, instead of a 2FP -2. A good thing, the NMC pinned my leader. Of course, while the squad with the MMG passed, they were still out of movement well short of their goal.
Despite what was overall probably poor luck for Patch, he really got what he needed: a 1 -2 FL shot killed an 8-0 leader. I only have three leaders. I cannot afford that….
Situation, Russian Turn 2 AFPh. Case study in the effective use of fire lanes.
Total casualties: 3.5×527, 2×447, 8-0 KIA; 1×527, 2×447 Broken
DFPh saw the SR move into 4S3, the middle of my current concentration of troops. Not going to to be able to do much about the FFE….
CC went well for me. The 3:1 in 4G3 killed the defending German for no loss, and the 447 advancing into 4AA4 got Ambush which caused him to get a CR, and those two things combined kept him from doing any damage in return.
Matt Romey pointed out:
“Why did the German tanks enter on the West edge? They should enter on the North or South edge of board 4.”
“We have played Hill 621 a bunch of times in the SoCal ASL Club, and we’ve found that the result of the tank battle that often occurs in turn 2-3 has a huge effect on the game. Here, of course, it has been avoided since the PzIVs entered safely behind the hill.”
“In one of our playings, the Germans avoided that turn 2 tank battle by hiding the PzIVs behind the hill. By the end of the game there were still some alive. One of the best Hill 621 games I’ve ever played just because the end game was so much different than usual. The German armor just sat up there in reverse slope and ripped any Russians that dared show their faces. Of course, the flip side was that the Russian SUs had a field day! I recall it came down to the last turn, but I forget who won.”
Well, I assumed Patch knew what he was doing…. 😛
Bad Dice commented:
“Interesting.”
“I have started this scenario a half-dozen times, and never finished it. B2hail-whatever and I are currently playing this via VASL.”
“It probably goes without saying that we’ll both be watching this one closely.”
“BD”
“Yeah, got so caught up on everyone else entering on the west board edge, I missed that the MkIVs didn’t enter there.”
“Did that the last time I played this one, too. :(“
Morbii asked:
“Since you guys are playing this map, perhaps you know the answer — do leadership DRM count for the pre-game German TC? There isn’t a triangle next to the “TC”, so I’m thinking yes, but figured I’d ask.”
“I’ve always played this one as the Leadership Modifier can be applied to units in a stack.”
Sorry for the delay here. Game went a bit slowly last week, though I meant to update earlier anyway.
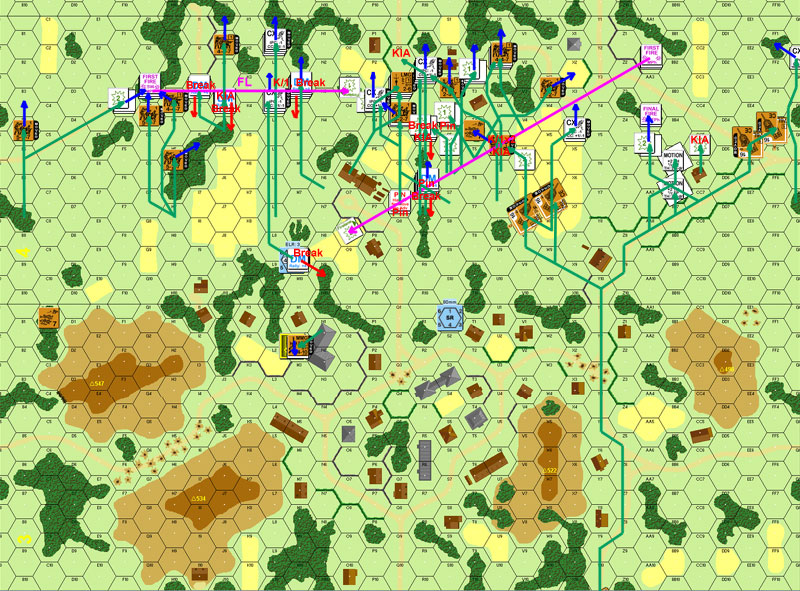
Patch immediately converted his SR to a Harassing FFE, taking in a fair amount of my troops, who were mostly in woods anyway. He broke my entire stack in 4R1, most of Q3, pinned a squad in T1, and my leader in T4. He continued to fail to entrench on top of 2CC8, which was a blessing, though he succeeded in S7. The HMG on top of 621 pinned a squad and sent another Berserk.
Most of my fire was involved in the bulk of the T-34s hitting his artillery observer in 2CC8. I broke the leader and squad early on, but just couldn’t get another result. Annoyingly, the lopsided melee in 4AA4 ended with both sides killing each other.
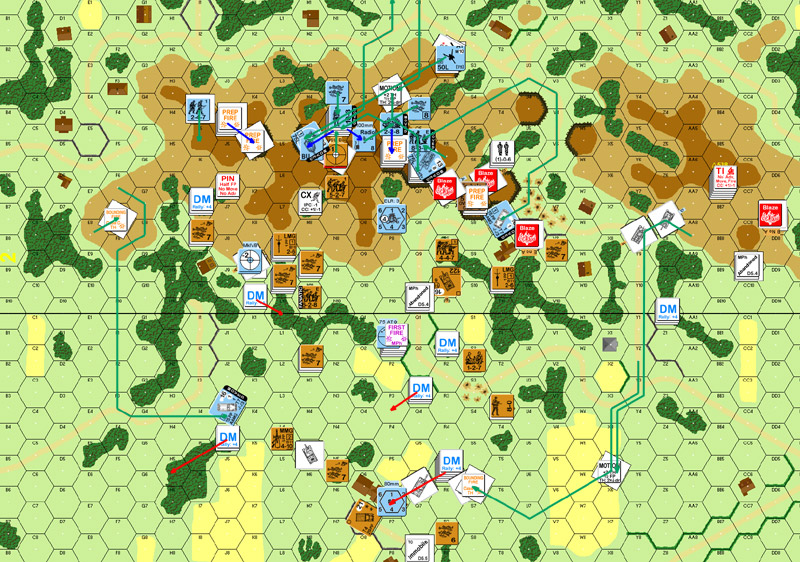
Situation, end of DFPh, German Turn 3.
Patch immediately rallied his leader the next turn, and he went Heroic. With luck, the habit of Heroes dieing easily may make that a bad thing…. My leaders were out of position, but I did self-rally a squad with a LMG.
The Berserk charge went better than I expected. The only targets were some distance away and uphill, so he could only get adjacent, but the DF shots were ineffective, doing a nice job of interfering with the rest of his DF. Mostly, movement went very well for me, but he did get a 2 -2 shot on my 9-1 and wounded him. Way too close a call on my second leader for comfort. He shot at the other living leader and broke the squad he was escorting. I aborted the rest of the leader’s move to stay in the area.
As my second T-34 started, the ATG opened up and Shocked it. Not exactly reassuring. Of course, I’d already had the problem that no matter what I did, I was a critical couple of MPs short of being able to properly swarm over the PzIVs on Hill 538.
So I swarmed over the MMG squad in 4Z0 instead. First I moved a tank up the road, getting behind the wall as I came into Panzerfaust range, stopping adjacent (he claimed WA but did not fire), and my shots missed. Then a second tank followed it and managed to break him on a moving BFF CMG shot (with no TEM since he had WA but the wall didn’t cover that side).
DF was nearly painful, but then Patch remembered that the FFE was going to have to go away as his leader rallied and could no longer see any of the FFE. (whew) I accepted the squad in 4Z0 as prisoners, rather than make it harder to chase down brokies later.
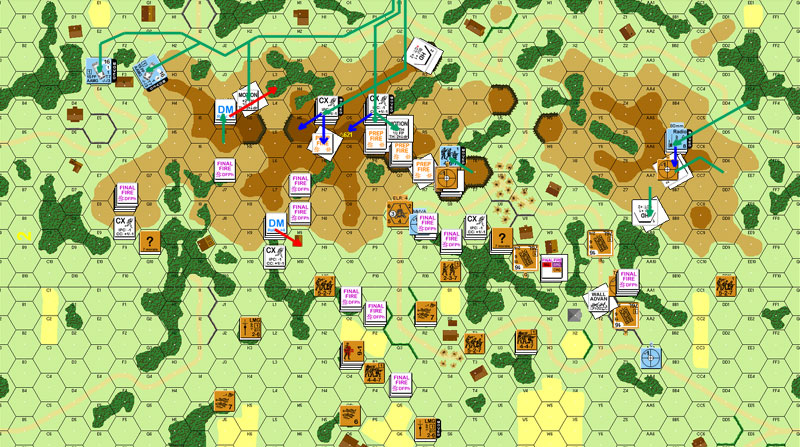
Situation, end of MPh, Russian Turn 3. Berserk charge is in orange.
German Turn 3
“Time to get some defenses going. I entrench successfully on the cliffs in 2S7, but fail at my OP in 2CC8. Shame, as I’d really rather have that one going at the moment. With all the woods about harassing fire seems the order of the day, and I drop an FFE on the 4S3 road net. Didn’t do too badly, though the wooden buildings are nice safe points for him. Still, it does nicely shut down the center. The hoped for HMG tear with a -2 leader goes poorly when I send a 527 into berserk status. I’ve still not gotten a decent ROF out of that thing.”
“In movement the ATG unloads in 2P5. I’d rather have it in 2Q6, but the HMG is there and I can’t stack everything in one hex. Not having a lot of luck in what to do with the MkIVs after their erroneous entrance. I keep them out of sight (anything I do will be 2:1 against me or worse), and instead keep back on the level 1 hills, covering a charge against the OP in 2CC8. I get lucky and get a MkIV HD in 2R2, covering the backfield.”
“Bad news in Defensive Fire when the T34s smother the 2CC8 position in MG fire, breaking everyone. Does not leave me happy. I rout out of there towards 2EE4.”
Russian Turn 4
“My 8-1 comes back with a vengeance, turning into a hero. Unfortunately his heroism isn’t contagious and the squad fails to rally. Short leaders, Rindis is struggling to get folks back up using his MMC self rally ability. I hope to widen his choices of troops to rally by breaking more units this turn, but that damn berserk unit is troubling.”
“Rindis is doing very little Prep this game, concentrating on moving like he should. The berserk 527 heads up the hill and takes a ton of fire as I try to save my ATG, but I just can’t break the SOB. Lots of infantry moves up, as there’s just no firepower out to engage them. My MMG took too long to fall back, and is smothered by T34s and breaks, sealing his fate. I can only hope the soon-to-be captured MMG breaks early. The other T34s move into the 2V8 village, where I just don’t have LOS to engage. The OBA fades away in Final Fire as I have no LOS to it due to Hill 538. Shame. The ATG finally duels with a T34, but that 11 AF is tough and I bounce shells off it for only a Shock result. That does not bode well for the remainder of the game. Where are my Panthers? >.<“
“Lots of Russians are a whole lot closer this turn. The arrival of my 838 section will truly be appreciated next turn. Broken Russians are as good as dead ones right now, and I need more FP up to do that.”
Okay, the game is proceeding a bit slowly, but nowhere near as slow as the updates. I’ve got my work cut out for me to catch up.
I got two bits of good news on the German turn 4 rally—my shocked tank recovered, and I recovered the MMG that my new prisoners had abandoned. The German ATG got a couple more hits on the previously shocked tank during Prep, but couldn’t manage to penetrate.
Elsewhere, he eliminated the Berserk squad on a single shot that maintained ROF (K/2 and failed the MC).
I nearly killed a squad as it moved away from me on a SFF shot. But between me cowering, and the fact that it had pinned on the first shot meant it only broke. Mostly, his tanks on Hill 538 moved around slightly and found Hull Down spots, while the reinforcing HTs turned south to anchor that flank. The infantry moved up to the crest line of Hill 621. Also, the squad in 2T6, having failed to dig in, moved off the little forward shoulder of the hill in the face of increasing Russian firepower in the area.
Situation, German Turn 4, end of DFPh.
“Oh my we have fallen way behind on this, haven’t we.  “
“
“Turn 4 saw the entrance of my reinforcement. My glorious reinforcements, who are arriving not a moment to soon. Rindis is now getting little packets of 2-3 squads within firing range, and although not deadly, the constant peppering of 4(+1) shots is like getting nibbled by ducks. Sooner or later someone’s going to break.”
“Not enough happens in Prep Fire, and in movement I throw the 838s on the hill. 2 halftracks head south to bolster the southern flank, which is needed when my lonely 467 down there breaks trying to fall back from far too much firepower and not enough TEM. My tanks on Hill 538 move into position for side or rear shots on any T34s that get adventurous and try to head down the U/V pass. 2S7/T6 is getting WAY too hot, and I fall back into the woods. MY foxhole units will wait until Advance phase, so they don’t get nailed when they exit the foxholes. To the north, my heroic radioman heads with his squad to 2AA6 to try and get OBA in on the Ruskie’s flanks.”
“Rindis’ Final Fire is thankfully also not very effective, turning this turn into a bit of a stalemate. I’m in slightly better position, and Rindis still has his FP on the line.”
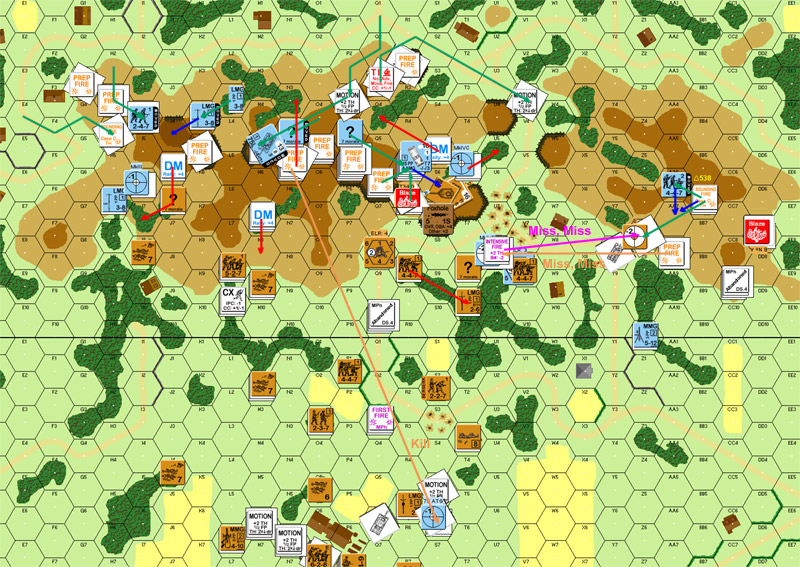
Russian turn 4 started calmly enough. The only thing that happened during rally (for either side) was a squad+LMG coming back. Only a couple units preped, to no effect.
The main plan was to try and boot him off of H538. He had two tanks holding down the flank, and if I could take care of them, dominating H621 should be much easier, and I should be able to permanently run off the artillery observer. Complicating this was the fact that the assets in the area was just 3 tanks, 2 squads and the recently-captured MMG. The first move in that sequence was sending a T-34 up to 2CC9, where it was hidden from one PzIV, and and outflanked the HD position of the other. An IF shot hit, and barely missed shocking the crew. A point here—Patch turned the turret for the first shot, and then turned the hull (paying NT change CA penalties) for the second. I’m still not sure if that’s legal. Certainly you can turn the whole tank instead of just the turret, but I’m not certain you can change VCA/TCA at all on PF/DF if the target is already in the CA of the weapon firing….
Then the second tank went around the same way to 2DD7, which outflanked the second PzIV’s HD position.
Hmm. Thinking about it some time later (right now). It might have been best to change the plan and concentrate on the first PzIV. The entire point of this exercise was to get rid of his HD advantage, and he’d just given that up on the first one changing VCA.
He naturally shot at that one too, but only changed TCA, and didn’t IF. Then came the risky part of the plan: 2Y9 started up, intending to go into Z7, where it could nicely contribute to both tank duels, starting with the adjacent AA8. This entailed giving his PzIV in R2 a nice side shot, but between Motion and the fact that I would only be visible for one MP, it was the best odds I could get.
Of course he killed it, with no survivors.
The rest of my tank force wasn’t handled too well either. One moved up to 2U6, which seemed like a perfect spot at the time—it wasn’t until the AFPh I realized that the woods on the level 1 hex S6 blocked LOS to Q6. I had found a neat little blind spot—too blind. The tank that had shocked (and recovered) last turn headed up the road in the middle of board 2. I had gotten too used to shots bouncing off the front armor.
Patch, of course prepared the welcome mat with his reinforcements, with an SR from his second battery landing near a cluster of my advancing troops, two MGs being assembled, breaking four squads, and CRing 3 already broken ones. Thankfully two PF checks both rolled 6’s. My advancing fire broke the squad in S4, clearing that part of the hill.
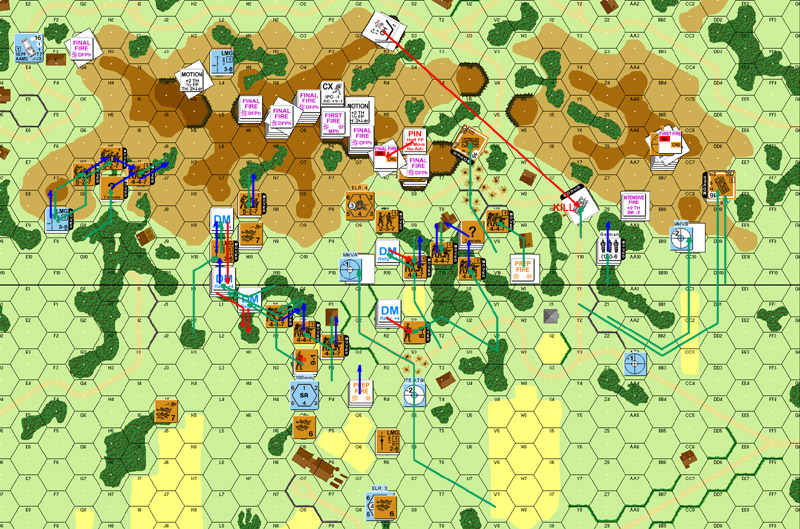
Situation, end of DFPh, Russian Turn 4.
A point here—Patch turned the turret for the first shot, and then turned the hull (paying NT change CA penalties) for the second. I’m still not sure if that’s legal. Certainly you can turn the whole tank instead of just the turret, but I’m not certain you can change VCA/TCA at all on PF/DF if the target is already in the CA of the weapon firing….
“Interesting point, which I had forgotten about. Still don’t know if it’s legal or not.”
Morbii opined:
“I don’t know if it’s legal or not either, but somehow I got the impression that you change either the VCA or the TCA, but not both. “
“Regardless of that, I think he could have shot the BMG by changing his VCA and then shot the MA right after by changing his TCA (but the MA shot would have assuredly missed).”
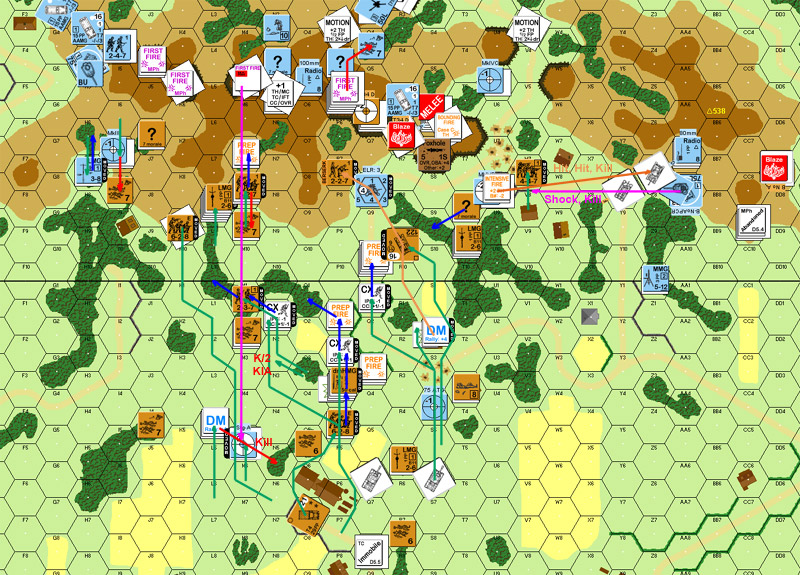
The highlight of German Rally was my wounded leader rallying the HS he was with. Otherwise, nothing going on….
The 100mm OBA came down just slightly off target and broke a pair of squads in woods, while the pair in a nearby house managed to maintain their composure. The ATG showed just how overconfident I’d become by Immobilizing my T-34 in 2Q10. Not a bad position to be stuck in… so of course the crew bailed out. His HMG went on a tear, reducing the squad manning my MMG (K/2 – survived the MC), eliminating the hapless crew of my T-34 (3KIA!), and then going back and eliminating the MMG HS (another K/2). The PzIV in 2R6 managed to break two squads. AA8 Immobilized my T-34 in CC9, and they promptly bailed out. R2 fired on my squad with the captured MMG twice, killing all the prisoners and breaking the squad. In BB6 the squad pinned on a PF check (third 6 in a row for those!), the hero found one… and missed, then the PzIV connected on an IF shot and… immobilized the T-34. This crew, being a bit more intelligent, stayed behind the armor.
Movement consisted of Patch rearranging his HTs a little, and bringing in the latest round of reinforcements. Most of it headed up the hill, while the PzIIIN headed south and the StuG stayed at the entry point. Presumably waiting to see what happened in the armor battle.
My first DF shot was the still-crewed T-34 in 2DD7 firing back at BB6. The hit failed to penetrate, and set off the German Sniper, which promptly reduced the Russian Sniper to a ‘2’. Naturally, the next two German rolls after that were ‘3’s.
During rout, I risked two OBA shots and two Interdiction shots to get troops to leaders faster. And all four caused CR. The former wasn’t surprising, and the alternative was to sit and take the OBA again anyway, but missing both of the latter rolls was disappointing. The only thing of note in the rest of the turn was Patch pulling out of the foxholes in 2S7. He was quite right that I’d made it too dangerous to stay.
All in all, a very punishing turn for me. The entire plan had been shot up with the T-34s, and worse, I hadn’t even taken a PzIV with me. Making things worse for me was Patch’s complaints that he wasn’t killing my tanks. As far as I was concerned, he’d mission-killed all three quite well, and just driving off was a good option for him. The crew of one was dead, and another was quite vulnerable to dieing outside his tank. Even if he did regain the T-34, both CC9 and DD5 were poor places to be stuck for the rest of the game as they wouldn’t have much bearing on the fight for the crest of Hill 621. I hadn’t seen any better ways of flushing out that position, and the gamble was going heavily against me, with nothing to show for it.
Situation, German turn 5, end of DFPh.
With Russian turn 5, my reinforcements were finally due to show up. I really wanted to have dealt with some of the PzIVs by now so that the SUs could concentrate on the German infantry, which is their primary job. As it was, they were probably going to have to pull the remaining two tank’s fat out of the fire. I set them and the two trucks up on the center board 3 road, with squads riding on all but the lead SU and the 9-2 and HMG in the rear truck.
The only thing that happened in Rally was I got a HS back. Oh, and the non-existent wind shifted direction. Especially annoying as I could have really used that ‘2’ to generate a new leader on the 1st MMC rally that came immediately after.
Prep was marked by a couple ineffectual shots, including two hits (one on IF) from 2DD7 to BB6. With no APCR available, they just glanced off though.
My opening gambit of the turn was a press towards 2K5, where one of his HTs had gotten separated from the others. I still needed to worry about fire from the main ridgeline, but they had their own worries as well. This eventually failed with two squads pinned, and the one that was going to make it broke during Final Fire. I also sent out a HS to recover the MMG which had lost its crew in his turn. The crew of CC9, tried to reoccupy their tank, but were broken before they could get through the hatches.
Patch fired on the first (CE) SU in line as it went through 3Q2, which makes a wonderful chokepoint, and left 2 residual there for every subsequent vehicle (with Riders) to pass through. I sent the tanks on the shorter clockwise road around the village and the trucks on the counterclockwise road, since the shellholes in 3Q3 would cost more time than the extra distance would. Patch attacked the first truck in 4Q8, but couldn’t quite get a result (one above what he needed for the truck and both squads in it narrowly made their MCs). A subsequent attack on the second truck in the same hex Immobilized it. I had been thinking of actually unloading in that hex, but realized too late that I didn’t have the MP to Stop and unload. So the Immobilize actually solved that problem for me. The collateral did nothing other than generate a Hero and make a squad Fanatic.
Over in the shoulder of H621, I sent a squad to support the T-34, and tried circling some troops around the front side, but they were broken in route. Then the T-34 crawled up the side of the hill, skirting between the cliffs and the woods. The squad in R6 missed it’s PF check. The Gun Duel ended up even – simultaneous shots. The PzIV swung the turret around and missed, while my return fire hit the side hull with APCR, turning it into a burning wreck.
With Patch having cleared out of S7 last turn, the last T-34 advanced into U8, which gave it HD (walls) against anything on H538. Patch didn’t like this idea, and promptly swung AA8 around, and got a turret hit on the second (ROF) shot, shocking it. Two more ROF shots failed to finish it off.
Patch’s OBA over corrected past some men in the open, but CRed away a squad and a half, broke my 8-0 leader… and sent a broken HS Berserk. I had stopped the leading SU in hopes of it providing cover as everything else moved up, but it was promptly killed by the 75mm ATG. In BB6 a squad finally passed a PF Check and connected, burning the still crewed T-34 in DD7.
Situation, Russian Turn 5, end of DFPh.
German Turn 5
“Reinforcements arrive at the nick of time, as reinforcements should. There are far too many Russians heading for the southern end of Hill 621, and there’s no one there to stop them.”
“Prep Fire brings my OBA down in the center to deal with the growing Russian fire groups. With most of the terrain wooded, I’m hoping for some good results on a 20(-1) attach, but end up with just 2 broken squads. There’s lots of T34s now pointed at my positions, and I have my best mixed luck thus far. Multiple hits, but I only score immobilizations (I’ve never had this much trouble killing T34s before >.<). Thankfully, two of the three crews bail out, and I kill one and break the other. Two of the tanks are immobilized on Hill 538, effectively taking them out of the action as there’s just no LOS to Hill 621. The 2M7/N56 woods must be a petrified forest, as I just can’t break the units in there even with the 10-3, and these two 527s pose the greatest risk to me. Behind the hill I try to entrench a backup position but fail.”
“In Movement I send the halftracks and the MkIII around the southern flank. It’s not a lot of firepower, but at multiple 2(-2) attacks I think I can hold him back. I vacate the 2S7 position, but get nailed in movement and break, my only losses this turn.”
Russian Turn 5
“Uh-oh, here comes the second wave! The 9-2 and .50cal HMG are going to be trouble.”
“Prep Fire was uneventful, with movement being the big phase this turn. Rindis poured his reinforcements up the middle, taking advantage of the CE road bonus to get his tanks up quickly. With an HMG under a 9-2, and a MMG under a 10-3, it was an opportunity to Stun (or even kill) some crews if I rolled well, and riders abound as well. I take a long range shot against 3Q2 for no effect, but at least it’s something he has to deal with. He winds up dealing with it rather well, as none of the following vehicles suffer ill effects. Not knowing who’s going where, and with multiple good targets (both SU-152s and the truck carrying the 9-2 are key targets) I withhold a lot of fire, until I finally get a chance to hit the truck with the 9-2, immobilizing it. The SP guns have weaker armor than the T34s, and my ATG nails one in Final Fire. Rindis gets damn sneaky with his T34 in 2U6, maneuvering it using bypass adjacent to my MkIV and kills it with bounding fire. Another moves into 2U8, where it’s HD status will make it difficult to kill. I go on a rate tear with the MkIV and get a Shock result. Russians charge 2K5, but I get enough fire down to keep him from advancing onto the halftrack for CC. Rindis gets to 2Q10, and my fear is he may try to recrew the tank with infantry, but I can’t get fire in to break the 447 headed its way.”
“In Final Fire I shift the OBA in an attempt to get one of the few remaining leaders, but sending another HS berserk ins not what I wanted. At long last I get a PF handy, and flame the offending immobilized tank in 2DD7. The two 527s in 2M7 survive yet again. I would love to get artillery down into the 2L8 area in interdict all the squads that are following them, but there’s just no LOS. I’m fairly confident in my position, but I really need to do something about his armor if I want to have a chance. If he can get several acquisition with 122 and 152mm guns on the crest, I’ll have to take a reverse slope defense, which is most definitely not in my favor. There are two SPGs in my LOS, so in my prep I do hope to nail one or two more.”
Turn 6 started with some good news: my T-34 came out from under shock with no harm. (Overall, I consider the armor game to have gone poorly for me, but I can’t complain on the shock rolls.) Patch also managed to draw a red card on both OBA, keeping me from having to worry about that immediately. The 75mm AT Gun continued racking up the kills, by killing the second SU-152. That’s both heavy support AFVs before they could even attempt to get into range. The good news was that the riders and crew made it out okay.
Most of the rest of the ridgeline opened up, killing a rider squad (but not affecting the CE crew), and breaking one of the squads working his way up H621. Importantly, the PzIV in 2R2 fired on the squad I had supporting my T-34 in 2S6 and broke it, really leaving him out on a limb. He also managed to break the squad that had gotten pinned in 2J5 next to his HT last turn.
Patch gathered a nice little force, with a 467, 838 and the 9-2 in 2R5, with the obvious intent of taking out my T-34. And I wasn’t able to do a thing about it. The PzIV on top of H538 came down adjacent to the other one and started trying multiple HD attempts. After the second failed one, I got the idea an fired on him before he could succeed. Two misses later (and depleting my APCR), the PzIV called it a day after failing its third HD attempt.
In Final Fire, I broke the 10-3(!), and stunned a HT in the hex, but couldn’t affect the squad and MMG with him. The 9-2 stack managed a 2MC after firing through smoke, and broke a squad, and CRed a HS.
Naturally, with the 9-2 leading, the entire stack piled onto the T-34, but couldn’t manage to get it in CC.
Situation, end of German Turn 6 MPh.
The one move I regret most in this game, is that I misunderstood my odds, and what I could do, and I attempted to move the T-34 out of CC, instead of just trying to plaster the infantry in Prep Fire. I thought I’d be able to start out with some fire, and then try to get out of the hex. Re-reading the rules showed that he’d get to attack first, and he immobilized it with CC Reaction Fire. My eventual fire was ineffective, and he burned the tank in CC.
Before that even, things started going wrong when my first shot with the T-34 in 2U8 caused a sniper check which killed my Sniper. Two shots bounced of the PzIV, before an IF shot finally, barely, killed it. I attempted to move my wounded leader up to the next group of brokies, but there was really no way to avoid a -1 HMG shot, which got a K/2 which killed him. (That’s two out of four leaders gone….) The MMG that I’d started out with in a Level 2 Location I had muffed some moves getting back out of there, and it was behind schedule in moving up. Patch managed a moderate range shot and broke the squad, which in its location pretty much meant it would be out of action for the rest of the game.
My attempt to get my spare vehicle crew to the immobilized T-34 in 2Q10, naturally attracted a lot of attention, and he broke on the way there. My 9-2 rushed a squad and HMG towards the front, only to get pinned. The first of the SU-122s I tried to move was promptly killed by Patch’s StuG.
During DFPh, he finally killed the broken crew that’d been cowering behind the the T-34 in 2CC9, meaning that it would never get re-crewed. …And he killed my last mobile T-34 in U8, and pretty much most of what few plans I had for how to pull this out.
Situation, end of Russian Turn 6 MPh.
German Turn 6
“Turn 6 opens to a bad, bad start for me when both of my OBA draw red cards.  So much for that little plan of destroying the advancing hoards with loads of HE. We’ll have to do this the hard way. The ATG takes out the second SU152, I break the annoying squad which crawled its way to 2J5, and miss the hull down T34 is 2U8. That’s so not good… To top off the bad results for my Prep, only one of the squads in 2M7 breaks under fire from the 10-3.”
“In movement I move the 9-2 off the ridge to lead the assault on the T34 in bypass in 2S6. Taking the 9-2 away from the HMG is a pain, but I looove the increase in odds (CCV 6 with a -3!), and the opportunity to take out another T34 is too much to resist. I move a second MkIV to the front to duel with the 2U8 T34. Only having 13MP is really annoying, as I can’t get anywhere I need to improve my odds with these tanks. A StgIII enters 2M5, adding it’s 75L to the southern flank forces, and the MkIII enters 2H4 to counterattack the advancing Russians.”
“In Defensive Fire, Rindis breaks my 10-3 with a 4(+1) shot. I checked the rules, and there’s nothing in there about 10-3s being immune to piddly 4FP attacks. Surely an oversight on MMPs part. The 10-3 flees the crest, but thankfully doesn’t take the squad with him, who are content to instead point and laugh at the Major. In CC, the 9-2 brigade completely fail to kill, immobilize, or hurt the feelings of the T34 in 2S6. I don’t know if they’re afraid of it or are unclear of the concept of “Close Combat”.”
Russian Turn 6
“Rindis wastes no time and engages a MkIV, hit with ROF but doesn’t kill, hit again but doesn’t kill, then decides third times a charm, Intensive Fires, and smokes it. Gah! but expected.”
“More Russians move onto the hill in movement, and I nail a SU122. The remaining two move up to Hill 621, ready to engage my StgIII and the infantry. Unexpectedly, the infantry in 2Q10 doesn’t enter the T34 as an improvised crew, which would have been a nasty piece of work. The second leader dies on a k/ result, which leaves just two Russians leaders on the board and none south of the Q hexrow. That’s a huge boon for me, as Rindis just isn’t able to rally the units I break anymore. And a broken unit is as good as a dead one. The T34 in 2S6 tries to escape, and after much rules consultation as neither of us have seen this before, I do a Reaction Fire attack and set the T34 alight. Additional smoke – not good. Burning woods restricting Russian advance onto the hill – excellent. In my second best showing with a 1 ROF weapon (the best was 6 shots with a Tiger I), my MkIV on Hill 538 fires four times, shocking, then killing, the last T34.”
“Turn 6 ends with me still fairly confident in my position. The arrival of the SU122s at the base of the hill isn’t good, but I have an opportunity to take one out in my Prep and both OBA modules are functional. Next turn I plan to try a flanking maneuver around the southern side of Hill 621 and add some pressure to make his job a little harder.”
iamspamus commented:
“Guys, this is one of the best AARs I’ve read. I like the back and forth comments and the maps. I could only give you reps once. Thanks and keep these great AARs coming.”
“P.S. What pack does this scenario come from?”
rustyshields answered:
“Scenario E is part of the ASL Classic Scenarios pack, available here along with a few other things. http://www.multimanpublishing.com/downloads.php”
“Guys, this is one of the best AARs I’ve read. I like the back and forth comments and the maps. I could only give you reps once. Thanks and keep these great AARs coming.
Thanks!”
“I feel that a good AAR really needs a screen capture of some sort, or it’s too hard to follow the scenario. Rindis’ amazing job of mapping out the moves really show the action. Thanks for all the work you’re putting into them!”
I feel much the same way. But… this one’s a little too big for the amount of detail I’m putting in. It takes quite a while to do one of these posts, which is why they’re running behind the game. (Hint: it’s already over. :))
Patch got a squad back on self-rally as well as Mr. 10-3. I naturally was unable to rally a thing. Patch called down his big OBA on 4P5, and missed by a hex, thankfully sparing the MMG crew in Q3. However, the 9-2 and and 2x628s in P5 all broke, the latter two both ELRing on a 4MC. A HMG shot CRed a 628 hiding under the abandoned T-34 in 2Q10 on a ’12’, they went away on a second shot, and the 447 sharing the cover with them broke. His attention then shifted to 2L8, where two squads promptly broke. Further fire broke one of the squads in M7, and the squad stuck in V7.
I had already started to give serious consideration to conceding, but I still had just enough to be able to give it a go. This kind of attrition on my squads was something I couldn’t take considering how rough the game had been on my leaders (2/4 left, both broken).
On the other hand, he malfed the MA of his StuG on an IF shot at my SU-122 in 2K9. A shot from AA8 Immobilized it though.
The best sign of the worsening situation was probably when Patch re-occupied his foxholes in 2S7. He mostly just fiddled around with his defensive line, though the PzIII moved into a flanking position of 2K9. Without mobility or a turret, there was nothing I could do about it. One of his HTs began a long flanking maneuver into my backfield.
The other SU did get a good hit, and killed his 8-0 OBA observer on a ’12’ and failed wound check, and I assembled the .50-cal.
Situation, end of German Turn 7 MPh.
German Turn 7
“Things are looking up! Most of Rindis’ armor and leaders are gone. However, his two SU122s are at the base of the hill, ready to start clearing a path. If he hits that 24 (+0) is nothing to sneeze at.”
“First priority is the .50cal HMG and 9-2. 8FP (-1) is also worrisome. I target an OBA and miss, but catch the 9-2 and two 628s, breaking all involved. Woo! An HMG takes away the threat of a HS manning the abandoned T34 in 2Q10 by breaking all occupants. The StgIII facing down an SU122 fires, bounces an AP off the glacis, thinks for a bit and Intensive Fires. Gun malfunction!!! That’s bad. It’s my only 75L on that side of the board. I try a long shot from 2AA8. It’s clear, but still a frontal shot. A hit, and I immobilize it! That’s a huge downer for an SPG, as my MkIII can now try for a flank or rear shot with impunity. The MkIV in 2R2 fires and breaks a squad in 2V7.”
“In movement i reoccupy 2S7 with a squad and LMG. The MkIII moves to 2E8, a ht moves to 4Y2 with the goal of getting the broken crew in 4S2 back under DM in Advancing Fire (which I plum forgot to do). A 447 heads to 2T5 to cover the road and close off any attempt to get around my rear with his infantry, and capture the broken Russkie in 2U5. Even more units move onto the 2J4 heights, daring Rindis to show his head.”
“In Defensive Fire RIndis shows just what the SU122 can do when he nails my 8-0 observer, and I help things along by rolling a ’12’, then failing the wound check. Damn. With my need for the -2 and -3 leaders directing fire, that radio isn’t getting manned anytime soon. The immobilized SU122 in 2K9 fires at infantry on the hill to no effect.”
“My goal this turn was to rebuild my line, and try to counterattack with my lighter vehicles. Getting ht in the backfield will inhibit his routing abilities, and there’s also the potential for encircling fire. With the loss of the SU122’s mobility, there’s little he can do at this point to stop it. If he can get a few more hits like he did with his SU122s, though, I may be forced off the hilltop. I think it’s my game, but I have learned more than once that you can’t take anything for granted in this game.”
Things got a little better during my RPh, as the StuG in 2M5 disabled it’s main gun, Recalling it. However, I still failed to rally anything, including my leaders. I just couldn’t roll lower than a ‘9’.
The covering fire from the still mobile SU did well, burning the HT in 2N5, and the immobile one broke the 10-3 again, and caused the 838 with him to break to a pair HSes. Then the MMG in 4Q3 broke a crew manning the HMG in 2P6 (but failed to affect the crew of the ATG).
Between that and the smoke in N5, suddenly his defenses didn’t look so overpowering anymore. It was a shame I had almost nothing left to take advantage of it with. Better yet, my Berserk HS got all the way into 2P5 before being eliminated by a 30FP -4 shot (3KIA), on his fifth DF shot.
If I’d had a real force left, now would be the time to knock him off the hill. But I only had a squad and a half near the main ridgeline. And six broken squads. All I could really do was continue to try and concentrate what I had left into the area.
All of this couldn’t keep him from killing the immobilized SU in his DFPh of course.
Situation, end of MPh, Russian Turn 7.
“Gads, this is gone on so long I’m losing track of what’s transpiring. I don’t have all the logs saved, either, so it’s hard to review the game.”
“Russian Turn 7. Gee.”
“My 10-3 is proving that he was promoted for political, rather than talent, reasons, as he breaks. Again. And his 838 tumbles along with him when it fails ELR. A covering ht burns in 2N5, which isn’t a big FP loss, but it’s a heaping load of cover for him to advance up the hill. The crest of Hill 621 is proving untenable in the face of those 122mm guns.”
“In movement his berserk HS resumes its charge towards my ATG and eats an enormous amount of FP before finally dying. I’m glad he’s dead, but there’s precious little left to fire now for anyone doing a follow-up. More units shuffle towards the 2L8 woods, identifying Rindis’ axis of advance. It’s not a bad route. I have no LOS from Hill 538, a lot of it’s blocked from the Hill 621 crest, and I can’t get OBA on that route. Good news is there’s not a lot of squads to head up that way.”
“Defensive Fire marks the loss of the immobilized SU122. Given the amount of fire the berserk unit absorbed, there wasn’t much else I could do and the rest of Rindis’ units survived.”
“Turn 8 next, and I get another AFV on board. My plan is to run the MkIII and some hts around both flanks, putting units under DM, encirclement, and blocking routs. I don’t think Rindis is gonna win this one.”
For German RPh 8, I got back one of my leaders (and the HS with him), and a crew. Patch self-rallied an 838 and the 10-3 (and a HS with him). Since the radio for the 100mm OBA was sitting unattended, the bombardment from there let up. The 80mm drew a black card and called for artillery on top of the HMG in 4P1, but it went wide, with the SR landing on P6. Prep fire managed to Pin 4P1 anyway.
Patch shuffled things around some more, and his vehicles came in for the counterattack during his movement. I didn’t properly appreciate the troubles he was giving me until one of his HTs fired at the MMG crew in 4Q3 from the wrong side of the hedge and broke it. Not only did he have HTs in my backfield, but they were going to pick off all my remaining fire support at that rate.
My defensive fire (what little there was) didn’t do anything, and his StuG that had just arrived on the crest knocked out the T-34 that had been sitting abandoned in 2Q10, so I’d never get a chance to re-crew it.
German turn 8, beginning of DFPh.
On my turn 8 rally, I finally got exactly what I’d been hoping for for some time. I got a ‘2’ on my 1st MMC rally, bringing back an squad with LMG in a hex with two other broken squads and generating… no leader at all.
ARRRGH! So close!
Also, the 9-2 stuck in the middle of board 4, and under DM thanks to one of the HTs managed to self-rally, and bring a squad with him. Patch recovered an abandoned HMG in 2P5. Prep was limited to the HMG (cower, NE) and a squad in 2R8 who both tried to suppress the HMG and ATG in P5 and failed.
I continued to try to trickle men into the M7/N6 woods area, only to see a HS die and and Hero wounded, and my Fanatic 628 Pin on their first hex of movement.
The 9-2, not liking the looks of things decided to go after the SPW 250/1 before it made an even bigger mess of things before the SR turned into an FFE concentration to spoil his day. I had a decent route, but forgot about the other HT in 4J3, who pinned the squad in Q5. The leader decided to go it alone, and promptly broke on a NMC in R5. This at least prevented the HT from interfering when my crew went over to recover the MMG in Q3.
I tried moving my 8-0 and HS back into the main flow of battle. From 4T3, they survived a 1MC in 4Q2, only for the HS to die and the leader break on a K/2 in 2P10, only two hexes short of the goal in N9 (the 8-0 would have advanced into the building in M9, which had three broken squads in it…).
And last, the last SU poked it’s nose into LOS of more of the ridgeline and was shocked before it could get it’s shot off.
Patch corrected the SR to the MMG and broke the crew, as well as eliminating the adjacent broken HS. He then took his remaining ROF shot at the SU and burned it. Further fire broke the squads in 2J6, M7 and R8.
At that point, with four unbroken squads (one of which was pinned), and no AFVs left, I conceded. I had been contemplating it for some time, but kept stubbornly going. The fact that I half cleared him off the ridge on my turn 7 showed that that was the right thing to do, but at this point it was well and truly over.
There were a couple of truly poor moves I made, but a fair chunk of my problems came down to some truly poor luck. I lost leaders fairly quickly, which is something that this scenario is not friendly to. The muff with Patch’s tank entry probably also hurt, as a duel as he attempted to get out of the clear areas of board four would have favored me more than the actual hide-and-seek game around Hill 538. In the end though, part of my problem was hurrying a little too much. The initial dividends on board 4 were worth it, but I just could never properly challenge him on Hill 621. Also, somewhat more conservative movement might have saved a leader. Then again, I didn’t consider anything I did with my leaders that risky….
German Turn 8
“My 10-3 came back up quickly, but only one of the 338 HS rallied. I need the 10-3 on the line more than i need the HS, so I plan on abandoning him to self rally assuming the game goes to Turn 9.”
“I Prep Fire to tray and take out more of the troops in the J6 woods, pinning one and breaking another. The .50cal in 4P1 survives but is Pinned, which is good enough for now. The Arty I tried to drop on it’s location falls in 4P6 instead, placing it near the 9-2. Not a bad spot either, really. Way over in 2BB6 I try to Entrench with the remaining radio stack for some cover.”
“In Movement I embark on the big pincher maneuver, and get two halftracks and a MkIV into the backfield of board 4. This is going to make Rindis’ routing difficult, if not impossible. I survive defensive Fire intact, and in a feat I’ve been trying to do all game, I frontally kill the immobilized T34 in an Advancing Fire shot. Now the fear of the tank being remanned is gone.”
Russian Turn 8
Rindis almost generates a leader, which certainly would have been helpful but I think a lost cause at this point. He simply has nothing left. He tries again to move up the L8 woods, but there’s to much fire pointed his way now. There’s a valiant attempt to take out my ht in 4S6, but the 9-2 and company just can’t go the distance and all break. A bold move by his 8-0 to run across the open base of hill 621 to M10 almost succeeds, ending Rindis’ hope of getting those broken troops into battle. The SU moves up and is promptly stopped with a Shock result, then killed in Final Fire. At this point, Rindis concedes.
Reflections
“It’s certainly an interesting scenario. I can’t really take credit for winning this one given the huge entry error I had with the MkIvs. Those damn T34s caused me fits, as the entire game I bounced shells off their frontal arcs. Those tanks are tough! The Russians certainly have an edge in the tank department in this game. If I had done this properly, it certainly would have been a different game.”
“I had expected Rindis to hold back his SU122s and smoke the hell out of the ridge line. Thankfully for me, it didn’t happen. Cover is what’s needed against those HMGs and -2/-3 leaders, and there just isn’t any out there.”
“It’s not a bad scenario, but every time I’ve played it I’ve run into the same problem — too many broken Russians, not enough leaders, and the assault peters out. I think the key is to rush across board 4, regroup, and then push up the hill. Trying to do it right away seems to lead to tiny packets of infantry that aren’t enough to dislodge the defenders, but simply add to the mess of broken squads.”
Matt Romey commented again:
“Great AAR, guys. As I said in a previous post, the tank battle determines the fate of this scenario more often than not. Not to rub it in, but I think the entry error of the panzers gave the Germans a distinct height advantage in the armor battle from which the Russian was never able to overcome. Committing the SUs to the fight was a desperate measure that resulted from having no real effective armor left. If the Russian had won the armor fight, then it would have bought time for the Russian infantry to regroup and assault the hill in more than a piecemeal fashion.”
“This is my favorite scenario of all time. It was fun just watching you guys play. Awesome.”
“I think so too, especially given the tremendous difficulty I had killing the T34s. Still, it was a fun game.”
Postscript:
The latter part of this game was a large drag for me as I tried to keep getting further forward with ever-diminishing resources and never quite getting the moderate-odds chances I needed when I needed them (still had some fairly serious good luck at a couple points though). It also showcases the problems of the detailed reporting model I had moved to at this point, as the graphics just take a lot of time and work to put out. This report dragged far behind the game, and this sort of problem continued through all the later games, eventually driving me to stop reporting at all for a while.
It would have been interesting to see the intended board 4 armor fight in this game. I’m certainly not the best at handling armor, so it may still have gone poorly for me. On the other hand, it probably couldn’t have gone much worse than the actual results. I was fairly happy with the turn 4 plan to drive him off the smaller hill, but Patch just blew it apart with kills and immobilizatons over the next turn or so. If that had gone slightly more my way, that alone could have had fairly decisive effects.
Discussion ¬