
A32 Zon With the Wind
“Zon With the Wind” always looked like an interesting scenario to me. Actually, it always made me think that it’d be at home among the Paratrooper set, except for being set well after Normandy. At any rate, it turned into one of our bigger projects, as we went through the entire Market-Garden set from Annual 91, though we didn’t formally make a ‘campaign’ of it. We stepped off in June 2009…:
Okay, I still need to finish off the tale of our last game. But I’m going to try to pick at that while keeping up with this one.
After some hemming and hawing, Patch decided upon the Germans in “Zon With the Wind” (from a list of suggestions from me). I’m thinking we may very well go through the whole A’91 Market-Garden set, though I don’t know if we’ll do the ‘CG’ bit, or even stick to the same sides each time.
I have to say, tonight is not anything I’m going to celebrate as wonderful tactical acumen from me. While thinking through the scenario, I remembered the fact that I could deploy, and had good smoke capability (which certainly was not true last game). But I forgot both of them until turn 2. It sure would have helped on turn 1.
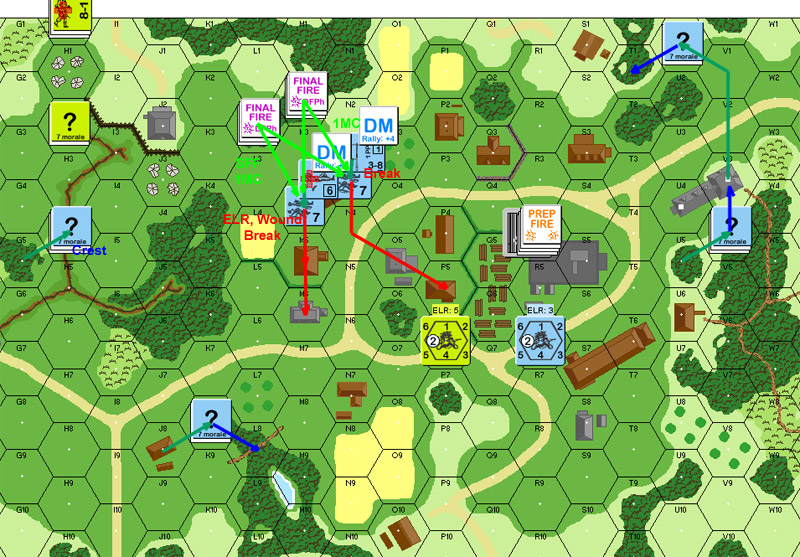
So, I went in with no scouting HS, and no smoke. Thankfully, the dice weren’t too kind to Patch, and one squad walked through a couple shots unhurt. My leader stack was going to head to J2, a nice, safe point from which to overlook the battlefield. Patch put down a FL, which did nothing. Then he revealed R4, which I get the idea he wanted to still be concealed for turn 2. He got a K/1 on a long-range shot and managed to wound the leader and break the squad. All things considered, not too bad a price for the muff. And as a last bit of luck, a squad in H2 managed to get ‘?’ while out of LOS, but not in concealment terrain.

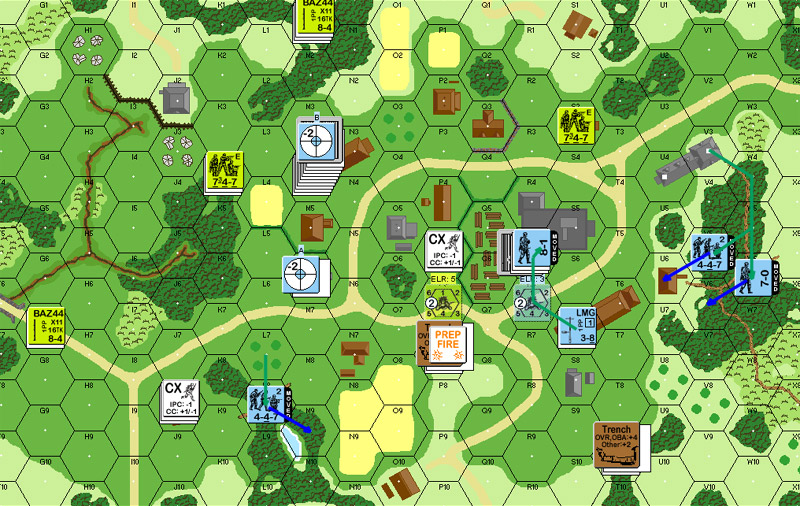
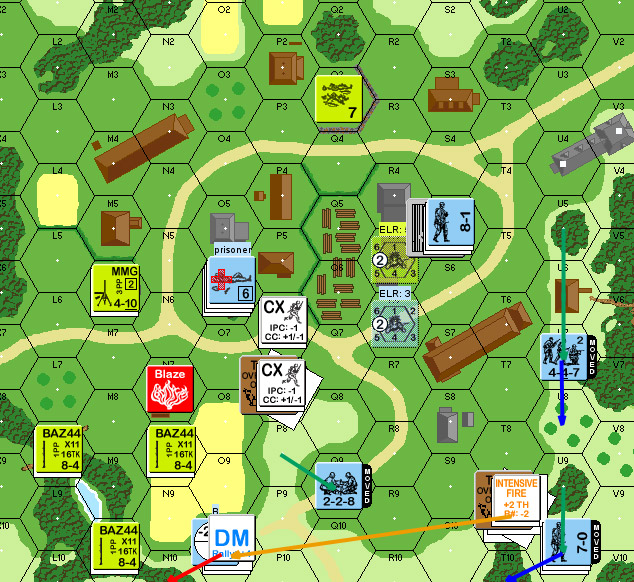
Situation, end of American Turn 1 MPh.
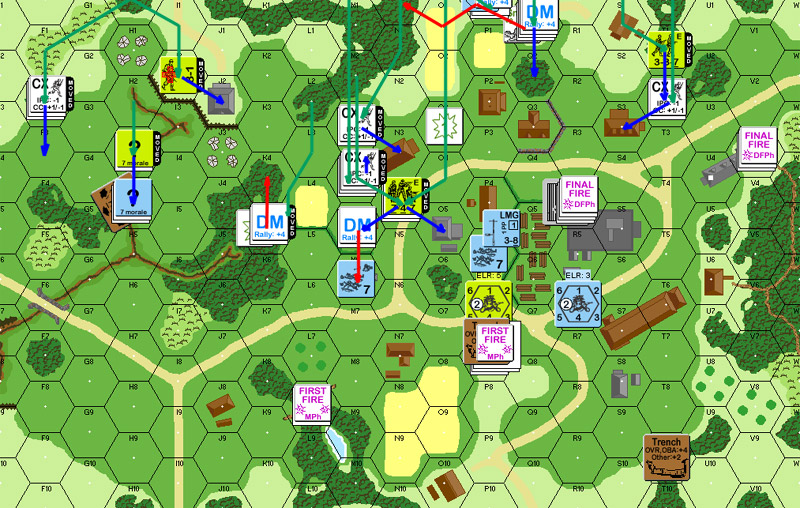
The German turn 2 got exciting. R4 fired on M2 to no effect. Patch then got aggressive with his east flank, sending one stack to the edge of the American turn 2 entry area, and another stack shifting position into its former location. One thing you’ve got to give Patch: he makes a wonderful German small-unit commander—he’s as aggressive on the counter-attack as the Wehrmacht could hope for.
He next tried to empty out building M4, but that was the entire reason why I had two adjacent squads of paratroopers across the way. With some hot dice, I broke both squads as they tried to move, and a ’12’ caused the 7-0 to ELR to a wounded 6+1. The dice are definitely trying to make up for my blunders. He also sent his west-flank force into Crest Status at H4, which complicated what I wanted to do.
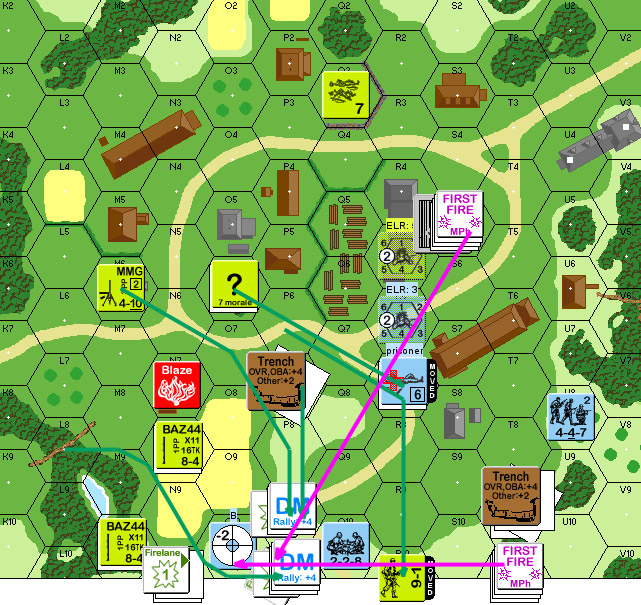
Situation, end of German Turn 1 MPh.
I took some time to figure out how I wanted to arrange my turn 2 forces. I also recalled that he had 5 dummy ‘?’. I realized that the T1 stack was probably a bluff as was one of his two flanking forces.
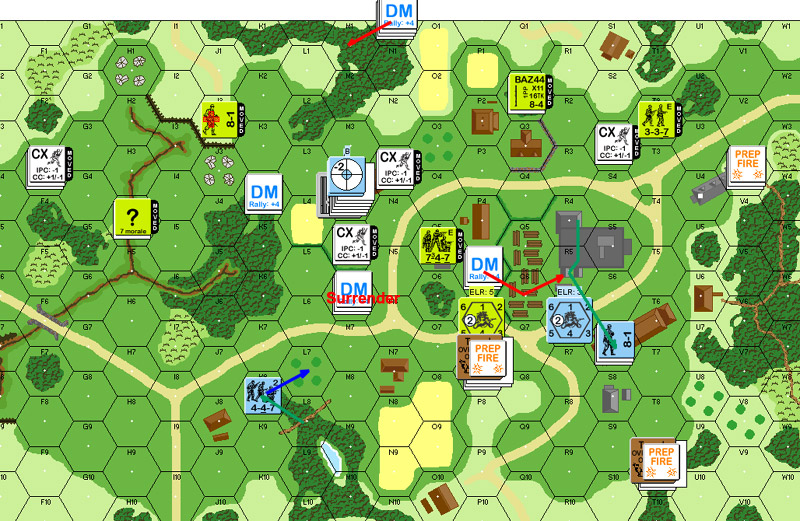
My broken squad came back, setting me up for a fairly active turn. The first thing was to send a HS into T1, which, indeed, was empty. My first attempt to press into his broken troops was repulsed when Patch revealed L6 and broke my squad in Bypass of K5. Suspecting that Patch hadn’t put all his Dummies on the same side, I advanced the recovered squad to the rear-side of his Crest Status counter, and then advanced my concealed squad up a hex. When he refused to even strip concealment, I was as sure as I could get.
My attempt to push in the center didn’t go so well. I smoked Q1 from off-board (planning to Advance in if the roll went badly), but fire from R4 still broke my leader, though it didn’t affect the squad.
My last move was not so good. I moved from O0 (offboard) to P0 and promptly got fired on by the first 88, which broke the squad. I was trying to save the extra 0.5 from O1, even though it wouldn’t have mattered. Bleh. 😛
I advanced a squad, leader, and dm MMG into N2h1, where it should prove an annoyance to Patch. My concealed squad in the west found that indeed there was no one home. And my main forces were well into the hole I’d blasted in Patch’s defenses and re-DMing everything in sight.
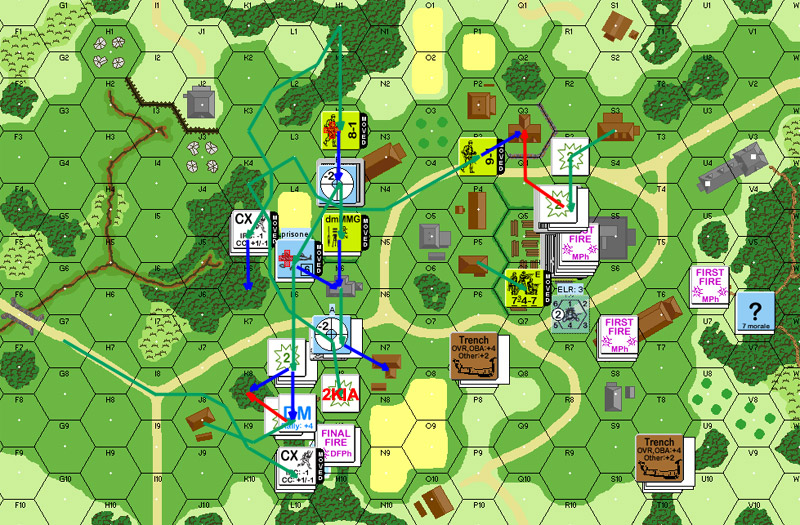
Situation, end of American Turn 2 MPh.
Tork commented:
“Fun story so far. Was the first 88 under the trench in P7? Interesting hearing about the Germans counterattacking–my experience is that those German squads are needed to choke off the exit zone.”
“I really like that Market Garden series of scenarios. There are definitely worse ways to spend your days.”
klasmalmstrom pointed out:
I smoked Q1 from off-board (planning to Advance in if the roll went badly),
“…I don’t think you can place Inf. Smoke from offboard.”
“A2.52:”
“…No action is allowed by units offboard awaiting entry…”
“A2.51 allows you to move normally offboard, but only to enter an on-board hex that is not adjacent to the one set up in.”
Blah. I thought something seemed funny when I thought of it, but Patch didn’t object, and his rules memory is better than mine. Maybe he was just stunned that I thought of using smoke at all.
Getting off the edge of the board can be a challenge in this one….
Tork, you’ll note he ‘counterattacked’ with a dummy stack. I quickly started realizing that’s what it was, but it sure made me think…. (Though, 4-7 CC odds is not something he can afford to invite.)
And yes, the ‘first’ 88 is the stack under the trench in P7. The second is obviously in T9. Both reasonably standard places for them, as far as I can tell. My problem is that the squads that are taking the hits and getting delayed are the ones with bazookas. That could get important later.
Blah. I thought something seemed funny when I thought of it, but Patch didn’t object, and his rules memory is better than mine. Maybe he was just stunned that I thought of using smoke at all.
“I’ll forgive that error, given my blunder of entering reinforcements on the wrong board edge last game.”
German Set-up
“Hmm. Hmm. And hmm.  I’m always lousy and predicting where the game will be in the next turn or two, and in a scenario like this, which is essentially a fall back defense as I trade space for time, you need to be good at it.”
“Where to put the 88s? The lynch pin to my defense, and the only units which will trade blows toe-to-toe with the Americans. I choose P7 for it’s command of the entry areas and board center. A little far forward and at risk of being flanked if Rindis goes wide, but I think it’s a good spot. The second is more difficult, but I chose T9 for its coverage of the exit areas. Unfortunately, the S7 building blocks a lot of my LOS, but it will work as the last layer of my defense.”
“The rest of the infantry is a bit scattered as I search for those -1FFMO shots if Rindis gets lazy. I occupy both upper levels of building M4, and another FG goes in the upper level of R4. Dummies go on the flanks in G5 and V3. V3 has the immediate plan to move to T1 on turn 1 to make Rindis a little nervous about his turn 2 reinforcement entry. Not likely to be a unit, but he can’t assume it’s not a HS either. A squad goes in J8 to cover the right flank and center as my reserve.”
US Turn 1
“Rindis moves a unit to L1, which catches fire from M4 to no effect. A second squad works is way into the H1 crags as he seeks cover of the gully, and then a leader and squad waltz right into I1. Initial fire from N3 does nothing, but long range fire from R4 gets a K/1 result on a 2 (-3), which wounds the leader. With no one left to fire, Rindis safely moves a second squad up to K2 with an advance into L2. Not a bad start.”
German 1
“R4 fires at M2, hoping to break the squad and let me escape from the M4 building, but to no effect. Not wanting to be stuck in the road, I move normally down the stairs in N3 and break under fire of a 12 (+2). Thinking that improves the odds of M4, I move them downstairs and get nailed with a 6 (+2) that CR’s the leader into the ever-helpful 5+2 and breaks the squad. Turn 1, and 40% of my force is broken with little hope of rallying. I move the dummy up to T1, and the other dummy into crest status in H4. Both LMGs are out, but I suspect Rindis isn’t counting counters, and this may still be a 7-0 and 447. My reserve squad moves to L8 to cover the O4 to N6 road, and the 7-0 and 447 in U5 move to V3 to cover the northern road.”
US Turn 2
“Rindis rallies his broken units, who sally forth. Rindis challenges the H4 dummy stack by moving right next to it in OG with concealed units. Drat. Along the northern edge, a scouting HS moves into T1 revealing that dummy stack as well. Smoke is placed in Q1 (since revealed to be illegal), to no avail as I break the 9-1 that enters with a squad. I break another squad bypassing K5, the 88L in P7 nails a squad in P0, but I can’t stop the other units that heading into town. Rindis is posed to get all my units back under DM (as I expected), and that hole in my left flank is getting bigger as the 9-2 sets up shop in M4 with the MMG.”
“I have several “move or shoot” tough decisions in my turn 2. V3 is facing an 8FP +4 if he stays, but has the opportunity of placing the 9-1 and squad that routed to N0 under DM if I stay, keeping them out of action possibly into turn 3, which is huge. R4 is due to be surrounded unless he leaves, but that 9-2 is a heck of a threat against my 88 in P7. And poor little L8. I have no clue where to put him as he prepares to face down three 747s, and there’s not a lot of wiggle room left for him.”
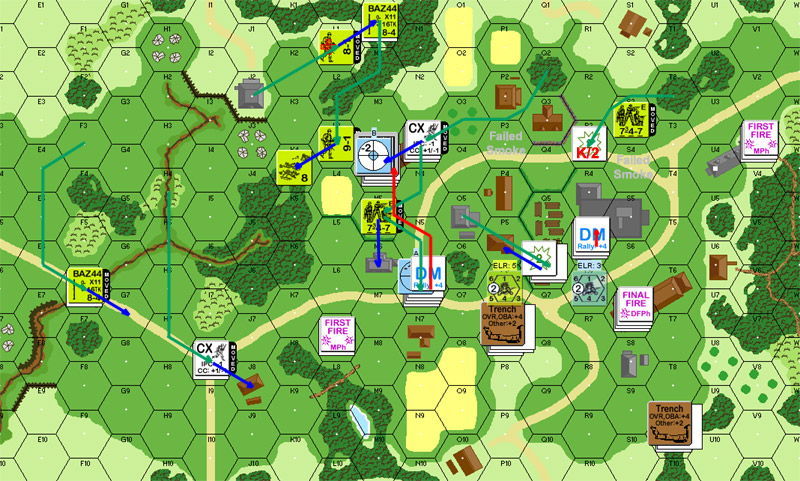
Patch immediately Prepped with both 88s at M4h1. He wasn’t able to do more than Pin the leader, but the squad double-broke, making the MMG useless for a bit, and showing just why it’s dangerous to let both concentrate on one high-priority target.
Other than that, it was a quiet turn. I accepted the surrender of the squad and wounded leader in M6. I didn’t want other squads running away if they’d otherwise surrender, and who knows, I might manage to exit them for bonus EVP. Patch also bugged out of building R4, which was getting a bit hot.
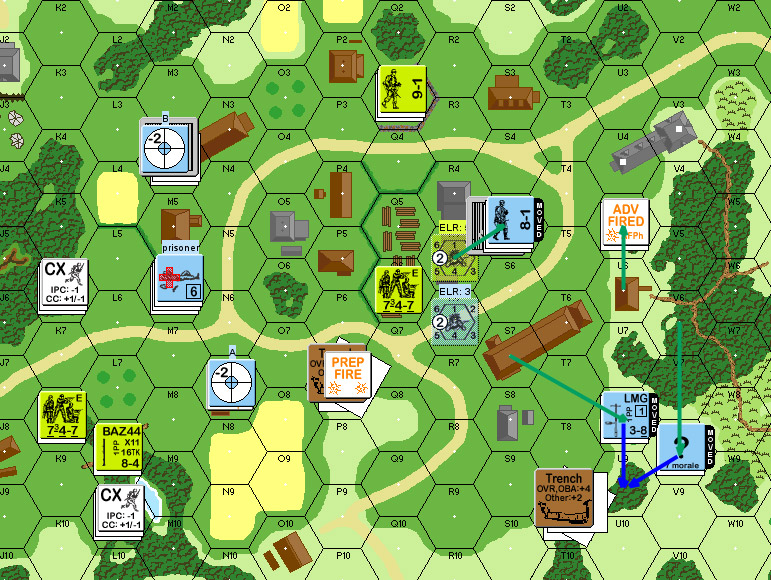
Situation, German Turn 2, beginning of AFPh.
Naturally, nothing came back in my own RPh. As I shuffled units about, I tried covering my left flank with some smoke, but a ‘6’ put an end to that, and the HS over there died from a lack of cover. I had hoped to pincer the remaining broken German squad between him and another squad, giving him nowhere to go (I forgot about the second level of R5, of course). But now I could only force DM.
Up the middle I moved the HS with the prisoners as human shields into the open at N6. Not that I thought Patch would avoid firing at them, but it would take a 3KIA to guarantee eliminating the HS. L7 fired to no effect, and then the 88 got a CH, which disrupted my HS, and reduced the prisoner squad to a HS. This was good enough, as it allowed my right flank to move more freely.
All-in-all, the turn went well, but it was marred by an oversight. I pulled back out of Q6, thinking it looked a bit hot. Notably, I was worried about the 88 in T9. Likely, the building in S8 would block LOS, but that’s the nature of a string of mistakes I started making at this point.
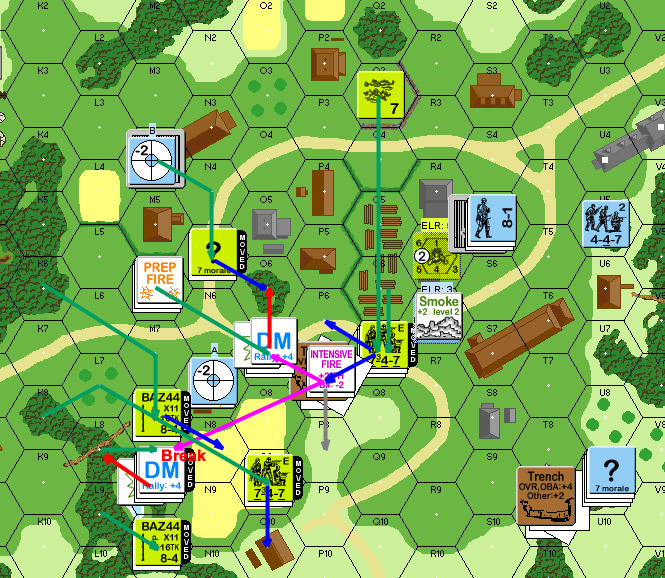
Situation, American Turn 3, end of DFPh.
At this point, I got most of my troops back, rallying 2.5 squads and the 9-2, only missing the HS that had gotten shot up last time. Patch only prepped with one 88 (the other having no targets), got one hit, but the squad passed the resulting MC.
Patch shuffled his forces around, pulling out of V3 to reoccupy U6, with the 7-0 backing him up in V5, in case something should happen. The annoying part was he sent his 8-1 leader back into R5, as I had no LOS to the area, and he could rescue the squad that I’d just let get away.
The captured HS made its TC to try to escape from my still-broken HS. This lead to a rules quandary that we never did adequately resolve. He attacked the HS and failed (barely…). The ultimate question was whether that produced a Melee situation. A20.55 kind of implies it does, but then you get all sorts of further questions. Considering that there’s a squad and a half in perfectly good order, prisoners trying to escape should be relatively easy to round up, but there seems to be no Inexperienced Personnel bonus to capture them (even though they would become such if they rearmed themselves…). I’m wondering if a failed attempt to get the guards even causes Melee at this point. At any rate, at greater than 10-1 odds, I recaptured them anyway. (Which caused the question of, if there was a melee, and the other troops did need to attack them in CC, have they now swapped guards?)
Situation, German Turn 3, beginning of AFPh.
“Gah! Switch gears now. The Russians are gone, and it’s back to the western front.”
German Turn 2
“The 9-2 and MMG are in M4h1, in LOS of both 88s, so why not? Both fire and score hits, resulting in a broken 9-2 and a broken 337. In movement I bail out of R4 as I’m close to being surrounded (and the key to a fall back defense is, well, falling back). V2 will be able to cover the 4-row road, and in S7 I can cover the other approach and the 7-row road. I move a 447 to L7 to cover H7, which I expect Rindis to enter, and to cover the western flank. Not a good position, but with two squads down it’s hard to get into any good positions now. Defensive Fire has no effect. In Rout, I lose both units in H6. Damn damn damn.”
US Turn 3
“Rindis has an excellent rally phase and fails to bring anyone back.”
“Rindis tries to screen his advance with smoke and fails. I kill a hs in R3, and when Rindis gets a little ballsy with his hs and all my prisoners, I drop an HE shell in the middle of the N6 crossroads with a Critical Hit which breaks everyone, reducing the prisoner squad to a hs. The fire he draws opens up his western flank, but there’s nothing I can do. There’s too many Americans and too little me.”
“Oddly, in Advance Rindis moves back from Q6 to P5. A move into R5 would put in in a stone building and out of LOS of the 88, and would put more pressure on the broken 467 who crawled upstairs in Rout. Heck, even staying in Q6 would be good as the 88 can’t hit him without changing its CA, which then means I’m ignoring the two platoons bearing down from the left if I turn to engage. Instead, he moves to P5, which is back into my covered arc. Plus, the way is clear for me to move the 8-1 into R5h1 and rally the 467 with a ‘9’ or less, as there’s no one with LOS to replace DM. Yeah, not one of Rindis’ better plays.”
German Turn 3
“With everyone out of LOS, Rindis has the Rally phase he needs and a lot of green is back in action. For Prep I fire the 88 at M6. P5 is a better shot, but I need to break M6 to free up an escape route my 447 in L8. I fire to no effect, and it’s too damn early to risk a Gun with an IF shot. In movement I abandon V3 for U6 (Rindis can’t go around and still exit at this point), and work the 447 to M9. I do not expect him to live next turn, though the L9/M9 pond does give him a fighting chance. Rindis fires a lot at the 88 in P9, but he’s dug in well and shrugs off the attacks. In Close Combat the T9 88L regains concealment, as does my 8-1 in R5h1.”
“Yeah, we did have an odd prisoner event this turn. With the guarding hs broken, my hs passes his NTC and tries to escape. I fail to kill the 337 (miss by 1!), and Rindis attacks back with his 9-2 and a fistful of infantry and recaptures him with a GO unit. Legal? No idea.”
“In turn 4, I expect Rindis to take the western half of the town center, and be into the K8-M9 woods. He’s still too far back to exit on turn 5, so this will go down to the wire on turn 6.”
Mudd commented:
“I played this one last month and placed my 88’s in the the same locations as you have Patch. I image you’re a brilliant man. ;)”
“That depends… did you win?”
Mudd:
“Oh yeah!”
“My 88 in P7 went on a couple serious rate runs.”
Among the things that I screwed up on during German Turn 3, was assembling the MMG. It was about to get into position, and I intended to do it, but the fact that I didn’t do anything else at that location during DFPh (nothing in LOS), meant I forgot about it.
Patch showed that my gaffe in the center of town wasn’t going to go unpunished when the squad in R5h1 promptly rallied at the start of my turn.
The general plan was simple enough: surround and eliminate M9, and try to do something about R5. This, of course, proved difficult.
First, I missed some of the terrain in the area. Namely, there’s a little sliver of water between L9 and M9, so you can’t move directly between them. So, moving a squad in there did me little good. Worse, they were CX to get that far, so they couldn’t get up the hill into M10 on Advance either (4MF). So, then he broke a squad in L9, and rolled snake-eyes for a 2KIA on a FPF shot to kill a squad and send himself Berserk on the HoB.
At R5, I brought a squad up to R4h1, and a ’12’ on a MC sent a HS scuttling back out. My first instinct was to bring the 9-1 leader over to help get them going again; it was only after I did it that I realized what a colossal waste it was going to be. Past that, all I did was bring the squad in P5 back over, not quite daring another good defensive shot with no backup nearby.
Just to make sure I knew I was having a bad turn, I rolled three ’11’s in AFPh.
Situation, American Turn 4, end of MPh.
Patch led off his turn with a 1KIA hit on N7, wiping out yet another squad. The charge of the Berzerk unit ate up all the firepower in the area. I couldn’t get better than a decent MC, and he kept passing them. Finally, on the last shot, I got a 1 KIA.
Past that, the turn was quiet as Patch repositioned to cover the exit area more directly.
Situation, German turn 4, AFPh.
A careful look at things showed that I could technically get 7VP exited this turn. It only meant dodging two 88s, and two different LMG-armed defensive positions. No problem.
The actual main goal was to take out the 88 in P7.
I started with a smoke grenade in R7, which hindered a couple squads for almost any shot they could take, and advanced next to the 88 crew, out of CA, who ignored me. I then moved the 9-1 to join them after failing to get anywhere with the broken HS. This didn’t work out as he was CX to get that far, and I didn’t realize until later that he couldn’t advance on the gun since it would take 4 MF.
Moving the guard HS up to point blank in CA, ended up with the captured leader surviving another wound, and the HS breaking. With the normal shot taken, I decided to try for the exit with the least valuable part of the plan, and see if it got anywhere. The IF shot hit and caused a break as soon as they started. Nope, no exit this turn.
So, with nearly 3-1 odds in CC vs the Gun crew… Patch gets an ambush and promptly Withdraws out. Not good.
Situation, end of MPh, American Turn 5.
Patch lead off his turn with a couple shots from the remaining 88 at the squad and 9-2 in O10. The first shot only pinned the squad, but the IF shot managed to break both of them. Exactly the type of thing I did not need.
Other than that, he maneuvered to put everything into position around the exit, including putting the crew in Q10—right in the middle of the three hex exit area.
Situation, DFPh, German Turn 5.
The wind change roll for my last turn showed that the dice were determined not to let me win. 12—Gusts.
Worse, the 9-2 rolled another ’12’, wounding him, and ensuring that those three points were not going to make it. In fact, at that point, I had 10 EVPs in range to exit, four squads and the 9-1 leader. I first moved up a couple units that couldn’t make it up to draw some fire and restrict later subsequent shots. I lost a HS and drew a FL for my trouble. The first serious move was from L8 to P10, he made it through the FL, but then T10 nailed him and put down a second FL. I moved the 9-1 next, hoping to attract shots on someone with a higher ML, and was the only one who could make it out to the east of the Crew. He survived the FL, but drew no additional fire. So I charged the squad that had taken the 88 in P7, who promptly broke on a 1MC FL shot.
At that point, I conceded, as there was no longer any possible way to win. He hadn’t even needed to use the 88.
Situation, end of game.
I’d like to say he diced me, and he certainly did over the last game-turn or so, but a lot of this was due to a stream of small mistakes I kept making during the mid-game. I’m grumpy, because I threw away a perfectly good chance to win, but not frustrated like after some games where I just don’t see what could have been done different (thankfully that is becoming pretty rare).
Anyway, while we aren’t doing the actual ‘M-G campaign’ in Annual ’91, we are planning on playing the full set of Market-Garden scenarios from there. So next up is A33 Tettau’s Attack. I have to admit, despite the ROAR record we’re not sure how the Brits can win this one. We have played FtF before, though I can’t remember anything about it. The record shows I lost as the Brits, so we’re going to see if I can figure out how to lose with the Germans now.
Great AAR with some awesome nuances – thanks so much!
p.s. I’ve run into similar vagaries with Prisoners, CC, Melee, Escape, etc. That rules section needs to be re-written IMHO.