Rindis.com

All my hobbies, all the time
  • Home
  • My Blog
  • Games
  • History

Categories

  • Books (490)
  • Comics (10)
  • Gaming (911)
    • Boardgaming (669)
      • ASL (154)
      • CC:Ancients (83)
      • F&E (78)
        • BvR – The Wind (26)
        • Four Vassal War (9)
        • Konya wa Hurricane (17)
        • Second Wind (5)
      • SFB (78)
    • Computer games (161)
      • MMO (76)
    • Design and Effect (6)
    • RPGs (66)
      • D&D (25)
        • O2 Blade of Vengeance (3)
      • GURPS (32)
  • History (10)
  • Life (82)
    • Conventions (9)
  • News (29)
  • Technology (6)
  • Video (48)
    • Anime (46)
  • Writing (1)

Patreon

Support Rindis.com on Patreon!
Become a patron at Patreon!

Other blogs:

RSS Inside GMT

  • MEET THE ASSETS AND PERSONS OF INTEREST IN CHECKPOINT CHARLIE March 18, 2026

RSS Playing at the World

  • Playing at the World 2E V2 Arrives May 5, 2025

RSS Dyson’s Dodecahedron

  • Return to An-Nayyir’s Pyramid – Part 2 of 3 March 18, 2026

RSS Quest for Fun!

  • The Myth of Rational Animals November 23, 2025

RSS Bruce Heard and New Stories

  • Preview: The Iron Queen February 9, 2026

RSS Chicago Wargamer

  • The 2 Half-Squads - Episode 310: Cruising Through Crucible of Steel January 27, 2023

RSS CRRPG Addict

  • Game 572: The Elder Scrolls: Arena (1994) March 14, 2026
SF&F blogs:

RSS Fantasy Cafe

  • Michael Swanwick Guest Post and Book Giveaway February 23, 2026

RSS Lynn’s Book Blog

  • Can’t Wait Wednesday: Carry Me to My Grave by Christopher Golden March 18, 2026
ASL blogs:

RSS Sitrep

  • Cardinal ASL Sins March 18, 2026

RSS Hong Kong Wargamer

  • FT114 Yellow Extract After Action Report (AAR) Advanced Squad Leader scenario April 16, 2025

RSS Hex and Violence

  • This still exists? March 25, 2025

RSS Grumble Jones

  • 2026 Kansas City ASL Club's March Madness Tournament March 16, 2026

RSS Desperation Morale

  • How to Learn ASL March 16, 2025

RSS Banzai!!

  • October North Texas Gameday October 21, 2019

RSS A Room Without a LOS

  • [Crossing the Moro CG] T=0902 -- Rough start July 18, 2015
GURPS blogs:

RSS Dungeon Fantastic

  • What color is paut? Sigh. March 3, 2026

RSS Gaming Ballistic

  • Pigskin project (by Chris Eisert) February 28, 2026

RSS Ravens N’ Pennies

RSS Let’s GURPS

  • Review: GURPS Realm Management March 29, 2021

RSS No School Grognard

  • It came from the GURPS forums: Low-Tech armor and fire damage January 29, 2018

RSS The Collaborative Gamer

  • Thoughts on a Town Adventures System January 18, 2022

RSS Don’t Forget Your Boots

  • GURPS Supers Newport Academy #3: “Season Of The Witch” February 8, 2026

RSS Orbs and Balrogs

  • Bretwalda - Daggers of Oxenaforda pt.4 - Fallen King May 27, 2017

Two Rounds of Raphia

by Rindis on September 6, 2021 at 12:00 pm
Posted In: CC:Ancients

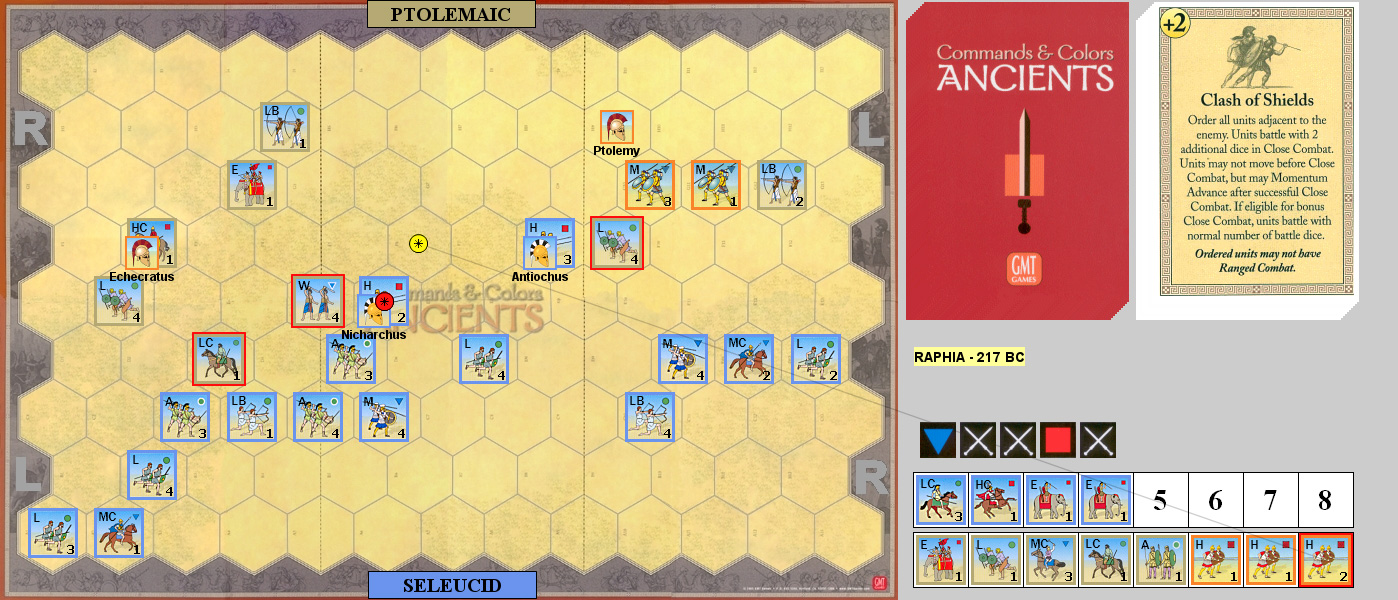
After finishing Carrier Hill, Patch and I did our usual between other games set of Commands & Colors: Ancients. Up this time was the Battle of Raphia from Expansion #1. This is a large battle, with armies stretching across the entire board, and going to eight banners. The mix is what you expect to see in an eastern battle, though perhaps with more heavy troops. No terrain, and no special rules at all.

Patch had the Selucids the first round, and started with Two Right, doing a block to my LB with a LC. I Ordered Lights, causing his LC to evade, and his LB to retreat on that flank. Patch Ordered Two Left, chasing off my LC who had advanced there. I Ordered Two Center to bring up some Heavies, and Patch used Inspired Right Leadership to bring up his Elephants, who did nothing even after a rampage on battle back, and his Lights got a ranged hit on my Elephants.

I Ordered Lights again, and killed his LC with a banner when he had nowhere to go. Patch used Leadership on the right again, bringing up his HC (did one block to my Lights), and his Elephants faced my Elephants for no damage. A Coordinated Attack let me deploy a bit more, but did nothing else. Patch then used Mounted Charge, knocking out my weakened elephants, and we both took a block to our Elephants on the other flank, while knocking out a Light, reducing LC to one block, and doing two blocks on a Heavy at a cost of a block to his MC and two to his HC.

Line Command brought up my center, and I finished off his HC as they tried to evade. Coordinated Attack brought in Patch’s Elephants again, and his center leader attached to a Heavy (the HC had been four hexes away from anyone the leader could fall back to). He forced my Elephant and HC back with a loss on one flank, and killed a MC when it had to retreat at the base line. Three Units Right let me get the shattered flank into action, and I got his Elephants in two attacks and forced his MC to retreat on momentum. Patch Ordered Mounted, but his MC did nothing and took two hits from my HC, while his Elephants did two damage to a Medium, and then a block to another on momentum, but the did a block in return. Order Four Left let me pick up the other flank, but completely failed to take out the Elephants in four attacks, taking two hits in the process. Order Heavy got part of Patch’s center in motion, and his Elephants nearly took out a Heavy (three sword hits; thankfully nothing on re-roll), but finally went down themselves.

I Darkened the Sky to do two hits to a LB, one to a Heavy, and one to a Light. Patch used Move-Fire-Move to straighten out his line, and did two blocks to a LB. An Order Two Right forced a Light to evade, and Patch’s Two Left did a block to my HC. Order Two Center brought up a couple units, and Patch Ordered Lights, forcing back the weak LB, reducing a LC to a block with a blocked retreat, and reduced a second Heavy to one block.

The remnants of my cavalry Mounted Charged, losing my LC to do one block each to a Light, Aux and LB. Patch Ordered Four Right, moving up a Heavy as well as a Med and MC, while his LB (thankfully) failed to take out a weak Heavy. Line Command got me closer, but I didn’t dare close with the weak Heavies. Patch closed the gap with Inspired Center Leadership, knocking out an Aux, reducing the good Heavy to two blocks, and finishing off the other two at the cost of one block. I used Clash of Shields, and only got two hits on a seven die roll, with the Heavies going down on Battle Back. 4-8

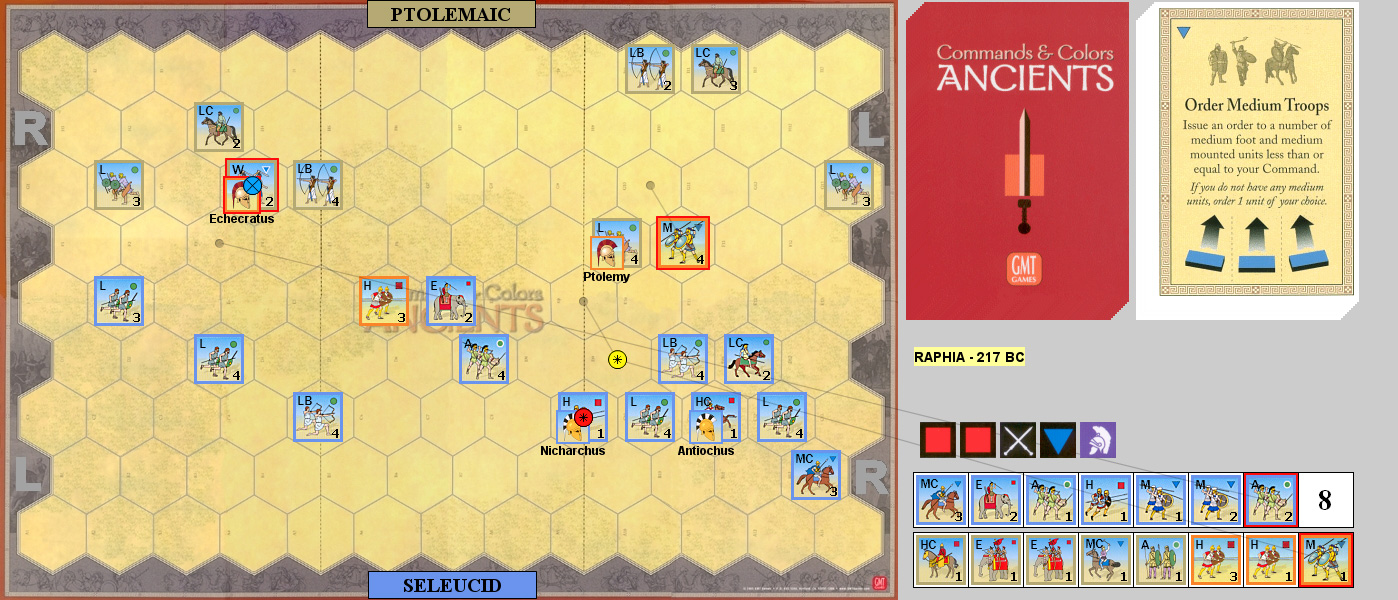
For the second round, I started with Order Two Left, and managed a banner against an Elephant, but the rampage didn’t do anything. Patch Ordered Four Right and did one hit to my Lights as they evaded. Mounted Charge brought me into contact on both flanks, and on the right, I did a block each to an Elephant and LB, forcing them both back, and rampage did a second hit to the LB. On the left, I killed a HC and his Elephants, but lost a MC in the process. Then Patch Mounted Charged, did a hit to my HC, but lost his remaining Elephants on battle back. Then he knocked out my Elephants and did another block to the HC, but took two hits on an MC in return. On the other flank he forced my Elephants back, but lost a Light block on rampage. Momentum did two more banners to the Elephants, driving them back to my line, but no other damage.

Then I played Clash of Shields (again! I almost never have a chance to play it!) to finish off a MC and force a LC to evade. Patch Ordered Two Left, to drive back my forward HC and LC. I used Line Command to bring the entire center forward, and Patch Ordered Three Left to bring up a LB and Warrior, and attach a leader to the latter (he had been with the HC). Move-Fire-Move let me deploy the flanks and did a hit to a Light and LC, and then left Lights went forward into contact to prevent ranged attacks at the remaining Elephants. Patch used Line Command to bring his center forward, and the LB fell back to take a shot at my Lights. I Counterattacked, bringing our main lines to two hexes away, and drove off a LB with archery. Patch then used another Line Command to get two units into contact, while the rest closed to one hex range, and did a hit to a Medium, and three to an Aux, but took three hits on an Aux himself, and two more on his Warriors.

I announced that I Am Spartacus, activating the Elephants, an Aux, Medium, and LB. Archery drove a Medium back a hex, while driving his Warriors to the baseline; momentum picked off a weak Aux, and then I took a hit and retreated my Mediums after a muffed roll (three triangles… versus a Heavy). Patch Ordered Three Center to drive his Heavies into my line, picked off a weak Aux, did a block and drove back my depleted Mediums, and did three blocks to a Heavy who couldn’t do more than force Patch back a hex.

I Ordered Three Left, forcing back a LC, and doing a single hit and banner to a Heavy with the Elephants, who then knocked them out on momentum. Patch Ordered Two Center to finish off the weak Heavy and Medium. I Ordered Three Center, doing two blocks to his led Heavy, in return for two on a Medium, and finished it off with the Elephants. Patch Out Flanked, knocking out the weakened Medium, and I Counterattacked, bringing the leader for that Medium back to the front, and doing three hits to a Medium who did two back, and did nothing to the Warriors who did two blocks to my Aux. Patch Ordered Mediums, and finished off the Aux, and then did one of two blocks to the weak Heavy who finished the game with a three-hit battle back (on one needed). 8-7

Afterword

This is a big demolition-derby battle, with the elephants and warriors adding just that bit of spice to make it really interesting.

Technically, I came out ahead in the first battle with Patch sacrificing the elephants and losing more than he gained. But actually my army was pretty completely smashed with key units weakened and all formation lost to scattered units. Things went bad in the second game as well when he smashed up my Heavies, and they didn’t do a thing. Patch had three good Heavies still, but that was about all he had, and when I started doing damage to them, the battle slipped out of his control.

└ Tags: C&C Ancients, gaming
 Comment 

Belisarius: The Last Roman General

by Rindis on September 2, 2021 at 12:00 pm
Posted In: Books

This is a slightly earlier book than Hughes’ works on the end of the Western Empire. Unfortunately, the main way this shows is that the Kindle edition has problems. This seems to be an OCR translation to ebook as there’s a number of repeating errors. The normal text seems to be in very good shape, but any time the text goes to italics it falls apart. Since there’s a lot of italicized Latin terms, this is a real problem (13 instances of bucellam compared with 7 for the correct bucellarii…). Interestingly, the italics are all present and correct, so it’s either fairly advanced OCR, or someone did go through it pretty well (I’m betting the latter), but doesn’t know the late Latin military terminology, and didn’t know better. On the other hand there’s occasional gaffes such as “twenty stades, approximately 2V3 miles,” so maybe not (I believe that should be “2 1/3″… but I don’t have a hard copy to check).

As for the actual contents of the book, its pretty good. I do think the later Western Empire ones a bit better, and certainly more valuable as going into subjects that are really short on focused attention. He describes the problems with sources well early on. The third chapter goes into the current organization and equipment of the Roman/Byzantine army of the Sixth Century AD, which is certainly handy for readers expecting old-fashioned legions, and lets him discuss how some of these units were being used. However, the equipment part is basically an Osprey book without the illustrations and photographs (there are some in a separate section, at the end for the Kindle version), and feels a bit summarized even from that.

The main part of the book starts with Belisarius’ campaigning in Persia, which is a bit muddy. The battles are described well enough, but there’s doubts as to whether he was in command at some of them, or just a subordinate, which makes it harder to draw conclusions. And then we get the preparations to go west, and a good description of the actions in Africa, and of course the campaign for Italy. The highlight of that is the primary (first) siege of Rome, which always seems glossed over in the other (limited) accounts I’ve seen. And then there’s a campaign in Persia, back to Italy, and apparent retirement.

Hughes does seem to draw unwarranted conclusions (something I’ve noted elsewhere), but is mostly on reasonable ground. There’s also a postmortem on Belisarius’ and his opponents’ generalship at the end of each chapter which is a mix of unhelpful and interesting points. I’d say his later books are a definite step up from this one, and this is still a useful introduction to Belisarius’ career.

└ Tags: books, history, reading, review
 Comment 

Two Versus One

by Rindis on August 29, 2021 at 12:00 pm
Posted In: Boardgaming

Our latest multiplayer-day went through a few revisions on the way to happening. It was going to be five people, but Mark’s work called him off to France for a couple weeks (…there are worse fates), and then Patch’s work called him at 6 AM on a Sunday (…and that’s one of them). So… we ended up with three-player Space Empires 4X again. This time we tried a 2-vs-1 scenario I had noticed in the scenario book after the last session; we actually went with the Close Encounters version where the single player (Dave) drew six empire advantage cards and kept four.

Jason and I of course then made up the team. Thankfully the scenario uses “suspicious allies” rules, because we wouldn’t have a chance at any unified action. By the end of the day we had some limited contact with each other (generally in the middle of the board), while the main strip between us was still mostly intact at the end of the day. I had set up a single shipyard out on that border, and most turns built a new SC to explore the region, but we use heavy terrain, and most of them just died instantly.

We also did two things to get things going faster, which worked. First, we used the 30-point homeworlds, but without much more to spend on, so after the initial hump of not enough shipyard space, things started humming along. The other was a ‘turn 0’ idea I had: everyone flips over three (non-deep space) tiles next to their homeworld, and moves a SC into each; do not bother to roll for any black hole you find (the price is having a black hole to dodge for the rest of the game). Then start the game, with a little knowledge of where your miners and colonies might want to go. It’s minor, but I think it helps, and is very fast.

Dave picked Space Pilgrims, Industrious Race, Fearless Race, and Star Wolves. The first negates terrain (other than pulling Danger! chits), which was certainly handy, the second allows colonization of asteroids, which he revealed mid-game, and did much to accelerate his economy. Star Wolves never came up as he wasn’t facing bigger ships (that the bonus applies to) until late, and he didn’t go the carrier route, and was only building the biggest ships he could. Fearless was handy for a long time, as the free rank “A” firing trumped everything until very late when BBs appeared. There’s a few times when retreating early might have been best, but he wasn’t afraid to throw away mid-game ships, and the big battles later happened over his colonies, which he was loathe to abandon.

His major successes in early exploration were mostly on my side of the map (actually, he got a lot of ‘safe’ deep space tiles early on), including a space wreck back on his edge of the board which got him Move 2. There was a barren planet in the area between him and I, another almost in the middle of the board, and a set of three at the far corner between us. I’m not so sure what was in the area between him and Jason, but it was taking a lot longer to clear out. I had a slow start thanks to most of my planets being in the outer reaches of my home area.

We had also opted to use terraforming 2/nebula mining from Close Encounters, just so miners would have something else to do (we used the base set sheets, but penciled in the extra tech, though I mis-remembered it as 30 instead of 25). Three of the hexes adjacent to my homeworld were a barren planet and two nebulas (and only two planets at range 2 of my homeworld!), so I purchased terraforming 1 during Econ 2, and terraforming 2 during 4. It took a while to get around to mining the second nebula, but the extra income sure helped. My economy was the weakest of all three until econ 5, when I overtook Jason, and I overtook Dave on 6 (though our totals stayed very close; Dave took terraforming 2 in econ 4, but didn’t start mining asteroids until later—I think he was still busy picking up mineral 10s).

I sent in raiding forces as soon as I could get a clear path between us (the first ‘clear’ path had a black hole, unfortunately), and while I established a small shipyard on my outpost out there, it mostly kept busy with colony ships (I got those three planets in the deep corner; it helped my economy keep up). And had enough success to keep Dave trimmed down a little. It helped that another space wreck showed up on my side of the center of the board, and it got me Move 2. (Jason spent on it too at some point, so we were all at Move 2 at the end of the day. I kept remembering that I wanted to spend on Move 3 right after balancing the budget….)

It was right after the first drive petered out and I was trying to face off Dave’s fleet that the asteroid colonies began, and I was seriously worried about the long-term economy building up there. Thankfully, Jason started finding his way to Dave’s empire at that point (aided by a Lost in Space for first contact). He was able to put ever-mounting pressure on from his direction that helped me manage to colonize that far corner without interference. While I was finishing with using destroyer swarms, and moving up to CAs, Dave had been using BCs after extensive construction of bases and shipyards. Jason initially showed up with CAs and moved to BCs, with slightly better tech. He also went his traditional route of taking tactics, which didn’t help in the first round, thanks to the free rank A shot, but helped after that, when when he moved into BBs and DNs, he consistently shot first.

The BC-to-BB period had two or three large fleet battles that tended to go on long, thanks to cold dice, and Dave’s lower technology on his ships vs Jason’s smaller ones. In the end, the first fleet battle went narrowly to Jason, and the second one went to Jason more quickly, but still with considerable losses to Jason.

By that time, my CAs were showing up with increasingly better tech, and I shifted to BCs for the final two rounds. As we were nearing the end of the day, Dave surrendered in frustration, with all his mobile assets gone, and his economy ready to take a big hit as our fleets pressed in. One thing that was a continuing problem for Dave was that with everyone at move-2, the pattern was to wait for round 3 from two hexes away, and hit the least-defended target.


End of the day. Dave = Yellow, I was Red, and Jason Blue.

Afterword

Dave has expressed problems with the game before, and is currently officially “done” with it. Now, right after the session, it turned out that one big problem is really an expectation mismatch. He sees naval designations, and thinks in terms of (WWII wet-)navy realities where cruisers have no right to take on a battleship and win even with higher numbers of cruisers. He has come to a belated realization that technology trumps size to a degree he doesn’t care for (…I pointed out the differences between a pre-dreadnought and the Iowa; we’ll see if that goes anywhere). He also doesn’t have a big background in space 4X games, which regularly just use naval designations as a shorthand for “size”, and is mentally prepared for mission differences. And he finds the tracking onerous enough that he doesn’t care to have different types of ships.

I’d been thinking his combat problems more stemmed from the fact that combat is a nuanced bucket of dice system, since relatively low-odds results were when the frustration was evident. Personally, combat is a place I find a bit weak in the design. Mostly, it’s a very neat, reasonably fast system with the right level of complexity. The trouble is that it’s a little too easy to get into combats where both sides have low odds of hitting, and then the combat drags out (asteroid fields are especially bad at this; thankfully we hardly ever end up with combat in one); the first fleet combat this time dragged out a few extra rounds with only moderately cold dice.

Accelerating growth by using the 30 CP homeworlds definitely helped, and freed up early game budgets a lot. I assume that effect is still true in full Close Encounters as you won’t be buying many of the extras straight off the bat. Since everyone also started building out pipelines early, this also meant a common early purchase was an extra shipyard at the homeworld. I eventually got to a full 6 there, but was stalled at 5 for a long time as it was another place that I kept thinking about after getting my production set.

Since Dave tends to be central to multiplayer days, there’ll probably be noticeably less SE4X in the future, though I’m currently engaged in a game over Discord (actually, my second game). Hopefully, next time we’ll finally have more than three people, and we’ll be doing a long-planned day of shorter games.

└ Tags: gaming, Space Empires
 Comment 

The Beacon at Alexandria

by Rindis on August 25, 2021 at 12:00 pm
Posted In: Books

Gillian Bradshaw is one of my favorite historical authors, and this one does not disappoint. She admits up front to distorting the timeline slightly in the interests of the plot, which spans about seven critical years in the Fourth Century.

At this point the Roman Empire is Christian, but not necessarily deeply so, with plenty of pagan traditions surviving, and of course deep factionalism over the proper form of belief. All of this is far from the life of a sixteen-year-old upper-class girl in Ephesus, but the plot takes us into that world. Athanasius is one of the most prominent figures of this time, and from what very little I know of him, I think Bradshaw did a great job depicting him.

But back to the center of the story. Charis is in love with medicine in a society that doesn’t allow women to practice it. So she largely hides her interest, and then for much of the book hides who she is instead, and much of the novel is an outpouring of love for medical learning, and the practicalities of its practice in this age as well as a glimpse into the scholastic side of Alexandria.

This is an intensely character-driven novel, with Charis’ first-person descriptions and relationships driving everything. With a couple exceptions for when larger events intrude on her life, and suddenly plot drives everything to lever it into the next major section. Some of that feels abrupt, because of the change in pacing, but overall, it’s a wonderfully-written, very personal feeling novel, and another winner from Bradshaw.

└ Tags: books, historical, reading, review, Rome
 Comment 

Rout of Glory

by Rindis on August 21, 2021 at 12:00 pm
Posted In: Boardgaming

Last Sunday, Jason came over and we continued our series of games of Pursuit of Glory that got interrupted last year. Neither of us had strong inclination either way, so random draw gave Jason the Central Powers. We got through the end of turn 6 before needing to call it a day (not bad, considering the rust), and declared me the winner, as things were sliding decidedly downhill for Jason by that point.

I started out with standard Russo-British Assault opening, taking Fao and Basra, and picking on Turkish cavalry units (one escaped). I had a first turn hand that was a little too good, as it was choked with events that needed playing. This included the Royal Blockade and Kitchner, and Russian Reinforcements helped shore up the line in the Caucasus. That was helped by a particularly devastating Enver Goes East at the start of turn 2, which not only weakened the Turkish troops, but then they rolled poorly versus good Russian rolls, Jason largely recovered using Reserves to the Front. He also got the Jihad ball rolling with Pan-Turkism and Jihad, taking Marsh Arabs and Kurds, the latter of which helped take and hold Urmia for the rest of the game.

Churchill Prevailed, but only about three forts fell to RN guns. Egyptian Coup laid what turned out to be important groundwork. Jason had decided to make sure of Mesopotamia, and sent, or built, a good number of troops in the region, built a TU-A corps there, and even spread out into Ahwaz, cutting off Shushter, and threatening Abadan. I brought in ANZAC Reinforcements there, which halted that, though Jason attacked Abadan three separate times over the next few turns, and always rolled poorly, with two ANZAC divisions handily beating a Turkish corps with divisional support. Jason was also taking a fair number of troops out of Anatolia to do all this, but he did use German Military Mission to build trenches in a few important places, including Adana.

During turn 3, Indian Reinforcements went to their usual place (for me), shoring up Basra, and getting a corps of my own in the area. I got two Invasion cards, and used Kitchner’s to put a beachhead off Adana. The next round I came ashore, and holed up in there and Eregli. Jason used Persian Push and Turkish Reinforcements for the extra divisions, but neither of us entered Persia for another turn or so, when I sent a division down to Qum. (During turn 4/5, he used German Intrigues in Persia for the Jihad and put the irregular in Isfahan.)

During turn 4, Gallipoli Invasion gave me more troops in Cyprus, and the two corps allowed me to move up to Konya and Aleppo. Jason used the big corps assets Turkish Reinforcements to organize another TU-A corps in Mesopotamia. Bull’s Eye Directive didn’t go so well for Jason (more bad rolls), but I felt too short on troops when he played Gorlice-Tarnow shortly afterwords and had to take the 2 VP penalty. On the other hand, I had driven him out of Erzurum and besieged it (I failed the first roll, but got it on the siege phase of turn 5).

Asquith/Lloyd George gave me the only RPs of turn 5, while more Russian Reinforcements poured more troops into that front. Drama was high in Anatolia as the British were beaten in Konya, and the perimeter fell back to Adana. But the ANZAC Corps and cavalry took Alexandretta, and the Corps moved south. There was an round where I thought Jason would cut it off, and was prepared to land the French in Beirut to try and re-establish supply. But he didn’t, and the ANZACs moved south along the coast, ending in Jaffa. I had previously moved a reinforced line of Commonwealth troops up to the Sinai/Palestine border, and during turn 6 hit Gaza from both sides, eliminating the defenders and the fort, but not taking the space.

Turn 6 lead off with Russian Winter Offensive, which again did very well. The Turkish line was in dire straights, though it took me half the turn to really see how many gaps there were, and I moved a Cossack unit through Diyarbekir and Mardin, where he became cut off and died in attrition, but the Turkish efforts to do this were well worth a division, and the Armenian Uprising started locking down the entire area. Meanwhile, the Mesopotamian front collapsed with an AP victory from Shelba to Nasirya, as as turn 6 ended, Jason was trying to find good anchors for a new line.


End of the day/turn 6.

Afterword

By the end of the day, I was moving forward on every front. Jason had skipped play of Bulgaria for the RPs. I know we had both gone through our decks once (I shuffled to get my last three cards for turn 6), but I don’t know what happened to Parvus to Berlin.

Overall, luck certainly favored me. The dice went against Jason more than they went for him. However, there’s a couple other things too. I think he over-committed in Mesopotamia. Now, we both think that putting more in there than usual was an interesting idea, and overall it certainly kept me nicely bottled up for several turns, which was bad when I had a Mesopotamian MO once (rolling that earlier would have probably cost me a VP).

Also, over the last couple turns, he devolved into too many OPS and SR plays. Now, I was giving him good reasons for much of this, but the RPs suffered, and as usual, the Ottoman dead pile grew too large, leading to the turn 5-6 collapse. They turned into too many OPS for me too, as I barely scraped by on the RPs, but I was mostly keeping things going. On the other hand, the Max RP marker was moving down as well.

I had early on been contemplating trying a Gallipoli invasion, but seeing Jason progressively move nearly everyone out of Anatolia diverted my attention back to my favorite landing of Adana. It is a problem location for both sides, since there’s three routes out to cover, and I never quite got to sending a unit or two to Antyla to open that one up. With the breaking of Gaza, I expect the next turn would have seen some real fighting in Palestine as I tried to secure Damascus and Jerusalem and force the defenders south, though that was still going to be tricky. I’d had a couple good combats in/near Azerbaijan as well, so I had hopes of a push at that end of the Russian line as well.

└ Tags: gaming, Pursuit of Glory
 Comment 
  • Page 84 of 310
  • « First
  • «
  • 82
  • 83
  • 84
  • 85
  • 86
  • »
  • Last »

©2005-2026 Rindis.com | Powered by WordPress with ComicPress | Hosted on Rindis Hobby Den | Subscribe: RSS | Back to Top ↑