Rindis.com

All my hobbies, all the time
  • Home
  • My Blog
  • Games
  • History

Categories

  • Books (504)
  • Comics (10)
  • Gaming (918)
    • Boardgaming (674)
      • ASL (155)
      • CC:Ancients (83)
      • F&E (78)
        • BvR – The Wind (26)
        • Four Vassal War (9)
        • Konya wa Hurricane (17)
        • Second Wind (5)
      • SFB (78)
    • Computer games (162)
      • MMO (77)
    • Design and Effect (6)
    • RPGs (66)
      • D&D (25)
        • O2 Blade of Vengeance (3)
      • GURPS (32)
  • History (10)
  • Life (82)
    • Conventions (9)
  • News (29)
  • Technology (6)
  • Video (50)
    • Anime (48)
  • Writing (1)

Patreon

Support Rindis.com on Patreon!
Become a patron at Patreon!

Other blogs:

RSS Inside GMT

RSS Playing at the World

  • Playing at the World 2E V2 Arrives May 5, 2025

RSS Dyson’s Dodecahedron

  • Scavengers’ Deep – Map 33 July 16, 2026

RSS Quest for Fun!

  • The Expense Post May 24, 2026

RSS Bruce Heard and New Stories

  • Pain, Exhaustion, and Morale in D&D BECMI June 7, 2026

RSS Chicago Wargamer

  • The 2 Half-Squads - Episode 310: Cruising Through Crucible of Steel January 27, 2023

RSS CRRPG Addict

  • Game 581: Dragon Quest (1982) July 15, 2026
SF&F blogs:

RSS Fantasy Cafe

  • The Leaning Pile of Books July 5, 2026

RSS Lynn’s Book Blog

  • Review: The Tinder Box by MR Carey July 16, 2026
ASL blogs:

RSS Sitrep

  • Cardinal ASL Sins March 18, 2026

RSS Hong Kong Wargamer

  • FT114 Yellow Extract After Action Report (AAR) Advanced Squad Leader scenario April 16, 2025

RSS Hex and Violence

  • This still exists? March 25, 2025

RSS Grumble Jones

  • Grumble Jones July Scenario GJ162 You Will Engage the Enemy July 1, 2026

RSS Desperation Morale

  • How to Learn ASL March 16, 2025

RSS Banzai!!

  • October North Texas Gameday October 21, 2019

RSS A Room Without a LOS

  • [Crossing the Moro CG] T=0902 -- Rough start July 18, 2015
GURPS blogs:

RSS Dungeon Fantastic

  • Felltower - Monsters Fleeing between Sessions vs. PCs replenishing June 28, 2026

RSS Gaming Ballistic

  • B-Scale Detail and Examples July 16, 2026

RSS Ravens N’ Pennies

RSS Let’s GURPS

  • Review: GURPS Realm Management March 29, 2021

RSS No School Grognard

  • It came from the GURPS forums: Low-Tech armor and fire damage January 29, 2018

RSS The Collaborative Gamer

  • Thoughts on a Town Adventures System January 18, 2022

RSS Don’t Forget Your Boots

  • GURPS Supers Newport Academy #7: “Invitation to the future.. of the 1970’s” July 5, 2026

RSS Orbs and Balrogs

  • Bretwalda - Daggers of Oxenaforda pt.4 - Fallen King May 27, 2017

The Iron Fist

by Rindis on February 12, 2016 at 12:00 pm
Posted In: Boardgaming

Patch and I just finished off another round of Up Front through Vassal on Tuesday (took three weeks, two of which were short sessions). We went for the next scenario in line, F “The Infantry’s Iron Fist”, which features an attack with a squad and light AFV against a squad with LATW. It’s the usual three decks, and the attacker has to get into cover at range 4 with four men to win. I ended up with defending Germans (who get a normal squad, except for using lower-morale leaders, and two panzerfausts), against Patch’s attacking Americans (who have a standard squad with higher-morale leaders, and are supported by an M8 Greyhound AC).

Patch followed my idea from the previous scenario we played, and put his M8 in the middle, so it could provide cover for two infantry groups, with Group A being the ‘strong’ group with six men including the assistant squad leader and BAR, while Group C had four higher morale men (5, 3, 3, 5) led by Sgt. Allen. I split into two even Groups, with A having the assistant squad leader and LMG, while B had two of my best guys with the panzerfausts and a couple of low-morale guys mixed in. We had some initial trouble with the deck shuffling bug, so we just kept individually shuffling it each time.

Patch led off with all three groups Moving up to range 1 at the same time. I responded by pinning two men in A with a Fire 2 (net 2 thanks to that AC…), while Group B also Moved up to 1. Patch moved into Woods with group A, while the other two stopped in open ground. Then his C Fired 1 (net 1 after Concealment) on my B, but only malfunctioned a rifle, while B Fired 2 with the MG on my B (net 3), but only pinned one guy with bad RNC cards (a red 0 was the best he got). I Rallied and A Fired 1 back at the AC for no effect. The AC Fired the main gun at B, and missed only thanks to the fact that B was still moving.
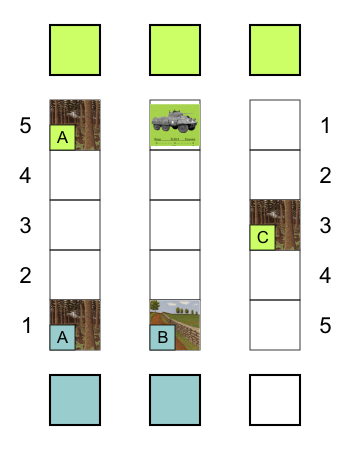
Up Front F1Right after that, Patch’s C Moved up to Range 2 and took cover in some Brush, while my Group B finally found a Wall to hide behind. The AC fired again, hitting (at -1 thanks to the wall) and doing no damage, while C got its rifle repaired. My Group A finally got a chance to Move up to Range 1 and Patch Fired 2 (net 2 after Concealment) to pin the LMG gunner and one other, while Rallying 1 in his Group A. My Group A ducked into some Woods, and then Rallied 2, and then Patch’s A Rallied 1 again for everyone to be in good shape at Range 1, except Patch’s Group C, which was at Range 2.

The AC Fired the main gun at my B again, hitting at a net strength of 1, pinning one man. Group C Moved up to Range 3 and took cover in Woods, while I Rallied my Group B. The AC Fired again (hit: net -1) and pinned a man again. His Group C followed that one up with Fire 3+1 (net 3) routing the pinned man, and pinning two more. I Rallied 1 before the AC Fired its gun again (hit: net -1 again) to re-pin the man who just rallied. This time a Rally 3 took care of the problem, while my Group A Moved up to range 2. The AC fired again, but malfunctioned its gun, as my A moved into Buildings -3 (we’d just burned through four building card removals).

In a better position, my A then Fired 6 at C (net 4) and pinned two men, including the SL, who immediately recovered on Rally 2. My Group B Moved forward to range 2, but got hung up on Wire. Soon after, the AC repaired its gun on the third try, but Group A Fired 4 at it (net 1 after Concealment) to pin it. More Wire was found around my Group A’s position, giving me more trouble with no movement in sight. Group A Fired 2 at C (net 0) anyway, pining one man. C Fired 1 back at my B (net 0 after Concealment) for no effect.

Group B finally got out from under the wire, only to run into a Stream. Patch’s B and C both Rallied 3 to put everyone in good order again. My A Fired 3+2 at C again (net 1 after Concealment) pinning one man, who immediately got a Rally 1. My Group B Forded the stream only to find more Wire waiting for them. The AC Fired at B, which missed, but it was followed up by C Firing 6 at them (net 7 after Concealment…) which killed one (only one!) man outright while pinning two others, including my SL. The last result was a red ‘6’ to malfunction a rifle. Rally All got my two men in good order again, while A Fired 2 (net 0 after Concealment) at the AC for no effect. The AC Fired at Group B again for another miss, followed by my A Firing 1 (net 0) at the AC again for no effect. Patch’s A Fired 1 at my B (net 2 after Concealment) to pin the SL again.

My A Fired 5 at his C (net 2) and pinned his SL and killed the man with the malfunctioned rifle outright with good RNC cards, while Rally 2 took care of my SL. Patch also got his SL in good order with a Rally 1. My A Fired 5 at C again (net 2) and pinned a man while suffering a rifle malfunction. Patch fixed his problem with a Rally 2. Group A Fired 4 at the AC for no effect.

I finally Moved B off of the wire, only to run into a Marsh, and had to fall back to the stream. Patch followed that bit of bad news up with Fire 3 from the AC against B (net 1 after Concealment) for no effect, and a Flanking move from Group C against my B. B then Fired 3 at C (net 1) for no effect. Finally, I Moved the wire off of Group A, shortly afterwards repairing the rifle in that group and getting B to successfully ford the stream again and got them into Buildings this time.

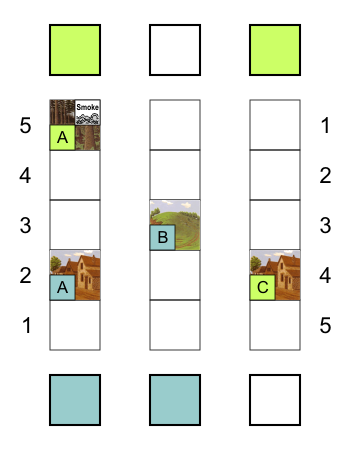
Group A Fired 7(!) at C (net 3 after Concealment) which pinned two men, quickly fixed with a Rally 4. My Group B Moved up to Range 3, and Patch’s A Fired 5 (net 0 after Concealment) for no effect other than malfunctioning a rifle, followed by the AC Firing at B but missing. Group B put themselves on a Hill while Patch repaired his rifle. B then Fired a PF at the AC (RR 4 = 0-1 TH, +1 hill, -2 Concealment), and barely got a hit, and destroyed the armored car!

With the cover from the AC gone, my Group A Fired 1+1 at his A (net 0) to pin two men. Patch Rallied 1, and then B Fired 1+1 at his A (net 0 after Concealment) to pin another man. Patch Rallied 2 to get the entire group back in good order. He then had a Sniper that pinned a man in Group A, but he Rallied on my turn (that was actually about the fifth Sniper of the game, almost all of them Patch’s, but it was the only one that had an effect). B Fired 2 at A again (net 1) and pinned two men, and Patch responded with a Rally 1 before Firing 3+3 at my A (net 0 after Concealment) to pin the LMG gunner.

Group C Moved up to Range 4 and into buildings (Patch later implied this was a mistake when he realized he was going past me and opening the range), while I Rallied my LMG. His A then Fired 4 on B (net 1 after Concealment) for no effect on bad cards (all red). I put some Wire on his Group A, which then Fired 5 at my B (net 3) to pin the entire group. Rally 3 fixed B, while A Fired 2+2 on his A (net 3) to pin two men, kill one outright, and kill the previously pinned man.

Patch decided to preserve his force by putting Smoke on his own Group A, and after a few turns of us cycling cards, I Fired 3+1 with A against his A (net 0 after Concealment) for no effect. Right after that, Patch finally Rallied 1 on his A, and then my B Fired 4 on A (net 1 after Concealment) to rout the remaining pinned man.

Patch managed to remove the wire on his A at that point, but it was also getting late, and Patch decided to concede at this point rather than continue next week. Considering that he was down to six men, and one more loss would be a victory for me, or I would win at the end of the current deck (probably around half of it to go), it was looking very unlikely that he could get me down from eight men to four with his remaining squad. He did have men in cover at Range 4, but there were only three men in the group, and no way to get a fourth in place.
Up Front F2Afterword

Actually, Patch mentioned that he’d forgotten the victory conditions for a bit, and that he’d just realized that he could win by getting C up another 2 Range when my lucky shot reduced the Group to three men.

I had a really bad stretch in the middle where Patch was shutting down all my movement and made Group B very vulnerable. Along with already having lost a man, and the AC burning through every junk Fire card Patch got had me convinced that it was just downhill from there. But I finally cycled Movement cards through to get out of trouble, and then managed to get into position to use PFs. Between woods, and wire, and the cover from the AC, my shots were at -4 against his main group in A for a while, and getting rid of the AC and wire one after another really changed things. After that, it was more a matter of letting the fire bonus from the hill and the LMG in buildings do their thing.

└ Tags: gaming, Up Front
 Comment 

Peter the Great

by Rindis on February 8, 2016 at 12:00 pm
Posted In: Books

Robert K. Massie’s volume is a massive biography that delivers a good look at its subject. “His Life” is covered in ~850 pages covering from his childhood and the later parts of the reign of his father, Czar Alexis, and the unstable politics that produced the co-reign of his half-brother Fedor and himself in 1682, through his death in 1725 with an epilogue that outlines the politics that produced four reigning empresses, ending with Catherine the Great.

The “and World” part of the title also gets good coverage with various extended asides that help bring the 17th-18th centuries alive, starting with a description of Moscow ca. 1680. Peter is the nominal focus of the entire book, but in true Massie fashion, any subject that catches his eye along the way (such as Charles XI of Sweden) gets an extended treatment in it’s own chapter. Peter, of course, had two extended trips into western Europe, and these also serve as a springboard into a look at the situation there as well, helping provide a wider context to Peter the Great’s life and just what he was trying to emulate in Russia.

As a popular history, it does not delve into historical controversy, and presents Peter solidly in his typical role as the hero of ‘westernizing’ Russia, even while clearly showing the tyrannical side that (for instance) pursued suspicions of a conspiracy against him with relentless torture and executions, and that his reforms almost entirely relied on threats and force from Peter himself. I particularly would have liked a better look at the great families of Russia that were important in the state at this time, though I guess that Massie felt they were only important near the beginning and again at the end of his life, and it would have distracted too much from the core of his book to delve into them in any depth.

└ Tags: books, history, reading
 Comment 

R vs B Coalition Turn 13 in Review

by Rindis on February 4, 2016 at 12:00 pm
Posted In: BvR - The Wind

Crossposted from the SFU blog on BGG.

Bel surprised me by cancelling a number of smaller hulls across all three empires on his turn. The Klingons are struggling with a massive cripple backlog, but there was spare money left in all three treasuries.

My stat tracking shows this is the highest amount of stored EPs the Coalition has had since turn 2, and Bel’s comments indicate that he’s looking forward to the shift to 75% economy on turn 16.

Bel naturally leaped on the out of supply Hydran fleet, and swiftly reclaimed planet 0518, while the Lyrans sent a tug over to the Hydran capital and started setting up a MB at Hydramax.

After that, the next goal of Bel’s movement was to engage Federation forces in the central Klingon Empire, and force them off of the two planets I’d captured. Notably, he pulled the five ships (including a C8 and D7C) still administratively marked as the North Fleet out of Sector C to help deal with this. There was very little movement near Kzinti space, only picking on a couple ships outside the range of all my reserves.

The Romulans continued their invasion, heavily hitting everything around the 7th Fleet and 6th Fleet SBs. They did not drive further into Federation space, instead aiming to widen the gap in the frontier.


The kicked anthill


Activity in the central Klingon Empire


The Romulan invasion continues

Battles:
0519: Planet captured
0418: SSC: Hydran: dest KN
0317: Hydran: dest LN; Klingon: crip D5
0908: SSC: Kzinti: retreat; Lyran: retreat
0705: SSC: Kzinti: dest FF
2518: Fed: dest CL, FF; Klingon: dest D5, recapture planet
2214: SSC: Fed: retreat; Klingon: retreat; planet goes neutral
1714: Fed: dest NCD; Klingon: crip D7C, D6, D6M, F5E, capture NCD & planet
1815: SSC: Fed: dest FF
1715: SSC: Fed: dest FF
1713: Fed: crip NCL, CL, FF; Klingon: crip 3xF5
1514: SSC: Fed: crip FF, retreat; Klingon: crip F5, recapture planet
3613: Fed: dest BATS, CL; Romulan: crip SP
2816: Fed: dest BATS, crip 2xNCL, FF, FFS; Romulan: crip SP, SPB, SK, 2xSKE, 2xBH
3016: Fed: dest BATS; Romulan: crip SP, SN
2915: Retreat after refused approach
3611: Retreat after refused approach
3711: Fed: crip FF; Romulan: crip KRC, FH, SP
3612: Fed: crip CC, CA, FF, dest FF, 2xPDU; Rom: dest SKB, SKE, K4, crip KE, WE, capture planet

I would have loved to re-open supply to the main Hydran fleet with the Hydran reserve, but I realized that combat supply is only re-evaluated at the moment that battle hex is resolved. If I picked a fight to re-open supply, and that hex was evaluated first, I’d have to win the fight so as not to retreat back off map, and the reserve wasn’t that big. So I reinforced the fight with a few ships that were at full combat power, and luckily only lost a DD this time, and have retreated into supply.

1714 was our first fight between CVAs (USS Napoleon and C8V Vindicator), but the Klingons had about a half-line of reserves, while the Federation was a ship short of a full line. As it was, I had a slightly higher ComPot, and rolled one less to do the same damage. Bel’s second ship capture in as many turns is annoying, but is still a long ways from the seven ships I’ve captured.

Bel ended up retreating out of both SB battles without fighting. In one case, I had no fighters to take damage on, and in the other, he had a fairly heavy line he could put up. I expected him to come in for at least a round on both, so held out for the extra firepower of the SB. In the second one, he was thinking of overrunning an adjacent planet, but since there was an alternate hex free of my forces, he had to go there or do a fighting retreat. Since the planet was where my second reserve had gone, that wouldn’t have worked out.

BATS 3612 had minor forces from both of us, and dragged out across five rounds of largely crippled lines as it could go either way. He had a bit more in the hex, but I took my damage to preserve ComPot, and had the bigger line for a couple rounds. Damage rolls were even until ComPot was too low for it to matter much. In the end, I had to retreat, but the three survivors are on the 6th Fleet SB, where they can be repaired.

While I can’t be happy about losing more border regions to the Romulan navy, the invasion is going much slower than I feared. I figured there’d be a major fights over both SBs this turn, leaving them with a lot of damage and cripples to try and make good.

In Klingon space, I’ll say that I had held onto things longer than I expected, and Bel is having to focus a lot of attention in the central empire to kick me out, while Kzinti and Federation forces continue to strip the northern empire of bases.

└ Tags: BvR Wind, F&E, gaming
 Comment 

The Four Vassal War Alliance Turn 3

by Rindis on January 31, 2016 at 12:16 pm
Posted In: Four Vassal War

Crossposted from the SFU blog on BGG.

While the Kzinti are having a hard time, with the Klingons having occupied the planet in 1105, they still hold the neutral zone planet in 1506, and the Hydrans were still disrupting three Lyran provinces and holding another at the start of their turn (worth 0.5 permanent VP) while only one of their provinces are held by he Klingons.

Both economies are in good shape and could absorb the modest number of cripples to repair with no trouble. I was surprised that Bel had no conversions this turn, but both empires paid to activate an extra Prime Team.

Builds:
Kzintis: BC, CL, CLD, CLG, 3xFF, MB, PT
Hydrans: DG, 2xKN, CR, 2xCU, Convoy, MB, PT

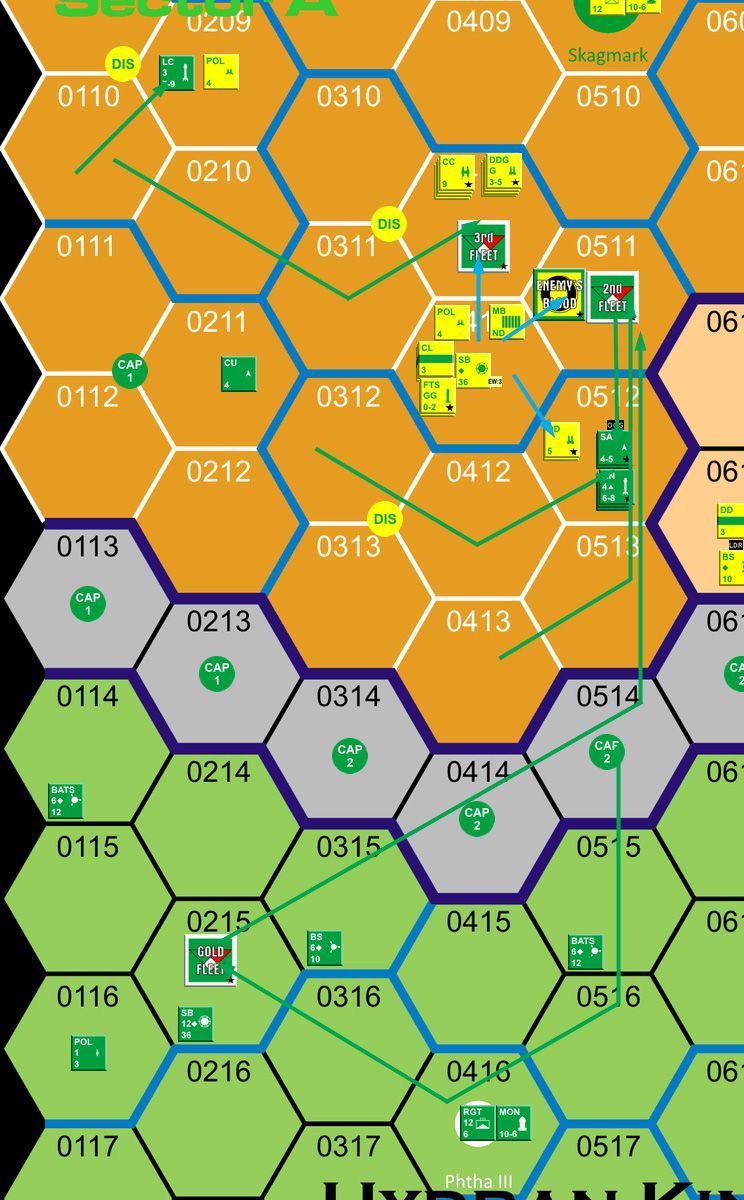
Both raids were against Lyran territory. The Hydran one easily fought off the called up POL that responded, and disrupted a province, while the raiding Kzinti CS fought a CA that responded from the adjacent SB and was crippled, while the CA merely retreated.

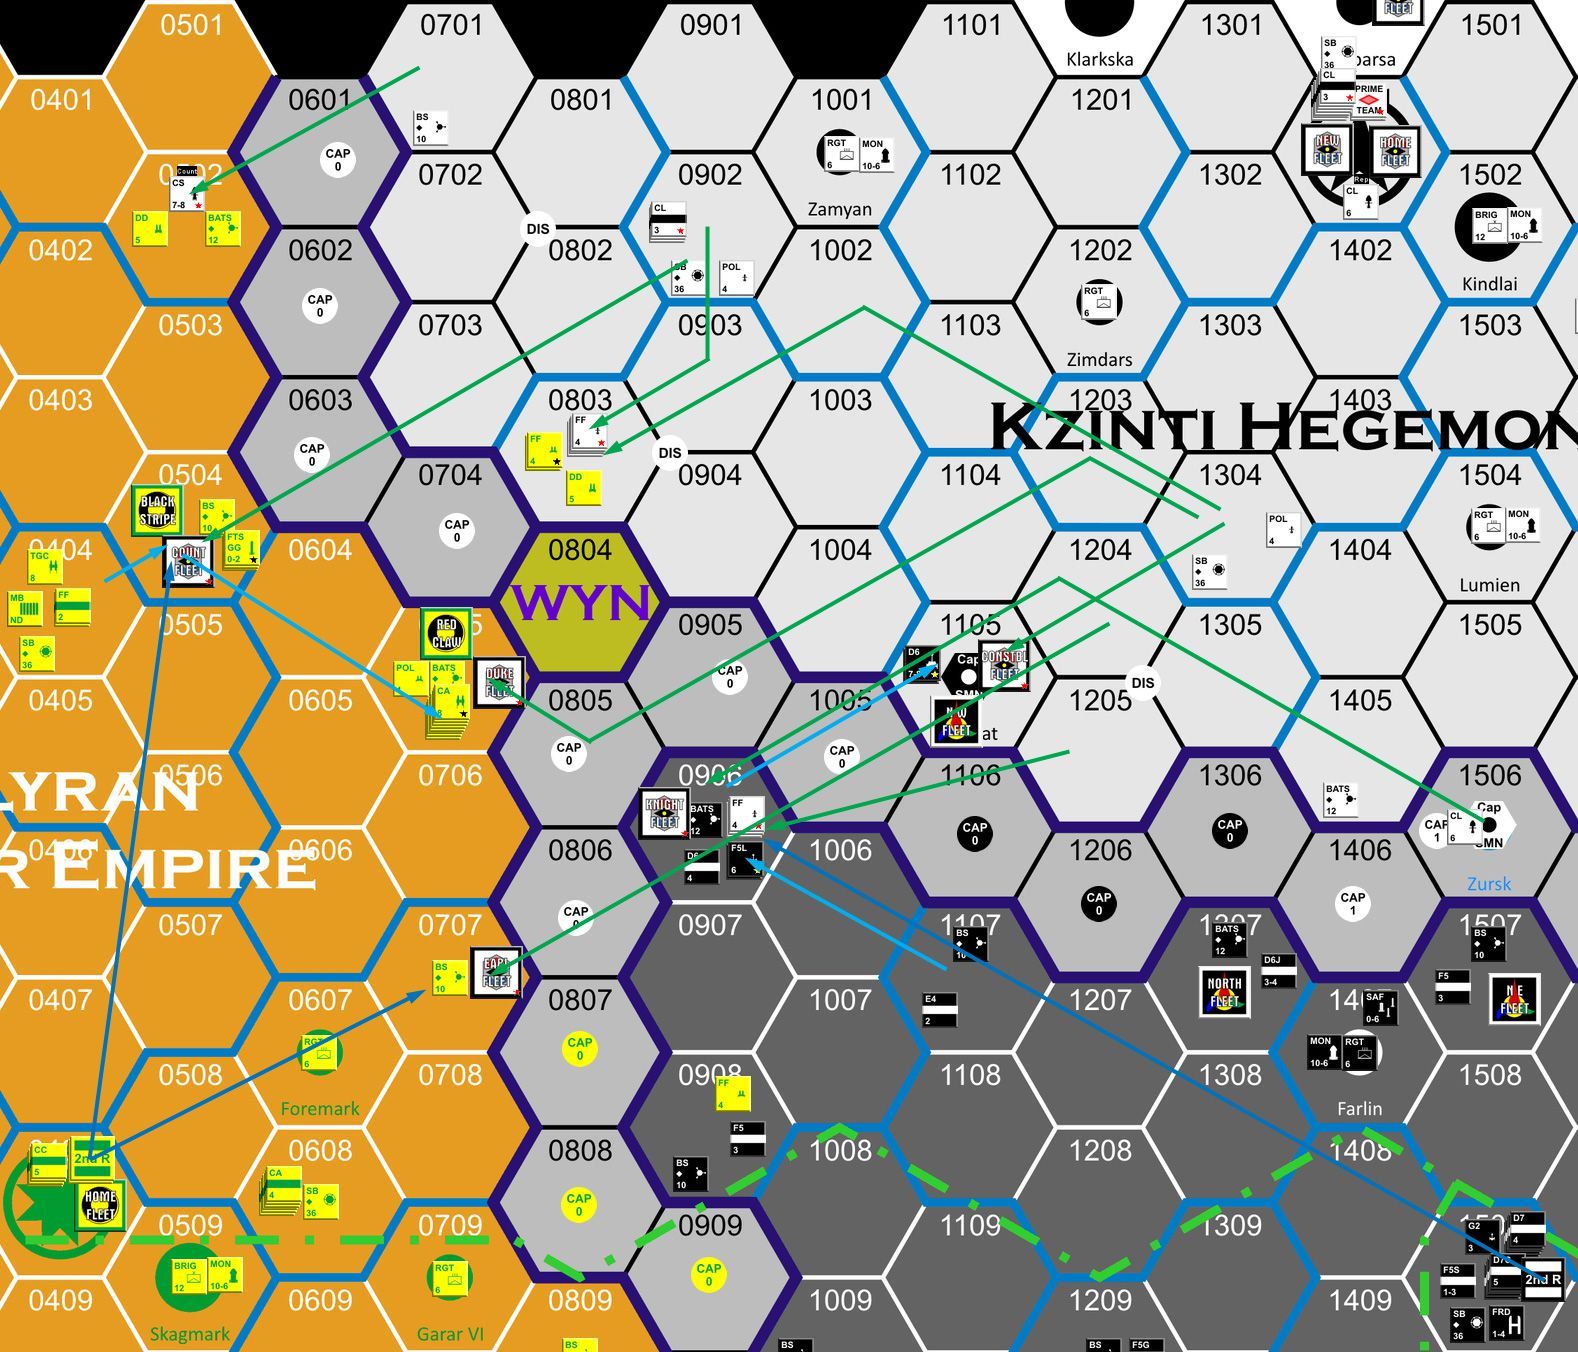
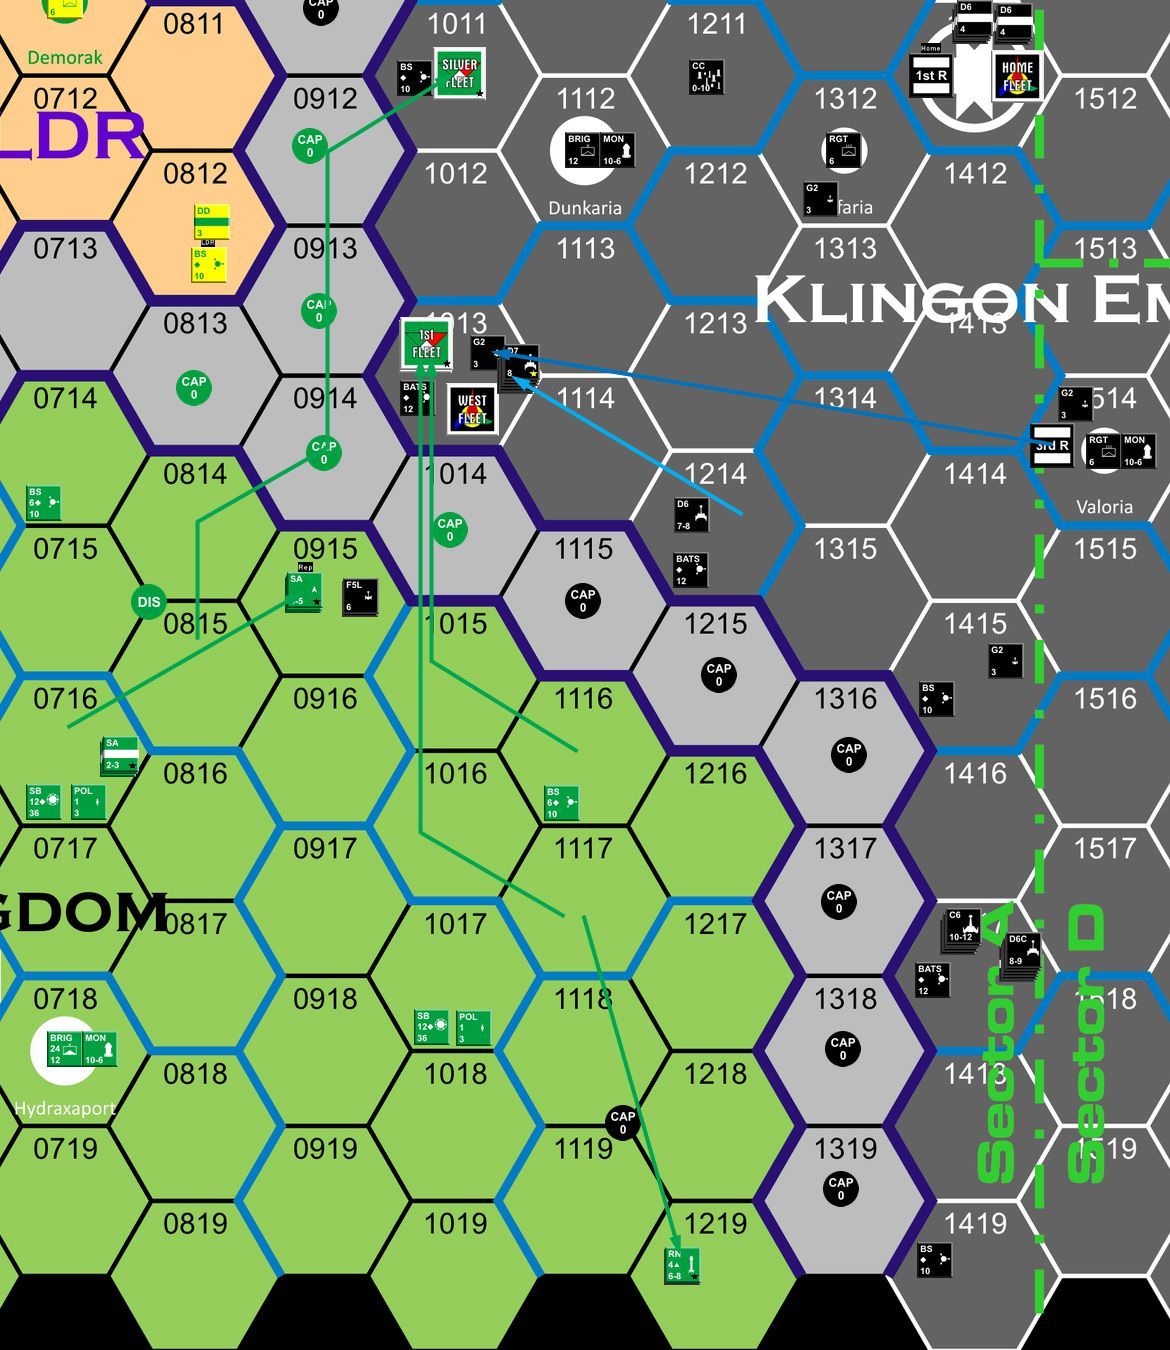
I had done my best to set up so as to be able to respond to most attempts to assault my border bases, and especially the more valuable BATS, but Bel quickly defeated all of that by sending a Hydran force around the edge of the Klingon border, and hitting 1011. Late in the turn, all the major forces in Lyran space headed east, I assume towards the relatively unprotected depot in 0810. I reacted off the Enemy’s Blood SB, and didn’t have enough to completely pin either move, but Bel stopped and fought there.

The Kzintis meanwhile struck near the Lyran-Klingon border, and finally sent a force beyond the border to hit 0707. Everything else was well enough in hand that I sent a reserve there, though I’d had to send a Klingon reserve to make a fight of the BATS at 1013, instead of trying to save 1011.


The Kzinti offensive


Hydran moves in Lyran space


Hydran offensive into Klingon space

Combat:
0209: SSC: Lyran: dest POL
0410: Lyran: dest FF
0502: Retreat on refused approach battle
0511: Lyran: crip 4xFF; Hydran: crip RN
1219: SSC: Klingon retreat
0512: Lyran: dest DD
0915: SSC: Hydran retreat
1013: Klingon: crip F5; Hydran: dest LN
1011: Klingon: dest BS
0707: Lyran: crip CA, DD; Kzinti: crip BC, 2xFF
0504: Lyran: crip CL, DD; Kzinti: dest CL, 2xFF
0906: Retreat on refused approach battle
0705: Retreat on refused approach battle
1105: Klingon: crip F5L; Kzinti: dest 3xFF
0803: Lyran: crip DD; Kzinti: crip FF

0511 was the large pinning battle. I went in for a round with my heaviest line with a TGC+BP, DNE, BCE, 2xCA, and then a battle group, and was still fighting 9 ComPot down thanks to how scary Hydran cruisers are. Low rolls kept anything meaningful from happening, especially as I was just short of killing a LN. He didn’t bother to pursue the heavy line when I retreated, and the cripples are now at the Enemy’s Blood SB for repairs.

Bel wanted no part of 1013 after my reserve showed up, but I challenged him to the initial approach battle. This is one of a few times lately where he’s tried to preserve his forces with a minimal line where it doesn’t make a lot of sense. He still had to put up about five ships, which is more than my force can destroy in a round, so he might as well put up a full line and do as much damage as possible in return.

0504 was a second case of this, and I ended up killing his cripples in pursuit. With a full line, I might have needed a much lighter line for pursuit (CLs to FFs) after taking the extra damage.

1105 was third time he did this. I don’t blame him for wanting out, as most of his force was FFs. I didn’t think to increase my BIR to 4, and let him off a bit easy.

Much to my surprise, Bel retrograded all but a handful of ships, leaving the Lyrans free to pick off Hydran province raiders for the first time in the game. They’ve been having to maneuver around large, aggressive Hydran fleets in their space all this time. Like me, he used almost all his forces in offensive operations this turn, and the Hydrans only have five ships in reserve, but the Kzinti Barony fleet just arrived from off-map, and formed the basis of two healthy Kzinti reserves on their capital.

The Alliance is up to 79.6 VPs, with 3.8 permanent VPs this turn, while my repairs also continue to pile up. Meanwhile, my VPs are also up slightly, to 64.75, thanks to all the ships I managed to kill. Overall, this is a Minor Alliance Victory, but that’s still eroding.

└ Tags: 4VW, bgg blog, F&E, gaming
 Comment 

Two Rounds of Phyle

by Rindis on January 27, 2016 at 12:00 pm
Posted In: CC:Ancients

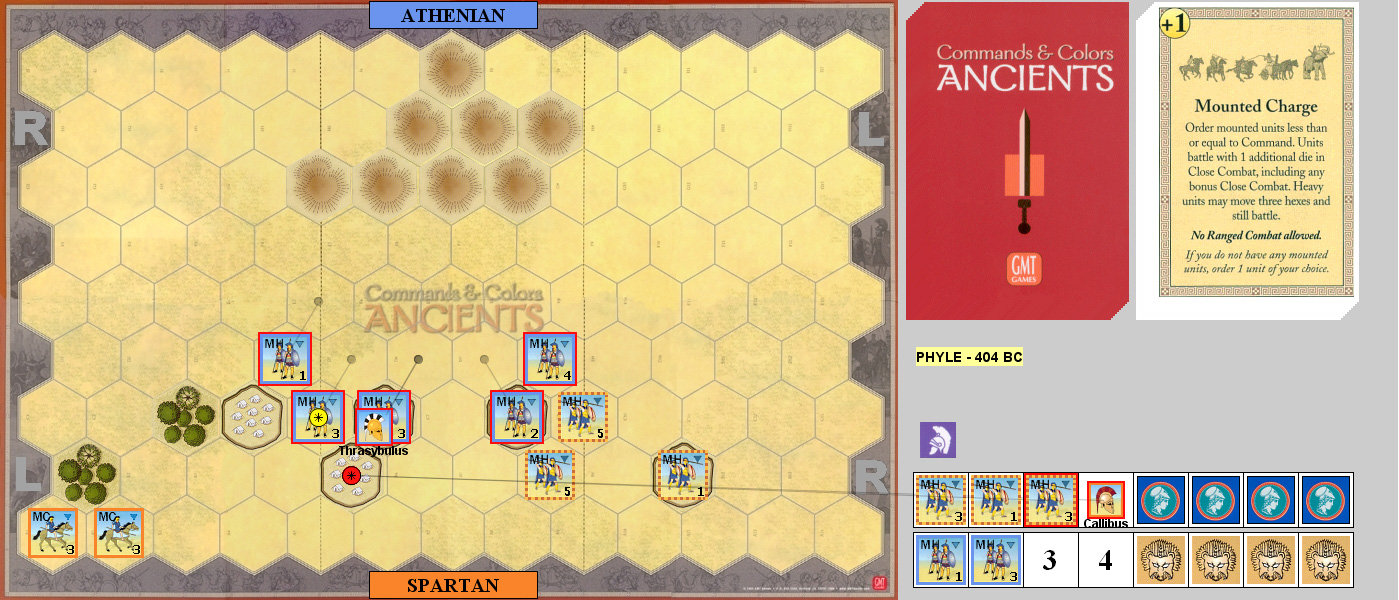
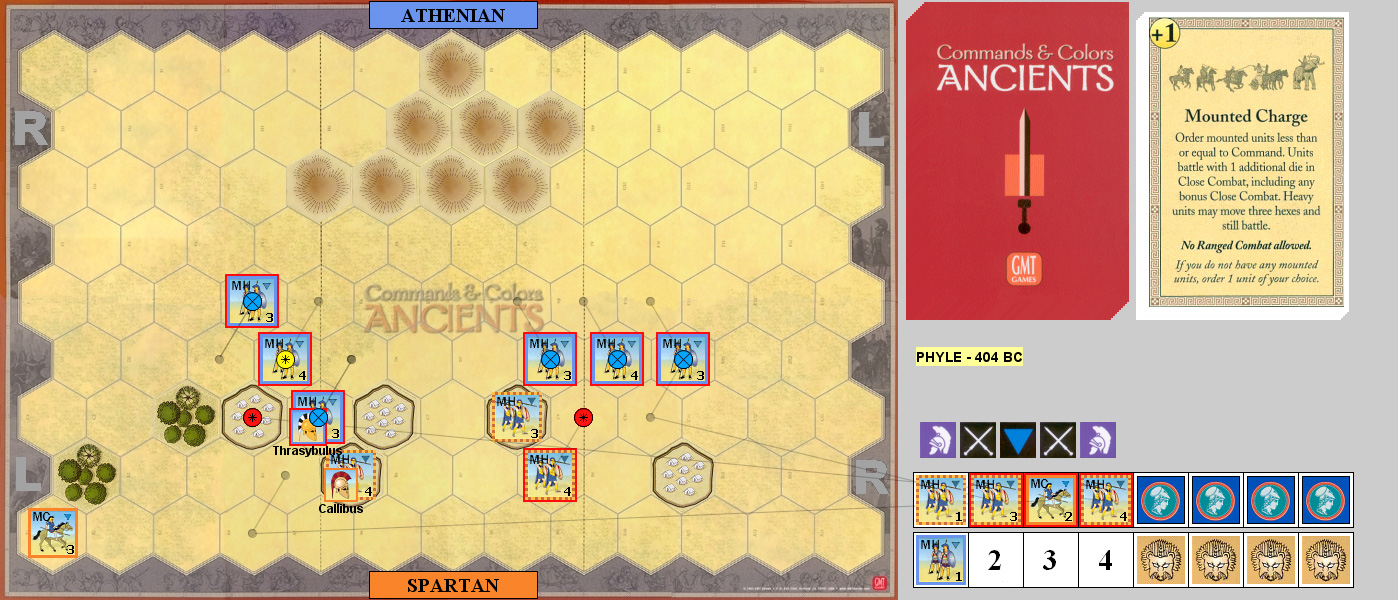
Patch and I did our irregular ‘between bigger games’ set of Commands & Colors: Ancients last night, with the fastest scenario I’ve seen: Phyle 404 BC from Expansion #6. Set after the Pelopennsian War, Athenian exiles attack a Spartan camp in the middle of the night. The battle goes to four banners (I’ve never seen below five before), the Spartans only start with two cards, but draw their way up to four over two turns, while the Athenians get six. The Athenian line starts practically on top of the Spartans who begin scattered, and mostly in fortified camps, which, along with the five-block Spartan hoplite units, gives them some staying power, though their leader starts unattached.

I had the Athenians on the first go-round, and I started off with Inspired Center Leadership, and followed up with Leadership any Section to get much of my line in motion and assaulting Patch’s camps. I knocked out the MH supported by his leader in two attacks, and momentum advanced to try and pick off the leader, but only caused him to evade into a unit on the back row. I also drove him out of a camp with no damage on the first card, and attacked another camp with the second, reducing a unit to 1 block while taking two blocks myself, and enough banners to shatter my line. Patch had Ordered One to put his leader back in a camp, adjacent to my leader, and despite the similar odds attacks with him having an extra block, I tried pushing on him only to take a block and a banner to retreat to the rest of my line.

Patch Ordered Two Right to assault the left end of my line, only pushing back two units with no damage. I Ordered Two Right to finish off the one-block unit. Patch Ordered One to get back into a camp and did two damage to a unit in return for being pushed back out of the camp. I used a Coordinated Attack to mostly get at his right flank and reduced another of his MH to one block and pushed it back, but one of my units took three hits in return. Patch used an Order Three Right (only had two) to get the 1-block out of danger while eliminating my one-block unit.

I Ordered Two Right to get at his leader, but lost a unit and two blocks on another to battle backs while only doing two damage to him. Patch responded with another Order One (too many dead cards with only medium units in this scenario) to hit my weakened unit again, and send it back two hexes. I used Mounted Charge (finally drew one in these hoplite scenarios!) to send my entire remaining force forward and picked off his leader unit, and then the leader himself died on the loss check. 4-2

Phyle-1

Patch led off the second round with Order Four Center in an assault that cost him three blocks across three units, and reduced my center unit to one block as he got driven back into my leader, while doing two blocks to another unit. Patch continued this with Order Two Center to knock out the leader’s unit and drive him out of the camps to the unit on the back row. He tried a Momentum combat with his leader, but only took two damage himself.

I used Coordinated Attack to bring up one of the MC in the corner and activate the leader’s new unit to knock out Patch’s reduced unit and form a small line, while hitting the left end of Patch’s line to do one block apiece. Patch used Mounted Charge (I had just drawn the other one!) to hit the entire line, wiping out one unit, and hitting the MC with three banners, which routed it off the board. Finally, he attacked my left-end MH in camp, first trading one block apiece, and then getting four hits to end the game. 1-4

Phyle-2

Afterword:

All told, two games over Vassal took us fifty minutes to play; a normal scenario takes us about an hour per play. With only four banners needed things can collapse fast, though it dragged out a little in the first game as I had a hard time getting a decisive turn. Both times, the game ended with the appearance of Mounted Charge. The camps block one sword and/or one banner per combat, and they absorbed a good number of hits in the first game. I thought I was getting somewhere when I managed to bring in the MC that had been ignored in the first game, but three banners is just something that cavalry can’t take. Anyway, it is a very fast scenario that offers just enough hope to the disadvantaged Spartans to stay exciting.

└ Tags: C&C Ancients, gaming
 Comment 
  • Page 194 of 315
  • « First
  • «
  • 192
  • 193
  • 194
  • 195
  • 196
  • »
  • Last »

©2005-2026 Rindis.com | Powered by WordPress with ComicPress | Hosted on Rindis Hobby Den | Subscribe: RSS | Back to Top ↑