Rindis.com

All my hobbies, all the time
  • Home
  • My Blog
  • Games
  • History

Categories

  • Books (449)
  • Comics (10)
  • Gaming (877)
    • Boardgaming (647)
      • ASL (151)
      • CC:Ancients (78)
      • F&E (78)
        • BvR – The Wind (26)
        • Four Vassal War (9)
        • Konya wa Hurricane (17)
        • Second Wind (5)
      • SFB (75)
    • Computer games (151)
      • MMO (74)
    • Design and Effect (6)
    • RPGs (64)
      • D&D (25)
        • O2 Blade of Vengeance (3)
      • GURPS (31)
  • History (10)
  • Life (81)
    • Conventions (9)
  • News (29)
  • Technology (6)
  • Video (45)
    • Anime (43)
  • Writing (1)

Patreon

Support Rindis.com on Patreon!
Become a patron at Patreon!

Other blogs:

RSS Inside GMT

  • Foreign Intervention in Baltic Empires: Part Two May 8, 2025

RSS Playing at the World

  • Playing at the World 2E V2 Arrives May 5, 2025

RSS Dyson’s Dodecahedron

  • Index Card Dungeon II – Map 1 – Tower Base May 9, 2025

RSS Quest for Fun!

  • Pro Active Price Increases April 5, 2025

RSS Bruce Heard and New Stories

  • D&D Class: The Cryptreaver February 24, 2025

RSS Chicago Wargamer

  • The 2 Half-Squads - Episode 310: Cruising Through Crucible of Steel January 27, 2023

RSS CRRPG Addict

  • Pathways into Darkness: Let Hitler Have It May 10, 2025
SF&F blogs:

RSS Fantasy Cafe

  • Virtual Sci-Fi/Fantasy Book Recommendations Event May 5, 2025

RSS Lynn’s Book Blog

  • Friday Face Off: Swordheart by T Kingfisher May 9, 2025
ASL blogs:

RSS Sitrep

  • Blockhaus Rock April 1, 2025

RSS Hong Kong Wargamer

  • FT114 Yellow Extract After Action Report (AAR) Advanced Squad Leader scenario April 16, 2025

RSS Hex and Violence

  • This still exists? March 25, 2025

RSS Grumble Jones

  • Grumble Jones May Scenario GJ147 Sturmgewehrs at Schevenhuette May 1, 2025

RSS Desperation Morale

  • How to Learn ASL March 16, 2025

RSS Banzai!!

  • October North Texas Gameday October 21, 2019

RSS A Room Without a LOS

  • [Crossing the Moro CG] T=0902 -- Rough start July 18, 2015
GURPS blogs:

RSS Dungeon Fantastic

  • Thoughts & Links for 5/9/2025 May 9, 2025

RSS Gaming Ballistic

  • Preview PDF Downloads Suspended due to Bot Spam January 5, 2025

RSS Ravens N’ Pennies

  • Carpe Blogiem: Author, Patreon, and Blog Highlights – February and March 2025 March 30, 2025

RSS Let’s GURPS

  • Review: GURPS Realm Management March 29, 2021

RSS No School Grognard

  • It came from the GURPS forums: Low-Tech armor and fire damage January 29, 2018

RSS The Collaborative Gamer

  • Thoughts on a Town Adventures System January 18, 2022

RSS Don’t Forget Your Boots

  • GURPS Kung Fu Furries #2: “The Chicken Unleashed!” April 6, 2025

RSS Orbs and Balrogs

  • Bretwalda - Daggers of Oxenaforda pt.4 - Fallen King May 27, 2017

R vs B Alliance Turn 4 in Review

by Rindis on August 31, 2011 at 12:00 pm
Posted In: BvR - The Wind

Crossposted from the SFU blog on BGG.

The carnage from the Coalition Turn 4 offensives caused several difficult choices for me. Kzinti income is down to 2/3rds normal (and down 11 just from last turn), while Hydran income dropped 25 EP to the 2/3rds mark in just one turn.

The Kzinti navy is in quite a bind, with a lot of cripples backed up at the Capital and the Barony. I had to short the repairs quite a bit, repairing my maximum in the Capital with a CC, 2xBC, 3xFF and four escorts. In the Barony, I only repaired an EFF, despite more cripples than the facilities can handle.

The other problem is that this is the Spring, a dreadnought turn. I made the hard decision to downgrade the DN to a CV. I would rather have subbed out the BC for that, and I’m worried about losing a CR-10 hull, but it did drop the cost quite a bit. I also canceled four FFs, and produced one extra MEC, which will go to a CV group without an inner escort.

The Hydrans canceled all six of their FFs and one HR, but built a PAL, RN, TR, and HR while adding two PDUs to the capital. I would have liked to build the max four, but didn’t like giving up any more quality units than I had to. Also, a HN and TR were repaired in the capital. There’s a few other cripples around, but most were not on repair facilities.

On the Kzinti front, this was a less intense turn that I would have liked. Part of it, is that I don’t have that much experience with the game, and I’m still trying to figure out just what can be gotten away with. It is also a goal to keep cripples (and therefore damage) down this turn so that the backlog can be mostly cleared next turn, which would put the Kzinti navy on a very good footing indeed. I poked at two Klingon-held planets, but not with enough to force him off after reserves showed up.

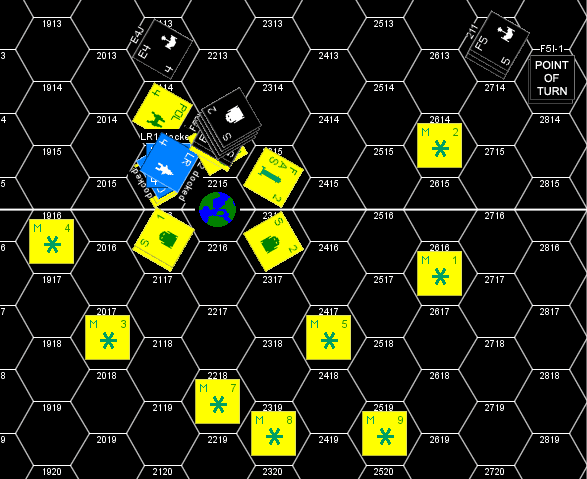
In Hydran space, most of my effort went into moving the cut off Gold Fleet back towards the capital. I also poked at the planet the Lyrans captured, to pin his ships there as I attacked a lone DN and crippled CA in 0318. If I had been smart, I would have set up cordon to catch the fleeing DN, but then, I’m not sure I could have spared ships across three hexes, especially since some of them wouldn’t get to retrograde.


Kzinti front


Hydran front

Combats:
1105: Klingon: crip D5; Kzinti: crip CLE
1203: SSC – both sides retreat
1303: SSC – E4 destroyed
1202: Klingon: crip D5, E4; Kzinti: crip CL
1402: Lyran: dest crip CC; Klingon: dest F5
0301: Lyran: dest crip CA
0416: Lyran: crip 2xCW; Hydran: crip LM
0817: Klingon: crip 2E4A, dest D7C

The last fight in particular surprised me. It was a fairly massive open-space confrontation brought about by my efforts to pull the wreckage of the Gold Fleet back from the destroyed SB to the homeworld. Included in the fleet were 5 crippled HNs, which I figured would probably go up during pursuit. In the meantime, I was going to make it hurt. I put up my second best line with PAL, 5xRN, HR, and a 4UH group (best line would have had 3xHR in place of the UH), for 100 ComPot.

The real surprise was that even with a D6M on the line, there was no directing, and when I retreated, no pursuit. I had kind of thought that Belirahc had already figured out the secret of fighting the Hydrans. But now I’m going to spill it all:

The Hydrans love open space battles. They want to engage in fights where there’s nothing important. They take damage on fighters, and maybe a cripple or so until the enemy retreats, or they run out of spare fighters, then they retreat. In this fight, the Klingons took two cripples and lost a D7C (not common enough to be throwing away) in return for nothing. The way to keep the Hydrans from doing this  is to direct on the biggest thing that can be blown up by direct damage every round (preferably a fighter-heavy fusion-ship). DirDam is technically inefficient, but it’s far more efficient than letting it all fall on fighters, and the Hydrans can absorb a lot of damage just on fighters (that line had 42 fighter factors in it, and only counted 8 of them towards the three squadron limit).

This shuts down the fighter-sponge tactic of the Hydrans quite easily. The Hydrans do not have an overly-large navy to start with, and their economy is not capable of building everything on their schedule. Therefore every ship loss hurts. Worse, cruiser losses soon become terminal, and have to be minimized by the Hydrans lest they lose the very units that can make them so scary.

└ Tags: bgg blog, BvR Wind, F&E, gaming
 Comment 

R vs B Coalition Turn 4 in Review

by Rindis on July 28, 2011 at 12:00 pm
Posted In: BvR - The Wind

Crossposted from the SFU blog on BGG.

I’m sorry for the long delay in posting here, but things have been going on! Belirahc sent forces into both Alliance capitals, and those fights really dragged on. After 131 Vassal logs for the combat phase, things have finally wrapped up for the turn.

By this point, I don’t really remember what the heck happened during the movement phase, but here’s how things looked at the beginning of combat, and the run down of all the combats:


Kzinti front.


Hydran front.

Combats:
0215: Hydran: crip KN; Lyran crip FF, dest CA, DD
0902: Kzinti: dest SB, crip CC, BC, CL, CLE, EFF, 2xFF, dest DD, EFF; Lyran: crip CA, 3xCW, dest 3xCA, 6xCW
1017: Hydran: dest SB, crip 5xHN, dest HN; Klingon: crip F5L, 3xF5, E4A, dest 2xD7, 2xD6, E4, 2xFV, 2xE4A (1 captured and expended)
1003: Kzinti retreat to 1104
1304: Kzinti: crip FF, retreat to 1204
1105: Kzinti: 2xPDU, planet captured; Klingon: crip D5
0915: Hydran: dest BATS; Klingon: crip D5, E4
1116: Hydran: dest BATS; Klingon: dest 2xF5
1217: Hydran: dest BATS; Klingon: dest E4
1219: Hydran: dest BATS: Klingon: dest E4
0416: Hydran: dest 2xPDU, crip SC, planet captured; Lyran: crip 4xDD, 2xFF, dest DW, FF
0318: Hydran: dest BATS, crip 3xLN; Lyran: crip CA, dest CA, 2xCW
0718: Klingon: crip F5L, 2xF5, E4
0617: Hydrax I: 2xPDU; Hydrax II: 2xPDU, devastated; Hydramax I: 4xPDU; Hydramax II: 2xPDU, devastated; Anthraxan I: 4xPDU, devastated; Anthraxan II: 2xPDU, devastated; Hydran: crip TR, dest 2xCU, 2xHN; Klingon: crip D7, F5L, E4, 2xE4A, dest 5xD7, D6, 2xF5L, 5xF5, 3xE4; D7, D6 captured (and re-captured)
1001: Kzinti: crip FF; Klingon: crip F5, dest E4
1401: Kzintai II: 2xPDU, devastated; Keevarsh I: 1xPDU; Vielsalm III: 2xPDU; Vronkett: 4xPDU; Kzinti: crip 3xBC, MEC, CL, 2xFF, EFF, DF, dest CL, FF, DF, 2xEFF; Klingon: crip D7, D6M, dest D7, 3xD6, 2xD5, F5L, F5, 7xE4; Lyran: crip BC, CC, dest CA, 2xCL, DW, 6xDD, 10xFF
1502: Kzinti: crip BC; Klingons: crip 2xF5, E4, dest 2xF5

Things went fairly well on the Kzinti front, and not so well on the Hydran front. Given attacks on the the homeworld, 0718 and 0318, as well as all three starbases, the Hydran navy was overmatched, and frankly, somewhat out of position.

I decided that the Coalition didn’t have enough to do more than raid the capital, so I sent out partial reserves to save the Major at 0718 and the BATS at 0317. The latter is especially important as letting the Lyrans take it for free would cut the off-map off from the capital. I didn’t send nearly enough to save it (especially in the face of his willingness to self-kill), but the retreated ships will keep the grid connected between the off-map and 0509.

Unfortunately, I underestimated just how much had gone into the capital. He didn’t have what it takes to take out the actual capital planet, but everything other than that is devastated, and he did get a couple of PDUs on the capital itself. The Hydrans also managed to capture a D7 and a D6, though the D6 later got re-captured. Pity the D7H isn’t in the game.

I figured that the Kzinti were looking at a capital raid, so I already had a good chunk of the Kzinti fleet in place to defend it. That battle went on longer than I expected, mostly because Belirahc was willing to bring mostly crap, and then self-kill much of it to press the attack. Three planets were devastated, and one more stripped of its defenses, but in return the Coalition lost 35 ships. I expect this will noticeably alter the pin-count calculations on that front, and I really need to total up just how much everybody has.

Also, the Lyrans do not have any forward supply posts yet, so the 5 Lyran ships left over from the capital (two of them crippled) are stuck in 1402 out of supply. The Klingons hold 1003, so they won’t even be in supply next turn unless they’re declared Homeless. Of course, I’d like to see to it they don’t live that long….

During Strat move, pretty much all Coalition construction moved to the Hydran border. Things are only going to get tougher down there. I assume he’s set to blitz the Hydrans and try to kick them out of the capital well in advance of Federation involvement. It’s time, and past time, to turtle.

He’s also strat moved the portions of the Klingon Northern Reserve that hadn’t already moved out to 1504. Both Lyran reserves and two of the Klingon ones are on the Hydran border. The other two Klingon reserves are at 0504. The Kzinti have things to do, if they can manage to get ships on target.

└ Tags: bgg blog, BvR Wind, F&E, gaming
 Comment 

R vs B Alliance Turn 3 in Review

by Rindis on April 5, 2011 at 12:00 pm
Posted In: BvR - The Wind

Crossposted from the SFU blog on BGG.

The Coalition turn left Kzinti space in a real mess. There were plenty of lightly-defended targets, but at the same time, the Hegemony Navy was not in the best of shape itself. I resolved to limit myself to a few important goals and concentrate on them.

Sadly, I didn’t take proper stock of the situation on the Hydran border. I ended up wasting any opportunities by spreading the fleet out too much, and not concentrating enough to actually achieve anything. Complicating matters was the fact that the reserves were almost universally in range of the Hydran border.

One error that thankfully only had minor consequences: Belirahc has been towing around some unassembled Mobile Bases for the past couple turns. He asked me about the timing of setting them up late in his turn. It was pretty obvious he wanted to set something up, but then nothing happened, but I forgot to double-check with him until a decent chunk of my movement was done. It turned out the Klingons were setting up a MB in 1304.

My goals on the Kzinti Front were clear: Keep the MB from setting up, kick the Coalition off of as many planets as possible, evacuate my cripples off the map, and hunker down to defend the remaining SB and the homeworlds. The Hydran front never got a clear goal, other than trying to raid a few BATS, and good maneuvering kept me from getting any freebies.


Activity on the Kzinti front.


Activity on the Hydran front.

All this led to a few fights where I’d had to pin him away from the real action, but neither of us really wanted to take casualties.

Combats:
1503: Klingon unopposed withdrawal to 1504
1203: Klingon unopposed withdrawal to 1303
1304: Klingon: crip D5, F5, 5xE4; dest D6D, MB abandoned
1004: Lyran unopposed withdrawal to 0905
1202: Kzinti: capture planet; Klingon: dest E4
1001: Kzinti: capture planet; Lyran: dest 2xCW
0413: Hydran: dest 2xCU; Lyran: crip 2xCA, FF
1112: Hydran: retreat to 1012
1013: Hydran: dest LM; Klingon: crip D6M, D6
1214: Klingon: crip D7
1014: Hydran: crip HN, Klingon: crip D5, F5

Things went well on the Kzinti front. After a couple rounds, he was forced to abandon the MB, though I was unable to generate enough damage to actually Direct Damage kill the tug responsible. I also forced him off of 1001 and 1202, pushing the Coalition further away from the capital.

The Hydran front did not go as well. Again, I was too spread out, keeping the Hydrans from getting good lines up, and not allowing any fighter reserves. Worse, I got forgetful, and forgot to put the command ship in formation in 1013, allowing the Klingons to kill a Lord Marshal command cruiser.

Everything retrograded back to defensive positions after combat. I used field repair on a couple of Kzinti escorts that had been damaged during the Coalition half of the turn and stranded away from repair facilities. This was part of the plan, but the Kzinti budget is stretched really thin right now. I’m likely to be canceling builds as it is, and this will make it harder. But I wanted the extra operational carrier group. Meanwhile, the Hydrans are setting up a MB in the capital, and have hauled one FRD to safety in the off-map area.

└ Tags: bgg blog, BvR Wind, F&E, gaming
 Comment 

SH124: Kroal’s Illegitimate War – Part 2

by Rindis on March 26, 2011 at 12:00 pm
Posted In: SFB

Crossposted from the SFU blog on BGG.

[See Part 1.]

The two F5s took the blast on the #2 shields without taking internals, but the E4J was hit on the weak #3, and took 7 internals (after blowing a battery) losing one power and the #2 and #4 phasers.

The E4J moved into the F-AS’ hex the next impulse, which fired into the front shield, dinging it. On impulse 16, the E4J moved adjacent to the CivBS and fired, doing 6 damage to the #6 shield through a 2 shift (ECM and poor crew penalty).

By impulse 21, the F5P and F5I-2 had moved adjacent to the base, and everything opened up. The two F5s launched a drone and a shuttle apiece, while the F-AL fired on the F5I. The CivBS fired ph-3s at the F5I and ph-2s at the F5P. The POL tried for point defense, firing one ph-3 at each drone, a disruptor at a shuttle, and 2xph-2s at the other shuttle. The F5s poured everything they had (5xph-2 and 2x overloaded disruptors each) at the CivBS.


Situation when everyone opened fire.

F5I-2 took 45 damage, punching 31 internals through the #6 shield, knocking out 9 power, both disruptors, 2 phasers and all controls spaces (other than security). The F5P took 32 damage on #6, causing 8 internals, knocking out one disruptor and the #1 and #4 phasers.

Poor rolls from the POL let both drones live while killing both shuttles.

Bad rolls, and a +1 shift caused 2 of the four disruptors fired at the CivBS to miss, and total damage was 62, causing 39 internals through the #1 shield. While only three phasers (#3, #8 & #9) were hit, so was one tractor, and it ripped through the hull and destroyed 13 repair boxes (out of 22).

The next impulse, the drones were knocked down by the Agro Station and a previously-launched shuttle, while further shuttles were launched from the E4J and E4I-1. The impulse after that, the CivBS launched two drones. (…all CivBS have drones, even if it belongs to a race that never uses them, it seems.)

On impulse 24, the two E4Is, having made it across the main line of TBs, slip in to range 4 on the oblique and fire. +1 for ECM combines with bad rolls so that no disruptors hit, and only six damage was taken from 8xph-2s. This knocked out another 2 phasers and four repair.

On Impulse 26, F5I-2, following behind the E4Is, slips in and fires. Again the disruptors miss at range 4 with a +1 shift. The 5xph-2 manage better, scoring 6 damage (instead of 6 damage across 8xph-2…). This knocks out a drone rack, and another two phasers, leaving the CivBS with 4 phasers total.

As the Klingons started maneuvering past the base, one of the drones took out one of the shuttles on impulse 28. On impulse 30, the one launched from E4I-1, from further away, turns out to be a scatterpack, and releases its drones while the drone from the CivBS is still 2 hexes away.

On impulse 32, the second wave of bombardment drone reach the line of transporter bombs. M7 does not detonate, but M3 does, wiping them out.

This is the critical turn. In the original game, things were very bad because the base was crippled, and all the tractors on it were destroyed, forcing it to drop all three Orion ships. This time is only slightly better. Two of the tractors are intact, so only LR-2 gets dropped at this point. However, weapons are running out, and so is Repair. Since there’s not much Hull on the CivBS, and hull hits turn into repair hits, the CivBS is down to 4 repair boxes. This frees up some power, but means getting the Orions underway is nearly impossible.

LR-1 still needs another two repair points to turn on a DamCon box so that it can start activating systems on its own. That leaves two repair points left over to do… I’m not sure what.

The Klingon force has become scattered, and may still get in trouble the the defending ships and the FF that is about to show up. However, now they can afford to spend more effort on achieving the mission of destroying the Orions, rather than reducing the base. There’s not much worry that the base will get them operational any time soon.

└ Tags: bgg blog, gaming, SFB
 Comment 

R vs B Coalition Turn 3 in Review

by Rindis on March 23, 2011 at 12:00 pm
Posted In: BvR - The Wind

Crossposted from the SFU blog on BGG.

I started Turn 3 with a fair amount of confidence. Both halves of Turn 2 went well for me, and short of Belirahc slipping a large force into the capital, I was pretty sure I could hold what I wanted.

After some fencing with his initial attempts to reach targets, I started getting worried. He was getting much more aggressive on what he was targeting, and I was looking at losing interior planets. 1001 and 1504 were unsurprising; those are common Turn 2 targets for me. However, he hit 1202; first he moved some Lyrans towards it, which I intercepted, and then a force of Klingons, which I couldn’t stop. He also moved in a force against the major planet in 1502.

I had only one Reserve force available, as I had established one in 1604. I didn’t have enough ships eligible to form Reserves otherwise after my heavy raids last turn, and figured they’d do the job of distracting ships from other targets to pin them. That worked, and because he neglected to send a high enough command rating ship, I was still able to send out a CV to the starbase fight in 1304. The other one was forced to save 1502 instead of helping with an SB fight.


Situation at end of movement, showing major moves, reactions, reserves, and retreats.

The biggest mistake was forgetting to reinforce 1105 after a FF was pinned there by the defense fighters. So, that’s one planet he had no chance at this turn.

All of this led to a large number of battles, as well as the two large fights for the SBs.

Combats:
0802 – no casualties – Kzinti retreat to 0903
0906 – Kzinti: crip FF
1004 – Kzinti: dest BATS; Lyran: crip DD, dest FF
1805 – Kzinti: dest BATS; Klingon: crip F5
1105 – Lyran: crip FF, retreat to 1004
1504 – Kzinti: 2xPDU; Klingon: crip F5, E4, capture planet
1506 – Neutral: 2xPDU; Klingon: crip F5, capture planet
1202 – Kzinti: 2xPDU; Klingon: crip 2xF5, capture planet
1604 – Klingon: crip 3xF5
1502 – Kzinti: crip CC, MEC, EFF; Klingon: crip CVT, D6V, F5, 4xE4A
1103 – Kzinti: crip DD; Lyran: crip DD
1001 – Kzinti: 2xPDU; Lyran: crip DW, FF, dest DW, capture planet
0902 – Kzinti: 4 SIDS, crip CC, BC, CVL, CLE, 3xDD, 2xEFF, dest CLE, EFF, FF; Lyran: crip 2xCA, 6xCW, 3xCL, 2xDW, dest BC, 3xCL, 3xDD
1304 – Kzinti: dest SB, crip CC, 2xBC, CL, CLE, FF, EFF, dest DD, 2xFF, SF; Klingon: crip 2xD7C, D6M, D5, 2xF5 dest D7, 2xD6, 6xD5, F5L, 4xF5, FV, E4A, D5 captured

Belirahc went pretty methodically from the small battles to the big ones. The order of resolution can be important, but it worked out well for him. I was able to retreat my force on 1001 intact to the SB, so he had to face it twice, but he avoided a worse trap. I was considering giving up the SB in 0902 and retreating onto 1001 so that he couldn’t take it. But once he had taken it, there was little point, since it still wouldn’t produce income for me.

Surprisingly, everything stayed in supply after combat, other than the FF that had been province raiding in Klingon space, and managed to retreat into 1005 after merely being crippled by a CA.

The first SB battle, on the Lyran border, went well. I crippled more than I liked, but forcing him to fight the SB again with my fighters replenished will still cause a good amount of hurt.

The Duke’s SB (Klingon border) turned into a long, bloody affair, with both of us refusing to blink. Three rounds in, he used directed damage. In a close battle, this is often a mistake, as the inefficiency of directed damage puts you behind the curve on wrecking the enemy’s ability to resist. However, here, it was a good choice. He killed all my fighters on the line, and I had already burned through all my spares. This lowered my ComPot substantially and allowed him to stick it out much longer. Later I returned the favor by direct destroying an FV group. But that wasn’t done to lower his ComPot, but to permanently kill a carrier and its free fighter reloads.

It certainly hurt my chances to keep the SB. It came very close, with the Klingons only with about an extra six uncrippled ships left in reserve (small ones at that). But I had already wrecked too much of my fleet, and left a couple of rounds past when I should have.

My biggest disappointment was actually in the fight for 1502. It wasn’t to hard to drive him off. But, when he retreated, I had a choice: retreat myself, pulling back to the repair facilities of the capital, and allowing all the damage to be made good, or pursue and try to take out a few ships permanently. With two crippled Klingon carrier groups retreating, I chose pursuit. I, naturally, rolled another ‘6’ for pursuit, giving me neither option.

So, both sides forces are a mess. The carriers are generally intact, but the escorts took a pounding, and the Kzinti treasury is drained by all the drone bombardment I paid for. Another turn of this will see the end of Kzinti resistance outside the capital and the Marquis region (if he enters that area, the Federation will intervene). Belirahc did a very good job this turn, especially in having the fortitude to stick out the second SB assault, never an easy task. The main problem is that he left the supply grid intact, so there’s no partial grids splitting up the money, and making ship construction more difficult.

So, will he continue against the Kzinti, or turn his main attention to the Hydrans?

└ Tags: bgg blog, BvR Wind, F&E, gaming
 Comment 
  • Page 15 of 17
  • « First
  • «
  • 13
  • 14
  • 15
  • 16
  • 17
  • »

©2005-2025 Rindis.com | Powered by WordPress with ComicPress | Hosted on Rindis Hobby Den | Subscribe: RSS | Back to Top ↑