
PB6 It’s About Time
The final scenario presented in Pegasus Bridge is a giant sprawling thing that takes up the entire map, and presents the British forces from the beach finally linking up with the Airborne division at the end of D-Day. It’s a very good, if very large, scenario that I enjoyed over four months at the beginning of 2007. Get something to drink, this one is going to be long:
This AAR on the final scenario in Pegasus Bridge has been a while in coming. It’s a large scenario, with a lot happening spread out over a large area. So setup took a while for both of us. I’ve been busy with a con that I sat in the dealer’s room in… and I’ve been a bit intimidated.
That said, we did most (and certainly the most exciting parts) of my (British) movement last Wednesday, and are now finishing off the turn.
This last scenario features hard-pressed airborne troops still defending Benouville and Le Port when the landing forces from Sword beach start arriving on the scene. This happens late in the day, and Turns 9-12 will have a +1 LV Hindrance for dusk (11 1/2 turns… yeesh. I hope it’s long enough).
The Germans are technically defending, but have a marked local superiority in Benouville, while the contest in Le Port would be reasonably even without the reinforcements.
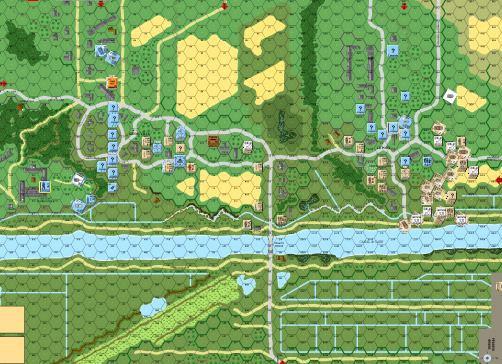
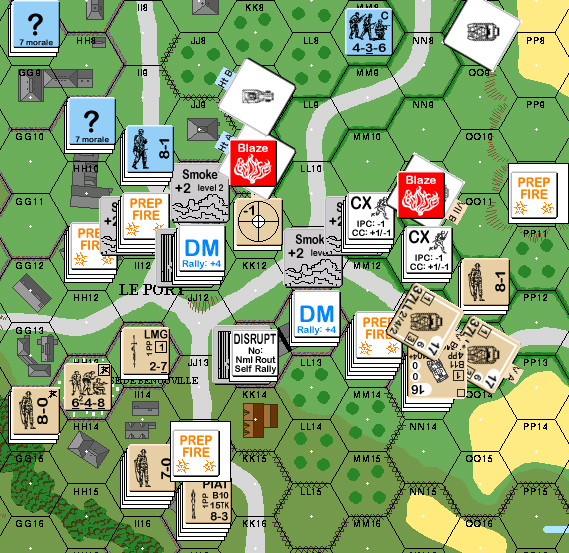
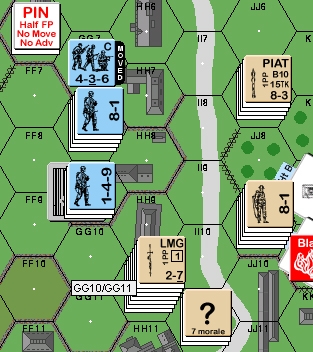
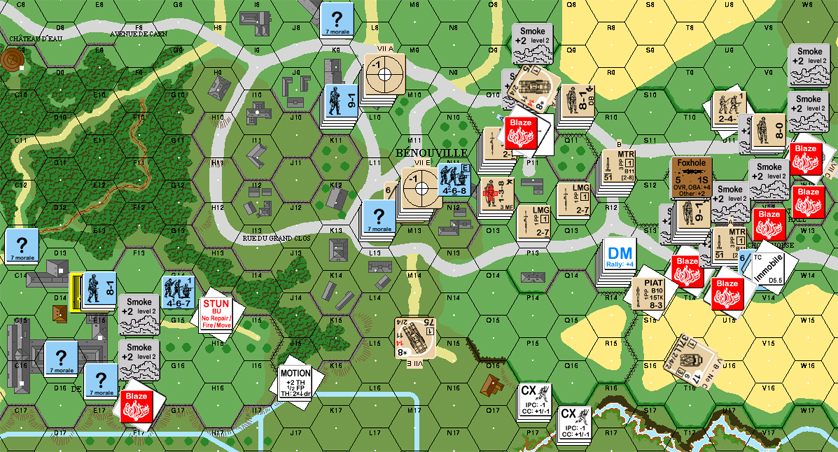
General situtation at the end of British Turn 1.
Patch is having some amazing luck, having broken a MTR, a MMG, a HMG, and a PzIVs BMG and CMG during his defensive fire. I haven’t broken anything, but I haven’t had any effective fire yet either (despite getting a BFF Improbable Hit), and have managed to loose a Stuart.
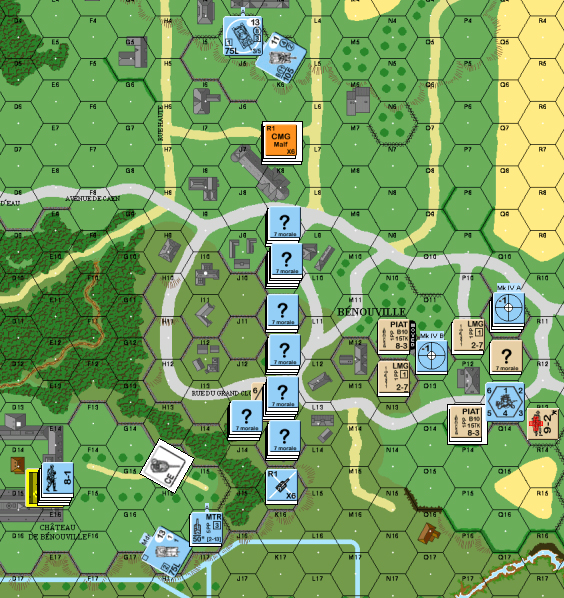
Detail of Benouville, end of British Turn 1.
Obviously, I’m going to have to start pressing the Germans back in a hurry, and then send what I can afford down the road to Benouville before the Germans really get into the swing of things down there.
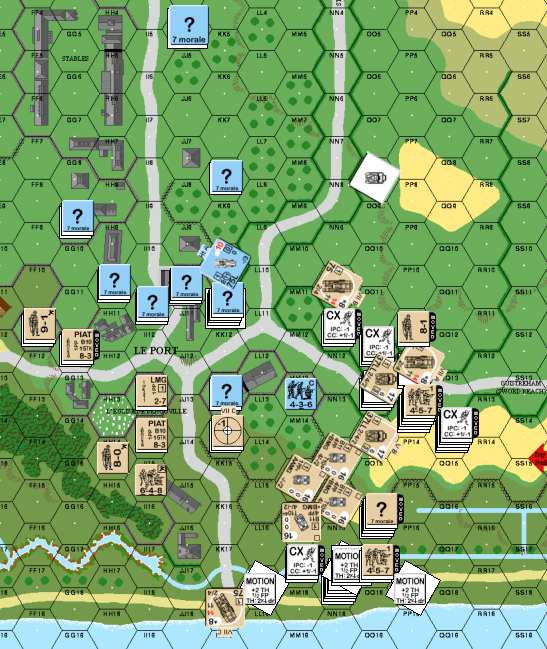
Detail of Le Port, end of British Turn 1.
“I’m awaiting Rindis’ Defensive fire response, so there’s no point in posting images yet for my Prep Fire and Movement.”
“Turn 1 is most definitely not going well. I was lucky on Turn 1 and popped a Stuart, but failed in Prep to Deliberately Immobilize a Churchill that’s staring me in the face. Unless Rindis repeats my Defensive Fire feat (5 broken weapons?!?! >.
“Le Port is proving difficult to defend. It’s one thing to look at the British OB and know what’s coming — it’s another to see it march across the board. VC require him to remove me from all buildings on board, so I’m trying to simply delay him there as much as I can. Every squad and AFV that turns north to kick me out is an squad and AFV not moving south.”
“I was successful in PB5 in kicking the Brits out of Benouville rather quickly, and I hope to repeat that before too many reinforcements arrive. I believe I have until turn 3 or 4 before I start having trouble, but If I can get dug in out to hexrow Q I think I’ll have a nice perimeter.”
“This is my first large scale game for some time. I find that my weakness in predicting how things will progress in turns ahead is proving a severe handicap, as it’s key for what will be a fall back defense. If I can’t get these damn MGs repaired, though, it’s not going to matter. :(“
“Things have certainly gone better for the Germans this series. I failed to repair any of my 5 malfunctioned weapons, and lost my CMG.”
“Prep Fire resulted in the failed Deliberate Immobilization attempt of a Churchill, and Intensive fire fared no better. Movement was a fair amount of skulking in Le Port, and my offensive in the south continued as planned, with the 105 SPG and a MkIV assuming flanking positions on the crest. Rindis flamed the offending halftrack in Le Port, avenging the Stuart, and taught me to keep OT AFVs out of range of light Mtrs as he hits the 105 SPG with a -2 Acq. Didn’t notice that when I moved there…”
“G2 ended with me in a good position to take N11/O12, and little damage to the north aside from the loss of the halftrack.”
“UK Rally 2 resulted in the loss of a CMG and a 50mm Mtr. Nothing else was repaired, leaving me without my MG interdiction base. The main reinforcements are too far away to be an issue this turn, I think, but I need those mg’s back in action. Very little Prep Fired before we broke for the evening, but the 105 SPG survived another Mtr shot which was my biggest concern. There’s a lot of Brits poised to race down the canal road, but I don’t see them preventing the loss of a few more buildings in Benouville next turn, which is key for me.”
“I’ll know more tonight. The Limeys advance at 7!”
Turn 2, and… things could be going better. Lost a Churchill when I started it and a concealed squad pulled out a Panzerfaust and flamed it.
Probably trying to hurry a bit much again. He managed to stun a CE Churchill. Despite the problems with him firing down the JJ12-KK18 road, I am finally getting vehicles past it, and should be able to get something into the outskirts of Benouville next turn.
I could definitely wish my fire was a bit more effective, I disrupted a conscript squad during PFPh, but I’m going to need to do a lot more than that if I’m going to get anywhere….
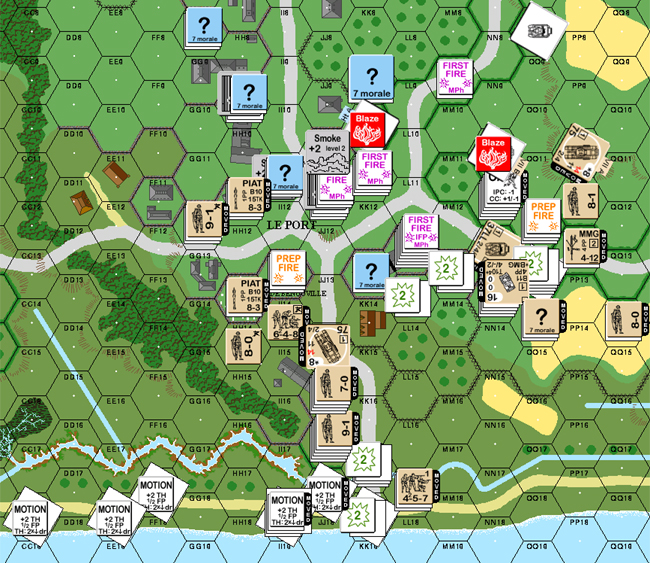
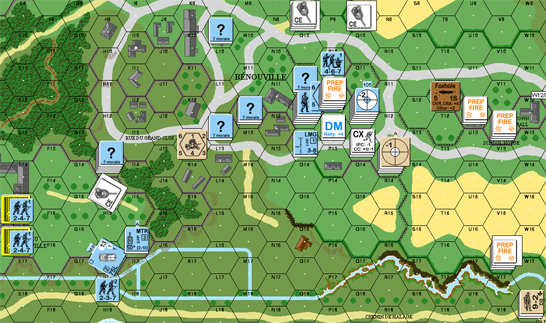
Situation near Le Port, end of MPh, British Turn 2.
“Boy, there’s sure a lot of stuff heading for the KK13 building.”
“Rindis is effectively bypassing Le Port this turn. I had a squad and lmg in KK14 to close the canal road, but he got chased off by an enormous amount of firepower. Rindis ran a CE Churchill down the road, and units in JJ13 managed to stun the sucker and lay some residual. Further fire into KK16 left some nice blocking fire for the line of Bren carriers, but with some fancy maneuvering and numerous bog rolls (don’t those damn things ever get stuck?) he got four carriers shoved down the road. Rindis got cute and sent another Churchill after my remaining halftrack. It’s outside of PF range so it’s up to an undergunned, underarmored rattletrap to take it out. With luck I can immobilize it in Prep.”
“My remaining mtr CR’d a squad working his way into the outskirts of Benouville, and the tanks broke three squads. Benouville is looking good for next turn. If things continue to go well, I may shove him past the Q hexrow. Reflection on the slope hexsides and LOS revealed the Marder in H16 can see some of those pesky carriers, and took a shot at the one towing the ATG. Missed (27 hexes, +2 moving, +2 size, of course I missed), but I hope to have Bren flambe in my Prep.”
“I missed stating that the HMG died in the rally phase. I’m really missing those MGs in the Chateau.”
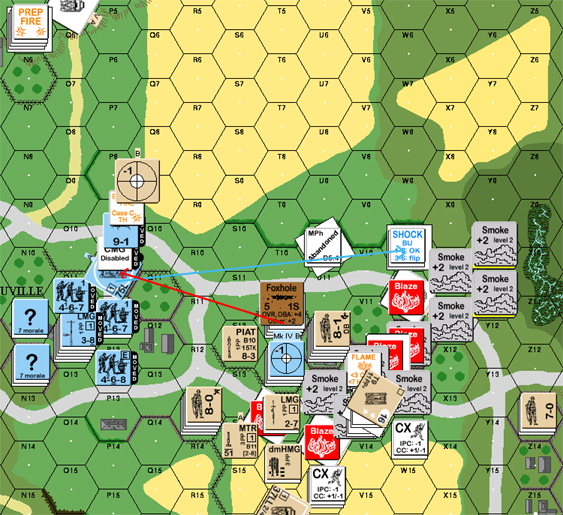
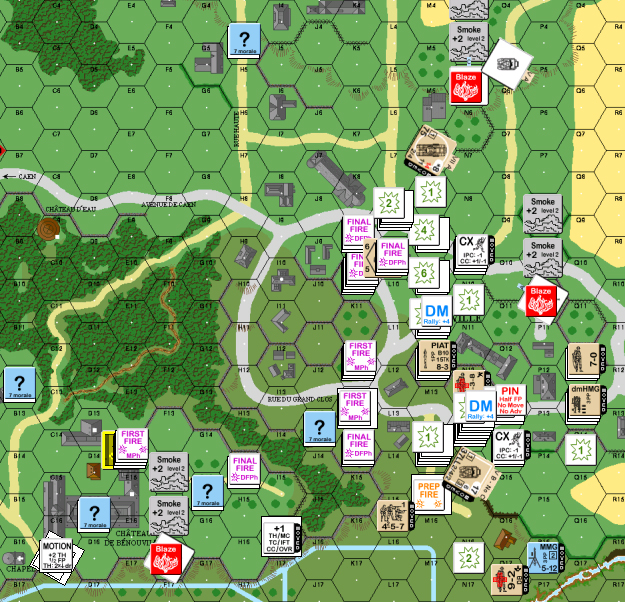
“Benouville, End of G2 DFPh”

Just had our Monday night on-line session. It’s now the beginning of British Turn 3 movement, and things have been happening.
Patch really needs to find a new mechanic as he’s managed to get a Low Ammo counter and break the MA on two AFVs, one of which was the PzIV that broke both its MGs the first turn. During my RPh he managed to repair the BMG, so it has a functioning weapon. The other was on the remaining HT in Le Port, which has now been put out of its misery by my Churchill.
The fight in Le Port has been going well, and a bit faster than I expected. I guess I’ve just never had that kind of overwhelming superiority before. Anyway, there’s now no intact Germans left east of hexrow 10. He’s got two concealed stacks left, a conscript on the outskirts of town, and a kill stack in the open, next to a couple of my squads. I’m not sure what Patch was thinking when he advanced them there, but when I whiffed a 24FP +3 attack, it sure put a crimp in my plans to clean the place up.
Situation in Le Port, beginning of MPh, British Turn 3.
Benouville is not doing nearly so well. Most of the original garrison is broken, and they’re refusing to give me a RPh miracle. One squad is going to go away in RtPh, and the primary rally point with a leader and a squad and a half (CRed on Rally) is going to have a hard choice of ending up in the open, way too close to lots of Germans, or taking multiple Interdiction checks. The one intact squad in P11 got pinned by the Sniper, so he’s not getting away.
Both MGs that Patch set up as a nice long distance kill stack in the Chateau have evaporated, so he’s currently moving a MMG back to it. Sadly, I have no way to prevent this.
Situation in Benouville, beginning of MPh, British Turn 3.
So my main focus is getting troops to the Town Hall as fast as possible. With the PzIVs closing in (O9 and Q9), I do have one question: anyone have good advice for setting up an ATG under fire? (Patch found a nice gap to fire his Marder between the two sections of half-orchard lined road. Thankfully, he missed, and I should be about to pry that -2 off the Loyd Carrier as soon as it moves.)
Overall situation, beginning of MPh, British Turn 3.
“I’m at serious risk of losing this game due to my die rolls. Another MA malfunctions, but I get the BMG repaired. I’m now 1 for 7 on weapon malfunctions, with 5 permanently gone. What is truly tragic is I nearly rolled the MA first instead of the BMG for repairs, but I’m so nervous about repairing weapons now I didn’t want the MA going first. The loss of that MvIV hurts big-time.”
“Le Port collapsed a game turn quicker than I had expected. Rindis finally got his DR’s, and my front units have crumbled. Building JJ10 has become a deathtrap and I’m struggling to evacuate units into the HH9 cluster where there’s some retreat options. The burning AFVs are offering both help and hindrance to my escape. Thankfully my retreating units didn’t break (though my covering units did, except for a mighty 436 that flamed a Churchill. Can he be a hero again?), so there’s something to salvage for now. With luck I can maintain Le Port the situation until turn 6 at least. The more units trying to dig me out of Le Port, the fewer head to Bénouville.”
“Bénouville, on the other hand, is going splendidly! The Brit paratroopers have collapsed quickly, and I expect kick him past the Q hexrow and wipe out most of his starting force if not this turn, the next. I still need to shuffle units about for the upcoming assault by his reinforcements, but I’m in excellent shape. Except for the loss of 5 weapons on this half of the board, which is a severe disadvantage). I don’t expect meaningful Brit units at Bénouville until turn 6, with an all-out assault starting on turn 7.”
“My tanks are moving up to take advantage of interdiction possibilities against fleeing units. The Marder is eyeing the numerous carriers headed my way, but at a base +4 to hit (+2 size, +2 moving) I don’t expect to hit much. Still, it is keeping Rindis wary, and there’s a MkIV there to back him up.”
“The Churchills are key to the UK assault, I believe. I’ll have a hell of a time killing another one given what Rindis learned about Panzerfausts this game, but killing one and stunning another I think is a good show for the Le Port forces. If only I’d managed to immobilize another…”
“Rindis is making a few mistakes in his game, which I will not reveal as I need him to continue those mistakes to pull this one off. It will make for an interesting discussion later.”
The Churchills are key to the UK assault, I believe. I’ll have a hell of a time killing another one given what Rindis learned about Panzerfausts this game, but killing one and stunning another I think is a good show for the Le Port forces. If only I’d managed to immobilize another…
Actually, I already knew, seeing it happen was another thing. And of course, it happened as soon as I got careless and forgot he was there….
Rindis is making a few mistakes in his game, which I will not reveal as I need him to continue those mistakes to pull this one off. It will make for an interesting discussion later.
Just remember to point them out afterwards….
I’m reasonably happy with the situation. Both towns are falling apart faster than I had hoped/expected. I shudder to think of what Benouville would be like if he had those two MGs in the Chateau still. Beyond the extra firepower, they’d be a really nasty threat to anything approaching the town, and I’m not sure what I’d do with them there. Defending that place is a puzzle I’ve yet to figure out.
I’m reasonably happy with the situation. Both towns are falling apart faster than I had hoped/expected. I shudder to think of what Benouville would be like if he had those two MGs in the Chateau still. Beyond the extra firepower, they’d be a really nasty threat to anything approaching the town, and I’m not sure what I’d do with them there. Defending that place is a puzzle I’ve yet to figure out.
“You think defending it is a puzzle? Turn 3 Defensive fire has resulted in the loss of the second mortar, my third tank MA, and an LMG (I was fortunate to roll my 4th boxcars of the phase on a UK MC during our email exchange). I think this brings my total Gun/SW loss to 10.”
“Bénouville is closer to Le Port than it looks, and carriers are swarming the northern limits with CX infantry. With my loss of weapon support I’m hurting to slow him down. Good news is the original defenders of Bénouville are all broken and are looking to perish (or be further hurt). Some happiness at least.”
“Bénouville, End German DfPh, UK 3”

Four carriers constitutes a swarm? 🙂
I really think you should just surrender to me now, if you get away you’ll just have to explain to Rommel how your equipment got in that condition.
I really had been talking about the original garrison (/PB5) when it comes to the defense of Benouville. And that’s fallen apart quite nicely despite the malfunctions.
I’ve gotten armor there, but all the speedy stuff has to hope for misses vs. 75mm shells….
“Four carriers and a Stuart, sir! Let’s not go slighting your abilities.”
“German Prep Fire, turn 3 has gone splendidly! Unfortunately, splendidly for the British as I malfunction the MA on the Marder, disable the MA on the 105 SP (was under a Low Ammo counter), and eliminate my second Mtr and an LMG during the Rally repair (I did at least fix a MvIV MA). Let’s review the game to date:”
SPW S307(f): MA Malfunction
MkIV(c): MA Malfunction (repaired)
MkIV (c): BMG Malfunction, (repaired)
MkIV (c): CMG Malfunction, Elim
MkIV(b): MA Malfunction
Marder: MA Malfunction
GSW 39H(t): MA Disabled
50mm Mtr (a): Malfunction, Elim
50mm Mtr (b): Malfunction, Elim
LMG:Malfunction, Elim
MMG: Malfunction, Elim
HMG: Malfunction, Elim
“I think the game is definitely tilting in Rindis’ favor, and after beating him every game this series, he’s probably due. But come on!!!  “
“
I’m coming to the opinion that the VASL dice are feeling sorry for me.
But not too sorry since you managed to blow up the 3-in MTR Carrier. T_T
“I need to read the OB more carefully. I didn’t know you even had a 3-in Mtr.”
Yeah, Carriers are a place where I wish VASL could reproduce the tiny writing on the counters.
German Turn 3 was mostly characterized by the Infantry moving up in Benouville to consolidate the main part of town. On the other hand, one of the PzIVs pulled back to the Slope line and is settling in for some long-distance shelling. In Le Port, he’s still pulling back, and is starting to get into the Stables.
Die-luck started going all over the place. My DFPh opened with the Stuart next the the School House attempting to take out the German AFVs across the way, and immediately Malfing it’s gun! (Three AFVs looking at each other and not a functioning MA.) I also noticed a really tricky shot in Le Port (pity I didn’t see it during movement). My up-Slope Churchill fired over two hedges and through two hexes of Orchard at the conscripts that are fading back from his north flank. Pity it didn’t do anything. I finally affected the main evacuating group, pinning the leader, breaking the guys with the MMG, …and getting a Battle Harden and Hero on the other squad. Further fire broke the promoted squad and… made the Hero a Fanatic. (This is going to come back to haunt me, isn’t it?)
Brit Turn 4 RPh saw the PzIV get it’s MA back, so… the poor little Stuart’s in for an interesting time. My turn is mostly movement as I try to get to grips with the Germans without being completely shot up. So far, so good on that front, he broke a HS as it unloaded from a Carrier, one leader broke and the Brits have their own Hero. We’ll see if that lasts through some of the important units that are coming up, and the DFPh.
Situation in Le Port, most of the way through British Turn 4 MPh.
Situation in Benouville, most of the way through British Turn 4 MPh.
Patch’s dice are back, and they’re not happy. He’s now repaired the MA on both AFVs parked in front of the Chateau.
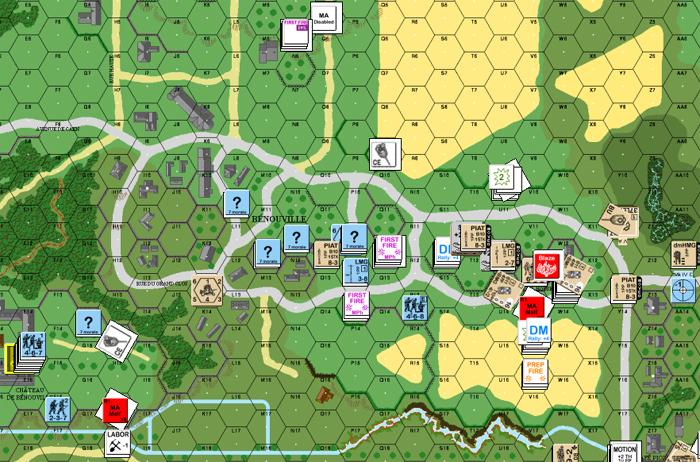
He also just had a very good Prep Fire. Highlight: Spraying fire that took out two squads from 2-3 hexes away. I’ve never gotten to see spraying fire work so well before:
And that on top of a 3-1 CC that I muffed completely. (You can see it going on in GG9.) The Germans seem to be determined to hang on to the Stables and their getaway horses….
“German Turn 4 went well so far. I repaired both AFV MA’s, leaving me with no malfunctioning weapons on the board. I’ve not been in this good a shape since I first set-up.”
“Prep Fire continued my luck. I rolled a number of ‘5’s, breaking a couple of units and allowing Le Port to continue another turn. I don’t think I’m going to lose that town until UK Turn 6. How the Melee will turn out is anyone’s guess. I figure I’ll have about a 55-60% chance of surviving this turn with at least one unit (which is near certain to die in his CC phase), but if I can keep him from moving that stack… Every turn I resist is another turn delay for British forces to head south.”
“Le Port, End of German Adv Fire, Turn 4. I’m running out of places to run!”

“Time to reshuffle units in Benouville. Brits, with a lot of armor, are arriving shortly and this is probably my last opportunity to move about freely without risk of inderdiction fire. The burning carrier has set fire to the town hall, which will slowly spread (but fast enough?) to cut off the buildings as an assault route, but the smoke is also screening his advance. I see from PB9 that the wreck blaze can’t spread to the grain fields. Drat.”
“Was this a good turn or not?”
“My my my, things are turning interesting.”
“British turn 5. Rindis starts things off by rolling ‘eyes for the Wind Change, resulting in a 2CW result. Now the wind is going 180 from game start. Worst, the drifting smoke is gone, exposing his routes of advance and my units for any Prep Fire. He follows that up with a repair of his Stuart MA.”
“There is very little fire and Rindis kicks things into gear and moves near everything. TwoChurchills enter the fray, lining up on two of my MkIVs. Two more are right behind them. I risk a HE shot against a CE Churchill and hit, but fail to get an effect. Rindis quickly goes BU and stops just out of DI range. This is followed up with his Stuart, who shoots to point-blank range against my MkIV west of town. He immobilizes me in a Gun Duel, but my other MkIV spins his turret and pops the Stuart.”
“Infantry moves forward with a high degree of boldness against German positions in Benouville, and Rindis’ gamble pays off. My rolls are poor and he moves several units through the grainfield next to my leading building, where I Pin them. I get one 457 to go berserk(!) but pop him at range 0 with a KIA. The ATG is deployed. Residual and firelanes are everywhere as I peck at him with First Fire, Final Fire, FPF, and thankfully multiple MG ROF. Le Port, in contrast, is quiet. My gamble to leave the 447 in GG9h1 pays off as he passes the MC from downstairs, but Rindis uses the time to reshuffle and prepare an assault against the stables and reinforce the forces entering Benouville. I will do the same next turn.”
“Defensive fire brought back my curse of 12’s. I malfunction the CMG on the MkIV that nailed the Stuart when I turn the turret to hit a HS. The MkIV by the Chateau takes the opportunity to try and relieve the infantry pressure and nails the Pin stack with a critical hit! Only one squad is affected, but with a ‘5’ for a K/4 (2MC) result, it drops it to a HS. But for the MCs, the leader rolls boxcars. Wounded! Survival roll: 6! Next unit: boxcars! Where’s the damn Yahtzee set? Everyone in the stack dies when all is over. Wow! The MkIV has ROF and switches fire to the Stuart that advanced through the grain, getting another ROF and dropping a -2 TAQ on it. The 447 in Le Port looks down the stairwell, rises to the occasion, and rolls another ’12’. That’s 4 this phase, bringing my game total to somewhere between 15 and 20. And it’s only turn 5!”
“I expect the town hall (currently containing a flame) to switch to a blaze this turn, or next. Nice to see that route getting removed from play, but it’s a crying shame I can’t ignite the grain fields. One thing I realized as all these Limeys moved closer is my plan to spread out a little to control more of the town was a mistake. I came damn close to losing R13 and O11 this turn, which would be crippling. I need to give this some thought. There’s still a long way to go.”
“End of UK Turn 5 Defensive Fire. UK lines of advance in brown. Some attacks are in red.“

When you last saw our heroes, things were not going too well. And that has continued to some extent.
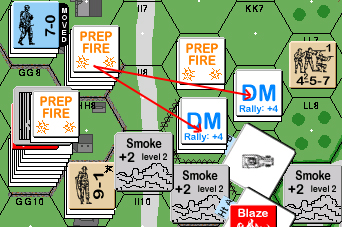
Patch’s Defensive Fire pretty much took out an entire platoon and the last operating Carrier (there is one that’s merely Abandoned, if I can ever get back to it). One exciting thing I did try almost worked out. I charged a Stuart over a Crest, through a wheat field and up a Slope to Stop next to a PzIV that had already fired. He missed on IF, I immobilized him, he bailed out, and another PzIV nailed the Stuart at moderate range with two CA changes…. It was a gamble, and I was somewhat prepared to loose the Stuart for no return, but it was sooo close. I had tried to get the tank that did it to fire earlier, but Patch didn’t bite.
German Turn 5 was no better. One of my Churchills malfed it’s MA when he pulled a PzIV out of it’s hull down position, and then the re-occupied Immobilized PzIV got a critical hit and brewed it up.
Charge of the Light Tank, end of British Turn 5 MPh.
The AT Gun is set up, but not in a great spot with all the smoke around. During DFPh I found a relatively decent shot (only +6!), fired AP until I got the -2 and then started firing HE in the hopes of getting a hit before I Depleted the HE. Despite 3 HE shots (and another 2 AP before, and 2 AP after), I never did get a hit. Probably my only ROF tear of the game, and nothing to show for it. I also managed to Deplete the remaining Stuart’s Cannister to no effect.
In Le Port, he managed to break my entire main stack that has been advancing towards the Stables. Because I hadn’t quite considered the possibilities, they got encircled, and are just barely managing to pull out. No doubt Patch intends to try to get some double breaks during my Turn 6.
Situation in Le Port, beginning of British Turn 6.
I have managed to force him out of P10 (PzIV HD), H16 (Marder HD) and R13 (stone building) this turn. But I’m loosing people, and he isn’t. I figure at this rate, with a little luck, I can make this a close run thing by the end of the scenario….
Mr. Incredible noted:
“I popped in for a looksee and it looked like you were in a right pickle in Le Port but things looked better in your screen shot.”
“One thing.”
“When the Brit stack in GG8 was broken and encircled with the Germans ADJACENT in GG7 the Brits had to surrender to the Germans as per A20.21, page A45 and not rout to HH8. If NQ had been in play by the Germans then the Brits could rout away.”
I noted that No Quarter had been declared by the Germans the previous turn, and Patch responded:
“Precisely. No Quarter was declared to try and eliminate the broken initial start units retreating from Benouville. I judged that I lacked units to control prisoners, so I elected to try and interdict their escape.”
“I had thought that the broken Brits in GG8 had no escape, not realizing they could enter HH8 until they routed. Damn shame. If I had wiped them out I’d be in a nice position to stick around perhaps to turn 8! As it stands, the addition of a nice new British MMG to my collection should make getting me out before Turn 7 difficult.”
“Benouville is requiring some reshuffling on my part. Rindis’ units in the open survived all my fire, so for the first time my units in Benouville are facing some heavy firepower. Time to spread things out, but I have damn little FP to return fire, and those Churchills are getting closer (thought critical hits are nice, I don’t think I can make them my primary game plan. Then again, I’ve had 3 thusfar).”
“I find it amazing to look at what has happened in just 5 turns. I’ve decimated the Benouville starting forces, taken the town, and have cut Rindis’ armor down by half. Rindis has blown through Le Port, marched across the board, and is gearing up for an assault on Benouville. And there’s 7 turns to go!”
With tonight’s session we finished up British turn 6, and got to the German AFPh. There’s been some remarkable back and forth going on. Patch had a fairly good DFPh (through various causes of CR, I think he nailed about three squads). I followed that with a reasonably good AFPh.
Most notably I eliminated the conscript squad on the North side of Le Port, which gave me much greater freedom in routing a large mass of brokies away. I also started breaking guys in Benouville, and Patch is largely skulking this in his turn, keeping much from happening there.
Situation in Le Port, German Turn 6.
Patch has moved the PzIV with the AL back up to P10, and Stunned my Churchill on the West side of town. If that goes, I really don’t know how I’m going to clean up that mess. He also noticed a unlikely looking LOS from F16 to O17, so the Marder and a Churchill are currently duking it out there. My ‘+1’ Churchill managed to eliminate the concealed squad in front of it, so the only thing between it and the Chateau are Orchards, irrigation canals and the Marder….
Situation in Benouville, German Turn 6.
That leaves the Stuart firing at the remaining PzIV (which now sports a ‘+1’ counter of it’s own, thanks to the Sniper) while it shells British positions….
Situation near the Chateau de Benouville, German Turn 6.
Patch is right. A lot is going on….
“My turn didn’t go very well at all, with the exception of a Shocked Churchill (damn well better die if I’m to pull this game off). I lack the firepower to do much damage, and I’m finally facing an awful lot of organized UK firepower. Time to skulk and figure out how to last 6 more turns. The loss of so many of my heavy weapons is really being felt as he advances through the wheatfield. If I can kill that Churchill, I’ve got the opportunity to stuff armor in his rear and maybe pull this off.”
“The battle in Le Port is going amazingly well. Roughly half or more of his forces broke last turn. I lack forces to exploit that turn of events, but it’s breathing room, and the longer he’s here the fewer units tackle Benouville. This is truly a game of time.”
We had to cancel the weekly on-line session, but I’ve been meaning to post anyway, as things have happened nonetheless. It’s now approaching the end of British Turn 7, and I can’t imagine Patch is too happy with the results.
The wind changed again (the third time this game), and is now blowing directly west. In rally most of my troops came back, and my Shocked Churchill recovered.
In Le Port, I managed a shot that broke two squads. Not only is that a lot in his remaining forces there, but it was the stack that had both his MMG and the one he captured from me. Worse, I did it and had two stacks of units still available to move in. I haven’t cut everybody off, but the important ones should die of FtR during his turn.
I am taking a small chance and moving more units out of Le Port before making sure that hot dice can’t kill me. But I should be able to weather most anything for right now.

Situation in Le Port, British Turn 7 RtPh.
In Benouville, the recovered Churchill promptly brewed up the PzIV sitting on the rise outside of town, and intensive fired to turn the front armor towards the one in P10. (I missed, even on this turn I’m not that lucky.)
Southeast of town, the other duel ended with the spectacular death of the Marder (on an IF shot), and my +1 Churchill has moved into the middle of the Irrigation ditches and started the ceremonial shelling of the Chateau. (Which may be all it is with the smoke from the Marder getting in the way.)
Sadly, his AL has shocked my Churchill again, and the German Sniper is getting active. We had a couple turns with hardly any 3s at all, and then the Snipers didn’t notice when we did start rolling them, and now we’ve had one British, and two German activations over the course of the last Game Turn or so.
Overview of Benouville and surrounds, British Turn 7 RtPh.
“Ah, yes. Le Port is finally collapsing. I needed to cover the street to restrict his assault on me, and his three squads promptly break my only meaningful stack in the town. I do still have a rout option (upstairs — huzzah!), but if no one rallies they will die for FTR next turn, as the Brits will control both downstairs locations.”
“Rindis recovers from Shock and promptly brews a MkIV, the first MkIV to die in the game. My return fire promptly shocks him again. This little battle is key for me. With the loss of so many heavy weapons early in the game I’ve lost the ability to slug it out with my infantry. I need that tank to balance out the coming hoard, but unless that Churchill dies I will not have the maneuverability to function, nor will I be sticking around for more than another turn before he takes me out.”
“Not moving the Marder elsewhere last turn was a big error on my part. I knew that he would brew if hit, but gambled on HD status to give me some time. Fat lot of good it did.”
“My DRs this turn were terrible. I did diddly-squat during First Fire, but did bring out a slew of 3’s and 4’s during Final Fire to bag two HS, wound a 9-2 with a Sniper, and Shock one Churchill.”
Luck in this game seems to be going all over the place lately. I generally feel that my fire rolls in most scenarios tend to average a bit high – punctuated by some well timed 2s and 3s. This one started out that way, but seems to be either all good or all poor in a fire phase for me in the last couple turns.
Patch… well, I’d say his luck is about normal if you ignore the insane number of 12s he got earlier. At the moment, it seems to have tapered off (Patch might argue that he’s run out of things that can break…). I’ve actually gotten my fair share, but they seem spread between my fire rolls and my rally/MC rolls.
Wind Change has been insane. In fourteen player turns, we’ve had 3 direction changes (2), and a British Civilian Interrogation (4).
The end of British Turn 7/beginning of German 7 has continued my current string of good luck, with troops advancing into GG7 in Le Port and successfully Ambushing his 437. (I had stacked the deck in my favor, but it was far from likely.) In Rally, both of his broken squads in the upper level of that building only failed to Rally because they’re now Encircled. And… my Churchill in Benouville recovered from Shock… again.
Considering that, and the fact that I’ve finally gotten a PIAT two hexes away from his PzIV/AL, I figure he’ll be pulling it back again. The question becomes where to/how far? I’ve got five more turns, and he’s got decent maneuvering room left….
Hopalong pointed out:
“The morale level drop caused by encirclement only applies to incoming fire.”
“Paul”
“Ps By the way enjoying the AAR :)”
Whoops! Good catch!
Thankfully, I hadn’t actually viewed Patch’s MPh in the log yet, so I considered it early enough to correct the error. I promptly paid for this when he double-broke two squads and pinned a third with them in PFPh….
So far, it looks like Patch is ordering a general withdrawal south and west into the outskirts of Benouville. The chase through all those stone buildings is going to be interesting.
The good news is that my PIAT caught his AL with a Critical Hit as he started.
“Good news my fanny. T_T”
“German Turn 7 has brought forth a new strategy on my part: run! Run!!”
“The P13-Q12 building cluster is too hot to defend. Rindis has finally gotten squads forward armed with multiple MMG/HMGs, and I can’t swap fire with him and win. There are too many wonky LOS back into the rear buildings to try and do something in depth in this location, so I’m falling back to the K10/L9 block. My attempt to bring armor with me has failed with a Critical Hit from a PIAT. So far, being hull down has done nothing to help me. My Sniper tags the ATG carrier, but I can’t see it being towed again this game so I’m not that impressed by that result.”
“Le Port is still in doubt, shocking considering the quality of troops defending it. I’ve two good order squads still in play against 4-5 squads. I’m in a lousy position, but it’s all about time. I’m impressed that he will be spending Turn 8 cleaning me out, and this has probably saved my bacon given how badly the game went for me at the start. I’m throwing me Hero into DD12 to block the woods road and interdict units trying to move from Le Port to Benouville. Another obstacle for Rindis to overcome!”
“Five turns to go, and dusk rules will shortly add a +1 to all fire attacks. Will it help him more than me? Too soon to tell, but I’m both worried and encouraged at the same time. The VC definitely favor me.”
“German Turn 7: Benouville, end of German Advancing Fire”

“Le Port, end of German Advancing Fire”

Patch is doing a good job running. I attempted to get up close and personal with his lone squad in N11, and quickly found that only a few leading elements could get close. He managed to break a HS and Pin a full squad in adjacent hexes, saving him from CC this turn.
Patch commented on something that I had recently noticed (and was pointing out by example): the N-Q cluster of buildings in Benouville is much more open than you would generally give credit for, and there’s all sorts of sneaky LOS available for the observant. It’s part of why he’s pulling out of that area as fast as he can, I was finding too many range 3-4 shots on him.
Patch was down to one functioning PzIV going into my turn, which had been Stunned earlier by the Sniper. He had gone CE again to make his shots more effective… and the Sniper activated and hit the tank again. So… the last German vehicle is about to go trundling off the board under Recall.
A bit before that, I had started moving one of my Churchills when Patch pointed out “You know you can’t go up a Slope Crest line?”
Well, yes, I did know that. I’d just read the rule a couple days ago. But I’d been contemplating what to do here for weeks…. So a quick reshuffle later, and the path to the Chateau isn’t as good, but it is legal.
Meanwhile, I have finally eliminated the last German MMC in Le Port. So, things are generally secured there, and I just have to figure out how to get the troops back in action while going through a Hero….
Situation around Benouville, end of British Turn 8….
My major concern, of course, is just how I’m going to get someone through the valley and even attempt to deal with the Chateau in four Game Turns. Patch is doing a very good job of setting up to delay me.
“Yes, I have lost my last operational MkIV (and AFV, period) to a Sniper shot. For a SAN of 3, our Snipers have been amazingly active. I think we’ve got Sgt York roaming around out there throwing lead at both sides. Rindis failed to mention that the Sniper that double-Stunned my MkIV was triggered by a CH on his moving ATG and assisting squad by that same MkIV. KIA’d the squad, and a near miss killed the crew and malfunctioned the ATG. Not a horrible exchange, but frankly, I want a tank back. Rindis still has 3 Churchills and a Stuart to cause me grief.”
“Rindis wipes out all my MMC in Le Port except for a broken squad with a broken leader. Will they rally? If not, Le Port falls. Nope, no tension there. Still, it took him 8 turns to wipe out my second string. That bought me crucial time to stabilize Benouville. Not bad for a bunch of 447s and 436s!”
“Dusk begins next turn, making Rindis’ job that much harder. I’m now in +3 terrain, with +1/+2 orchard LOS hindrances, and a +1LV hindrance. Despite his FP advantage, he’s going to have trouble digging me out in four turns as I skulk and delay. Do I have this won? Not by a long shot. But it will be a much closer game than I think any of us thought back around turn 3 when most all of my guns were malfunctioning. In ASL it truly isn’t over until the fat lady sings.”
During Turn 8, Patch generally faded back some more, and ducked out of sight.
With four turns to go, and a lot to do, I grimly started Turn 9, with a goal of trying to get enough troops up close enough that the FP can keep pushing him back. With a little luck, I could start developing a hole in his lines that I can try to shove a few guys through, and with a lot of luck and care, tie everyone around the chateau up in Melee for the end of the game (since Melee, isn’t GO, I don’t have to kill or break him—just get up close and personal).
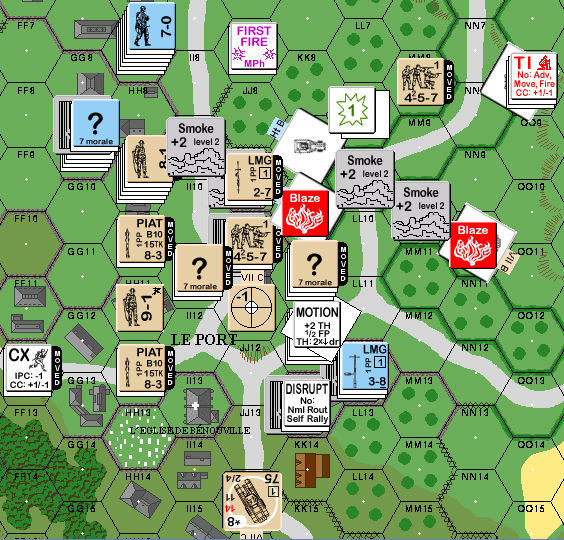
My Turn 9 MPh went a lot better than I ever would have expected. I’ve seen this happen before—but it’s usually me who’s wondering what it’s going to take to hit moving Infantry. The +1 LV is helping out a lot, as it’s taking the edge off a lot of attacks.
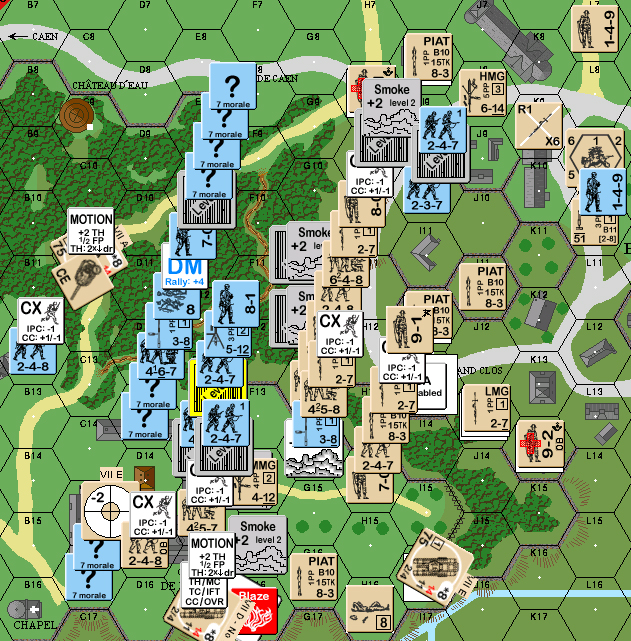
End of British Turn 9 MPh. Note the lack of DM to go with all the Resid.
I’ve more-or-less enveloped the west flank of his line. If AF/CC goes well, I may take care of a very large headache right there. All told, he broke a squad and the 9-1 leader, and Pinned a squad and a half.
Detail of Benouville, British Turn 9 AFPh. L9 was pinned by the Sniper, only a leader is broken in N13.
“Yeah. Things went poorly for me this turn. I muffed near every die roll, only breaking a few inconsequential units. Rindis advanced into K9 and L9, killing K9 and holding L9 in Melee. My flank has definitely been turned, and my retreat routes have been seriously compromised. The game has turned into a chase — can I run faster than he can? Umm, no. I’m definitely in trouble.”
“German Rally brought about Gusts, making the fourth wind change and turning this into the windiest game I’ve ever played. Rally is, if nothing else, eventful.”
“Prep Fire, for what I had from the Chateau, broke a squad and leader in M10, easing some pressure from the flanking maneuver. Beyond that, I’m falling back the best I can, trying to get some sort of line up that will shield some units, allowing them to fall back the following turn. Movement is still ongoing, so it remains to be seen how my plan is unfolding. It’s coming down to die rolls here, and I need to roll better if I’m going to have anyone left come turn 12.”
“Rindis is continuing to be aggressive, especially given how little time he has left. Rindis finally remembered to place Smoke, but failed in his depletion numbers and found his Mtr out of range of the Chateau.”
“The after-effects of Gusty Winds kept drifting smoke clear from the board, which didn’t provide as much effect on my defensive fire given the thrust of Rindis’ advance through the western portion of Benouville which was open to fire from the Chateau. The UK Sniper is being beyond troublesome, breaking my squad in melee and leaving Rindis more freedom of movement as he needn’t reinforce the melee to win.”
“I have most definitely been kicked out of Benouville. Shame. Seemed like a nice neighborhood. I was successful in breaking several units in his movement as opposed to last turn, and have relieved some of the pressure on the flank. With only two turns of movement left I think Rindis will have a hard time getting units in to the Chateau to win, so I do have a chance if I can keep him headed in different directions. The success or failure of the upcoming Advancing Fire/CC in J11 and I14 will determine my strategy for the remaining two turns.”
“End of German Defensive Fire, UK Turn 10”

“Rindis and I finished off German Turn 10 last night. He has two moves left, I have one. My line has effectively collapsed, and I can’t hold a line at all. During the end of UK 10 Rindis killed the squad in J11 and broke the leader in I14. Not liking the upcoming CC odds now that my concealed unit was gone, I broke the squad and routed them both back, in the hopes of rallying them later.”
“All I could do during my turn 10 was run. I deployed two squads to increase my area of coverage. Rindis needs to take the chateau to win, and if I can block the stairwells I can hold the upper floors. Can I get it done? Hard to say, but I’m hoping I’m spreading enough about to make things difficult. My retreat from I12 resulted in a broken squad, which I routed to G13 to cut back on avenues of advance on my positions. There’s little firing going on anymore. It’s all about position and movement.”
“Beginning of UK 11. The 7-0 and 467 in F12 have rallied. Off-map a Stuart is chasing down a concealed unit in F3”

The various situations this game has gone through are amazing. Right now, I am indeed cleaning the German’s clock. However, it looks like night will fall (I assume that’s what imposes the scenario time limit) before I can give it a true spit-and-polish job.
Patch did a wonderful job during his turn 10 reorganizing around the Chateau. He has units sitting on top of all three stairwells (two of them concealed), and two more sitting in upper levels. It’s gone from “I might just be able to do this” to “a bit short of impossible (in two turns)” with the new defenses.
I’m starting to come up with a plan to make a try for it. The big problem is a Stuart is not an efficient thing to go hunting a concealed squad with. By my current calculations, the troops currently running down the west side of the board from the Stables won’t make it there in time.
Once again (in both places), I’m coming down to not having enough available close enough to be able to create/exploit weaknesses.
This… is embarrassing.
I practically diced Patch in the first third of the game (admittedly by rolling something akin to average while he rolled high), and still couldn’t beat him.
It was close. It was very close.
But Patch definitely knows how to defend buildings, and at the beginning of my Turn 12, I had way too many things to do for one turn, including fighting my way through different blocked stairwells.
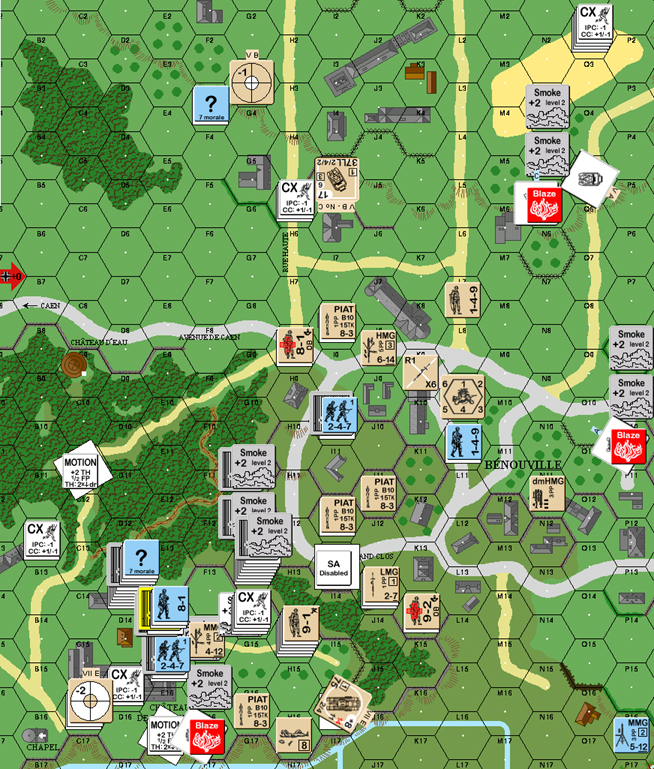
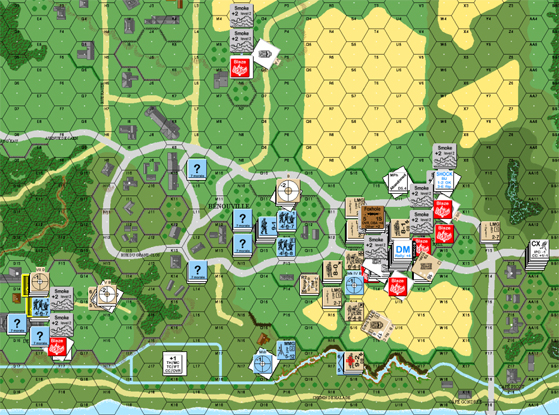
General situation, British Turn 12 RPh.
Detail of the Chateau de Benouville, with exploded stacks.
I’d been figuring for some time that it would end like this. Actually, for much of the game, I had a feeling that I’d wipe up the Germans elsewhere, but not get to the Chateau at all. But I successfully got inside on Turn 11. (Again I did fairly well. The biggest annoyance was him breaking the MMG squad in F14, which, surrounded promptly died of FtR.)
So what went wrong?
Well… if I really knew that I probably wouldn’t need to type this. I did have some bad things happen to me mid-game that certainly contributed.
Patch points out that I needed to SMOKE more. That’s pretty much a given. I’m still new enough that figuring out how to use SMOKE is still a very steep learning curve for me. However, I will point out that Patch’s original attack into Benouville knocked both my light MTRs out for a while, and he killed the 3 in. MTR before it could get unpacked, much less go into action. That leaves the tanks, which were desperately trying to suppress his armor, which was being all too effective.
There’s a bit after that which is where I probably should have used SMOKE with the MTRs.
One point I’ve felt for a while, is that I think I tried pressing an attack in Benouville a turn too soon. Feeling the press of time and a lot to do, I tried pushing as soon as I had troops up there at all. This didn’t get anywhere, and lost me 2-3 squads. The next turn, much the same happened.
Considering how fast the collapse happened once it happened, I can’t help but think an initial attack with both turn’s losses (-.-;) available might have actually done much more than either attack that happened did.
Another point is that I wanted to get into the lower part of Benouville from the east, before he retreated into it. I figured I might disrupt some rout paths. At the very least, the threat of it should help, even just a little. Afterward, they could become the core of an assault team on the Chateau. In the event, the group was a little too small and got picked off other than a wounded leader. So much for that plan.
Once my back was against the wall (time wise), and Patch was retreating, and I had to rush after him to keep him from finding a good place to hole up in, I think I did pretty well. I’m especially proud of my turn 9 performance. Sure, I was aided by Patch’s dice again, but I think I did a good job exploiting the opportunity to the fullest, and it made sure that we had to get to the last turn to determine whether I could pull out a win.
Our next scheduled game is the Primosole Bridge CG from Journal 6. I’ve had enough of the Brits for a little while, so I’ll be the defending Italians and Germans. There will probably be a small delay getting it going as this will be my first night scenario.
Perry Cocke (of “Perry Sez” fame) chimed in at this point with:
“Congrats, guys.”
“Great job.”
Patch summed up from his side:
“Whew! That certainly was a long and exciting four months. Anyone who has a game going poorly and is ready to throw in the towel early need only look at this replay. I lost how many weapons due to malfunctions within the first 4 turns? (Answer: 13, or half my OB) Yet I still pulled it off. Wow.”
“Two key events helped me achieve this victory. My 8-turn stand in Le Port, and the speed with which I booted Rindis out of Benouville.”
“Le Port is a speed bump in this scenario. Poorly led and equipped second line and conscript squads face off against 26 squads and 8 tanks. Gaah! What the heck am I going to do with them? I thought they’d last 4 turns, 5 max. They were highly successful in battling the UK armor (killing one Stuart and a Churchill, and stunning another) and I forced his infantry to deploy, delaying reinforcement of Benouville. Though Rindis did clear out the row 12 and 18 roads quickly, I was able to maintain withering fire that inflicted some casualties, and I formed a small core force that held off several assaults as they retreated through the stables, keeping 6-8 squads moving in a direction not towards Benouville.”
“In Taylor Made Defense, it took me 4 turns to flush the troops out of the town. This time, I did it in 3. By the time Rindis got troops into the northern outskirts I had a defensive line up to the Q hexrow. If I had not gotten this far, I would most likely have lost as it gave me a wide open ground area (R-T hexrows) to interdict the coming UK assaults. The delaying action in Le Port helped this immensely, as it let me keep a local superiority and push him out.”
“Rindis hit upon a factor which I’ve been hoping he wouldn’t notice for months now. The use of SMOKE. The Churchills have good smoke and WP abilities, as well as sD and sM, but they weren’t used. The 51mm Mtrs also were not used for Smoke until late. (I was fortunate to destroy the 76mm Mtr and its carrier before it could get deployed, eliminating another SMOKE source.) With everything burning merrily away on the board I was certain Rindis would catch on, but he didn’t until it was too late. (I was even careful not to mention in my posts how the drifting smoke from all the wrecks was obscuring my LOS to avoid dropping any hints.) I’m convinced liberal use of SMOKE is vital for a successful UK attack, especially if I had the full MG compliment in the Chateau. SMOKE on the strongpoints and envelopment, working units into the towns to cut off retreats, seems to be the key to victory.”
“Rindis showed an amazing (and irritating) ability to work units into odd corners this game, sending units into places I was not expecting. As he pointed out, this was a close game. My goal, if it reached that point, was to stay concealed and try to withdraw out of any CC into another building hex, but it wasn’t necessary. I deployed what few squads I had left and parked them on the stairwells, keeping him from moving through the chateau to tie me up in CC and get me out of GO status. Two more turns would clear out the last of my units, but thankfully he lacked those turns.”
“Despite a 3 SAN, both our snipers were extremely active, killing leaders, breaking squads, and even recalling a MkIV. We had four wind changes, when in my experience there’s usually none. Most every vehicle kill resulting in a burning wreck, setting fire to the northern edges of Benouville and keeping Rindis out of cover for his assault. This was an amazing game, and I had a great time trying to hold things together.”
“Now it’s off from one bridge to another. Our next game will be the Primasole Bridge CG, with me as the British. Should be an interesting (and long) campaign.”
Postscript:
In case anyone is still wondering, this is a great scenario, with a heck of a lot of moving parts to have fun with and watch go wrong. It really has scope for a bit of everything, and I recommend it (or it’s revised version, PB6a in Journal 2) to anyone who can spare the time for it.
This playing in particular had more than it’s fair share of chaos, with more weapon malfunctions or wind changes than it had any right to generate, and probably more wind changes than I’ve seen in all my games since. I can still remember the turn 9 MPh, and the dawning realization that this was my big break, and I had to press forward while I had the chance.
Smoke was something I still wasn’t using at this point, though I do remember I contemplated it a time or two in the middle and didn’t see any way to make it work. I’d have to look over the logs in detail and see if I’d pick up something I missed now.
In many ways the biggest problem was Benouville. Technically, defending it should have been easier than in PB5, as the Panzers were too busy to just surround the town and make sure I couldn’t do anything, but the town fell even more quickly than it had for me in that scenario anyway. My biggest concern during the early scenario was getting everything I could past Le Port to shore up that area so I wouldn’t have to re-take it later. And that failed completely. I couldn’t stem the tide, and I ended up blowing a lot of time and troops trying to retake the area that fell in the first three turns.
I will say that the biggest thing that keeps me from offering to play it again is the thought of trying to advance without all those MGs malfunctioned. ^_^;
Discussion ¬