
28 Ambush!
After finishing up in Piepsk, Mark and I went back to the Partisan scenarios for one set in Greece. Bulgaria claimed a part of it after the Axis victory there in ’41, and by that winter had thoroughly pissed off most of the locals, leading to the beginnings of a few partisan movements. In March ’42 a group raided a Bulgarian camp and made off with whatever weapons they could carry. The Bulgarians gave chase, and the Greeks split up in disagreement, with some staying to face down the Bulgarians.
The scenario starts right after a captured MG opens up and breaks the head of the Bulgarian column. The Greeks are defending board 4 with thirteen partisan squads (and sixteen “?”), three LMGs and two MMGs (all captured Axis Minor SW). The Bulgarians have nineteen squads lined up on the road, stretching back to board 10, five of which are broken and DM at scenario start (must have been in column). Mark took the Greeks, and mis-read the victory conditions, thinking he needed to stay at the victory line, instead of keeping me from crossing it. A clever twist is that while the Bulgarians need to have 7 squad-equivalents east of/on hexrow I, that number goes up for any MGs the Greeks have operating, potentially including any more they grab from the Bulgarians during the scenario.
My first action was to assemble one of the 50mm MTRs, which was right at the board 10 tree line. After that was a scramble for cover, and hurrying the rear of the column to the front. Mark didn’t have any fire during movement, in fact, we found a fair number of just-barely blocked LOS as he checked for concealment loss. The 4G3 MMG then broke my MTR squad, reduced two of the broken squads, and eliminated a HS.
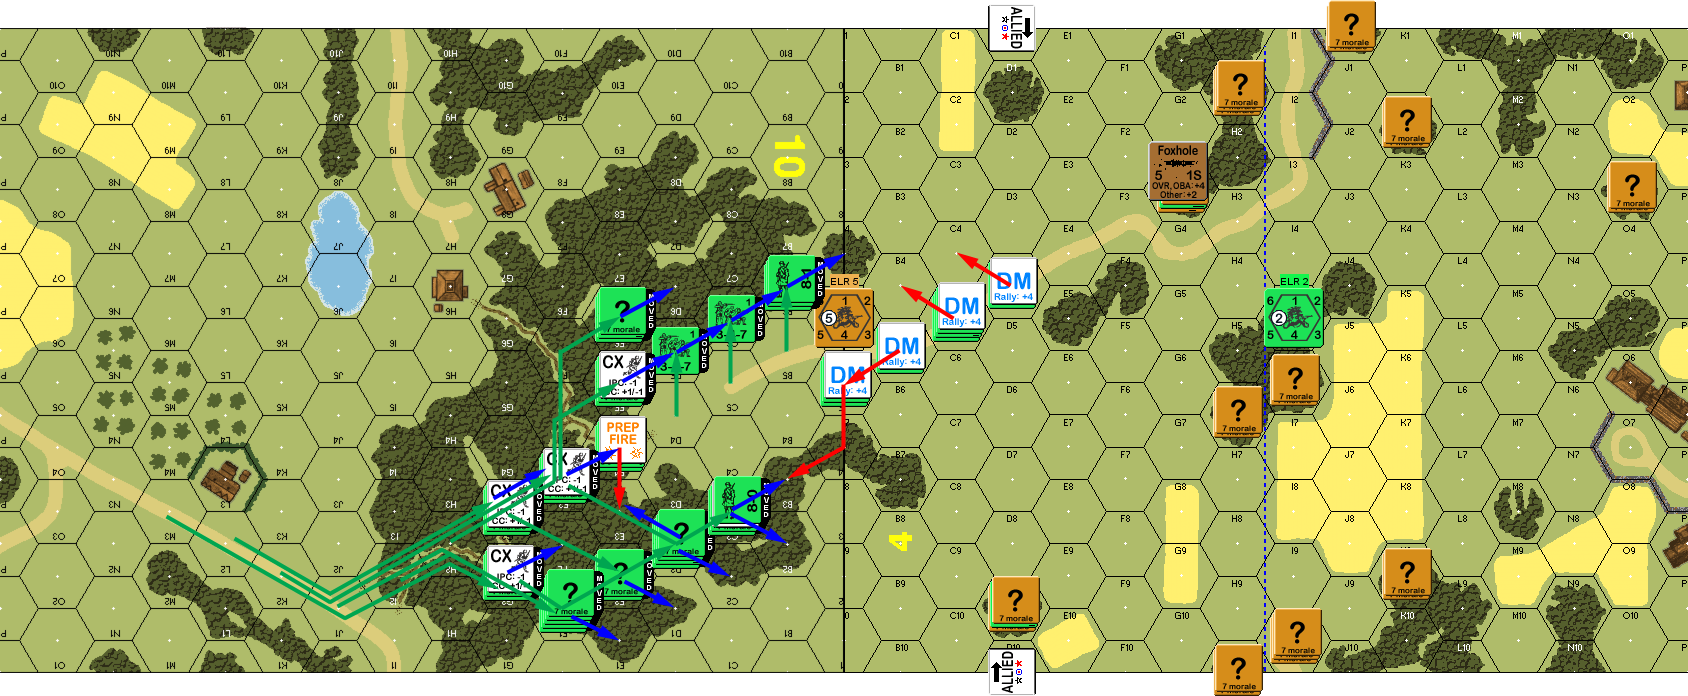
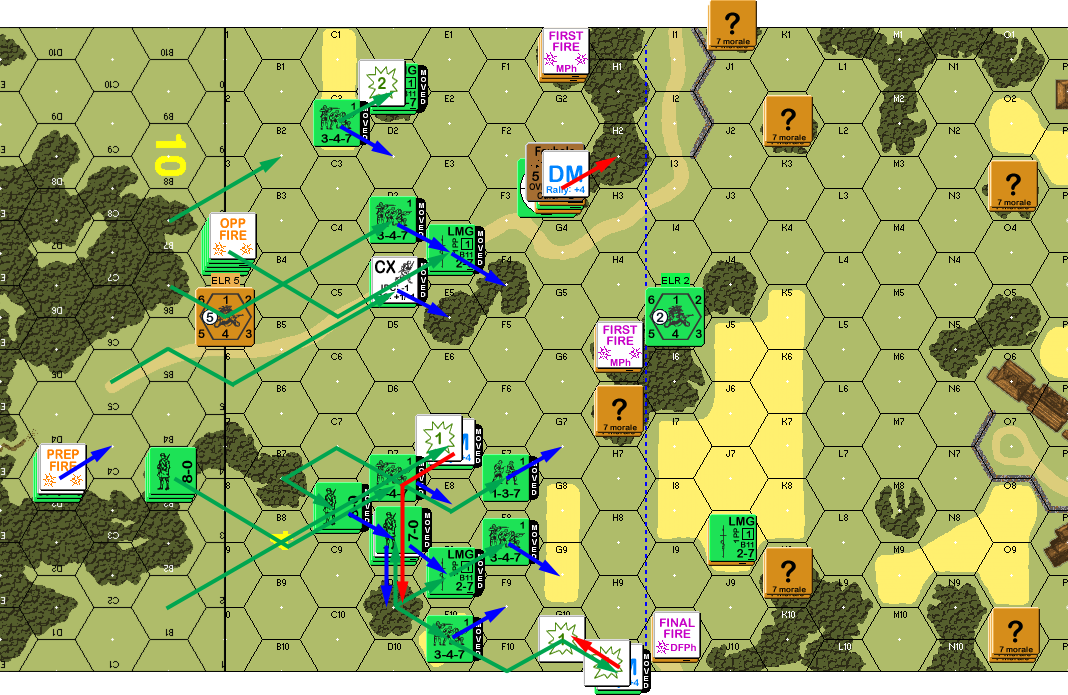
Situation, Bulgarian Turn 1, showing the full board. The blue dashed line is the goal for the Bulgarians.
For Mark’s first turn, my ex-MTR squad HOBed back to first line after having ELRed when it broke. A different squad recovered the MTR. The 4G3 MMG kept firing, but this time didn’t manage to cause any mischief. Mark pulled out of 4D9, and my MTR got three hits on G3, though all the effects rolls were quite high. I assembled my MMG and managed to pin G3 with small-arms fire. (I also rolled Mark’s SAN of 5 three times in DFPh, but none of them did anything.)
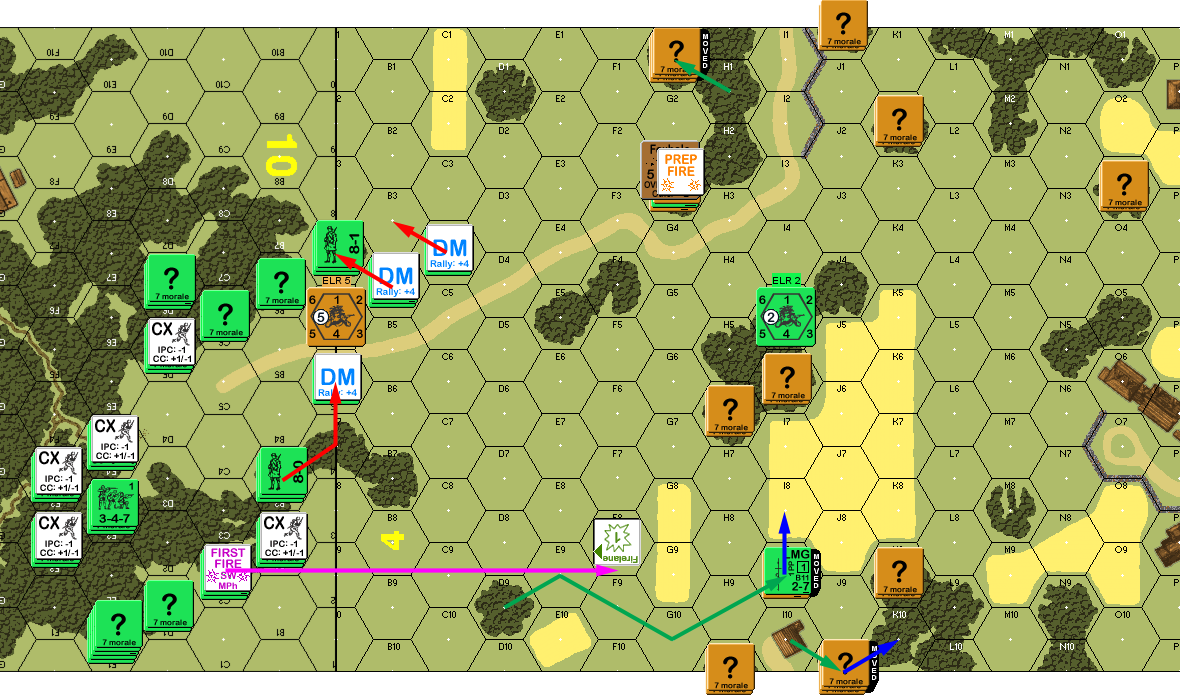
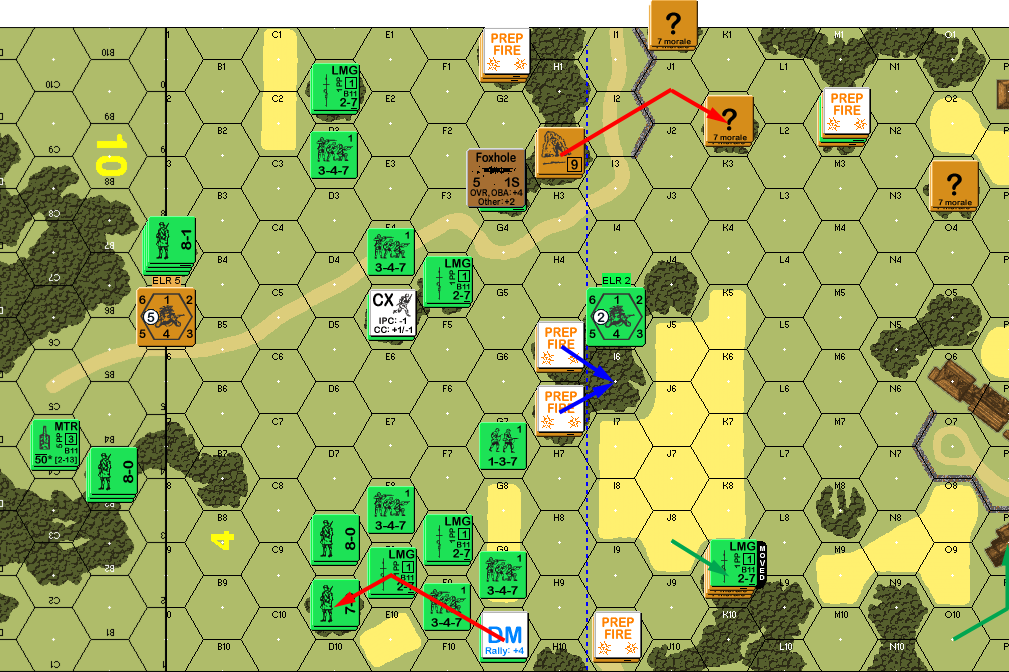
Situation, Greek Turn 1.
I rallied one HS for my turn 2 RPh, while the MTR got another three ineffectual hits on G3, and the MMG didn’t manage anything. The general plan was to split into two wings, one north and one south, both of which needed to take what comfort they could from grain hindrances. As it was, both managed to move up without trouble, but the one squad I sent to try and take the central E5 position broke to fire from the Greek MMG. There was plenty of other fire in DFPh and AFPh, but nothing with a result.
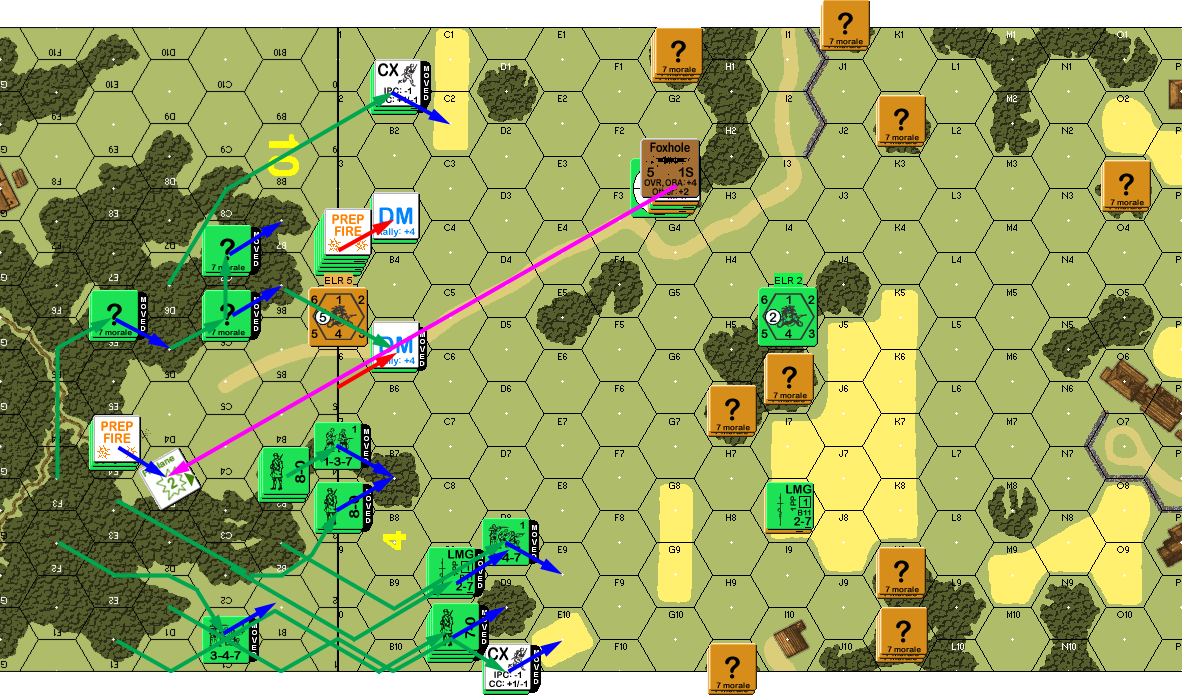
Situation, Bulgarian Turn 2.
For Mark’s turn 2 I rallied another HS, and then reduced one of the broken squads on a 12. He pulled back a little more, with my one shot managing to pin his squad in the grain. The MTR managed two more hits on G3 without any more effect than the rest of our fire.
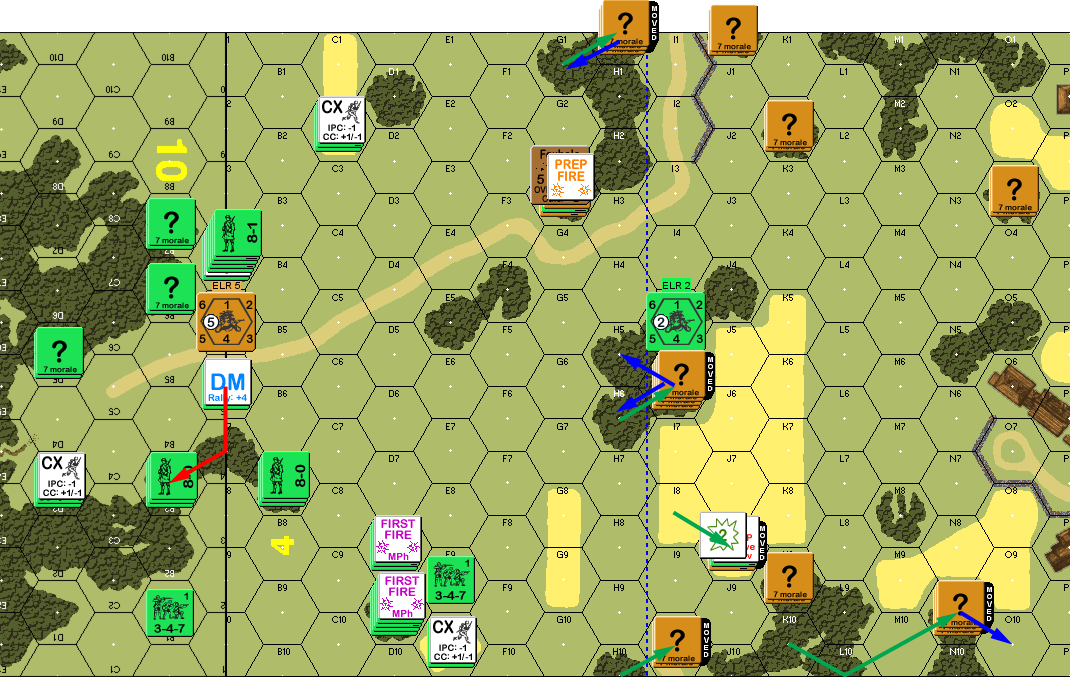
Situation, Greek Turn 2.
I rallied a squad for my turn 3 RPh (with another squad and two HS still broken), the MTR (still CX from its advance last turn) finally got an actual result (NMC) on its first hit which broke the Greek 9-1 and and reduced the MMG squad on a 12. As there were some reveals likely from my movement, I declared Op Fire with my MMG and a LMG squad in the south. Much of my force headed out into the open as I closed with the Greek partisans, with one squad breaking and another breaking after a K/2. I managed a couple of AFPh results, but the best I could do was pinning two squads in G1.
Situation, Bulgarian Turn 3.
That rarest of events happened for Mark’s turn 3 RPh: wind increased to mild breeze. With no smoke or fires possible, it was something of a waste. The only other event was me rallying a squad back in 10B3. Most of the partisans opened up during PFPh, including a HIP group in 4M2, but suffered from uniformly high rolls. My MTR zeroed in on G1, and got a K/1 on its second hit, pinning one squad and breaking the one that reduced, who was eliminated by a later NMC. I also pinned the squad in I10 but malfunctioned a LMG.
Situation, Greek Turn 3. A Greek partisan squad disappeared right after moving to 4P8; probably a stray delete command that didn’t get noticed. >.<
For my turn 4 RPh I rallied three HS (just leaving the recently broken squad), and lost my LMG while Mark self-rallied his 9-1. The MTR missed on its one shot, but the MMG got a good roll and broke G1 and then revealed+pinned a squad in K9, as well as reducing the visible squad there (12 on NMC) through two hexes of grain hindrance.
This really opened up the north, since his middle had shifted to protect the back-side in I6, there wasn’t any way to get fire up there. The pin and break in K9 really opened up the south and let me run the swarm in, and Mark’s rolls weren’t able to stop anyone. Combined with some bad advice from me (I really didn’t think I’d get that far), I got into I1 and took Wall Advantage. I got two squads into I10, but CC was ineffective.

Situation, Bulgarian Turn 4.
Mark’s HS in L9 self-rallied and generated a 7-0 for his turn 4 RPh, and he rallied his other HS in K2. K9 and I6 prepped, with the latter breaking my entire stack in G7. However, I was set to pour over the finish line in the next turn, and he mostly shifted a little try and fire on me as I came on. I managed to break a squad in K9 and he malfed a LMG. I managed to knock out the Greek squad in melee for no losses.
My MTR hit H6 three times in my turn 5 PFPh, breaking one of the squads there (it was the best place for them to be, but I might suggest splitting one into I5 instead). I was able to pile into I10 and J10 without any real interference in the south, and piled into the H1/H2 woods in the north. This meant the I/J wall blocked a lot of LOS to them, and they could just advance over the finish line. I finished the turn with 11 squads over the goal line out of 8.5 squads needed (he had a LMG and MMG left) to win.
Afterword
This is the last of our ASL games for now. Mark is doing some charity work in the time slot we were using to get him up to speed with the system, so we’re “merely” down to our weekend games.
Victory here largely came down to having time to sit back and fire with the important weapons (MMG and MTR), while employing good maneuver tactics. There’s a lot of dangerous open ground out there, but the 3 range of a partisan squad makes it tough to keep the Bulgarians from getting close.
An important tool for the Greeks to look at though is setting up MGs for firelanes. A lot of cover I was using was the wheat hindrance, and that doesn’t work on a firelane. However, with no long range, that’s still limited to 7 hexes for the LMGs.
Overall, there’s almost as many Greeks as unbroken Bulgarians at scenario start, however, the bulk of the cover is woods, and even a 50mm MTR can do some real harm with air bursts. On the other hand, the Bulgarians have plenty of time to pick up the brokies and sweep forward, using good ‘blob’ tactics (like I did). I think the H5 woods area needs to be one of the centers of the defense, with some spare squads to cycle forward as the initial ones get revealed and broken. In some ways the most annoying area to defend is the x1-x3 area, as that wall is on the wrong side of the finish line and complicates the defense if the woods can be taken.
4H0 might be a good place for one of the HIP partisan squads, as it is unlikely to come under fire early, and it can try to hit Bulgarians advancing to win from behind (maybe even getting encirclement). But, it’d have to stay hidden until relatively late, and would probably be sacrificial at that point. Assuming the Bulgarians don’t stumble into it.
Discussion ¬