
D The Hedgehog of Piepsk
After finishing off a first lesson with OBA, Mark and I turned to the classic Squad Leader scenario “The Hedgehog of Piepsk” (as updated for ASL). The last time I played the scenario was with my dad in the early ’90s in its Squad Leader form. The remake features even more Russian squads, but half of them are conscripts, and of course, defensive fire can be much more powerful in ASL.
The Russian force is brittle, since there’s only three leaders for thirty-two squads (this and “Hill 621” were the ‘mob of Russians rushing a small defense’ scenarios of the original game), while the Germans get seven squads with four leaders, five machine guns, and OBA. It uses all of the three original non-city boards, though in practice the rear thirds aren’t going to get used. With the winter of ’41 starting, the Germans are holing up in whatever shelter can be found, and the Russians are counterattacking to push them out by taking all the stone building Locations (so each Location must be claimed, not just the buildings themselves) in the board 3 village in ten turns.
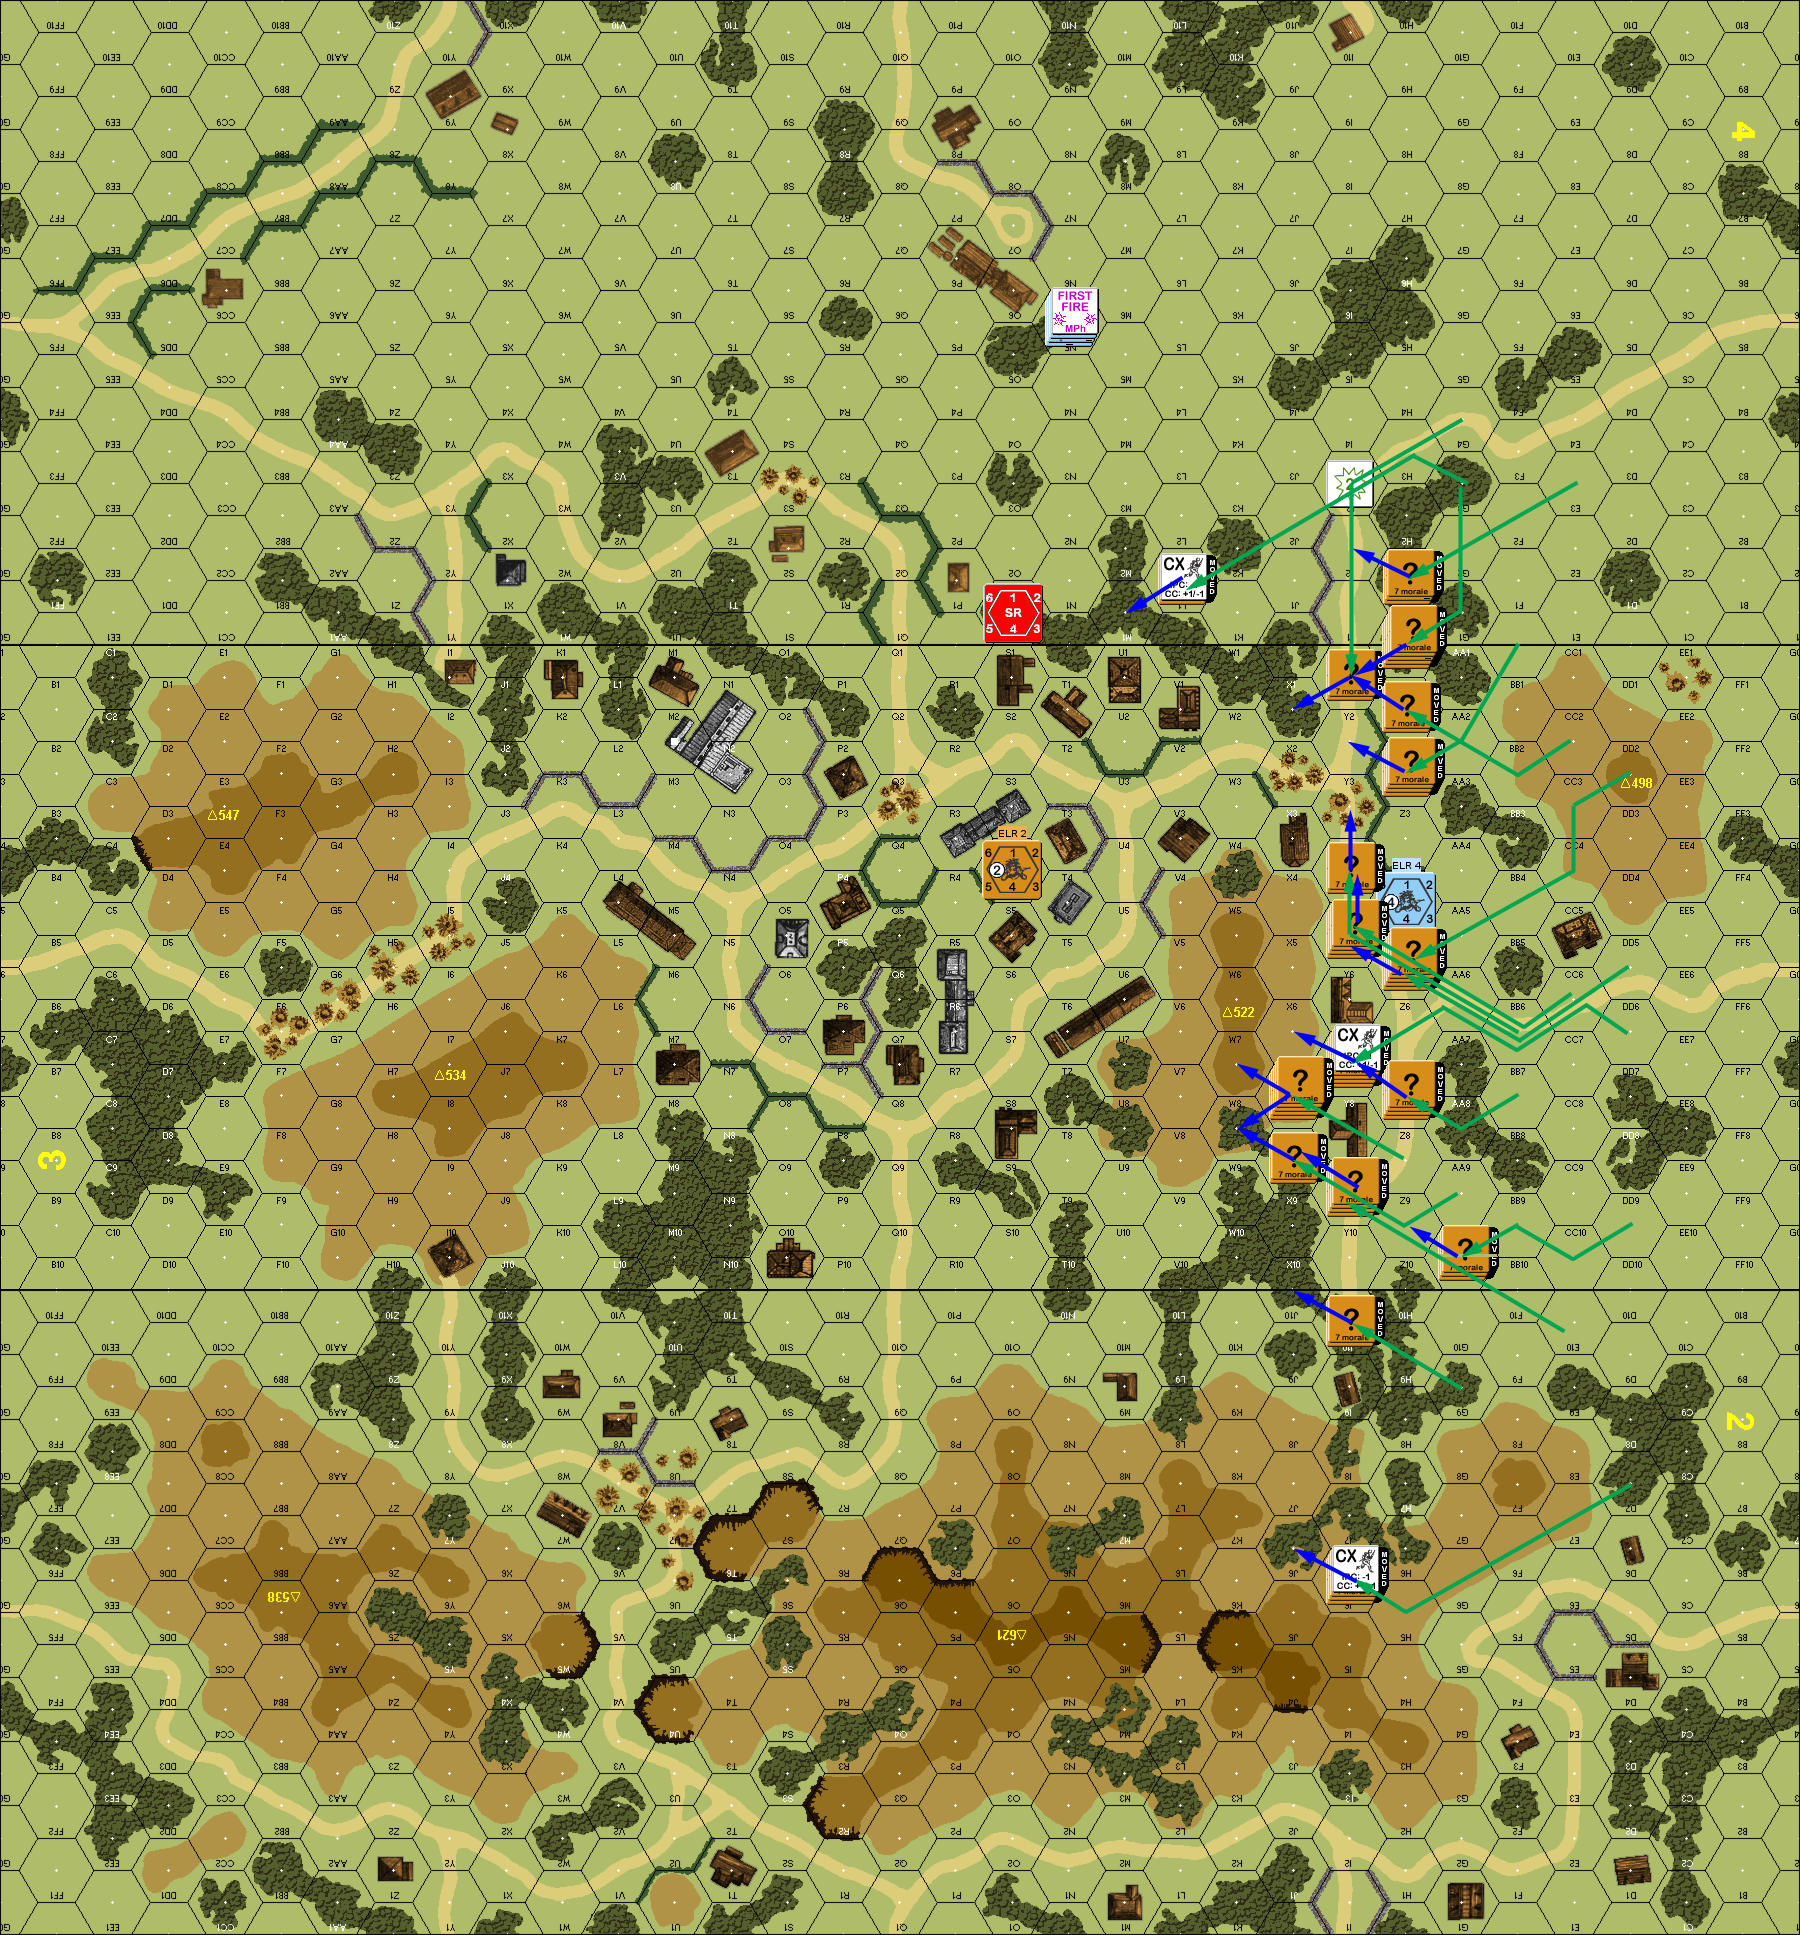
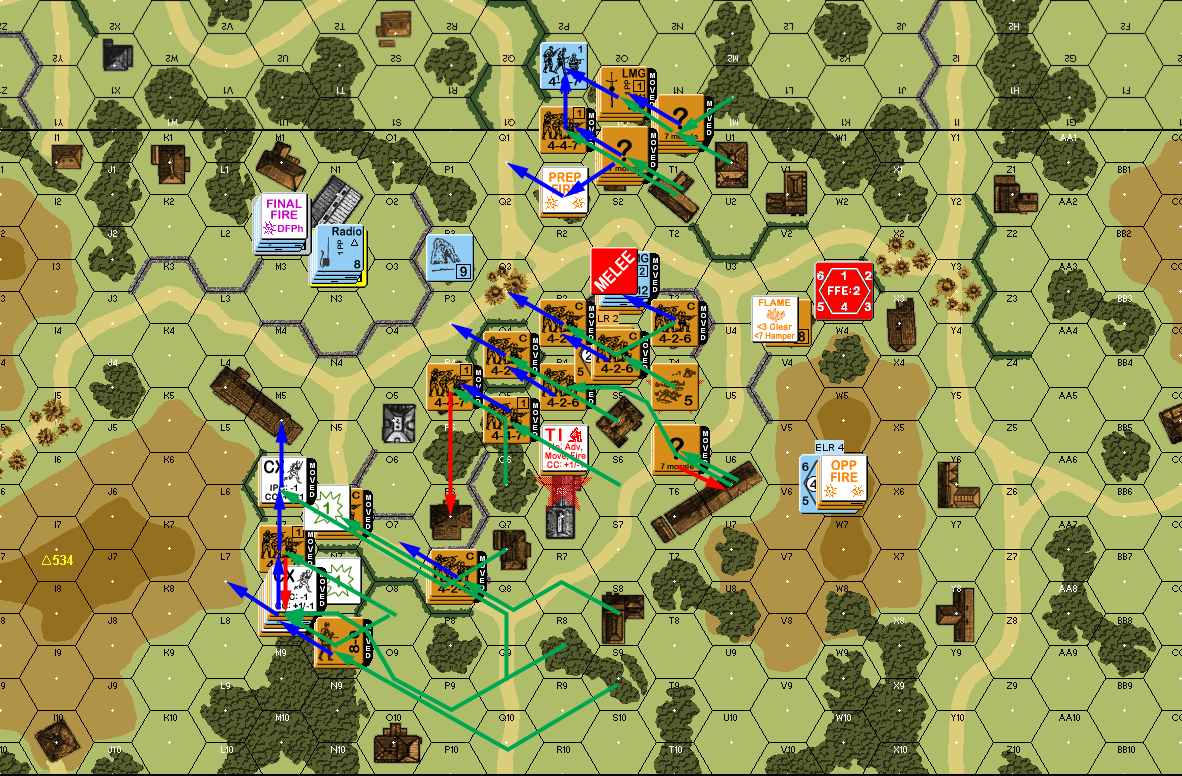
Mark took the defending Germans, and set up with nothing visible, which meant they were all in concealment terrain (by SSR), and not on exposed hilltops with great fields of view. I organized the 32-squad horde into three rough groups, with the center being the largest, and the initial objective was to seize hill 522. The north flank was to work along the board 3/4 board seam, and the south was to work along the foot of the board 2 hill with some scouting further up the hill.
The first turn was occupied by getting onto the board, and no Germans revealed themselves as I started sorting myself out in movement. The only sound was some faint German cursing as a HIP leader failed to get contact with his OBA battery. I advanced the one MMG onto the top of hill 498 (3DD2), which stayed concealed thanks to the lack of anyone to reveal them, and they could see most of the local area.
The lack of contact continued on the German turn, and no movement left me to try a couple probing shots that did not get any results.
The second move of my second turn finally drew fire as a LMG nest turned up in 4N5. That was the only activity other than contact finally being made, with an AR in 3X2 with the SR landing in 4O1.
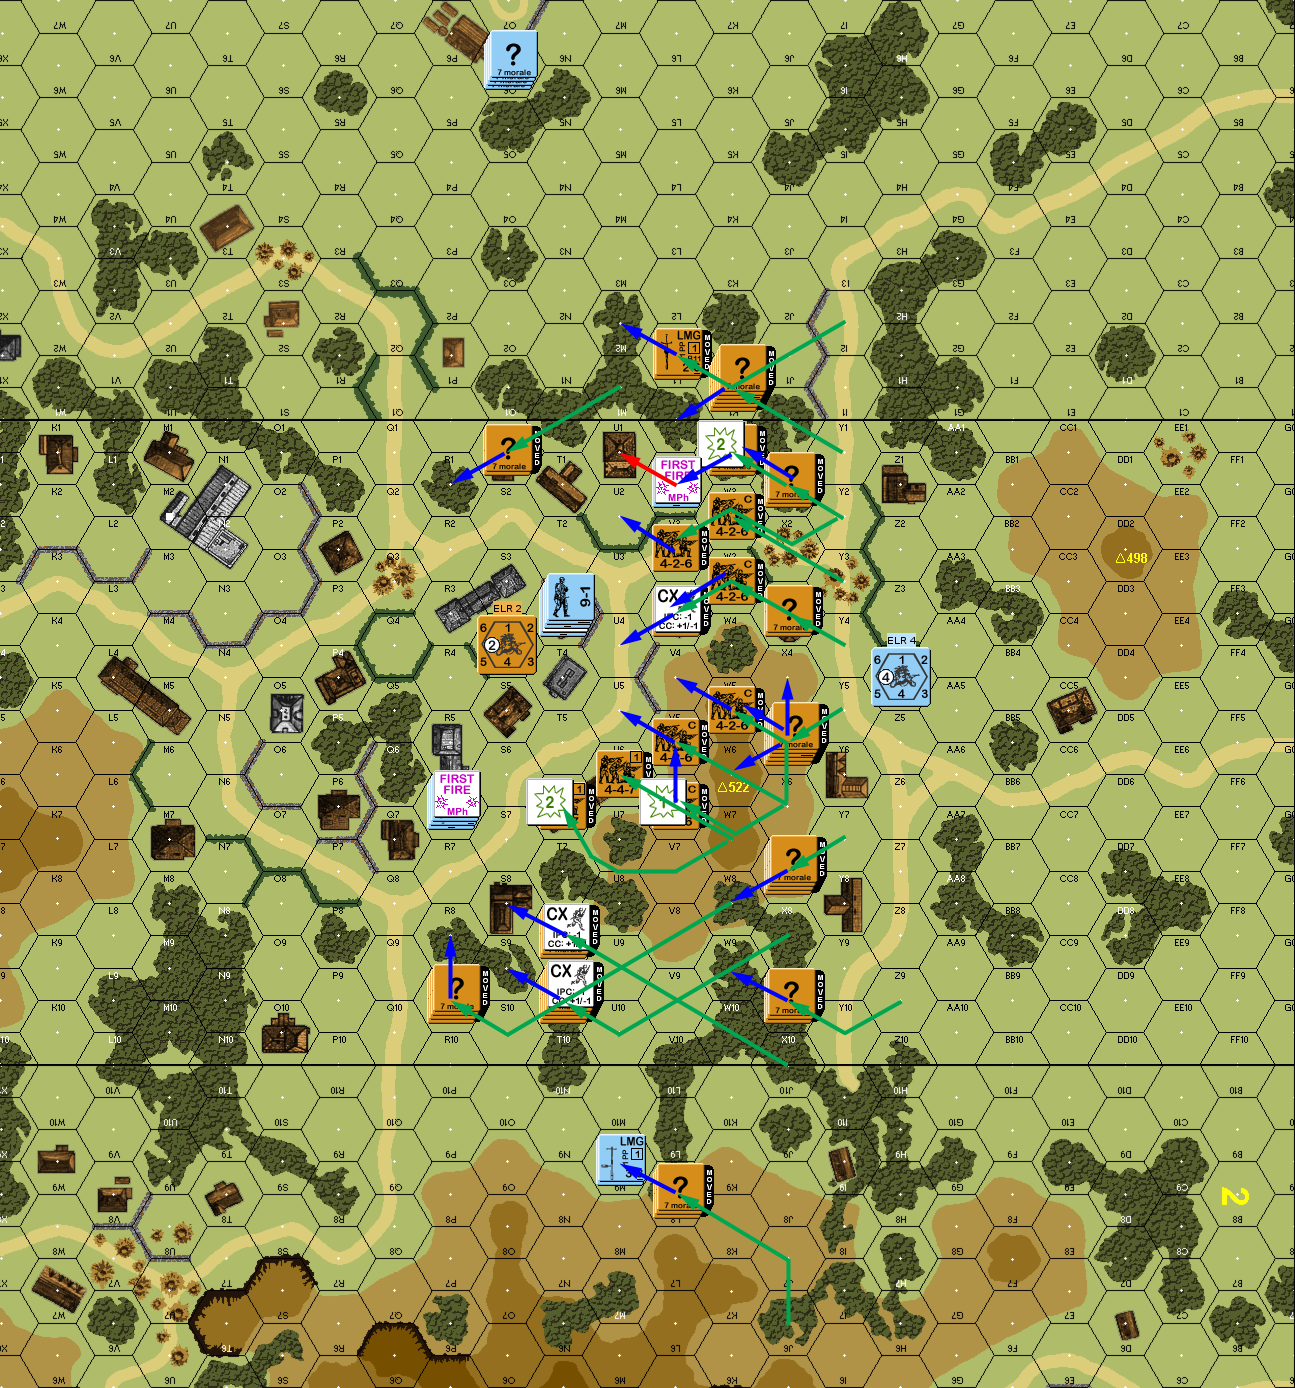
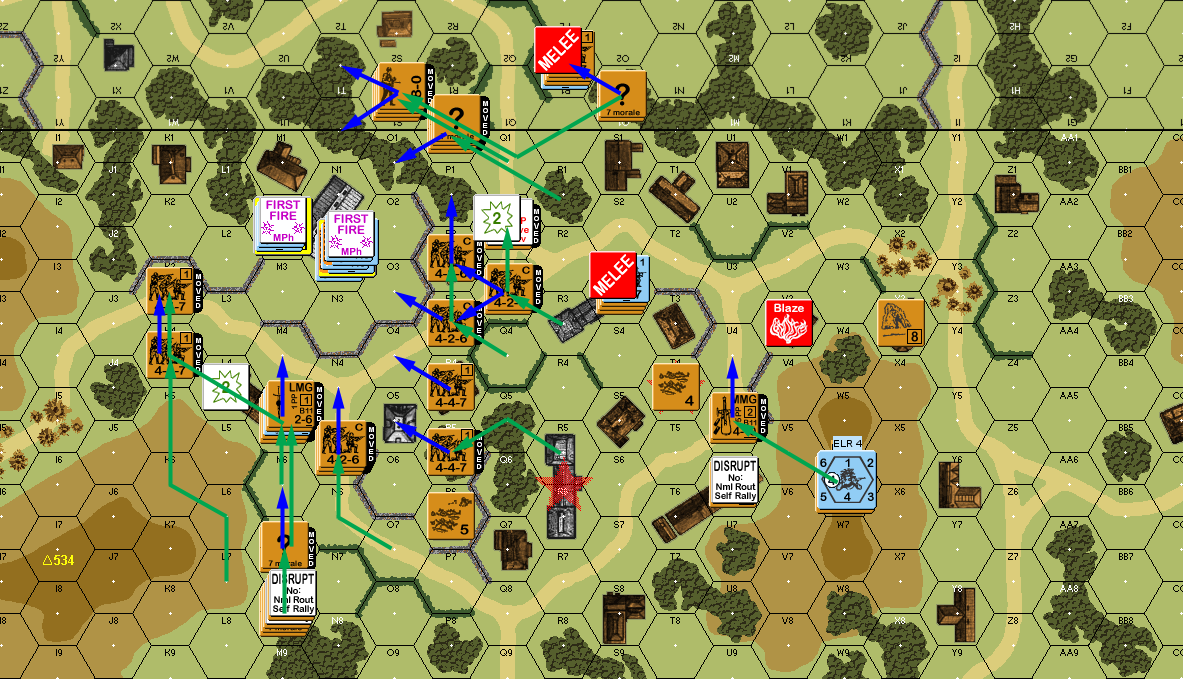
Situation, Russian Turn 2. The objective is to take all the stone building Locations.
Mark kept contact for his turn 2, but correcting the SR back to 3X2 demanded an extra chit draw, which was red. And suddenly, Germans were everywhere, with squads opening fire from 3T10, V1, and T3. None of it did anything, but the squad in V1 was potential trouble, as my forward scout had already pressed past him. However, I finally had real targets for my fire, and a good roll broke T10, who routed to the foot of the board 2 hill.
As I came down off of hill 522 for my turn 3, Mark revealed a squad in R6, but he and T3 couldn’t get any results. He did force me to swing further south as I continued working my way around the village down there. I swarmed V1, and Mark didn’t manage to do anything, but did regain battery access, putting down a request on 3W5, which errored to BB2. I only had one attack, but it broke V1. My squads on the hill came in for CC against the brokie in 2M9 (since there was no one to force a reveal as they moved, there was no reason for the Germans to rout), and despite a -2/+1 modifier difference, didn’t get ambush; but the -2 for attacking broken units was enough to eliminate the Germans.
Situation, Russian Turn 3.
I recovered the LMG in M9, and… Mark broke the radio in PFPh. He prepped with 3R6, breaking some conscripts in the street, but malfunctioning a LMG (that’s two 12s in four rolls for the fire phase). Movement was minimal, with Mark successfully pulling out of the 4O6 area, with LOS checks from M2 being blocked by O3, and a shot from 3R1 doing nothing as they ran all the way to 4T1, while 3T3 shifted to S3. Advancing fire featured another ’12’ and no results, and S3 advanced to R3.
My turn 4 started with Gusts (not going to do anything here), and my broken squad self-rallied while generating a new 6+1 leader (in this scenario, I’ll take anything!). And Mark repaired the radio and LMG. I swarmed into the village, overloading Mark’s ability to defensive fire, and got three squads around R6, which laid down a LMG firelane along the S6-U5 road. The HMG nest showed itself in 3N2h2 (where else?) to break my northernmost squad. Overall I suffered four squads broken, one reduced and pinned, and my MMG squad was pinned by his sniper on one of my only passes of a MC. While I was able to get encirclement on R6, AFPh had no results.
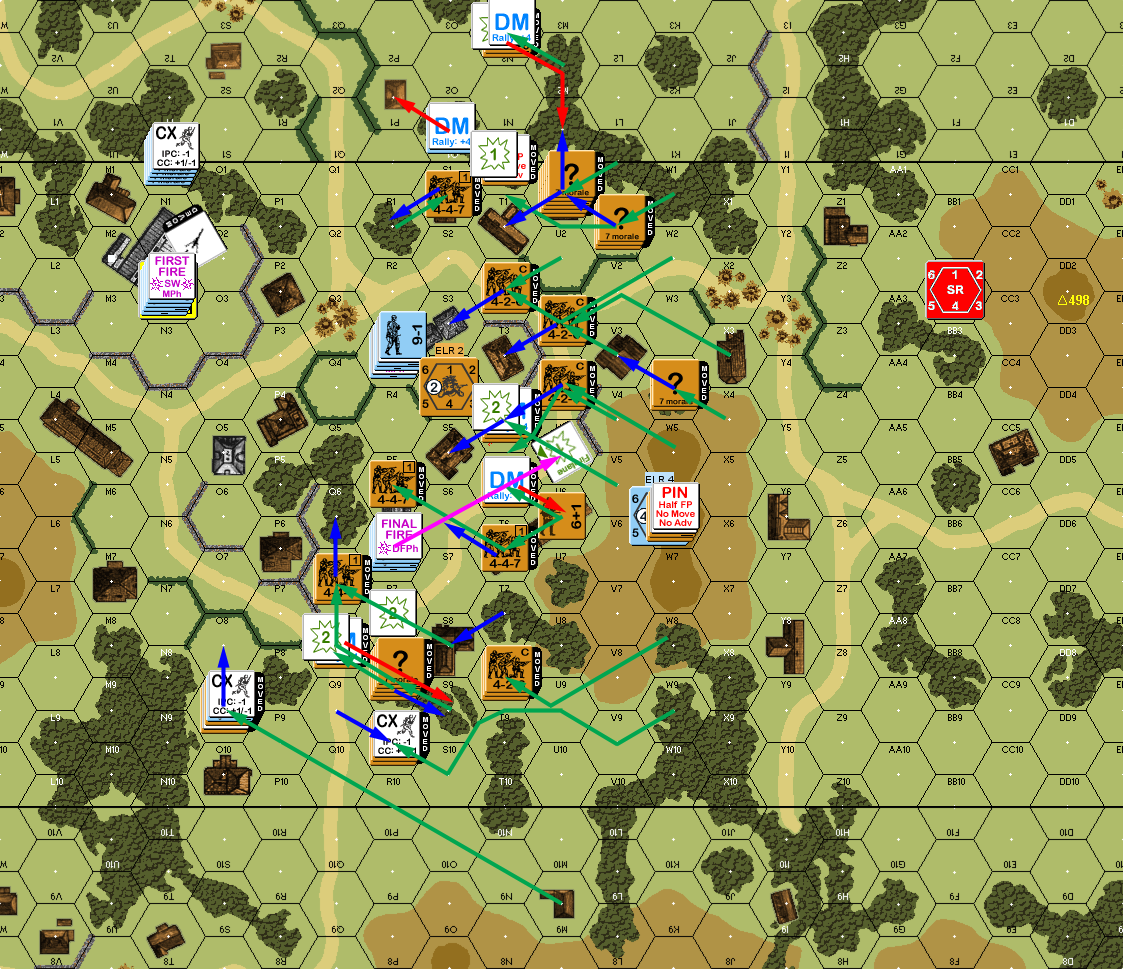
Situation, Russian Turn 4.
Mark self-rallied his broken squad in 4P1 for his turn, while none of my rallies worked. He took a chance on a eight-hex Correction to 3T4, and plotted conversion to FFE. It was inaccurate, and landed in W3, breaking and ELRing my 9-1 (nice, but of course, he was going for all the squads in the village), as well as starting a fire in his Location. Most everyone prepped, with surrounded R6 managing to pin two squads, but couldn’t actually break one. His force from board 4 entered the 3N2 building and started up a stairwell, where my fire pinned the squad.
Three big Final Fire attacks against R6 managed to kill the 8-1 there (break, and then broke again with a 12), but didn’t touch the squad who easily passed a 2MC, NMC, and 1LLMC. Similarly, a big attack on R3 broke the 9-1 but had no effect on the two squads there. Rather than go through that again, both groups advanced into CC. R3 went into S3 for two squads on two, and got Ambush, but missed a pair of 1:1 attacks and I did a CR on a 2:1. R6 went into Q6, going CX thanks to the encirclement, and I took them out for no loss, largely thanks to the CX.
I rallied three squads for my turn, and I Mopped Up building R5 to claim all the Locations there. Mark didn’t have a lot of First Fire, but he corrected the FFE into T4, which drifted to T5, where it broke the 6+1 and reduced a broken squad (into S4 could have been very scary). Final Fire featured a K/2 to reduce a squad in N6, and disrupt all the survivors, and also broke P4. I put a third squad into S3, but the Melee continued with no results. I advanced two squads into CC in 4P1, but there were no results.
Situation, Russian Turn 5.
Both of our leaders rallied for Mark’s turn, but nothing else. The radio malfunctioned again, and he went on to malfunction the HMG and a LMG during prep fire. My fire generated a NMC on N2h2 which sent the German 9-1 berserk, and took the HMG squad with him. The flame in V3 burst into a blaze, forcing my just rallied 8-1 to self-break to get out of the building. I finally knocked out the HS in S3 in melee, leaving just a single squad, and 4P1 continued without result.
I didn’t get anything back for my turn 6, and Mark permanently lost his malfed LMG. With the machine guns down, I had a relatively easy time getting closer to the big building, taking fairly safe moves close to the building first to draw first fire, and keep him from firing at more distant targets. And there’s a nice wall around the building to help give cover. The Germans didn’t manage to do more than pin a squad, and I didn’t manage more than pinning his 8-0. (I largely didn’t attempt anything against morale 10 units in stone building, and only picked on 3M2h2.) The blaze spread to the woods in W4, S3 finally resolved with the loss of the remaining German squad, and I took out the squad in 4P1 in melee, with a ’12’ from Mark letting me withdraw into Q1 afterwards.
Situation, Russian Turn 6.
Mark repaired the HMG (right before dropping it for the berserk charge), while my 8-1 self rallied. I had advanced one squad into O3, so he’d be the target of the charge, in open ground. Four different attacks couldn’t do more than a 2MC, and he passed everything. The remaining German squad shifted to N2, and the rest of my forces fired at them, but couldn’t get a result, though they failed to recover the HMG.
For Final Fire my three adjacent squads rolled a 2 for a 1KIA in O3 to kill the leader and force the squad to reduce. I was able to take out the remaining HS in 2:1 CC.
I rallied a HS for my turn 7, and Mark recovered the HMG in time for my attempt to get into the final building. With plenty of squads present, who’d just get in each other’s way in the building, I took three large shots at 3N2h2, breaking the squad with a 1MC, and pinning the 9-1 with a NMC. However, the HMG was in the hands of the 8-0, so he wasn’t defenseless. I got several squads into the building, and three of them up the stairwell to M2h2 intact. The squad was eliminated when I declared No Quarter, and even with CX, a 6:1 CC attack was enough to knock out the last defenders at let me claim the few remaining locations there at my leisure.
Afterword
So, Mark had some decidedly bad luck at critical junctures, with several malfunctions. But, his problems stemmed back to setup, and I was looking at things and thinking the problems seemed familiar. That is, they’re mistakes I’ve made in the past.
First off, with a large board, with a number of approaches, with fairly limited defenders, it it time to Deploy. I’m not a big fan of it, and don’t do it as often as many players better than me, but deploying the one allowed squad before the game is going to be a must for more coverage. I also don’t care for handing machine guns to HS, I prefer a unit that can fire it and inherent firepower, but with a 7:5 squad-MG ratio, now’s the time.
Mark defended the board 4 flank from N5. This is generally a good, defensible area, but it’s too far from the final goal, and Mark got a bit lucky to get the squad and leader back to the main defense before it got even harder. I’d actually recommend something like 4O3, which is much closer to the rest of the action, and you can assault move to P2, and then either advance or rout over the hedge. And, you can still see any place a wide flanking maneuver will go through. More importantly, it is likely to help slow down Russians going through cover along the board 3/4 seam, and help make sure that the 3V1 squad has a better chance of getting out alive.
3T10 doesn’t look like a bad place to be, but when they broke, they routed to 2M9, where they were alone to get snapped up quickly. 3U8 might be a better place for that flank… or perhaps P8, which can look down part of the road loop, and plenty of open ground for anybody swinging south, and the hedges and walls will help with routing.
Also, while setting up entirely hidden can be nerve-wracking for the enemy, a few positions in the “open” can do a lot to slow down the initial rush. Notably, a MG on the 3W5-W7 ridgeline will still be concealed (thanks to off-board entry) and will force the Russians to really think about an opening center rush. They should get off that ridgeline nearly immediately (I got the Russian MMG onto DD2 on turn 1 so it’d be at level 2 for such an eventuality), but forcing a cautious center advance will buy most of a turn.
Way back when, my dad put the German HMG on top of the board 2 hill. At level 3, it’ll always have height advantage. That isn’t enough, and they broke soon enough, but it seriously held up a lot of Russians until that happened. Here, it’s even better, since the conscripts have no hope of dealing with that, with 3 MP and a max range of 4 hexes. The only things the Russians can do is avoid it, take the losses, or make sure there’s some MGs for long-range firepower available. And if the phone is up there….
One big mistake was 3N2h2. It’s an obvious place to be. In fact, it’s impossible not to have a MG nest up there. But Mark found having a 9-1 and the phone up there was trouble, naturally. He could call in artillery (or try to; though even with his troubles, OBA has done more for him in two scenarios than it ever has for me) or direct the HMG, not both. The phone should be with an 8-0, who should be somewhere slightly less obvious (N1h2 is good, or on one of the hills).
And lastly, the defense of the village was too concentrated, with two squads in 3T3. There needs to be multiple positions in the area, with the idea of generating a wall of residual as the Russians close. Any scrap of open ground should be covered if at all possible, as with such a disparity in bodies, the Germans need every -2 shot they can get.
Discussion ¬