
AP112 First Ally
After demonstrating a Fighting Withdrawal, Mark and I turned AP112 “First Ally” from Action Pack 12 as our next ASL game. Set early in the invasion of Poland it features the rare match up of Allied Minors (Poles) versus Axis Minors (Slovaks). Published in Action Pack 12, it features vertical board 5a, along with half of boards 10 and 50. Though, really, board 10 isn’t here at all, as it’s almost entirely covered by overlay 6. Hi12 adds an extra small hill to board 5a, and X18 adds an extra cluster of buildings to the corner of board 50.
I had the defending Slovak forces, who set up in building hexes, which can let them scattered over a fair amount of terrain, and need to hold at least one multi-hex building at the end of seven turns. They get nine squads, two leaders, a MMG and two LMG. I spent quite a while pondering a defense, as the Poles also have an extensive setup area, and I had no idea what direction they’d come from. I eventually settled on the buildings near the border of boards 50 and 10 as my likely ‘final stand’ area, with both leaders, and three-and-a-half squads scattered about the ‘board 10’ hill, including the MMG, which would be used to slow down attacks into there.
The Poles are counterattacking to keep from being cut off by the Slovak advance, and have thirteen squads, three leaders, two MMG, and a radio for 70mm OBA (part of the point was to get Mark some OBA experience). They get to set up on the hills of boards 5a and 50, giving them a fair number of approaches to this scenario. Mark put five squads and a 8-0 on the south end of board 50, to sweep onto board 10 from that end, and the rest were on board 50, concentrated at the eastern end.
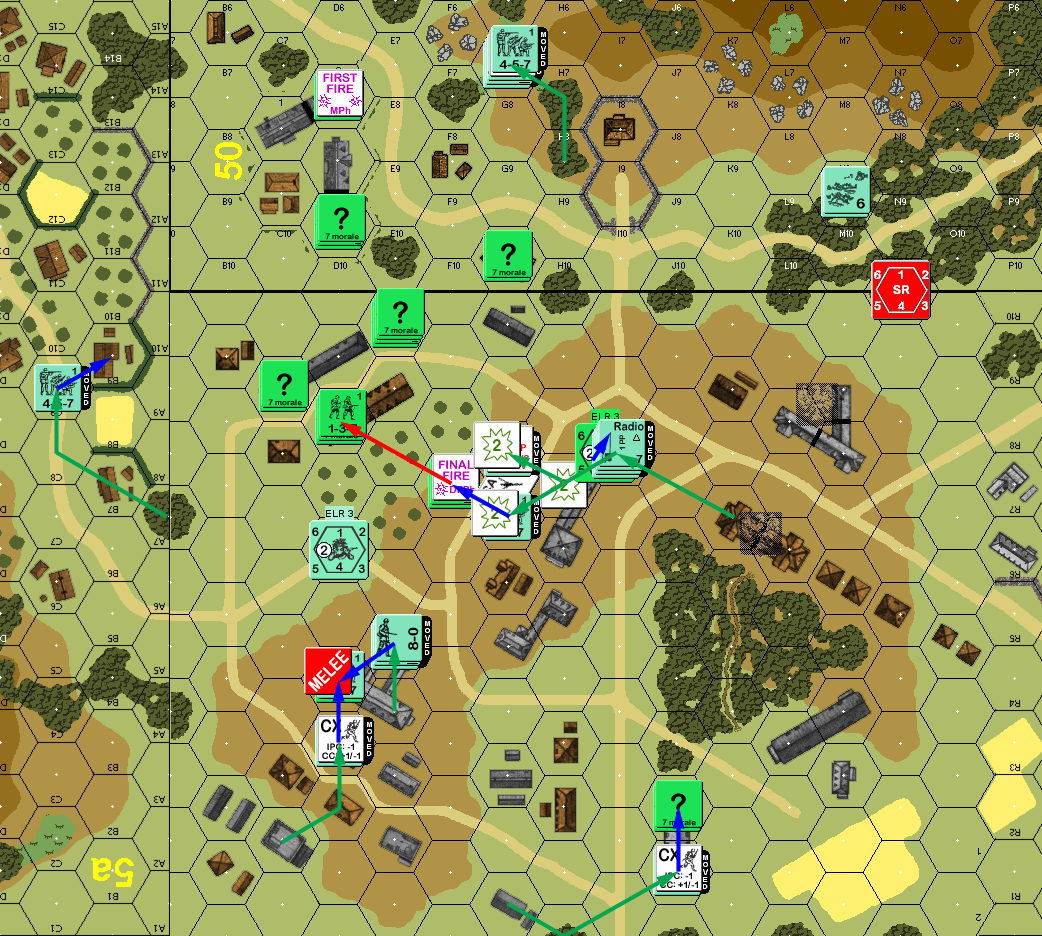
The initial advance was on the 10U9 building, and I had no luck against that (or anything else) at first, with the Poles walking through my fire, and tying up the squad while the leader stack maneuvered around the edge of the hill. However, my HS in T5 got a PTC to pin the 8-1 and one of two squads. After that, another squad broke in U10 to the residual, and another broke as it tried to cross open ground nearby. At the other end of the hill, my first shot at his main stack approaching the hill did nothing, but SFF pinned his leader and a squad, and broke another one.
Advancing fire pinned a couple units, including the HS in 50I8, who then self-broke to get out of the area. I also self-broke 10U9 to avoid the 4:3 CC coming up, but didn’t have any great route paths out of the area.
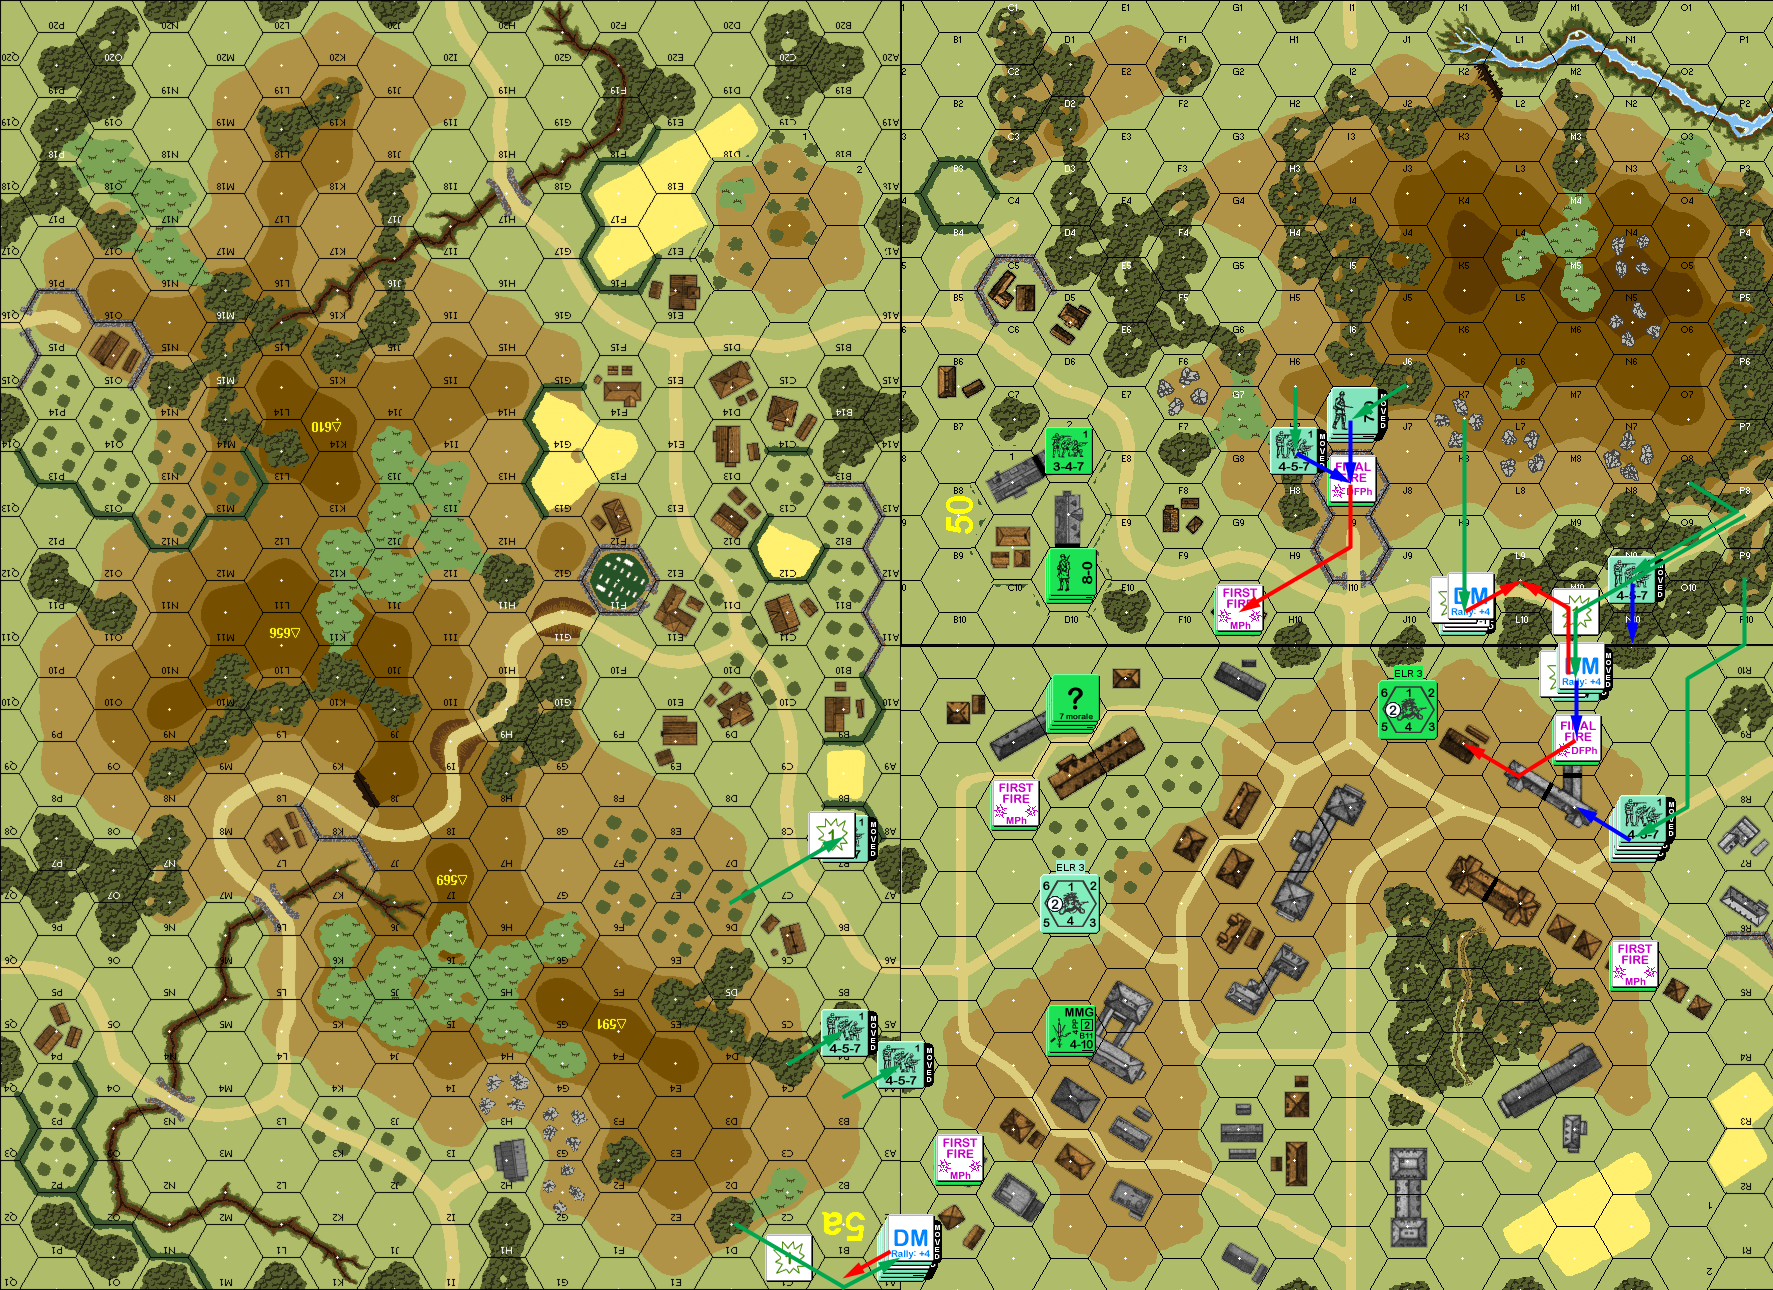
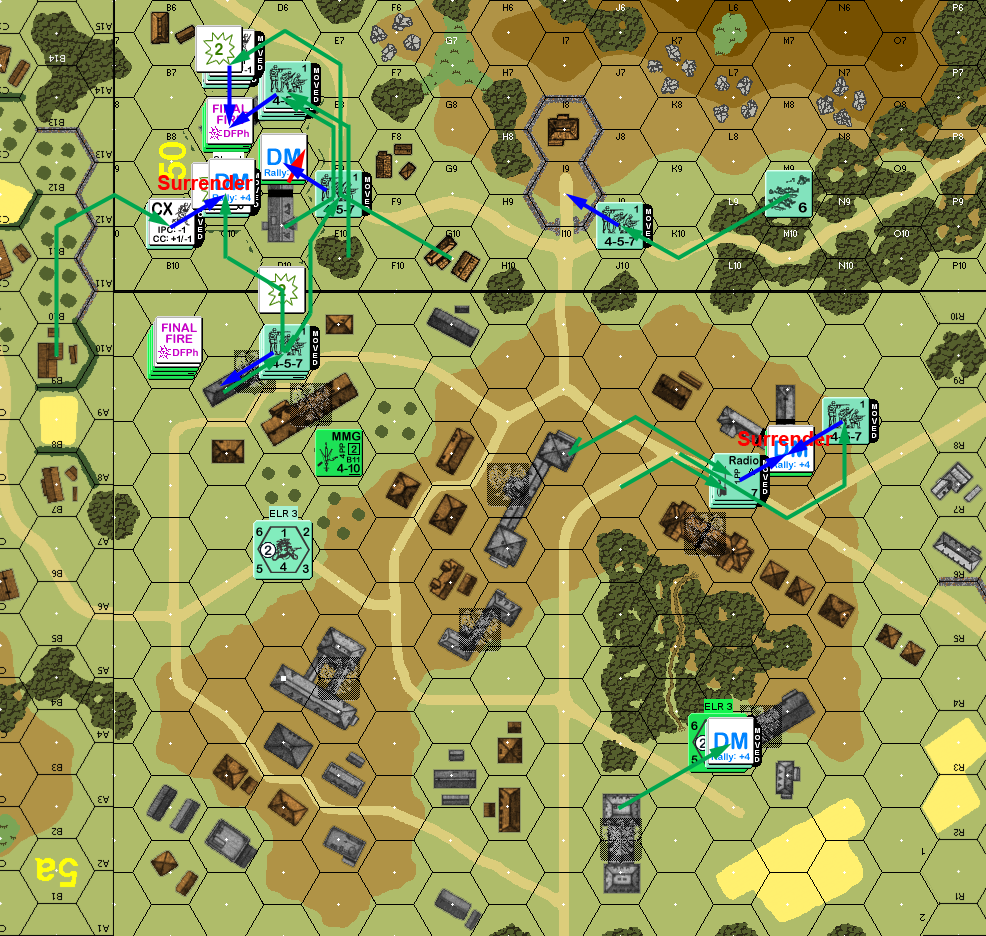
Situation, Polish turn 1. Note that the lower-right is all overlay 6 on top of board 10.
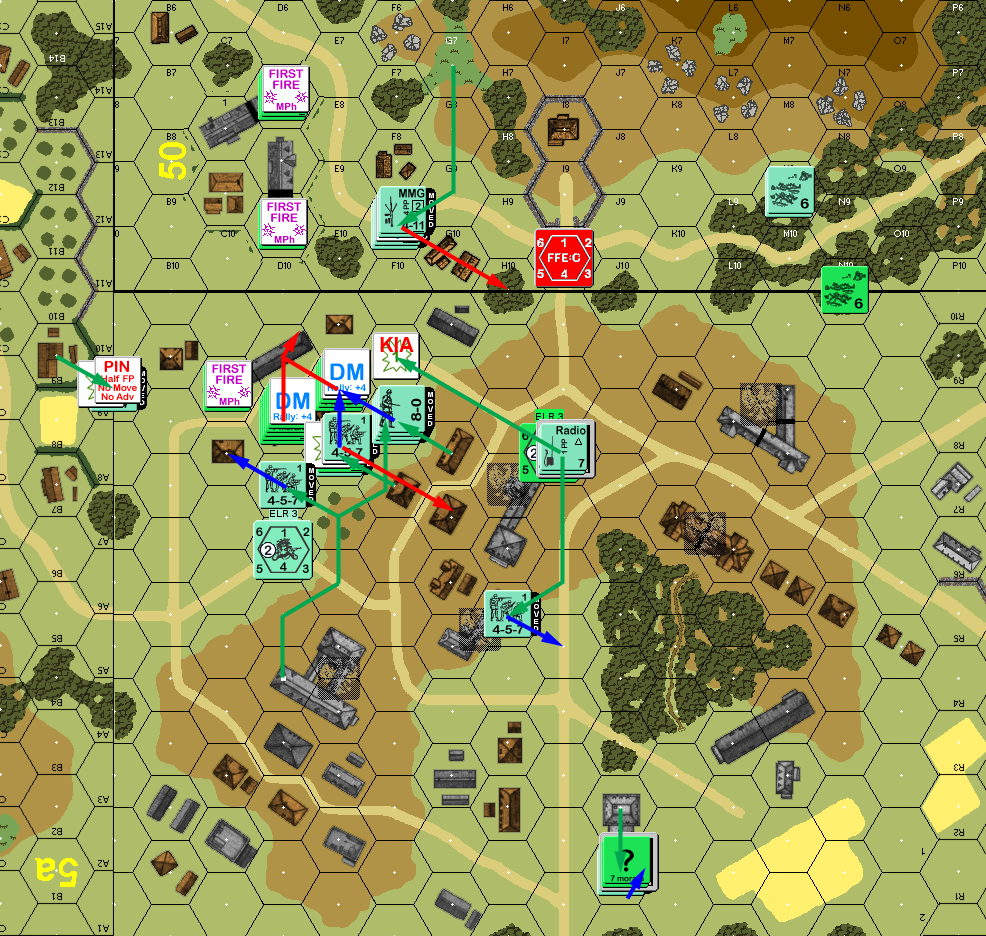
Nothing happened for my rally phase, and my one prep fire put the Poles in 50L9 under DM. I mostly skulked, but the MMG headed for a more central position. The 8-0 transferred over to G8 to rally the squad there, running through inaccurate fire on the way. Mark’s 8-1 got on the radio and got battery access, calling for a spotting round on the central three-hex building, but the SR landed back in the woods on top of his unbroken squad.
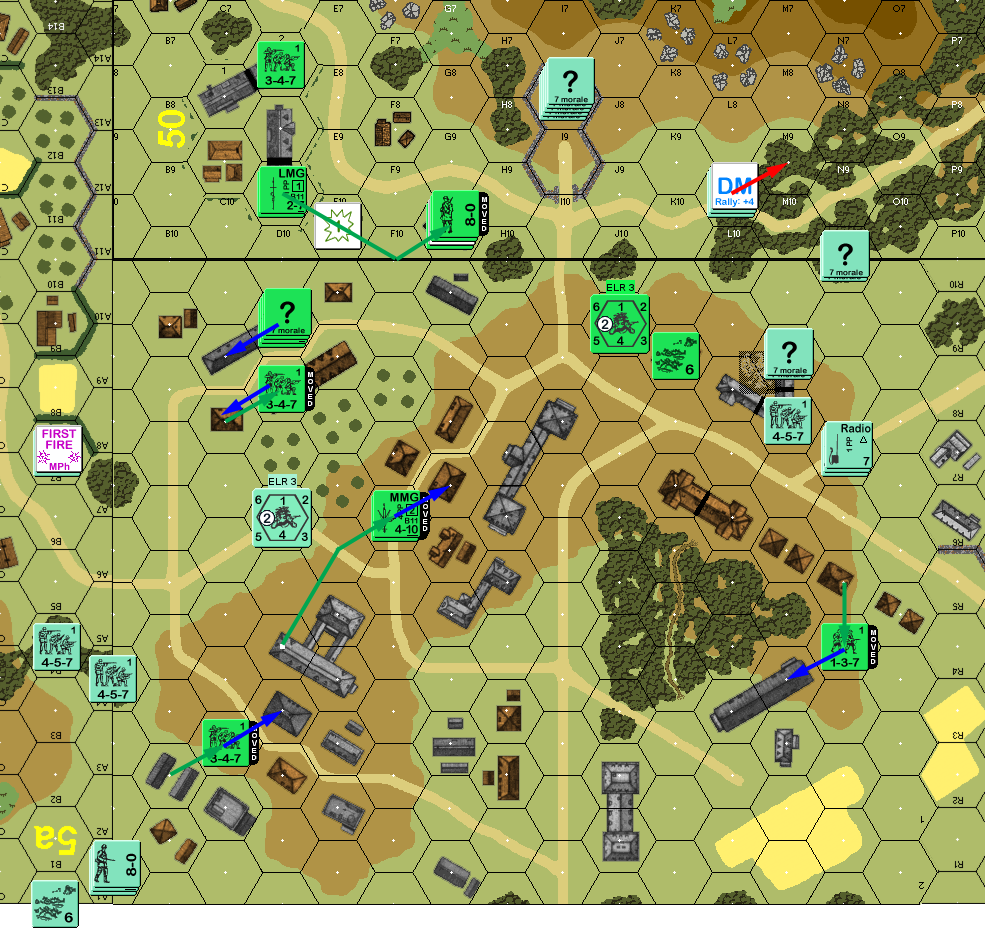
Situation, Slovak Turn 1.
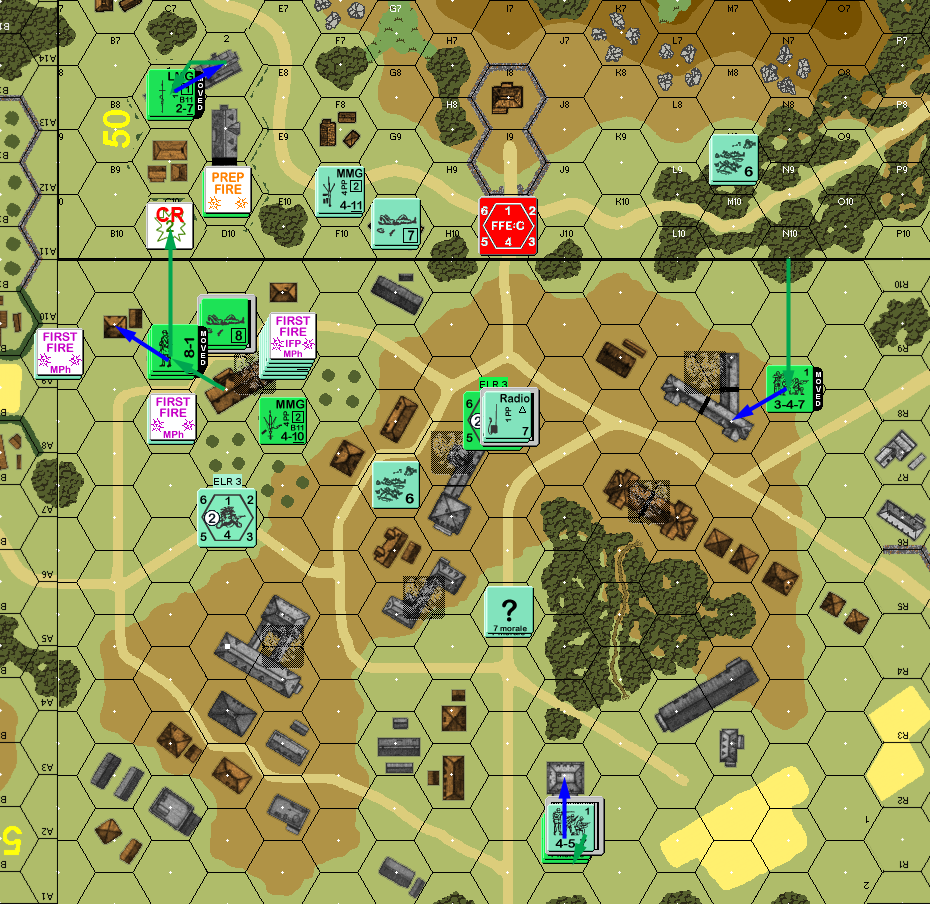
Mark self-rallied the squad in 5aA1 for his second turn, while I rallied the HS in 50G10. Naturally, he swept over the undefended north-east end of the board 10 hill, and got onto the south end. My fire did nothing, but Mark’s set off my sniper (after a passed NMC) to break the squad that had just moved into the central three-hex building, sending him back out of the center.
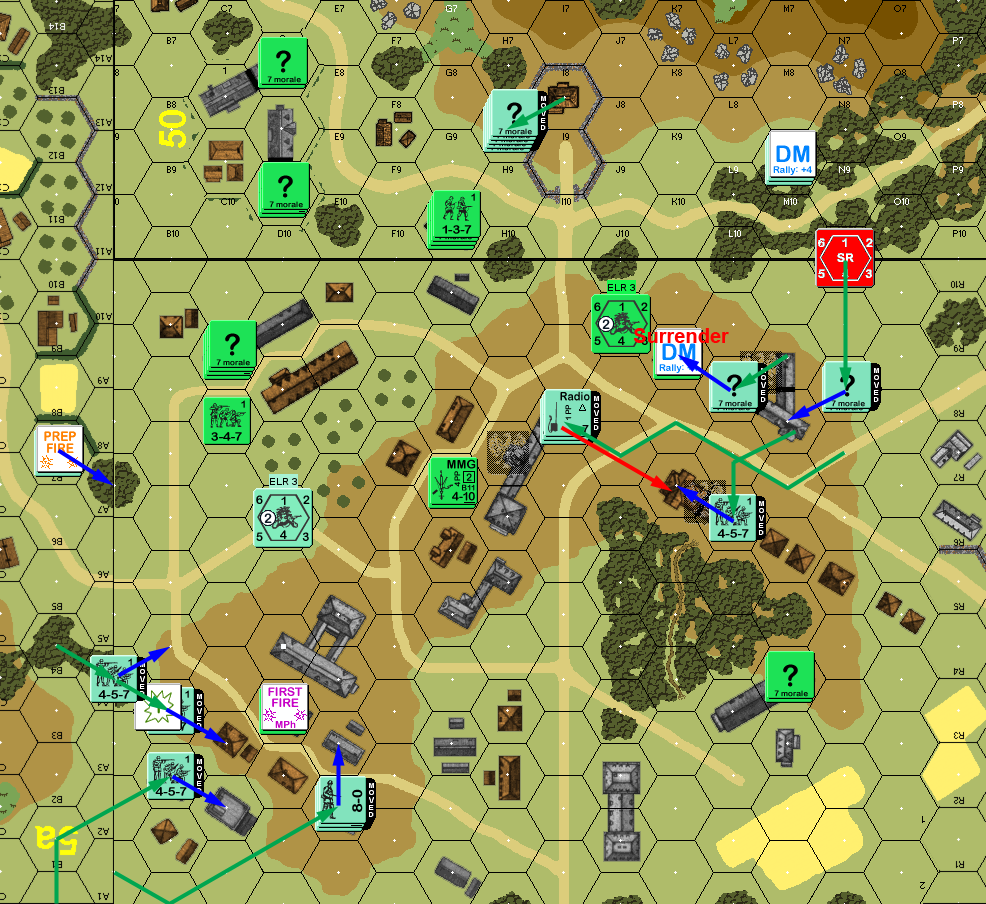
Situation, Polish Turn 2.
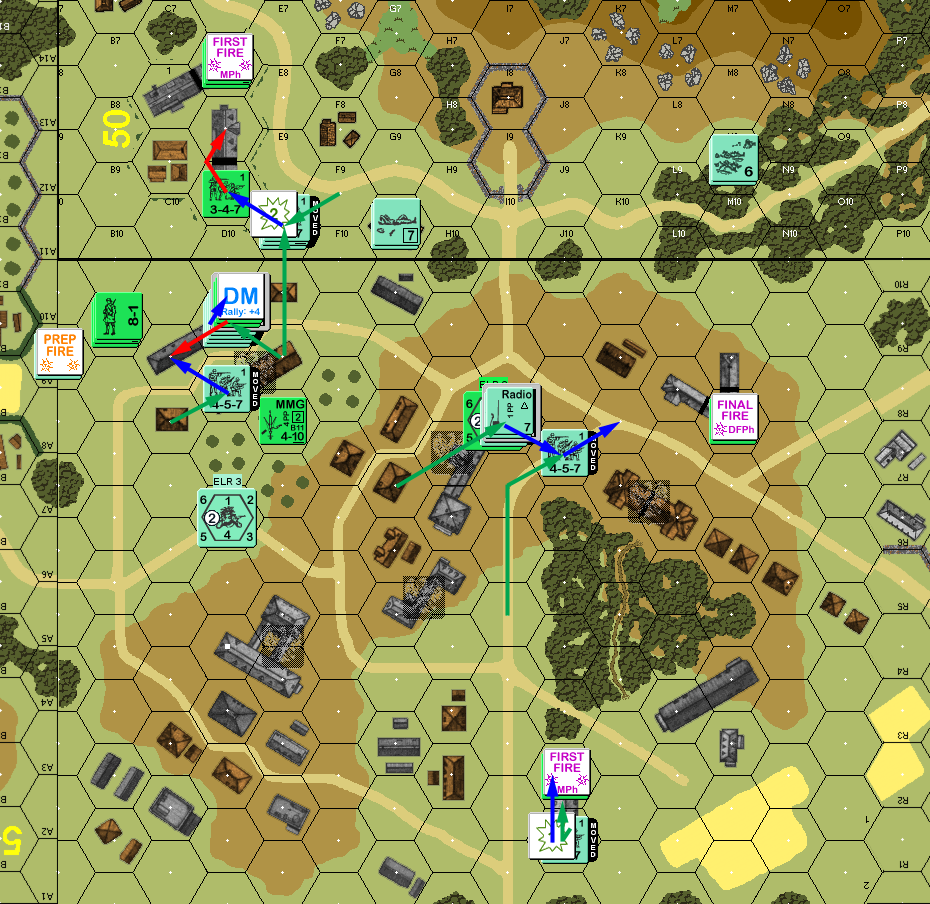
Very little happened for my turn 2, with almost everyone skulking. I pulled out of 10DD3, but got pinned. (We also forgot to have Mark contact his OBA.) The MMG prepped ineffectively, but then advanced into the center building to retake it.
Mark did not rally anything for his turn 3, and he failed to contact his OBA. He prepped his MMG to no effect, while I broke a squad trying to get at 10DD4, and another as it tried to skirt around the middle, as well as pinning a squad as it entered the central building. Mark got into DD4 for CC, with both sides ineffective.
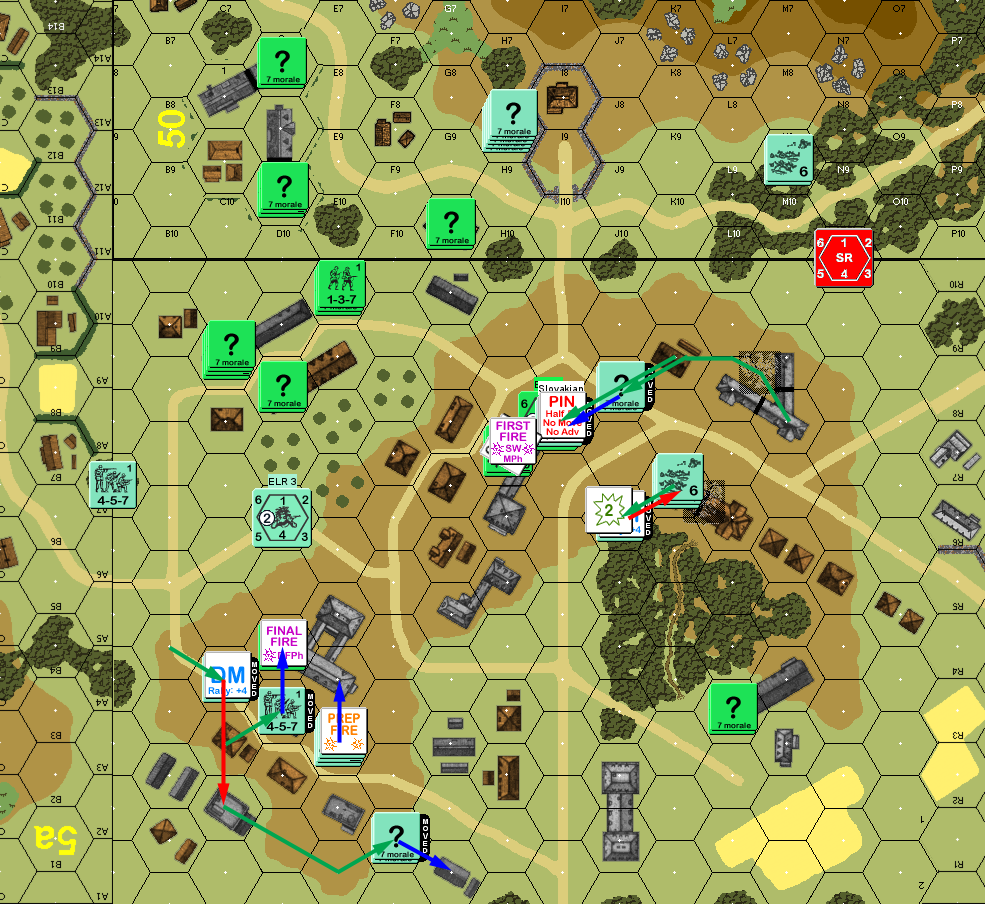
Situation, Polish Turn 3.
Mark rallied a squad for my turn, and I abandoned the central building back to his control instead of staying adjacent (going upstairs might have been much more productive, if a guaranteed sacrifice). His rolls were uniformly high, giving him no results to defensive fire, on top of failing to contact his OBA again. I largely skulked, with the MMG ending up in 10BB7, where the orchards gave an exit to my main area. The Melee continued without result.
Mark self-rallied 10EE2 and rallied the remaining squad in W7 for his turn 4. My final defense on top of the board 10 hill didn’t go so well, as he walked through all the fire the MMG could put out, though I did pin a squad, before it was pinned by advancing fire. He also started moving against the north end of defense, but a PTC pinned his 7-0 and MMG squad in 50G7. I abandoned my MMG to rout back to the main defense area rather than take on a 3:4 CC while pinned.
Mark piled two more squads and 8-0 into the melee, and managed to CR my squad. He also tried for CC in 10X2, and despite his being CX, and me being concealed, there was no ambush. But he got no result, and I refused to attack to maintain concealment.
Situation, Polish Turn 4.
Nothing happened in my turn 4 RPh, including Mark failing to recover my MMG. I skulked and consolidated what I still held, but sent a squad down the road at the edge of board 50 towards the broken Poles still in M9. Mark finally managed to get contact with his OBA back, and since the SR was still over there, he managed to correct it onto the squad and convert to an FFE to break them. They were able to rout out and still visit the Poles to get DM on them. Mark managed to roll a 12 in the Melee, but at 13:1 odds, that was still enough to kill the HS before they could withdraw.
Mark missed his self-rally (and would have even without DM), and recovered my MMG for his turn 5. He corrected the FFE to 50I10, and the Poles moved in on all sides of my shrinking defense. Thankfully, I had a number of overlapping lines of sight available, and needed them all. I pinned his first move, and then broke the 7-0 and a squad while pinning a second for his second move. Both of these required two shots to accomplish though, so options were drying up. As he moved against the 10DD8 building, I broke one squad, and then was down to FPF, which rolled low to kill another. My squad broke on their next shot, and the pressure mounted as I kept a squad, LMG, and 8-0 concealed.
Advancing fire got a 1MC against 10CC9 to wipe out my broken squad with a 12, also spoiling my plan to get the 8-0 out of there by routing with the squad. I had to self-break to get him out of there. Mark refused to go into CC with DD8 (probably a good idea; while he could get two squads in there, concealment and an 8-1 meant I had a good shot at ambushing and killing a single squad). Mark’s second attempt to corner my concealed HS in X1 got no result in CC again.
Situation, Polish Turn 5.
I managed to self-rally the squad in 50N10 for my turn. The main goal was to get my concealed group away from the big stack in 10CC9, though I couldn’t get out of it’s LOS. He got a PTC to reveal the stack, but thankfully couldn’t do anything more. I tried to send a HS up to the board 50 buildings, but it rolled a 12 on a MC. Meanwhile, my just recovered squad made for building 10U8 to give Mark another direction to worry about. He failed to contact his OBA as the FFE:C ran out, and concentrated fire on the broken units in 10DD9h1, reducing the squad there.
Situation, Slovak Turn 5.
Mark self-rallied his squad in 10AA7, but failed to rally his 7-0, while I, surprisingly, rallied the 8-0 in DD9h1 for his turn 6 RPh. He reestablished contact with his OBA, but drew his first red card for access. In the south, he finally took care of the hide-and-seek game I was playing by bumping into my HS to reveal it. Elsewhere, he started moving in on the board 50 buildings, and I could only pin a squad, while advancing fire broke my squad in D9. Worse, he also broke my squad in 10U8, making that corner much easier to deal with. Thanks to being in a rowhouse, 50D9 took interdiction as it routed, reducing to a HS.
In 10X2, the lack of concealment meant I couldn’t just refuse to participate in CC, and I lost my HS. In DD9, my 8-0 had been pinned, and was eliminated in CC, with my broken HS huddled nearby, with no rout paths.
Situation, Polish Turn 6.
I didn’t get anything for my turn 6 RPh, while Mark finally rallied the 7-0 and squad in 50G10. I managed to pin 10EE9 in prep, at least meaning that my best (if poorly positioned) stack would not be taking doubled fire. So I had one mobile unit, who skulked out of sight and advanced back into the northernmost victory building. Mark got OBA access, and requested artillery on 50D7, with the SR landing up on the hill in I5. Thankfully, he couldn’t get any results against 10FF9, though he did encircle it.
Mark finally got to self-rallying a squad in 50M9 for his final turn. It was essentially down to clean up, but there were two buildings to clean broken units out of, and a squad in the final rowhouse to silence. Mark’s first attempt to get at the last building ended with a broken HS (12 on a 1MC), but that allowed him to put a squad on the other side of the rowhouse bar. The 7-0 and squad moved around the other side, with the 7-0 pinning to SFF. Annoyingly, my sniper went off during this, breaking his only squad in the SE corner after it had moved to take the last building down there.
Advancing fire encircled 10U8, forcing it to surrender, instead of routing upstairs. 50C9 was stuck with nowhere to go, so he had to surrender to my squad, rearming the prisoner HS he’d been guarding. Mark piled three squads into 50C8 against my squad-and-a-half (with the FP differences it was 12:4), killing my HS to rearm his HS, but missing on an attack against my squad, while I did nothing in return.
Situation, Polish Turn 7.
With C8 in Melee, and 50D8h1 due to surrender in my RtPh, there wasn’t much to do. Self-rally of D8h1 failed, so I had one gambit left: Dash 10FF9 across the road to the single-hex wooden building in EE9, and advance into the two-hex wooden building in DD8 to retake it and win. Sadly, the squad pinned in the road, ending that plan.
However, while I was still unable to do anything in melee, Mark rolled a 12, failing on his 4:1 attack, and just barely giving the Slovaks a victory.
Afterword
This probably an unusual defense for this scenario. I imagine most people will defend the ‘board 10’ hill, and try to keep the Poles too busy to get at the two buildings in the corner. However, those buildings are more spread out, and there are clear gaps in several places. The area I chose to defend heavily has a much higher density of victory buildings. Of course, I defended the hill as part of my delaying tactics, and that generally worked out.
Another thing to keep in mind is the Slovaks only have two leaders, so a spread out hill defense is going to have more places to hole up in than there are leaders.
One of the defensive challenges is that the Poles have a lot of flexibility in where they set up, and therefore what route to take towards the goals. In general, Mark’s plan was to hit both ends of the thinly-defended hill, and sweep up from there, and that worked well. However, he ended up with three squads that effectively did nothing for several turns. The lone squad at the edge of board 5a was generally a mistake, as he didn’t have the ability to do much on his own. However, he is the one that eliminated my HS when I tried to switch defensive areas.
Of course, I’d already given up the 50G10 area, and that was likely a mistake. That’s where the cover between the two building areas was, and Mark’s force on the hill came into play once he could easily move down there. That force didn’t to much for a while, though some of that was just having to deal with the annoying LOS of that area.
Of course, giving up G10 was mostly to keep his broken squads out of the game, and threaten to retake buildings. That worked, drawing off three squads at the end of the game, and them surviving to actually contest the building should have been more likely than the final CC was.
Discussion ¬