
1 Fighting Withdrawal
After finishing “Lost Opportunities” with Mark, I took him back to the beginning. The first scenario for ASL, 1 “Fighting Withdrawal”, is a very strong one that really does show off maneuver and firepower. Set in the initial Finnish thrust towards Leningrad at the start of the Continuation War, both sides are trying to exit off the far edge of board 21, while fires rage behind the Russian lines.
I played it with my then-current roommate when I first got the game around ’96. As I recall, I came up just shy as the Finns as I could match, but not beat, the Russian exit points, and the Finns need to exit more off the far edge of board 21 than the Russians. I can still remember one squad generating heroes on back-to-back morale checks, and Colin was asking, “Why am I even shooting at these guys?”
I had the defending Russians this time, who have a six column setup area (V–AA), with 14 squads, three leaders and MGs, and 8 OB-given “?”. They also get two HIP squads, but I forgot about that during setup. They suffer from ammo shortage, but also have a SAN of 7 versus 2 for the Finns. The MMG went in the back behind a wall, concealed squads went in the rear of each flank, and a mostly concealed line went up front, with leaders on each flank, and the 7-0 in the rear to help catch anyone routing back. The dense buildings make for easy initial routing, though it can become a problem later.
The Finns have 16 of the ‘super’ squads (648, spraying fire, assault fire, self-rally, and they’re not even elite!), with three leaders, and one more MG than the Russians. Across a ten hex frontage, that’s about where you want to double up and put the MGs. Mark avoided stacking, and had a fair amount slightly in the rear.
Mark opened by firing everything with an LOS, and broke and ELRed one of the visible squads, while pinning the other, and revealing and pinning the 8-0 and the LMG squad with him. Movement was minimal, other than one squad shifting flanks.
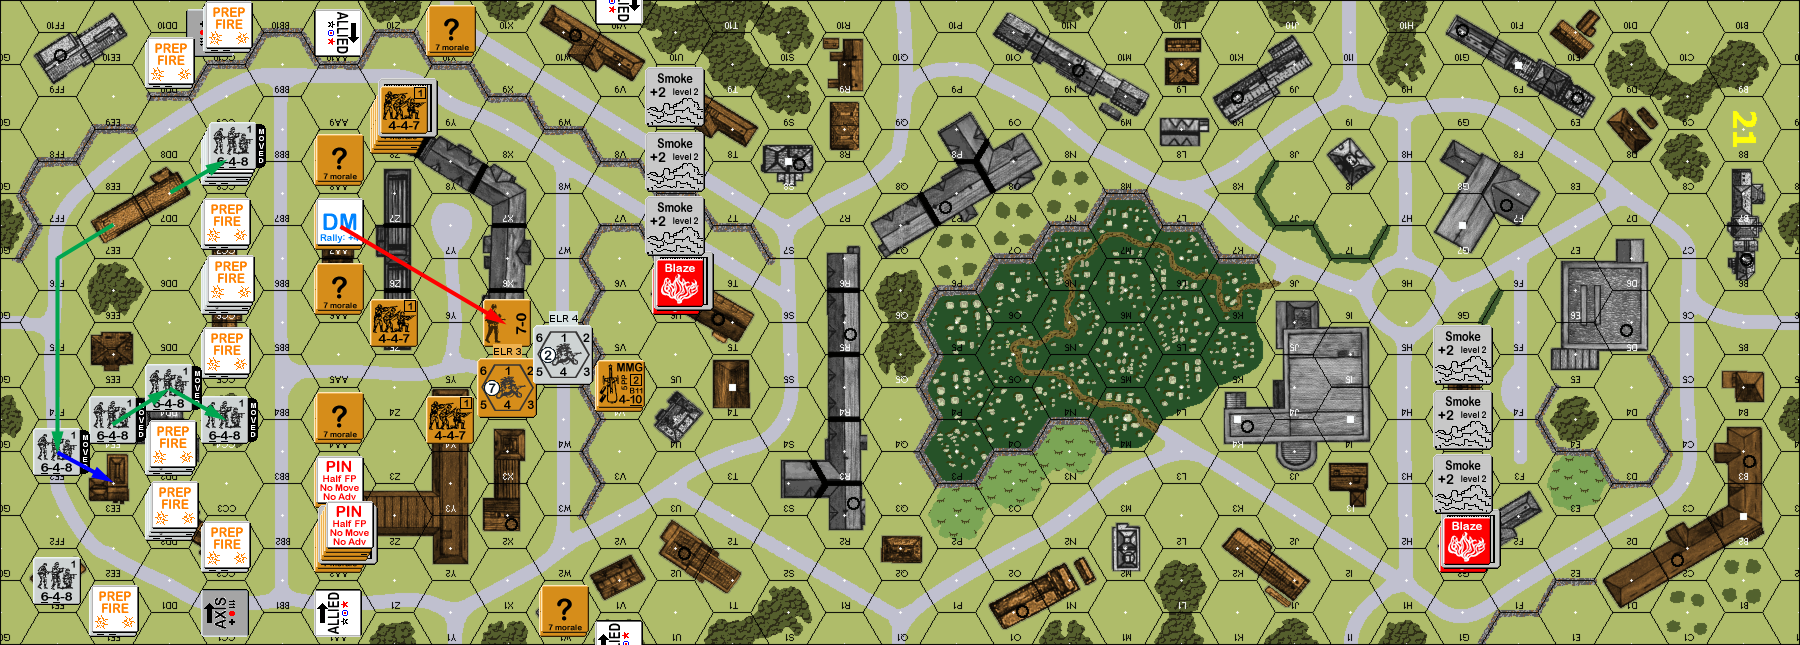
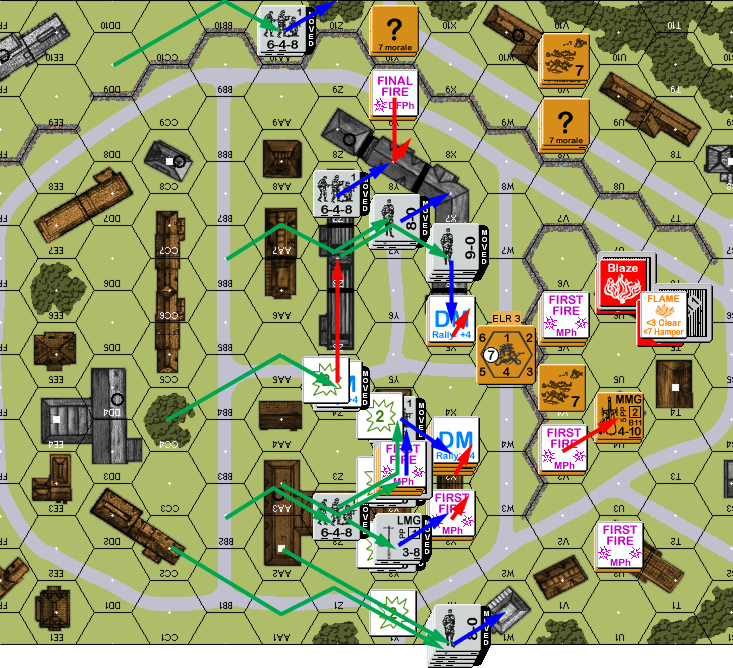
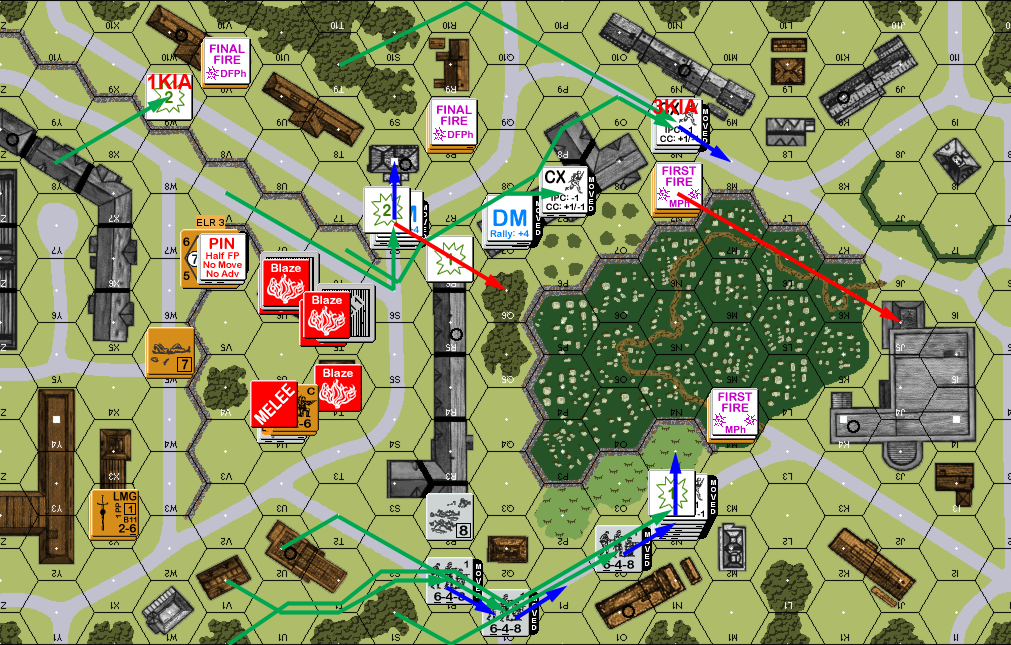
Situation, Finnish Turn 1. North is to the left, and the goal is to get off the south side.
I didn’t get my squad back for my rally, but the MMG fired down the central road and broke a squad. I only had one other shot, as I mostly skulked and repositioned. Defensive fire pinned a squad and broke another to conscripts, who then reduced to a HS on another shot. My advancing fire got a PTC, which he passed… but activated my sniper to eliminate his.
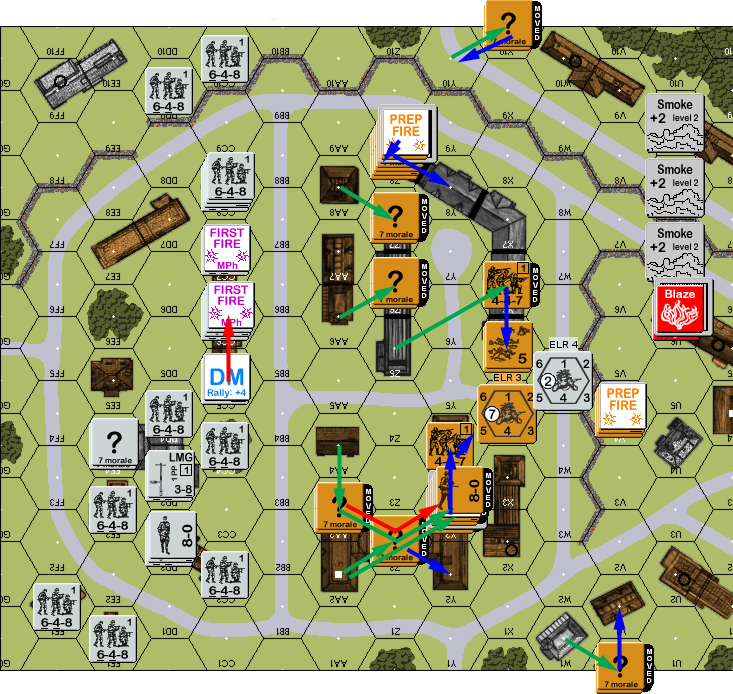
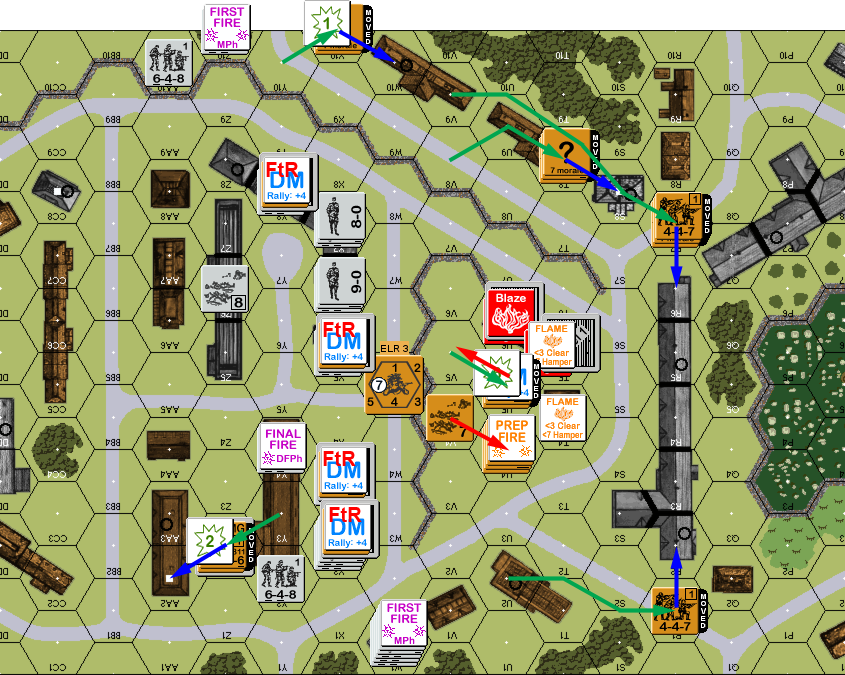
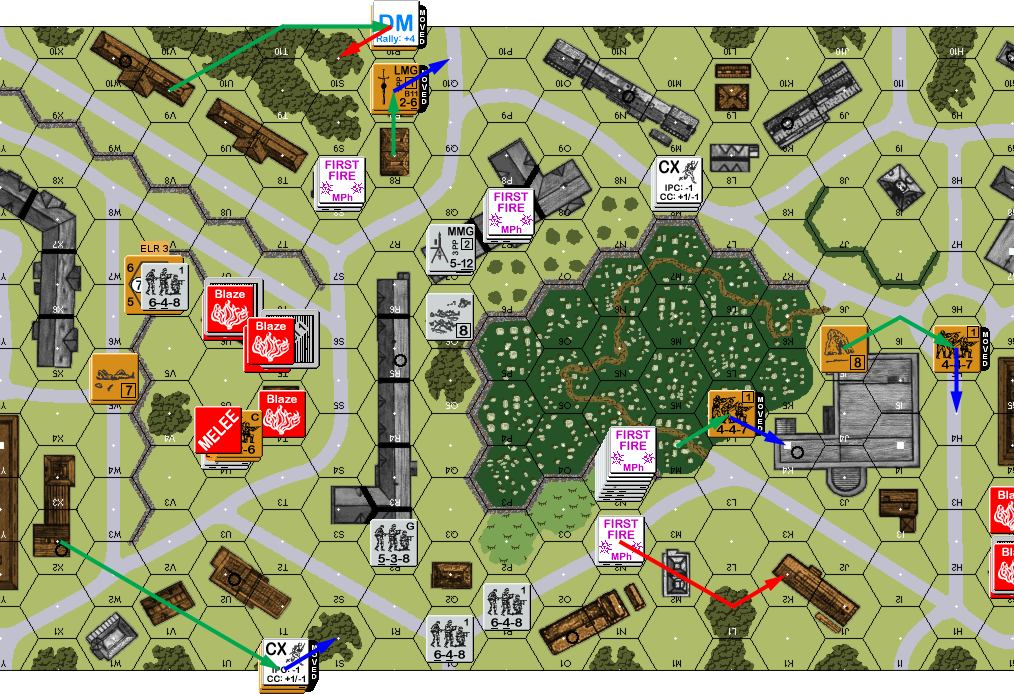
Situation, Russian Turn 1.
Mark self-rallied his squad for his turn 2, and did minimal prep fire for no effect. His first attempt to cross the BB street met a KIA, but since it was from a 2, it also put me on final fire, and kept me from putting down residual. And then FPF caused my squad to pin. Past that, I didn’t manage any damage to the approaching Finns, but advancing fire ELRed my 8-0 and pinned the squad with him. My pinned squad self-broke to pull out of likely bad-odds CC, and instead he piled onto the concealed squad in Z6 (13-4), but I got ambush, and the squad ran out the back door.
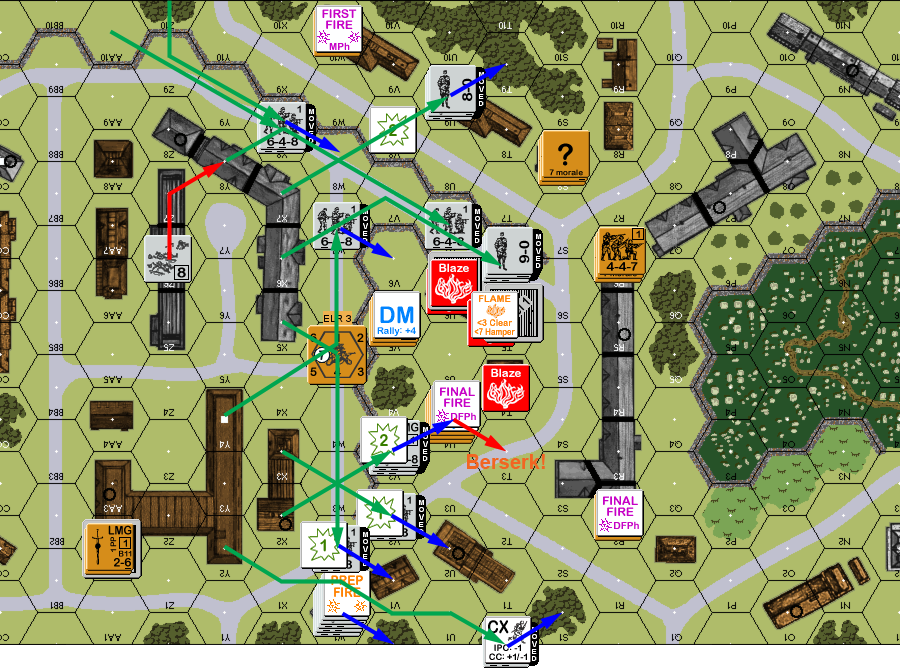
Situation, Finnish Turn 2.
I didn’t manage any rallies for my turn. One squad was now effectively trapped in the upper level of building Z2, and he prepped to pin a Finnish squad. My efforts to pull back were only partially successful, with a dashing squad getting pinned in the east, and a squad assault moving downstairs in Y4 took fire from several units before rolling a 12 on an NMC to turn into a broken conscript HS, and he broke the squad that had just gotten away from CC after it got into the X6 rowhouse. With all the casualties (I was down to 8 good order squads), I had to start seriously thinking about how I was going to keep the Finns from infiltrating my line and get behind me. The first couple of turns hadn’t seen a lot of movement, but my line was giving way fast.
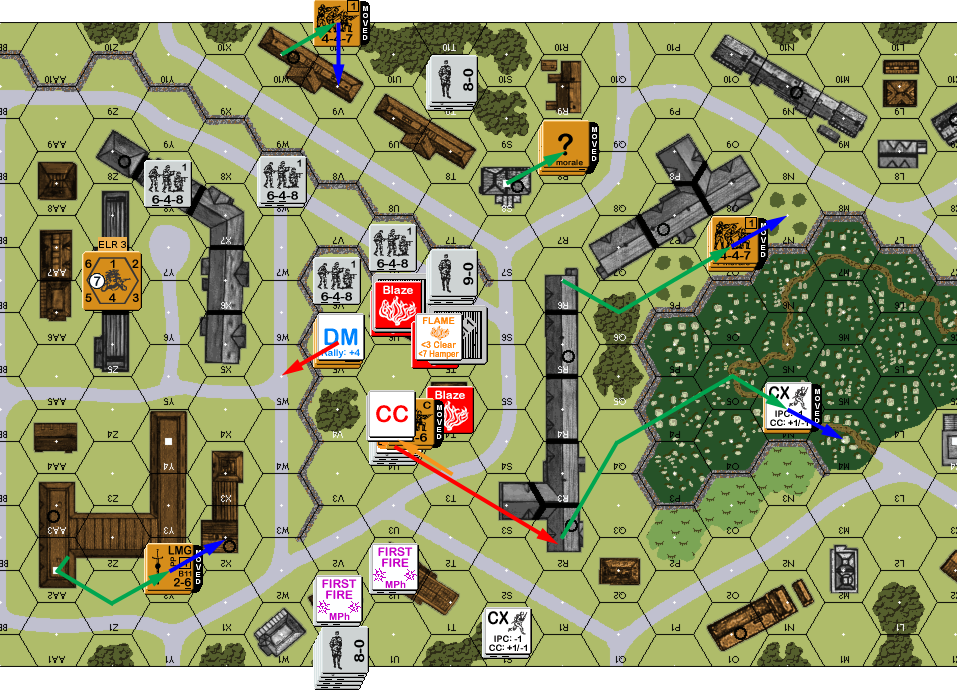
Situation, Russian Turn 2.
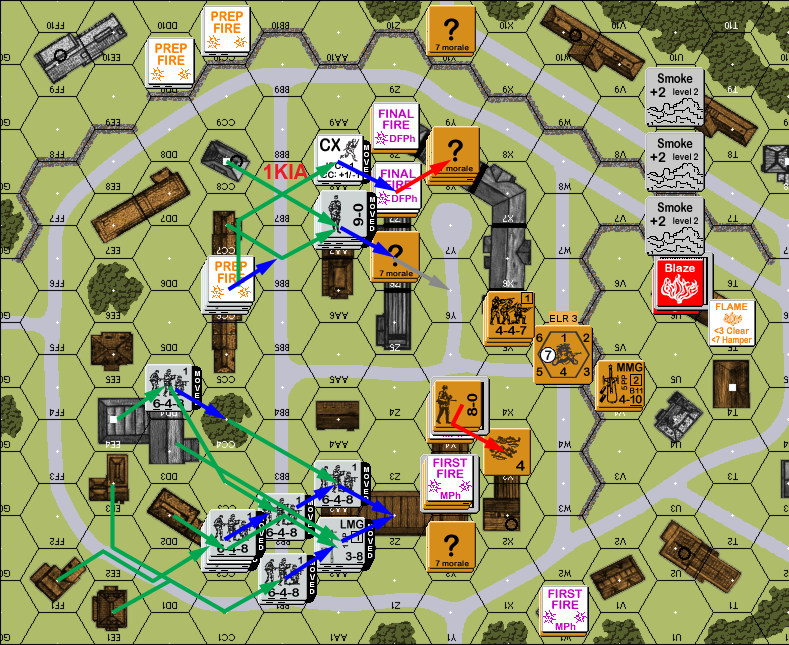
The wind dropped off to nothing for Mark’s turn 3, eliminating the drifting smoke. My attempt to hold him up at Y column failed as the Finns shrugged off every MC and TC I could throw at him in the Z2 building. My one success was the upper-level squad broke one his out in the open. In return, he ELRed two squads, broke the one out in the street, and eliminated two broken HS while wounding the broken 7-0. Worse, rout was a disaster as he could interdict the W road, forcing me to go upstairs instead of somewhere away from marauding Finns, and the squad in Y9 could only pick the rowhouse as his target, forcing him upstairs in there too. Even better, flames spread to T4, which was intended to be my next spot to hold him off from.
Situation, Finnish Turn 3.
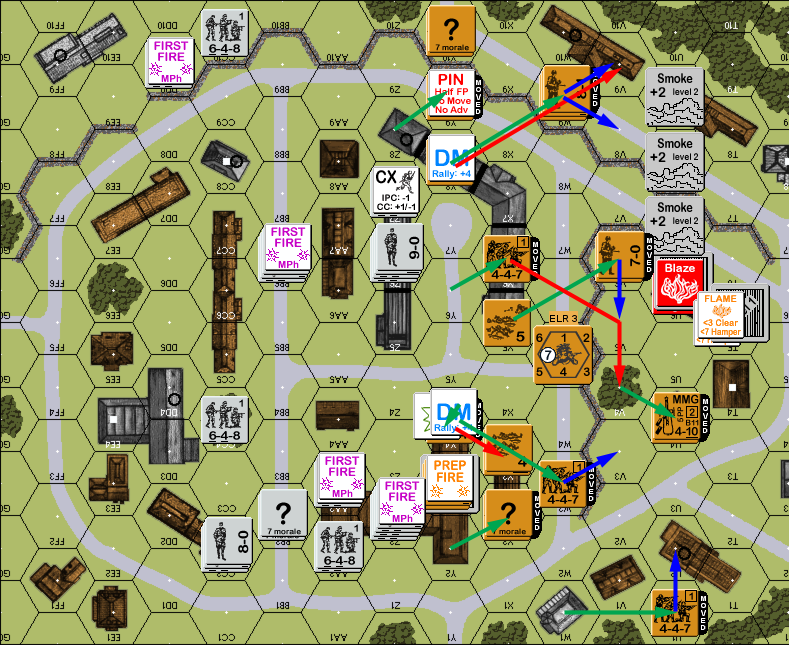
I only managed a rally in V9 for my turn 3 RPh. Mostly, I stayed out of sight, while heading back to form a new line, but V5 had to cross open ground, and got hit by a K/3 to break the 7-0 and reduce the squad to a broken HS. Then T4 burst into a blaze, keeping them from routing that way. Three squads and a wounded leader were trapped upstairs with nowhere to go, and not wanting to be burdened with that much baggage, Mark declared No Quarter to kill the lot of them. (I did start with the wounded leader….)
Situation, Russian Turn 3.
Nothing happened for Mark’s rally, and his stack in W1 thankfully rolled poorly in Prep for a mere PTC (which did pin the MMG). To my surprise, Mark didn’t push hard on the east side, staying behind the wall. On the west, I tried gumming up the works with residual, but all my shots cowered, reducing the residual, and my volume of fire. The MMG squad ended up ELRing from FPF, leaving me with 2.5 broken squads in U4, and R2 as my only GO squad in the area. At the end of movement, he finally sent a squad and 8-0 over the east wall, running through my fire with no trouble.
At this low ebb, things took a sudden turn. My two and a half squads in U4 ran for S3, facing interdiction on the way. The half-squad died to interdiction, but both full squads rolled HoB and went berserk in T3!
Situation, Finnish Turn 4.
Mark self-rallied his squad for my RPh, but I got nothing. The ‘zerkies charged U4, surviving a 3MC intact, and their advancing fire broke one of the Finnish squads. The rest of movement was setting up to interdict roads as time was a-wasting with half the board to go. The CC had no results.
Situation, Russian Turn 4.
Nothing came back for Mark’s turn 5 RPh, Things continued going better in the east than the west, with two squads broken and two more (plus 8-0) killed as he tried to make his way through the gauntlet of fire on the roads. Over on the west side, I only had one squad, and he had no result against a large leader-led stack in the open. However, advancing fire broke the leader and squad in N7, which was the primary defense on the east side. The melee continued in U4 with no results.
Situation, Finnish Turn 5.
For my RPh, I managed to self-rally the squad that had just routed to J5, while Mark rallied the squad in R2. As I moved to new positions, Mark managed to break a squad, but the most vulnerable one, in M4, managed to assault move away, and broke one of his squads with advancing fire. The melee finally finished with me wiping out the Finnish squad.
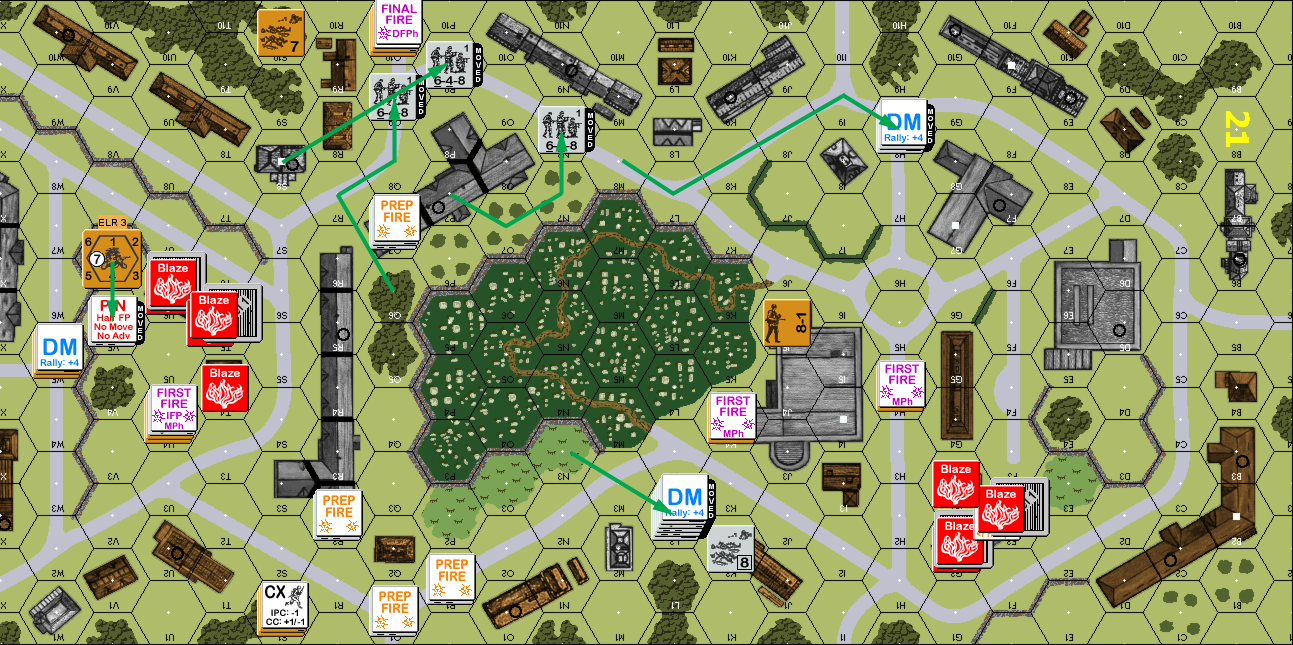
Situation, Russian Turn 5.
Mark self-rallied the squad in Q6, while my 8-1 in J5 rallied. While there were still two turns to go at this point, the number of units in theoretical range of the board edge was already extremely low. Basically, the leader in M8, and the stack in N3 could make it (as long as they stuck with their leader), while I had a squad and the rallied 8-1 in range.
He prepped out of range units to pin my LMG squad in Q10. Of the important units, the 9-0 set out first, with my pinned squad getting no result, but he took a K/2 from the H-column squad which would have stopped him even if he didn’t break. The big stack moved out, and took a NMC from my squad in K4, which broke the 8-0 and one squad. The remaining two squads had no way to exit in time, so we called it there, with EVP somewhere from 0/0 to 0/4 (for a squad and 8-1).
Situation, Finnish Turn 6.
Afterword
Well, the scenario lived up to my quarter-century old memories of it. The high density of units actually lets it play fairly faster than would seem normal for the number of units. It’s also a good intro to the wind and fire rules (I wish that would show up in more regular scenarios).
The initial density also makes the Finns job look tougher than it is. The Russians just can’t take the firepower the Finns can dish out for long, even with +3 terrain; Mark should have built some big fire bases for the initial prep phase, though that goes against the lessons of most ASL scenarios.
I should have pulled back a bit faster than I did to keep turns 2 and 3 from being as bad, but that first turn let me think this about right. And with the distance to cover, every hex of delay is important. Both sides have fairly obvious, but not that easy objectives, which is what makes it a good scenario.
Turn 3 was really bad for me, and the log says I averaged 9 on MC rolls that turn. It was looking like I’d handed the game to Mark by not pulling back fast enough and letting the line break up, but the two squads suddenly going berserk during rout really changed the entire character of the situation, and it turned out I had slowed him enough to make going down the clear roads the best chance, which lets the comparatively low Russian firepower do its thing.
Discussion ¬