
DA1 L’Ecole Normale
The aftermath for “The Liberation of Tulle” mentions there were a few major buildings the Germans still held at the end of the day; among them was L’Ecole Normale, which made me say, ‘I know that name…’. And indeed, scenario DA1 from ASL Annual ’89 is about the Maquisards assaulting that building the next day in Tulle. So this sequel became the next stop in Mark and I’s play of ASL scenarios.
This time, I had the defending Germans, who have five squads, three machine guns, ten “?” and set up on deluxe board c. The partisans get ten squads (two of which are 527s) and a pair of LMGs, and have seven turns in which to render building cK4 aflame (in this case, having two blaze counters in the building—and they do have MOL capability), or for there to be no unbroken German MMC in the building.
Setup is simultaneous, and I deployed two squads (the Germans can deploy everything by SSR), one of which was my allowed HIP squad-equivalent, which went in cI3 with a LMG to halt any advances towards the east side of the building, and the other was buried in cK3h1 to force a search/mop-up once the obvious defenders were taken care of. The west side had a dummy and the other LMG+HS with the 7-0 leader. Sadly, there’s almost nowhere to set up north of the building so that relied on a squad and a half, and more dummies, with the MMG centrally located in L3.
Mark mostly set up in a rough line to the north on board b, with three squads and his 7-0 to the west largely on the board e hill. Prep did nothing, and Mark did a limited advance under cover of smoke (by SSR, partisans have a Smoke exponent of 2, and he rolled well), with my only fire being to break a 527 after the smoke went away.
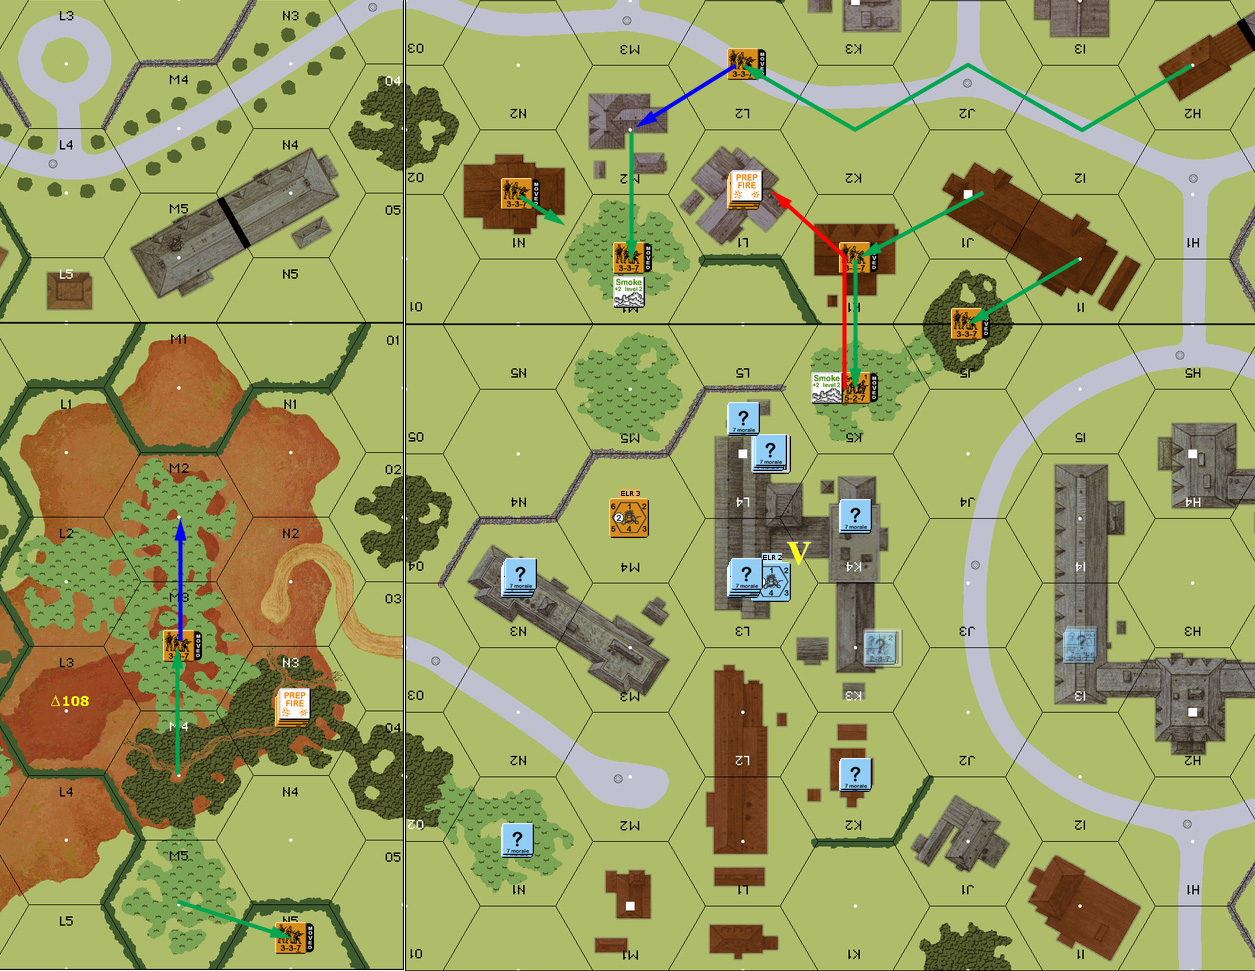
Situation, Partisan turn 1, showing my HIP. This is not the full board, but is all the important parts, and stone building cI3 is actually woods. Only buildings with printed stairwells have a level 1 (and there’s no level 2 Locations).
My turn was as boring as I could manage while skulking a few units. Mark got a PTC to reveal the 7-0/LMG stack in cN3, which set off my sniper to reduce his broken unit. (Which was a pity, as his 8-1 and the other 527 were the other targets.) I cycled the MMG to L4 while the squad that fired last turn stayed back.
Mark failed to get his HS back for his turn 2 RPh (thanks to the DM from the sniper), and then advanced with a lot of assault movement. I revealed I3 to set up a fire lane as he advanced into K5, but cowered instead. I had a couple of good shots at L5, and broke one squad, but the other became fanatic. I pinned a couple more squads during DFPh, but couldn’t break anything. In turn, he pinned the squad in L4h0 and went into CC with two squads against it, and moderate rolls wiped out the Germans at the cost of his fanatic squad in HtH.
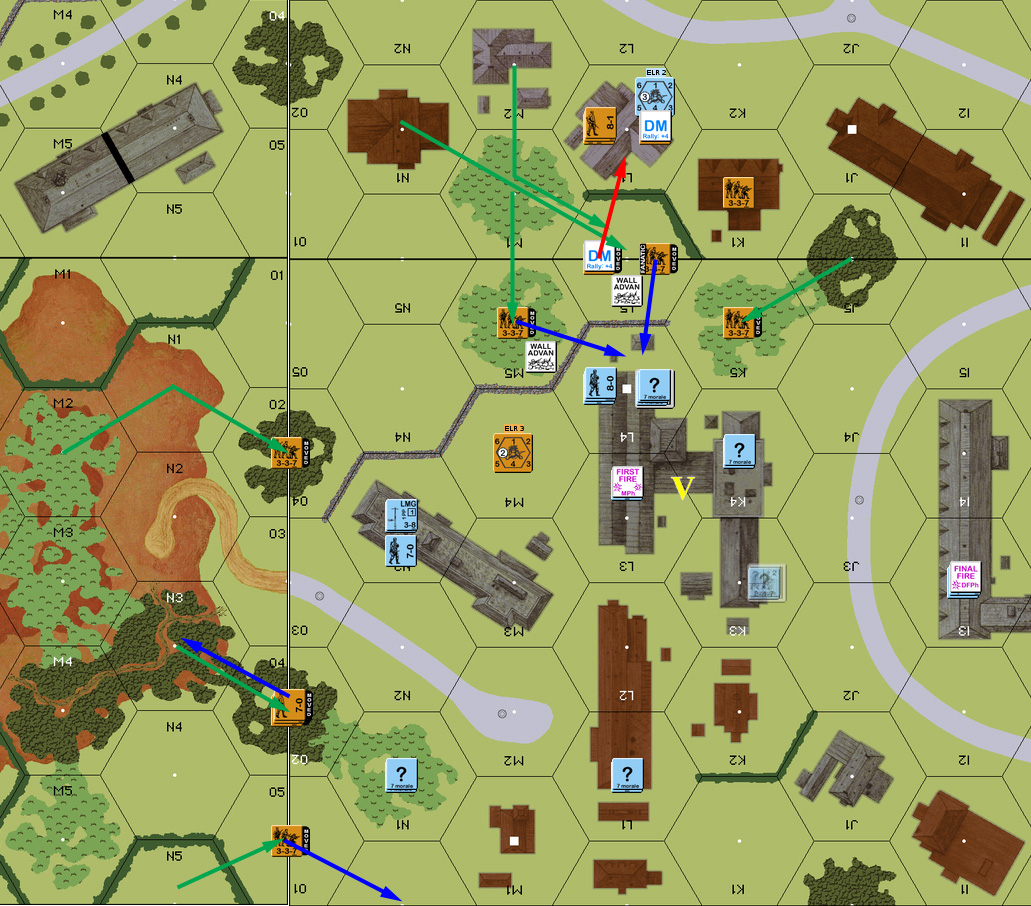
Situation, Partisan turn 2.
Mark recovered the MMG in my RPh, and I prepped at him for a NMC which he passed. I pulled in, with the I3 HS successfully crossing the street under fire. Mark’s fire did break and ELR the squad that had prepped though. I moved back adjacent to give him multiple targets and try to hold too many more partisans from getting in.
Mark’s broken squad and HS finally rallied for his turn 3. The 8-1 led a prep fire at L4h1, but merely lost a LMG for his trouble. L4 fired at L3 and broke my HS with a 1MC. Partisans swarmed in on the west side, and fire from L2 managed to to pin two squads (I needed a lot more than pins…). He attempted entry in K4, but found the “?” was a HS. My sniper went off again during DFPh, and returned to the scene of the crime to kill the 8-1, break the squad on re-roll from a tied result, and then the HS there broke from the LLMC.
Mark sent two squads into K4, and thankfully for him, did not declare HtH. Nothing happened, but with HtH numbers, I would have taken out a squad for no loss.
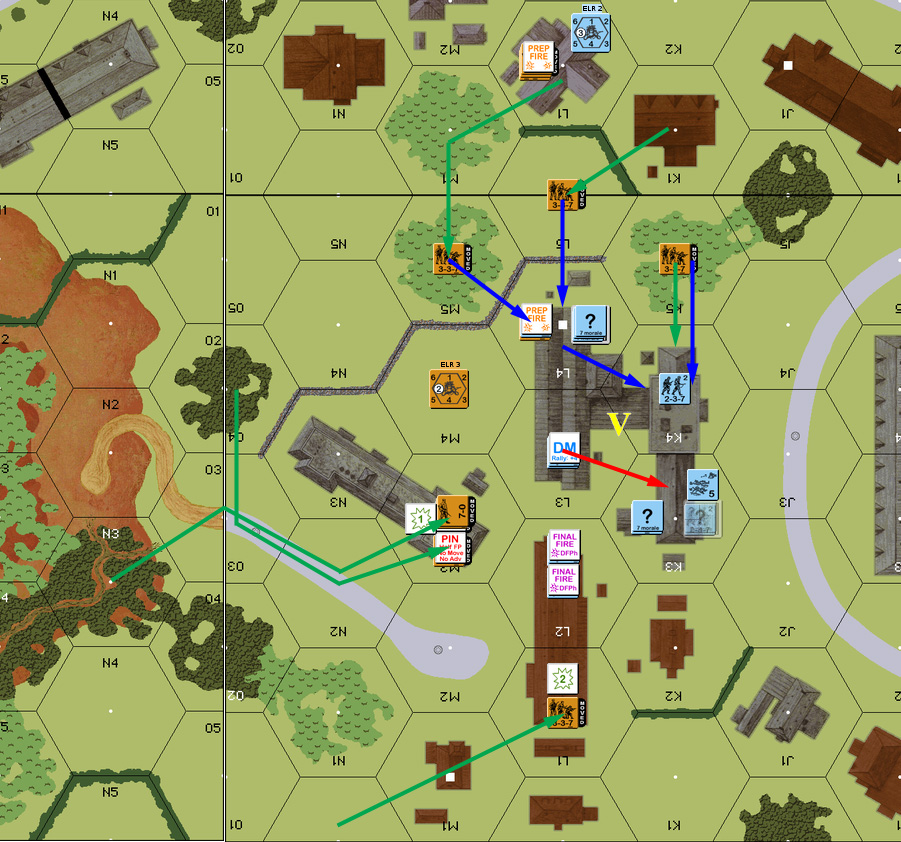
Situation, Partisan turn 3.
I didn’t manage a self-rally for my turn, and didn’t have much left that could do anything. Final fire eliminated a broken HS and reduced the broken squad in K3, but the unbroken HS there was fine. The remnant broken HS fled to I3, and I advanced the last “?” squad into L1, hoping for a successful ambush to relieve some of the pressure. I converted the melee in K4 to HtH and went for broke, missing against the pair of partisan squads while they killed my HS. L1 went better, missing ambush, but killing the partisan squad for no losses.
Nothing rallied for Mark’s turn 3, and he swarmed into the building, with my only DF shot being ineffective. Thankfully, his advance fire did no better, and he advanced three squads into L4h1 and another three into K3. The former held the big stack of dummies I’d been holding onto since the start (I am surprised there had been no effective attacks against it), while I managed ambush in the latter, and withdrew out.
Not that there was much of anywhere to go. My broken HS died to a 12 in my RPh, and the 7-0+HS pulled back to M3 to avoid taking a point-blank shot. This led to some discussion of the victory conditions, as they do say that the partisans win immediately upon there being no unbroken Germans in the main building. I had to point out that I had HIP, and just because he couldn’t see them didn’t mean they weren’t there. Also, there’s only eight locations in the building, and he’d been in six of them…
My spare squad joined the main group in M3, but partisan fire ELRed the 7-0 to a 6+1 (while not affecting the squad and a half), and I advanced the squad into L3. They promptly ELRed to conscripts to a 24FP +3 prep fire shot in turn 5, and then Mark mopped up the building to take them prisoner and reveal a “?” in K3h1 (no result on the casualty roll). The two squads not tied up by that moved into K4h1 and then advanced into K3 and successfully took out my last HS in HtH CC.
Afterword
I have a lot of problems with these close-in point defense scenarios, and I don’t think I’ve ever had one go well for me. If there’s some maneuvering room, that’s one thing, but not being able to set up anything north of the victory building really ties the German hands here.
Some more breaks from the partisans would have helped. If turn 3 had seen three breaks instead of pins, that would have changed things quite a bit. As it was, I was quickly dealing with about 3:1 odds, with no real advantages to make up for it. The result from that point was predictable.
A somewhat belated look at Scenario Archive/ROAR shows not enough playings to be certain, but does indicate this is noticeably pro-partisan. Since I had collapsed by turn 4, and this ended in turn 5, shortening the scenario (from seven turns) doesn’t seem to be enough (though six turns would be a good first step). Maybe that and the current German balance of adding another 447 squad would get it close
Discussion ¬