
1862 Civil War
A little bit back, Mark and I finally got GMT’s U.S. Civil War to the top of the ‘to try’ list. There’s single-year scenarios, and the rules recommend the 1862 scenario as a better beginner one than 1861, so we went with that. I’ve been impressed by what little I’ve seen since it came out, and reading the rules, and playing the game did not disappoint. Mark didn’t have any preference, so I took the Union, since I had some idea of what I should be doing strategically.
Interesting overall features include variable length turns, and a small deck of cards that are used for occasional extra actions. There’s four action rounds, with an initiative roll at the start of each round, and the difference between the Union and Confederate rolls is the number of actions each side gets, with the exception that a difference of 1 is instead one action each in the three theaters (east, west, trans-Mississippi). And on a tie, you both draw an extra of those cards I mentioned, and roll again. And that’s how the game started, with a tie for us to each get a third card.
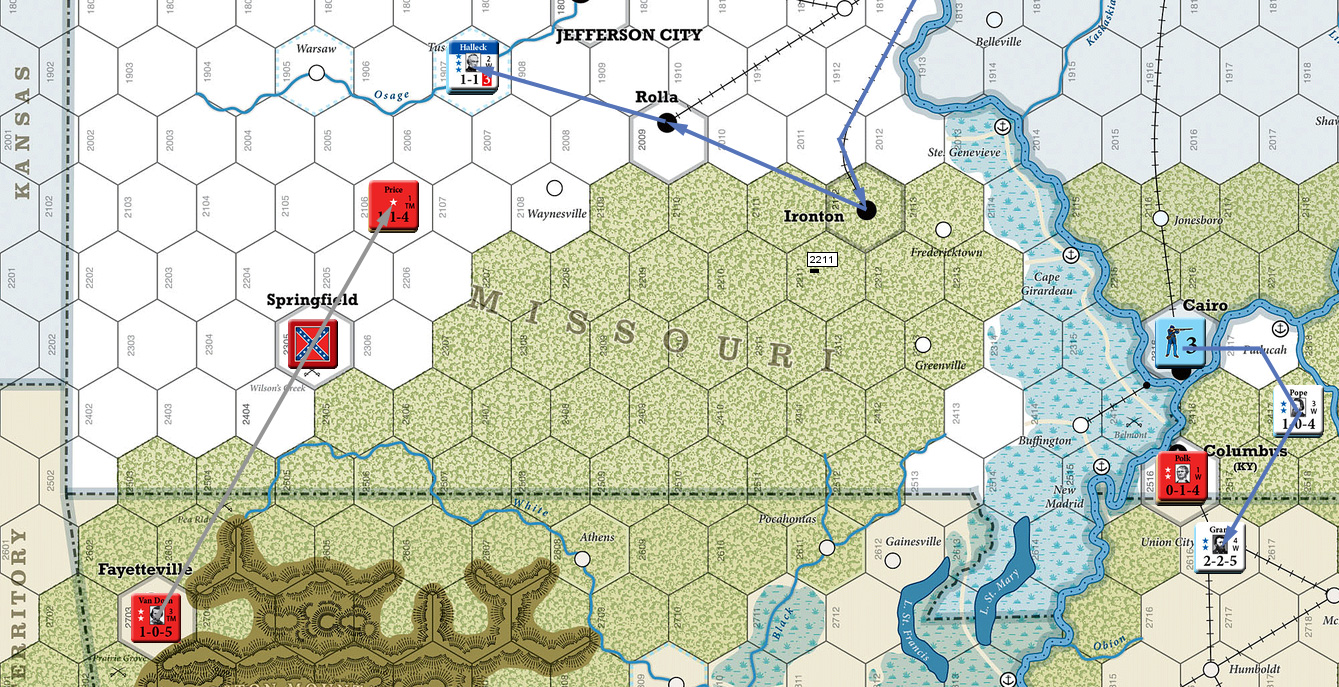
We had two rounds (1st and 3rd) where the rolls were off by one, which guaranteed that activity remained spread out. In the Trans-Mississippi, Price moved into southern Missouri, and in two tied battles destroyed Curtis’ army and took Springfield. (This was aided by not seeing that rallying to remove demoralization and moving have to be in two separate rounds). These caused us to take a real dive into the supply rules, and eventually figuring out just how things are supposed to work, since there’s no way to have Full Supply out there, but the answer is Limited Supply is fairly easy, and the network of objective and resource hexes in the various “backwoods” areas maintains that. (The supply system overall is good, but takes a bit of reading to figure out, and river control is decidedly complicated.) Hallek starts in St Louis, so he took the troops there, gathered the garrison in Ironton, and started moving to intercept.
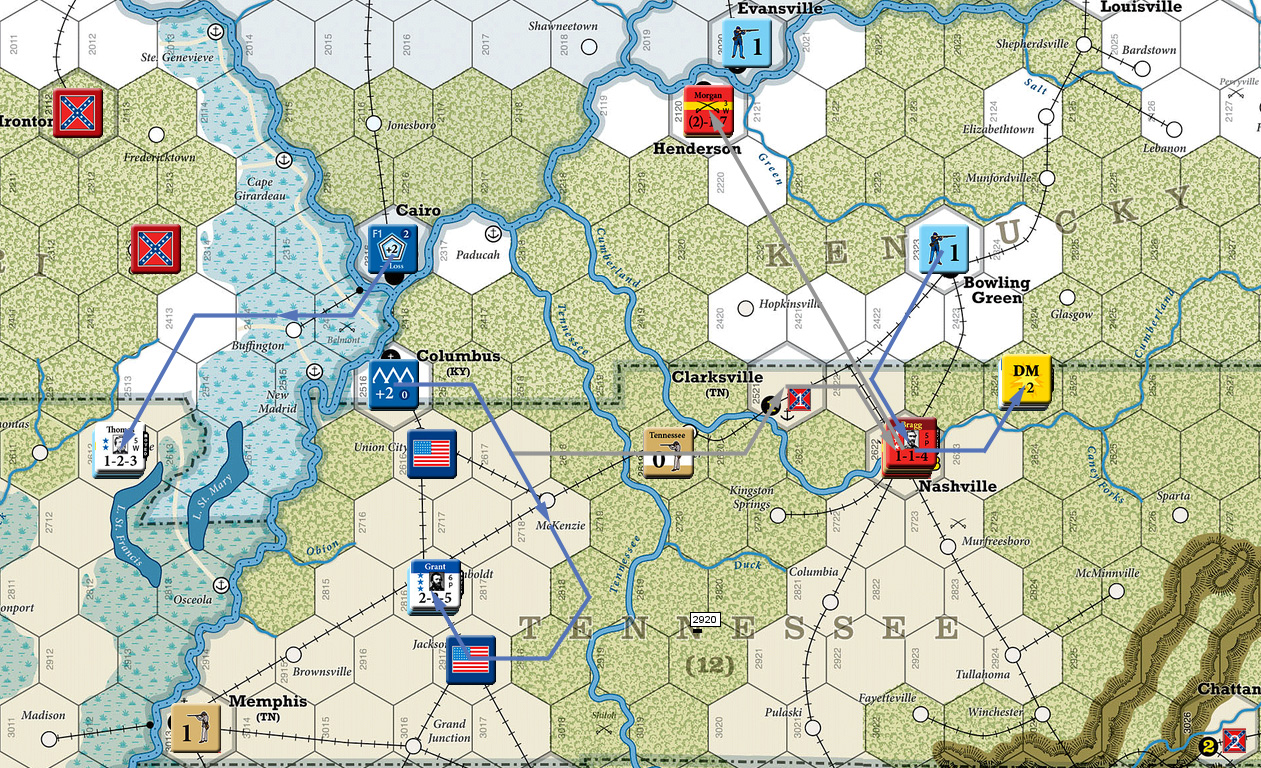
In the West (Mark had some trouble with that theater label, since he’s not as read up on the ACW as I am), I really wanted to send Grant after the Confederate fort in Columbus, but didn’t have a West card for the combat bonus, and the odds looked bad without that. So, the main action was Buell moving down to Bowling Green and defeating A.S. Johnston’s army with a 1* result (there’s a couple of “this result is better than others with the same number”, which works out well as its all strength point losses), who then fell back on Clarkesville, and then drew troops out of Fts. Henry and Donelson, and I moved Grant south of Columbus to cut off its supply (which caused several different looks at river control, and I don’t remember the logic chain one way or another right now).
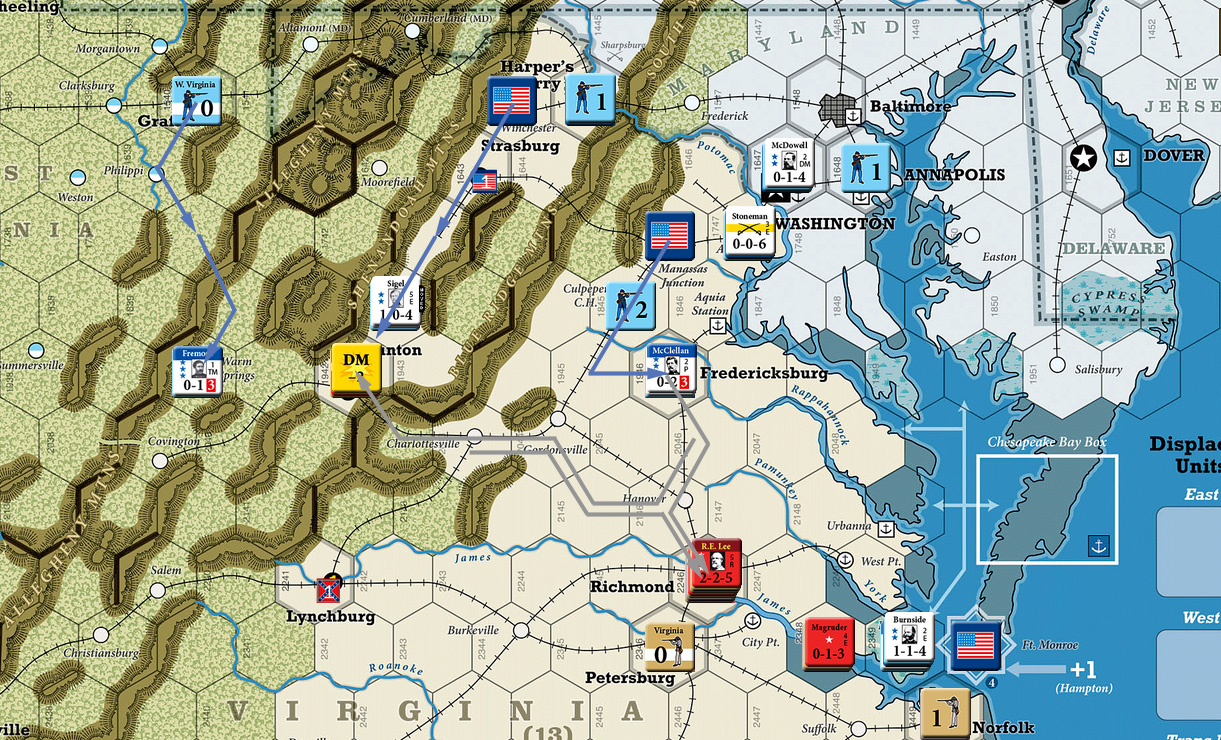
In the east, things were more mixed, as Joe Johnston moved into the Shenandoah Valley to attack Banks in Harper’s Ferry, but even with a force twice as large, the fortifications caused another tied battle, though this hurt the Union force more. McClellan moved forward (spending an action point and a card, since I didn’t realize that just an appropriate action card is needed to get a cautious general to move), to take control of Manassas Junction, and attacked Longstreet at Culpepper, forcing him across the Rappahanock before entrenching in his forward position. I then spent another East card to rail reinforcements from Washington to Harper’s Ferry. Johnston then marched up the length of the valley to leave a garrison in Staunton, and cross the mountains into ‘eastern’ Virginia.
At the start of each turn both sides get reinforcing strength points. The Union’s are on a constant schedule scattered about the north, but the Confederates depend on holding resource hexes, and getting extra supplies through blockade running, which is a set of die rolls modified by how many ports (or forts blocking access to them) are still held by them. Even if they do hold everything, the extra points gained that way dry up as the war goes on. And they get further bonuses for holding important parts of the border states, all of which, at this early point in the war gave him 11 SPs, close to the Union 12 SP total reinforcement.
Confederate SPs also have to be scattered about (for instance, no more than two in a state), but this is followed by strategic movement, which lets you get things roughly where you need them. I don’t think either of us ever maxed out rail movement, though river and ‘road’ movement have serious constraints. Of course, we were generally just concentrating forces, and not trying to shift concentrations from one area to another. The Union also gets a free fortress construction every turn, and I placed the Spring 1862 one in Harper’s Ferry. Leaders also change a bit every turn, with some going away, getting promoted or demoted, and new ones arriving. The big news in turn five is of course the replacement of Joe Johnston with Lee, which makes Virginia noticeably trickier for the Union.
Worse, the initial initiative differential was a 5. Both 4 and 5 are “On to Richmond” results for the Union, where they have to do something offensive in Virginia, Maryland, or Pennsylvania. So Sigel marched up the Valley to Strasburg and attacked Jackson, where both sides got good rolls for a tied battle. Then I sent a small force up to McClellan, who crossed the Rappahannock and attacked Longstreet before Lee could move north, and took Fredericksburg. Then I set out on a long-considered expedition (all of the previous turn…), with Freemont moving to cross the Alleghenies. Longstreet fell back, and Lee moved to join him in Richmond, while Stuart moved to garrison Staunton. Sigel made another attempt in the Valley, this time dispersing Jackson, and taking control of Winchester and Strasburg. The next round, he continued south to attack Stuart but was repulsed in a tied battle.
Out west, I sent an SP out from Cairo to cut that side of the Confederate supply lines, and did a naval invasion of Ft. St. Phillip, but I had mismanaged my leaders, and didn’t have one available for the force, and lost even after using a West card for the bonus. Polk left Columbus to enter Missouri from the south-east, while Hindman and Price moved to take Rolla, burning cards for forced marches on both. Hindman then took Ironton, and Polk doubled-back on my garrison in Buffington, capturing it, and headed to New Madrid. Grant advanced on him there (thankfully, that’s a ‘special’ hex where a major crossing point negates many of the problems with the Mississippi River), and defeated him. Van Dorn moved north to take Union City, and Grant re-crossed the Mississippi, and defeated him, while Thomas headed back across the Ohio on his way to Missouri. A.S. Johnston went west and attacked Grant with a force nearly twice as large, and defeated him.
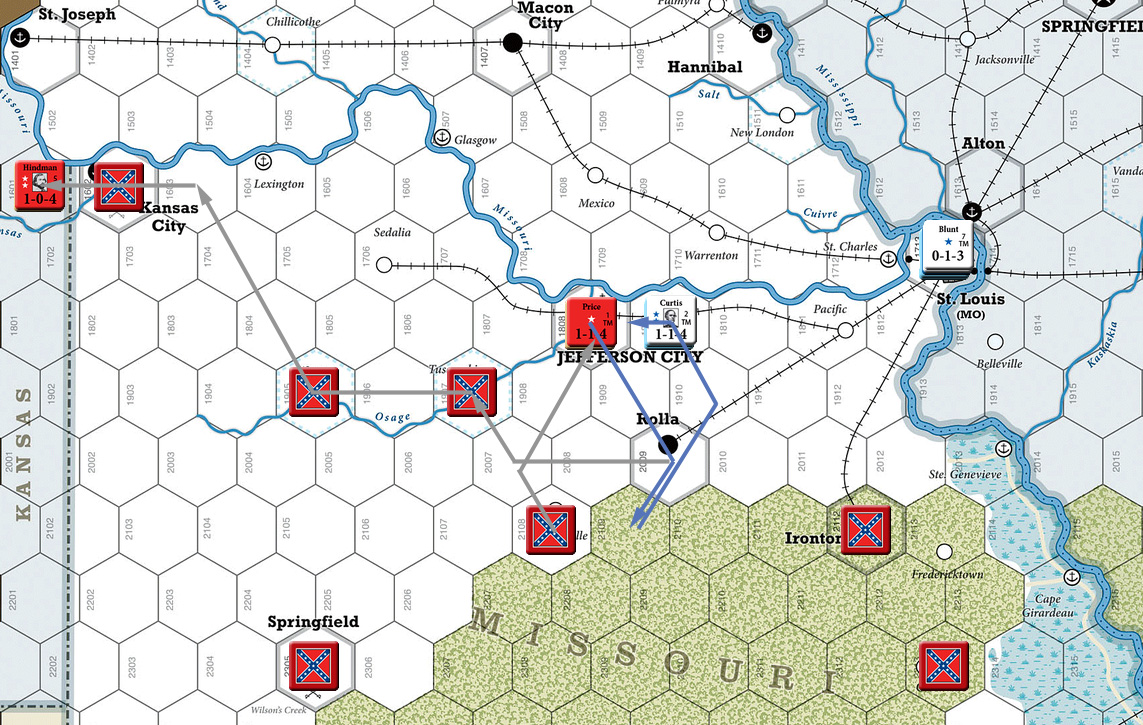
Beyond the Mississippi, Curtis attacked Price in Jefferson City, and lost, then Hindman attacked Halleck and defeated him, taking Waynesville, and went north to attack Curtis, who avoided battle into Jefferson City. This ended the turn with two fairly stable Confederate supply networks into the state, and everything south of the Osage and away from the Mississippi was in Confederate hands.
For turn 6 (Summer, part 1), I put the new fort in Fredericksburg, and Mark was up to 12 SPs in reinforcements (mostly thanks to better blockade rolls). Outside of Virginia, I hadn’t gotten much of anywhere, and was afraid I’d lose at the end of the year without getting anywhere; the Confederates getting as many new men as I did not help the impression. Halleck gets removed on this turn, leaving Curtis in charge of Missouri. Grant gets promoted, and Sherman shows up (who I put in charge of a detachment I’d river moved to Paducah). Hooker also arrives, who was put in charge in the valley, while Banks took command of the defenses in Culpepper. Sigel was sent west to take charge of the recruits in St Louis, and help Curtis. A.S. Johnston dies and was replaced by Bragg (who’d been watching the Gulf coast). Forrest was put in charge of the garrison of Clarksville, and Taylor arrived in Springfield MO (the Confederates have an abundance of leaders in the trans-Mississippi…). Price was shifted to Polk’s command, and Polk was put in charge of the defenses of Mobile.
Mark got the first initiative, and Lee went north before the fort in Petersburg could be finished with our first (only?) army that could roll three dice, but McClellan held on in a tied battle. (There’s actually different combat charts for different size armies, with the bigger ones rolling 2- or 3d6, which means they also tend to be more predictable. Also, the number of leaders who can add modifiers is the same as the number of dice rolled; that’s a neat touch.) Hooker drove into Staunton, and then through the pass towards Charlottesville, with Stuart backing up before him. I transferred troops to the Peninsula, where Burnside had been patiently waiting, which caused Jackson to pull out of Norfolk to defend Richmond. Burnside then advanced to take out Magruder’s small force, and then circled around to take West Point (this… was a mistake; I should have either gone for Richmond [4SP +1 vs 2SP +4], or camped on it’s doorstep with the peninsula to retreat down…). Hooker finally caught up with Stuart and knocked out his force, took control of Charlottesville, and then pulled back to Staunton in case Lee headed west. Lee went after Burnside and defeated him, which forced a surrender of a 4SP force with nowhere to go.
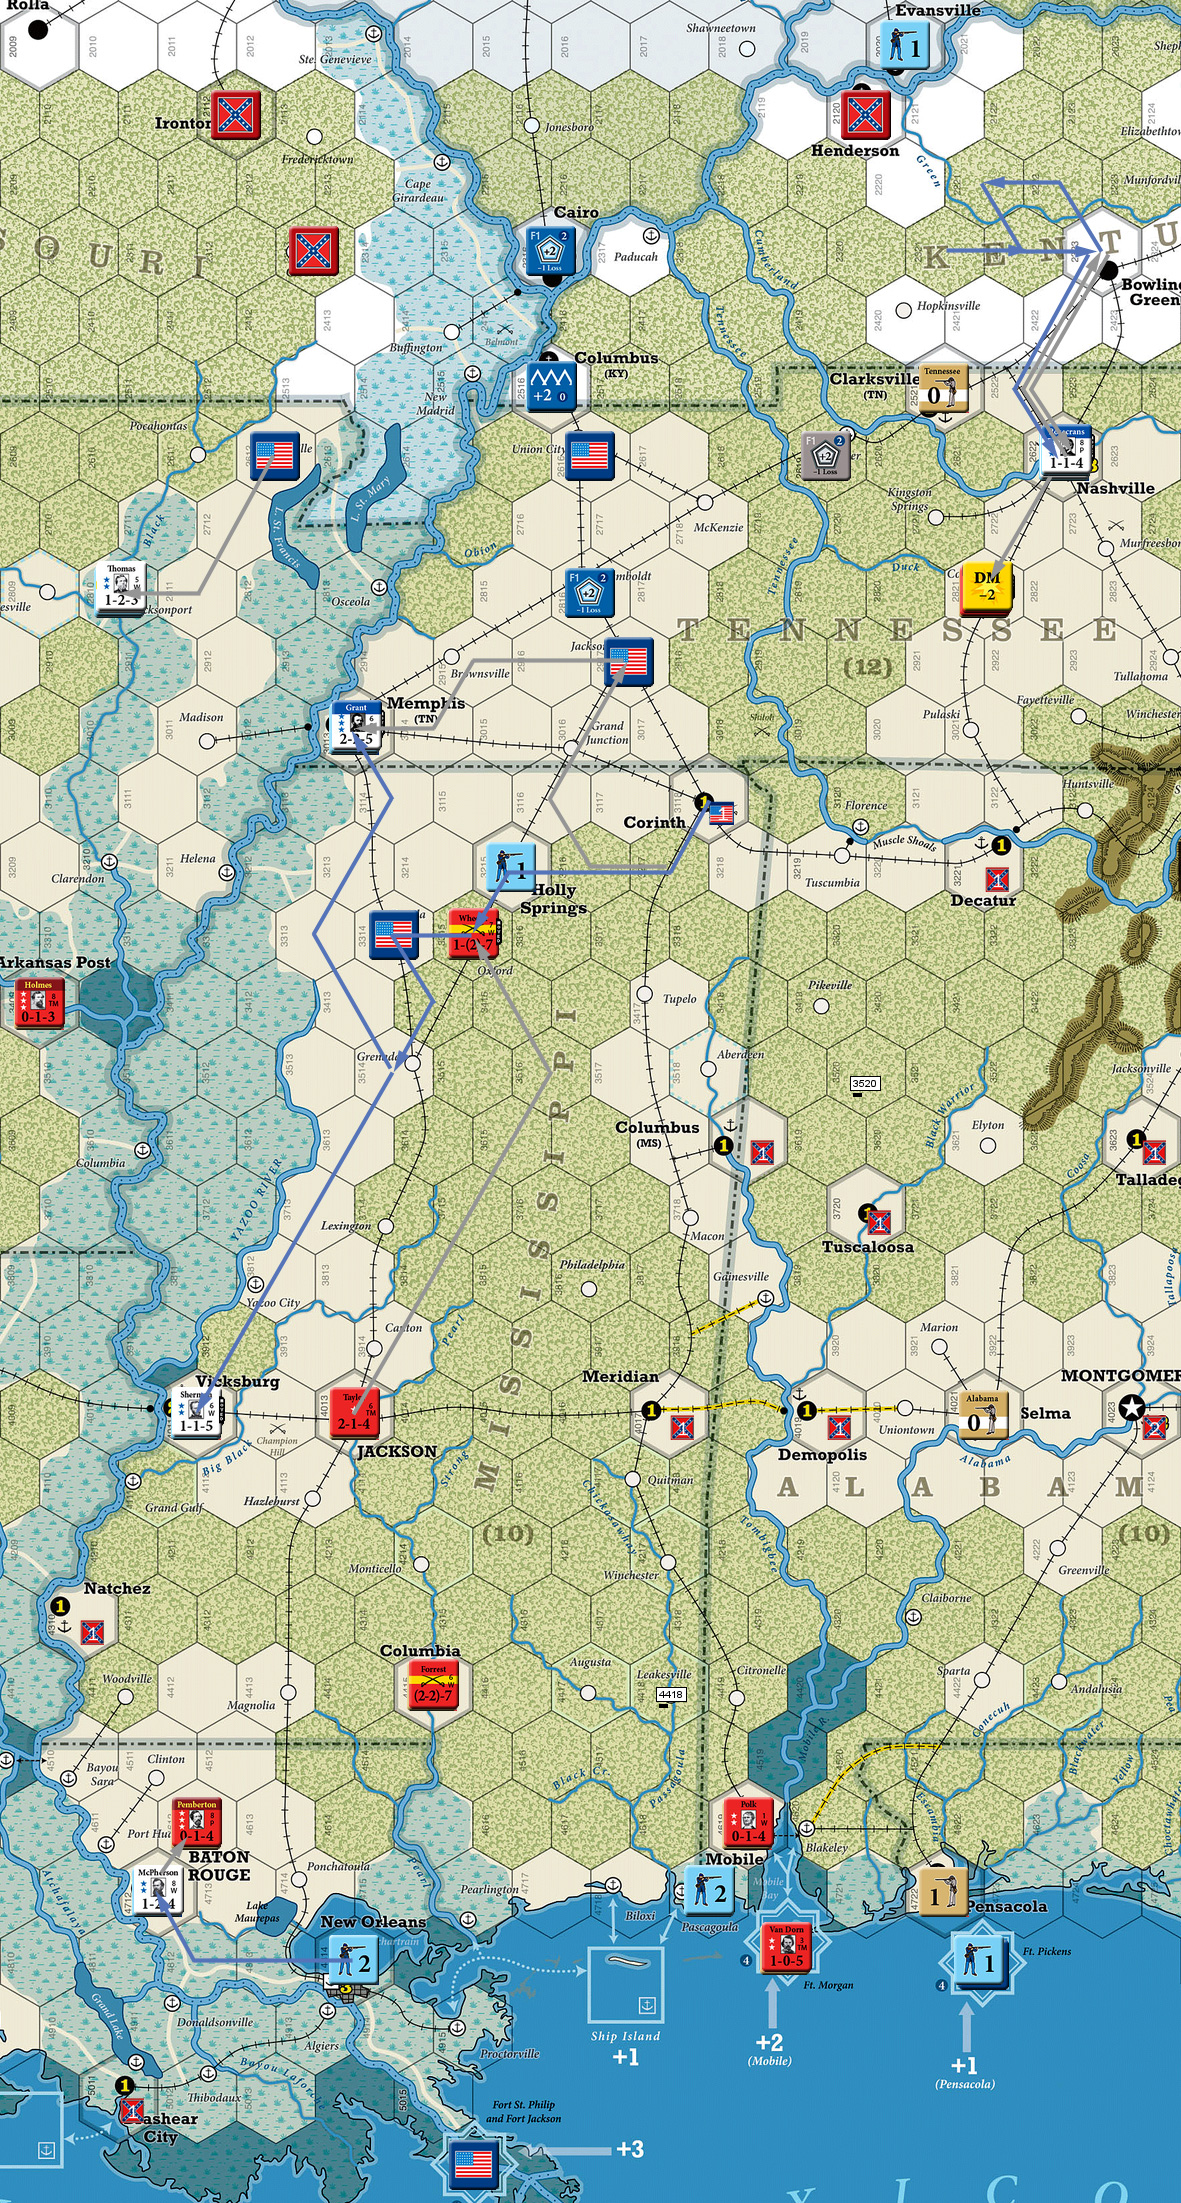
Morgan… was true to form, and headed north into Kentucky, defeated the state militia, and took Henderson. Sherman joined Grant’s army, which then attacked the fort in Columbus, and finally got rid of that thorn in my side. With the big Confederate army still over there, Buell went south and took Nashville, which drew Bragg east to defend Clarksville. Grant headed into Tennessee, defeating Van Dorn at McKensie, and then chased him along the Tennessee River to another defeat, and then turned to take control of Jackson, TN, and Humbolt. Bragg then fought Buell at Nashville, and managed to defeat him (thanks to an action card).
In Missouri, Taylor headed north to Warsaw, while Curtis went south and drove Hindman back. Taylor went east and tried to take Jefferson City, but Curtis managed to intercept him to defeat and displace Taylor (lost the only SP he’d had). Thomas finally crossed into Missouri, and defeated Price, and eliminating that small army.
The Confederates got 12 SP reinforcements in turn 7 (Summer, part 2) as well, but other than losing Burnside’s army, I had made some real progress. Things were going from bad to worse in Missouri, but Tennessee was coming apart for Mark, and I placed the new fort in Humbolt to hold that central rail junction. Price returned to Missouri, Van Dorn took charge in Decatur, Magruder showed up in Weldon, and Burnside was put in charge of the Chesapeake holding box (a generic representation of off-map New England and the Union’s ability to ship troops by sea). Butler is removed on this turn and Banks replaced him on the peninsula (like Joe Johnston, he’ll be back… but not during this scenario). Fremont is replaced with Hunter, and Blunt shows up in St Louis. Annoyingly, Pope gets promoted, so he can no longer be a subordinate for Buell (which had been handy), and he was transferred to the fresh army gathering in Bowling Green (which was the thing to do anyway, but now he couldn’t attach to Buell for one big army to scare Bragg). Rosecrans transferred from Frankfort to hold down the fort (ha ha) in Fredricksburg, and Sumner transferred to Culpepper. The Confederates get Breckinridge, who joined Pemberton in Corinth, and Wheeler, who showed up in Memphis, and Taylor also transferred to there.
Pope marched down to take Clarkesville while Grant set off for Memphis and took it after forcing Taylor to retreat. Burnside made a second try on Ft. St. Phillip and took it. Bragg marched on Clarksville and defeated Pope, and then Van Dorn used rail movement to join Bragg. Buell then moved to take Nashville, and Bragg marched back there to retake it, while Taylor backed off all the way to Jackson, MS. Grant then headed east to Corinth while Pemberton avoided battle. Bragg went between the two demoralized armies to take Bowling Green again, before returning to cover Nashville, and left Bowling Green to Buell. Morgan moved out… at first to cut the Union rail into Kentucky, but Mark got ambitious and took on the garrison in Louisville, and high rolls took out both 1SP armies. Burnside marched up the road to New Orleans, and defeated the militia there, and a second naval move got the forces on Ship Island ashore in Pascagoula.
Hunter continued the West Virginia campaign, taking control of Covington, and heading for Lynchburg. With Lee still a bit east, Rosecrans took the bulk of the Army of the Potomac, and assaulted Jackson in Richmond, but lost on an average roll (he was going to need a good one with all the modifiers, and couldn’t have actually beat Jackson’s roll). Sumner then moved to take actual control of Aquia Station (something I’d been regretting not doing earlier, and moved reinforcements into Fredricksburg, and then Stoneman did the same (as well as give me a cavalry leader with his avoid/intercept bonus there). Lee moved back to Richmond, shuffled the command staff a bit, and chased Rosecrans to Fredericksburg (passing two avoid battle rolls to get there). Lee turned west, and Hooker entrenched in Staunton, so Lee ended up turning back to Richmond after leaving a garrison in Petersburg.
Hindman marched north again, taking Tuscumbia, Warsaw, and Kansas City, while Curtis chased Price out of Rolla and back to Waynesville. However, with the Missouri River completely under Union control, crossing it to get at St. Joseph, and points east started giving Mark trouble. Price slipped around Curtis and took Jefferson City; Curtis followed, but only tied a battle there, ending up the turn stuck on the rail outside.
I upgraded the fort in Fredericksburg to level two for turn 8 (Fall, the final turn for the scenario), and Mark was down to 11 SPs, mostly because of the resource hexes I’d taken over the summer. Morgan joined Pemberton outside of Corinth, and Forrest took command of the garrison in Columbia, MS. I railed a SP into St. Joseph, and used the naval transportation to boost Burside’s army in New Orleans. Of course, Burnside is promoted and replaces McClellan this turn, and Rosecrans is promoted to replace Buell, and Pope is removed, which gave me some sorting out to manage. McPherson took command in New Orleans, and Couch arrived in Fredericksburg, and Sigel transferred to take over Pope’s army, and Blunt moved to St. Joseph to lead the defense of northwest Missouri. For Mark, Holmes arrived to lead the garrison of Arkansas Post, and Pemberton was promoted, and then transferred to Baton Rouge. Van Dorn was removed as a ‘third wheel’ under Bragg to take over the troops occupying Ft. Morgan.
Mark spent two activations getting 2SPs across the Missouri. Curtis made a second attempt on Jefferson City, and this time scattered Price’s small force, leaving Hindman alone in Missouri, and Curtis went on to Tuscumbia, which he took control of, and then went on to Warsaw, cutting all Confederate supply to northern Missouri. Hindman continued on to take St. Joseph, and headed back to the Missouri, crossing it on the next action round (with help from an Any card to activate the second SP separately). Curtis went north to attack the foraging force in Kansas City, and sent it south in an even bigger hurry. Thomas finally got a chance to activate again, and went to Jacksonport.
Hunter did a forced march to get to Lynchburg, taking control of Salem on the way. Jackson took an army twice as big out of Richmond, but even with the use of a card for a bonus, a good roll from Hunter let him stand there on a tied battle. Jackson tried again, and Hunter avoided battle. Jackson left 2SP behind (equal to Hunter’s army at this point) and went north to take Charlottesville. Hooker came over the pass to attack Jackson’s depleted force, and defeated him, and Jackson retired back to Lynchburg.
Morgan split off from Breckinridge to occupy Jackson, TN. Bragg went north to Bowling Green to defeat (now) Rosecrans’ army, which retreated towards Sigel. Grant knocked out Breckenridge’s army, left a garrison in Holly Springs and continued south, eventually taking Oxford, Panola, and Grenada. McPherson left a garrison behind in New Orleans (with some thought to being able to take Bashear City, but that is an annoying place to get to) and Pemberton avoided battle out of Baton Rouge. Rosecrans rallied, and then crossed the Green river, regrouping Sigel to him (you can order a subordinate one hex away to join the active force, another nice rule, and one we didn’t really notice until the end), and retook Bowling Green from the garrison there. Morgan then went to Memphis and managed to defeat the garrison left behind (helped by a card bonus), and Wheeler went to sit on Oxford, potentially causing supply issues for Grant. Sherman detached from Grant with 4SPs and defeated the militia in Vicksburg, while Grant went north to re-take Memphis. Rosecrans then marched on Nashville, defeating Bragg and taking the city.
Afterword
The Union wins this scenario by having a 24 VP lead. By the end, I’d captured 22 points of resource hexes, a 3-point bonus for full control of the Mississippi, and another 4 for the ports I’d closed (well, the bulk of those had been closed before the scenario began), while Mark got 4 VPs for controlling for border state objectives, giving me a fairly close victory.
The first two turns had looked pretty grim, as I hadn’t seemed to get anywhere, and the situation in Missouri not only was fairly dire, but was distracting me from other efforts. However, I sealed up northern Virginia fairly well. Mark could probably have done a lot more than he did, but it would have been an uphill struggle without a forced march, a couple activations in a row, and a plan to keep me out of Richmond. I potentially needed better protection for Washington, but I had fairly decent coverage of the approaches. A decent, earlier, attempt to retake the Valley would have been a good idea.
The West is where things came apart. Once I was going, I had three decent maneuver armies to fork Bragg’s one good one. The expedition into Arkansas was initially meant to help cut supply into Missouri, but it needed someone faster than Thomas’ three movement to make worthwhile.
Both of us are greatly impressed by the game and want to get back to it. The only thing that’ll delay it is the huge backlog of other games to try out. I had some concerns about the ‘action economy’, but as you can see in the above, one year can still be pretty action packed. There’s some little wrinkles in the rules that take getting used to, but they’re worthwhile for a fairly nuanced system. Oh, and if you play it, make sure you have the current rules PDF. Mark tried to use the physical rule book at first and was confused by some of what I was quoting off, because there’s pages of extra material that has been added since publication.
Discussion ¬