
14 Silence That Gun
Mark and I have dedicated Monday nights to ASL, as he tries to come to grips with the system as a whole (he’s an old SL veteran). Part of the plan is to play through some of the old Paratrooper scenarios with him, since they tend to be good for the introductory side. This time was “Silence That Gun” which is a nice small infantry scenario with a single titular ordnance piece. There were a couple of prominent errors, so this isn’t a completely ‘textbook’ playing, but it was instructive.
Mark took the Germans, who are defending part of the board 3 village with ten squads (mix of 2nd line and conscript), the usual MGs a 75mm AT, and one fortified building; and need to preserve the Gun and keep the fortified building (they have a choice of five buildings to secretly fortify), or at least maintain a CVP total equal to or better than the Americans. He didn’t set up his HIP properly, so I ended up knowing which building was fortified (3N2), which is a heck of of thing to try to mentally ignore. The Gun was next door (which makes for usefully concentrated defense), and a loose line was established across board 3, with one conscript squad all the way out on the edge of board 2. I looked at the setup, and suggested that having someone at the upper level of 3N2 would be handy, as it could do a lot to inhibit initial American moves—completely forgetting that SSR1 limits that building (alone) to just a ground level. And we’ll see just how good an idea it was….
I lined up at the limit of my setup area, with seven squads and a hero, giving the latter a DC, and deployed one squad, prepared to move into the rest of the middle loop, and use BAZ against buildings from open ground Locations such as O6, and of course start driving on the main concentration of Germans. Mostly, there wasn’t a lot he could do, but an attempt to Dash to P2 ended in tragedy as a 1KIA killed a squad and broke my 9-1. Final Fire at a HS malfunctioned a LMG.
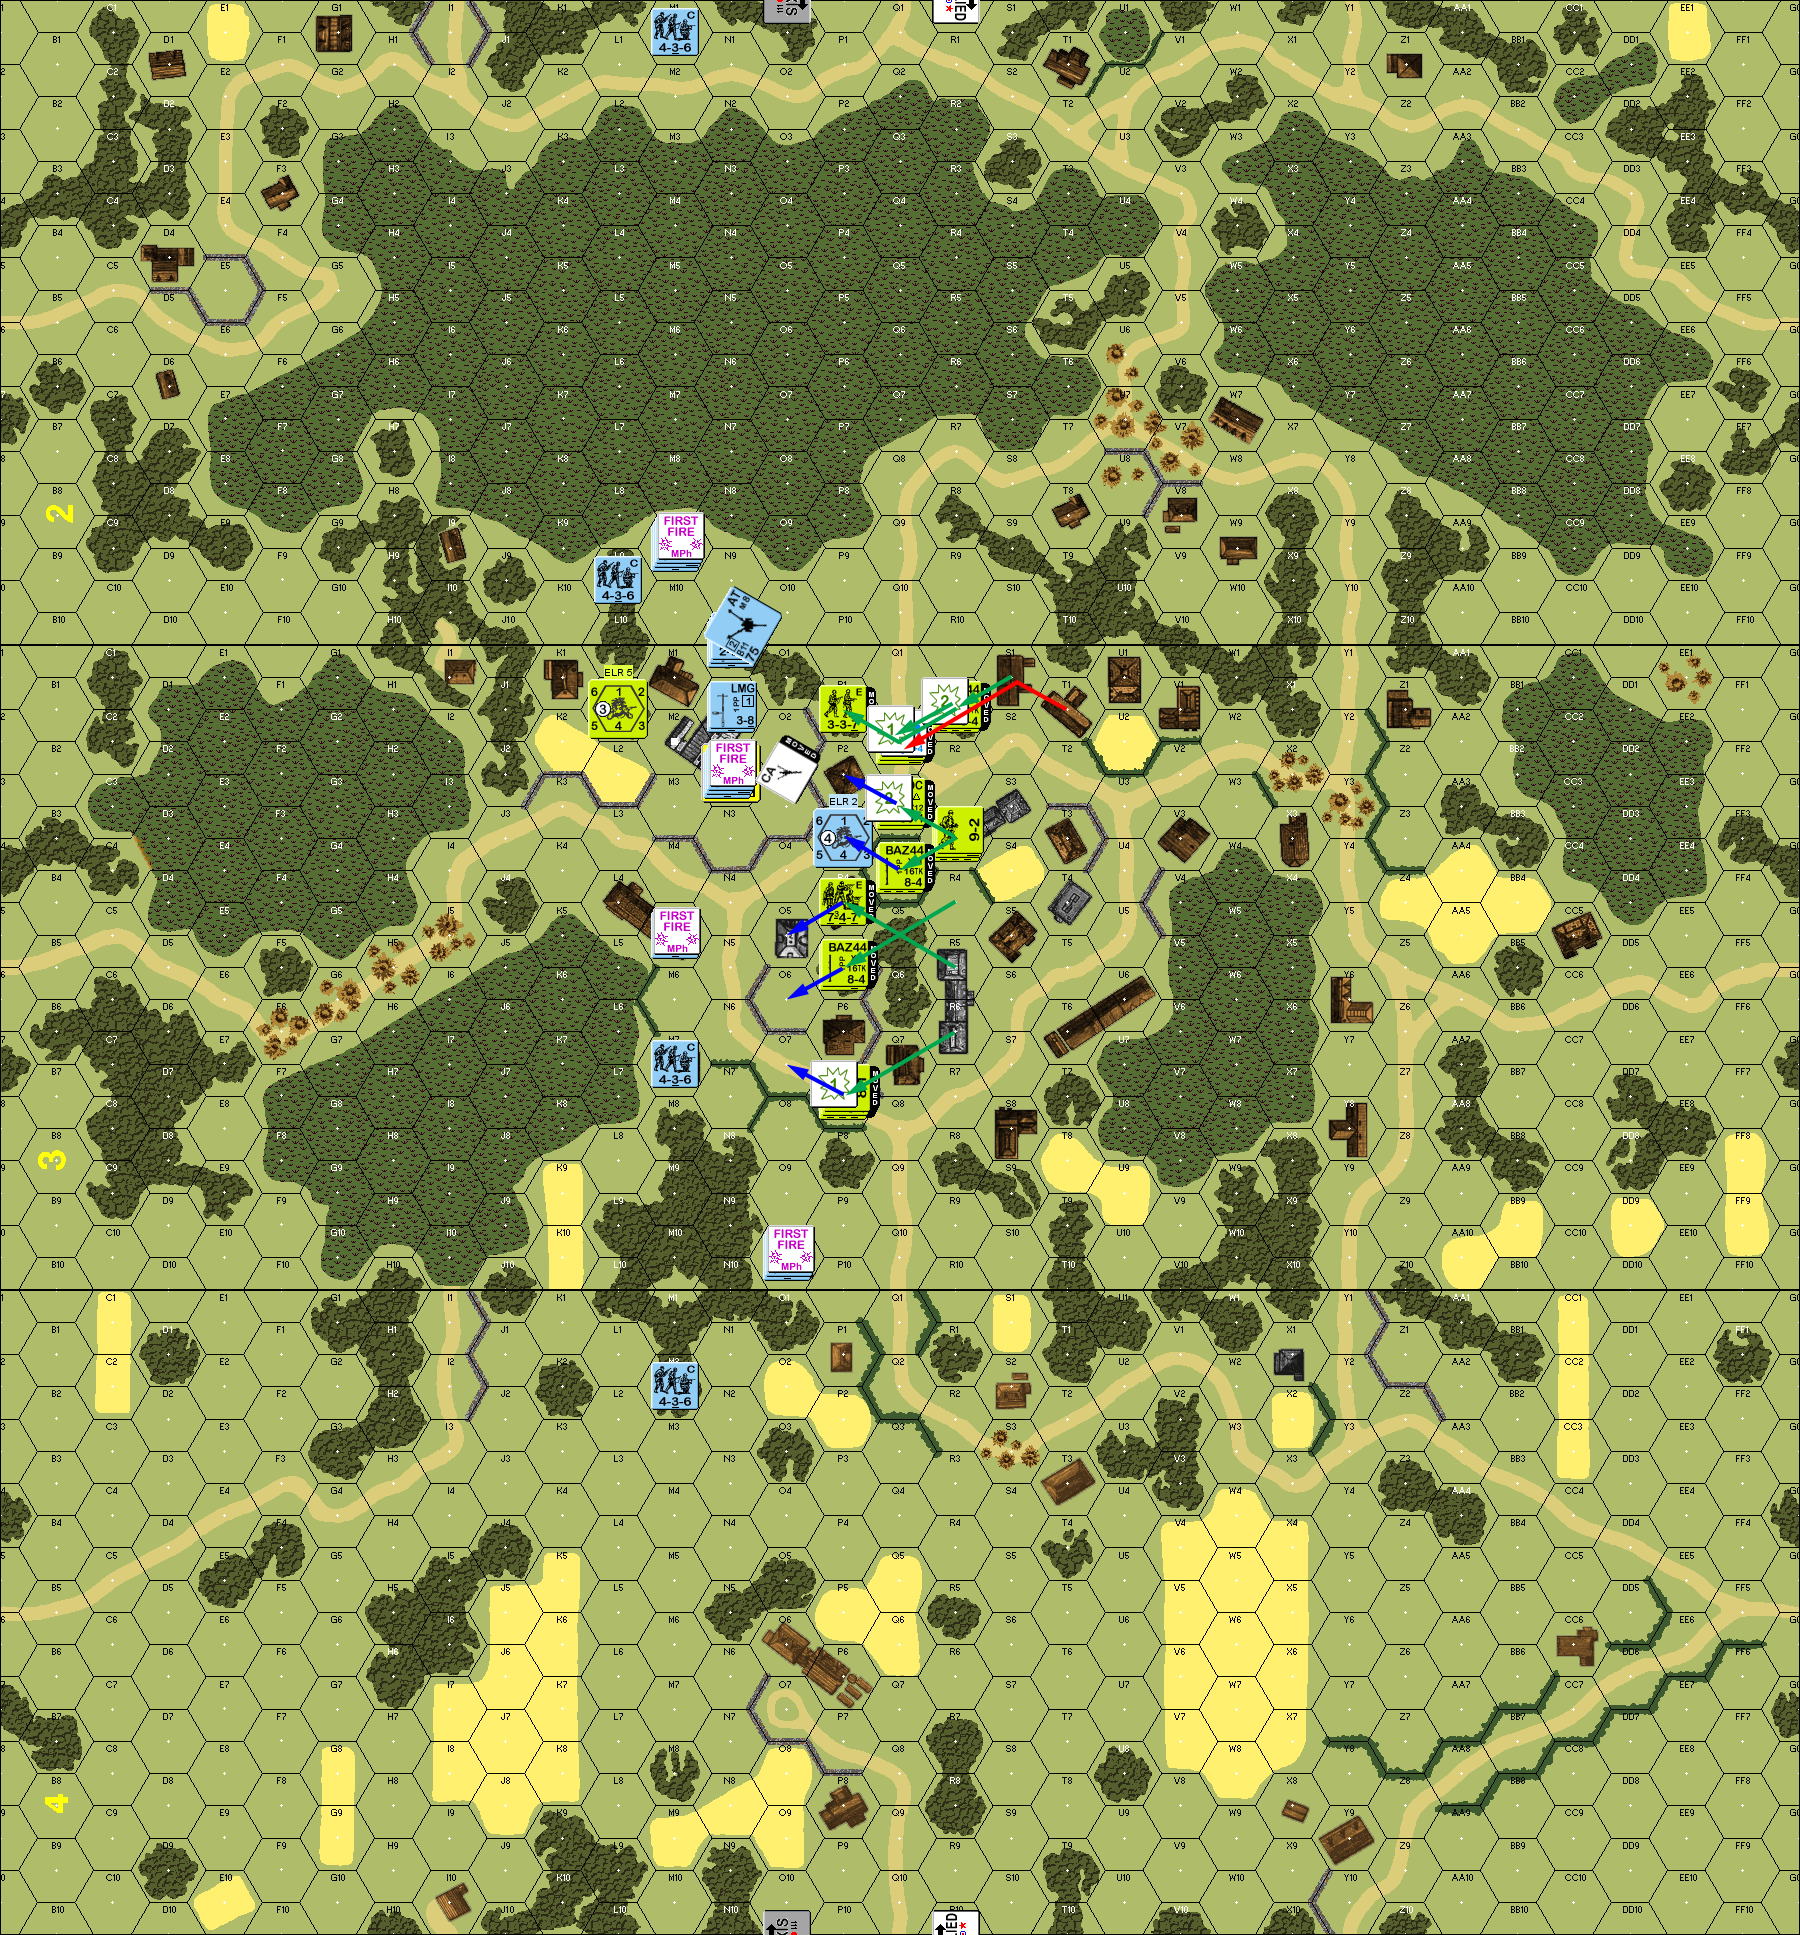
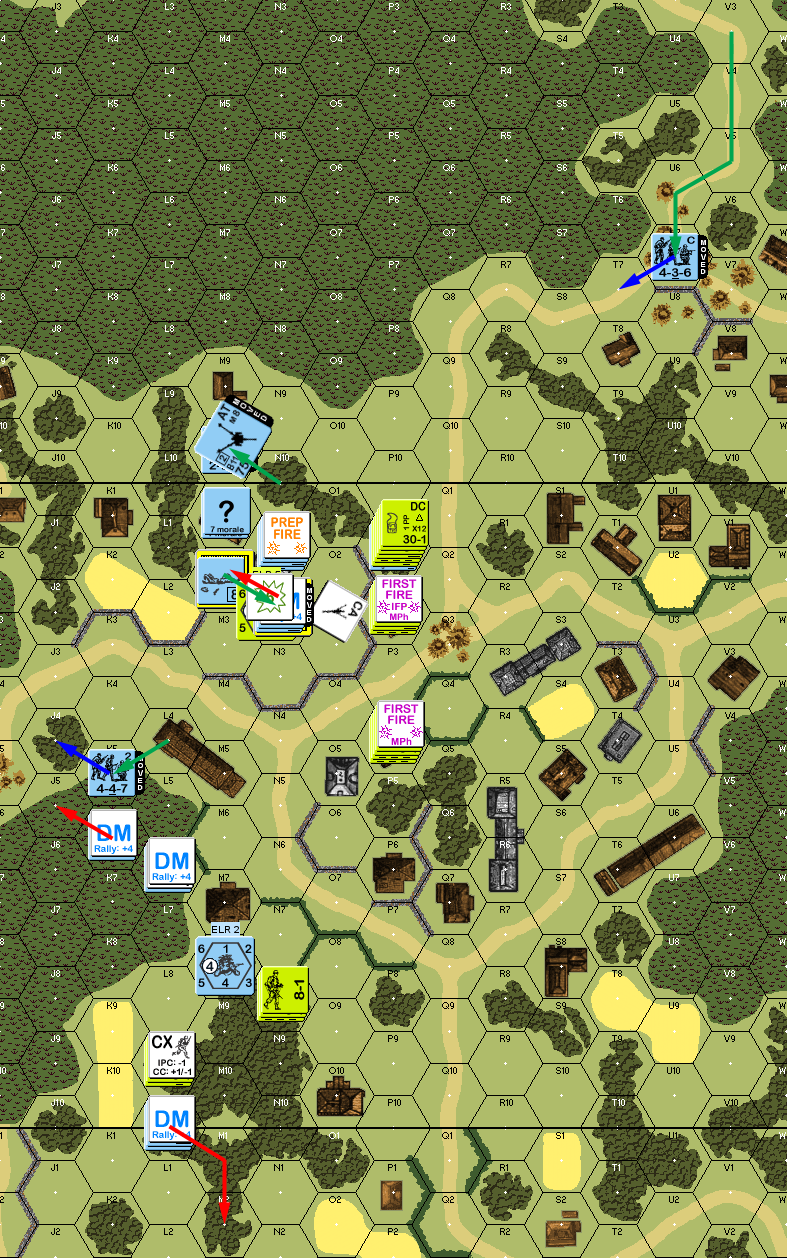
Situation, American Turn 1, showing the full board. Yes, all hills are marsh, and north is to the left.
Mark’s turn started with the loss of his malfunctioned LMG, and then prepped with most of his main line, only getting a PTC, which pinned a squad. Everyone else moved in, folding up the flanks, largely where I couldn’t do anything. However, the last move was his 7-0 and a squad going through the western woods, and 1MC broke both of them. Worse, the same squad fired a BAZ into M7 in DFPh, and got a hit for a 2MC that reduced it to a disrupted HS on a 12. The BAZ in O6 also got a hit for a 2MC on M5, but they passed.
He moved up a squad to my HS in P1, and was unfazed by defensive fire, and then advanced it in for CC, where I managed to reduce him while taking no casualties.
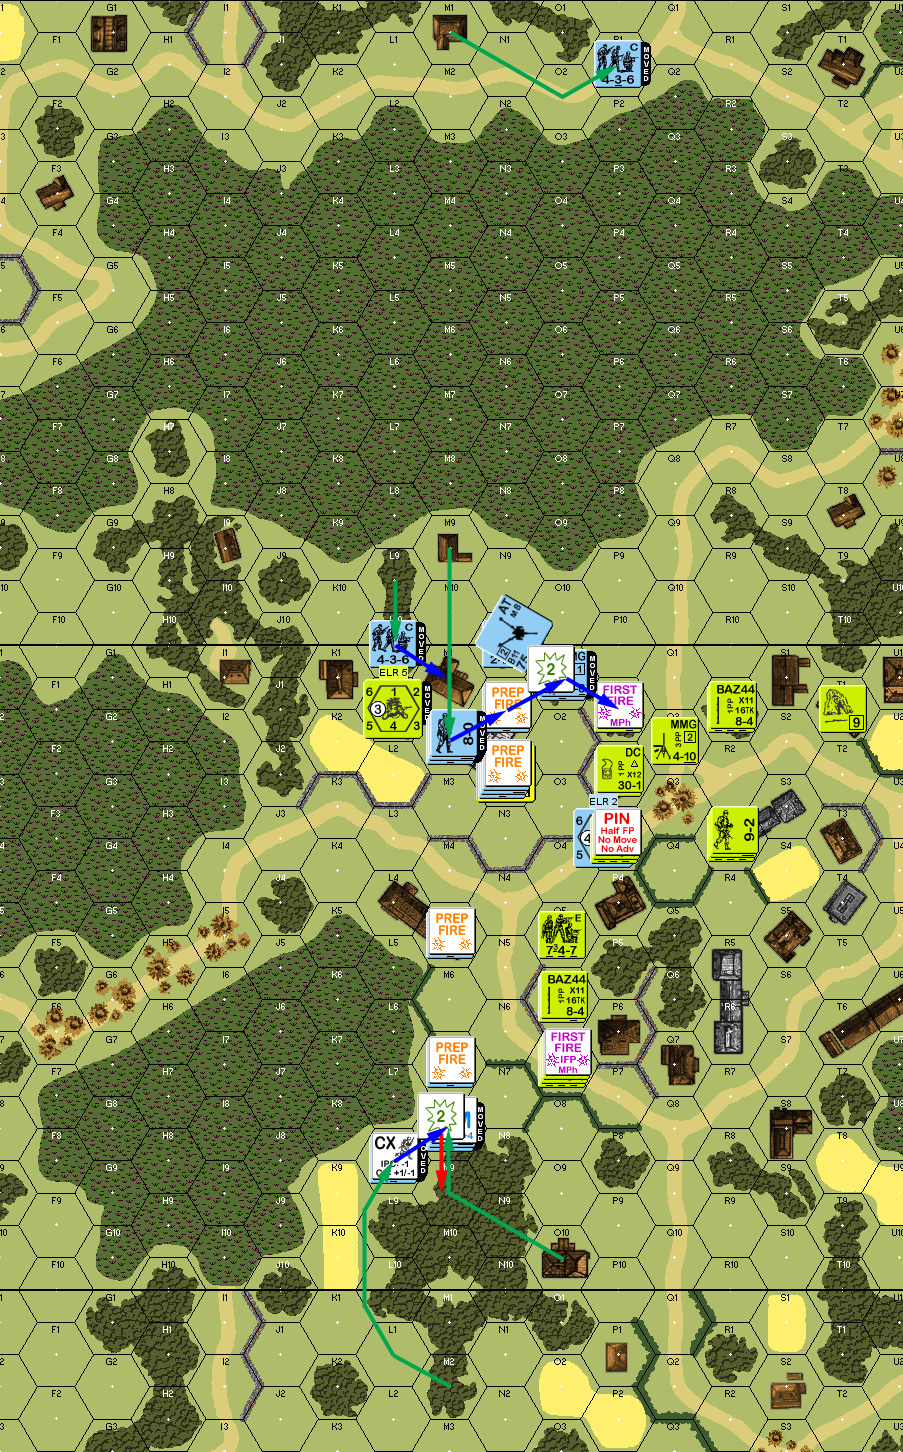
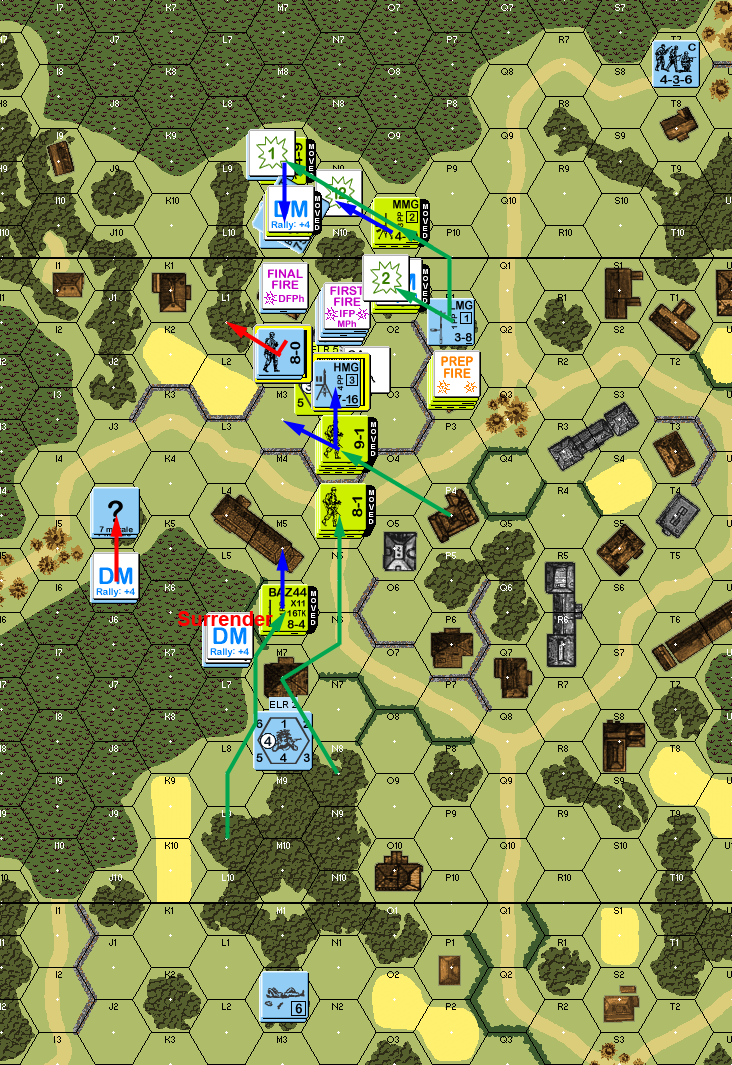
Situation, German Turn 1.
My 9-1 rallied for my turn 2 RPh, and I took a few PFPh shots, including another BAZ hit, with no effect, and my 9-2-led MMG got a PTC on Mark’s HMG group, and pinned the squad. I tried moving my 9-2 up, but a shot from the ATG pinned him (don’t blame him, I’d duck too). I moved the 8-1 group around to get at his conscripts in the woods, and put the rest under DM, forcing them to flee. Final fire from N2 broke the squad in P3, and set off my sniper, who just pinned the already-pinned squad. In return, AFPh broke the M8 conscripts, leaving nothing on the west flank. I moved the hero into the melee to get 2:1 and the modifier, and finished off the German HS with no trouble.
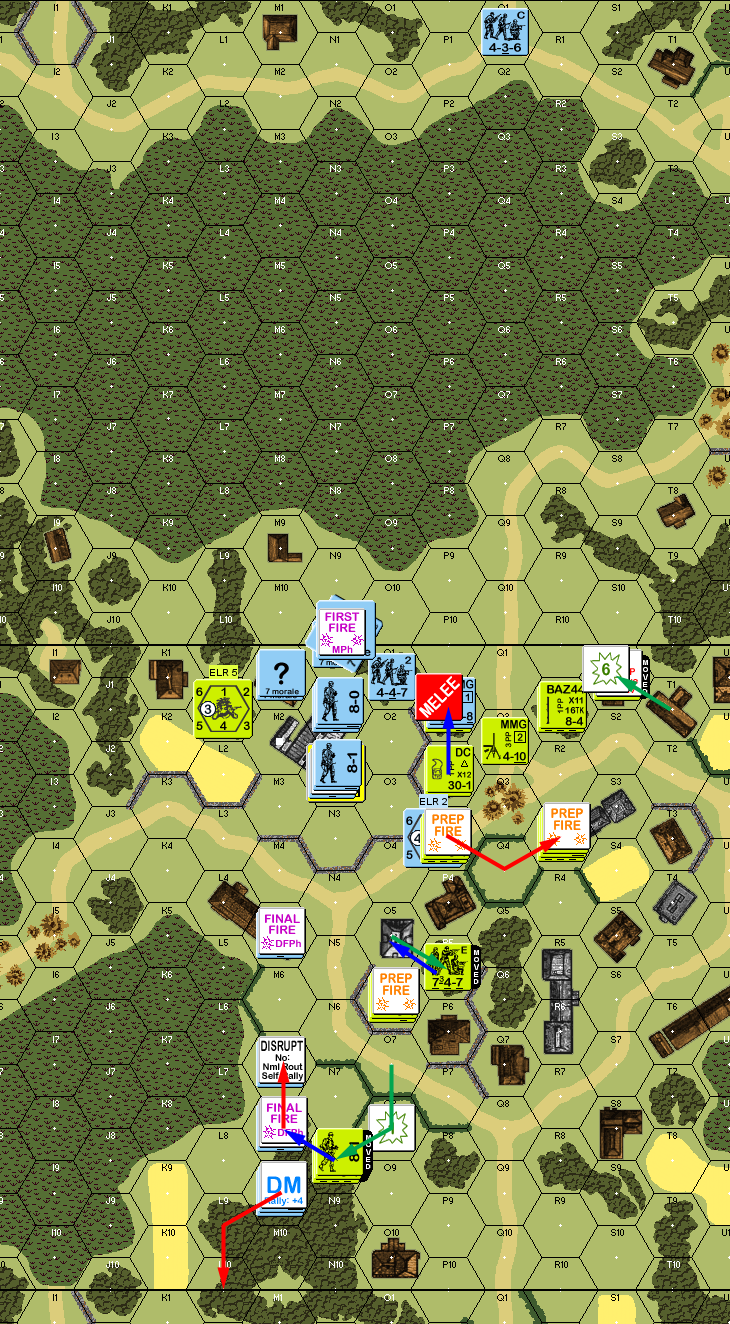
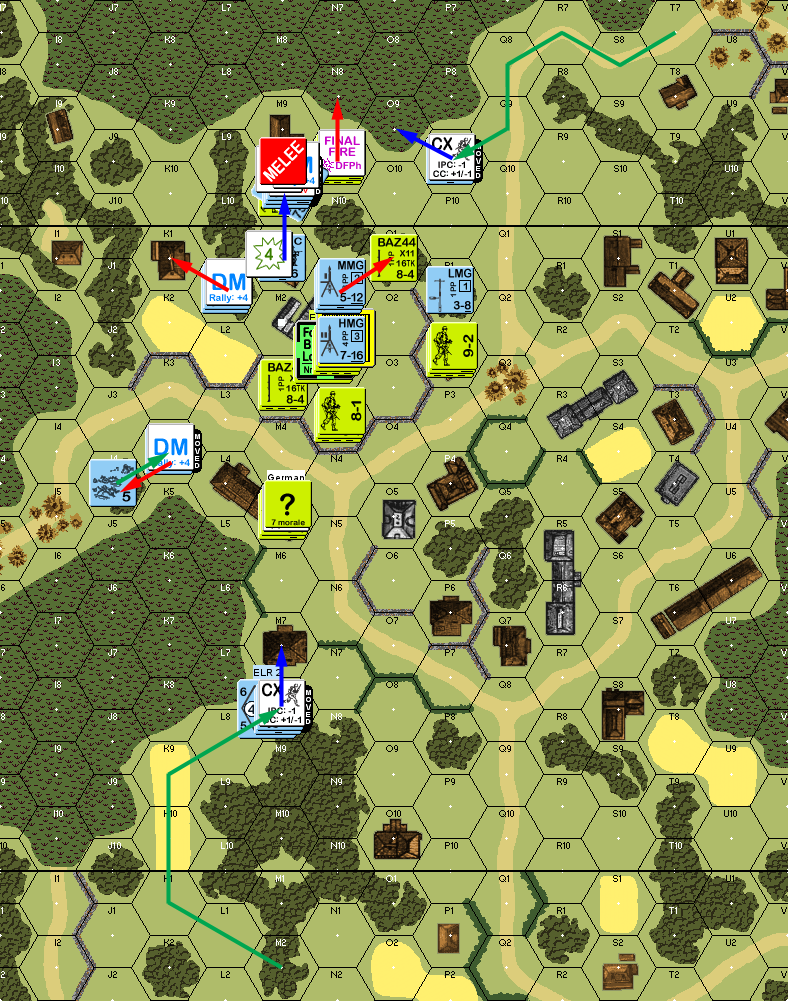
Situation, American Turn 2.
Mark didn’t get anything back for his RPh, but I rallied my broken squad. He prepped at P1 for 2MC, and somewhat to my surprise everyone passed. The HMG opened up on O5, and pinned the squad there, and the HMG squad fired on P1 to pin my HS. Movement was limited to the eastern conscripts hurrying down the road, and M5 backing off. My MMG stack (now with two squads) got a 2MC on 3N2h2 to break the contents. I got his AT crew to take a PTC, which they passed, but it set off his sniper, who broke my squad in M8.
This led to a major rout question for me, as I hadn’t realized that enemy broken units don’t have to rout away from each other, which made the status of a disrupted unit in such a situation confusing for me. (We ended with everyone routing away from each other, the Germans ducking into the swamp, as there was no one to accept surrender.) Mark advanced into P1 with another squad while I was pinned, with no result.
Nothing happened for my turn 3 RPh either. Two attempts to push on the German positions ended with broken squads: I went into L4, to try and get at the squad there, and I got shot up approaching the wall around N2. I shifted the 9-1 to deal with them, and and moved everyone else short of LOS. I put a squad into the P1 melee, and killed the German squad for no loss.
Situation, American Turn 3.
Mark self-rallied the HMG squad for his turn 3 RPh (the leader didn’t rally), while I got my western squad back, and both squads in P4. Naturally, he moved to reclaim the HMG, and naturally, that drew my fire, and I managed to break the squad again. More surprisingly, he pushed the gun out of 2N10, trying to get it further away from my men.
Situation, German Turn 3.
I had nothing for my turn 4 RPh, but Mark’s 8-0 leader rallied. And then the (ex-)HMG squad reduced to a HS on a 12. I had one Prep fire, which managed to pin the 8-0 in N1. With the Germans in a confined space, I managed to get into N3 without him seeing me. I sent a HS into O1, who drew fire and broke. Then the hero went around and charged the ATG in the open. Heroes are good because they don’t pin, and have good morale… but FFMO/FFNAM is a great way to get critical hits on ITT, as it depends on Final TH DR. He took two, and shrugged off the resulting MCs, went into the building in 2M9, and Placed his DC on the Gun, with the crew breaking from FPF.
Sadly, he did manage to eliminate that broken HS on Final Fire, and the DC only managed a 4MC, which eliminated the crew, but didn’t do anything to the ATG. I was able to walk into N2 (confirming it was fortified), and the hero moved onto the ATG.
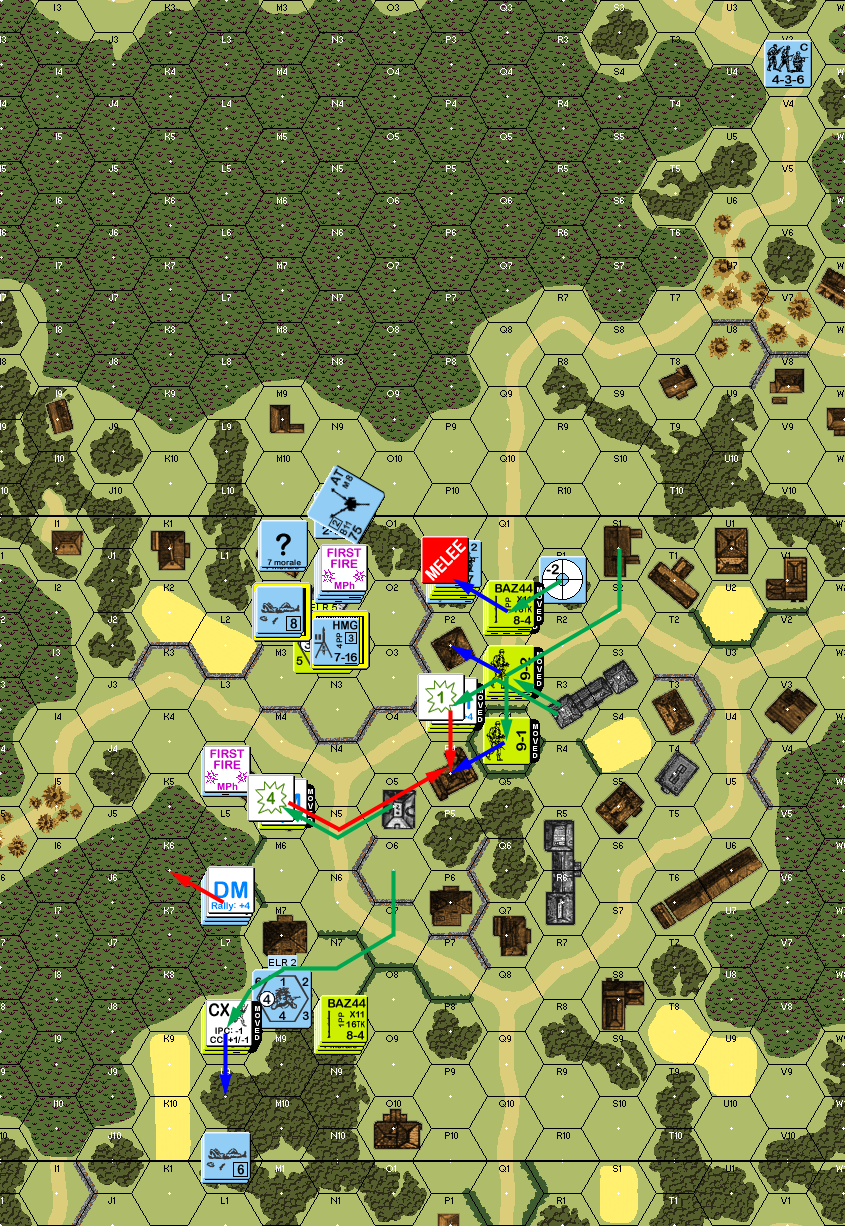
Situation, American Turn 4.
Mark got his 6+1 and squad in 4M2 back, and I managed to recover the Gun. He moved part of the N1 stack out to M10, to deal with the hero, but my MMG was unable to get an effect on them before they did an infantry OVR. However, the hero managed a 1MC on TPBF to break the squad, and pin the 8-0, with no result from the immediate CC. The MMG squad tried SFF, which reduced the broken squad but the 8-0 passed (and the hero had no effect thanks to the gunshield).
He tried moving the J4 squad up to reinforce the building, but he was broken in the first hex. Bad news continued in DFPh with me breaking the 8-0 still in N1, and I finished off the HS in L1. On the other hand, advancing fire from 2P9 broke the MMG squad over there, eliminating my last chance to turn around the grab for the Gun. I also had bad rolls with 3N2, but thankfully it was only a PTC. He advanced in the conscripts from M1 onto the Gun, and took out the hero for no loss.
Situation, German Turn 4.
Mark regained the gun in my turn 5 RPh, but my first prep fire shot was the MMG and 9-2 against N1, which got a 2MC to break the squad there and effectively win me the game. They’d be forced to rout out of the building, and I’d gain Control of it at that point to win. (Current CVP was 9 to 3; thank goodness heroes aren’t worth CVP.)
Afterword
I’m pretty sure that 3N2 is SSRed to single story to keep the Germans from locking up American movement options, so even when I spotted the mistake, I figured it’d be decent balance against pretty much knowing where the fortified building was. However, as I’ve learned in multiple scenarios, putting a MG on an upper story doesn’t work as well as you’d think. In this case, it had too many things to deal with, while the 9-2 and MMG squad had only one task, and a better leadership modifier.
The early-game hits with BAZ were more dramatic than I’d expected. To try and be completely honest with things, I should have sent a HS into O10 at some point (wasn’t that far away) to be sure that it wasn’t fortified, but given German movements, it be a fairly unlikely target to begin with.
Mark was trying to protect against flanking movements in his setup, which caused everything to be spread out too much. The worst example of this was the conscript squad on the far side of the board 2 marsh (looking up marsh rules was interesting, I get to see that way too little), who still managed to show up just in time to help make sure he retained the gun. I’m thinking a conscript squad or HS in O5 is probably needed. He probably won’t live long, but giving the Americans a free pass to the rest of the village loop really needs to be avoided.
My main concern was how to approach N2 without getting shot up, and a lot of the moves west were just to sweep out that flank. Once I could approach without taking shots from the flank, it wasn’t too hard to get in, though it wasn’t something I did lightly. Mark’s defense there needed to be more active, and look at keeping N2h0 occupied to contest that approach, especially once the HMG was unavailable. With a +2 to +4 TEM difference, it should be holdable.
Some of the problem was being fixated on the ATG too much. While I did eventually go for it, I didn’t care for the idea taking 12FP shots from it, and was concentrated on the building. I’m really amazed a pair of CHs from it didn’t kill the hero outright, though the DC wasn’t able to destroy the Gun either (it’s a tough thing to do). It certainly helped add a lot of drama to the last turn or so.
Discussion ¬