
20 Taking the Left Tit
After The Marketplace at Wormhoudt, Martin and I went back to checking off various early scenarios, and up this time was 20 “Taking the Left Tit” from Yanks. This is the first night scenario done for ASL, and features an American attack on a hill in Italy.
Patch commented to me that he’s never seen a German win in the scenario, but we played the updated version from 2nd Edition Yanks, which adds a 9-1, two squads and four mine factors to the German OB (this is nearly a 1/3 increase in forces). One wonders if early playtesters had trouble figuring out how to do a night attack. Or maybe the cloaking rules changed late in development…?
Martin took the German defenders, and scattered “?” across the board 2 hills, with two up front in the brush leading to the slopes (all woods are brush in this scenario). With eight 467 squads, and 5 MGs of various types, he gets to set up three squads HIP and, and eight Dummies, as well as being entrenched. The Americans get fifteen 666 squads, three leaders, a HMG, two MMGs, three BAZ (nearly worthless with only a handful of buildings and walls around), and two light MTRs. The goal is to exit four squads off the far (mid-board) edge of board 2, and have more good order squad-equivalents at level 2 than the Germans do after 7.5 turns.
Contrary to normal practice, the Americans set up on board 18, but is still considered the Scenario Attacker. This does mean they have some low hills to set up some of those support weapons on (after assembling them…), and I set up a big double line of Cloaking markers at the edge of my area. I concentrated big stacks into a couple of them so I’d have some Dummies, and had a general plan of swinging west around the hills away from the (presumably defended) road, with the big stacks and SW on that side, and Dummies and just enough force to keep his attention on the other side.
On my first move, a Dummy Cloak moved into NVR of the forward outposts, who immediately sent up a starshell, ending the entire ‘before the first starshell’ phase right there, and then put up a second that illuminated about the entire front, forcing me to slow down. Martin took one shot at a Dummy with a HS as it crested low hill, but did nothing, and then took a shot from 2CC6 during DFPh that got a PTC to eliminate Dummy Cloak C. One turn, and I was down a Dummy, and getting behind schedule, thanks to an early starshell.
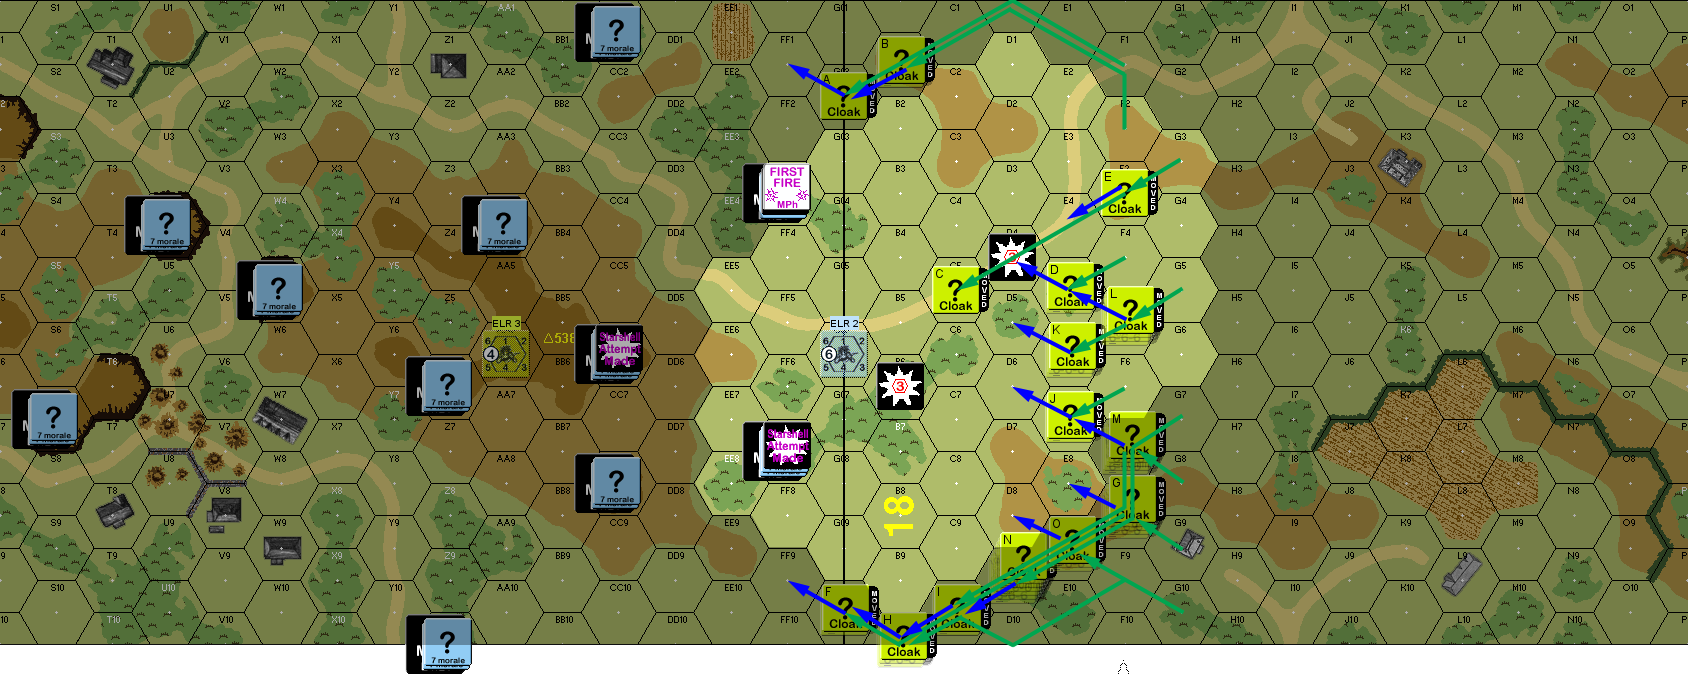
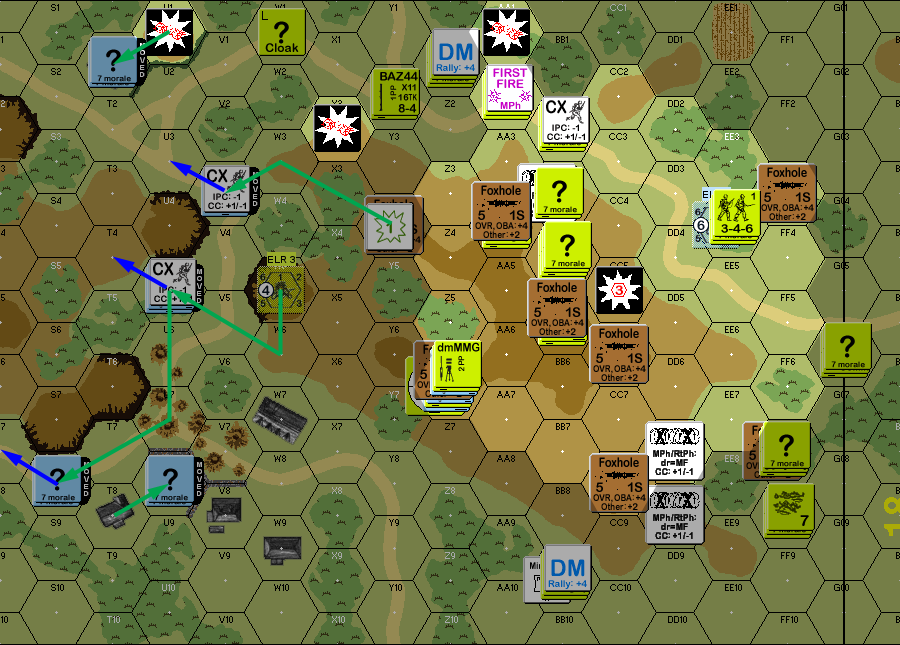
Situation, American Turn 1, showing the full board. North is to the left. My units are in place to give an idea of how the Cloaking is distributed.
On the other hand, NVR went down to 2 for Martin’s first RPh. The HS in 2FF3 got off another starshell to illuminate their local area, and FF7 got another to light up the other half of the line. Both the forward positions, and CC6 prepped, but got no results. No units had been revealed, so he had no Freedom of Movement, and I split off some concealment from Cloak M so that I could assemble a MTR.
For my turn 2, Martin’s front outposts both put up a starshell on their own locations, and then managed a third from CC6, trying to light up the road in back of his outpost… but it drifted directly on top of another starshell. This allowed me to move around the edge of the illumination, and Martin got a 2MC on Dummy Cloak A. I moved adjacent to both outposts, and then revealed Cloak I as a HS, who was broken by fire from FF7, which was revealed as a HS. I revealed Cloak J as another HS, which broke to fire from CC6, and during Final Fire, he revealed and pinned Cloak B as a HS.
The streak of good attacks continued in my AFPh, when the pinned HS fired back to… reveal the foxhole there. I split a leader off of Cloak N to rally, and Cloak F went into FF7 for CC. I got Ambush, but then rolled a 12 to reveal my HS, and Martin withdrew out of the hex.
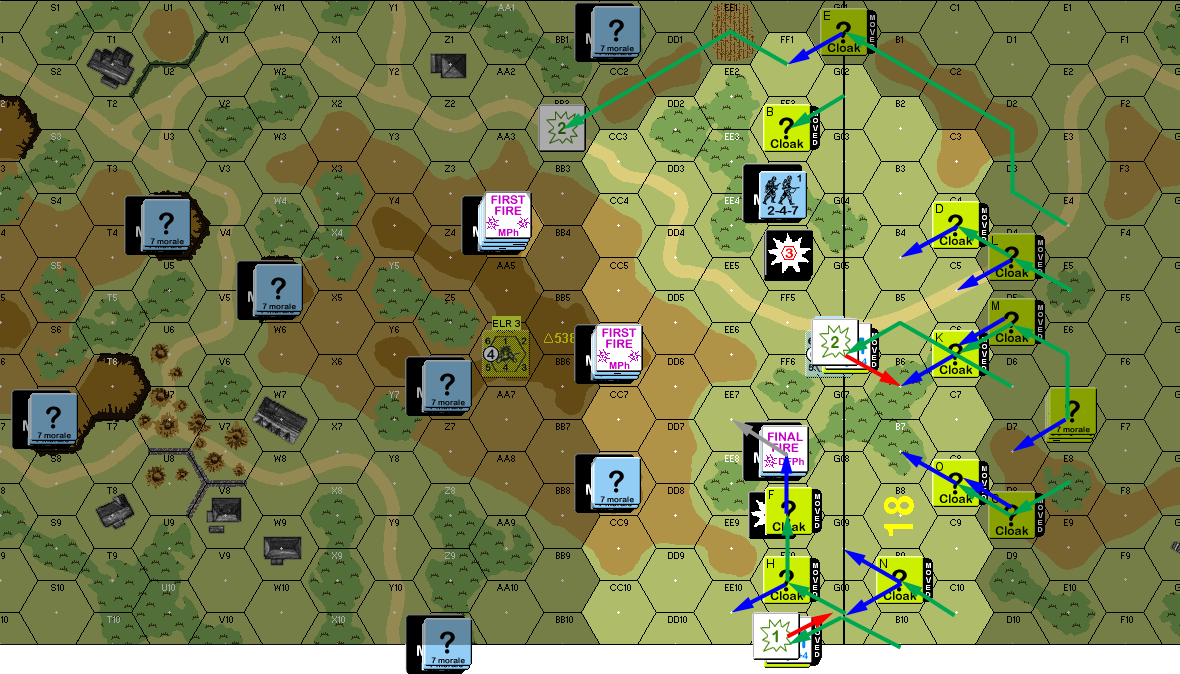
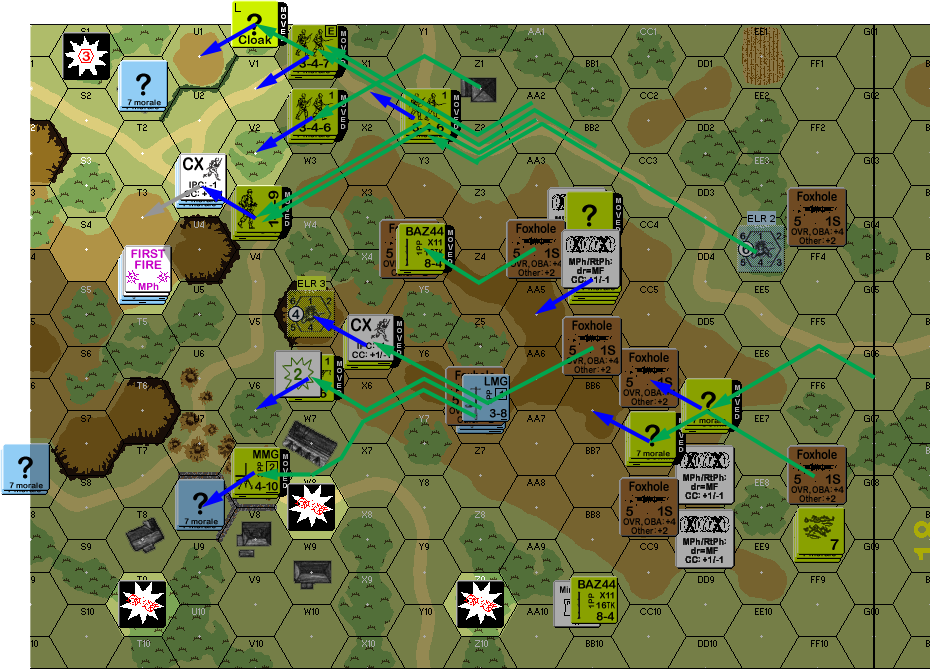
Situation, American Turn 2.
I failed to even remove DM in Martin’s 2nd RPh. For once, he had trouble getting starshells, with only one in five attempts. Prep went poorly, with one good shot… but my HS merely battle hardened and generated a hero. I generated one starshell, lighting up a little more of the slop up the hill. Now that he had some freedom of movement, Martin started moving, with his western “?” moving back, and his exposed HS headed up the hill, but my fire broke him. My MTR opened up from 18D7, and got two shots, with one hit on 2CC6, but couldn’t get an effect.

Situation, German Turn 2.
There were three rally attempts between the two of us for my turn 3 RPh, and no one even removed DM. I tried for one starshell and failed, and set the MTR to Op Fire, hoping for at least some gunflashes after movement. Cloak H got out of the Illuminated area, headed for the backfield… and right into mines inBB9. They generated a 1MC that turned the squad there into a broken 2nd line HS. Obviously, there’d be more mines in BB10, and I needed to re-think my approach.
It turned into another slow turn of creeping forward, and not even that went well, when a shot at Cloak O generated a NMC that broke both squads in it. Final Fire generated a PTC on EE3, which I easily passed, and CC8 turned out to be a squad with LMG who got a NMC on FF7, who thankfully both passed. The MTR got another hit on CC6, breaking his 7-0, and eliminating the broken HS, but leaving the squad unaffected by it all. I split a leader off of Cloak G in APh to deal with the mess of broken squads piling up in 18C8. I put a full squad into 2FF3, and failed ambush, losing Cloak D, and failed to do anything to him in CC.

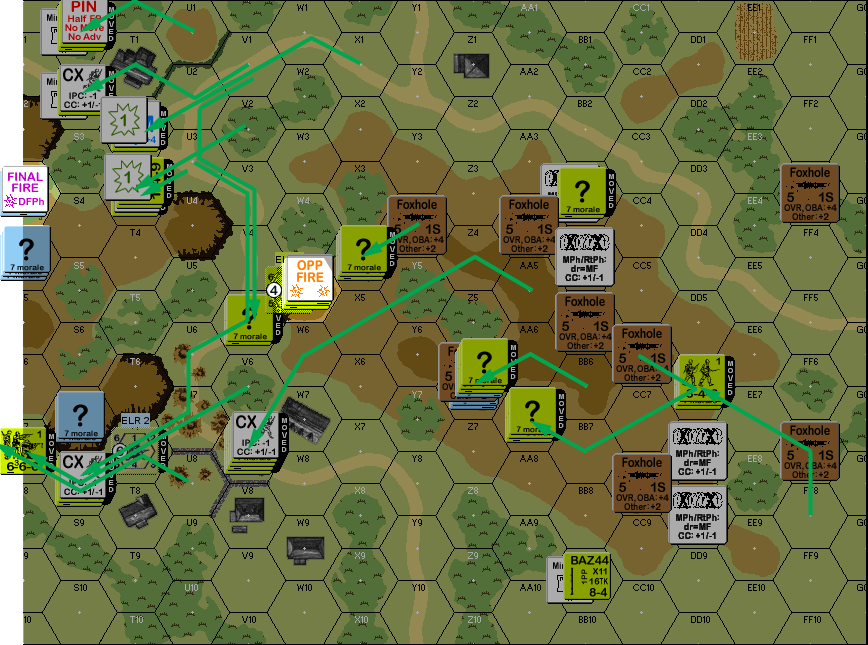
Situation, American Turn 3.
Nobody rallied for Martin’s turn 3, but everyone at least removed DM. On three attempts, he got one starshell, lighting up the eastern flank. Prep fire got a result on Dummy Cloak E, removing it. A couple more shots were fired at EE3, but ended up malfunctioning his MMG. Most everything not on No Move prepped, so there was no movement, and in DFPh, my MTR hit CC8 twice, forcing a reveal of the foxhole, but no other damage. However, the German sniper went off to re-DM the entire broken stack in 18B6. The Melee in FF3 finished off with me getting a 8-0 on field promotion, and then I Withdrew into EE4.
NVR went back up to 3 on my turn 4 RPh, I managed to remove DM again on two units in 18B6, and rallied the HS in GG10. Even better, Martin lost his MMG. I didn’t try for any starshells, and Op Fired the MTR again. Martin got one starshell up on two tries, which lit up the broken HS in BB9, which removed more No Moves. However, I was now directly in front of a position, and a second one I might be able to get at from the flank while it was blinded.
My first move was a HS down the hill road, which got fire from AA4, and then he revealed a squad in Y4 who got a NMC to break the HS. Then, as Cloak M worked around the Illumination, a squad+LMG revealed in BB5, but had no effect with his initial shot, but then M went up the hill, and a second shot got a PTC to reveal a squad who passed. I then split a squad off of Cloak N, only to run into wire!
Thankfully, the wire movement dr was ‘1’, so the squad got under without trouble, but my offensive was getting more complicated. I realized that the hill was five hexes wide, and the Germans have five hexes of wire, so my initial assumption was that the entire front of the hill was lined with wire (I was wrong). To test this, I sent forward another HS into DD7, and found more wire there. Cloak K started forward to press on AA4, but but took a 1MC from residual… which he passed, but the revealed squad no longer had the MF to get there. Worse, my squad in EE4 attempted to go up the hill, but took a K/1 and the remaining HS broke.
Final fire went well, breaking the HS in DD7, and revealing his HMG squad and 9-1 in Z6 for a NMC against Cloak N, revealing two squads, breaking both, and ELRing one. However, further fire on them only had the effect of sending one berserk. However, he didn’t do anything to the leading squads, and advancing fire broke BB5 and pinned CC8. Thankfully, the broken HS in DD7 was able to get off the wire and rout out of the hex.
I had CC in three places; in CC6 I reduced the German squad at no cost, in CC8 I failed Ambush but again reduced the Germans at no cost, and CC1 turned out to be Dummies (which I suspected, but I needed to make sure that he wouldn’t go taking out the HS that routed to Z1.
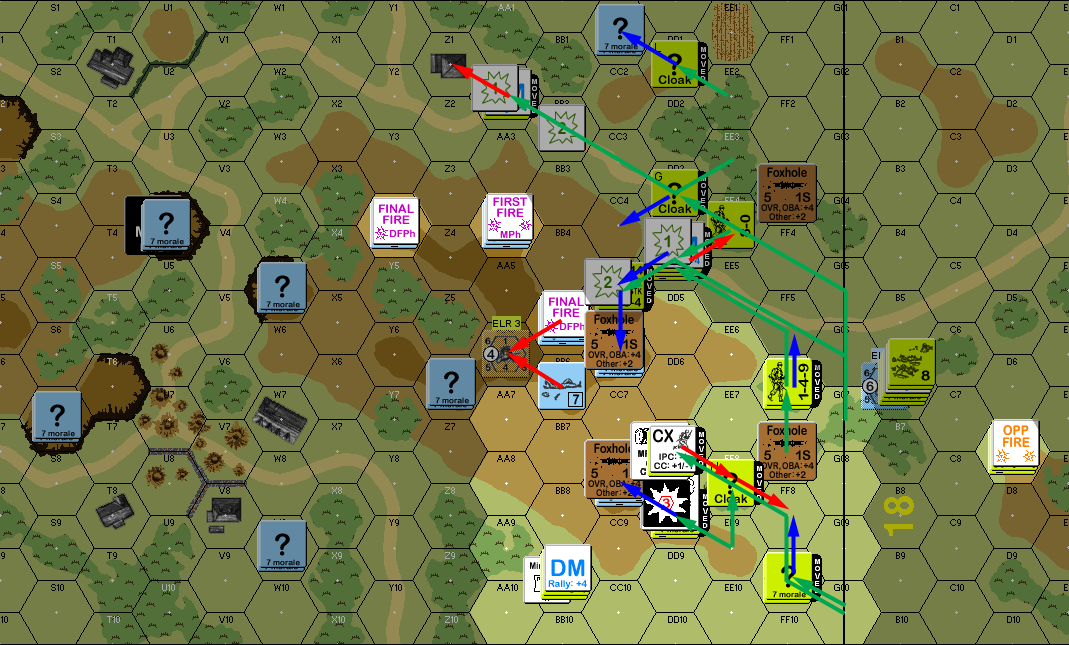
Situation, American Turn 4.
Martin got nothing for his turn 4 RPh, while I rallied FF8 and a squad and a half in 18B6. He put up one starshell in the middle of the action, and fired into the CC6 Melee, with both of us passing a 1MC. I managed to put up another one that covered the back half of the hill. With everything nicely visible, Martin started re-working his defense. My fire revealed two more foxholes, and set off his sniper, which ended up doing nothing (‘2’ sniper vs a broken HS).
I assembled a MMG and the second MTR, while the first one was disassembled. Advancing Fire managed to get a PTC on Cloak G, revealing two squads. My sniper went off to pin a unit, but it was out of my LOS. Both Melees ended with me finishing off the German HSes.

Situation, German Turn 4.
NVR went back down to 2 for my turn 5 RPh, and removed DM in two places, and rallied the last squad in 18B6. I put up a starshell that drifted towards the west, and the second MTR got three of hits on Z6 which pinned the 9-1 and HMG squad, while killing the broken 7-0 and squad there. The MMG managed to break the 8-1 and squad in AA4. My berserk squad charged Z6, making it thanks to rolling a 1 to get under the wire in the way. I found more wire in BB3, which halted my plans for getting at the back of the hill. Cloak L split off my last leader so he could try to rally the HS holed up in Z1.
I got into CC in two places this time, one of which was merely clearing out the brokies in AA4, who I killed without trouble, and with two squads in Z6, I had no trouble taking that out either.
Situation, American Turn 5.
Martin generated gusts, and moved the NVR back up to 3 for his turn 5, and generated one starshell that scattered just right to blind most of my guys, giving him an important turn in which to get away from the green horde without being shot at. I tried for a starshell to fix the situation, but got one on eight attempts, and it scattered out of the way and just blinded more of my men.
The good news was that by now I’d done a head count and realized the two squads I could see should be all that was left of his force. As long as I could keep track of them, I could ignore the rest as Dummies. I didn’t have any shots, but I did assemble a MMG in Z6, and reassembled my first MTR.
Situation, German Turn 5.
My turn 6 RPh got my HS in Z1 back, but the HS in BB9 rolled a 12 on self-rally to CR out of existence. Martin put up a pair of starshells, one of which went offboard to the west, and the other lit up the exit I was headed for (blinding one of his squads). There wasn’t much he could do as I rolled forward, but not everything went my way. The squad in BB3 stayed stuck on the wire. Also, it turned out I had advanced onto more wire last turn in BB4, but Martin had forgotten to reveal it. Thanks to having a leader, everyone there got under the wire, but there was no movement left.
I got into CC with the squad in U3, but but he maintained “?” and got Ambush, which he used to withdraw out of the hex. I also got into U8, and confirmed it was a Dummy.
Situation, American Turn 6.
For German turn 6, NVR went up again to 4, and I rallied a HS in FF8, getting everyone back into Good Order. On eight starshell attempts, I only got one, and it drifted to the wrong part of the board. Martin ducked his squads back to S4, and I had no LOS to it, and then advanced to R3 and R4.
For my turn 7, I Op Fired the MMG in W5, and started looking for ways to get four squads off-board. Neither of us bothered with starshells (a lot less needed at NVR 4). My first move got a squad to the edge of the board in the west, and a second got me near the edge in the east… which revealed mines in S2; and I had to assume, in S1. In fact, Cloak L was too far east for anything else, and indeed found mines there, and the squad that was in it pinned while trying to exit the minefield. Knowing that the west needed to be my primary exit, I started shifting that way, and got my first squad to exit.
I also had my first case of straying during the turn. With the roads, and Illumination, there hadn’t been a lot of straying rolls, but I finally failed one; but the squad ran into another unit in its first hex, and got going the right way again. I also started moving on the last two squads, hoping to at least keep them from interdicting the clear road on my last turn. However, as I first got into range, he got a K/1 to kill a 8-0 and ELR the HS with him. Further fire pinned a 7-0, but I got a HS and hero onto the hill. The MMG squad got a 1MC vs R4 and the HS+hero got one vs R3, and both of his squads failed the MCs.
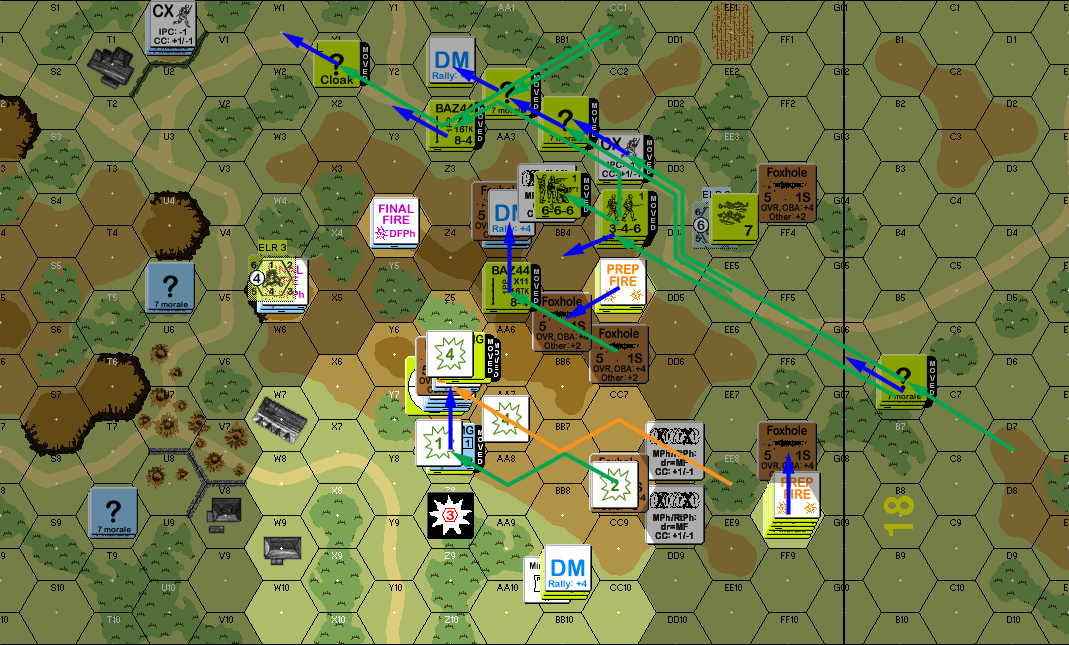
Situation, American Turn 7.
Afterword
Technically, Martin had a self-rally roll coming that might allow him to pull something out, but it was highly unlikely. I exited a second squad during APh, and had a third on the board edge, so he could do AFPh against it on his turn, but it’d exit before he could do a First Fire shot. I had a squad and a half that advanced to U8 and could exit without the road, plus another 1.5 squads within range to exit, plus the squad pinned in the mines. Sadly, the HS on the mines took a K/2 trying to advance out, so nothing there.
Turn 4 was of course the big one here, where everything blew open thanks to being able to push in when starshells left him vulnerable, and then fire broke too many men. Many of the American problems are alleviated at night, when there’s fewer fire attacks, and a better likelihood of CC (where those 666s are just murder against normal 467s), and once I got into CC things fell apart fast for the Germans. After turn 4, Martin commented that he should have pulled out a turn earlier, but I admit I would have done about the same as him, as I didn’t see it coming either.
However, Martin got very lucky with starshells for the first two turns, and my initial advance was a lot slower than I wanted, and I nearly started throwing away Cloak status in order to get in faster. I imagine that would have led to the kind of firefight you’d more normally see in this scenario. In general, the defenses seem pretty solid, though I’d think mining both road exit hexes to be a bit better. There’s room to go around on the west edge, but it’s behind a string of brush, and night movement rates (+1 MF for concealment terrain except when Cloaked) make it less attractive.
Because the original version was unbalanced, and the Germans still came apart fast here, I’m not sure that the changes worked. One thought is to reduce the Germans a squad again, and shorten the scenario by a turn, but I’m thinking the distance may just be too far at that point. Another German MG, or promoting one of the three LMGs to MMG might be better.
Discussion ¬