
AP19 Winter of Their Discontent
After our last adventure in Korea, Patch and I decided to return to Action Pack 3 for our next ASL game. It’s a couple of weeks after the previous scenarios in that package, and the main part of Gruppo Nord is still encircled, and holding out for rescue as the Soviets launch an attack to wipe them out.
The scenario uses half of boards 22 and 49, and as ever with this set, has some interestingly different bits. There’s a base Italian line up for defense, and then an number of Italian and German reinforcements that can be bought with VPs, and the the Axis player must spend at least 15 VPs (decided before setup). The Russians have a fairly nice force that sets up on board, and can spend VPs to enter some of them from the flank. In addition, both sides track CVP, and get one VP per building hex they control at the end of turn 7. Oh yes, there’s ground snow, and everyone other than non-elite Italians have winter camouflage.
Patch took the Axis defenders, and spent the minimum 15 VP, giving him twelve Italian squads (ranging from elite to conscript), an Italian 75mm AA, and two German 50mm AT (all standard setup), plus a pair of Pz IVF2s on turn 2 (spending another VP to get them a turn early), and a platoon of 467s with MMG & 8-1 entering on turn 3. His initial ‘anchor’ turned out to be the 49W9 (partially rubbled) stone building, with more on both flanks, and a second line on board 22.
The Russians get fifteen squads (mostly 447s, with some 458s), a few SW (including a DC, and 2xATR—oh, and the Italians have two Russian ATRs), two T-70s, and three T-34s. I set up 3×447, 9-2 (best leader), and an ATR to enter from the north (4 VPs for four units). They were to head into his flank forces, with a tank heading over to provide cover, and everything else lined up at the limit of my area, with a south group somewhat detached from the rest (largely thanks to terrain). The initial goal was to seize some forward locations, and then have a few spare squads sweep through taking building hexes; something that caused more trouble than I had hoped.
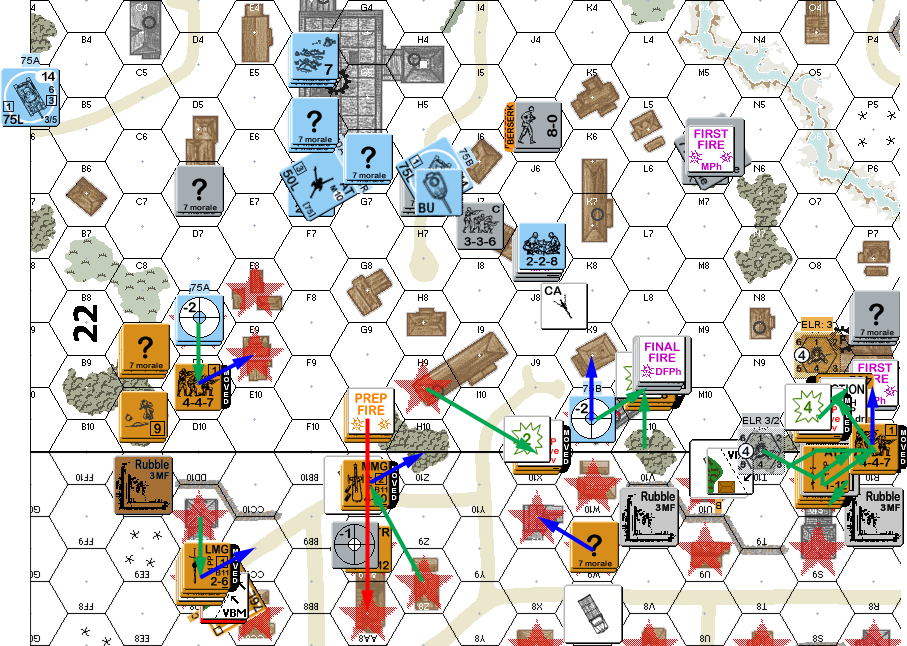
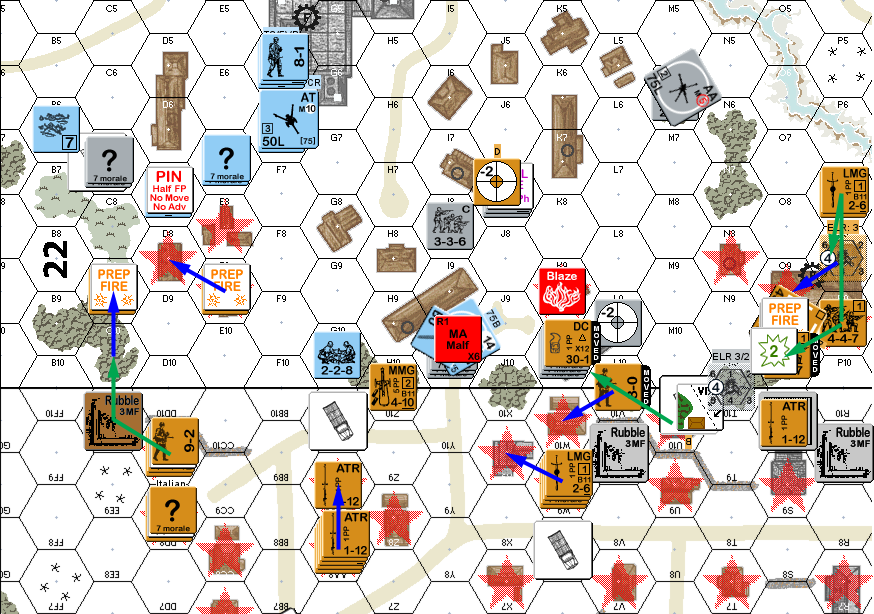
Patch didn’t interfere at all with my movement (“Just going to it out there: My setup needs work.”), but Patch had noted all the long LOS alleys in the map, and had set up guns for them. A 50mm AT was in 22F6, and immediately hit and killed a T-70 during DFPh. Z9 turned out to be the Italian HMG nest (as I had figured), which failed to do anything with its shot. AFPh teased me with a ‘2’ for an Unlikely Hit on the HMG… which turned out to be no hit at all (subsequent 6).
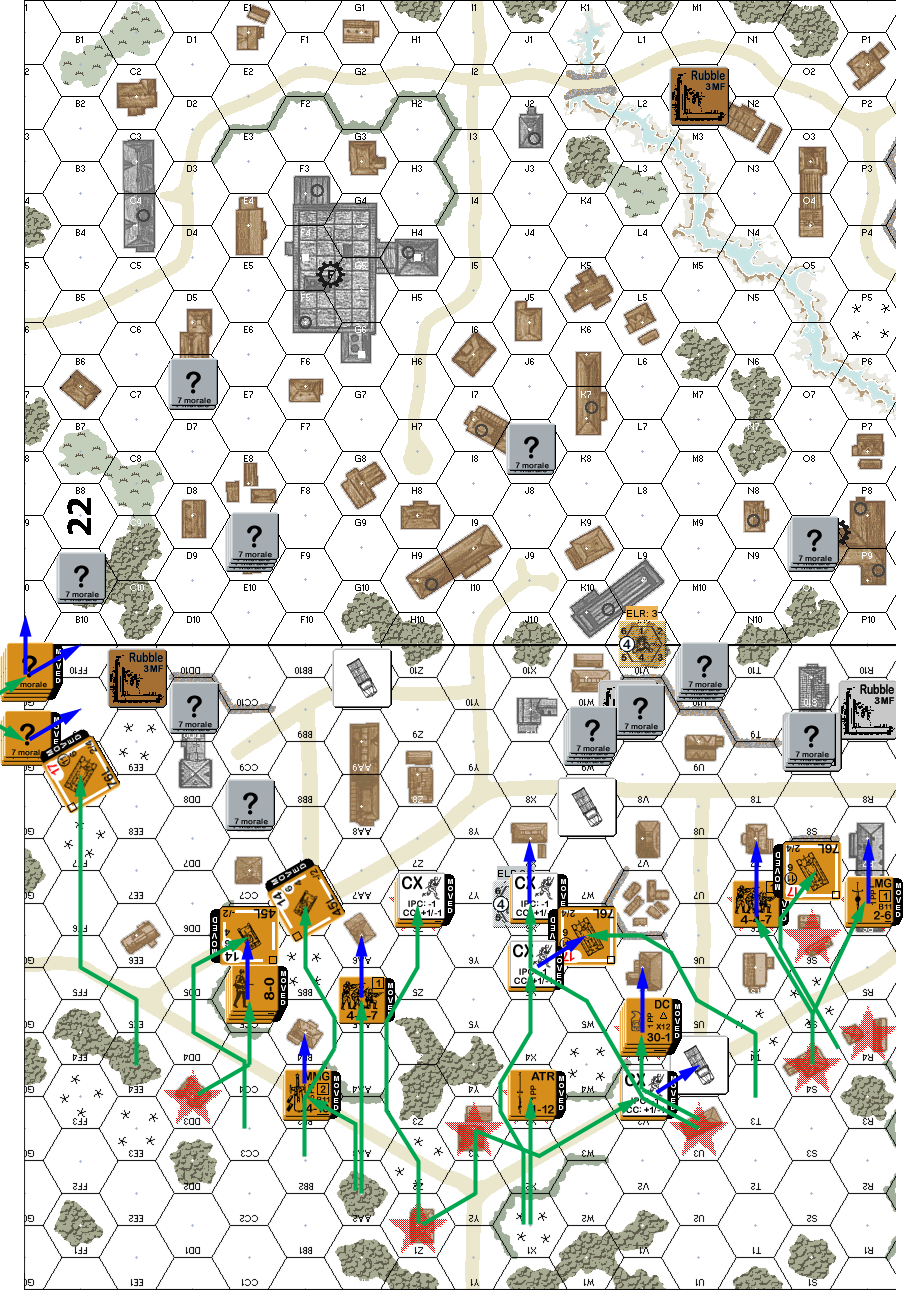
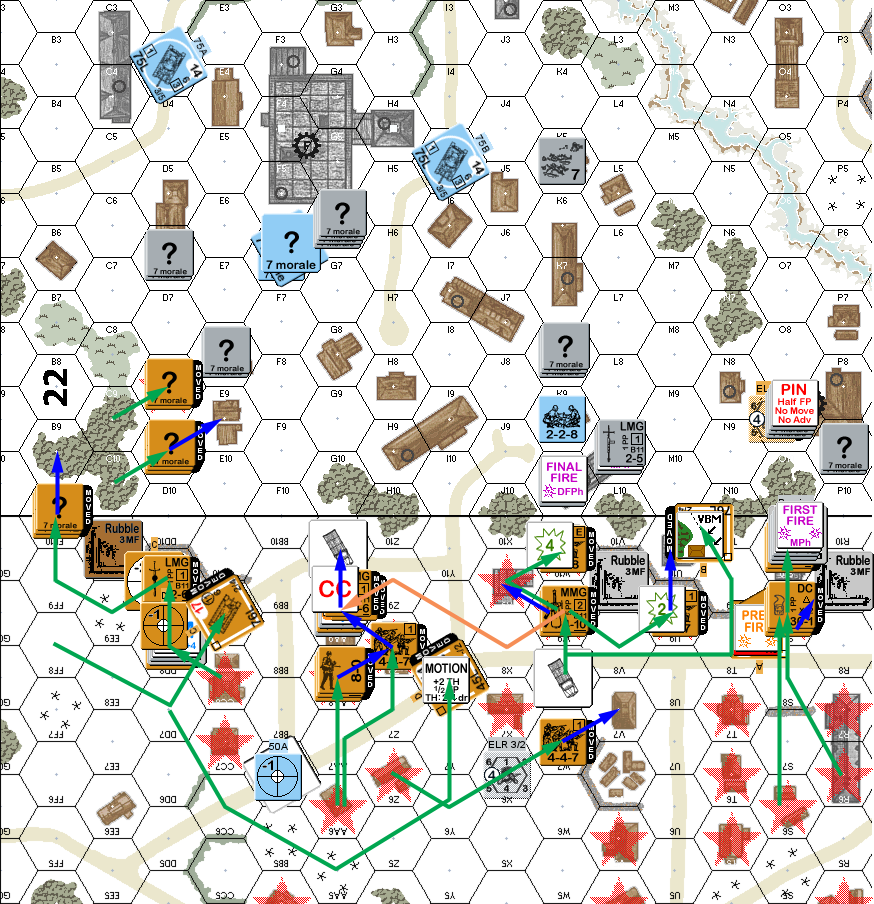
Situation, Russian Turn 1 showing the full board. North is to the left; note two buildings are factories, and a few hexes start rubbled.
Patch’s turn was gusty, and his only shot was from the HMG for a 1MC… which sent my squad in Z6 berserk. After that, he skulked. I had no shots at his movement, and precious few after that, none of which did anything.
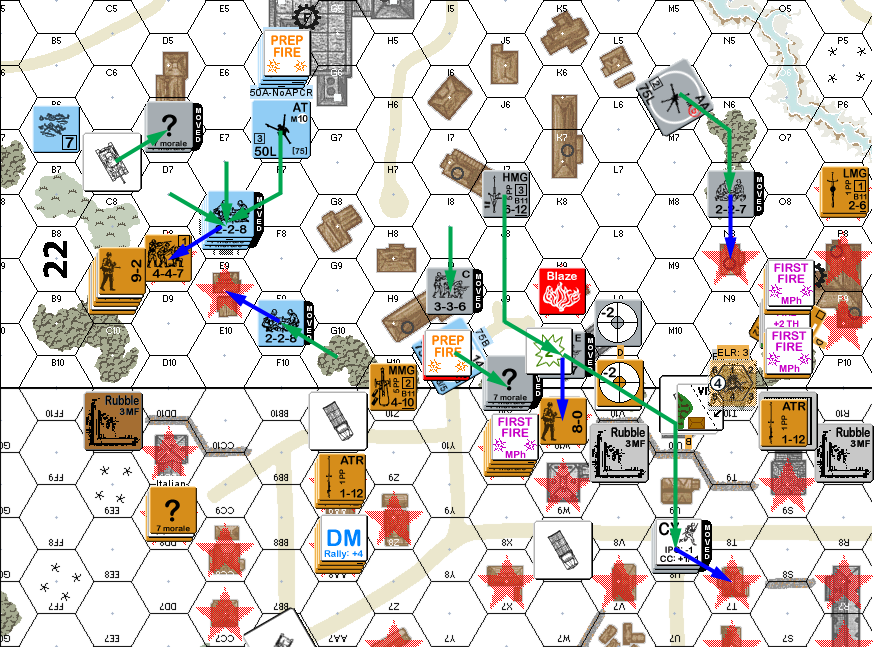
Situation, Axis Turn 1.
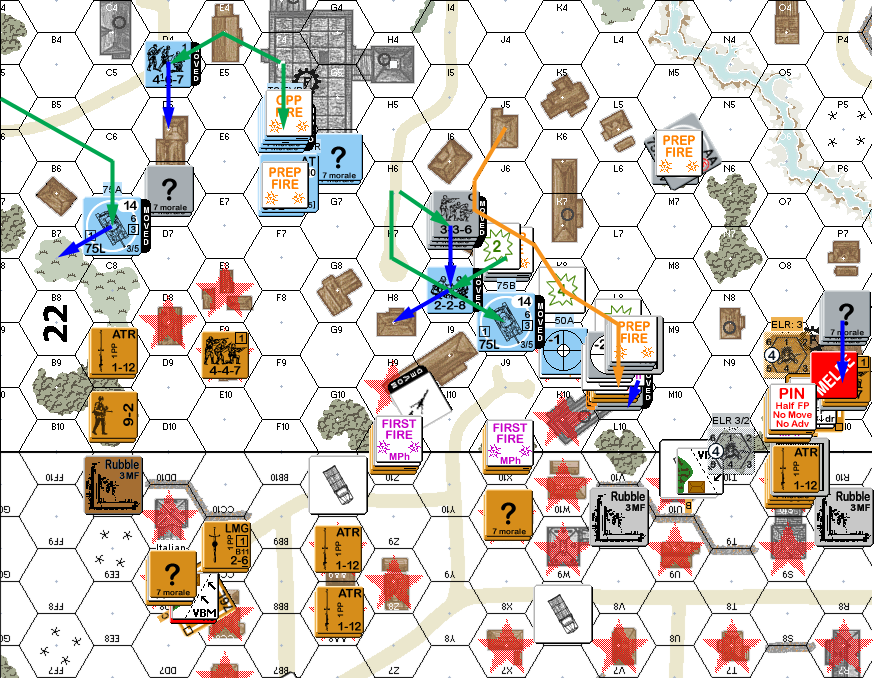
My only prep for my second turn was against 49DD9, where to both of our surprise I got an ATT hit and 1MC. Patch’s conscripts passed the MC, but they were now revealed. My berserk squad charged W9, and the HMG waited until they entered the hex for a 30FP +1 attack… which rolled poorly for a 1MC that the ‘zerkies passed. SFF was better, but they passed the 2MC also.
I then put a T-34 into bypass of S9, and attempted to dash a squad into the ground level of the building, who broke in the street, but I was able to then cross with other units. I rushed towards Z8, only to find out that his one HIP unit was in AA8, but amazingly I passed a 2MC. Sadly, he broke a second squad I tried to get adjacent. The real surprise was that the other 50mm was in 49X9. Thankfully my supporting T-34 was out of CA, so it fired on the adjacent squad, getting two critical hits that only produced MC that they passed, then eliminating itself on a ’12’ intensive fire roll.
I evened things up a bit during AFPh by malfunctioning the MA of my T-34 in S9. Patch self-broke the (ex-)ATG crew to keep them from being swamped in CC. I put two more squads into W9… which, because they’d advanced in, opened it up to Ambush, which I promptly was. The Italians skipped out the back door. In AA8, I CRed the squad in CC, but they killed my squad (despite being 3:4). In CC8, I did nothing with two squads, while Patch got a CR on another 3:4 attack.
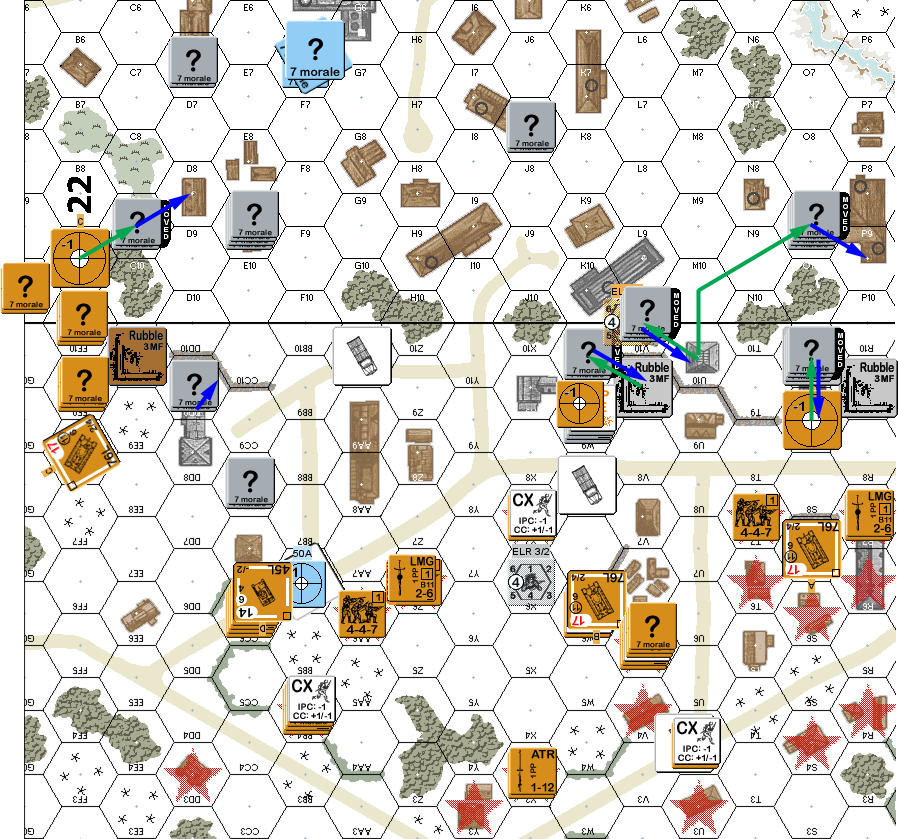
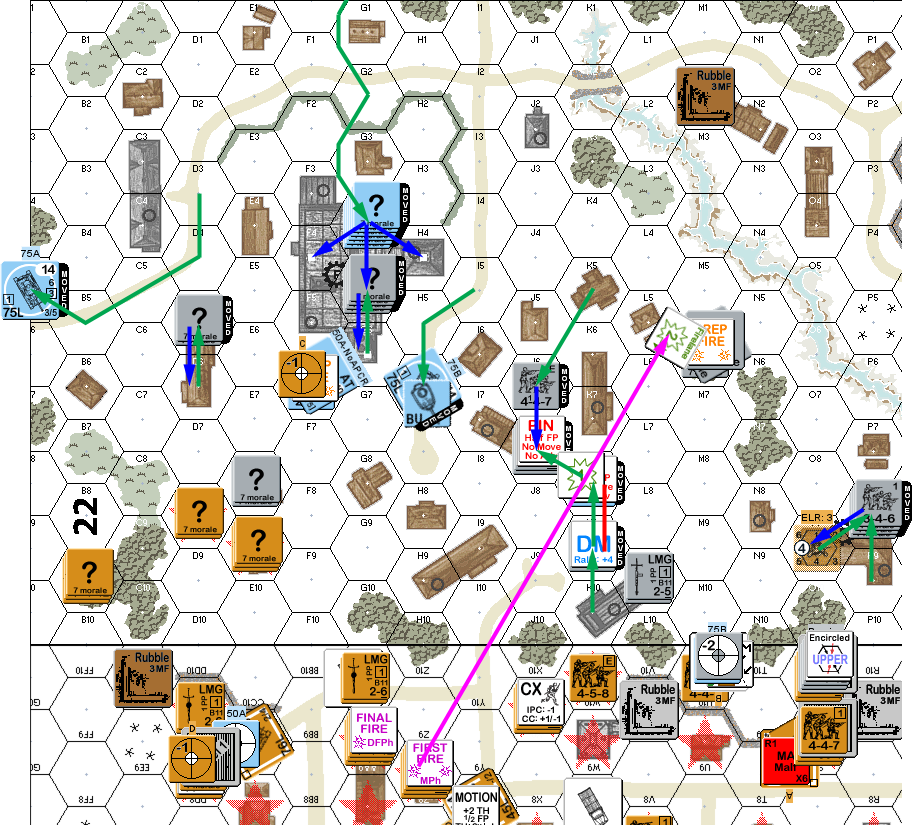
Situation, Russian Turn 2.
Nothing came back for RPh in Patch’s second turn, while the Pz IVs lined up at the east edge. While there was some skulking, he also started setting up a new line, with the HMG heading for a cluster of wooden buildings on board 22, and one stack in the north heading back to the large factory. The Pz IVs hung back a bit further than I had figured, and were largely out of sight.
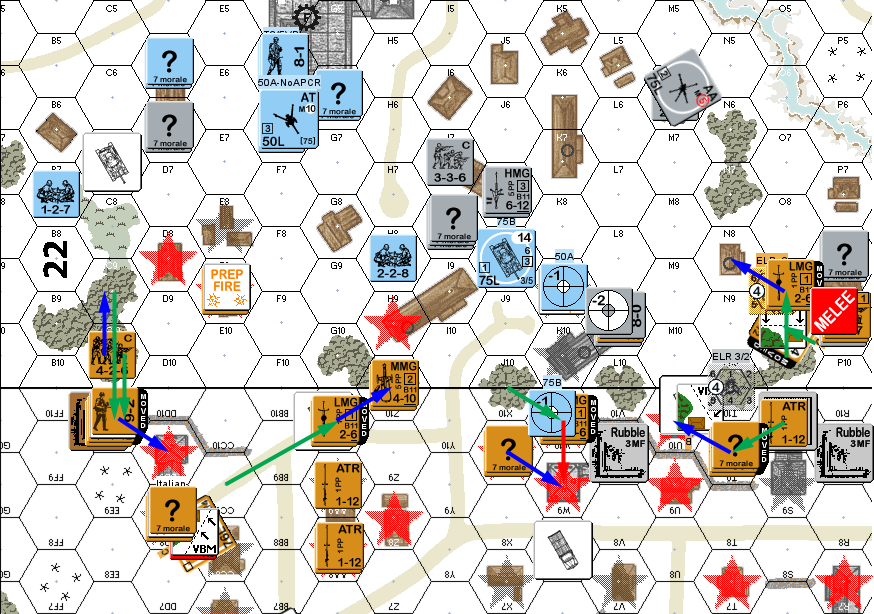
My DFPh had a number of good rolls, and I broke the squad in 49DD8 and broke and CRed the AA8 squad. We’d had a large number of 4s (both of our SAN) the previous turn, with no result, but now my sniper went off to kill the Italian 9-1, and the LLMC broke the HMG squad. The Melee in CC8 finished predictably when I eliminated the Italian squad for no losses.
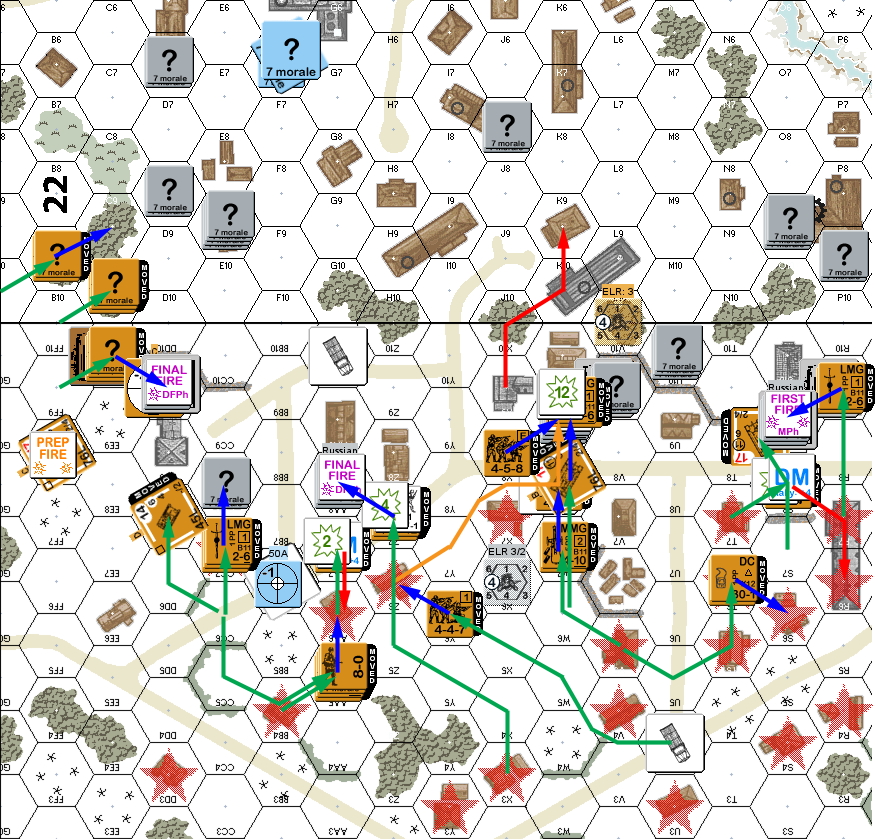
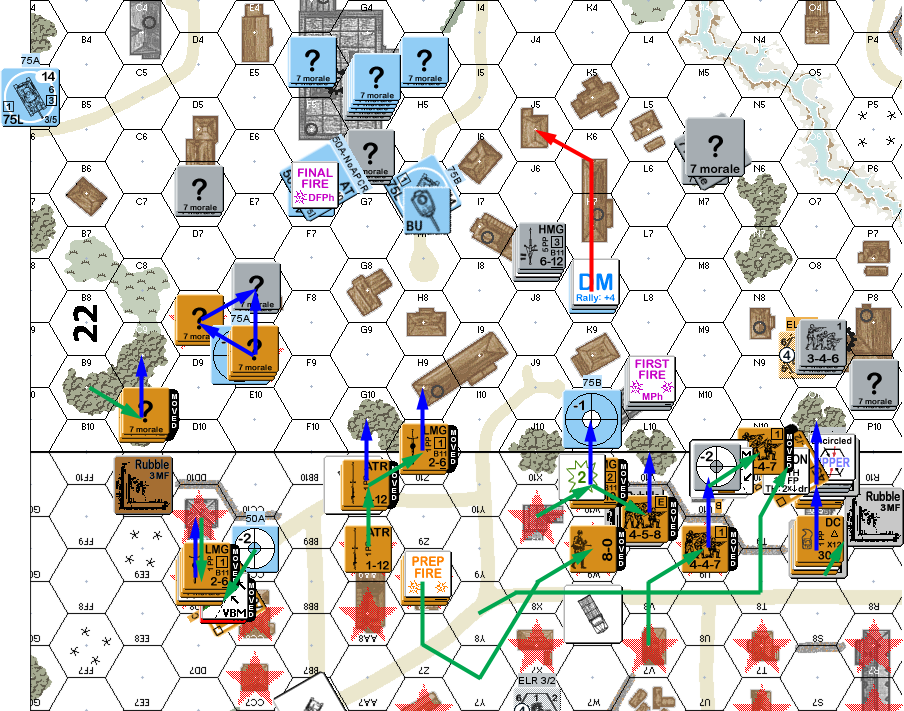
Situation, German Turn 2.
I got both of my broken squads back for my turn 3, while Patch rallied his crew and recovered the HMG. My only prep was at the ATR squad in S10h1, which did nothing. My berserk squad charged the broken HS in AA9, and Patch didn’t interfere. He was rightly worried about me pressing forward, though I took some time out this turn to grab more building hex control.
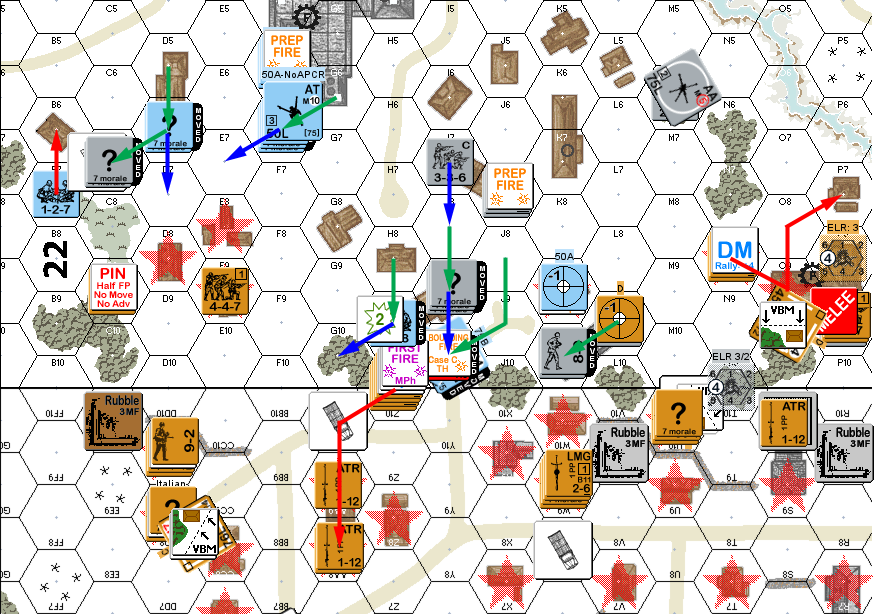
But at the start of DFPh, I found I had not been cautious enough, as Patch revealed the Itallian AA in 22M6 and hit the a T-34 that had gone into bypass of 49U10, and I barely passed a Shock TC. Worse, the Pz IV in I5 had a clear shot (that I hadn’t seen), and pivoted to gain acquisition. The 50mm got a hit against the other (HD) T-34, but didn’t penetrate. My fire had little effect, but the berserkers CRed their HS target out of existence. I ended up capturing the broken squad trapped in DD8, and didn’t quite feel like I could brave CC anywhere.
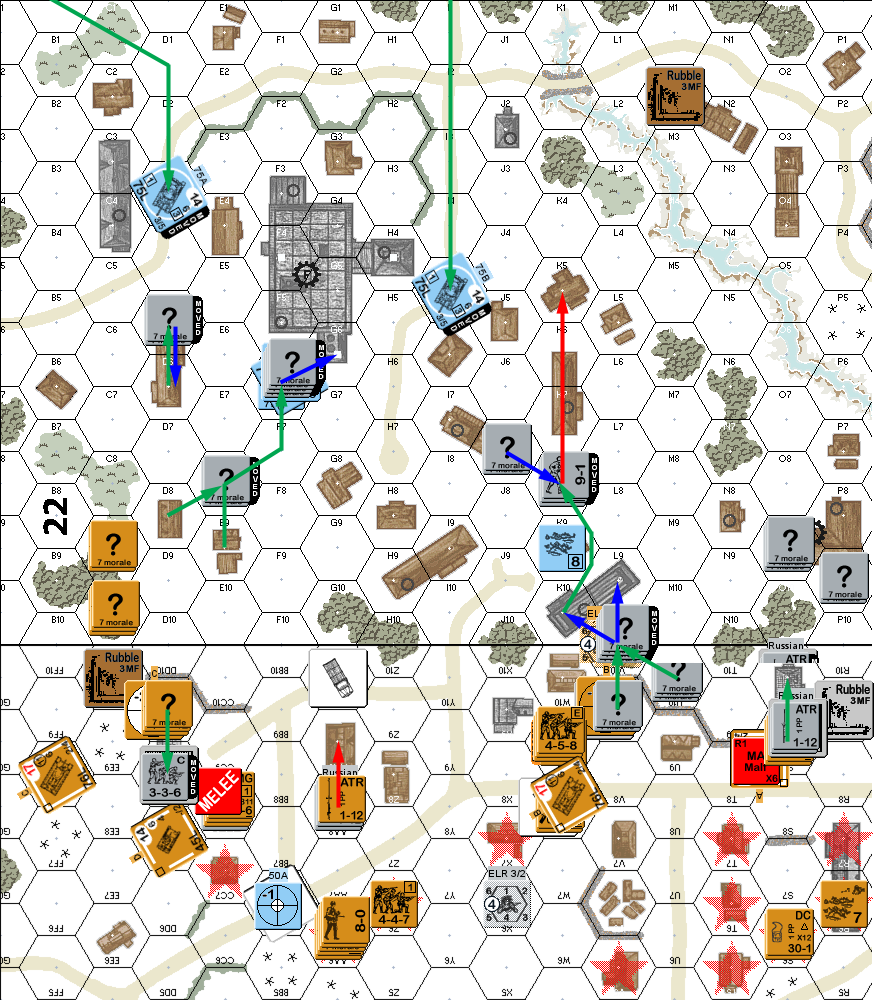
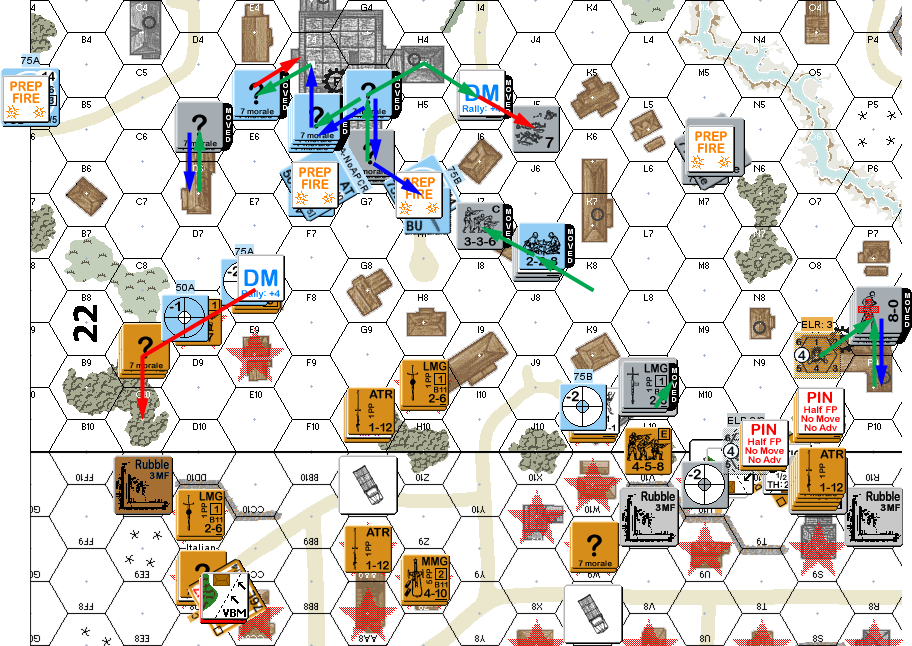
Situation, Russian Turn 3.
Patch self-rallied his squad for his turn 3 RPh, while I recovered an ATR, and failed, again, to repair my MA. His AA killed my exposed T-34 with two shots, and no survivors. The 50mm tried for APCR, had none, and missed a shot at the remaining fully-functional T-34. The squad trapped in S10 fired adjacent, but cowered for no effect. In the center, he pulled the HMG into cover, moved the rallied squad up, and continued to pull back, but I pinned his crew, and broke a squad. He skulked in the close factory, while his reinforcements went into the big one. Both Pz IVs crept forward, generally keeping to safe places.
And as if the armor battle wasn’t already going against me, I malfunctioned the MA on the remaining T-34. No other fire for either of us had any effect.
Situation, German Turn 3.
And it got worse in my RPh, as the S9 T-34 disabled its MA and went under recall. The only bright spot was that Patch couldn’t claim CVP for it. My Prep generally got IFT results, but the only one squad (S10h1) actually pinned. So one T-34 left, the other backed up so that the wall blocked LOS, and the T-70 headed towards the small factory, but didn’t have the MP to get into sight of it.
I had gotten most of my original flanking force into a northern set of buildings, and sadly Patch got a BMG/CMG PTC against one stack. They were unharmed, but Patch got to see my elite squad and 9-2. The MA opened up for a hit and 3MC, which thankfully I also passed. However, my sniper went off to wound the Italian 8-0 in the small factory. I then pinned him with a later attack, but neither of us had any other results. I got into E8 to find that it was held by Dummies, and in S10h1 I easily wiped out the trapped Italian squad.
Situation, Russian Turn 4.
Neither of us had any results for Patch’s turn 4 RPh. The Pz IV in A5 concentrated on my forward stack, pinning the 9-2 with MG fire then getting a CH against him for a 3MC that broke him and ELRed the squad with him. The Italian AA got a CH to outright kill my squad in U10. Thankfully, the other two big guns missed, but the HMG pinned O10. Patch attempted to move the third Italian leader to rally J5, but I caught him in the open with a 1MC that broke him, though that set off Patch’s sniper to pin another squad. DFPh was a mix, revealing and breaking a German squad in E5, but also malfunctioning a MMG.
Situation, German Turn 4.
I got nothing back for my turn 5, but Patch got HoB on his leader in J5. This sent him berserk, bringing the squad with him, with DD9 as their initial target (at first we thought they couldn’t see anyone, but board 22 is more open than it looks). My minimal prep fire didn’t work, and I tried entering the small factory, figuring I was dealing with a Dummy. I wasn’t, and after he was revealed, he fired to pin my squad. I then sent the T-70 into bypass of the Location, and sent a couple squads to P9 to get in later.
Outside of the south, my main concern was trying to shore up the center, and do something about the squad in L9h1. He managed to pin one squad after it Dashed across a road to get closer, but his fire as I gathered in L9h0 failed and malfunctioned a LMG. However, in DFPh, he broke my ATR squad in G10, and revealed and pinned the one in C9. Despite plenty of up-close firepower, my AFPh did nothing, and I sent both squads into the factory, while I spread out for more building locations in the middle. Despite my tank still being in bypass, there was no ambush, and no casualties on either side in the CC.
Situation, Russian Turn 5.
Patch rallied his only broken squad for his RPh, while I self-rallied my 9-2. His 50mm got a hit on my lead squad in K9, followed by a 2 for an outright kill… and start a flame in the building (Patch: “What is this, Budapest?”). Other shots pinned L9 and O10. His berserkers couldn’t see anything, so they started towards DD9, and got one bypass hexside before spotting L9 and changing targets. I took several shots at them on the way in, but couldn’t get better than a 1MC, which they shrugged off. He started pushing forward a little in the center, and both tanks moved forward.
With my north ATR exposed, I wasn’t going to get the side shot that I was hoping to sneak him into… he got a CH and killed a Pz IV through the front; sadly the crew survived. Patch got a good hit from the other Pz IV for a K/3 against J10. Patch reinforced both the existing melee and the berserk CC, which went better than it should have. I knocked out a squad in L9, as I went down to a 2:1 attack, and in the factory I killed the good squad, while the Italians did nothing, leaving it at 2×447 vs 346.
Situation, German Turn 5.
I rallied one squad (with the 9-2) for my turn 6, while Patch recovered my malfunctioned MMG (for permanent elimination). I started trying to shift things into the center, as I’d lost much of what was there. Patch broke my W10 HS in DFPh, but also malfunctioned his Pz IV MA. Also, my sniper went off to kill his leader in the small factory.
Situation, Russian Turn 6.
Patch’s turn 6 RPh was gusts, and I eliminated my MA to recall the remaining T-34. The HMG broke my forward squad in N8, and then reduced it to a HS with ROF. The Pz IV moved forward and pinned my LMG squad, and broke the MMG squad in H10 with MG fire. I managed to pin the HMG and break the (ex-)vehicle crew in DFPh, but he broke and ELRed the pinned LMG squad in AFPh, giving me nothing more than leaders from column 49T to 49BB. And the flame in K9 converted to a blaze. He crept forward, and the melee in P9 finished with me killing the remaining squad.
Situation, German Turn 6.
I managed a self-rally in AA8, and rallied the HS in W9 for my turn 7 RPh. We did a rough count of VPs at this point, and found I had a ~10-point lead, which was entirely possible for Patch to make up if he could keep retaking building hexes. The T-70 managed a possible CH against the HMG, but didn’t get the CH, nor any actual result. My 8-0 crept forward and placed the DC on K10; Patch kept concealment instead of trying to stop it with fire, which worked as it was a 1MC that he passed when it went off in AFPh. I tried to move a squad from the factory back towards the center, but got pinned in O10 (right after I realized he should have bypassed behind the woods to T9 and get to the center safely).
Situation, Russian Turn 7.
Nothing happened for the final RPh, and Patch did no more than pin two squads in C9 for prep. I’d managed to give everything but the U10 region some decent cover (thanks to that pin, and a couple not-great moves). So when the Italians in K10 went CX and started moving, it attracted a lot of fire. Sadly, the best I could do was a NMC that they passed. He piled two squads into E8, which meant a likely CC that I wouldn’t win in D8 (though taking out a squad there could sure upset things), and he abandoned his heavy equipment to charge for more building hexes.
DFPh had some decent dice; notably another front CH on a Pz IV from an ATR. Sadly, it didn’t penetrate. Other than that, I pinned a squad in J10, reducing the threat around my center garrison to one squad.
Going into CCPh, the score was 75-73 my favor (and Patch winning ties), with two CCs to resolve. I had left a 8-0 in W10 instead of self-breaking him out in the hope that Patch would miss in CC (with a 4:1…) and not take the building and the win. Sadly, Patch got ambush and killed him. And the Germans managed another ambush in D8 to kill my squad for no losses. Final score: 78-73 for an Axis win.
Situation, German Turn 7.
Afterword
I pointed out that I don’t think I’ve won a game where Patch has started a fire. Patch: “That’s an interesting and terrifying statistic. Patch is coming over to game, have we hidden the matches?” I haven’t thoroughly double checked, but it seems to hold true so far.
This is definitely another good scenario from Few Returned, and possibly the best one so far. Certainly, it was exciting and tense for the both of us from the start through to the exciting end. I had a fairly good start, helped a lot by the disastrous self-elimination of the forward ATG, but got ground down to a nub fairly fast, and the turn 5 losses really gave me a big problem.
Despite the havoc caused by my sniper (killing leaders), both of our snipers were below par. We both had a lot of 4s on turn two, and Patch continued rolling a lot of 4s later, with me getting a few during turn 6. Also, we both got a good number of 2s, and shared on 12s… but mine really hurt since my MAs went down when I really needed them, and his didn’t happen until most of the use of a 75mm was done. On the other hand, the early 12 IF shot really hurt Patch’s initial defense.
If the factory CC had finished earlier, I would have been in much better shape. I had three squads stuck in that area, and an earlier finish would have put one in the center, and I had thoughts of using one and the T-70 to try and take the AA from behind.
Discussion ¬