
217 Gloster Hill
I finally got the ASL Korean War module a couple months ago, and Patch has had an interest since it was announced (he preordered it), so it was inevitable that we’d try that for our next game. Patch looked through the scenarios, and picked “Gloster Hill”, and I took the defending Brits.
It’s during the initial Chinese offensive, and the Gloucestershire Regiment is getting overrun and surrounded. The Chinese attack the board 82 hill with 16 squads, two crews, a good number of leaders, a few MGs, a captured British MTR, a couple DCs, and some Dummies as they come on board. They also get another squad and three HS with one leader, one LMG and more Dummies entering on either turn 1 or 2. The main force come in on three sides of the playing area, while the second one comes on on the fourth side where the British will want to escape. The British have six squads and four HS, and two squad-equivalents are Walking Wounded (the second time I’ve seen that concept borrowed from Pegasus Bridge for unrelated scenarios), an MMG, a MTR, minimal Dummies, three hexes of Wire, and a good number of foxholes. The Chinese have six turns to have more squad-equivalents at level 5(!) than the British, and the British can auto-win by exiting 6 EVP on turn 4 or later.
Between using part of the large, rough hill provided in the Korea set, and the steep hills rules, this would provide a climbing challenge for Patch, akin to what I’ve had with board 25 twice now. On the other hand, the short distance to go helps a bunch. Both of us had to mediate over LOS for a while at the start, since there’s a lot more up and down than normal to wrap our heads around. Double-crest lines abound here. The Communist Chinese also have fairly extensive special rules, starting with using step-reduction like the Japanese, and having to use Infantry platoon movement and restrictions on firing. However, there’s so many exceptions that this didn’t hinder them nearly as much as I had figured on. Lastly, they use two-tone counters with the ‘main’ color being… British tan, which adds plenty of extra aggravation to this scenario. (Especially since even their concealment counters are two-tone, which brings up the question of why they’re two-tone at all?)
The British get a ‘drum major’ (effectively a 0-0-9 hero who becomes a 8-0 if he ever moves, but causes Fanaticism within four hexes) by SSR in E4, and naturally I set up around that to an extent, with three surrounding hexes occupied, one by a squad and 9-2. A squad and a half backstopped the center board edge, and my MTR went in B1, where it had a good LOS down the eastern board edge. A couple of Dummies went out on the NW ridgeline (not my smartest move), with the MMG and 8-1 in I5, with a couple hexes of wire to slow down advances on the position. The north edge got a squad, two HS and the 8-0. Patch set up in four rough groups, the largest on the east side, and the smallest on the west, and two lose groups coming from the north. Technically, they can enter on any turn (“Turn 1 or later”) but Patch entered them all at once, while the southern force (which must enter on turn 1 or 2) waited for turn 2.
I was expecting some movement trouble from having glanced at the North Korean rules, but there’s a number of exceptions, including for entering the board. Not that Patch necessarily poured on any speed, being generally happy to AM and keep concealment in Steep Hills. Things were smooth until we had to think again about how many blind hexes some of these crest line were producing, and Patch starting having to wonder about how he was going to lug some of the heavier equipment up Steep Hills with crags. I had a couple shots, but nothing effective, though my MTR did surprise Patch.
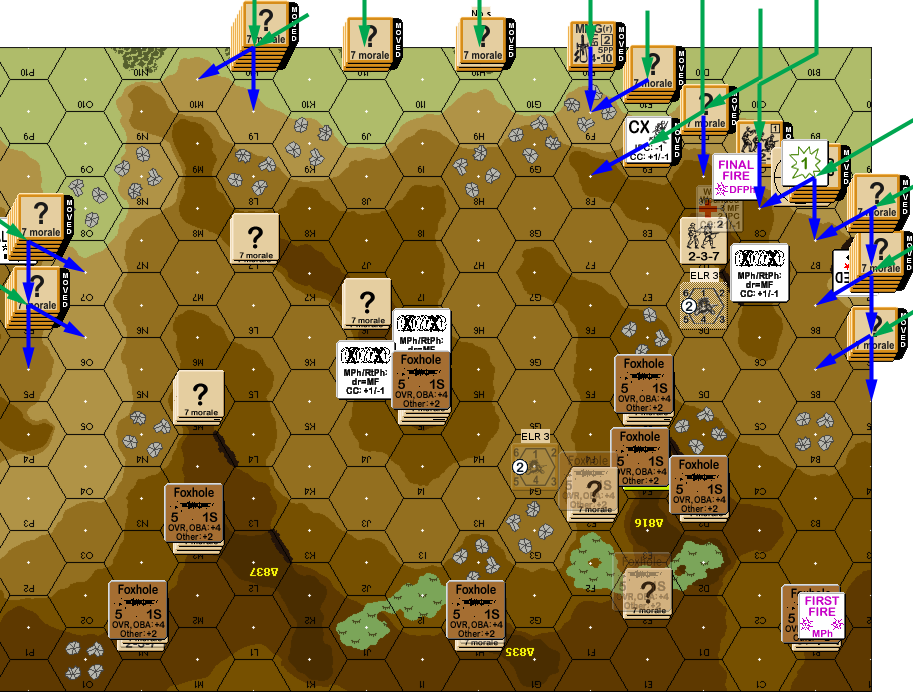
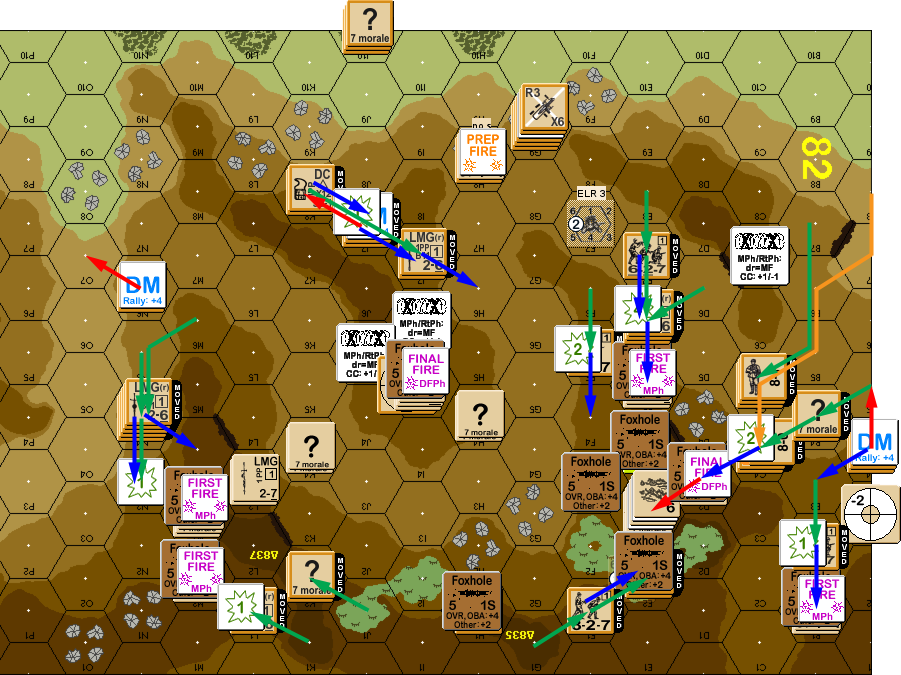
Situation, Chinese Turn 1, showing full setup. Note the transparent Chinese sniper in G4 is a lot harder to see than the older dithered style British sniper in D6. N1 was an unnoticed crags hex and therefore illegal; it was shifted to M2 when we noticed.
I opened up with a few units for my turn, and managed to reduce a squad, pin another and break an 8-0. The rest of it was the simple process of pulling forward units back, and skulking with M5. Since the Chinese units are all 627, there wasn’t much Patch could do as nearly everything was out of range.
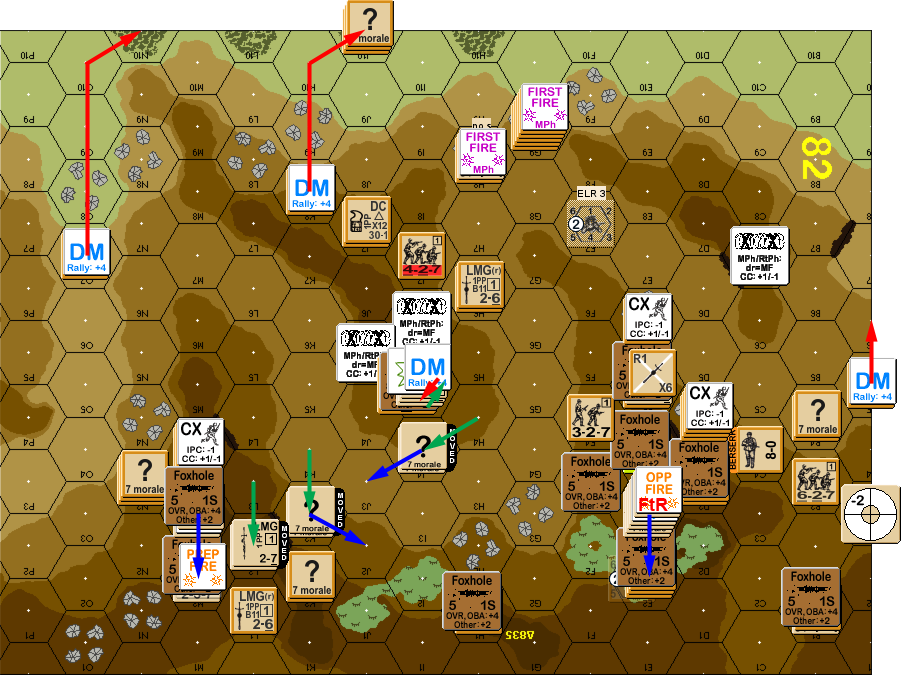
Situation, British Turn 1.
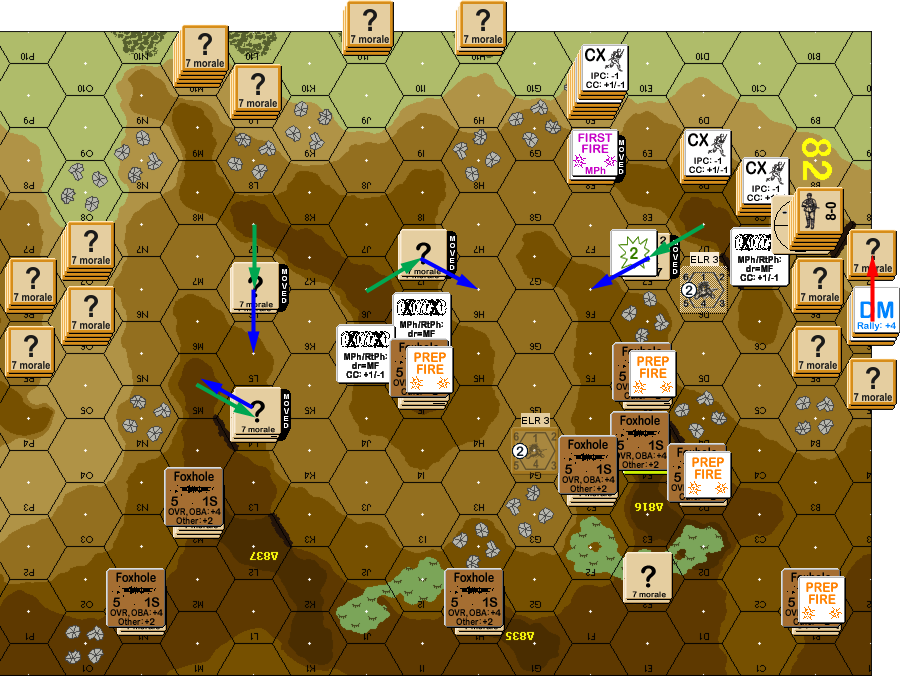
For turn 2, the southern force set up in six stacks in a row from F to K, putting them in the middle of everything, and likely to overrun my poor walking wounded HS in H1. His leader failed to rally, and with no prep fire, he sounded bugles at the start of his move. This has more effects at night, but is an SSR-granted option that gives the Chinese a bonus to movement TC when not moving as a platoon (…and not allowed to move normally by other exceptions). It can also cause Jitter Fire from the defenders, even in daytime scenarios, but this scenario just after the time frame where that can happen.
But his first move was the entire east side force as a platoon… with assault movement. That drew fire from me, with the MTR missing, but one shot revealing A4 (passed PTC), and another doing a 1KIA + K/1 to the concealed units in B6, which ended up breaking a 8-0 and HS, and killing a squad. The west side also assault moved as a platoon, and I got a 1KIA against the leading “?” stack… only to find out it was all Dummies. Fire at his southern group went well, breaking the 7-0, pinning a HS, and eliminating Dummies. The 7-0 was forced to surrender, but I refused it knowing I’d never keep him.
Patch had some good rolls for his advancing fire, but my rolls continued hot, and I passed all MC and PTC. My sniper also went off, and reduced his step-reduced squad down to a HS. But that HS still got into CC with me in F6, and a squad got into H1. With the Chinese, this automatically goes to HtH, and they have a -1 to such CC rolls, while both my units were walking wounded, so it was no contest for him to kill everyone for no losses.
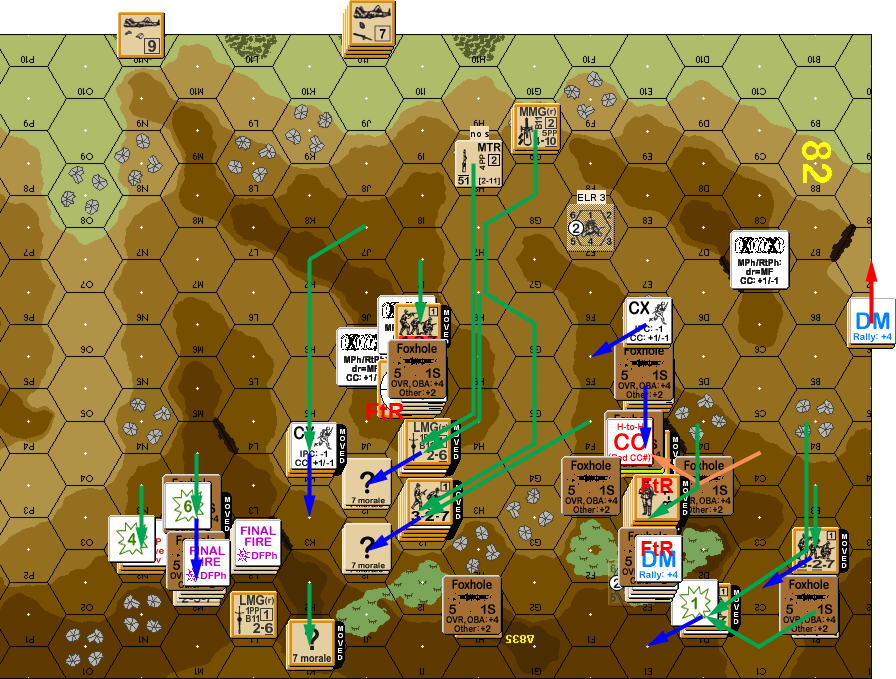
Situation, Chinese Turn 2.
For my turn 2, Patch got an 8-0 back, promoting to 8-1 with HOB, while missing on two other rolls. My MTR got two hits on the approaching Chinese, and got a ‘2’ on the second for a K/1 to reduce his squad to a broken HS, but his sniper went off to break my HS in E2. I also managed to reveal and pin B3, and revealed M6, which had his political officer, who broke on a second shot from the MMG, and his squad there was reduced. Movement was generally my guys outside of foxholes (squad, LMG, 2xDummies) crawling back; Patch got a 1MC against the squad, who passed with continued good dice.
Patch assembled his MTR during DFPh, and his two MMGs were finally in LOS of the enemy, but one malfed on the first shot. He managed a good ‘blob shot’ at E5, but didn’t do more than pin it.
Situation, British Turn 2.
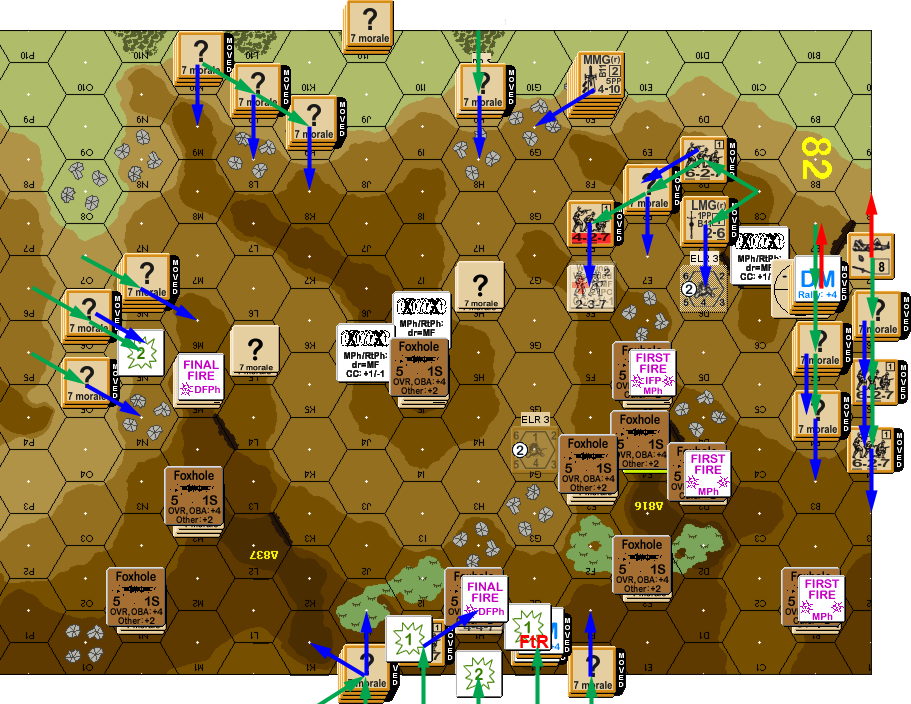
For his turn 3, Patch got another HoB, with his other 8-0 going berserk. Thankfully, he had no other good rolls. I had pulled my main stack out of F3 to E3 for a possible rally, but even a 9-2 wasn’t able to swing it with DM. He didn’t do a lot of prep, but it was all focused on the MMG nest in I5. Patch sounded bugles again, and started forward. One southern stack got adjacent to M2, and another good roll gave me a K/1 to reveal the stack, and leave a now unpossessed LMG on the ground. He moved into N3, where my other HS opened up and eliminated more Dummies.
On the eastern side, things were bad. Notably, Patch was finally in reach of E5, and my fire only managed to reduce one squad out of the two and a half coming in. He also got adjacent to D3 and B1 with a squad apiece, and I couldn’t affect them (despite a 1MC). In the middle he moved his three stacks as a platoon towards M5, and residual broke his 7-0 and reduced a squad. On the plus side for him, advancing fire broke the squad in D3. However, another big attack at E5 rolled boxcars to malf a LMG. The revealed parts of N4 also managed a good roll to reveal the still-concealed 8-0 in M3, but didn’t actually get a result.
To my surprise, the “?” that had crawled into E2 did not reveal himself to complicate rout, and D3 made it back to the 9-2. I wanted to self-break E5 to get them out of there, but they had nowhere to go with the Chinese swarming all over that part of the map. Patch sent in a 1 3/4 squads in E5 to kill my squad, but I got the reduced squad in return; meanwhile he took out the MTR crew for no losses (one off of a CR).
Situation, Chinese Turn 3.
This had me in a very bad situation for my turn 3, with one turn to go before I could start trying to exit. However, I had 5 EVP available in the west, and I was getting suspicious that the “?” in K2 was a Dummy. Similarly, E2 had a Known HS, and another “?” that could be a Dummy. I had 5 EVP in units in E3, including a concealed squad who just might help me get through E2, so partial exits of both would be a game-winner. I also had a broken squad and a half in E3, and the HS rallied. Patch didn’t rally anyone, but he did repair the MMG, and recovered one of my LMG.
Prep did nothing, though I also OpFired the visible parts of E3 in the hopes that E2 might reveal itself. The third part of my plan failed completely. I planned to move the MMG squad over to join the western force (and give me a possible 9 EVP there), but Patch’s MMG broke the leader and squad as soon as they exited the foxhole. Final Fire produced another large attack that wounded the drum major in E4. Several attacks against E3 did nothing, but did encircle it. He got a 1MC against L2, who passed, and a NMC against M5, which wounded my 8-1.
Patch (wisely) rejected the surrender of the squad in E3, putting both of us to NQ. I avoided contact in K2, but dove into E2 (having to go CX thanks to that encirclement). The “?” was a Dummy, and I managed Ambush to kill his HS and maintain “?” on my squad.
Situation, British Turn 3.
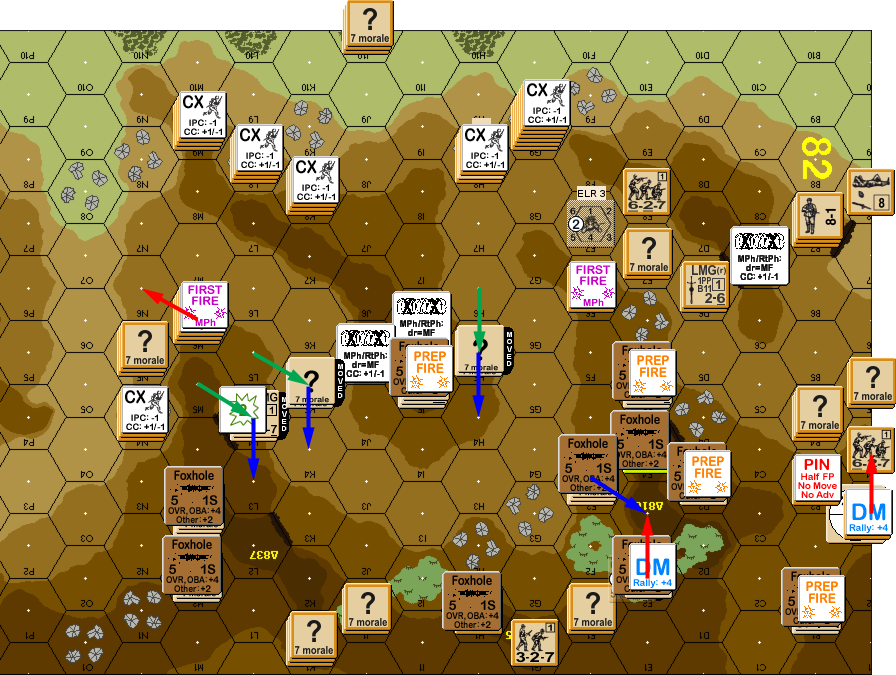
Patch had no luck in RPh, and no prep. His berserk leader hadn’t quite made it to D3 last time, so it charged the drum major in E4 this time. After that, the first focus was overwhelming E2, which went very well. He got two squads into D1 without me getting any effect, and then moved a two-stack platoon into E3, and placed a DC on me. Or tried to, as I FPFed to pin the HS delivering it. And with a 9-2 present, FPF wasn’t that big a deal, so I did another FPF on his final MF to try and do something about the 1 1/2 squad stack there… and rolled a 12. This eliminated my HS and broke the 9-2, and the concealed squad was revealed by the LLTC. Then he sent much of the center area racing up at full speed to my “?” in J2/J3, while also surrounding I5. Finally, his “?” in K2 backed off, while the remnant of the west force moved up, with one squad getting pinned, and a reduced squad reducing to a HS.
My otherwise uncommitted squad in E2 fired in DFPh, and broke an 8-1, and reduced a squad, who then pinned to LLTC. Patch’s Advancing Fire went well, eliminating the Dummies in J2 and J3 (and from Patch’s reaction, I think he’d figured J2 as real), and the two squads in D1 broke my squad, ending all resistance in the east. Rout eliminated my guys in I5 and E2, as well as Patch’s broken leader in E3. In M2, I did nothing, while Patch’s HS killed one of mine, leaving the hex in Melee. In E4 the drum major went down for no losses against a squad and 8-0.
Situation, Chinese Turn 4.
Afterword
I conceded at that point, with 1.5 squads left, and no hope of contesting any victory condition. Things looked pretty bleak during turn three, but my turn had shown that I did have a real hope, and getting off the western force was a real possibility.
On one side, my odds were vastly reduced by two critical things: All of I5 breaking as it tried to leave the foxholes. If it had gotten over to the western force (the goal), Patch could have had a very rough time of it, though he had enough to flood the area, so maybe not. The second was the 12 on a FPF shot. I was desperate, and really needed to do something about everything coming in on E2, and 8 or less to avoid any trouble was good enough odds to be worth it. But that’s the danger with risky shots.
In general, this scenario seems nearly impossible for the British. I’m sure it’s better if you have experience defending against the Japanese (with the step-reduce results), but neither Patch nor I have that. I don’t really see how the British can put down enough fire to appreciably slow the Chinese.
I was thinking that the platoon movement rules would make up for that, but there’s so many exceptions that Patch could often move fairly freely. Certainly, being able to roll a TC for non-Infantry Platoon Movement, and still go a hex on a failure seems awfully generous. On a small board like this, that, or just declaring a one-hex AM (which doesn’t require a roll) was all that was really needed on many occasions.
One mistake I made was getting the idea of going after his leaders to reduce his flexibility. Not only does the above mean it doesn’t work that well, but there’s six Chinese leaders in the OB, for a 1:3 leader:squad ratio. That’s pretty good for any nationality, and extremely good for one that sounds like it should be moving around in inflexible masses. And then there’s the fact that the presence of a leader raises the ML of MMC with them by one, making them ‘free elites’, and even harder to stop (admittedly, there’s no actual elites in the line up…).
Overall, I have to wonder at how exception-heavy the Chinese rules seem to be, though the general intent looks really interesting. Similarly, this scenario is actually quite interesting, and was certainly a good intro to the Korean hill boards and steep hills.
Discussion ¬