
K The Cannes Strongpoint
When I asked Tracey after Might Makes Right if there was anything he wanted to try next, he asked to learn about pillboxes. That immediately brought to mind the old SL scenario that features a fairly solid defensive position to take, and redone for ASL in the pages of The General. I suggested it, and he agreed to take the Americans in that. Technically, this was a teaching game, though with a lot of things I’m not familiar with, so it was the blind leading the blind.
Of course, there’s a lot more than pillboxes in there. The Germans are defending the board 2 hills with seven pillboxes, 18 hexes of wire and 90 factors of mines (15 hexes at the minimal 6FP allocation). They man these defenses with a single 838 squad, 2×467 and four crews with two each LMG, MMG, HMG, and a 75mm ATG. The Americans are digging out this bypassed unit in southern France with twelve 747 paratrooper squads with 4x.50-cal, 2xFT, 4xDC, 3xBAZ, two OBA modules, as well as a pair of Shermans, a pair of Priests, and four M3 halftracks. They have five turns to make sure there’s no Germans with a LOS and normal range to an edge road hex, but have a 20 CVP cap.
There’s already a good AAR for this scenario out there, and I referenced that as I started figuring out my setup. I decided for more of a ‘zone’ defense, with the pillboxes placed at cliffs where possible (forcing NCA attacks at close range, or longer-range fire duels where I had a TEM advantage), and wire mines were deployed to cover the inevitable empty lanes. I found that I would have dearly liked another pillbox or two, but it’s not as if there would have been anyone to man them. I missed the bit about everything in a pillbox being Known/not-Known together, so I could have scattered around some OB-given “?” in the woods. I did use some Dummies to ‘fill’ a pillbox with the HIP Gun, which still kept that from being obvious.
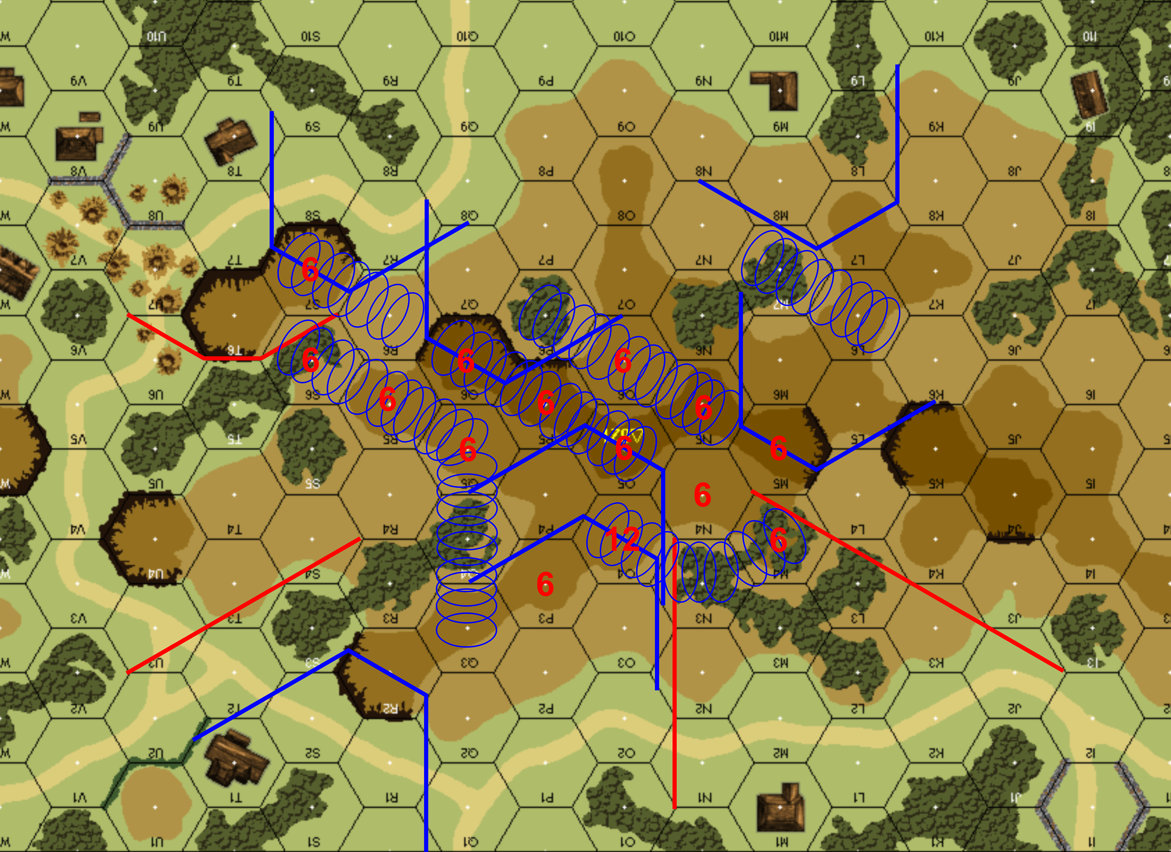
Diagram of the defenses. Blue lines are the CAs of the pillboxes; red lines are the boundaries of the ‘open’ paths in. North is to the left. …And there’s an error that I’m not going back to fix: O4’s CA is actually to N3/O3, not O3/P3.
The primary defense was facing east towards board 3, with the ATG in Q6. L8 was clear of other defenses so the occupants could easily get out and make a cheezy run for a board edge, and win that way. The ‘Alamo’ was O4, in the west-facing defenses with one of the HMGs, a crew, a spare HS, and the 10-3. They were judged most likely to keep a MG up and running to hold out the five turns. My one 12-factor mine hex was there, and there was another pillbox right behind it with a LMG squad and 8-0, so that he could assault O4 until it was taken care of (delaying things further).And both of them helped protect R2.
Tracey set up a big group in the 4H9 area, with a Priest off in 4T7 to duel with the R2 location, there was a more distributed line at the edge of board 3, with both radios on top of hill 534 along with a Sherman and Priest, and the other Sherman on hill 522, along with a HMG HS. Things started poorly for him, with neither radio making contact. The board 4 Priest placed Smoke in O4, which also did a lot to block O5, something I hadn’t considered. He also put Smoke on L7, but it was his Sherman’s last round. The other Priest tried for M5, but LOS was blocked by N6 (barely) and N5, and lost its Smoke rounds. The second Sherman also tried for Smoke on Q6, but didn’t have any.
A .50-cal moved up to the tree-line in front of S7, who fired on him for no effect. Most of my turn was spent trying to keep track of when Tracey came in view of another hex of Wire. Between that and some other confusion, and all the counters littering everything, I missed a HT not spending extra MP to get into R2 (uphill; it should have been stuck in Q2). Meanwhile, everyone else also moved in, and he unloaded a HT in the L4 saddle, cleverly out of my LOS, and at the base of of a two-level cliff. In DFPh O5 fired on R2 and pinned the HT and the squad in it, while Q6 opened fire on W7.
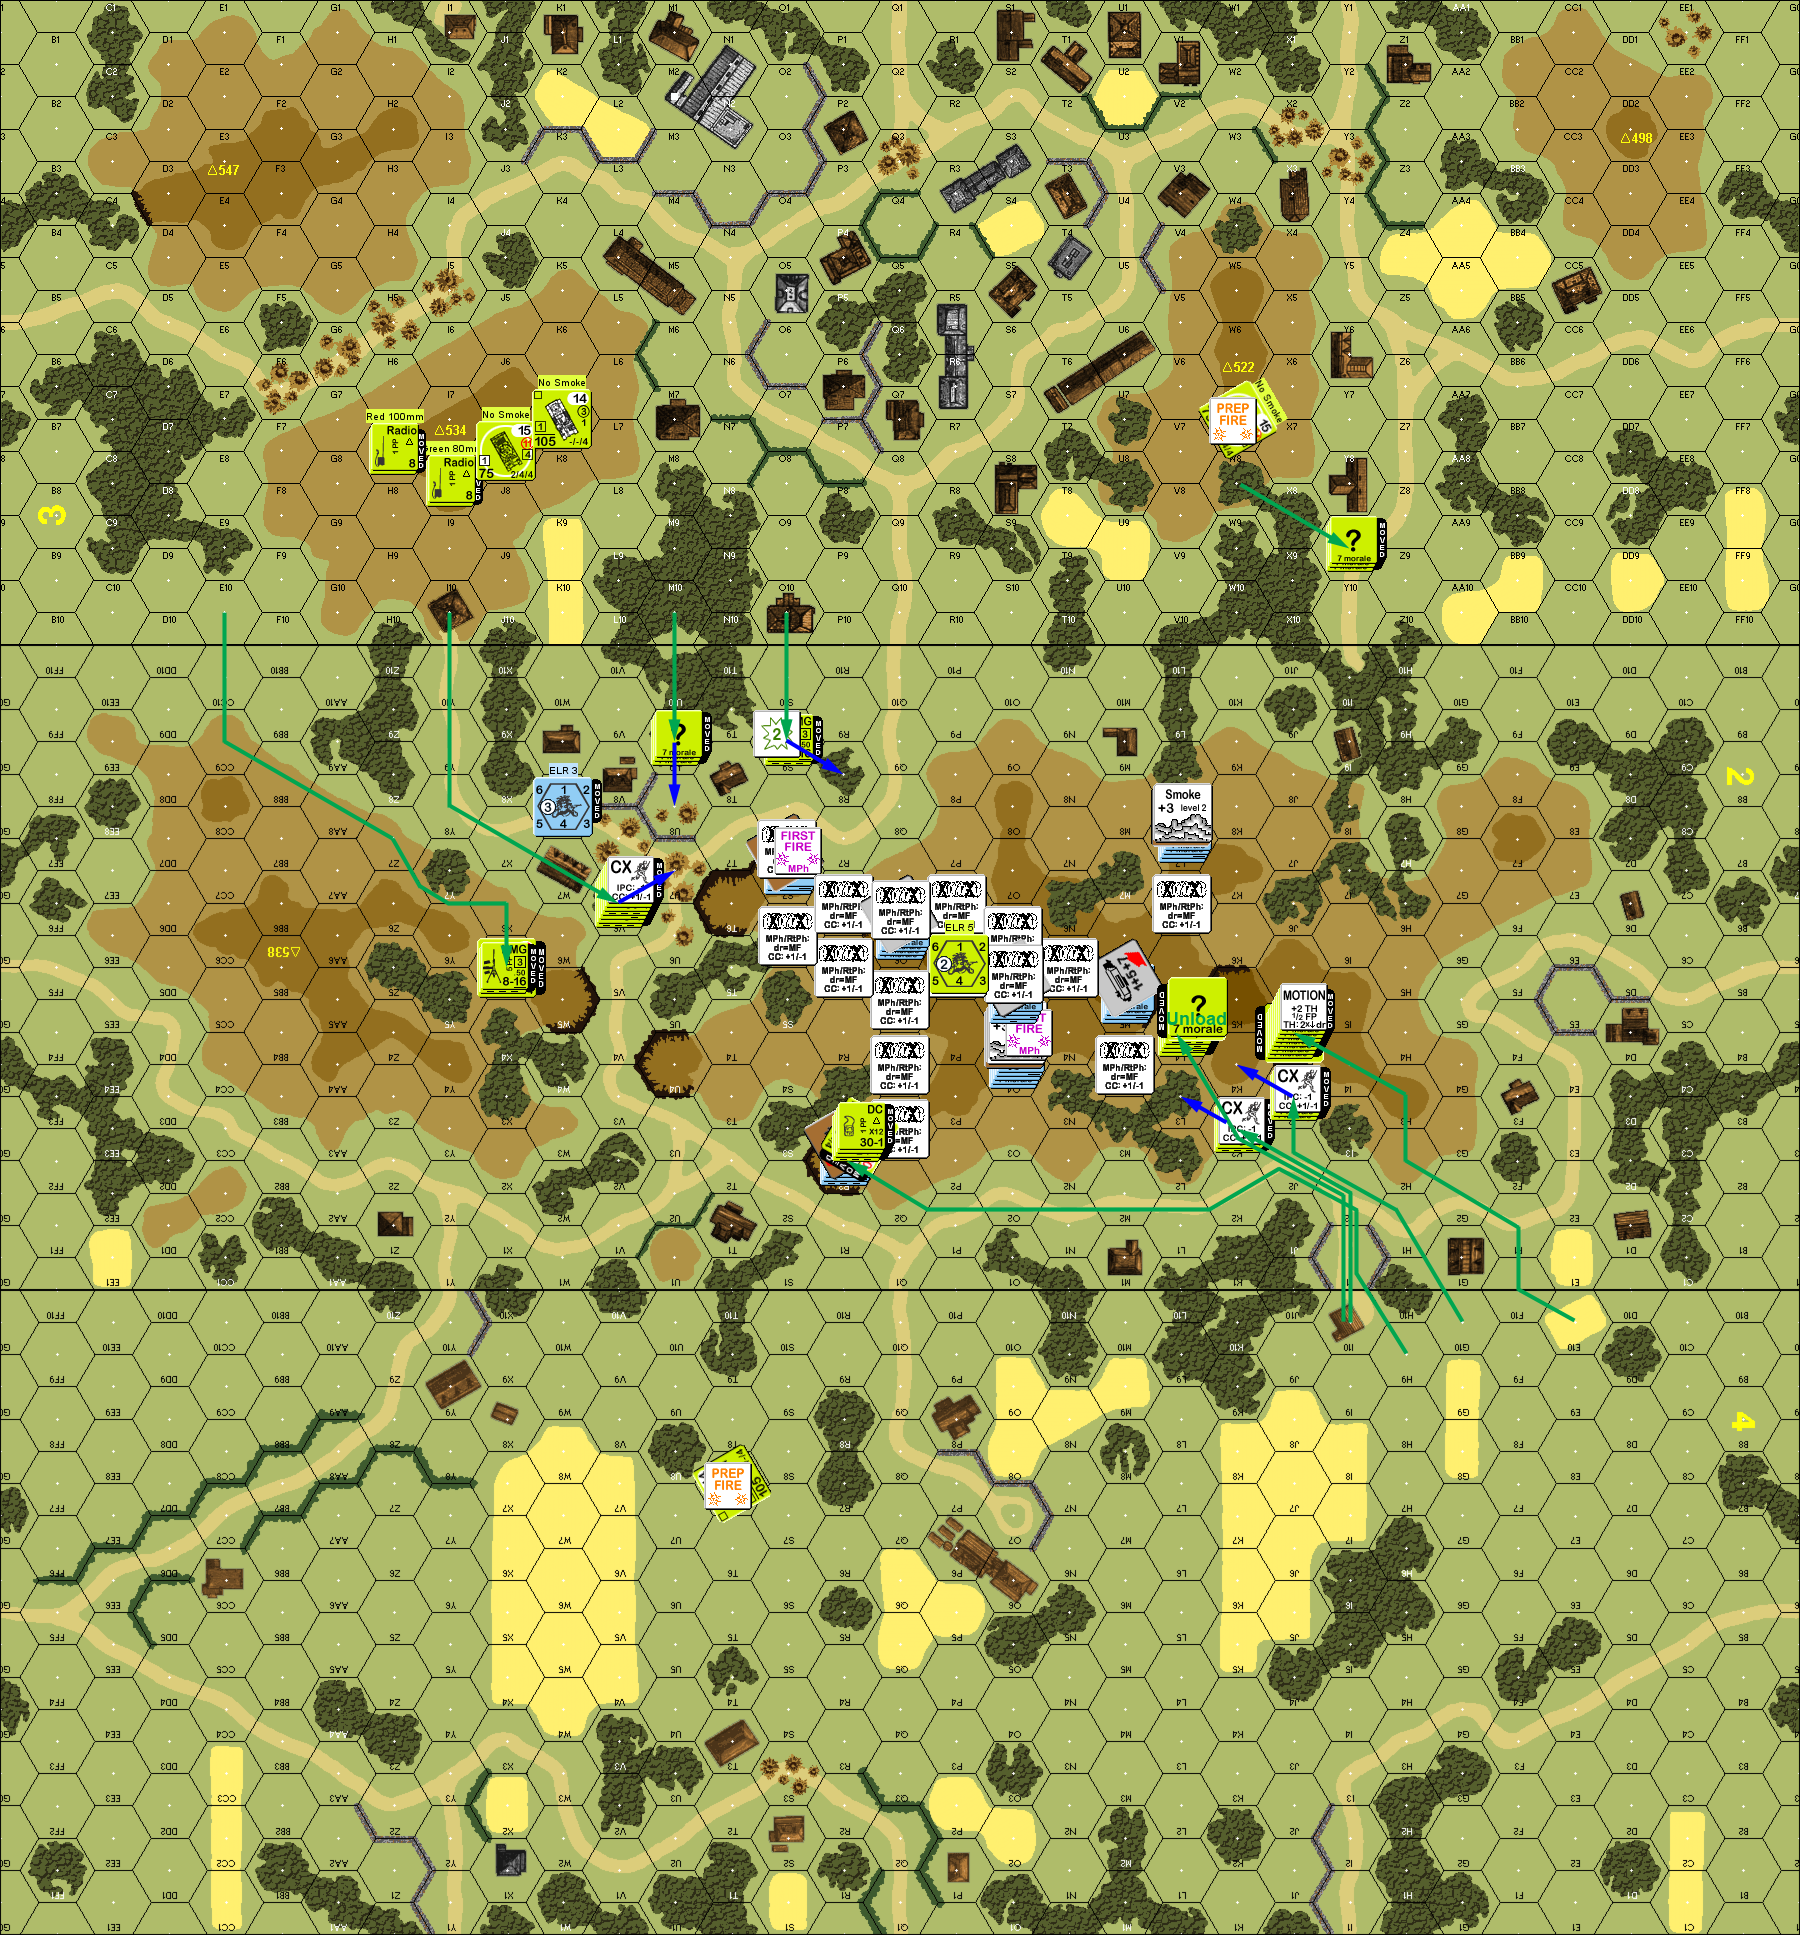
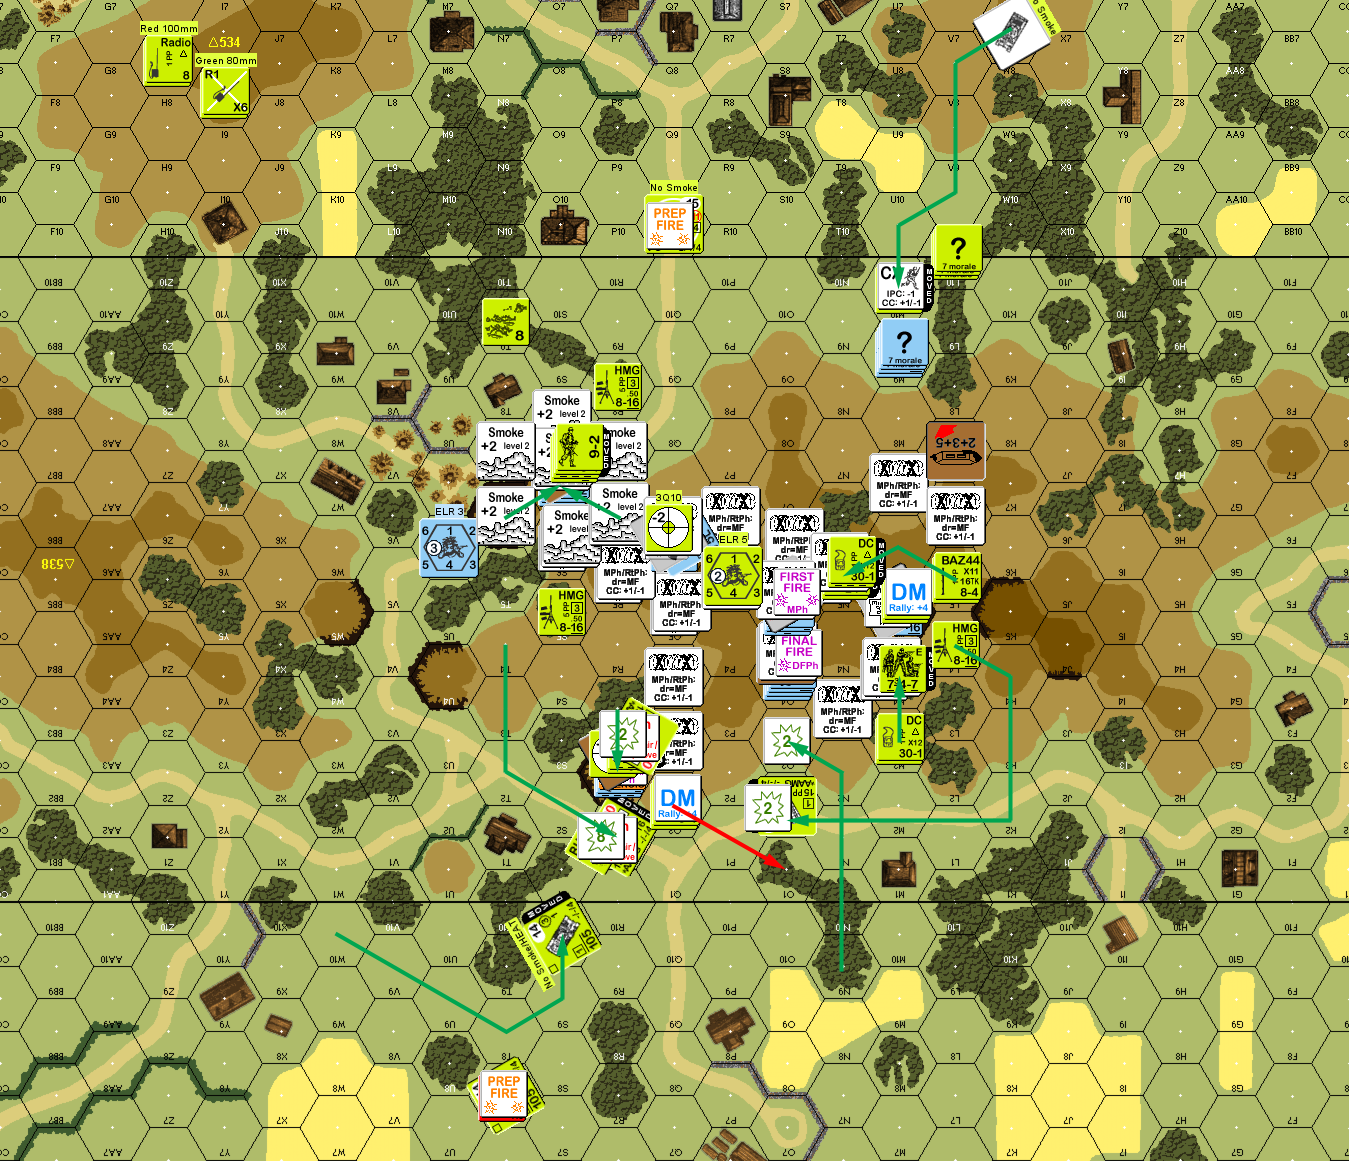
Situation, American Turn 1, showing the full board.
Not having much possible movement, I had a fair amount of prep fire. The ATG fired on 3W7 again, hitting, but couldn’t penetrate the hull armor, with it passing a possible shock TC. O5 fired on R2 again, S7 fired on the HMG squad again, but both had really high rolls, and did nothing. However, the smoke in L7 gave me the perfect opportunity to sneak out of the pillbox without being revealed, and he advanced into the L8 woods.
Defensive Fire had a major highlight: the board 4 Priest got a hit against the CA of R2, and thankfully the IFT result was a mere 2MC that demoted my 9-1, and didn’t affect the 838 squad. ROF got another hit for a PTC (12 effects DR) which they also passed.
Tracey forgot his OBA on my turn (I should have just let him do it late, but I think it slipped both our minds until quite late in the turn), but got contact and access for his turn 2. The 80+ SR came down accurate on S7, while the 100+ drifted from N5 to N10. His Sherman fired back at my ATG, and missed by two even with the pillbox DRM. The .50-cal fired on S7 and pinned my 8-1 there.
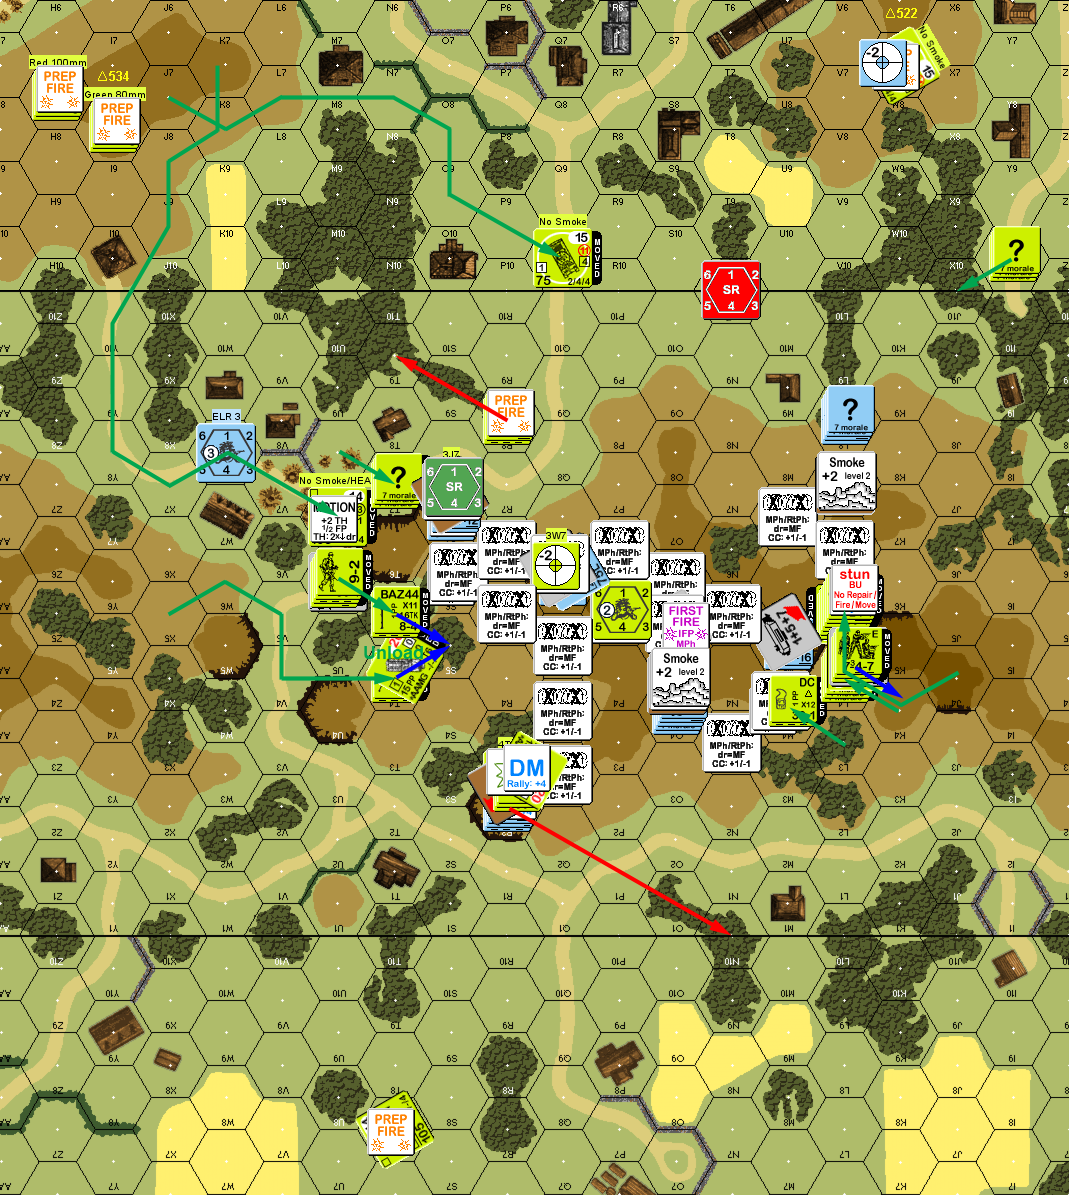
Situation, American Turn 2.
He moved a couple AFVs up for better firing positions, and his .50-cal squad unloaded in T4, which had me nervous. His 7-0 in the R2 halftrack unloaded to try and place a DC on the bunker, but died to a ‘2’ from O5 (1KIA). The FT squad unloaded after him, and broke on a ROF shot. He finally started finding mines during this turn, one by moving in, and one by a search. He also started learning a valuable section of the rules by climbing up a couple of the cliffs towards my bunkers. Many people want to assume you need an SSR, but that’s only for buildings. I’ve gotten into it because it’s the only way around board 25, and it can be a valuable way around defenses, though there’s certainly problems. The main problem was he had to drop a HMG to do it, but another squad came in and recovered it.
The Motion HT tried circling around the K5 cliffs and through the saddle, but that gave me a nice range one shot from M5 with a HMG, which broke the 9-1 and a HS, leaving the squad fine, but the HT’s crew was stunned stopping it and buttoning everyone up. My ATG managed another hit during DFPh, and penetrated to kill the Sherman on 3W7, but the crew survived. S7 managed to break the .50-cal squad, getting rid another western problem.
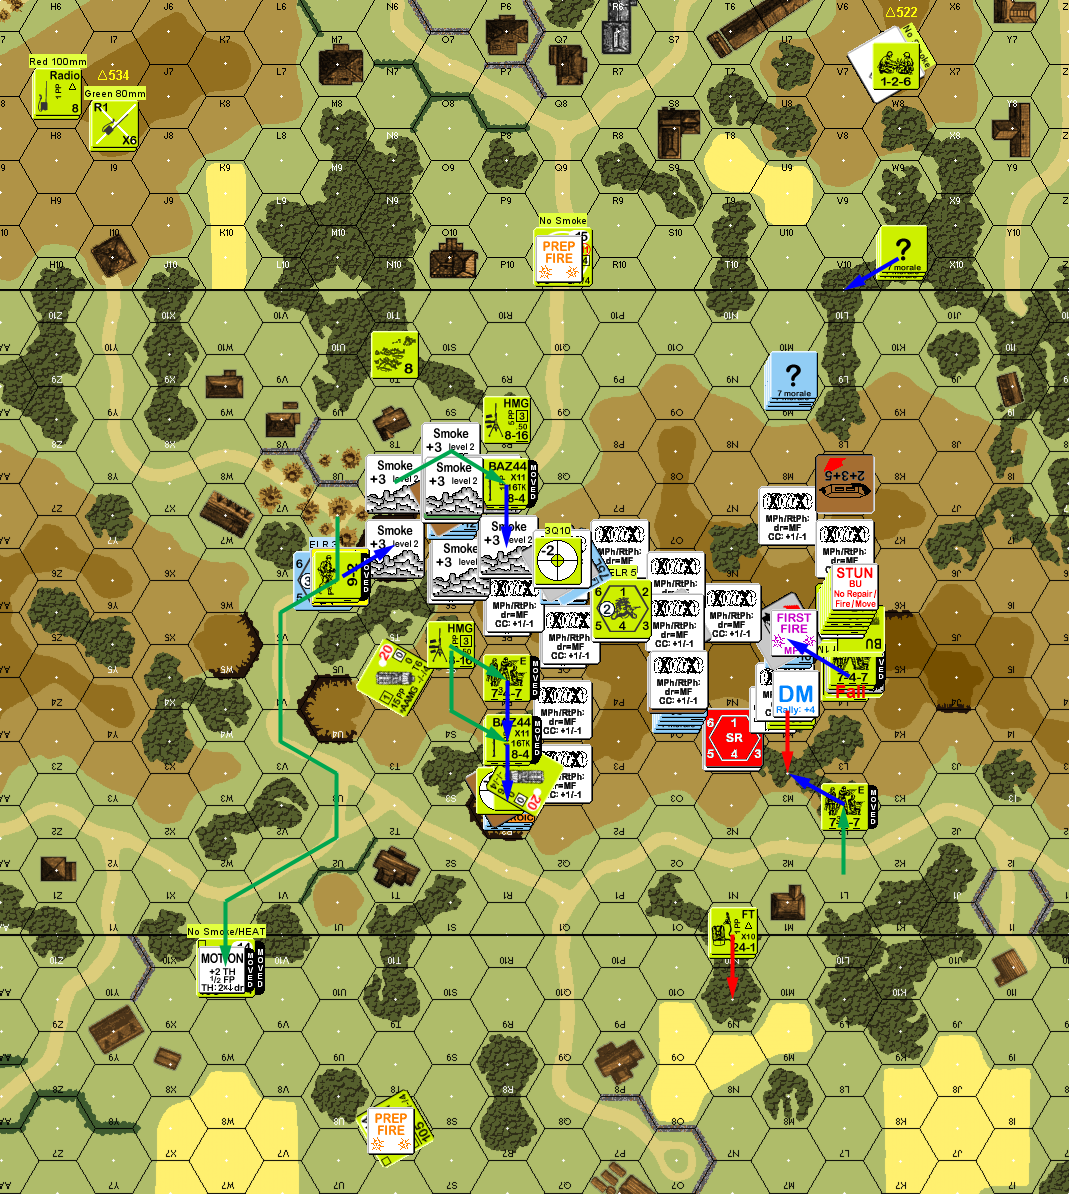
Situation, American Turn 3. One of his squads got somehow moved into L1 at the end of his previous turn, and we didn’t notice it until way later.
My 8-1 in R2 self-rallied on my turn, and the ATG got a hit on the Sherman that moved up to 3Q10, but didn’t penetrate. The battalion mortar put down smoke on S7, while the other OBA tried for the crest of the hill again, but the SR drifted the other way to N3. The board 4 Priest got another hit on R2 (disturbingly close to getting a CH), but the only result was my 8-1 Battle hardening and going heroic.
For his turn three, Tracey rallied the broken leader and HS in the L5 halftrack, but broke a radio, and lost contact on the other (’12’ and ’11’!). The Priest got another hit on R2 that I shrugged off, and the Sherman in 3Q10 got three hits on Q6, finally breaking the crew on the last one. The cost was my sniper going off and breaking a squad climbing the U6/T6 cliff (which eliminated him, and as far as I could tell, the DC he was carrying). Horrible luck continued for him with the 9-2 climbing L4/M5 fell to his death and the squad and a half with him not getting anywhere (’12’, ’11’, ’10’; I have no actual doubts about the Vassal dicebot, but things like that are what make you wonder…), though that got forgotten, and they advanced off the cliff later anyway.
Worse, his squad in M4 got under the wire, but then broke to the minefield while leaving the hex (where he would have found more mines…), and then CRed routing out of the hex, and the L5 HT took a Stun result from my adjacent HMG when it started up. As it already had a +1 from the earlier Stun, it was going to be recalled, and Tracey needed to break all the passengers to get out before it drove off with them in a turn.
Despite the problems he was finally in CC with two of the pillboxes, and eliminated the crew in M5, though there was no result in R2. However, in my Prep, O5 broke the squad there and stunned the HT. Somewhat surprisingly, no other fire was effective from either of us on my turn.
With the occupants of O5 gone, the stack under the L5 HT didn’t regain DM (voluntarily removed), didn’t need to rout, and the leader and squad rallied on Tracey’s turn 4, just leaving the HS there. His FT squad also self-rallied, and so did my ATG crew. Prep was poor, with the board 4 Priest malfing the MA, and the remaining Sherman missing on the ATG bunker.
The FT squad tried running up to O4 and died in the attempt, but he got into S7, and got his 9-2 w/FT under the wire in N5, though the squad with him didn’t make it. M5 tried to leave the hex, but broke to mines. He tried repositioning his remaining HTs for hindrance purposes, but one of them got stunned in the process. The FT then got a ‘2’ in Advancing Fire to knock out O5 with a 3MC (non-CA attacks with a FT do take a TEM; on the other hand very few things even get to make an attack). There was CC result in R2 again, but he knocked out the occupants of S7.
Situation, American Turn 4.
Nothing really happened for my rally, but my Prep was so good it was a disaster. O4 ‘pinned’ the crew of the HT in O2, and R2 got a K/2 on the functioning Priest (for a STUN/Recall), but that set off the American sniper, who killed my 10-3 in O4 and naturally the 3LLMC broke everyone else. From being largely intact a turn ago, I was down to R2 (with a 7:9 CC going on) and the ATG in Q6.
My plan with the crew and MMG had stalled while I tried to find a way around his guys, or wait for them to expose themselves, and they did the same. The Sherman decided to end that with a MA shot that broke my crew and set off my Sniper, who killed the 9-2 in S7, breaking everything else. Another shot from the FT at O5 CRed the squad in the pillbox. I’d forgotten my ATG crew was back during Prep, but in AFPh it got a hit on the Sherman to Shock it. Tracey got lucky in CC to eliminate my 838+leader in R2.
Nothing happened for his turn 5 RPh (other than the Shock flipping over to UK). Which was a problem for him, since there was very little that could even attempt to get at my final pillbox in Q6. He couldn’t get under the wire with the nearby squads, and his 9-2 broke to mines trying to leave N5 to get into FT range of it. I added injury to insult by killing the Sherman in DFPh.
Afterword
I do wish there were a few more scenarios that involve properly prepared positions like this one. (A few pillboxes to get past at the beginning should work.) However, there was a lot of chaos, and really crowded conditions, which caused more than a few flubs as we went through the scenario. I’m thinking FtF with 1″ hexes like many of the HASL maps have would actually work out a lot better.
The main problem with ‘siege’ scenarios of course is one side’s decisions are all front-loaded. That said, that aspect made it a fairly good teaching scenario. With less to do on my end, I got to spend more time pointing things out… and re-reading rules that I haven’t had occasion to use much of. (This was actually more of a lesson for me firing on OT/CE vehicles than on pillboxes and the like….) I kept forgetting to keep track of CVP anyway, so I’m not sure were it ended up; it almost certainly edged over the CVP cap (2xdead Shermans = 10 + 1 crew for 2 + 2x 9-2 for 8 = 19, and I don’t know how many squads).
Tracey kept a fairly good, if often frustrated attitude the entire way, and the loss of three leaders was certainly a spectacular finish. Luck really turned around for him right at the end, but no one should have to deal with the OBA problems he had.
Overall, I tend to think the assault needs to concentrate on one direction or the other, possibly planning to use Smoke at the end to try and mask remaining pillboxes on the other side. Get a good feel for the wire and mines on one side, get into the pillbox hexes, and (hopefully) move on. On the other hand, I think that process might be more than a 5-turn endeavor.
Discussion ¬