
J40 Might Makes Right
After finishing up “Confusion Reigns“, I accepted a request for another game from Tracey. I looked around a little, and found a fairly simple and fast looking one with a minimum of fancy toys. J40 “Might Makes Right” from ASL Journal 3 is set a month after the invasion of Norway. The British have started evacuating, leaving a Norwegian force to hold a village that had recently been retaken against a German counterattack.
The Norwegians get a mix of eight squads and two leaders with a LMG and two MMG (which are B11 by SSR) to defend half of boards 18 and 10. The Germans have three and a half elite squads on one hexrow of board 18 at start, with another eight and a half coming in on turn 1. Out-of-play terrain is still treated as being there, probably to allow use of a gully. The Germans get one LMG, MMG, and 50mm MTR each in both their on-board and off-board forces, and need to take 13 building hexes on board 10 in seven turns. All buildings are single story, leaving the rolling hills of board 18 as the only Level 1 terrain, and Alpine Hills are in effect, cutting off LOS in those hills.
Tracey had the defenders this time, and set up a loose net of “?” across board 18, with the obvious concentrations being towards the rear. The Norwegians get 12 “?” to cover eight squads, so there will be a couple Dummies. I set up my MMG to be able to fire on the two most-forward stacks, and the MTR would shell the northern positions from behind a hedge (I wasn’t thinking in terms of Alpine Hills yet, so that was blind hex with few possibilities even after advance, and I didn’t realize it until after I fired), while the second MTR would advance to a firing position in the gully with the MMG. My major advance was along the north edge, but the south edge got a lot of attention as there was some brush to use in an otherwise open expanse.
All of his sighting announcement for stripping “?” as I moved came from the edge positions, implying that his two central ones were Dummies, and I sent one stack out in LOS of K3 without being shot, which tended to reinforce that supposition. But I certainly wasn’t going to take too many chances with them. He did reveal a squad in 18I8 for fire, but didn’t get a result. My advancing fire went better, with the MMG getting a PTC to reveal K6 as Dummies, and another shot broke I8, but set off his sniper, who pinned the second MTR HS IN the gully of P4.
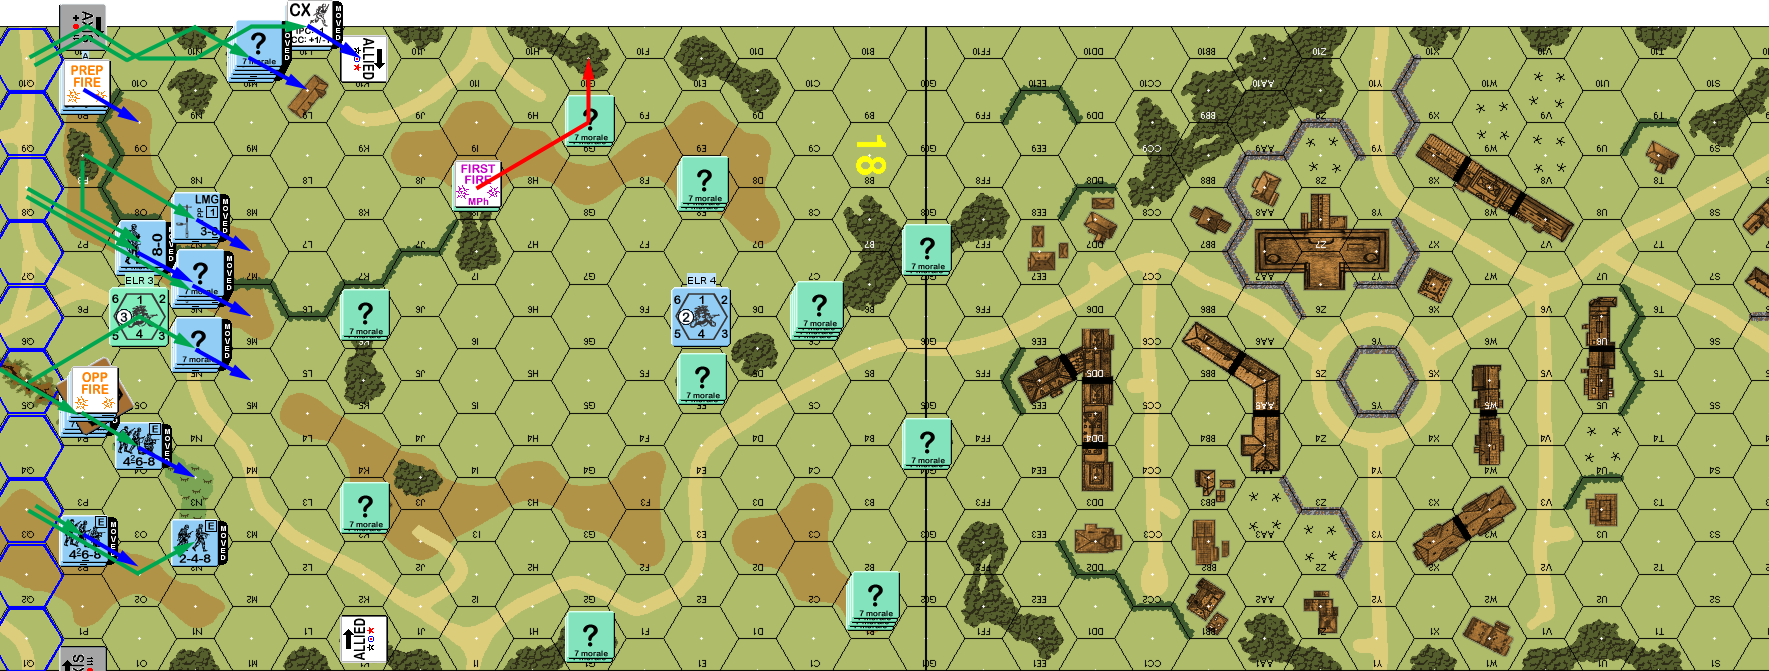
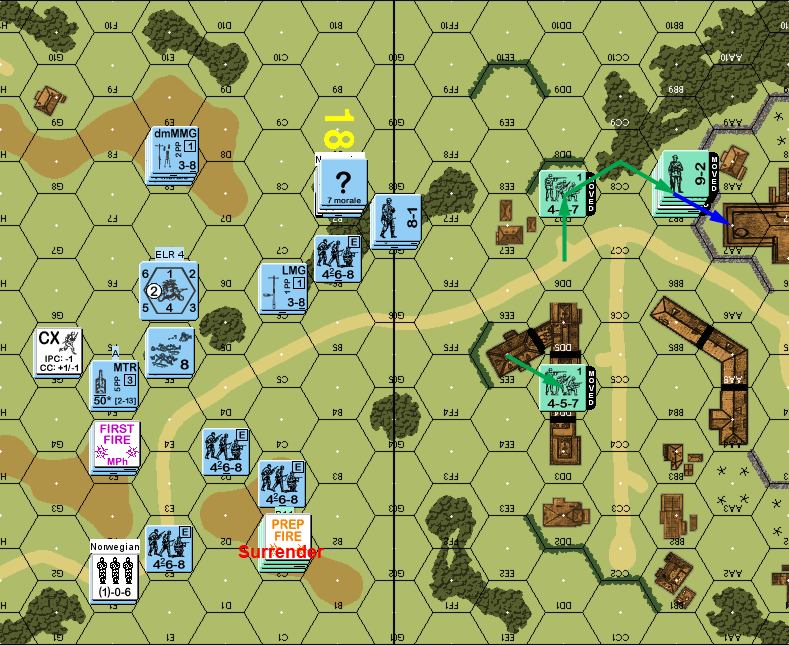
Situation, German Turn 1, showing the full map. Blue hexes are the off-board entry area.
Tracey’s Turn 1 was extremely quiet; the only RPh activity was the attempted self-rally of Tracey’s squad, which naturally failed under DM. Most of his units skulked, leaving me all of one worthwhile defensive shot (M7->J3), which wasn’t able to force him to reveal anything. Overall, the only changes from start to end of turn was a “?” moving up to 18B7, and the the 18K3 “?” shifted to the woods in J3 and stayed there.
I repeated the good shot in my Turn 2 prep, but still couldn’t get a result, and started forward with my primary goal to get at G9, and force G10 to surrender. Secondarily, I went after J3, but was still cautious, should it turn out to be real after all this. An early shot from G1 cowered, giving me an easy time in the south, but in the north his first shot pinned my advancing HS, and kept me away from his broken squad. However, the rest of the group advanced onto the hill, hoping to engage G9 in CC, and my first squad went Fantatic on a 1MC, and his squad broke to FPF as the second squad and 9-1 came adjacent to him. Worse yet, a shot from C4, with his 9-2 merely malfunctioned his MMG.
I advanced into G9, setting up a capture of the adjacent squad next turn, and into J3, which was indeed a Dummy. I’d exposed two Dummy stacks, and completely overrun his first line. More importantly, I was in a good position to force him off of the rest of the F8 hill, and that left only one hill between me and the town. The real problem would be the woods line, and all the open ground out there. Also, I was ending up with more in the south than I had planned, and had had to make sure a leader got down there.

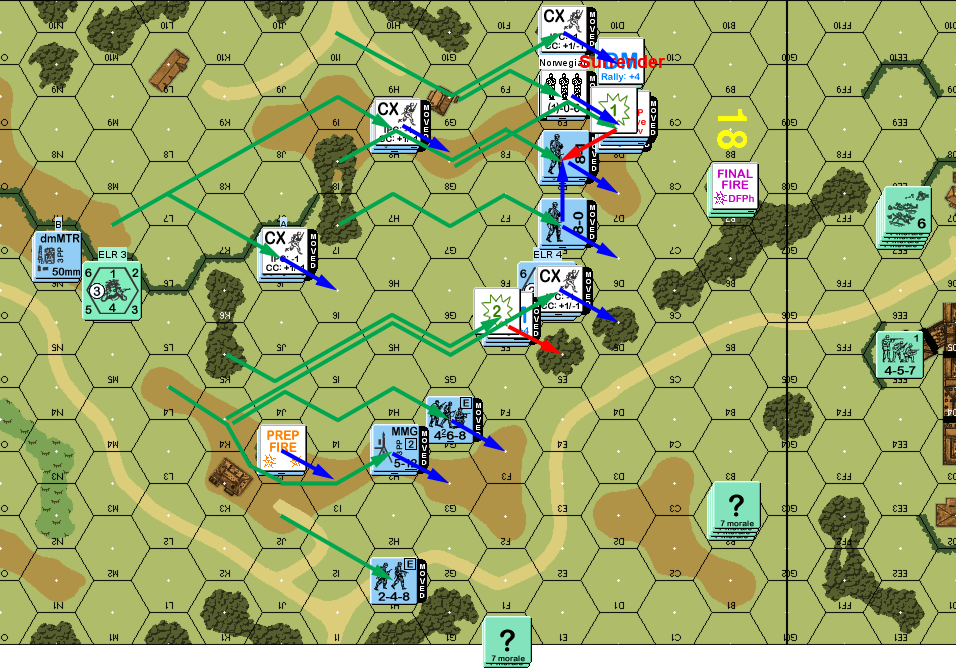
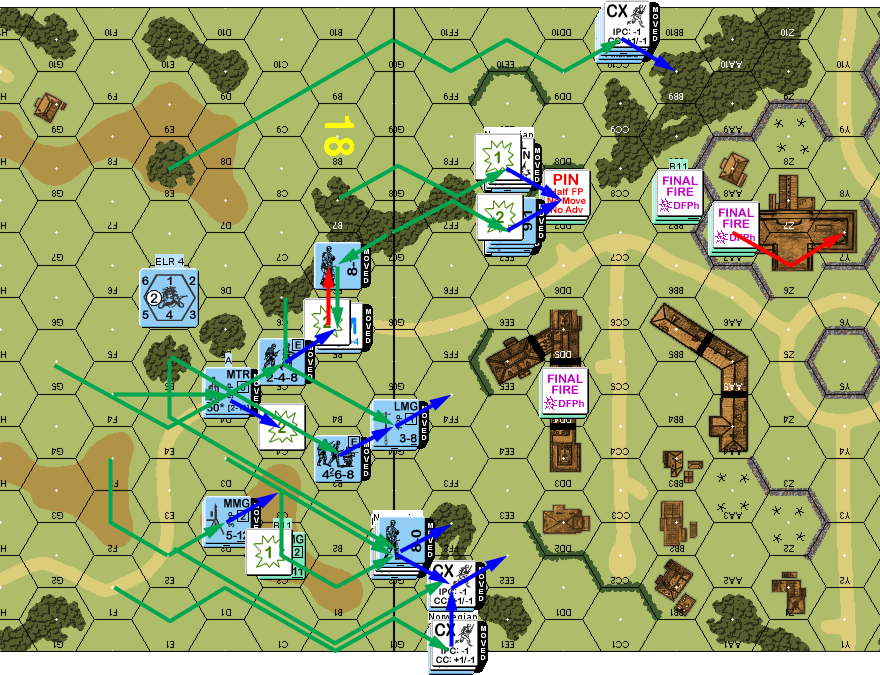
Situation, German Turn 2.
Tracey pulled back for his second turn, abandoning his positions on the hills, and the 9-2 headed back for the village. I managed to find one long-range LOS and shot, but didn’t stop the squad with a PTC. In Final Fire, I revealed D5 as a third Dummy, but that set off his sniper again, who broke my MTR HS in M6. Another shot revealed and broke B6.

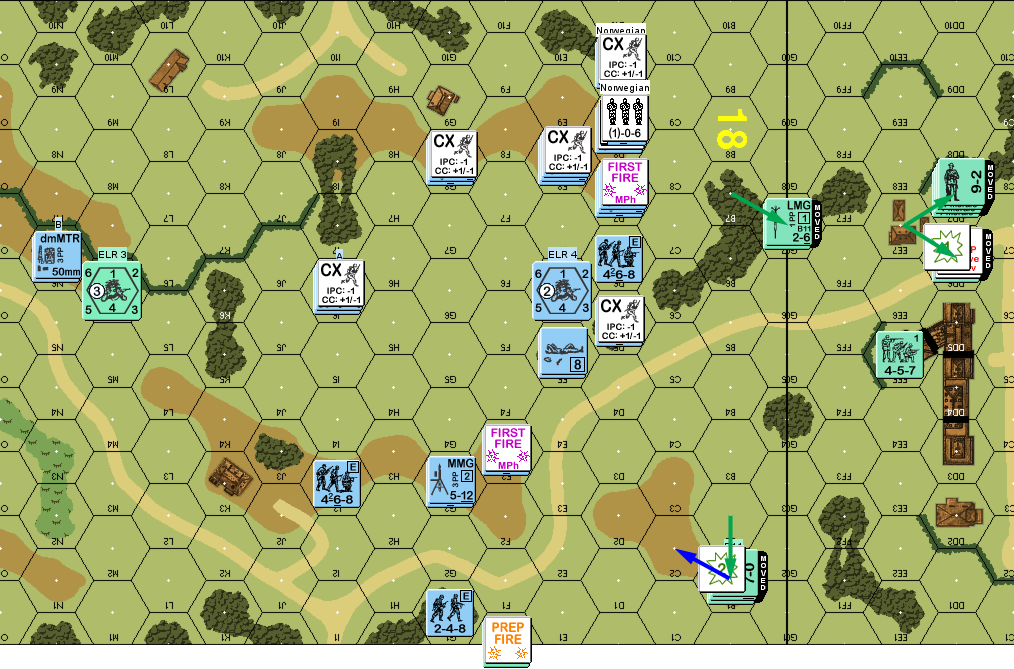
Situation, Norwegian Turn 2.
Naturally, my HS didn’t come back for my turn 3, but Tracey managed to repair his MMG. I took a long-range shot at 10EE5 that I normally wouldn’t bother with as my only Prep; as it was about the only one I had at all, I knew everyone else was moving, and felt the squad was worth the chance. The first goal was to get to the woods line and start threatening B7, while forcing a capture on D9. The secondary goal was to get close to F0 and leave him with bad choices for his turn.
Movement was fin until the end, where the most of the units that were approaching B7 moved. He let a squad go without fire early on, but at the end, he broke a squad and 8-0 in F5, and broke a squad in D8, while pinning the 9-1 there. That complicated the rout situation in D9, as D8 was what would have made Interdiction obvious. After a long examination of all the possible rout paths, I found that anything that could get to cover in one turn had to move through hexes interdicted by E9, forcing them to surrender (whew).
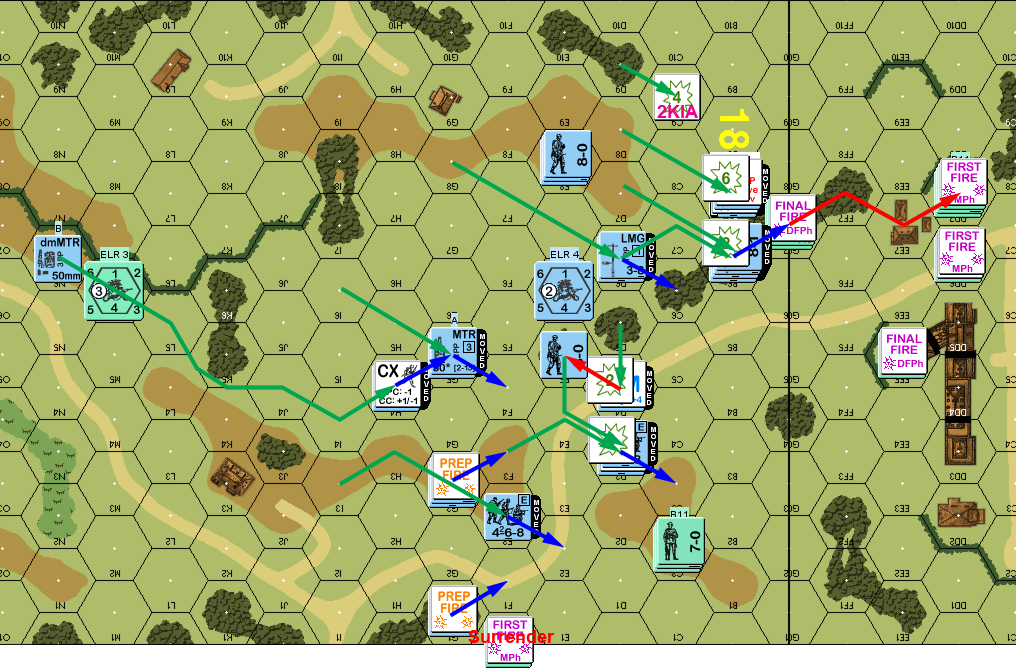
Situation, German Turn 3.
Tracey rallied his squad for his turn 3 RPh, while all I could do was wait out DM. F0 took a shot at my MMG, but couldn’t get a result. He tried running the rallied squad south into the village, but I pinned him in the street with a long-distance shot. Past that, I wasn’t able to do anything to him, not even with my two shots at F0.
Situation, Norwegian Turn 3.
I self-rallied the MTR HS in N6, and my 8-0 leader, but only one of my other squads came back. Annoyingly, I still couldn’t phase F0 in Prep. By this point, I was starting to get concerned over time issues. I was going to need some time once I got to the village to get the required building hexes. But if I could keep eliminating his defenders, moving around would be easy, so I largely avoided the 9-2 to try and overload GG7, and worked on getting to the southern hill to force C2 out of position; something that would have been easier without F0 there….
Sadly, the first move was the HS and prisoners in view of the 9-2 two who eliminated everything with a 2KIA. A move into B7 generated a 1MC that pinned my leader and squad, but another squad got into B6 without trouble, followed by a LMG squad+8-1, but sustained fire malfunctioned his LMG. In the south, he ignored my first move into D3 early on, but then broke a squad in D4 as it moved up, and pinned another in D3. Final Fire concentrated on my HS in G1, who passed multiple MCs. My advancing fire broke GG7, sending it, too running back to the village, which beat dealing with CC, and I finally got F0 to break, who had little choice but to surrender with open ground on every side.
Situation, German Turn 4.
Tracey immediately got his squad back for his Turn 4 RPh, while I rallied E8. C2, not having anywhere left to go, fired on C3 (MMG) and E2 (squad) for no effect (AMing away would probably have been better, as they at least would have had rout possibilities once away from me; on the other hand, if it came to that, they’d just get hung up on the FF1 woods). The full 9-2 stack moved further into the village, but my MMG had a clear shot down the road and pinned his MMG squad. I naturally had a couple Final Fire shots at C2, and pinned the stack before successfully breaking them on a 1MC, and forcing another surrender.
Situation, Norwegian Turn 4.
I rallied my last broken squad for my Turn 5 RPh, while Tracey lost his malfunctioned LMG. While things were certainly looking good, I refused to get at all complacent; I had three turns to get into the village, and the Norwegians to move last, so I would have to have some cushion and an ability to keep him from just running around behind me. More immediately, the pin had actually stuck his MMG in the handy position of BB7, where it had a clear shot down the road, and I wanted to shift troops across that road to get into the southern buildings.
I moved next to EE7, who fired for a K/2 (and cowered), but the remaining HS went fanatic and generated a hero. I moved a second squad up to EE8, and survived with FPF pinning his squad. E8 hurried north and around, ready to cause problems from that end while forces flooded into the south. My main move south took fire from the MMG and survived without issue. Since I considered it obvious, and important, enough, I offered to let it play with a fire lane declaration. Tracey admitted to forgetting all about them and declined. A later move took a K/2 from the squad and broke.
My luck went from good to better in AFPh, when I fired on AA7 (as opposed to the already pinned DD7), and got a 1MC to break his 9-2 and ELR the squad. I put a 1.5 squads, hero and 9-1 into DD7 to ambush Tracey’s squad and barely eliminated them, which was good, as I’d also brought prisoners with me who could have joined in a melee.
Situation, German Turn 5.
Tracey couldn’t rally for his turn, and when his MMG tried to pull back, another amazingly lucky shot from DD7 eliminated him with a 1KIA. With only one active squad left (though a decent change of getting the other on my turn), Tracey conceded.
Afterword
The main thing here is that the action really points up the need for good rout paths, and units to cover them. I got an insane number of prisoners for very cheap during all that. Then I had some very good rolls at the end to just close it down completely.
Looking at it, the Norwegian forces have a really tough job. The first thing is to deploy a squad for the extra coverage. The hills should be good to hold, since the alpine terrain makes it easy to duck out of sight. But they’re something of a trap, as the lack of rally terrain forces broken units off to the edges of the board. That suggests putting a couple of units on each board edge as harassment that cover each other and fall back fairly steadily. The K3 & K6 “?” are still a decent idea as the Germans have to take them seriously, and having one of them real, to run back after the first turn could well be worth it.
But the entire J to F area is really hard to defend with the amount of German firepower out there. The biggest Norwegian problem is that they only have two leaders. With three, I’d put one on each edge, and the main one in the center woods line. As it is, finding decent positions to fire from is hard, and yet you’ve got to delay the German advance so they have to sweat the details of keeping 13 building hexes.
Discussion ¬