
43 Into the Fray
After a little casting about, Patch and I ended up going for an ASL scenario with the Allied Minors, playing “Into the Fray” from Doomed Battalions. It’s the first day of the invasion of Poland, and Germans are attacking with 16 1st-line squads with decent leadership, and some armor (2xPz II plus 3x PSW 221) coming in on turn 3. The Poles initially defend with 13 green squads with poor leadership, a MMG and two ATR, but get 13 elite cavalry squads with good leadership on turn 1. Both sides have a minimal SAN of 2. The Germans win by either exiting 30 VP off the far edge of boards 4 and 33 in seven turns, or by getting 20 more CVP than the Poles do.
Patch took the Poles, and when I got his setup, I saw three main possibilities. The first one that occurred to me was to advance near the west edge of board 4. I had a grainfield and a couple of woods hexes for cover, and would presumably push back the Poles with their 6+1 leader. The real problem was that there was actually a fair amount of terrain to fall back on, and I’d be pushing him back ~4 hexes at a time. The second, and a fairly interesting one was up the center. There was a group of four squads with no leadership with only light cover. If I could isolate them on the flanks (using my MGs) I should be able to defeat them in detail. But the cavalry would be in front of me after that, and everyone else on my flanks….
I ended up with the third option: Up the east side of board 33. There’s a large grainfield to cover the initial advance, and an initial knot of defenders in a two hex house to deal with, and then a lot of open space with only an orchard for cover. Trying to exit that way certainly had it’s own problems, but I had a range advantage, especially over the initial green squads, and the wide open spaces would allow me to use that.
As expected, my first turn was reasonably quiet. Between the grain, and long range, Patch didn’t have a lot of shots, but an upper-level squad managed to pin my MMG squad as it started forward, delaying that part of my plan. A shot by his other upper-level squad at my 8-1-led stack with my other MMG generated a PTC that was ineffective. A couple of DFPh shots did nothing, and then… my first AFPh roll was ‘2’, which generated a 1MC broke his squad even after cowering, my second shot was a 1MC that broke another squad, and a later shot was a NMC that reduced a brokie to a HS (it would have disrupted the last squad in the building, if I hadn’t been going for a double-break). Patch routed out of the large building into the stone building adjacent.

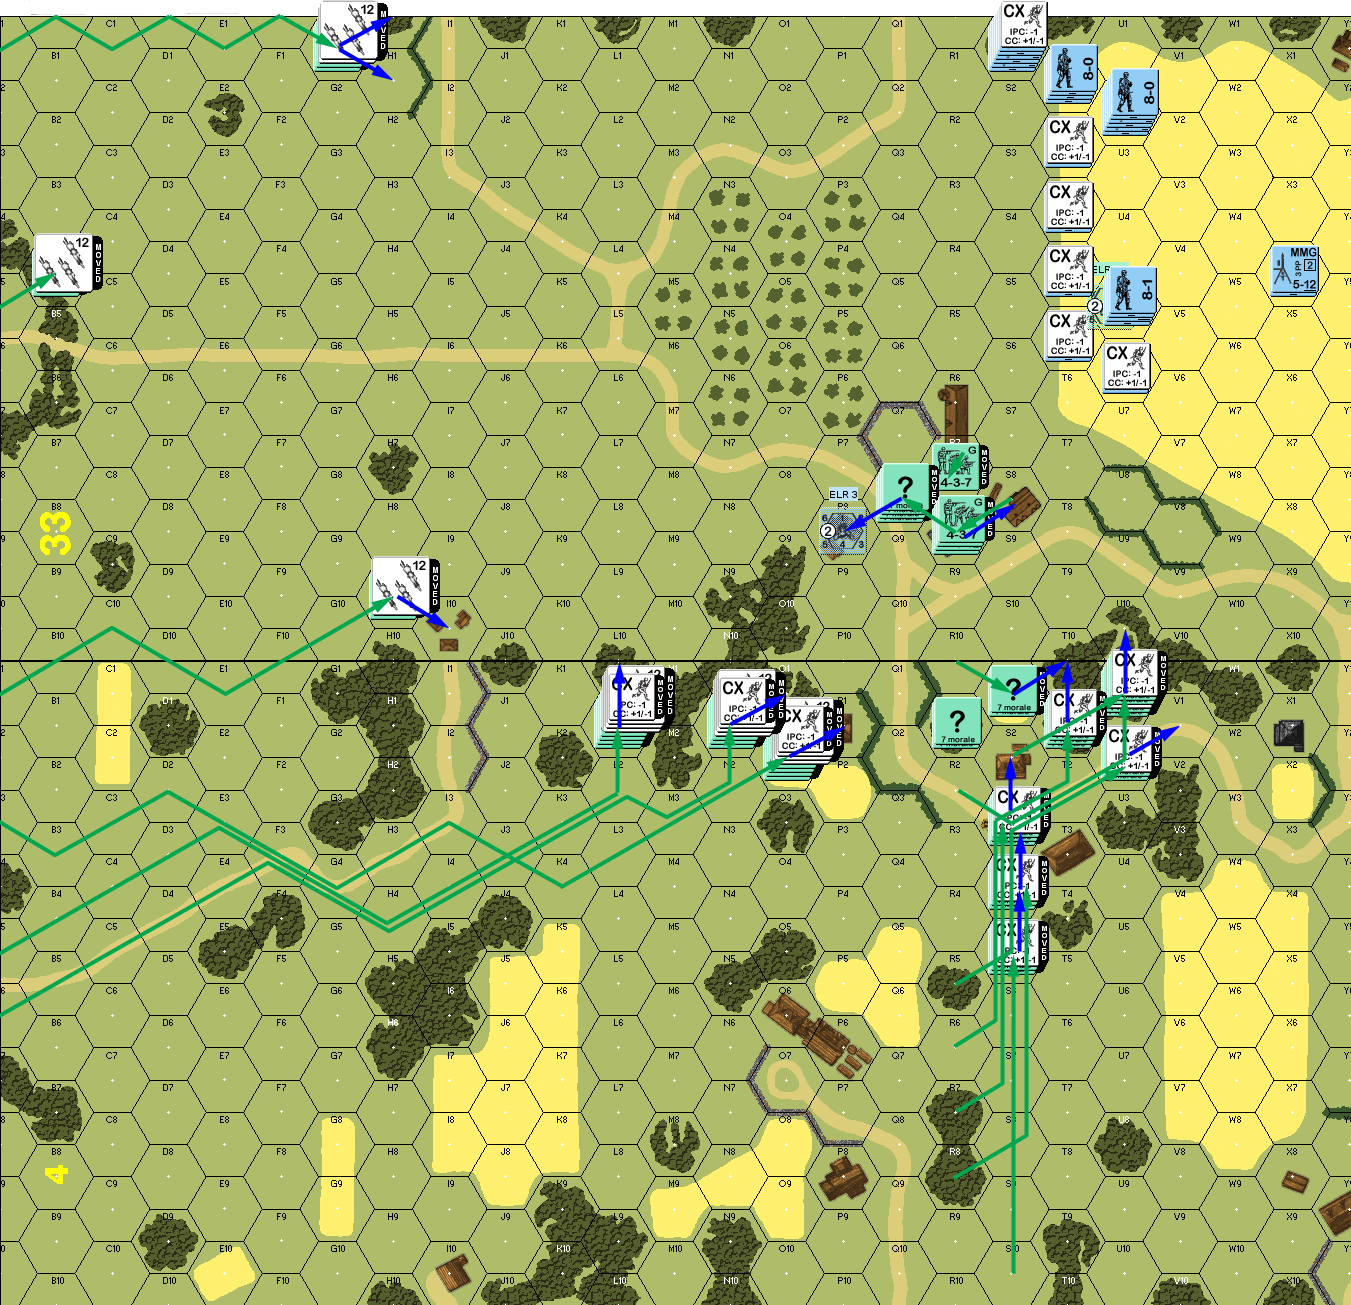
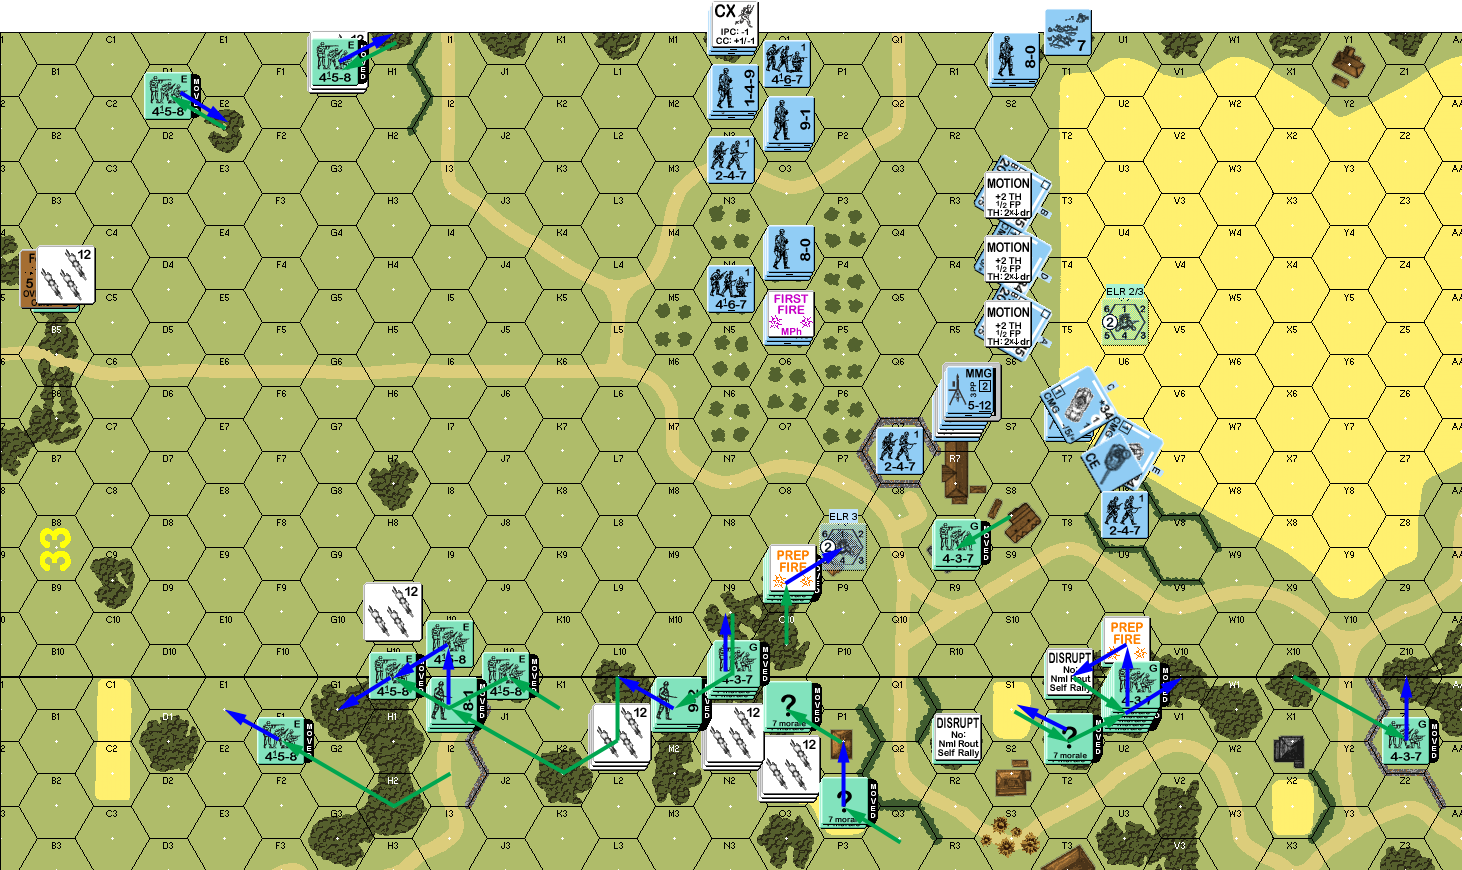
Situation, German Turn 1, showing the full board. North is to the left. The Poles had a two-hex strip to set up in….
Patch didn’t even try to rally his men, preferring concealment, while the bulk of the cavalry lined up near the board 4 road. Those ended up lining behind the woods at the board join from L to U, while a squad secured the far end of the board, and two more headed for the H1 hedgeline. The group around 33R7 skulked, but another ‘3’ in DFPh broke the one squad I could easily see. Return fire did nothing, and Patch left the squad in place to block some movement on my turn. After some hesitation, he parked his main stack from building R6 in building P8, though he seriously considered going for the wall around Q7.
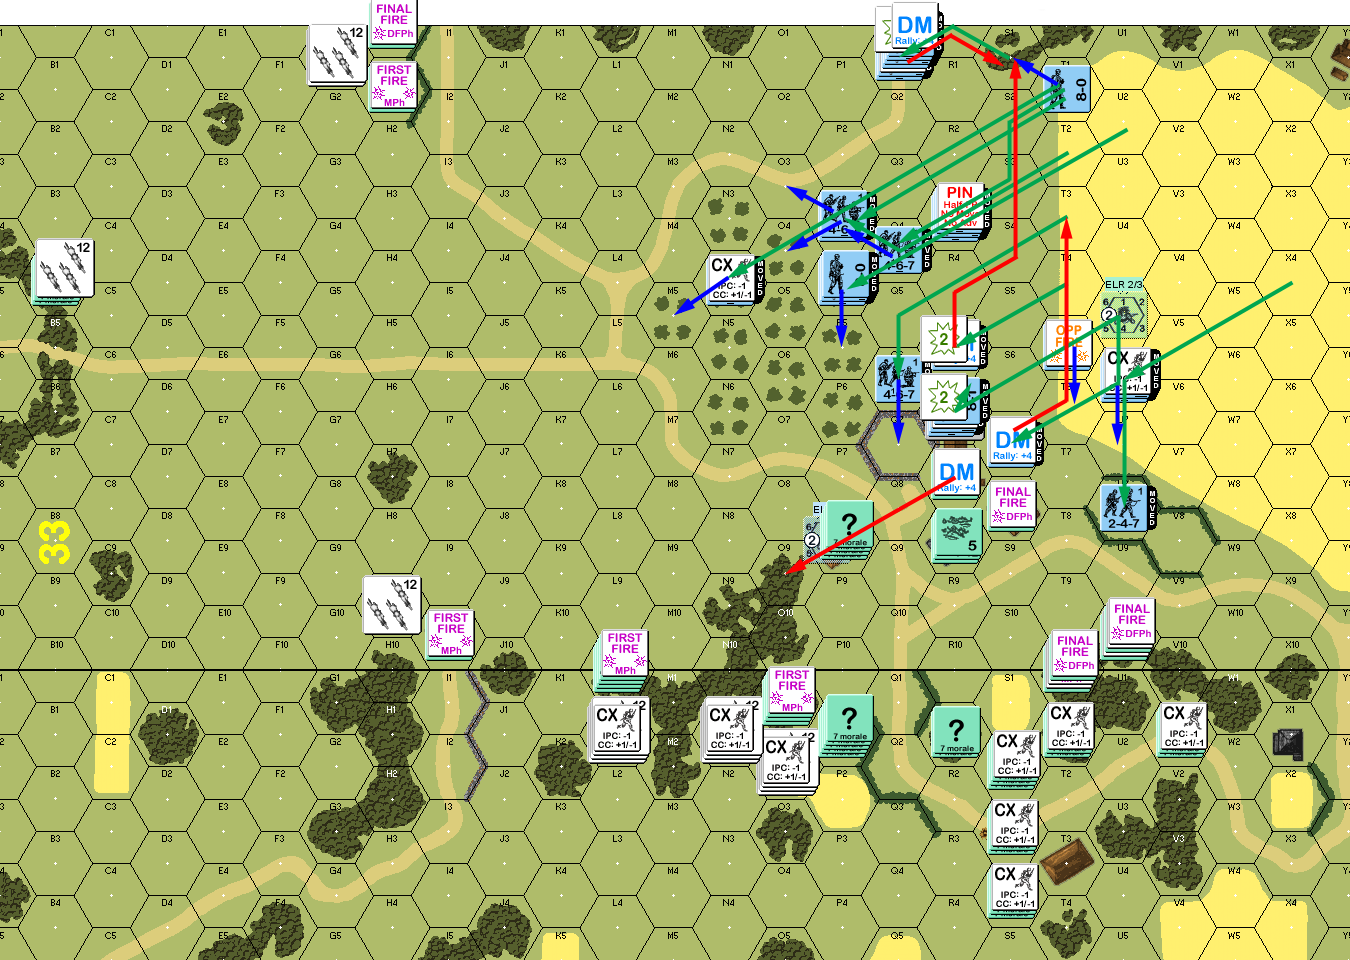
Situation, Polish Turn 1. We forgot to enter the bulk of the cavalry concealed….
I declared Op Fire with 33T5 so the CX could come off, and started a move on the survivors in S8. The initial move into R6 had mixed results: two squads cowered firing on him, but the third broke my squad. I moved a squad adjacent to S8, but they ELRed even when the squad cowered on SFF. With one leader in the area to rally folks, I settled for moving into R6h1 at that point, but that exposed me to further fire that pinned the MMG squad.
The rest of the line advanced into the orchard, with some attrition when a stack of elites led by the 8-1 pinned two of my squads on a PTC. My advance along the east edge halted when a NMC broke a squad and pinned another. Better, his MMG malfunctioned in DFPh. My AFPh did nothing, with lots of high rolls and cowering.
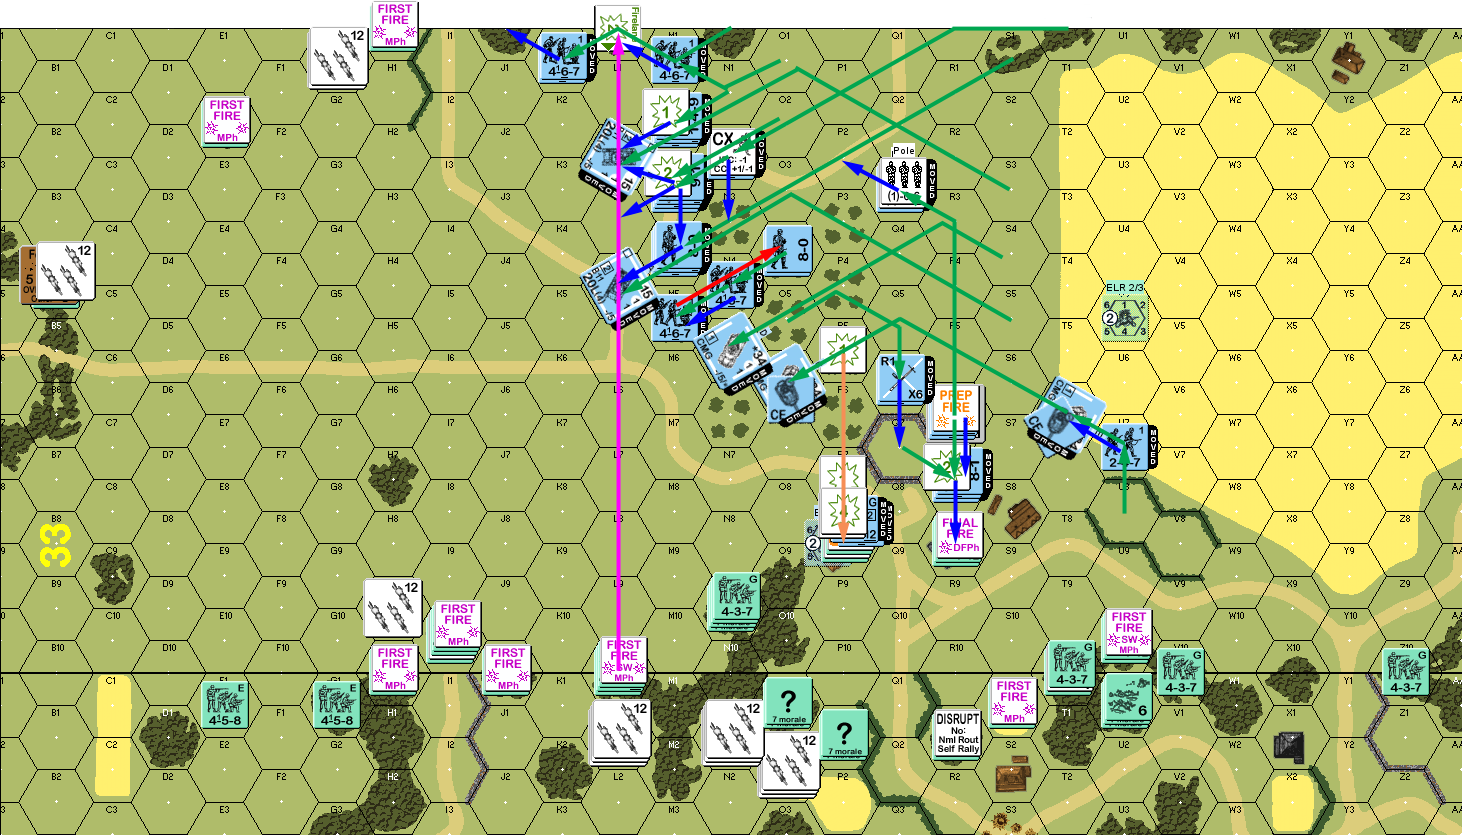
Situation, German Turn 2.
Patch got his MMG back immediately, but didn’t manage self-rally, but I rallied a squad, generating a Hero in the process. Patch successfully entrenched 33B4, and fired with several units, with good rolls from me avoiding several good shots, but M5 and both squads in R3 broke. One of the squads near H1 pulled back to occupy E2, while much of the southern end sidled over a little, and a couple squads headed back north as Patch realized he needed more men around 33I10. I got a ‘2’ on my first DFPh shot, but S8 passed the 1MC, soon after I got a ‘3’ against T10 to break a squad and Disrupt the second. The next shot malfunctioned a LMG. A later ‘3’ revealed a squad and Disrupted it. I also pinned S8, but that was not the most helpful result at that point….
Situation, Polish Turn 2.
My armor entered at this point, and the main jobs for it were to keep the Poles from collapsing my west flank around R6, providing cover for my advance, and providing the bulk of my Exit VP. This meant that they needed to hurry this turn, but naturally the main road went through Polish positions, so the ACs wouldn’t get that far this turn. Nevertheless, they were positioned on the road so they could get some distance before turning cross-country, while the Pz IIs entered further east to catch up to the main advance. I got two squads back in rally, leaving me with one broken squad in each of 33S1 and T0. Patch missed his two rally attempts.
Prep pinned the squad in S8, however, the easy move at them from T6 still broke to fire from his main line, denying me a chance to get them in CC. I didn’t press very hard on the east side, mostly waiting for the armor to catch up, but Patch managed to break the squad in N4 thanks to the 9-2 directing the MMG. Q7 AMed adjacent to S8, and had no trouble. My AFPh was ineffective other than pinning 33T10 with a shot from an AC. The two Polish squads in R8 couldn’t route without Interdiction, and I accepted their surrender, splitting off a HS of guards who faded back.
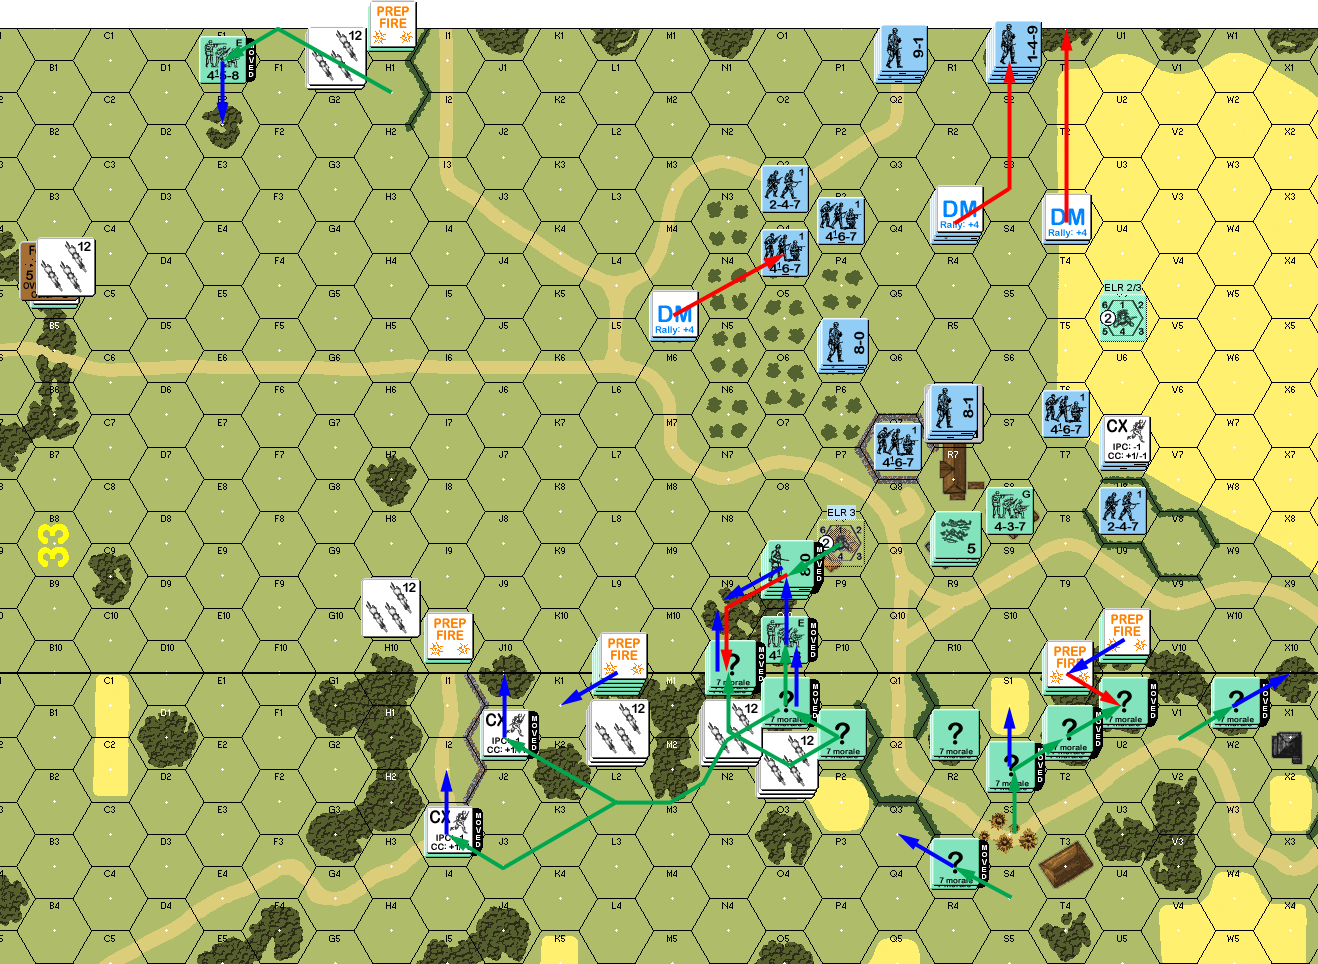
Situation, German Turn 3.
Patch’s one rally failed (he had two squads that might have attempted to self-rally, but they were Disrupted), but I got two squads back. He tried a couple Prep shots at relatively exposed units, but didn’t get a result. Patch skulked and continued to rearrange his line a bit to find better firing positions across my advance. Both us rolled high for our fire, punctuated by a couple of ‘3’s from me on blocked shots.
Situation, Polish Turn 3.
I rallied two out of three squads for my turn, and Patch recovered his ATR. My MMG in R6h1 got several shots off in Prep, but only managed to pin one of two squads in P8. The other MMG repositioned from south of the R6 building to north of it in the orchard under cover of Armored Assault… or started to. Right at the end of their planned move a shot from P8 sent them berserk, and despite a lot of fire, they successfully charged the building.
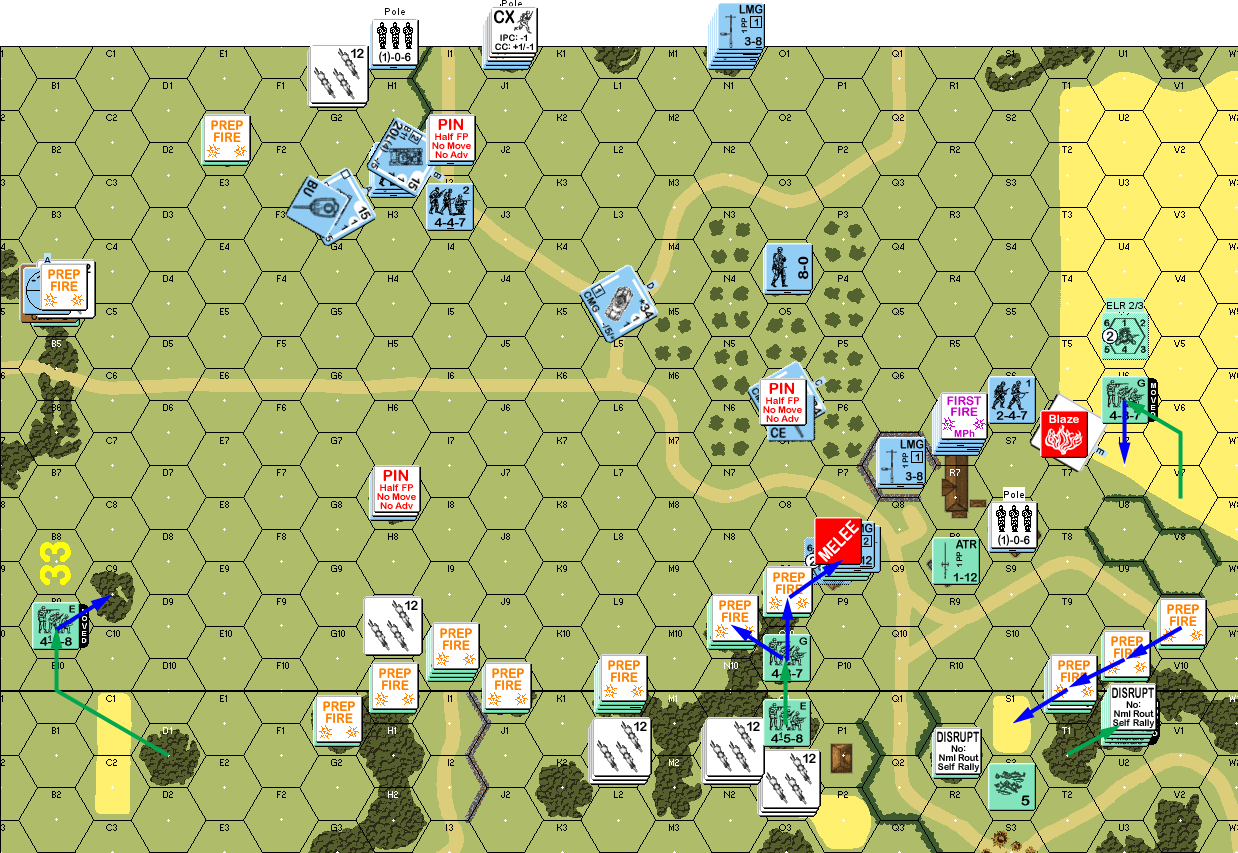
As I moved up my first squads in the main advance, Patch laid down a firelane with his MMG. I hadn’t really thought about it, so I got a second squad past it through woods, and then lined up everyone else before it, while parking the Pz IIs on it to provide cover during his turn, and allow Armored Assault next turn. The ATR in U10 also took a shot as the first AC started up, but thankfully the shot bounced off the turret. Other than that, Patch had a lot of high rolls, which made things noticeably easier. I also sent one squad back south towards R6 to help out there since the MMG squad that was supposed to be nearby wasn’t going to be doing much of anything….
Patch continued getting high rolls, but still managed to break my new squad in M5. Fire from my berserk squad pinned the second squad they were after, but no more. I managed a good shot at H0, and broke his squad there, leaving only two squads actually in front of my advance, both of which were still at long range. I advanced into CC in 33R8 with 1 1/2 squads plus the 8-1, and both that and the berserk CC in P8 failed to get any results.
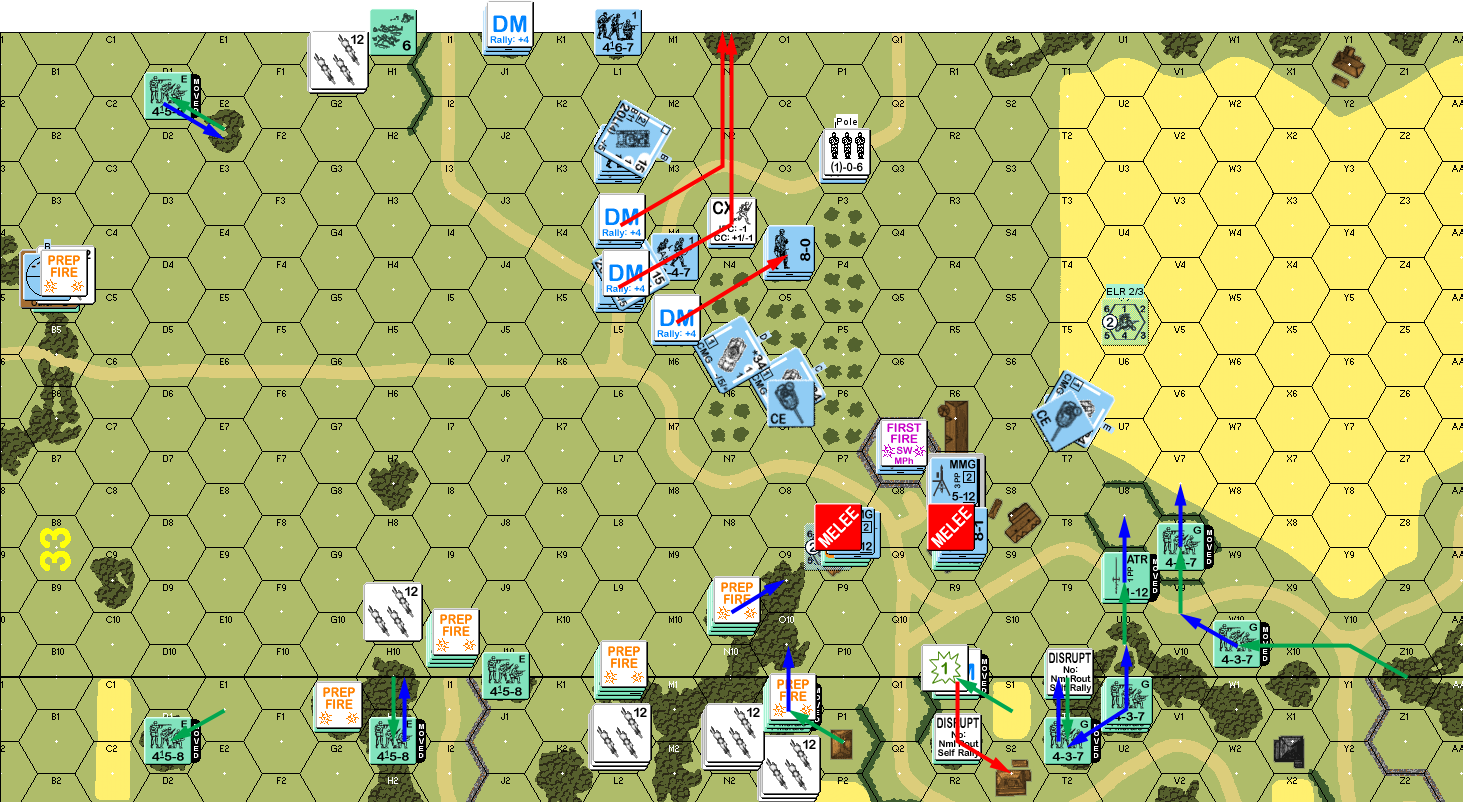
Situation, German Turn 4.
Patch got one squad back for his turn, and I finally repaired the LMG that had broken a couple turns back, as well as rallying one of my two broken squads. He did a decent amount of Prep, and broke the squads in M5 and L3, one in J0, and broke the leader in L4 as well as reducing the squad with him on a ’12’ MC. During MPh, he moved up on the R6 area and the nearby AC, but one squad wandered into view of Q8, who got him with a K/1.
My DFPh did nothing of note, and in AFPh, Patch’s ATR bounced another shot off the turret of my AC. The big melee in P8 continued without result, but Patch eliminated my HS in R8 while I captured his squad.
Situation, Polish Turn 4.
I didn’t manage either of my self-rallies, but I did get one squad back in O4 for my turn 5. I tried a few shots in Prep, but couldn’t get any results, especially against the ATR squad in U8. I seriously considered abandoning my plan at this point. CVP were 2 each, but I held three squads as prisoners, and it was likely that I could take the squad in H0 prisoner. If I could keep the CVP score even (which was slightly unlikely with an AC under threat, and the lopsided Melee in P8), then one more squad of prisoners would create the 20 CVP gap I needed for victory that way. (It is worth noting at this point that the final exception in A26.222 says I keep the double CVP if enemy fire kills prisoners, so I don’t even have to keep them all that safe.)
This idea would have sent a bunch of men (including the other ACs) back south to try and smash his green troops, and hopefully give me chances at getting adjacent to the couple of Disrupted squads down there so they’d surrender to me. But, not only would I have to redeploy, but I had to take chances on casualties. So I decided to stick with the exit plan. Even if he got the AC in T6, I should have little trouble exiting the rest of my vehicles for 20 EVP, meaning I just needed to exit 10, possibly including a captured squad from H0. I just needed to get rid of E2 and B4.
My first few moves went very well, with Patch expending a fair amount of firepower before finally pinning a squad. One of the worst moments was a 1MC on my Armored Assault, which killed my Hero with a ’12’ but left the 9-1 and squad intact. A later move also drew a K/1 to break the leftover HS in K3, but the rest of my available infantry was already in position. DFPh went better, with the ATR burning my AC, other fire pinning the other one, and he broke the MMG squad in 33R7h1. A little late, my AFPh Disrupted his ATR squad, but couldn’t accomplish anything else.
I took the surrender of H0, and then advanced into their position, while everyone else in the area got ready to pound E2, which I was going to have to go right by next turn. In P8, the Melee continued without result….
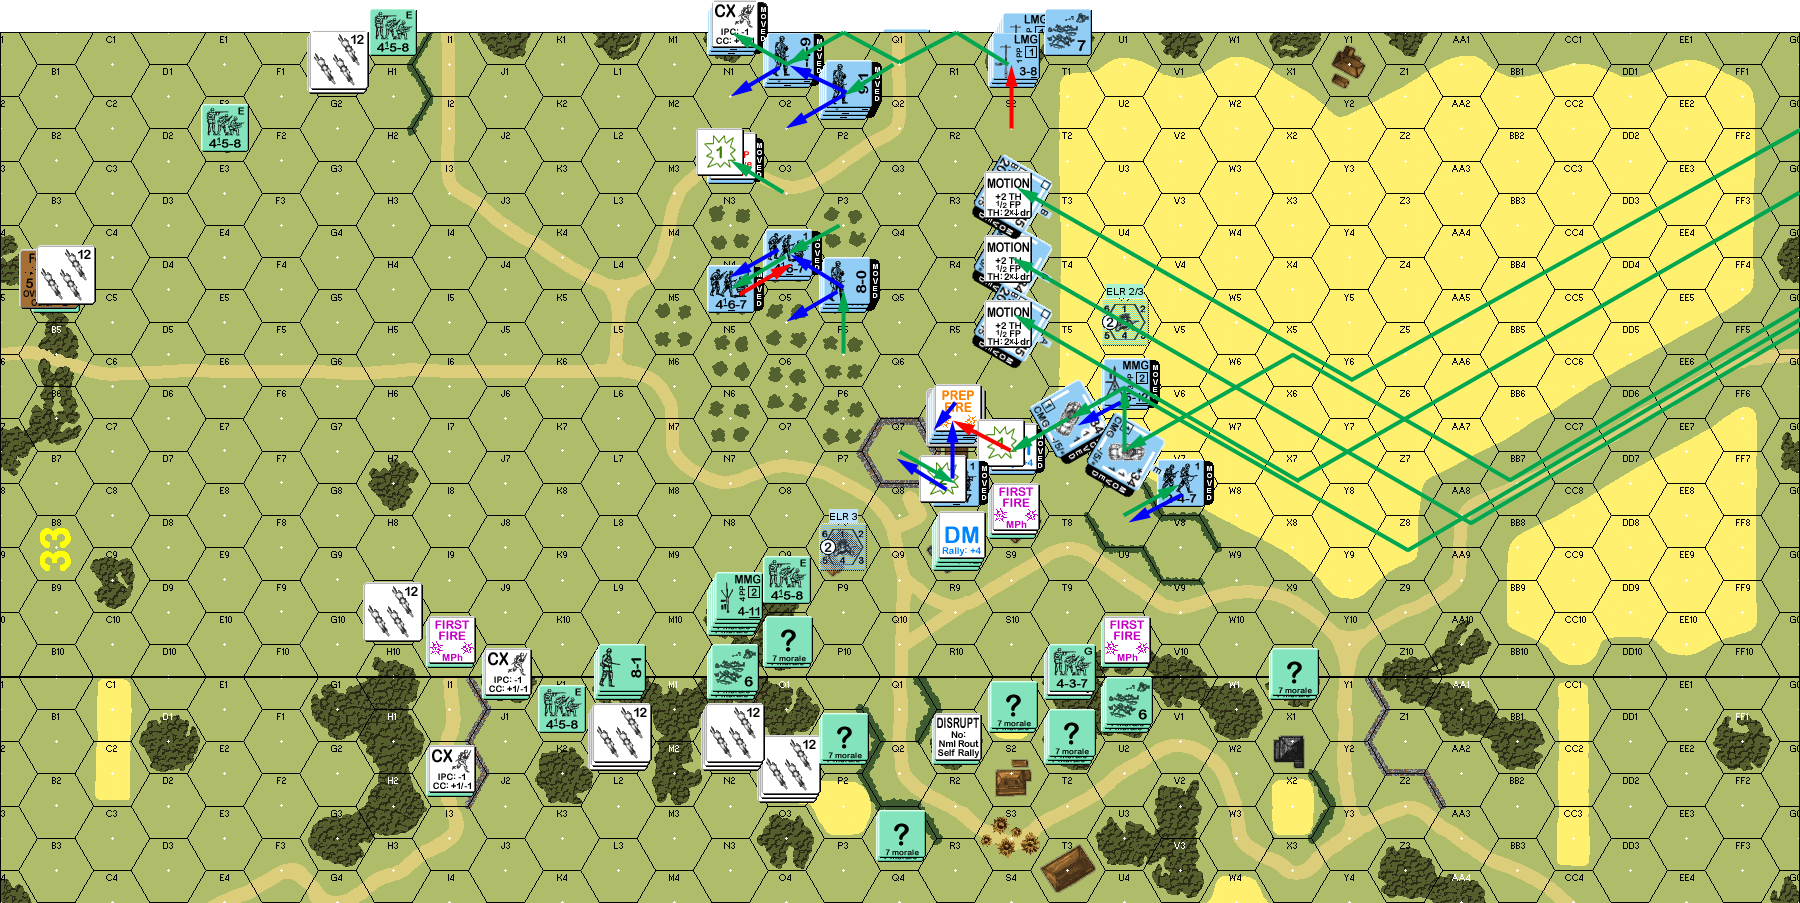
Situation, German Turn 5.
The only result for Patch’s RPh was my squad in O4 rallying. Patch Prepped with most of his line, but poor rolls kept him from doing more than pinning H7, I2 and the AC in O6. Naturally, there wasn’t a lot for me to fire at during MPh, and DFPh was largely a bust. However, I’d been firing at P8 without effect since the Melee began, since one squad vs two wasn’t going to work, and my ML 10 zerkies would have an advantage under fire. I finally got a 1MC which broke one squad and reduced the other on a ’12’ while my squad was untouched.
Patch reinforced the Melee with a green squad, but my Berserk squad couldn’t take the easy road of trying to capture them. Instead, I killed the withdrawing broken squad, letting the HS go, while his new squad continued to get no result, leaving us with a 1:1 Melee, and bringing CVP to 5 to 8.
Situation, Polish Turn 5.
My sixth turn began poorly as my broken leader in N0 wounded in self-rally. One of the squads there did self-rally, and the MMG squad in R6 rallied, as did Patch’s ATR squad in 4U1. Despite some good progress early on, I now had to really watch my distance this turn to make sure units had a shot at exiting on turn 7. Still, I generally had the tools I needed to tie up the close-by units, just leaving long-range fire as a worry.
First, a Pz II started, and Bypassed E2. When it Stopped there Patch tried CCRF, but failed the PAATC. The tank successfully used sD to smoke in the hex, and then moved out to park in B3, to tie up SFF options for the entrenched squad in B4. I then moved up the squad that had taken the prisoners in H0, and fire from B4 got a K/1 which tied (6-6) to take out a HS from both. The remaining prisoners were fine, but my HS broke. Then my HS that had the early two squads of prisoners moved up, and Patch got another K/1, which selected my HS. Not only did I lose the prisoners, but one HS of them re-armed (though after losing a squad by both of them CRing on failed 1MCs).
The next squad moved adjacent to them, with the hope of recapturing in CC, but the new green HS got a K/1 to knock out a HS and pin the remaining half. However, for the first time in a game that had seen a fair number of ‘2’s (mostly from me), the Sniper activated… and went off in about the only direction I didn’t want to DM a Disrupted squad. My one recovered squad moved up with the goal of advancing into the same location as my 8-0, which would give him just enough movement to advance off next turn, but another K/1 broke the remaining HS.
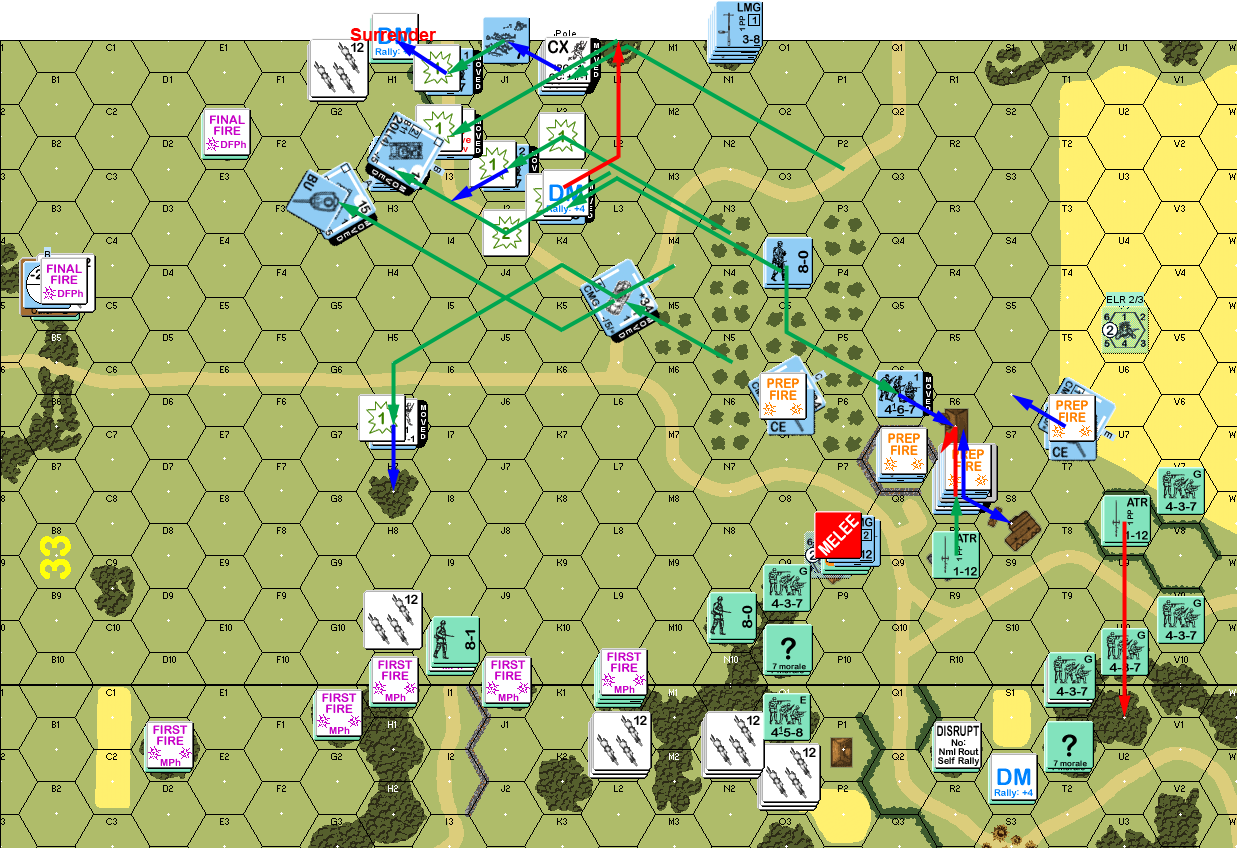
The good news is that Patch was rapidly running out of options, and when I moved my 2nd Line squad adjacent to the newly-freed Poles, he only had one shot, which they survived. The further AC moved up to the area that everything was happening in, but an attempt to leave smoke in K5 failed. The 8-0 and final squad from the orchard moved up, but both broke to a 2MC. I finally moved up the second Pz II in Armored Assault with my 9-1 and squad, but 1KIA from his MMG got the squad and broke the leader.

Final moves, German Turn 6.
Afterword
Looking things over in detail, at this point the absolute best I could manage was 27 EVP. I still had a decent shot at recapturing G1 in CC, and that was barely in range for exit, which would be 6 EVP. If the HS in H7 advanced into G8, and survived, he might try to run off on 7 for another. The four remaining vehicles would probably exit for 20.
For most of the game, my luck had been notably better than Patch’s. After one session we checked the stats from VASL, and Patch had a average DR just under 8, while my average was just over 6. However, Patch got the bulk of his good luck when he really needed it. Anything less than that string of K/1 results would probably have resulted in me having a fairly strong position to exit 10 VP + 4 vehicles on turn 7.
Among things that could have gone very differently is if the AC in T6 had managed to survive being menaced by the ATR, that was another 5 EVP. The Melee in P8 should have ended ages ago, and most likely awarded Patch a second MMG.
Patch had figured I’d go for the CVP early on. Rush the building (as I was in the middle of trying to do), and then gobble up more green squads for victory. That’s why he ended up strung out on the board 4 edge, trying to pick me off at long range. I just don’t like goals that come down to getting the dice to give me kills, so I usually avoid CVP options, though I did nearly redirect for it here. I had my moved mentally sketched out before I decided against it.
At any rate, it played out as a really tense scenario that both of us enjoyed. Good going Patch, you used what you had very well!
Discussion ¬