
A4 Beyond the Blue Beach
A while back, I proposed the first Annual scenario to have not been reprinted as my next game with Tom Arnold, but we went with the much shorter 195 “Rocket’s Red Glare” instead, as there was limited time before he was unavailable for a few months. We went back to A4 “Beyond the Blue Beach” after the break. With its record on ROAR, the original intent was to play it with the American balance, but that plan got lost in the delays.
Tom took the Americans, who are defending the Salerno landings against a German counterattack. They get fourteen first-line squads with pairs of HMG, MMG, and MTR, and four BAZ 43, with two 105 ART arriving by truck on the first turn. The Germans have six first-line squads with a HMG, two MMG, and three LMG (one MG per squad!), with four Pz IV Hs with an AL entering on turn 1. The Germans have 10 turns in which to exit two tanks off the opposite edge (or exit one and generate more CVP than the Americans). The area is three boards, with Americans setting up in the west on board 19, and the Germans setting up in the east on board 4. The catch is that any time a tank is eliminated, the AL must make a TC, or the surviving tanks must go back to board 4 to regroup before they can try again. Presumably the long time limit assumes that there may be one or two false starts on the German offensive.
The main American problem is that they have to guard an entire long board edge. They can concentrate once the Germans are underway, but have to be wary of the tanks using their good speed to try to just get around them. That and the fact that the ART has no AP and HEAT 6 means that killing tanks is going to be hard. I initially looked at advancing near the center, where board 16 has some walls and buildings to take as cover before pushing into a thin line of woods near the board 16/19 join. But Tom’s main defense seemed to be in that area (and if he’d had the American balance of three foxholes, where I’d expect some of them to be), so I eventually went for a north-edge approach. There was less immediate cover, but some woods and brush between his setup and mine, and I could use the long Y/Z wall to cut off LOS to my advance from most of the rest of the board. Both sides get some “?”, and I used mine to create a Dummy as well as cover everyone, but then I never had anything to do with the Dummy with all the open ground around.
I sent a squad and two HS forward as fast as I could, and sent a MMG squad forward, but two squads and the lesser of my two leaders stayed back to see how it went. On the edge of the board, the HMG and 8-1 moved forward to a woods half-hex, where it could see through some of the gap as Tom moved up. This last move was the only one to draw fire, a range 16 MMG shot that did nothing. The tanks entered as a group, and it was only after I started that I realized I should probably have set up CE to gain some distance from the initial road; I did put the last one CE so he could catch up (going BU during APh). The first tank halted to provide covering fire, while the others stayed in Motion to gain some distance (the AL was in the second tank entered, who ended up in the middle of the Motion group).
Tom’s DFPh had one effect: he malfunctioned the 60mm MTR in 19CC5 on its second shot; it had been trying to shell the stopped tank in 16AA10 (which could have turned into a problem, immobilizing tanks is a mission kill in this scenario with only four of them).
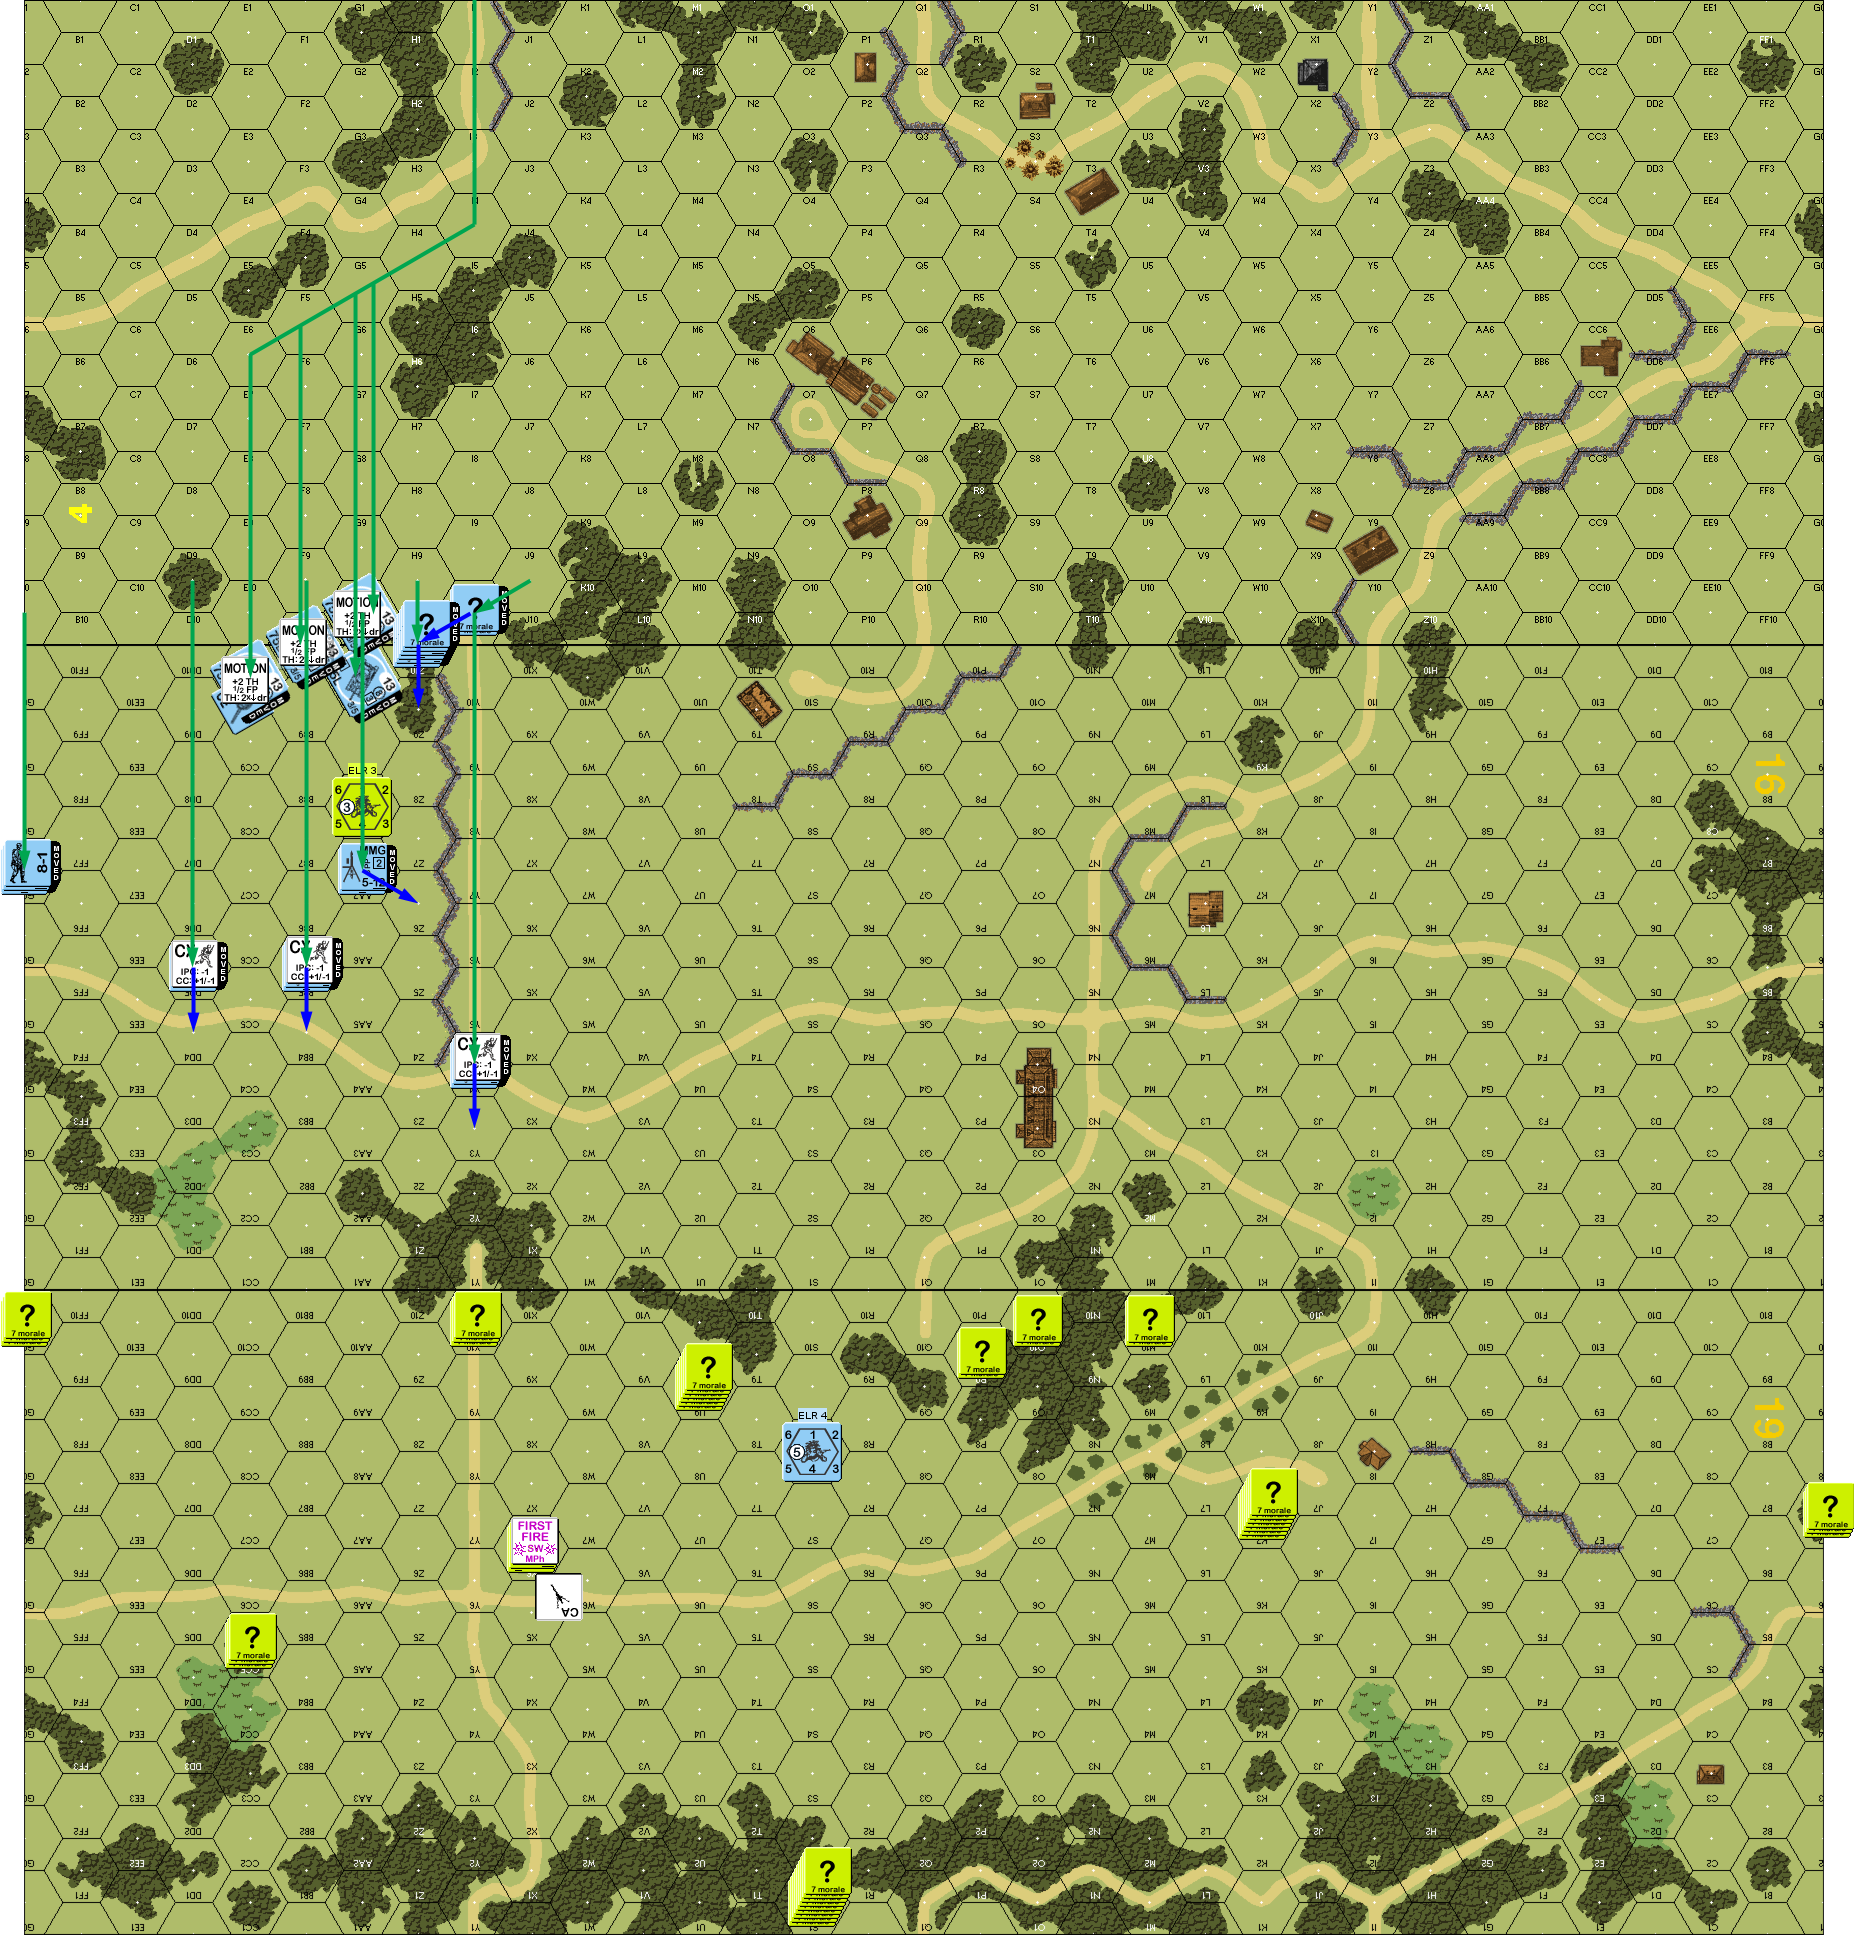
Situation, German Turn 1, showing the full board. North is to the left.
Tom had shuffled some equipment during my RPh, and this time tried to entrench with two squads in 19U9, succeeding with one of them (this was when I started remembering the American balance, but we were a bit too far in by now). However, the malfunctioned MTR was eliminated. Tom started with entering his trucks, and that’s when things went really bad. He entered in the same area I was in, and crossed my HMG’s LOS. A range-19 shot generated a ‘2’ to burn the first truck and eliminate the Gun. The second one entered and almost immediately stopped to unload adjacent to the wreck, and the HMG was unable to affect it before he unloaded (a second hex of brush in the way certainly didn’t hurt). (Looking at the logs, this was the original plan, with the first truck headed cross-country; I assume it was going to start setting up the Gun so as to flank my advance later.)
The rest of movement was the expected reshuffling now that he knew where I was going. Well, mostly. A couple counters split off his main concealed reserve at the edge of the board to head away from my advance, while the bulk of it moved to be more directly in the way. Also, he reshuffled a bit in the middle woods, but did not immediately try to get into building 16O3 (I’d expect him to get someone into h1 to be able to see past the wall). If I’d been paying a bit more attention, I would have noticed the slow movement of 19A7 indicating that’s where one of the HMGs was.
The HMG had kept rate during the MPh, and with nothing else moving through its field of fire, it returned its attention to the remaining Gun in DFPh, getting a ‘4’ to immobilize the truck and break the crew on a NMC.
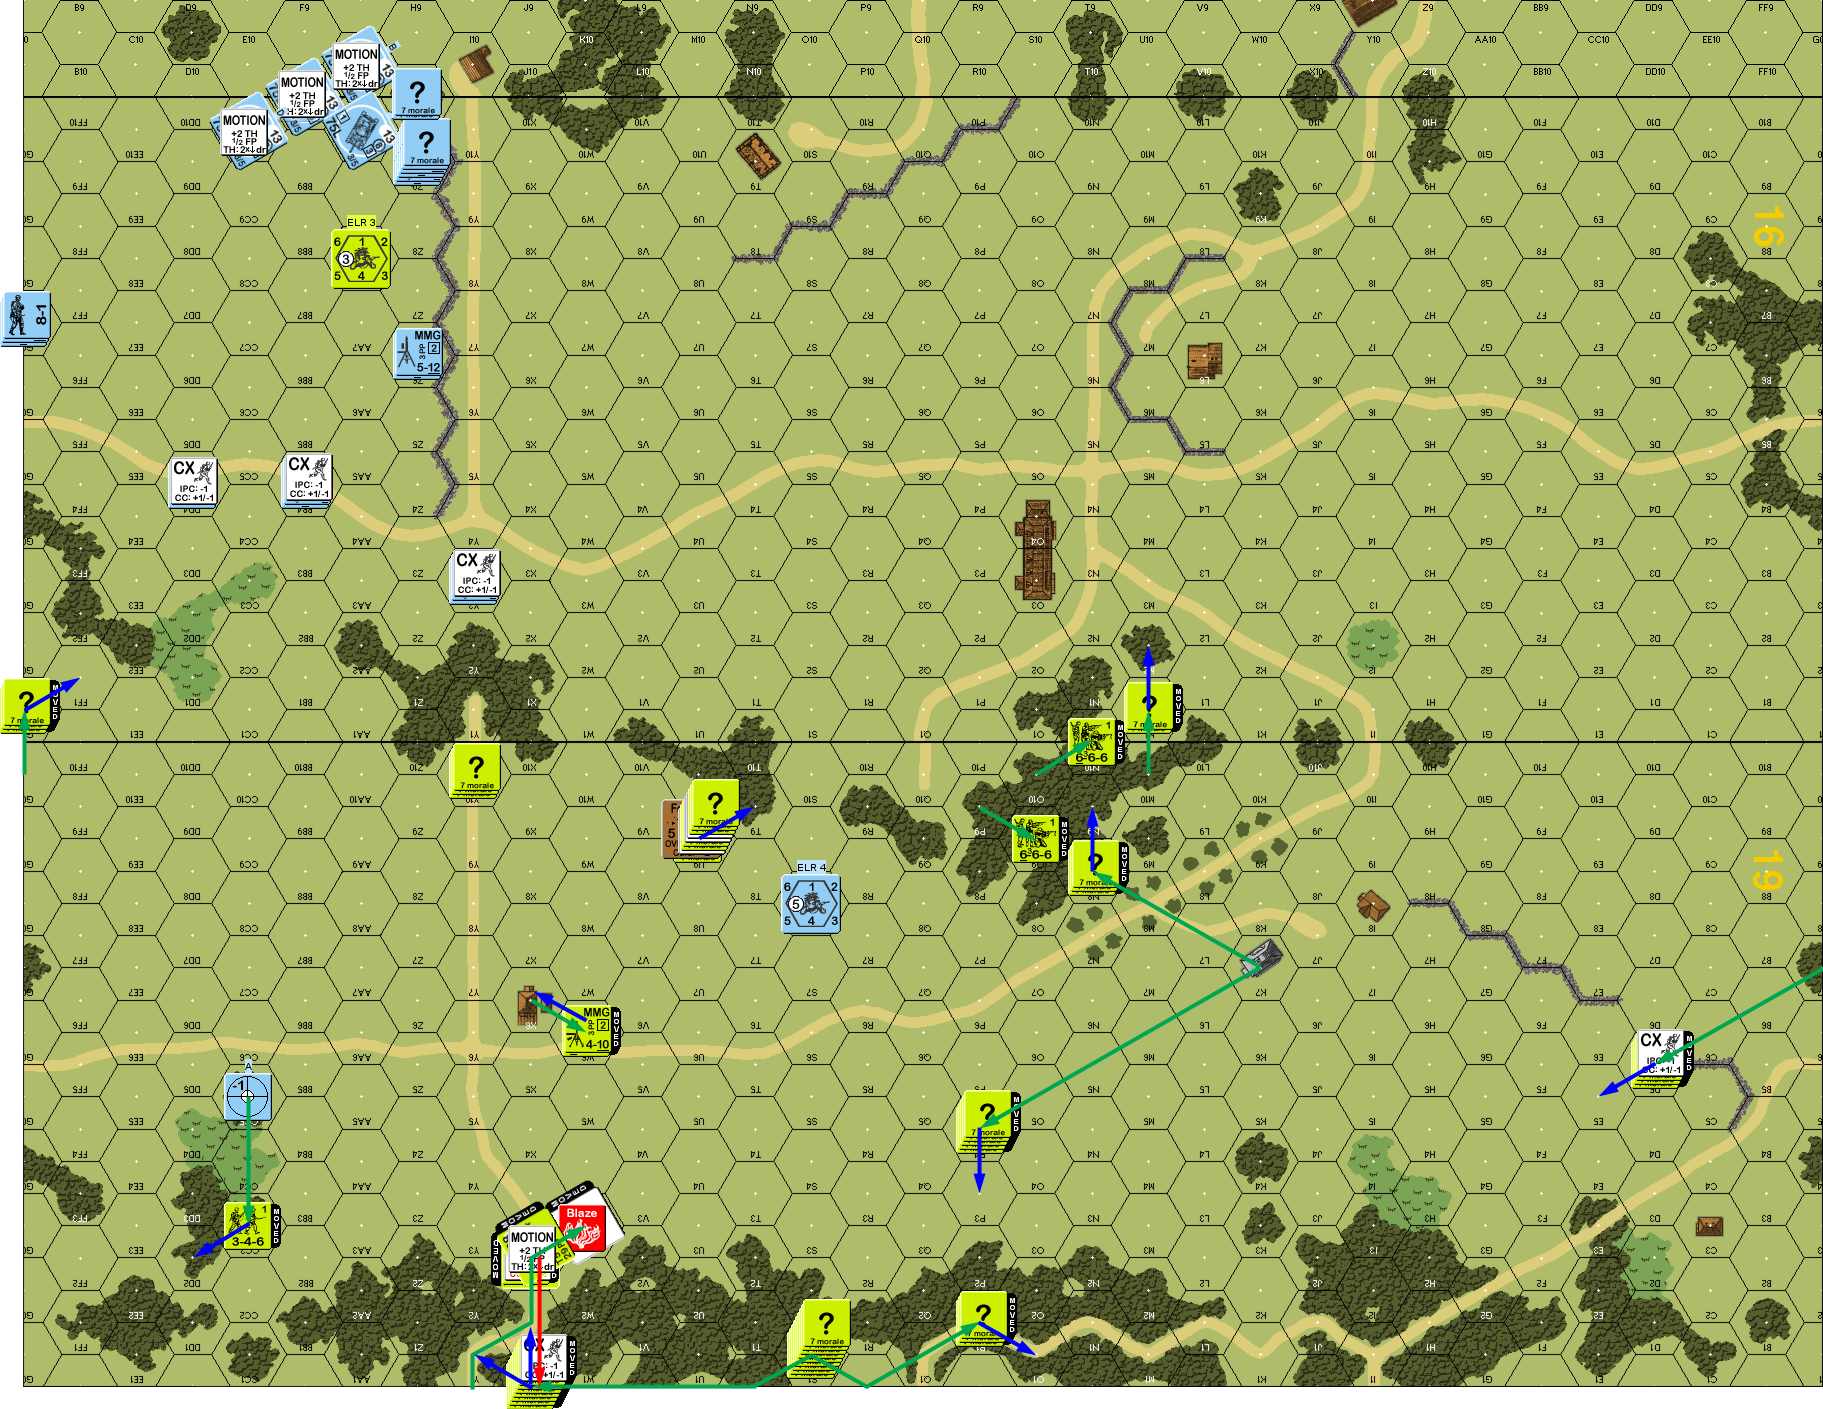
Situation, American Turn 1.
I had no activity for my turn 2 RPh, but the American crew immediately rallied. My HMG turned its attention to the MMG in 19X6, and pinned the squad. The major goal this time was simply to get into the brush and woods in front of me, and start trying to the the nearby defenders bad options while the Pz IVs moved up. With ten turns, my general plan was a slow advance to keep my infantry cover in place until I could create an opening that the tanks might get through in one turn. First, I had to get within a turn’s movement of the board edge.
The main iffy part was getting into the 16DD2 brush, but a shot from the pinned MMG did nothing. My main group moved up out of LOS of everyone who was left, and the Pz IVs parked right in front of them so they could advance into their locations and use Armored Assault next turn. One Pz IV moved up to the wall, so it could fire on anyone who started trying to flank the advance.
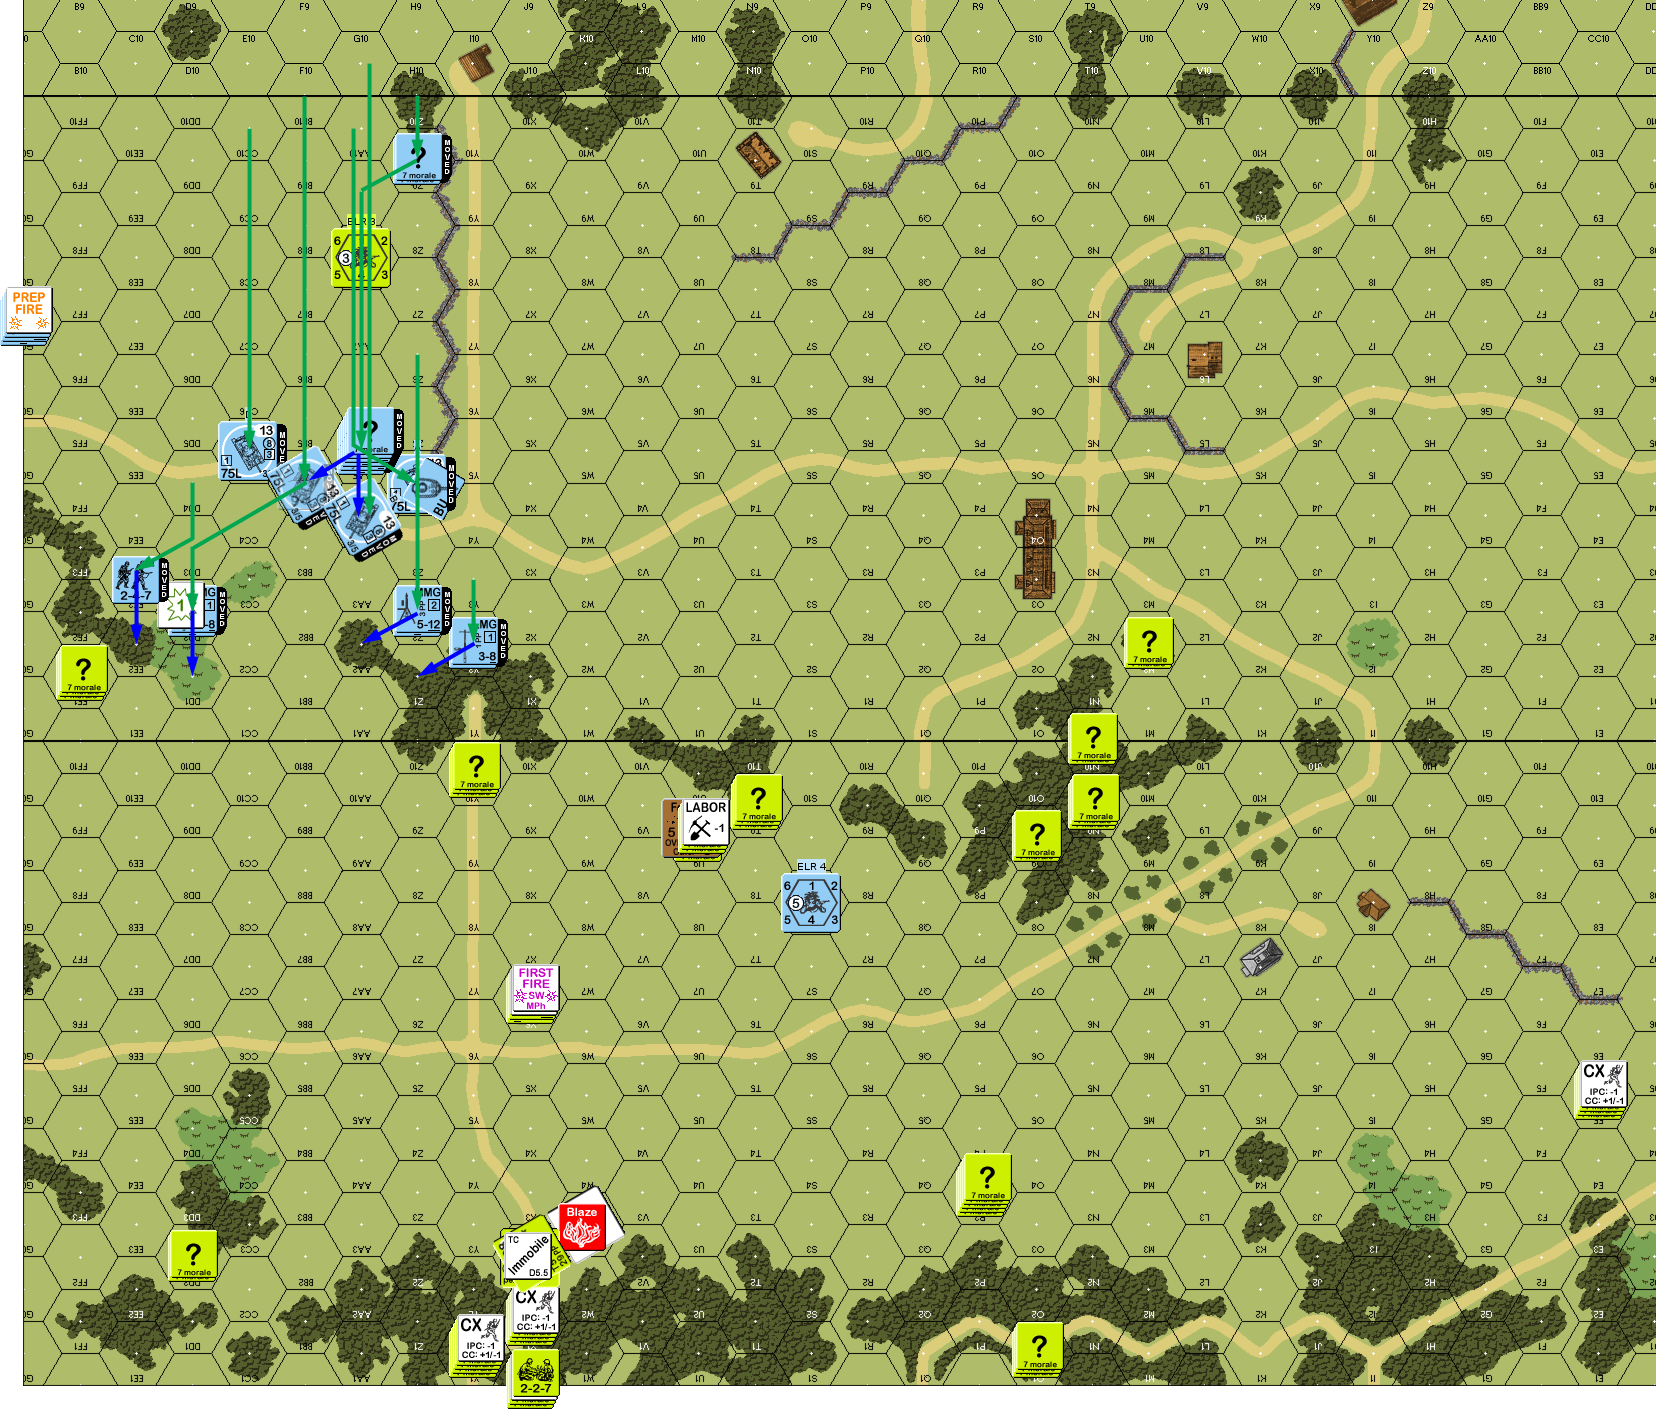
Situation, German Turn 2.
My main worry with my advance on the north flank was that Tom would send his unit(s) there into the 16FF3 woods and force me to deal with him before my HMG could move. Sure, he’d lose him, but it could really throw off my advance. Instead, he fired on the LMG squad in 16DD1 and pinned it (revealing that the other unit was a Dummy, even though he didn’t have to). An HMG in 19P3 revealed itself and broke 16DD1 in two shots, and took two more at the HS in 16EE2 before finally running out of rate.
Tom started his MPh by having the MMG squad in 19X6 throw smoke grenades into Y6 (if he’d done that last turn, it might have gone much differently, though I imagine he wasn’t really expecting that long-distance shot; also with the MMG in Y6 I probably would have shot it instead of the crew in DFPh). Tom continued maneuvering, reshuffling units in 19U9, and finally putting someone near building O3 (but not able to go into the upper level).
The crew moved back to the Gun; presumably Tom wanted them there now to unlimber during AFPh instead of during his DFPh, but a shot from the northernmost tank hit (at first I thought it was a CH on a Final ‘2’, but then remembered the Smoke, which turned it into a Final ‘5’), and broke the crew again, leaving 1 Residual (it would have been an 8 without the smoke; I don’t think I’ve ever seen more than 6). Tom then moved a BAZ squad into the hex, and took a NMC on the resid, which broke him to a 2nd-line HS on a ’12’. Tom gave up at that point.
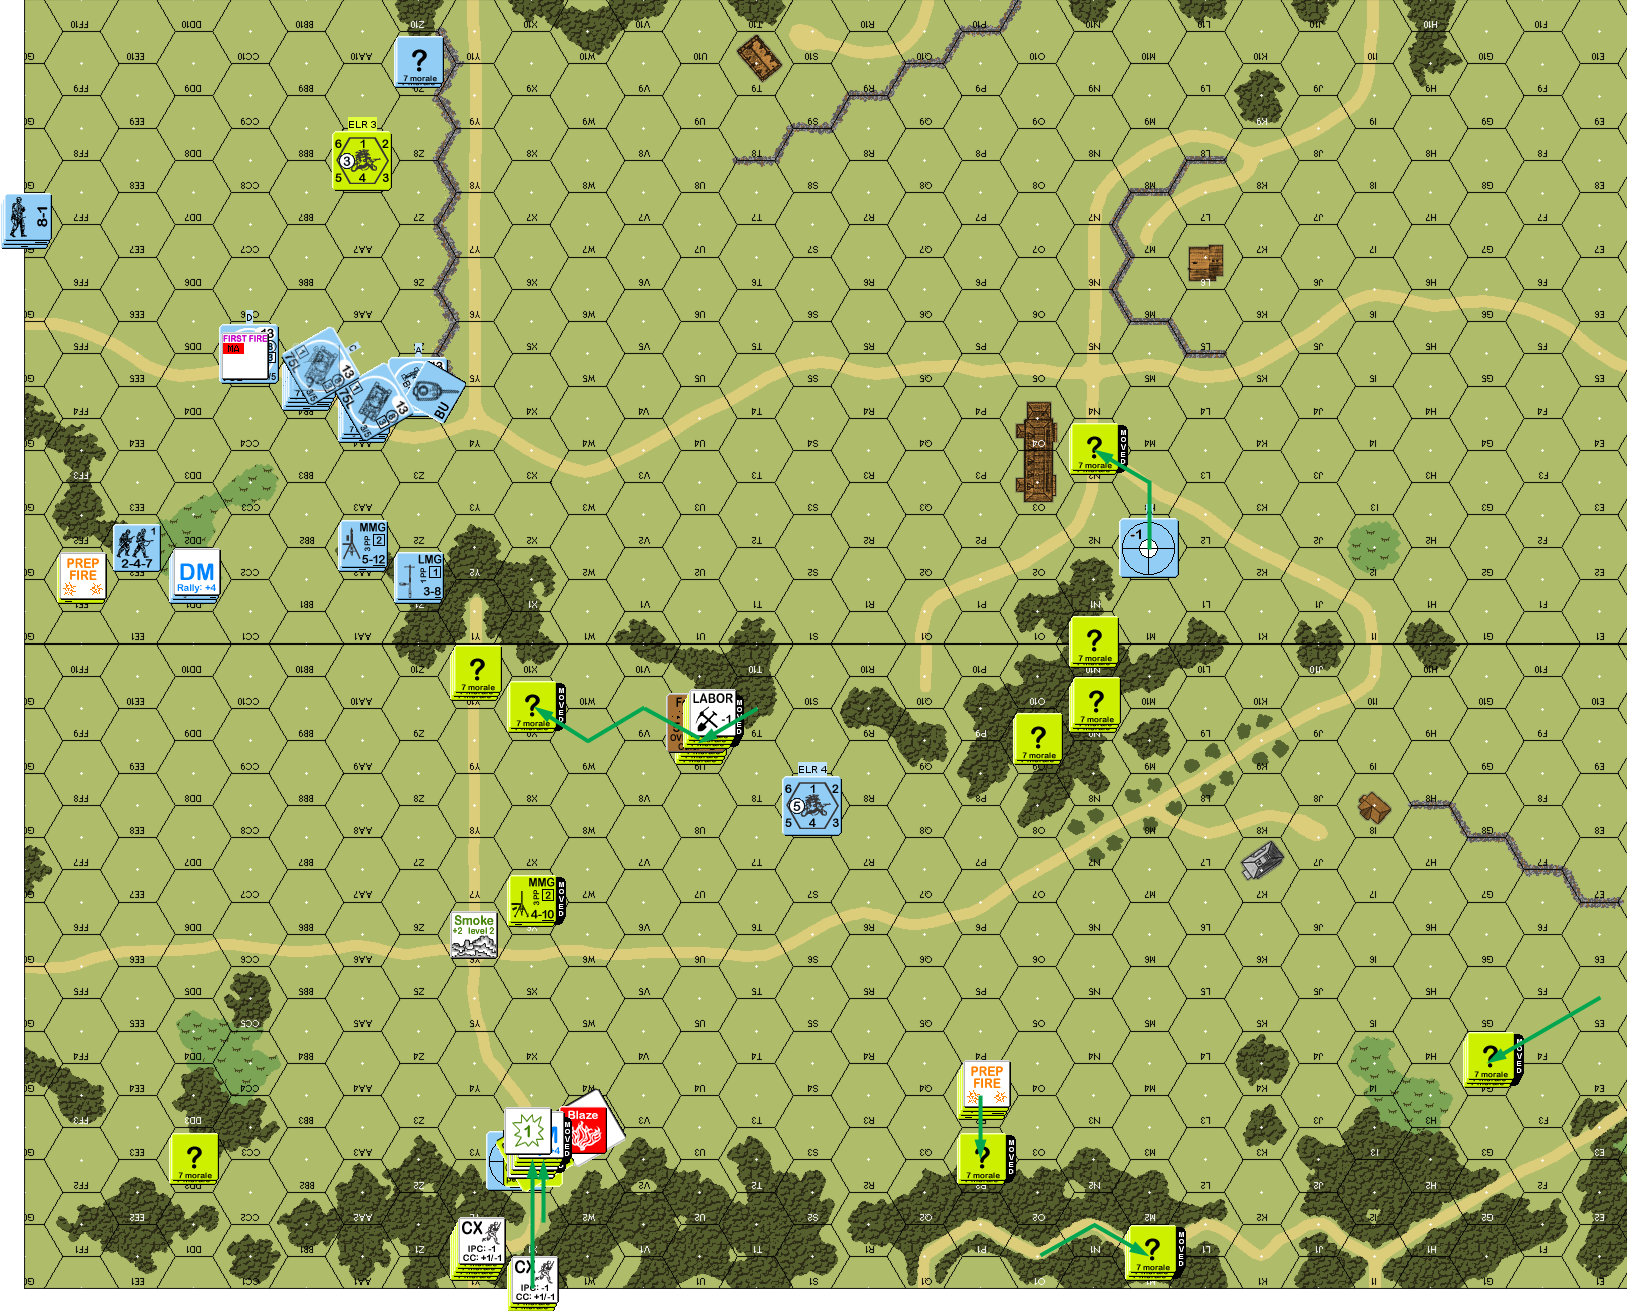
Final moves, American Turn 2.
Afterword
A win still wasn’t anywhere near guaranteed after all that. I still needed to get a good sense of where his BAZ were, and get into range of exiting. But the Americans have a tough time since it comes down to killing armor, and the tools they have to do that are not great. I certainly can’t blame Tom for getting frustrated with the consistent dicing he was getting (“I think I ELRed my PMC.”), and I’ve certainly been on the other end of the table for feeling behind the eight-ball.
And the balance of three foxholes wouldn’t have really helped with the particulars. 19W3 and X2 were the deadly hexes, and they wouldn’t have gotten the foxholes. I assume Y10 would have gotten one (since he was determined to slow me down there), and U9 another. Maybe the third could go near the stone wall.
It wasn’t all my dice. I managed to pick the weakest area of his defense. One HMG was at the south edge, and the other not that far away. Frankly, I didn’t like the combination of board 19 stone wall and board 16 open terrain, and never really considered that area for my attack. My HMG went where he did just so he could make shots like he did on turn 1. I didn’t really expect anything to come of it, but it would have to keep him cautious.
The scenario is definitely in the older school of being a bit too big and long for what it is. Certainly, it could probably be cut down to 8 turns without anyone really noticing today. A big problem for the Americans that I haven’t brought up is leadership. Three leaders for fourteen squads is decidedly on the thin side, but is made much worse by the need to spread out a defense that will have a fair amount of open terrain in/right behind it. However, it’s really nice to see a scenario with a fair amount of room in it that isn’t constrained by wall-to-wall bodies. Taking range 13+ shots is all too rare in ASL these days, but they were a regular occurrence in this scenario.
Discussion ¬